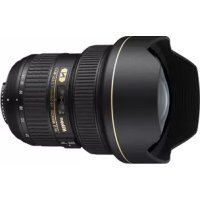
PC-E NIKKOR 24MM F-3.5D ED - Camera lens NIKON - Free user manual and instructions
Find the device manual for free PC-E NIKKOR 24MM F-3.5D ED NIKON in PDF.
User questions about PC-E NIKKOR 24MM F-3.5D ED NIKON
0 question about this device. Answer the ones you know or ask your own.
Ask a new question about this device
Download the instructions for your Camera lens in PDF format for free! Find your manual PC-E NIKKOR 24MM F-3.5D ED - NIKON and take your electronic device back in hand. On this page are published all the documents necessary for the use of your device. PC-E NIKKOR 24MM F-3.5D ED by NIKON.
USER MANUAL PC-E NIKKOR 24MM F-3.5D ED NIKON
PC-E NIKKOR 24mm f/3.5D ED
Nano Crystal Coat
使用說明書 (P.2-17)
User's Manual (PP.18-33)
Touching the internal parts of the camera or lens could result in injury. Repairs should be performed only by qualified technicians. Should the camera or lens break open as the result of a fall or other accident, take the product to a Nikon authorized service representative for inspection after unplugging the product and/or removing the battery.
Turn off immediately in the event of malfunction
Should you notice smoke or an unusual smell coming from the camera or lens, remove the battery immediately, taking care to avoid burns. Continued operation could result in injury. After removing or disconnecting the power source, take the equipment to a Nikon-authorized service representative for inspection.
Do not use the camera or lens in the presence of flammable gas. If the electronic equipment is operated in the presence of flammable gas, it could result in an explosion or a fire.
Do not look at the sun through the lens or viewfinder
Viewing the sun or other strong light sources through the lens or viewfinder could cause permanent visual impairment.
Keep out of reach of children
Particular care should be taken to prevent infants from putting the batteries or other small parts into their mouths.
Observe the following precautions when handling the camera and lens
- Keep the camera or lens unit dry. Failure to do so could result in a fire or electric shock.
- Do not handle or touch the unit with wet hands. Failure to do so could result in electric shock.
- In backlit shooting, keep the sun well out of the frame. The sunlight could focus into the lens body and cause a fire. When the sun gets close to the frame, it can also cause a fire.
- When the lens will not be used for a long time, attach both front and rear lens caps and store the lens away from direct sunlight. Failure to do so could result in a fire, as the lens might focus sunlight onto an object.
- When shifting and/or tilting, handle the lens with care. Failure to do so, may result in your fingers being nipped between the lens and the camera body, or the lens scratching the camera body.
Thank you for purchasing the PC-E NIKKOR 24mm f/3.5D ED lens.
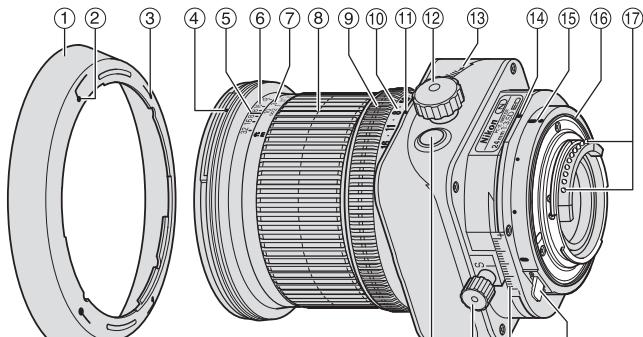
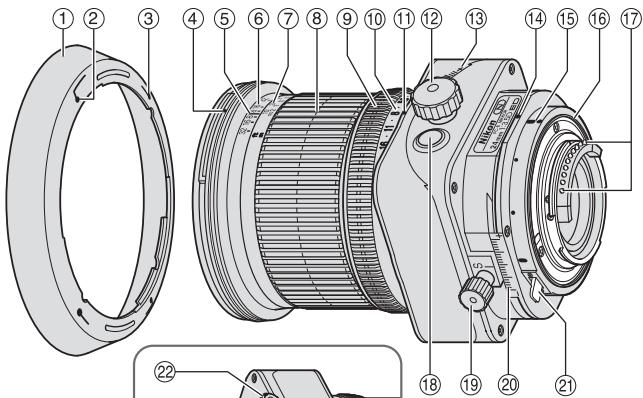
1. Nomenclature
① Lens hood
(2) Lens hood attachment index
③ Lens hood setting index
4 Lens hood mounting index
(5) Distance index
(6) Depth of field scale
⑦ Distance scale
⑧ Focus ring
⑨ Aperture ring
10 Aperture scale
⑪ Aperture index
12 Tilt knob
(13) Tilt scale
14 Revolving index
15 Mounting index
16 Lens mount rubber gasket
⑰ CPU contacts
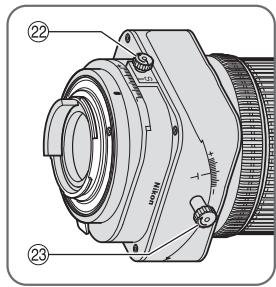
18 Aperture stop-down button
⑲ Shift knob
② Shift scale
② Revolving lever
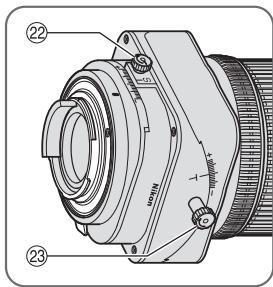
② Shift lock release knob
(23) Tilt lock release knob
2. Major features
This is a retrofocus-type perspective control (PC) lens that lets you emphasize or correct near and far perspective, or control depth of field. It also lets you correct distortion caused by the camera angle. Moreover, you can use the lens' tilt and shift mechanism to achieve focus of the entire subject plane when it is not parallel to the camera.
- This lens features automatic aperture control. When it is mounted on a Nikon D3, D700 or D300 camera, the user can use all exposure modes to take images without operating the aperture stop-down button.
- More accurate exposure control is possible when this is mounted on a Nikon camera with 3D Color Matrix Metering capability, because subject distance information is transferred from the lens to the camera body (without tilting and/or shifting) (with maximum aperture while mounted on cameras).
- The use of three aspherical and three ED (extra-low dispersion) lens elements ensures sharp pictures virtually free of color fringing. Also, by utilizing a 9-blade diaphragm that produces a nearly circular aperture, out-of-focus images in front of or behind the subject are rendered as pleasing blurs.
- The Nano Crystal Coat deposited on some of the lens elements ensures that fine, clear images can be reproduced under various shooting conditions, from the sunny outdoors to spotlighted interior scenes.
- The closest focusing distance possible is 0.21 m( 0.75ft) .
-
A total of two SB-R200 Wireless Remote Speedlights can be attached to the front of the lens*.
-
When attaching an SB-R200, tighten the shift lock release knob. Failure to do so may cause the lens to shift down under the weight of the SB-R200. Tilting and/or shifting the lens while the SB-R200 is attached is not recommended.
Note on the shift and tilt lock-release knobs
The lens does not lock completely by turning the shift and tilt lock-release knobs. This is not a malfunction. Turning the shift and tilt lock-release knobs too tightly to lock the lens or forcibly shifting/tilting the lens when it is locked can damage it.
3. Usable cameras and available functions
There may be some restrictions or limitation of available functions. Refer to your camera's instruction manual for details.
| Cameras | Aperture setting by camera | One-touch preset aperture operation | Tilting/shifting | Mounting to a camera | Exposure mode*1 | ||||
| P*2 | S | A | M | ||||||
| D3 | *3*4 | ✓ | ✓ | ✓ | ✓ | ✓ | |||
| D700, D300 | ✓ | ✓ | ✓*5 | ✓*6 | |||||
| D2-Series, D1-Series, D200, D100, D80, D70-Series, D60, D50, D40-Series, F6, F5, F4-Series*, F100, F80-Series/N80-Series*, F75-Series/N75-Series*, F65-Series/N65-Series*, Pronea 600i/6i* | *8*9 | — | ✓ | ✓*5 | ✓*6 | — | — | — | ✓ |
| F90X/N90s*, F90-Series/N90*, F70-Series/N70*, F60-Series/N60*, F55-Series/N55-Series*, F50-Series/N50*, F-401x/N5005*, F-401s/N4004s*, F-401/N4004*, F-801s/N8008s*, F-801/N8008*, F-601M/N6000*, F3AF, F-601/N6006*, F-501/N2020**, Pronea S, Nikon MF cameras, (except F-601M/N6000*) | — | — | — | — | — | — | — | — | |
Possible —: Impossible
Sold exclusively in the USA
* Sold exclusively in the USA and Canada
1 Exposure will be incorrect when the lens is shifted and/or tilted.
2 P includes AUTO (General-Purpose Program) and Vari-Program System.
3 When the lens power or the camera is turned off (including using the auto meter off function) while stopping down the lens aperture, the diaphragm blades fully open to the maximum aperture. This is not a malfunction.
4 Stopping down the lens aperture activates AE-L (AE lock).
5 Handle the lens with care while shifting and/or tilting. Failure to do so may cause the lens to scratch the camera body.
6 See "Mounting lens" (P. 23)
7 Diaphragm blades open and close after each press of the shutter button, and exposure will be incorrect for continuous shooting.
8 When the lens power or the camera is turned off (including using the auto meter off function) while stopping down the lens aperture, the lens aperture remains at the stopped down setting. When the camera is turned on again or the camera shutter release button is lightly pressed, the diaphragm blades open once and then close. This is not a malfunction.
*9 When the camera is turned off using the auto meter off function while stopping down the lens aperture, lightly press the shutter release button to display the selected aperture value in the camera's LCD or view finder before shooting. Failure to do this may lead to incorrect exposure when the shutter release button is fully depressed.
Aperture stop-down button (one-touch preset aperture operation)
- The lens aperture can be stopped down from maximum aperture to a selected aperture by pressing the aperture stop-down button. Pressing the button again fully opens the aperture. Whether the aperture is stopped down or not, check the camera viewfinder, or check the diaphragm from the front of the lens.
- Even at maximum aperture after canceling the aperture stopdown, the preset aperture value is displayed on the camera body.
- When using the D3, D700 or D300 camera, the aperture is stopped down to a selected aperture automatically by pressing the shutter release button, even when the aperture is fully open (maximum aperture) before shooting. When the lens power or the camera is turned off (including using auto meter off function) after stopping down the lens aperture by pressing the aperture stopdown button, the aperture stop-down is cancelled and the diaphragm blades fully open to the maximum aperture.
Important!
- When the lens is mounted to a camera other than the D3, shift, tilt and/or revolve the lens with care. Failure to do so, may result in the lens scratching the camera body.
- This lens is a manual focus lens, and autofocus is not possible even when the camera's focus mode is set to AF mode.
- Use of tilt/shift function can cause some vignetting or slight color change. (Vignetting is the darkening of the corners around the image.)
- When mounted on Nikon digital SLR (Nikon DX format) cameras, such as the D2-Series and D300, the lens' picture angle becomes 61^ and its 35mm equivalent focal length is approx. 36mm .
- Be careful not to soil or damage the CPU contacts.
- If the lens mount rubber gasket is damaged, be sure to visit your nearest Nikon authorized dealer or service center for repair.
- In low temperatures, new or fully charged batteries should be used in the camera.
4. Mounting lens
1 Set the shift amount and tilt amount to 0 by rotating the shift and tilt knobs (Fig. 2).
Note: Avoid attaching/detaching the lens to/from the camera while using tilt, shift and/or revolving, and without locking each knob. Failure to do so can lead to you pinching your fingers between the lens and the camera body, or the lens scratching the camera body.

Fig. 2
2 Set the tilt and shift knobs. (Fig. 3)
Note: Turning either knob too tightly may damage the knob.
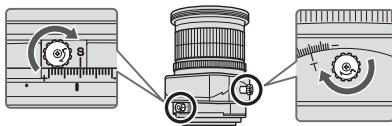
Fig. 3
3 Turn the camera power off, align the mounting indexes on the lens and camera and then twist the lens counterclockwise until it locks into place. (Fig. 4)
- Mounting the lens to a camera while camera's power is on, may prevent the camera from operating correctly.
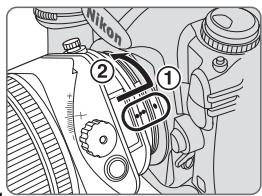
Fig. 4
5. Using bayonet hood HB-41
Align the lens hood attachment index ( ) on the hood (either of two indexes) with the lens hood mounting index on the lens, and turn the hood clockwise until it click stops to secure.
- Make sure that the lens hood mounting index aligns with the lens hood setting index (-o) .
- If the lens hood is not correctly attached, vignetting can occur.
- To facilitate attachment or removal of the hood, hold it by its base around the lens hood attachment index rather than its outer edge.
- To store the lens hood, attach it in the reverse position.
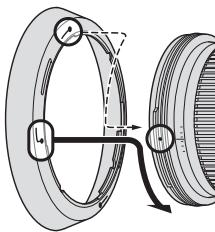
Fig. 5
6. Determining exposure
■When using the Nikon D3, D700 or D300 camera
1 Set the shift and tilt amount to 0 by rotating the shift and tilt knobs. (Fig. 2)
2 Set the camera's exposure mode.
3 With A or M exposure mode, set the aperture using the aperture ring or the camera's command dial. When using the camera's command dial, set the aperture to minimum aperture lock (L) (Fig. 6).
With P or S mode, set the aperture using the camera's command dial.
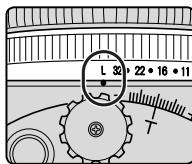
Fig. 6
When using other Nikon cameras
1 Set the shift and tilt amount to 0 by rotating the shift and tilt knobs. (Fig. 2)
2 Set the camera's exposure mode to M.
Press the aperture stop-down button to fully open the aperture, set the aperture ring to "3.5" (maximum aperture), and set the shutter speed for correct exposure.
4 Set the desired aperture by rotating the aperture ring and shift the shutter speed by the same number of changed steps.
- Setting the aperture ring to minimum aperture lock (L) fixes the aperture at f/32 (minimum aperture).
- Set the aperture with the lens' aperture ring even on a camera that requires aperture to be set via its command dial. With a camera that has the custom setting menu "aperture setting with lens' aperture ring," this setting is not required.
Determining exposure (with an external exposure meter)
1 Set the shift and tilt amount to 0 by rotating the shift and tilt knobs. (Fig. 2)
Set the camera's exposure mode to M.
3 Set the desired aperture via the lens' aperture ring or the camera's command dial and read the aperture value displayed in the camera's LCD panel or selected aperture ring value. Input the aperture value to the external exposure meter to determine exposure, and set the shutter speed.
- When using a camera other than the D3, D700 or D300, set the aperture with the lens' aperture ring even on a camera that requires aperture to be set via its command dial. With a camera that has the custom setting menu "aperture setting with lens' aperture ring," this setting is not required.
7. The shift/tilt function
Important
- Use of a tripod is recommended for correct shooting.
- Turning each knob too tightly can cause damage.
-
Use of tilt/shift function can cause some vignetting. (Vignetting is the darkening of the corners around the image.) To counteract this, close the aperture (choose a larger f-number), or compensate the exposure before shooting.
-
Determining correct exposure with shift and/or tilt use requires experience. We recommend that you take a series of test shots until you feel comfortable with the operation.
- When the lens is mounted to a camera other than the D3, shift and/or tilt the lens with care. Failure to do so, may result in your fingers being nipped between the lens and the camera body, or the lens scratching the camera body.
The shift function

Fig. 7
When the shift knob is rotated, the lens is shifted horizontally (or vertically, when the lens is revolved) parallel to the camera body (± 11.5mm)
By shifting, you can recompose the frame of the shot without moving the camera.
This lets you correct the perspective distortion of the subject or exclude unwanted objects from appearing in front of the main subject (p. 195).
- After shifting, tighten the shift lock release knob to fix the lens' shift position.
Note: When shifting the lens, be careful not to pinch your fingers between the lens and the grip of the camera body.
The tilt function
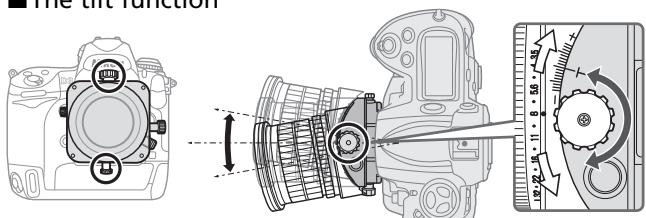
Fig. 8
By rotating the tilt knob, the lens is tilted up and down (or right and left, when the lens is revolved) ± 8.5^ to the camera body. By tilting, you can obtain clear focus of the entire subject plane when it is not parallel to the camera or can focus small areas of the subject which are parallel to the camera (p. 195).
- After tilting, tighten the tilt lock release knob to fix the lens' tilt position.
- Note that tilting the lens also changes the viewfinder image.
- Once the lens is tilted, neither the depth-of-field scale nor the distance scale on the lens barrel can be used.
■ Revolving
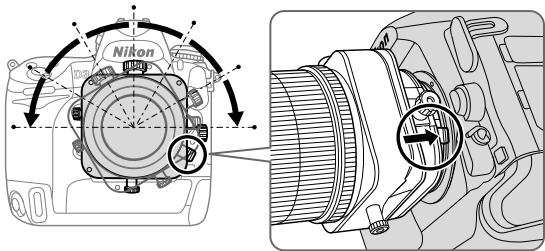
Fig. 9
This lens can be revolved up to 90^ right or left. By revolving the lens, the shift function can be changed to operate vertically, and the tilt function can be changed to operate horizontally.
- Before rotating the lens, set the shift and tilt amount to "0" by rotating the shift and tilt knob.
Note: When revolving the lens while using tilt and/or shift, be careful to avoid nipping your fingers between the lens and the camera body or scratching the camera body with the lens. Failure to lock each knob can also have the same effect.
- Push the revolving lever and rotate the lens holding the square parts of the lens.
- Click stops are provided in 30^ steps both right and left. At 30^ and 60^ , you can rotate the lens without pushing the revolving lever.
8. Focusing
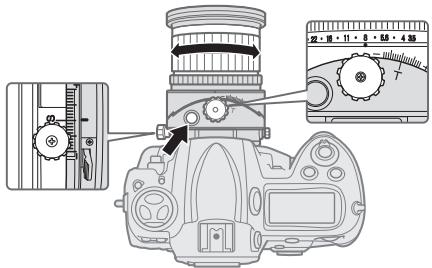
Fig. 10
1 Set the aperture to its maximum by pressing the aperture stop-down button, and focus by rotating the focus ring.
Before shooting, press the aperture stop-down button again to stop-down the aperture.
- When using the Nikon D3, D700 or D300 camera, you can take a picture without operating the aperture stop-down button (the aperture can be stopped down to a selected aperture automatically by pressing the shutter release button without pressing the aperture stop-down button). Alternatively, the aperture stop-down button can be used.
- While using tilting and/or shifting, the camera's electronic range finder cannot be used to confirm correct focusing. Focus should be confirmed by checking the image in the camera's viewfinder.
- When you change the degree of tilt and/or shift after focusing the subject will become out of focus.
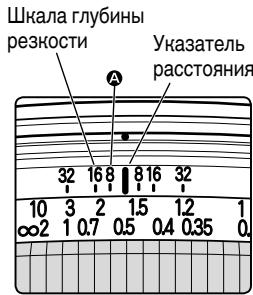
Infrared compensation
For photography using infrared film, attach a red (R60) filter to the lens and compensate the focus manually.
First, focus on the subject manually. Rotate the focus ring to realign the desired distance scale number ("0.5 m" in fig. 11) to A ("8" on the depth of field scale in fig. 11) to compensate the focus. Attach an R60 filter for infrared photography.
9. Depth of field
- Approximate depth of field can be determined by checking the depth of field scale.
- Using the aperture stop-down button of the lens or the camera's depth-of-field preview (stop-down) button (with the D3, D700 or D300 camera), the depth of field can be observed while looking through the camera viewfinder.
For more information, see p. 222.
Note: When the lens is tilted, neither the depth of field scale nor the distance scale can be used. (Both scales can be used when the lens is shifted only.)
Depth of field scale
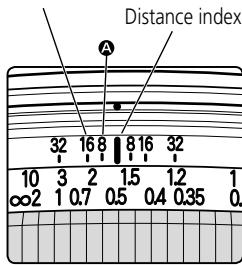
Fig. 11
10. Taking flash pictures using cameras with a built-in flash
To prevent vignetting, do not use a lens hood, and take images referring to the shooting distance below.
Note: The following limitations are only for shooting without tilt and/or shift. When using the camera's built-in flash for tilt/ shift shooting, vignetting will be greater than shooting without tilt/shift. For tilt/shift shooting, use of camera's built-in flash is not recommended.
| Cameras | Available shooting distance |
| D700 | 1.5 m (4.9 ft.) or greater |
| D300, D200, D100 | 1 m (3.3 ft.) or greater |
| D80, D70-Series, D50 | 2 m (6.6 ft.) or greater |
| D60, D40-Series | 3 m (9.9 ft.) or greater |
| Other cameras | Vignetting occurs at all shooting distances |
11. Recommended focusing screens
Various interchangeable focusing screens are available for certain Nikon SLR cameras to suit any picture-taking situation. The ones recommended for use with this lens are:
| Screen Camera | A | B | C | E | EC-B EC-E | F | G1 G4 | G2 | G3 | J | K | L | M | P | U |
| F6 | ◎ | ◎ | — | ◎ | — | — | — | — | — | ◎ | — | ◎ | — | ||
| F5+DP-30 | ◎ | ◎ | ◎ | ◎ | — | ○ (+1.0) | ◎ | — | ◎ | — | |||||
| F5+DA-30 | ◎ (+1.0) | ◎ | ◎ | ◎ (+0.5) | — | ◎ | ◎ (+0.5) | — | ◎ (+1.0) | — | |||||
| F4+DP-20 | — | ◎ (+1.0) | ◎ (+1.0) | — | ◎ | ◎ (+1.0) | ◎ (+1.0) | — | ◎ (+1.0) | ||||||
| F4+DA-20 | — | ◎ (+1.0) | ◎ (+1.0) | — | ○ (+0.5) | ◎ (+1.0) | ◎ (+1.0) | — | ◎ (+1.0) |
^ :Excellent focusing
:Acceptable focusing
Slight vignetting or moiré patterns appear in the viewfinder, but not on the film.
- : Not available.
(:) Indicates degree of exposure compensation needed (Center-Weighted metering only). For F6 cameras, compensate by selecting "Other screen" in Custom Setting "b6: Screen comp." and setting the EV level to -2.0 to +2.0 in 0.5 EV steps. When using screens other than type B or E, "Other screen" must be selected even when the required compensation value is "0" (no compensation required). For F5 cameras, compensate using Custom Setting #18 on the camera body. For F4-Series cameras, compensate using the Exposure Compensation Dial for the focusing screen.
See instruction manual of the camera body for more details. Blank box means not applicable. Since type M screen can be used for both macrophotography at a magnification ratio of 1:1 or above and for photomicrography, it has different applications than other screens.
Note:
- For F5 cameras, only EC-B, EC-E, B, E, J, A, L focusing screens are usable in Matrix Metering.
- When using the B and E focusing screens in cameras other than those listed above, refer to the columns for the B and E screens.
12. Lens care
- When the lens is not in use, set the tilt and shift amount to "0." The lens has many moving parts and can be easily soiled by dust, dirt or water drip.
- Clean the lens surfaces with a blower brush. To remove dirt and smudges, use a soft, clean cotton cloth or lens tissue moistened with ethanol (alcohol) or lens cleaner. Wipe in a circular motion from center to outer edge, taking care not to leave traces or touch other parts of the lens.
- Never use thinner or benzene to clean the lens as this might damage it, result in a fire, or cause health problems.
- To protect the front lens element, an NC filter is recommended at all times. A lens hood also helps protect the front of the lens.
- When storing the lens in its lens case, attach both front and rear caps.
- When the lens will not be used for a long time, store it in a cool, dry place to prevent mold. Also store the lens away from direct sunlight or chemicals such as camphor or naphthalene.
- Do not get water on the lens or drop it in water as this will cause it to rust and malfunction.
- Reinforced plastic is used for certain parts of the lens. To avoid damage, never leave the lens in an excessively hot place.
13. Standard accessories
- 77 mm snap-on front lens cap LC-77 - Rear lens cap LF-1
- Bayonet hood HB-41 • Flexible lens pouch CL-1120
14. Optional accessories
- 77 mm screw-in filters
En
15. Specifications
| Type of lens: | D-type NIKKOR lens with built-in CPU and Nikon bayonet mount |
| Focal length: | 24 mm |
| Maximum aperture: | f/3.5 |
| Lens construction: | 13 elements in 10 groups (3 ED, 3 aspherical and some Nano Crystal Coat-deposited lens elements) |
| Picture angle: | 84° with 35 mm (135) format Nikon film-SLR cameras and Nikon FX format digital SLR cameras61° with Nikon DX format digital SLR cameras71° with IX240 system cameras |
| Maximum reproduction ratio: | 1/2.7 |
| Distance information: | Output to camera body |
| Focusing: | Manually via separate focus ring |
| Shooting distance scale: | Graduated in meters and feet from 0.21 m (0.75 ft) to infinity (∞) |
| Closest focusing distance: | 0.21 m (0.75 ft) |
| No. of diaphragm blades: | 9 pcs. (rounded) |
| Diaphragm: | Electrically automatic/One-touch preset aperture operation |
| Aperture scale: | f/3.5-f/32 |
Lens movement:
Shift and tilt movement at right angles (the two operations can be modified for a surcharge, to move in the same [parallel] direction. The shift lock release knob can also be changed for a larger one, but the changed knob may affect mounting the lens to the camera or lens operation. For details, contact a Nikon authorized service representative.)
Maximum shift amount: ±11.5mm
Maximum tilt amount: ±8.5°
Lens rotation:
90^ right and left (click-stop for each 30^ step)
Exposure measurement:
Via full-aperture method
Attachment size:
77 mm (P = 0.75 mm)
Dimensions:
Approx. 82.5 mm dia. x 108 mm extension from the camera's lens mount flange
Weight:
Approx. 730 g (25.7 oz)
Specifications and designs are subject to change without any notice or obligation on the part of the manufacturer.

ACHTUNG
Forvara utom rackhall for barn
5. Anvanda bayonet hood HB-41
- 77 mm screw-in filter
15. Specificationer
PehomeHdaaHn no 6e3oNaChOH 3KcNpyataaun H3dJIIN
PNEyPENKDEHNE
He pa36npaIte yctpoIcTBO
PnIKOCHOBENK BHYTpeHHNtAChrM FOTOKaMEpbI NII O6bEHTMa BOHcET PnIBeCTN KNoJIyEHNIHO TpABM.PeOMHT DoJIHKe IpnO3B0DITbCra ToIbKO KBAINPHINPOBaHbIMN CneuHaJICTAMn. B Clyueae NoBPeJdHmN KOpNyCa FOTOKaMEpbI NII O6bEHTBa B pe3yIbTate NaHEna IpyrO npOnCSweCTBn OTHIOUHTe CeTeBO 6Iok NITaHn H/INH3MBeHNTe Batapeo H DocTaBtYe UcTpoCTBO DnI pOBepHN b5INKaIshn ABTOH3OBaHNb CEpBCHbI CEHTP Nikon.
PnnoBLeHHn HncnPabHcOHTn HeMeJeHNo BbIKHIOHTe FOToKamepy
PnI NOBLeHINbIMa Nm3anapa,MCXoJrIeOOT FOtOKaMEbpNlNObBeKTHBa, HEMeJIeHNO hBNEKHe Batapeo;CoBIOaJte MebpI pReDcTOPOXHOCTN,ToBbHe noluyntbOOnr. IpoDIOJIeHne pa60TbC yCtPOCTBOM MOKeT pNIBECTN KNoJyEHNO TpABM. Pocne b3BNeHueB batapEnN OTHIOUeHNE HcTOUHNaN pNTAnH NcOCTBaTbe N3dJeIne IpnOBepKn B6nKaJnN ABTOPi3OBAHN CepBHCb YeHTP KOMPAHNI Nikon.
He nCnoJIb3yIte foToKamepy nnIOsbEHTNB npn HauNCHI JERKOBOCnJaMaHReIOxnxr Ra3OB
He pa6oTaTe C 3eKToPOnHbIM O6OpYoDaHnEM PnI HauHmN B 03dyXe IeKOBocPnAmEHaouXcra 3aO8 -3TO MOKeT PnBecT N B3pblBy nIN NOkapy.
He cmotpnte Ha coJIHnce uepe3 obbektHB nIN BnOncHaTeIb
B3rIaH na coIhne nn IpyroJ npKn HCTOuHKn CBetae 06bEeTINB nn BIDOnckateJB MoKet Bb3BaTb Heo6paTmOE yxUdSeHne 3peHna.
XpaHnte yctpoBCTBO HneOCTynHom IJIa IeTe MeCTe
PpIMnTe Ooc6bIe MepbI ppeOCTOpOHcTb BO n36eJHHe NOnaDaHn8 6aTaPeI INpyrNx He6oJIbXIN PpeMeTOB B pOT DeTm.
Bo Bpem 3KcnIpyataunn foToHAmepbI nnN o6beHTBa co6IIOaIte cIeDyUOuNe MEPbI npedocTopoHHOCtN
XpaHnTe foToKamepy nnIOnbEeHTNB BC yCM oMeTc. Heco6JIIOJeHne 3TOrTOpe6oBaHnMoKET nPnBeCTN K npaKeHnIO 3JleKTpUeChm TOKOM.
He depjHnTe foToKamepu Hne pInkacaiTeCb K HeM oKpbmm pykAmn. HecobIoudme 3TOrTO Tpe6oBaHm MOHET PnBBeCTN K nopAhenHO 3JeKTPnuecHMM TOKOM.
PnCsbEMHe C noCDBcKo3 CaDn He DOnyCKaTe NOnadAnH CoNHeHbIe LyuH MOrT CfoHcyCnPoBaTB C B KOpNc O6BeKTbNA H CTaTb PnpHNOH NoJaHa. KpOme TOr, PtncNoHApA MOrT CTaTb CoNHeHbIe LyuH, nonAdaoJueH H oKOpNc B HENOpCeDCTBEHHO 6bn30CTn OT BnDOHNKeTAeJIa.
Ecln obektnb He IaHpyeTcNIOJIbOBAbTa H npOTRAKeHNI dInTeIbHOrO BpeMeHN, pIcMoEOyHnITHe 3aHNOIO NpeEPHIIO KbIISIKI IN OMeCTHTe o6bETnB HA xpaHENBE M MeTO, KOToPOe He NOBeepKeHO BO3dEChTBNO pRMAbX cIoNeHbX Lyue. PnH eoc6bDcENHm 3TO rTre6OBaHnBO3HNaIEBepoTHCtB O3HKnHOBENHn POHa, nOCHJbHy o6bETnB MoJcHfOkyCpObAtc COIeHhBle LyuH a OKpyHauOxN pPeMeTaX.
Cobndt octopoxnHcpt npCbrne HmHnM3eHHeHHy nHa hNHOa ob6bHTNBa. HeocToPooHc0b MeKpIbnBcTn K 3aemElenHn Olanbce MEndy o6bETNBOM I KopnyCM KamepbI HnI NOBLeHnO capanHn OT o6bETNBa H kOpnyCE KamepbI.
1. Komnohehtbl
① BileHda
② MeTha KpeJIeHnIe 6IeHbI
③ MeTkaΦHKcauHbJIeHbI
④ yctahOBOCHNA MEtKa 6JIeHdbI
⑤ yHa3aTeInb paCToHnH
⑥ shkana rnybHuIpe3KocTn
⑦ 山kaIpaacctOHHN
⑧ΦOHyCnPOBOOHHOKJIbIcO
⑨ Kolbó dnaΦparMbI
⑩ Lka nαφparmbI
1 MeTka dnaΦpaMbl
⑫ Kpemalbepa perynlobovnyta na Hacnoha
⑬ⅢKanaHaKJloHa
14 MeTkaBpaueHnna
(15) YctaHOBOUHAR MeTKA
16 Pe3nHObbyyIPOTHNTHeB KpeJIeHmHaO6BeKtMbA
⑦ KohtaktbI ynpabJIeHnA
(1) KhoIka DmaΦpaarMmPoBaHnA
⑨ HpeMaJIbepa
peryulipobBcCdBnA
② Μκαλa cdBnra
②Поворотьний рынжок
(2) Khonka
pa3bIOKINPOBKNcCBNfA
23 HONIPA pa36IOnHPOBN MEXAH3Ma yrIa HAHO
2.OCHOBHbIe OcO6eHHoCTn
3To nepeBepHytBJ o6BeKTHN B C BO3MOHHOCTbIO KOHTpOJIa NEPcNEKTnBBI (PC), KOTOpBI NO3BOJIAET BbIDeINb IIN cKOPpeTnPOBaT b6NIHHN I daJIbHNI PAnbI, INI KOHTpONIPoBAT rIy6bHy pe3KocTI. C eRO NOMOJIbTO TAKHe MOxH0 KoppeKTHPObAITb NcKaHEHNA, Bb3BaHNbIe HeBPbIM yrIOM CBemKn. HpOME TOR, Bbl MoKeTe NCNoB3OBaTB MEXAH3M Cdbnra IHAKIoHa OB6eTtBA, Tc0bI yDePbaTb BfoHYce BcO PILOCHOCb OB6eKTA, ecn OH He npaJIJIeHekamepe.
- OObEeKTHB OcHauen CnCTeMoH aBTOMaTHeCKo peRyIuPobHN dHaaparmbI. PnY cTaHOBHe Na FOToHApemBe NIKon D3, D700 nnD300 daHHbI oObEeTNB ppeOCTaBJIeT BO3MOxHocTb HcNoJIb3ObaTb BCE peHJIMMbI 3KcPOn3HUN BO BPeM aCbeMKn, He np6bera K NOMOUs KNOHKn DnaΦpamHPOBaHN.
- Pn yctahOBHe 3TOrO obEHTnBa Ha foToKHamepy Nikon, ochaueHHo CnCTeMOI uBETHORo MATPnHOrO 3D 3aMepa 3cNc03nUu, MOxHO NOBbICrTb TOCHoCTb UnpaBLeHna 3KcNo3nUne 3a ChET TORO, qTO INHOpMaunO O paCtOraHm Do obEKeTa cBeMn NpePeaeTcA OT o6bEHTnBa B FOtoKHAMEy (6e3 CdBnHa HnIn NaKHOa) (C MaKcMaJIbHoN DnaΦparMo nPi yCTAHOBHe Ha KaMepbI).
IcnoJIb3OBAHne DEBtHIneNECTKOBoI dnaΦparMbI c npaHTNueChn KpyTlbm OTBepCTHeM ObecneHbAet KpaCnBOe "pa3MbTHe" 3aDHeRo FOna NpePeDHeRo INaHa.
HaHokpncTaJInuueckoe aHTn6JIuHOBOe nOKpbItne, HauHeceHHOE Ha HeKOTOpBle 3JIeMeHTbI oBeKeHTNbA, rapaHTnpyET NOLyEne YeTHNX CImHMOB OTLIuHNOrO KaYeCTBa B IIOb6bIX ycLOBIAHX -OT CbEMHN pRi COJHeHOM OCBSeUeHN Do CbEMHN B NOMEUeHNX pRi CBTe pRIOKeKToPOB. - MHHMaJIbHoe paCCTOaHHe oKycnPoBKn - 0,21 M.
K napeDneHue chaTn obBeKTHBa MoJHo pInHpeNHT bDe HCTaHcUHNO ynpabJIeMbIe 6ecpnoBODHbe BCbIshKu SB-R200*.
*Pn npnkpeHEnbCbIbHKN SB-R200 3aKpyTne KpeMaJIbepa36NoHOPOBHNcBnHa. B npOTNBOM cLyae ObeHTNb MOKeT cBnHyTBcR BnH3 NOd TReHeCTbO SB-R200. He peKomeHdyetc NaHIOHrtb n/nn CbIraTb ObEeHTNb c npnkpeHEnHO BCblkOi SB-R200.
PpHMeUHHe Opyhax FyHKnC cDnra/HaKNoHa
Pn noBOPoTe pyueK cDInRa/HaHNoHa o6BeKTHb FHKcNpyeTc Hne NlHOCTbO.3To He roBOpNT O HeNCnPABHOCTN.CmUkOM CnIbHOe 3aKpyuHbAHne pyueK FyHKnC nCBVa/HaHNoHa, C ceJIbO FHKcaUNo6BeKTHBa NII pNHyNDteNbHO rCdBVa/ HaHNoHa I3 aFHKcnpOBaHORO NOLOKeHHMOJET NoBpeNTb O6BeKTHB.
3. CobmteMbIe foToHApEpbI n DocTyNhbIe yHHcH
IcnoIb3ObaHne DoCTynhblxФyHKnI OObeHTBa MOHeT 6bITb CBra3aHO C HeKOTOpbIMN OrpaHnueHnM. Iopro6hble CBeDeHn CM.BpyKOBoDCTBE NO 3KcIIyatauIN FOToKaMepbI.
NonpaBHa npHΦpaHpaCHO cbEMeK
ДлфpoToIpaФи,снмaelbIXhaИнФpaKpaPachHyOПлEHKy,yctaHOBInTe haObbeKTHB KpaChbI(R60)ФиЛьТРиВpyuHyOOTpeRyIInPyuTeФoHycIpOBky.
ChaçaHana cfohucnyTecb Ha oBbEKeTBe BpyHyIO. NobepHnte KOBluo FOhycpOBn TAK, UTObI HAcTPOntb JKeIaEMbI HOMeP Ha shkaIpe paccToHnra («0,5 M» Ha pnc. 11) Ha A («8» Ha shkaIe rIy6bHnPe3Ou I3o6paJaemOro npocTaPahCTBa Ha pnc. 11) IJRA KOMNeHcaUHn FOhycpOBnH. 3AkpeNITe FInlbTp R60 dIra BblOnJIHeHry INHΦpaKpacHoy cbEmKn.
9.Глубина peЗнoctи
-Приблentьногглбпаpe3костиоп dedяетс noшкалeглбнblpe3кostn.
-Пи ИСОЛьЗОВАнИКHONКIN
ДаФРARMPOВАнЯ 6БЕТNUBA ИЛN
KONКIN ПпEDВAPNTБНО ГО NGСМТРа
rIy6INbI pe3KOCtN (ДИФРARMPOВАнЯ)
(Ha ФотOKAMePax D3, D700 ИЛN D300)
rIy6INHу pe3KOCtN монKO OЧЕНь чурз
BIDONCHATeNB.
-Дононтульные CBeDEHnCM.Ha cTp.222.
Пгимechани:
I3meHHeYrHaHaHIOHaObEeKTHBa
ДelaetHEBO3MOXKhbIMHcNoJIb3OBAHMe HN
IkaJIbI rIy6HbI pe3KoCTN, Hn IkaJIbI paCCToHnI. (Obe IkaJIbIMoryt 6bIbI hCNoJIb3OBAHbI TOJIbIO npu cDBrE O6BeKTINBa).
Pnc.11
10. Cbemka Ha foTohamepy co BCtroeHHo BCblHoi
IpaedOTBpaUeHbINbEtnPOBaHnRE HcNpOJIb3yUte KpbIshKU O6bETNbA HbIIOnJIHnTe CbEMky B COBTBeTCTBNi C yKa3aHHbIMN HnHexPacCTORHmMDo 6bEKA TcEBMn.
PnmeaHne:
CJeIyUOHe OrpaHnueHnE NpIMeHnMbI ToIbIko K CBeMHe 6e3 CDbIrA H/INn HaNIOHa
Ob6eKTHBa. Ppi IcNOJIb3OBaBHn BCTPOBHNH BO BPEMa CBeMn CO
CdBInOM/HaNIOHOM Ob6eTbNA 3oΦeKT BnHbETnPBOAHn 6yDfET 3NaHTeJIbHe, cem
Ppi CBMeHE 63 CDbIrA/HaNIOHa. He pKeMoHdEyTe TcNIOJIb3oBaT BCTPOeHNyIO
BCbIbIKy Ppi CBMeHE Co CDbIROM/HaNIOHOM Ob6eKTHBa.
77-MM BBINHcYBaEmbIe HJIbTpbl
15. TexHHueChHe xapaHTepnCTHn
TnObeKTHBa: OBeKTHN B NIKKOr TnA D CO BCTPOeHHbIM MInKpOnpoIeCCOpOM 6aHHeTOM Nikon
Фokychoe 24 MM pacctoHne:
MaKcImaJIbHaJ f/3,5 dHaΦparMa:
海歌藻藻藻藻藻藻藻藻藻藻藻藻藻藻藻藻藻藻藻藻藻藻藻藻藻藻藻藻藻藻藻藻藻藻藻藻藻藻藻藻藻藻藻藻藻藻藻藻藻藻藻藻藻藻藻藻藻藻藻藻藻藻藻藻藻藻藻藻藻藻藻藻藻
示音:
TAEYANGHIXIJX1E0
S1F3T+HJ#J#J#J#J#J#J#J#J#J#J#J#J#J#J#J#J#J#J#J#J#J#J#J#

四
H
@:默默默默默默默默默默默默默默默默默默默默默默默默默默默默默默默默默默默默默默默默默默默默默默默默默默默默默默默默默
O: 二
Correct perspective distortion of subject
- Without shifting (Photo A): When the lens-to-subject distance from the top and bottom of the subject differs, the subject appears with distorted perspective in the frame.
- With shifting (Photo B): To correct distortion, place the camera parallel to the subject and shift the lens up.
Excluding unwanted reflections
- Without shifting (Photo C): When shooting a reflective surface such as a mirror, the photographer or the camera may be reflected in the frame.
- With shifting (Photo D): To avoid such reflection, place the camera in a position where such reflection does not occur, then shift the lens left.
Excluding unwanted objects in the frame
- Without shifting (Photo E): Sometimes unwanted objects appear in front of the main subject in a desired position for a specific composition.
- With shifting (Photo F): To exclude such objects from disrupting the scene, move the camera horizontally at a position where the unwanted object will not be in the frame, then shift the lens left.
Achieve focus on the entire subject plane when it is not parallel to the camera
- Without tilting (Photo G): When the subject plane is not parallel to the camera, focus cannot be achieved throughout the entire subject plane.
- With tilting (Photo H): Tilt the lens down to take a photo in which the entire subject plane is in focus.
Achieve focus on a specific part of the subject
- Without tilting (Photo I): Focus is achieved on all parts of the subject.
- With tilting (Photo J): Tilt the lens left to focus on only a specific part of the subject.
(ft.)
Depth of field
| Focused distance | Depth of field | Reproduction ratio | ||||||
| f/3.5 | f/4 | f/5.6 | f/8 | f/11 | f/16 | f/22 | f/32 | |
| 0.75 | 8-14/16 in. | 8-14/16 in. | 8-14/16 in. | 8-14/16 in. | 8-12/16 in. | 8-10/16 in. | 8-8/16 in. | 8-6/16 in. |
| 9-2/16 in. | 9-2/16 in. | 9-2/16 in. | 9-4/16 in. | 9-4/16 in. | 9-6/16 in. | 9-10/16 in. | 9-13/16 in. | |
| 1 | 11-12/16 in. | 11-12/16 in. | 11-10/16 in. | 11-8/16 in. | 11-4/16 in. | 11-1/16 in. | 10-13/16 in. | 10-5/16 in. |
| 1 ft. 4/16 in. | 1 ft. 4/16 in. | 1 ft. 6/16 in. | 1 ft. 10/16 in. | 1 ft. 13/16 in. | 1 ft. 1-5/16 in. | 1 ft. 1-15/16 in. | 1 ft. 3-4/16 in. | |
| 1.2 | 1 ft. 2-1/16 in. | 1 ft. 1-15/16 in. | 1 ft. 1-13/16 in. | 1 ft. 1-9/16 in. | 1 ft. 1-3/16 in. | 1 ft. 13/16 in. | 1 ft. 6/16 in. | 11-10/16 in. |
| 1 ft. 2-14/16 in. | 1 ft. 2-14/16 in. | 1 ft. 3-2/16 in. | 1 ft. 3-8/16 in. | 1 ft. 3-15/16 in. | 1 ft. 4-15/16 in. | 1 ft. 6-4/16 in. | 1 ft. 9-8/16 in. | |
| 1.5 | 1 ft. 5-4/16 in. | 1 ft. 5-3/16 in. | 1 ft. 4-13/16 in. | 1 ft. 4-5/16 in. | 1 ft. 3-13/16 in. | 1 ft. 3-2/16 in. | 1 ft. 2-4/16 in. | 1 ft. 1-5/16 in. |
| 1 ft. 6-13/16 in. | 1 ft. 6-15/16 in. | 1 ft. 7-7/16 in. | 1 ft. 8-3/16 in. | 1 ft. 9-4/16 in. | 1 ft. 11-6/16 in. | 2 ft. 2-14/16 in. | 3 ft. 15/16 in. | |
| 2 | 1 ft. 10-7/16 in. | 1 ft. 10-3/16 in. | 1 ft. 9-10/16 in. | 1 ft. 8-10/16 in. | 1 ft. 7-13/16 in. | 1 ft. 6-6/16 in. | 1 ft. 5-1/16 in. | 1 ft. 3-6/16 in. |
| 2 ft. 1-15/16 in. | 2 ft. 2-4/16 in. | 2 ft. 3-6/16 in. | 2 ft. 5-3/16 in. | 2 ft. 7-15/16 in. | 3 ft. 2-4/16 in. | 4 ft. 3-10/16 in. | 12 ft. 3-13/16 in. | |
| 3 | 2 ft. 7-15/16 in. | 2 ft. 7-7/16 in. | 2 ft. 6 in. | 2 ft. 4-1/16 in. | 2 ft. 2-1/16 in. | 1 ft. 11-6/16 in. | 1 ft. 9 in. | 1 ft. 6-2/16 in. |
| 3 ft. 5-8/16 in. | 3 ft. 6-8/16 in. | 3 ft. 9-15/16 in. | 4 ft. 4-9/16 in. | 5 ft. 4-9/16 in. | 9 ft. | 75 ft. 3-12/16 in. | ∞ | |
| 10 | 6 ft. 6-12/16 in. | 6 ft. 3-2/16 in. | 5 ft. 5-12/16 in. | 4 ft. 7-9/16 in. | 3 ft. 10-13/16 in. | 3 ft. 1-9/16 in. | 2 ft. 6-12/16 in. | 2 ft. 2/16 in. |
| 22 ft. 3-12/16 in. | 27 ft. 3 in. | 97 ft. 1-9/16 in. | ∞ | ∞ | ∞ | ∞ | ∞ | |
| ∞ | 17 ft. 6-10/16 in. | 15 ft. 4-15/16 in. | 11 ft. 1-11/16 in. | 7 ft. 11-3/16 in. | 5 ft. 10-13/16 in. | 4 ft. 2-6/16 in. | 3 ft. 2-3/16 in. | 2 ft. 3-15/16 in. |
| ∞ | ∞ | ∞ | ∞ | ∞ | ∞ | ∞ | ∞ | |
Nikon
No reproduction in any form of this manual, in whole or in part (except for brief quotation in critical articles or reviews), may be made without written authorization from NIKON CORPORATION.
NIKON CORPORATION
FUJI BLDG., 2-3, MARUNOUCHI 3-CHOME, CHIYODA-KU,