
W18LTX - Cordless Power Tool METABO - Free user manual and instructions
Find the device manual for free W18LTX METABO in PDF.



| Product type | Cordless angle grinder |
| Brand | METABO |
| Model | W18LTX |
| Battery pack voltage | 18 V |
| Max. accessory diameter | 125 mm |
| Max. working tool thickness (with standard clamping nut) | 6 mm |
| Mandrel thread | M14 |
| No-load speed | 8500 rpm |
| Weight (with smallest battery) | 2.1 kg |
| Compatible battery pack | Metabo Li-Power 18V |
| Main functions | Grinding, sanding, wire brushing, cutting |
| Additional handle | Yes, removable with vibration damping |
| Protective guard | Yes, tool-free adjustable |
| Dust filter | Yes, removable and cleanable |
| Anti-start safety (dead man's switch) | Yes, on WP... models |
| Electronic safety stop | Yes, on WB..., WPB... models |
| Battery capacity indicator | Yes, via LED |
| Rotating battery pack | Yes, 3 positions |
| Cleaning | Clean dust filter regularly with compressed air |
| Repairs | Only by a Metabo specialist |
| Recommended accessories | Original Metabo batteries and chargers |
| Environmental protection | Do not dispose of with household waste, recycle batteries |
Frequently Asked Questions - W18LTX METABO
User questions about W18LTX METABO
0 question about this device. Answer the ones you know or ask your own.
Ask a new question about this device
Download the instructions for your Cordless Power Tool in PDF format for free! Find your manual W18LTX - METABO and take your electronic device back in hand. On this page are published all the documents necessary for the use of your device. W18LTX by METABO.
USER MANUAL W18LTX METABO
Original instructions
1. Declaration of Conformity
We declare in our sole responsibility: These angle grinders, identified by type and serial number 1, comply with all relevant requirements of the directives 2 and standards 3. Technical file at 4 - see page 3.
2. Specified Use
The cordless angle grinders, when fitted with original Metabo accessories, are suitable for grinding, sanding, cutting-off and wire brushing metal, concrete, stone and similar materials without the use of water.
The user bears sole responsibility for any damage caused by improper use.
Generally accepted accident prevention regulations and the enclosed safety information must be observed.
3. General Safety Instructions

For your own protection and for the protection of your electrical tool, pay attention to all parts of the text that are marked with this symbol!

WARNING - Reading the operating instructions will reduce the risk of injury.
WARNING Read all safety warnings and instructions. Failure to follow all safety warnings and instructions may result in electric shock, fire and/or serious injury.
Keep all safety instructions and information for future reference.
Pass on your electrical tool only together with these documents.
4. Special Safety Instructions
4.1 Safety Warnings Common for Grinding, Sanding, Wire Brushing or Abrasive Cutting-Off Operations:
a) This power tool is intended to function as a grinder, sander, wire brush, or cut-off tool. Read all safety warnings, instructions, illustrations, and specifications provided with this power tool. Failure to follow all instructions listed below may result in electric shock, fire, and/or serious injury. b) Operations such as polishing are not recommended to be performed with this power tool. Operations for which the power tool was not designed may create a hazard and cause personal injury. c) Do not use accessories that are not specifically designed and recommended by the tool manufacturer. Just because the accessory
can be attached to your power tool, it does not assure safe operation.
d) The rated speed of the accessory must be at least equal to the maximum speed marked on the power tool. Accessories running faster than their rated speed can break and fly apart. e) The outside diameter and the thickness of your accessory must be within the capacity rating of your power tool. Incorrectly sized accessories cannot be adequately guarded or controlled. f) Threaded mounting of accessories must match the grinder spindle thread. For accessories mounted by flanges, the arbour hole of the accessory must fit the locating diameter of the flange. Accessories that do not match the mounting hardware of the power tool will run out of balance, vibrate excessively and may cause loss of control. g) Do not use a damaged accessory. Before each use inspect the accessory such as abrasive wheels for chips and cracks, backing pad for cracks, tear or excess wear, wire brush for loose or cracked wires. If a power tool or accessory is dropped, inspect for damage or install an undamaged accessory. After inspecting and installing an accessory, position yourself and bystanders away from the plane of the rotating accessory and run the power tool at maximum no-load speed for one minute. Damaged accessories will normally break apart during this test time. h) Wear personal protective equipment. Depending on application, use face shield, safety goggles or safety glasses. As appropriate, wear dust mask, hearing protectors, gloves and workshop apron capable of stopping small abrasive or workpiece fragments. The eye protection must be capable of stopping flying debris generated by various operations. The dust mask or respirator must be capable of filtering particles generated by your operation. Prolonged exposure to high intensity noise may cause hearing loss. i) Keep bystanders a safe distance away from work area. Anyone entering the work area must wear personal protective equipment. Fragments of workpiece or of a broken accessory may fly away and cause injury beyond immediate area of operation. j) When carrying out tasks that involve a risk of the mounted tool contacting hidden wiring, make sure you hold the device on the insulated gripping surfaces only. A cutting accessory contacting a "live" wire may make exposed metal parts of the power tool "live" and could give the operator an electric shock. k) Position the cord clear of the spinning accessory. If you lose control, the cord may be cut or snagged and your hand or arm may be pulled into the spinning accessory.
I) Never lay the power tool down until the accessory has come to a complete stop. The spinning accessory may grab the surface and pull the power tool out of your control. m) Do not run the power tool while carrying it at your side. Accidental contact with the spinning accessory could snag your clothing, pulling the accessory into your body. n) Regularly clean the power tool's air vents. The motor's fan will draw the dust inside the housing and excessive accumulation of powdered metal may cause electrical hazards. o) Do not operate the power tool near flammable materials. Sparks could ignite these materials. p) Do not use accessories that require liquid coolants. Using water or other liquid coolants may result in electrocution or shock.
4.2 Kickback and Related Warnings
Kickback is a sudden reaction to a pinched or snagged rotating wheel, backing pad, brush or any other accessory. Pinching or snagging causes rapid stalling of the rotating accessory which in turn causes the uncontrolled power tool to be forced in the direction opposite of the accessory's rotation at the point of the binding.
For example, if an abrasive wheel is snagged or pinched by the workpiece, the edge of the wheel that is entering into the pinch point can dig into the surface of the material causing the wheel to climb out or kick out. The wheel may either jump toward or away from the operator, depending on direction of the wheel's movement at the point of pinching. Abrasive wheels may also break under these conditions.
Kickback is the result of power tool misuse and/or incorrect operating procedures or conditions and can be avoided by taking proper precautions as given below.
a) Maintain a firm grip on the power tool and position your body and arm to allow you to resist kickback forces. Always use auxiliary handle, if provided, for maximum control over kickback or torque reaction during start-up. The operator can control torque reactions or kickback forces, if proper precautions are taken. b) Never place your hand near the rotating accessory. Accessory may kickback over your hand. c) Do not position your body in the area where power tool will move if kickback occurs. Kickback will propel the tool in direction opposite to the wheel's movement at the point of snagging. d) Use special care when working corners, sharp edges etc. Avoid bouncing and snagging the accessory. Corners, sharp edges or bouncing have a tendency to snag the rotating accessory and cause loss of control or kickback. e) Do not attach a saw chain woodcarving blade or toothed saw blade. Such blades create frequent kickback and loss of control.
4.3 Safety Warnings Specific for Grinding and Cutting-Off Operations:
a) Use only wheel types that are recommended for your power tool and the specific guard designed for the selected wheel. Wheels for which the power tool was not designed cannot be adequately guarded and are unsafe. b) The grinding surface of center depressed wheels must be mounted below the plane of the guard lip. An improperly mounted wheel that projects through the plane of the guard lip cannot be adequately protected. c) The guard must be securely attached to the power tool and positioned for maximum safety, so the least amount of wheel is exposed towards the operator. The guard helps to protect the operator from broken fragments, accidental contact with the wheel and sparks which could ignite clothing. d) Wheels must be used only for recommended applications.
For example: do not grind with the side of cutoff wheel. Abrasive cut-off wheels are intended for peripheral grinding, side forces applied to these wheels may cause them to shatter.
e) Always use undamaged wheel flanges that are of correct size and shape for your selected wheel. Proper wheel flanges support the wheel thus reducing the possibility of wheel breakage. Flanges for cut-off wheels may be different from grinding wheel flanges. f) Do not use worn down wheels from larger power tools. Wheels intended for larger power tools are not suitable for the higher speed of a smaller tool and may burst.
4.4 Additional Safety Warnings Specific for Abrasive Cutting-Off Operations:
a) Do not "jam" the cut-off wheel or apply excessive pressure. Do not attempt to make an excessive depth of cut. Overstressing the wheel increases the loading and susceptibility to twisting or binding of the wheel in the cut and the possibility of kickback or wheel breakage. b) Do not position your body in line with and behind the rotating wheel. When the wheel, at the point of operation, is moving away from your body, the possible kickback may propel the spinning wheel and the power tool directly at you. c) When wheel is binding or when interrupting a cut for any reason, switch off the power tool and hold the power tool motionless until the wheel comes to a complete stop. Never attempt to remove the cut-off wheel from the cut while the wheel is in motion otherwise kickback may occur. Investigate and take corrective action to eliminate the cause of wheel binding. d) Do not restart the cutting operation in the workpiece. Let the wheel reach full speed and carefully reenter the cut. The wheel may bind, walk up or kickback if the power tool is restarted in the workpiece. e) Support panels or any oversized workpiece to minimize the risk of wheel pinching and
kickback. Large workpieces tend to sag under their own weight. Supports must be placed under the workpiece near the line of cut and near the edge of the workpiece on both sides of the wheel.
f) Use extra caution when making a "pocket cut" into existing walls or other blind areas. The protruding wheel may cut gas or water pipes, electrical wiring or objects that can cause kickback.
4.5 Safety Warnings Specific for Sanding Operations:
a) Do not use excessively oversized sanding disc paper. Follow manufacturer's recommendations when selecting sanding paper. Larger sanding paper extending beyond the sanding pad presents a laceration hazard and may cause snagging, tearing of the disc or kickback.
4.6 Safety Warnings Specific for Wire Brushing Operations:
a) Be aware that wire bristles are thrown by the brush even during ordinary operation. Do not overstress the wires by applying excessive load to the brush. The wire bristles can easily penetrate light clothing and/or skin. b) If the use of a guard is recommended for wire brushing, do not allow any interference of the wire wheel or brush with the guard. Wire wheel or brush may expand in diameter due to work load and centrifugal forces.
4.7 Additional Safety Instructions

WARNING - Always wear protective goggles.
Use elastic cushioning layers if they have been supplied with the abrasive and if required.
Observe the specifications of the tool or accessory manufacturer! Protect the discs from grease or impacts!
Grinding discs must be stored and handled with care in accordance with the manufacturer's instructions.
Never use cut-off wheels for roughing work! Do not apply pressure to the side of cut-off wheels.
The workpiece must lay flat and be secured against slipping, e.g. using clamps. Large workpieces must be sufficiently supported.
If accessories with threaded inserts are used, the end of the spindle may not touch the base of the hole on the grinding tool. Make sure that the thread in the accessory is long enough to accommodate the full length of the spindle. The thread in the accessory must match the thread on the spindle. See page 2 and chapter 14. Technical Specifications for more information on the spindle length and thread.
When working in dusty conditions, ensure that ventilation openings are not blocked. If it becomes necessary to remove dust, first remove the battery pack (use non-metallic objects) and avoid damaging internal components.
Damaged, eccentric or vibrating tools must not be used.
Avoid damage to gas or water pipes, electrical cables and load-bearing walls (static).
Remove the battery pack from the machine before any adjustments, conversions or servicing are performed.
Before fitting the battery pack, make sure that the machine is switched off.
If the machine is defective, remove the battery pack from the machine.
A damaged or cracked additional handle must be replaced. Never operate a machine with a defective additional handle.
A damaged or cracked safety guard must be replaced. Never operate a machine with a defective safety guard.
Secure small workpieces. For example, clamp in a vice.
Due to safety reasons, the nut with two holes (17) must not be used for machines with the designation W..B... Use the "Quick" adjusting nut (1).
Reduce dust exposure:
Some dust created by using this power tool may contain chemicals known to cause cancer, allergic reaction, respiratory disease, birth defects or other reproductive harm. Some examples of these chemicals are: Lead from lead-based paints, crystalline silica from bricks and cement and other masonry products, Arsenic and chromium from chemically-treated lumber, hard wood like oak or beech, Metals, Asbestos. The risk from these exposures depends on how long you or bystanders are being exposed. Do not let particles enter the body. To reduce your exposure to these chemicals: work in a well ventilated area, and work with approved safety equipment, such as dust masks that are specially designed to filter out microscopic particles.
Observe the relevant guidelines for your material, staff, application and place of application (e.g. occupational health and safety regulations, disposal).
Collect the generated particles at the source, avoid deposits in the surrounding area.
Use suitable accessories for special work (see chapter 11.), thus less particles enter the environment in an uncontrolled manner.
Use a suitable extraction unit.
Reduce dust exposure with the following measures:
- Do not direct the escaping particles and the exhaust air stream at yourself or nearby persons or on dust deposits.
- Use an extraction unit and/or air purifiers.
- Ensure good ventilation of the workplace and keep clean using a vacuum cleaner. Sweeping or blowing stirs up dust.
- Vacuum or wash the protective clothing. Do not blow, beat or brush.
4.8 Safety instructions for battery packs:

Protect battery packs from water and moisture!
Do not expose battery packs to naked flame!
Do not use faulty or deformed battery packs!
Do not open battery packs!
Do not touch or short-circuit battery packs!

Slightly acidic, flammable fluid may leak from defective Li-ion battery packs!

If battery fluid leaks out and comes into contact with your skin, rinse immediately with plenty of water. If battery fluid leaks out
and comes into contact with your eyes, wash them with clean water and seek medical attention immediately.
Transport of li-ion battery packs:
The shipping of li-ion battery packs is subject to laws related to the carriage of hazardous goods (UN 3480 and UN 3481). Inform yourself of the currently valid specifications when shipping li-ion battery packs. If necessary, consult your freight forwarder. Certified packaging is available from Metabo.
Only send the battery pack if the housing is intact and no fluid is leaking. Remove the battery pack from the machine for sending. Prevent the contacts from short-circuiting (e.g. by protecting them with adhesive tape).
5. Overview
See page 2.
1 Clip to tighten/release the (tool-free) clamping nut manually * 2 Clamping nut (tool-free) * 3 Support flange 4 Spindle 5 Spindle locking button 6 Sliding on/off switch * 7 Electronic signal indicator 8 Battery pack release button 9 Capacity indicator button 10 Capacity and signal indicator 11 Battery pack 12 Dust filter 13 Switch-on lock 14 Trigger 15 Additional handle / Additional handle with vibration damping * 16 Safety cover 17 Clamping nut * 18 2-hole spanner 19 Lever for safety guard attachment * depending on equipment/not in scope of delivery
6. Initial Operation
6.1 Attaching the additional handle
Always work with the additional handle attached (15)! Attach the additional handle on the left or right of the machine and secure.
6.2 Install safety guard
For safety reasons, always use the safety guard provided for the respective wheel! See also chapter 11.
Safety guard for grinding
Designed for work with grinding wheels, flap sanding pads, diamond cut-off wheels.
See illustration E on page 2.
- Pull on the lever (19). Place the safety guard (16) in the position indicated.
- Release the lever and turn the safety guard until the lever engages.
- Pull on the (19) lever and turn the safety guard until the closed section is facing the operator.
- Make sure that the guard is seated securely: the lever must engage and you should not be able to turn the safety guard.
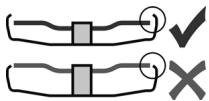
Use only accessories that are covered by at least 3.4 mm by the safety guard.
6.3 Dust filter
See illustration A on page 2.
Always fit the dust filter if the surroundings are heavily polluted (12).
The machine heats up faster when the dust filter is fitted (12). It is protected by the electronics system from overheating (see chapter 10).
To fit:
Attach the dust filter (12) as shown.
To remove:
Holding the dust filter at the edges, raise it slightly (12) and then pull it downwards and remove.
6.4 Rotating battery pack
See illustration B on page 2.
The rear section of the machine can be rotated 270° in three stages, thus allowing the machine's shape to be adapted to the working conditions. Only operate the machine when it is in an engaged position.
6.5 Battery pack
Charge the battery pack before use (11).
If performance diminishes, recharge the battery pack.
The ideal storage temperature is between 10°C and 30°C.
"Li-Power" li-ion battery packs have a capacity and signal indicator: (10)
- Press the button (9), the LEDs indicate the charge level.
- If one LED is flashing, the battery pack is almost flat and must be recharged.
6.6 Removing and inserting the battery pack Removal:
Press the battery pack release (8) button and pull the battery pack (11) forwards.
Inserting:
Slide in the battery pack (11) until it engages.
7. Attaching the grinding wheel
Before carrying out any modifications: remove the battery pack from the machine. The machine must be switched off and the spindle at a standstill. For reasons of safety, attach the safety guard for cut-off grinding before performing Abrasive Cutting-Off Operations (see chapter 11. Accessories).
7.1 Locking the spindle
- Press in the spindle locking button (5) and turn the spindle (4) by hand until you feel the spindle locking button engage.
7.2 Placing the wheel in position
See illustration C on page 2.
- Fit the support flange (3) on the spindle. The flange should not turn on the spindle when properly attached.
- Place the grinding wheel on the support flange (3). The grinding wheel must lay flat on the supporting flange. The metal flange on the cut-off wheel must lay flat on the support flange.
Note: The support flange (3) is secured to prevent it from falling off. To remove: use some force if necessary.
7.3 Securing/releasing the (tool-free) clamping nut (depending on features)
Only tighten the (tool-free) clamping nut (2) manually. For the machine to operate, the clip (1) must always lie flat on clamping nut (2).
To secure the (tool-free) clamping nut (2):
Do not use the (tool-free) clamping nut if the accessory has a clamping shank thicker than 6 mm! In this case, use the clamping nut (17) with 2-hole spanner (18).
- Lock the spindle (see chapter 7.1).
- Flip up the clip (1) on the clamping nut.
- Fit the clamping nut (2) on the spindle (4). See illustration on page 2.
- (1) Tighten the clamping nut on the clip manually in a clockwise direction.
- Flip down the clip (1) again.
To release the (tool-free) clamping nut (2):
- Lock the spindle (see chapter 7.1).
- Flip up the clip (1) on the clamping nut.
- Unscrew the clamping nut (2), turning it anticlockwise manually.
Note: If the clamping nut is very tightly secured (2), you can also use a 2-hole spanner to unscrew it.
7.4 Securing/releasing the clamping nut (depending on features)
Due to safety reasons, the nut with two holes (17) must not be used for machines with the designation W.B...
Securing the clamping nut (17):
The 2 sides of the clamping nut are different. Screw the clamping nut onto the spindle as follows:
See illustration D on page 2.
- A) For thin grinding wheels:
The edge of the clamping nut (17) faces upwards so that the thin grinding wheel can be attached securely.
B) For thick grinding wheels:
The edge of the clamping nut (17) faces downwards so that the clamping nut can be attached securely to the spindle.
- Lock the spindle. Turn the clamping nut (17) clockwise using the 2-hole spanner (18) to secure.
Releasing the clamping nut:
- Lock the spindle (see chapter 7.1). Turn the clamping nut (17) anticlockwise using the 2-hole spanner (18) to unscrew.
8. Use
8.1 Switching On and Off

Always guide the machine with both hands.
Switch on first, then guide the accessory towards the workpiece.
The machine must not be allowed to draw in additional dust and shavings. When switching the machine on and off, keep it away from dust deposits. After switching off the machine, only place it down when the motor has come to a standstill.
Avoid switching on the machine accidentally: always switch it off when the battery pack is removed from the machine.
In continuous operation, the machine continues running if it is forced out of your hands. Therefore, always hold the machine with both hands using the handles provided, stand in a safe position and concentrate.
Machines with slide switch:
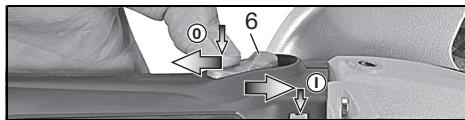
Switching on: Push the slide switch (6) forward.
For continuous activation, now tilt downwards until it engages.
Switching off: Press the rear end of the slide switch (6) and release.
Machines with Paddle Switch (with dead man function):
(machines with the designation WP...)
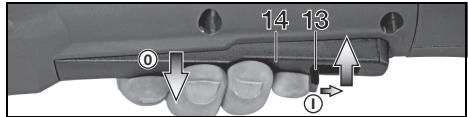
Switching on: Slide the switch-on lock (13) in the direction of the arrow and press the trigger (14).
Switching off: Release the trigger (14).
8.2 Working instructions
Grinding:
Press down the machine evenly on the surface and move back and forth so that the surface of the workpiece does not become too hot.
Roughing: position the machine at an angle of 30° - 40° for the best working results.
Cutting-off:
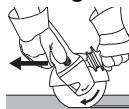
Always work against the run of the disc (see illustration). Otherwise there is the danger of the machine kicking back from the cut out of control. Guide the machine evenly at a speed
suitable for the material being processed. Do not tilt, apply excessive force or sway from side to side.
Sanding:
Press down the machine evenly on the surface and move back and forth so that the surface of the workpiece does not become too hot.
Wire brushing:
Press down the machine evenly.
9. Cleaning
Clean the dust filter regularly: remove and clean with a jet of compressed air.
10. Troubleshooting

The electronic signal display (7) lights up and the load speed decreases. The temperature is too high! Run the machine in until the electronics signal indicator switches
temperature is too high! Run the machine until the electronics signal indicator switches

The electronic signal display (7) flashes and the machine does not start. The restart protection is active. The machine will not start if the battery pack is inserted while the machine is switched on. Switch the machine off and on again.
Electronic safety shutdown (Machines with the designation WB..., WPB...) The machine has shut down by itself. If the slew rate of the current is too high (for example, if the machine suddenly seizes or kickback occurs), the machine switches off. Switch off the machine. Switch it on again and continue to work as normal. Try to prevent the machine from seizing. See chapter 4.2.
Only use original Metabo battery packs and Metabo accessories.
Only use original Metabo battery packs and Metabo accessories.
Use only accessories which fulfil the requirements and specifications listed in these operating instructions.
Use only accessories which fulfil the requirements and specifications listed in these operating instructions.
A Chargers B Battery pack C Safety guard for cut-off grinding
Designed for work with cut-off wheels, diamond cut-off wheels.
Designed for work with support plates, sanding pads, wire brushes.
Designed for work with support plates, sanding pads, wire brushes.
Install hand guard under the additional side-mounted handle.
E Adjusting nut (17)
F Clamping nut (tool-free) (2)
G Dust filter (12)
For a complete range of accessories, see www.metabo.com or the main catalogue.
12. Repairs

Repairs to electrical tools must be carried out by qualified electricians ONLY!
Contact your local Metabo representative if you have Metabo power tools requiring repairs. For addresses see www.metabo.com.
You can download a list of spare parts from www.metabo.com.
13. Environmental Protection
The sanding dust generated may contain hazardous materials: do not dispose of with the household waste, but at a special collection point for hazardous waste.
Observe national regulations on environmentally compatible disposal and on the recycling of disused machines, packaging and accessories.
Battery packs must not be disposed of with regular waste. Please return faulty or used battery packs to your Metabo dealer.
Do not throw battery packs into water.

Only for EU countries: Never dispose of power tools in your household waste! In accordance with European Guideline 2002/96/EC on used electronic and electric equipment, implementation in national legal systems, power tools must be collected separately and used for environmentally compatible recycling. For disposal, discharge the battery pack in the tool. Prevent the contacts from shorting (e.g. by protecting them with adhesive tape).
14. Technical Specifications
Explanation of details on page 2. Subject to changes serving technical progress.
U = Voltage of battery pack
D_max = max. diameter of accessory
t_max,1 = max. permitted thickness of clamping shank on accessory when using clamping nut (17)
t_max,2 = max. permitted thickness of clamping shank on accessory when using "Quick" clamping nut (2)
t_max,3 = grinding wheel / cut-off wheel: max. permitted thickness of accessory
M = Spindle thread
= Length of the grinding spindle
n = No-load speed (maximum speed)
P1 = Nominal power input
P2 = Power output
m = Weight (with the smallest battery pack)
Measured values determined in conformity with EN 60745.
Direct current
The technical specifications quoted are subject to tolerances (in compliance with the relevant valid standards).
A Emission values
These values make it possible to assess the emissions from the power tool and to compare different power tools. Depending on the operating conditions, the condition of the power tool or the accessories, the actual load may be higher or lower. For assessment purposes, please allow for breaks and periods when the load is lower. Based on the adjusted estimates, arrange protective measures for the user e.g. organisational measures.
Vibration total value (vector sum of three directions) determined in accordance with EN 60745:
ah,SG = Vibration emission value (sanding surfaces)
ah,DS = Vibration emission value (sanding with sanding pad)
Typical A-effective perceived sound levels:
LpA = Sound pressure level
During operation the noise level can exceed 80 dB(A).

Wear ear protectors!
Original instructions
Transport of Li-ion battery packs:
Original operating instructions.

Spare parts lists can be downloaded at www.metabo.com.
Do not use damaged, deformed, or vibrating power tools.
Do not use damaged gas or water lines, electrical cables, or load-bearing structures.
Rechargeable battery block made of electropneumatic hammer, with reconditioning, maintenance or repair.
Make sure that the power tool is switched off when installing the battery block.
In case of tool malfunction, remove the battery block from it.
A damaged or cracked auxiliary handle should be replaced. Do not use the tool with a defective auxiliary handle.
A damaged or cracked protective guard should be replaced. Do not use the tool with a defective protective guard.
Secure small workpieces, for example, clamp them in a vice.
For safety reasons, in machines with the marking W... it is forbidden to use
the chuck with two holes (17). Use the quick chuck (1).
Reduced load:
Dust particles generated while working with this tool may contain substances that can cause cancer, allergic reactions, respiratory diseases, birth defects, or other reproductive harm. Some examples of such substances: lead (in lead-based paint), mineral dust (from construction materials such as brick, concrete, etc.), additives for wood treatment (chromic acid, wood preservatives), some types of wood (e.g., dust from oak or beech), metals, asbestos.
The level of risk depends on the duration of exposure to these substances and the user's proximity to them.
Do not allow dust particles of the material being processed to enter your body. To reduce the harmful effects of these substances: ensure good ventilation of the work area and wear appropriate protective equipment, such as respirators capable of filtering microscopic particles.
Follow the safety regulations that apply to the material being processed, personnel, application, and work site (e.g., occupational safety regulations, waste disposal).
Ensure removal of generated particles, do not allow them to accumulate in the surrounding environment.
For special work, use appropriate accessories (see section 11.). This allows reducing the amount of particles released into the surrounding environment.
Use the dust extraction system.
The following measures will help you reduce the dust load:
- Do not direct the exhaust air from the tool at yourself or at other people, and do not direct the exhaust air at animals. Use the dust extraction/air cleaning unit.
- Ventilate the work area well by cleaning it with a vacuum cleaner. Blowing or sweeping only stirs up dust.
- Vacuum or wash the protective clothing. Do not blow on the clothing, do not brush or scrape the dust off it.
4.8 Safety instructions for handling the battery pack:
Take measures to protect the battery pack from moisture!

Do not expose the battery pack to open flame!
Do not use defective or deformed battery packs! Do not open the battery pack! Do not touch the contacts of the battery pack and do not short-circuit them!

A defective lithium-ion battery pack may leak a slightly flammable liquid!

If the electrolyte leaks out and comes into contact with the skin, rinse the affected area with plenty of water. In case
of electrolyte getting into the eyes, rinse them with water and seek medical attention immediately!
Transport of lithium-ion battery packs
The transport of lithium-ion battery packs is subject to the regulations for the transport of dangerous goods (UN 3480 and UN 3481). When shipping lithium-ion battery packs, check the applicable regulations. If necessary, consult your transport company. Certified packaging can be obtained from Metabo.
Transport of battery packs is only possible if the housing is not damaged and no liquid leaks from it. For shipping the battery pack, remove it from the tool. Take measures to prevent short-circuiting of the contacts (e.g., insulate the contacts with adhesive tape).
1. Lock nut (without wrench) / Lock nut (without wrench) * 2. Lock nut (without wrench) * 3. Support flange 4. Spindle 5. Spindle lock button 6. On/Off switch * 7. Electronic signal indicator 8. Battery pack unlock button 9. Capacity indicator button 10. Capacity signal indicator 11. Battery pack 12. Dust filter 13. Chip breaker 14. Toggle switch * 15. Auxiliary handle / Auxiliary handle with vibration damping * 16. Protective guard 17. Lock nut * 18. Two-pin wrench * 19. Clamping lever for protective guard * Depending on configuration / not included in delivery scope
6. Commissioning
6.1 Installing the auxiliary handle
Work only with the auxiliary handle (15) installed! Screw the auxiliary handle onto the left or right side of the tool.
6.2 Installing the protective guard
For safety reasons, use only the protective guard that is provided for the corresponding abrasive tool! See also section 11. Accessories.
Protective guard for grinding
For work with grinding wheels, lamellar grinding wheels, cutting wheels, and diamond cutting wheels.
See figure E on page 2.
- Pull the lever (19). Install the protective guard (16) in the position shown. - Release the lever and turn the protective guard until the lever engages. - Pull the lever (19) and turn the protective guard so that the open zone is facing you. Check the guard: the lever must be engaged, and the protective guard must not move.
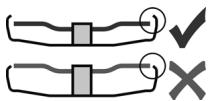
Use only the mounted tools that protrude from the protective guard by no more than 3.4 mm.
6.3 Dust filter
See figure A on page 2.
Remove the dust filter (12) before cleaning.
With the dust filter (12) installed, the instrument heats up faster.
The electronic unit protects the instrument from overheating (see chapter 10).
Installation:
Install the dust filter (12) as shown in the figure.
Removal:
Pull the dust filter (12) by the top edge, then remove it by moving it downwards.
6.4 Rotating swivel block
See figure on page 2.
The instrument's spare part can be installed in 3 positions with a rotation angle of 270°, which ensures the instrument's head is adapted to working conditions. During operation, the instrument must be locked in one of the positions.
6.5 Battery block
Before use, charge the battery block (11).
Disconnect the charger from the battery block.
The optimal storage temperature is between 10°C and 30°C.
Press the instrument with moderate force and move it back and forth over the surface so that the surface of the workpiece does not overheat.
Operation: For best results, work with a setting angle of 30° - 40°.
Abrasive cutting:
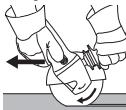
For abrasive cutting, always work in the direction opposite to the direction of rotation (see figure). The tool may not be able to achieve the required height from the floor. Work with
the appropriate tool for the material being processed. Do not jerk, press, or rock the tool.
Sanding with sandpaper:
Press the tool with moderate force and move it over the surface, ensuring that the surface of the workpiece does not overheat.
Working with card scrapers:
Always hold the tool firmly.
9. Maintenance
Regularly clean the air filter: remove it and blow it out with a stream of compressed air.
10. Troubleshooting

The electronic signal indicator (7) lights up, and the speed under load decreases. The temperature is too high! Let the tool run at no load until the electronic signal indicator goes out.
The electronic signal indicator (7) flashes, and the tool does not work.

The overload protection has been triggered. If the battery pack is inserted into the tool, the tool will not start. Turn off and then turn on the tool.
The overload protection has been triggered. If the battery pack is inserted into the tool, the tool will not start. Turn off and then turn on the tool.
Electronic device for emergency shutdown: (instrument with marking WB...., WPB...) The instrument switches off independently. In the event of a rapid increase in current strength (this occurs, for example, during sudden blocking or release), the electronic instrument switches off. Switch off the device. After this, it should be switched on again and continue working in normal mode. Avoid blocking in the future. See Chapter 4.2.
11. Accessories
Use only original battery packs and accessories from Metabo.
See page 4.
Use only those accessories that meet the requirements and parameters listed in this operating manual.
A Charging devices for battery packs with protective contacts for abrasive cutting
Intended for work with cutting discs, diamond cutting discs.
D Protective hood for grinding with sanding paper, working with fiber discs
Intended for work with a support plate, grinding plate, fiber discs.
Protective hood for installation under the side additional handle.
E Handle guard (17) F Handle guard (without key) (2) G Dust filter (12)
Full range of accessories see on the website www.metabo.com or in the main catalog.
12. Repairs
Repairs to the power tool may only be carried out by qualified electricians.
For repairs to the power tool from Metabo, contact your nearest Metabo representative. Address see on the website www.metabo.com.
You can find the spare parts online at www.metabo.com.
13. Environmental Protection
Dispose of dust and waste separately according to the relevant regulations for waste disposal, as they may contain hazardous substances.
Follow the national regulations for the disposal of waste electrical tools, packaging, and accessories.
Do not dispose of battery packs with household waste. Return defective or used battery packs to your Metabo dealer!
Do not dispose of battery packs in water.
Only for EU countries: Do not dispose of power tools with household waste! According to the European Directive 2002/96/EC on waste electrical and electronic equipment and its implementation in national law, used power tools must be collected separately and recycled in an environmentally friendly manner. Before disposal, discharge the battery pack and remove it from the power tool. Insulate the contacts (e.g., with adhesive tape) to prevent short circuits.
14. Technical Specifications
Explanatory notes on page 2. We reserve the right to make technical changes.
U = Voltage of the battery pack, max. = max. diameter of the tool
t_max,1 = max. permissible tool thickness in the clamping range when using the clamping flange (17)
t_max,2 = max. permissible tool thickness in the clamping range when using the Quick clamping flange (2)
t_max,3 = for grinding wheels / cutting discs: max. permissible tool thickness
M = spindle thread
1 = spindle length
n = speed of rotation of the tool (no-load speed) P1 = rated power input P2 = power output m = mass (with clamping kit and guard)
The measurement results correspond to the EN 60745 standard.
~ = direct current
The technical data specified apply to the standards in force.
Noise and vibration values
These values allow comparison with the noise and vibration generated by other electric power tools. Depending on the operating conditions, the condition of the electric power tool or the tools used, the actual values may be higher or lower. For a realistic assessment of noise and vibration, take into account breaks and phases of low (partial) load. Determine protective measures for the user based on the actual values.
The sum of the three values is calculated according to the EN 60745 standard:
ah,SG = vibration emission value (surface grinding)
ah,DS = vibration emission value (grinding with grinding discs)
Kh,SG/DS = tolerance coefficient (vibration)
Noise level according to method A:
LpA = sound pressure level
LWA = sound power level
KpA, KWA = tolerance coefficient
During operation, the noise level may exceed 80 dB(A).
Dear buyers!
EAC
Information for the buyer:
Certificate of Conformity:
Certificate of Conformity: No TC RU C-
DE.AH30.B.01486, valid from 24.03.2015
to 23.03.2020, issued by the body for
product certification "IVANOVO-
CERTIFICATE" LLC "Ivanovo Certification Fund"
Address (legal/factual): 153032,
Russian Federation, Ivanovo region,
Ivanovo, st. Stankostroiteley, 1; tel.
(4932)23-97-48; fax (4932)23-97-48; E-mail:
ivfs@mail.ru; Accreditation certificate No POCC
RU.0001.11AH30 dated 20.06.14, issued
Country of origin: Germany
Country of manufacture: Germany
Manufacturer (factory-manufacturer):
"Metabowerke GmbH",
Metaboallee 1,
D-72622 Nuertingen, Germany
Importer in Russia:
LLC "Metabo Eurasia"
Russia, 127273, Moscow
st. Berezovaya Alley, 15 a, bldg 7, office 106
Tel.: +7 495 980 78 41
The production date is encoded in the 10-digit
serial number of the tool, indicated on
its nameplate. The first digit denotes the year,
for example, "4" means that the product
The numbers indicate the place of manufacture.
For example, "05" means small.
Warranty period: 1 year from the date of manufacture.
Service life of the tool: 5 years from the date of manufacture.
Manufactured

- ORIGINAL INSTRUCTIONS
- DECLARATION OF CONFORMITY
- SPECIFIED USE
- GENERAL SAFETY INSTRUCTIONS
- SPECIAL SAFETY INSTRUCTIONS
- KICKBACK AND RELATED WARNINGS
- SAFETY WARNINGS SPECIFIC FOR GRINDING AND CUTTING-OFF OPERATIONS
- ADDITIONAL SAFETY WARNINGS SPECIFIC FOR ABRASIVE CUTTING-OFF OPERATIONS
- SAFETY WARNINGS SPECIFIC FOR SANDING OPERATIONS
- SAFETY WARNINGS SPECIFIC FOR WIRE BRUSHING OPERATIONS
- ADDITIONAL SAFETY INSTRUCTIONS
- REDUCE DUST EXPOSURE
- SAFETY INSTRUCTIONS FOR BATTERY PACKS
- TRANSPORT OF LI-ION BATTERY PACKS
- OVERVIEW
- SEE PAGE
- INITIAL OPERATION
- ATTACHING THE ADDITIONAL HANDLE
- INSTALL SAFETY GUARD
- SAFETY GUARD FOR GRINDING
- DUST FILTER
- TO FIT
- TO REMOVE
- ROTATING BATTERY PACK
- BATTERY PACK
- REMOVING AND INSERTING THE BATTERY PACK REMOVAL
- INSERTING
- ATTACHING THE GRINDING WHEEL
- LOCKING THE SPINDLE
- PLACING THE WHEEL IN POSITION
- SECURING/RELEASING THE (TOOL-FREE) CLAMPING NUT (DEPENDING ON FEATURES)
- TO SECURE THE (TOOL-FREE) CLAMPING NUT (2)
- TO RELEASE THE (TOOL-FREE) CLAMPING NUT (2)
- SECURING/RELEASING THE CLAMPING NUT (DEPENDING ON FEATURES)
- SECURING THE CLAMPING NUT (17)
- A) FOR THIN GRINDING WHEELS
- FOR THICK GRINDING WHEELS
- RELEASING THE CLAMPING NUT
- USE
- SWITCHING ON AND OFF
- MACHINES WITH SLIDE SWITCH
- SWITCHING ON: PUSH THE SLIDE SWITCH (6) FORWARD
- MACHINES WITH PADDLE SWITCH (WITH DEAD MAN FUNCTION)
- WORKING INSTRUCTIONS
- GRINDING
- CUTTING-OFF
- SANDING
- WIRE BRUSHING
- CLEANING
- TROUBLESHOOTING
- ONLY USE ORIGINAL METABO BATTERY PACKS AND METABO ACCESSORIES
- REPAIRS
- ENVIRONMENTAL PROTECTION
- TECHNICAL SPECIFICATIONS
- A EMISSION VALUES
- REDUCED LOAD
- SAFETY INSTRUCTIONS FOR HANDLING THE BATTERY PACK
- TRANSPORT OF LITHIUM-ION BATTERY PACKS
- COMMISSIONING
- INSTALLING THE AUXILIARY HANDLE
- INSTALLING THE PROTECTIVE GUARD
- PROTECTIVE GUARD FOR GRINDING
- INSTALLATION
- REMOVAL
- ROTATING SWIVEL BLOCK
- BATTERY BLOCK
- ABRASIVE CUTTING
- SANDING WITH SANDPAPER
- WORKING WITH CARD SCRAPERS
- MAINTENANCE
- ACCESSORIES
- NOISE AND VIBRATION VALUES
- EAC
- INFORMATION FOR THE BUYER
Brand : METABO
Model : W18LTX
Category : Cordless Power Tool