LM 233A - Blender MOULINEX - Free user manual and instructions
Find the device manual for free LM 233A MOULINEX in PDF.
User questions about LM 233A MOULINEX
0 question about this device. Answer the ones you know or ask your own.
Ask a new question about this device
Download the instructions for your Blender in PDF format for free! Find your manual LM 233A - MOULINEX and take your electronic device back in hand. On this page are published all the documents necessary for the use of your device. LM 233A by MOULINEX.
USER MANUAL LM 233A MOULINEX
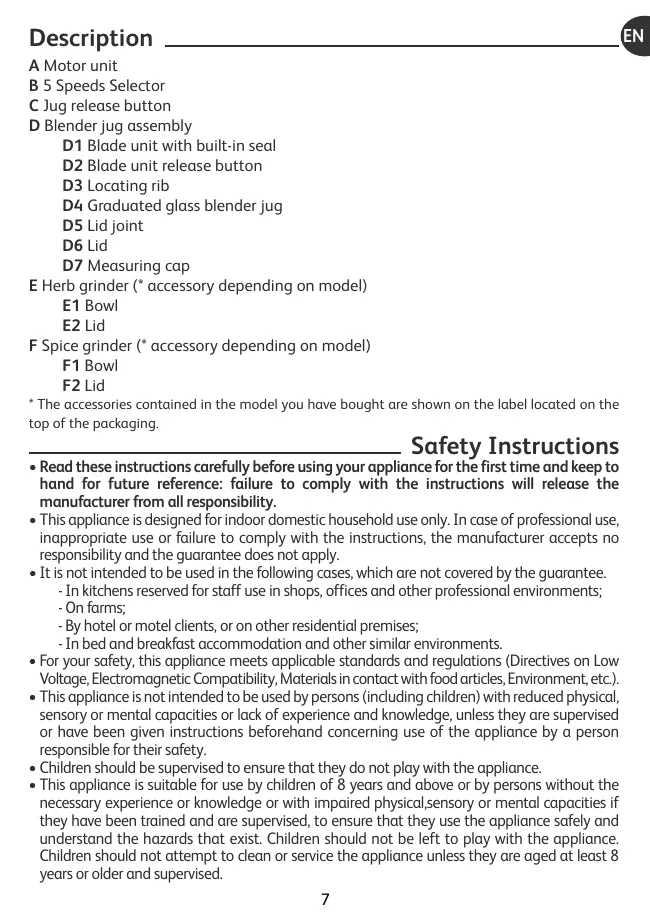
D1 Blade unit with built-in seal
D2 Blade unit release button
D3 Locating rib
D4 Graduated glass blender jug
D5 Lid joint
D6 Lid
D7 Measuring cap
E Herb grinder (* accessory depending on model)
E1 Bowl
E2 Lid
F Spice grinder (* accessory depending on model)
F1 Bowl
F2 Lid
- The accessories contained in the model you have bought are shown on the label located on the top of the packaging.
Safety Instructions
-
Read these instructions carefully before using your appliance for the first time and keep to hand for future reference: failure to comply with the instructions will release the manufacturer from all responsibility.
-
This appliance is designed for indoor domestic household use only. In case of professional use, inappropriate use or failure to comply with the instructions, the manufacturer accepts no responsibility and the guarantee does not apply.
-
It is not intended to be used in the following cases, which are not covered by the guarantee.
-
In kitchens reserved for staff use in shops, offices and other professional environments;
- On farms;
- By hotel or motel clients, or on other residential premises;
-
In bed and breakfast accommodation and other similar environments.
-
For your safety, this appliance meets applicable standards and regulations (Directives on Low Voltage, Electromagnetic Compatibility, Materials in contact with food articles, Environment, etc.).
- This appliance is not intended to be used by persons (including children) with reduced physical, sensory or mental capacities or lack of experience and knowledge, unless they are supervised or have been given instructions beforehand concerning use of the appliance by a person responsible for their safety.
- Children should be supervised to ensure that they do not play with the appliance.
-
This appliance is suitable for use by children of 8 years and above or by persons without the necessary experience or knowledge or with impaired physical, sensory or mental capacities if they have been trained and are supervised, to ensure that they use the appliance safely and understand the hazards that exist. Children should not be left to play with the appliance. Children should not attempt to clean or service the appliance unless they are aged at least 8 years or older and supervised.
-
Please keep the appliance and its power cord out of the reach of children less than 8 years of age.
- Check that your power supply voltage corresponds to that shown on the appliance (alternating current only). Any error in plugging in your appliance may cause irreversible damage and invalidate the guarantee.
- The appliance is to be connected to a socket-outlet having an earthing contact.
- Given the diverse standards in effect, if the appliance is used in a country other than that in which it is purchased, have it checked by an Approved Service Agent.
- Do not use an extension lead. If you accept liability for doing so, only use an extension lead which is in good condition, has a plug with an earth connection and is suited to the power rating of the appliance.
- Before first use, remove all packaging materials, stickers and accessories from inside and outside of the appliance.
- Carefully wash the attachments in warm water with a little washing up liquid, rinse and dry thoroughly.
- Completely unwind the power cord before plugging into an earthed socket.
- Check the electrical power cord for signs of wear or damage prior to each period of use. If the electrical power cord is damaged, it must be replaced by an Approved Service Agent to avoid any danger.
- Never leave the appliance unattended whilst connected to the power supply, even if only for a few moments, especially where children are present.
- Use the appliance on a flat, stable, heat-resistant surface away from water splashes.
- To avoid the risk of electric shock, never use the appliance with wet hands or on a damp or wet surface. Never immerse the motor unit, power cord or plug in water or any other liquid.
- Do not let the power cord hang where children may reach it.
- Always switch off and disconnect the appliance from the power supply before changing attachments, cleaning & maintenance or when not in use.
- Never disconnect the plug by pulling on the power cord.
- Do not leave the power cord close to or in contact with sources of heat or sharp edges.
- Do not allow long hair, scarves, ties etc. to hang over the appliance or attachments when in use.
- Do not use your appliance for more than 3 minutes continuously.
- Never touch any moving parts when the appliance is running. Wait for the appliance to come to a complete stop before handling or removing accessories.
- Do not introduce cooking utensils (spoon, spatula etc.) into the jug during operation.
- Do not use the blender jug without ingredients, with dry or hard products only(such as sugar cubes), with boiling liquids (over 80^ / 176^ ) or if the lid (D6) is not properly fitted to the jug.
- Alway pour liquid ingredients into the blender jug first, before adding any solid ingredients, without exceeding the maximum level.
- Do not use the jug or bowls as containers for freezing, cooking or sterilisation.
- Do not use this appliance to blend or mix non-food items.
- Handle the blades of the blade unit (D1), herb grinder (E) and spice grinder (F) very carefully when emptying the jug or bowls and when cleaning: they are extremely sharp.
- Do not place any parts containing metal in a microwave oven.
-
If your appliance "jams" during operation, switch off, disconnect from the power supply and check that it is not overloaded with ingredients. Carefully remove any obstructions before reconnecting.
-
Do not use your appliance if it does not operate correctly, if it has been damaged or if the power cord or plug is damaged. To maintain safety, these parts must be replaced by an Approved Service Centre.
- Any intervention other than normal cleaning and maintenance by the customer must be performed by an Approved Service Centre.
- For you own safety, only use accessories and spare parts from the appliance manufacturer, which are especially designed for your appliance.
Safety locking
The appliance will not operate if the blender jug assembly (D) or the accessories (E) or (F) are not correctly positioned and locked on the motor unit (A).
Before first use
Before using your appliance for the first time, clean all the accessories (D, E, F) in warm water and washing up liquid, except for the motor unit (A).
CAUTION: The blades are extremely sharp; handle them with caution when using or cleaning the appliance and when emptying the bowls or jug.
Make sure all the packaging has been removed before operating the appliance.
Important note: Turn the speed selector (B) to "0" before placing the blender assembly or accessories on the motor unit.
Do not turn the blender on if the lid (D6) is not properly in place on the blender jug (D4).
Use
Using the blender
- Before assembling the jug (D) choose the most convenient position for the jug handle (D4) (on the right or on the left.).
With the "clc" button (D2) of the blades block (D1) in front of you, place the locating rib (D3) in the assembly slot located at the base of the jug (D4) (fig. 1 a) then lower the blade unit (D1) down into the second slot (D4) (fig. 1b) located at the front of the jug base until the unit is locked in place (you will hear a click) (fig. 1c).
Make sure that the jug (D4) and the blade unit (D1) are well assembled, press the button (D2) and place the ingredients in the jug without exceeding the maximum level indicated on it:
- 1.5L for thick mixture
- 1.25 L for liquid mixtures
Make sure that the joint (D5) is on the lid (D6) (fig. 2 a) and place the two together on the jug (D4).
Put the cap (D7) in the slot destined for it on the lid top.
Place the assembled blender jug (D) on the motor unit (A), with the "clic" button (D2) on the blade unit aligned with the "clic" button (C) on the motor unit (Fig. 2b) and press the jug down firmly to lock it on the motor unit (you will hear a double click) (Fig 3).
Plug in the appliance and turn the speed selector (B) to the desired position or press "Pulse" a few times.
To stop the appliance, turn the speed selector (B) to the "0" position. Unplug the appliance. Remove the jug (D) from the motor unit (A) by pressing the "clic" button (C) then lift off the jug (fig. 4).
Using the lift herb grinder and spice grinder
- With the herb grinder (E), you can chop ingredients like onion, garlic, meat (cut into pieces), dried fruits and herbs in a few seconds and make crumbs (from rusks, etc). Do not use the herb grinder for liquid preparations (fruit juices, etc.).
- With the spice grinder (F), you can grind to a powder a variety of spices in a few seconds: coriander seeds, peppercorns, etc.
These accessories come with a lid that prevents access to the blades during use. Pour the ingredients into the bowl (E1) or (F1). Line up the symbol on the lid (E2) or (F2) with the symbol on the bowl (E1) or (F1). Fit the bowl onto the lid and turn the lid clockwise up to 1 to lock the assembly (Fig 5).
Place the assembly (E) or (F) on the motor unit, lining up the 2 ribs of the accessory with the slots on the motor unit, with the "clic" mark on the lid aligned with the "clic" button (C) on the motor unit (Fig 6a) and press down the accessory firmly to lock it on the motor unit (you will hear a double click) (Fig. 6b).
Plug in the appliance and turn the speed selector (B) to the desired position or press "Pulse" a few times. Hold the accessory firmly during operation. To stop the appliance, turn the speed selector (B) back to position "0". Unplug the appliance. Hold the accessory and release it from the motor unit by pressing the "clic" button (C) on the motor unit (A) (Fig 4).
Unlock the lid in the reverse order of the assembly.
You can then remove the preparation in the bowl.
| Ingredients | Quantity (max) | Operating time | Accessories |
| Dried apricots | 80g | Press button continually for 4 seconds | E |
| Breadcrumbs | 1 rusk | In pulses | E |
| Onion | 50g | 5 seconds on speed 1 | E |
| Parsley | 6g | In pulses | E |
| Meat, cut into cubes (gristle and sinew removed) | 60g | In pulses | E |
| Coriander seeds | 50g | 60 seconds on speed 5 | F |
| Peppercorns | 50g | 60 seconds on speed 5 | F |
Cleaning
Unplug the appliance and remove the bowl or accessories.
The blades of the accessories are very sharp. Handle them with caution.
Rinse the jug, bowls and lids immediately under running water and the removable parts in hot water and washing up liquid.
For easy cleaning, you can detach the blade unit (D1) from the jug (D4) by pressing the "clic" button (D2) (Fig 7a, 7b, 7c).
The seal of the blade unit (D1) is not detachable.
The lid joint (D6) is removable.
The jug (D) and the accessories (E) and (F) can be cleaned in the dishwasher in the top basket with the "ECO" or "LIGHTLY SOILED" programme.
Clean the motor unit (A) with a damp cloth and dry carefully.
Never immerse the motor unit (A) in running water.
What to do if your appliance does not work?
| Problems | Causes | Solutions |
| The product does not work. | The plug is not connected. | Connect the appliance to a socket with the same voltage. |
| The jug or accessory is not correctly positioned or locked on the motor unit. | Check that the jug or accessories are correctly positioned and locked on the motor unit as shown in the instructions You must hear a double "click". | |
| The blade unit (D1) is not correctly attached to the jug (D4). | Unlock the blade unit (D1) and bolt it to the jug (D4) (fig 1a, 1b, 1c) once again. | |
| Excessive vibrations. | The product is not placed on a flat surface. | Place the product on a flat surface. |
| Volume of ingredients is too high. | Reduce the quantity of ingredients processed. | |
| Leak from the lid. | Volume of ingredients is too high. | Reduce the quantity of ingredients processed. |
| The lid is not correctly positioned. | Lock the lid correctly on the blender jug. | |
| The joint (D5) is not well placed on the lid. | Place the joint (D5) correctly on the lid (D6) (fig. 2a). | |
| Leak at the bottom of the jug. | The blade unit (D1) not properly or securely locked on the jug (D4). | Place the blade unit correctly on the jug; you must hear a click. The button (D2) must be fully aligned with the blade unit (D1). |
| The blade does not turn easily. | Pieces of food too large or too hard. | Reduce the size or quantity of ingredients processed. Add liquid. |
Your appliance still does not work?
Contact the consumer services (see contact details in the guarantee booklet).
Accessories
You can customise your appliance and obtain the following accessories from your usual retailer or an approved service centre: Herb grinder accessory (E), Spice grinder accessory (F) or additional blender jug (D).
Recycling

- Disposal of the appliance and its packaging materials.
The packaging is comprised exclusively of materials that present no danger for the environment and which may therefore be disposed of in accordance with the recycling measures in force in your area.
For disposing of the appliance itself, please contact the appropriate service of your local authority.
End of life electrical and electronic products:
Your appliance is expected to last for many years. However, when the time comes to replace it, do not throw it in the bin or in a dump, but take it to the recycling centre in your town (or to a waste reception centre where applicable).

Think of the environment!
① Your appliance contains valuable materials which can be recovered or recycled.
Leave it at a local civic waste collection point.
Rengoring of apparatus
(100000000000000000000000000000000000000000000000000000000
ylll lil y 100000000000000000000000000000000000000000000000000000000000000
(D)
gill
aill lll 100 g o eall no jolll
a 1

aaiiig 1 iiei i 1 1 1 1 1 1 1 1 1 1 1 1 1 1 1 1 1 1 1 1 1 1 1 1 1 1 1 1
(1)
1gai
Lgaii sle! Ss yu Lueo a 1sgo le ciiall lss
iiaaiall 1alglll jsljgla


.7a,7b,7c (D2) "clic"
dall lil (D1) all
dall yla (D6) llalgl (D5)
"ECO" (J)
"LIGHTLY SOLED"
a 1 a a a a a a a a a a a a a a a a a a a a a a a a
Lall Lall Lall (A)
.(Jlll)(D4)
D3) 1J Ld (D1) 1s d (D2) "clc"
dD1 (D1) 1a (D4)
Jdll 1 (1b Jd) (D4) Lgll dla a
.(1cJ)lll (J)
jllbcbiol, jkiy bLg jz D1) 00 (D4) 00
:dll lalll lal lal lal lal lal lal (D2)
aassssssssssssssssssssssssssssssssssssssssssssssssssssssssssssssssssssssssssssssssssssssssssssssss
1.10
le 2a (D6) uall gao (D5)
.(D4) LcJ
.(D7)
aee (D2) "clc" jj bck. (A) dkrk (D) bklk
j 2 (2b k) d a (C) "Cic" j c
(3) (山K) (g a) d
Ie biai 1, aii y i 15 (B) eae 1
"pulse"
J 0" (B) aee
(4 kll) cgll (C) "clic" jlc bili (A) dds j D) cgl
()
L 1
(20 ^(1) = ^(1)^(1)^(1) (204
8jyJg:Jg JgJgJgJgJgJgJgJgJgJgJgJgJgJgJgJgJgJgJgJgJgJgJgJgJgJgJgJgJgJgJgJgJgJgJgJgJgJgJgJgJgJgJgJgJgJgJgJgJg
J
golkall kawl. lalilal alalll gaiuagaae aalea
(F2) (E2) 1111111111111111111111111
aJyI yIyI yIyI yIyI yIyI yIyI (F1) yE1 (E1) yIyI yIyI yIyI yIyI
(5Jzill) 10
a aallll lnnn nlll llll 1 (F) k jg (E) k jg
c (C) "clic" 0000000000000000000000000000000000000000000000
gaaagw) dall s glc ally jaoaall ybcjz (6a Jlll)
(6bJ)
Ie biai a i. 1000 1000 (B) eae aee
"pulse"
Jgaaal aaiylll alaal lalal yag aagaae aee aae aee aee aee aee aee
aabla 111
aill jsi
plably jlll jll lglal gall aal -
Jzll ciiisll Jiaiui
21 10000000000000000000000000000000000000000000
.aa 1
gill, gillall aill llll alll g s j 1
(F)Jgdl aabog.(E)UaLbIy aabu (Df)UaJafalld sdd JdaJI
a a a a a a a a a a a a a a a a a a a a
Jolai jlll 1
iill jglg lalall o 1oill
Ldai (D) 1000
aLwJilggi.(SswlllulaoJia)bdolalglgag.
L L L L L L L L L L L L L L L L L L L L L L L L L L L L L L L L L L L L L L L L L L L L L L L L L L L L L L L L L L L
A. all sL do
1 1
1
y
aalal yblal lal a k jg 0" gall (B) acgall
all
.(D)sglgllgl 40000000000000000000000000000000000000000000000
iiial 1j
A
5 B
C
b) 1 z1 ≤ z2 ≤ z_3
D1
D2
D3
D4
D5
D6
D7
(1)
1c9 E1
E2
(1)Jusall (2)Jusii F
1cF1
F2
aiee aie eae aeallgees siaai jlll jll laoe aee aell
aokwll JJ
1 1
aaggaa aagaaas yaaagaaa aagaaa aaaaa aaaaa aa
aalabawblll blll lllllllllllllllllllll
(2a1alllg y aall) 1. lalil
jL jJn JnJnJnJnJnJnJnJn
423 1000000000000000000000000000000000000000000
( x,y) = 1
jI jI jI jI jI jI jI jI jI jI jI jI jI jI jI jI jI jI jI jI jI jI jI jI jI jI jI jI jI jI jI jI jI jI jI jI jI jI jI jI jI jI jI jI jI jI jI jI jI jI jI
· (D)
jol jolil jil jil jil jil jil jil jil jil jil jil jil jil jil jil jil jil jil jil jil jil jil jil jil jil jil jil jil jil jil jil jil jil jil jil jil jil jil jil jil jil jil jil

aaijia jia laaiia jia jia jia jia
J (F) 8 (E) jj g (D)
"LIGHTLY SOLED" L "ECO" L
L 1jai jai jai jai jai jai aas L (A)
A
(D4)
$$ \left(\frac {1}{2} \cdot \sin \omega \right. \left(\frac {1}{2} \cdot \sin \omega \right. \left(\frac {1}{2} \cdot \sin \omega\right) $$
J 1 (D3) k L (D1) "clc" ≤ k dL
Lk 1 (D1) aaaa (1a) (D4) Lk
(du)clc L (sL) (1b) (D4)
$$ \left(\mathbf {1 c} _ {\text {j j j}}\right) $$
jD24
$$ \therefore \mathrm {i d} j \mathrm {j} \mathrm {j} \mathrm {j} \mathrm {j} \mathrm {j} \mathrm {j} \mathrm {j} \mathrm {j} \mathrm {j} \mathrm {j} \mathrm {j} \mathrm {j} $$
$$ i s i s s i s s i s s i s s i s s i s 1. 5 ^ {*} $$
$$ 1. 2 5 ^ {*} $$
2a (D6) JwJ (D5)
$$ \therefore \Delta A B J \sim D (D 4) \sim C W L \sim S _ {P A} L $$
$$ \therefore \text {d} \left| \frac {\partial f}{\partial x} \right| = \frac {\partial f}{\partial y} \text {d} \left| \frac {\partial f}{\partial z} \right|, \quad \text {d} \left| \frac {\partial f}{\partial z} \right| = \frac {\partial f}{\partial y} \text {d} \left| \frac {\partial f}{\partial x} \right| $$
(C)"clic"LbLbLbLb(LD2) "clic"LbLbS.SiaaLb
$$ . (6 b J s i) \left( \right.\omega_ {s} \omega_ {s} \omega_ {s} \omega_ {s} \omega_ {s} \omega_ {s} \omega_ {s} \omega_ {s} \omega_ {s} \omega_ {s} \omega_ {s} \omega_ {s} \omega_ {s} \omega_ {s} \omega_ {s} \omega_ {s} \omega_ {s} \omega_ S S S S S S S S S S S S S S S S S S S S S S S S S S S S S S S S S S S S S S S S S S S S S S S S S S S S S S S S S S S S S S S S S S S S S S S S S S S S S S S S S S S S S S S S S S S S S S S S S S S S S $$
Ld 1000000000000000000000000000000000000000000000000
$$ \therefore \text {p u l s e} $$
Lai Lai Lai Lai Lai Lai Lai Lai Lai Lai Lai Lai