Personal Blender LM1A0D - Blender MOULINEX - Free user manual and instructions
Find the device manual for free Personal Blender LM1A0D MOULINEX in PDF.

| Product type | Personal blender |
| Brand | Moulinex |
| Model | Personal Blender LM1A0D |
| Maximum capacity | 600 ml |
| Power | 300 W (estimated) |
| Power supply | Mains 220-240 V |
| Operation | Press the bottle onto the motor unit to blend |
| Maximum continuous operation time | 30 seconds, then a 10-minute pause |
| Safety | Safety lock: only works if the bottle is correctly assembled and positioned |
| Bottle material | Plastic (type not specified) |
| Blades | Stainless steel, very sharp |
| Included accessories | Blender bottle, blade with seal, sport cap with seal, plastic cleaning stick |
| Maintenance and cleaning | Bottle, blade and cap are dishwasher safe (top rack, ECO program). Wipe the motor unit with a damp cloth. |
| Removable parts | Bottle, blade, seal, cap, cleaning stick |
| Repairability | Spare parts available; contact customer service |
Frequently Asked Questions - Personal Blender LM1A0D MOULINEX
User questions about Personal Blender LM1A0D MOULINEX
0 question about this device. Answer the ones you know or ask your own.
Ask a new question about this device
Download the instructions for your Blender in PDF format for free! Find your manual Personal Blender LM1A0D - MOULINEX and take your electronic device back in hand. On this page are published all the documents necessary for the use of your device. Personal Blender LM1A0D by MOULINEX.
USER MANUAL Personal Blender LM1A0D MOULINEX
natural_image
Technical line drawing of a blender with handle and spout, no text or symbols present
natural_image
Illustration of a flashlight with a circular frame, showing internal components and a downward arrow indicating motion (no text or symbols)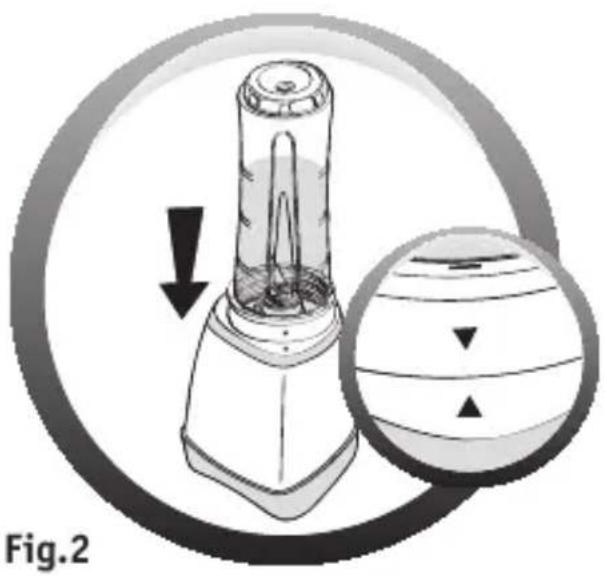
natural_image
Illustration of a blender with a downward arrow and a magnified view of its lid (no text or symbols)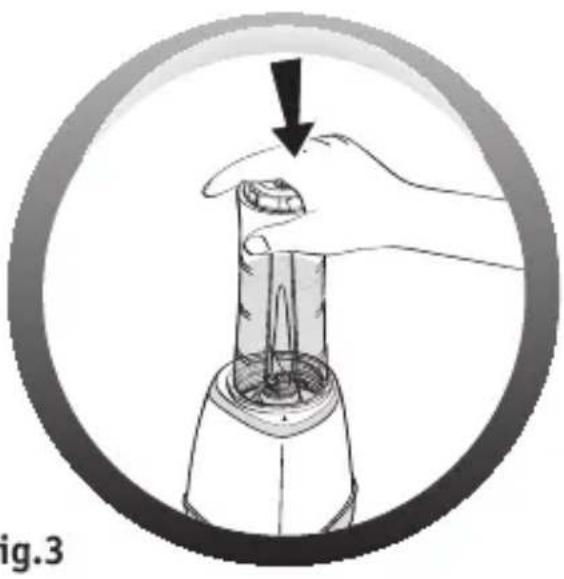
natural_image
Illustration of a hand holding a tool with a downward arrow, enclosed in a circular frame (no text or symbols)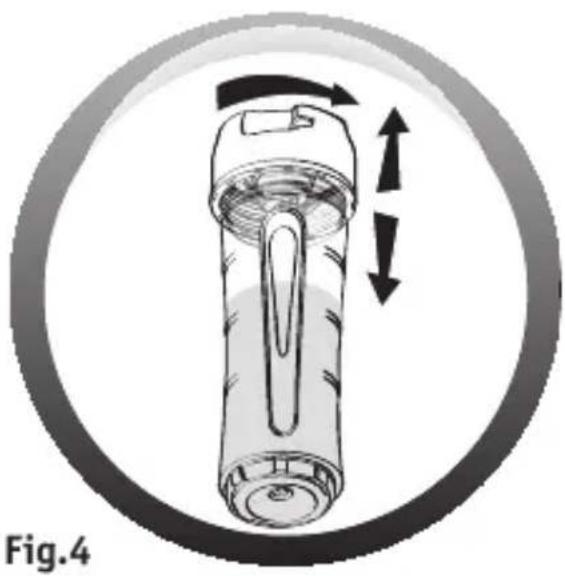
natural_image
Illustration of a flashlight with directional arrows indicating motion (no text or symbols)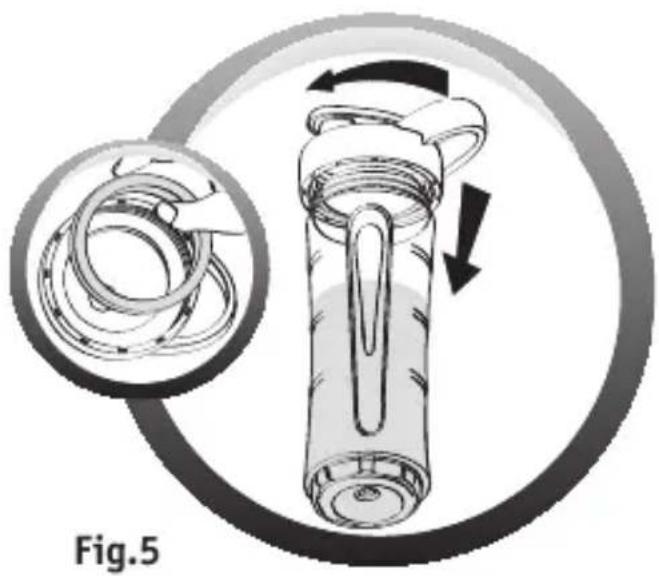
natural_image
Diagram of a mechanical device with a magnified inset showing internal components and directional arrows (no text or symbols)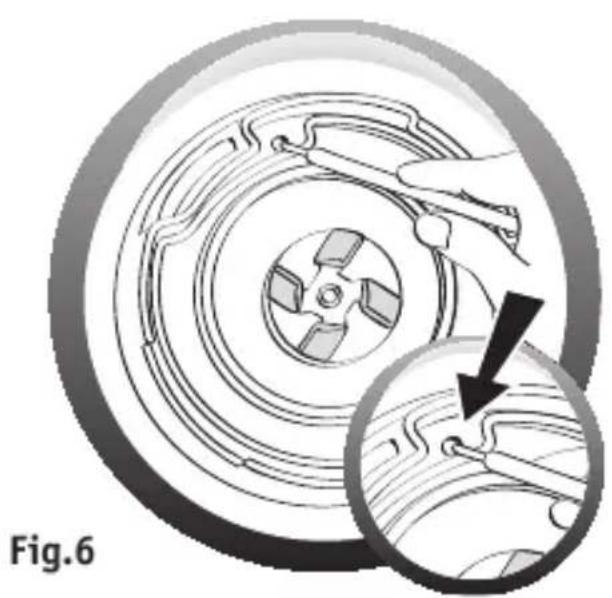
natural_image
Mechanical assembly diagram showing a wheel with internal components and a magnified inset highlighting a specific section (no text or symbols)D Asticella in plastica
DISPOSITIVO DI BLOCCAGGIO DI SICUREZZA
HET APPARAAT SCHOONMAKEN
NL
UW APPARAAT WERKT NIET. WAT NU?
CAUTION: the safety precautions are part of the appliance. Read them carefully before using your new appliance for the first time. Keep them in a place where you can find and refer to them later on.
DESCRIPTION
A Motor Unit
B Blender bottle assembly
B1 Blade unit
B2 Seal
B3 Plastic bottle
C Lid Assembly
C1 Lid Seal
C2 Lid
D Plastic stick (for removing the lid seal)
SAFETY LOCKING SYSTEM
The appliance will not operate if the blender bottle assembly (B1 + B2 + B3) is not correctly assembled and correctly positioned on the motor unit (A).
BEFORE USING FOR THE FIRST TIME
Before using for the first time wash the blender assembly (B) and lid assembly (C), in warm water and a little washing-up liquid. ATTENTION: DO NOT IMMERSE THE MOTOR UNIT (A) OR PUT IT UNDER WATER OR ANY OTHER LIQUID. Clean with a damp cloth then dry it carefully.
WARNING: The cutter blades are extremely sharp, handle them with caution during use, cleaning or on emptying the bottle. Do not fit the blade unit onto the motor unit by itself.
Make sure that all packaging has been removed before operating the appliance.
INTRODUCTION
This blender will allow you to discover a new world of textures: liquids, chopped fruits and finely ground powders for culinary use. Using it, you can blend some simple ingredients to obtain delicious recipes.
USING YOUR APPLIANCE
- Place the motor unit (A) on a flat, stable, heat-resistant surface away from sources of heat or water splashes, and plug into a wall socket.
- Fill the blender bottle (B3) with ingredients. The maximum level is 600 ml (see marking on bottle) and must not be exceeded. For best results, we recommend filling the bottle with liquid ingredients first and then fresh/frozen ingredients (cut the ingredients into pieces no larger than 2 cm). Do not overfill the bottle.
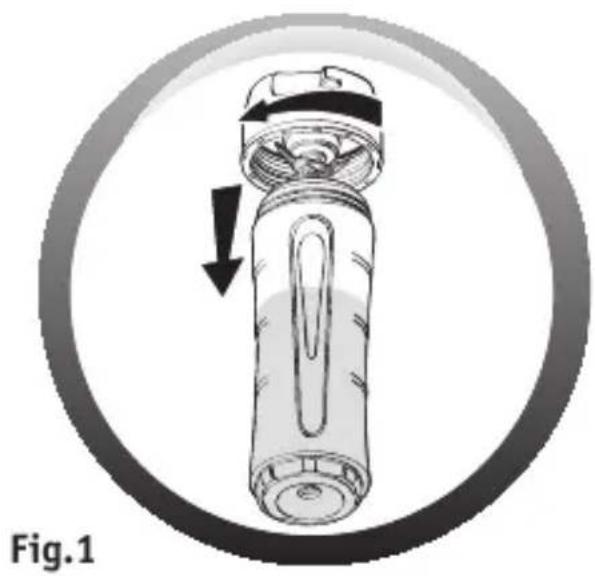
- Screw the blade unit with seal (B1+B2) securely on to the open end of the blender bottle (B3) Fig.1. Turn the bottle upside down so that the blade unit is at the bottom, then align the arrow on the exterior of the blade unit with the arrow on the edge of the motor unit Fig.2.
Mixing starts as soon as the blender bottle (B) is pressed down into the motor unit (A) Fig.3. Press down until mixing is complete. Mixing stops once the bottle is released. The maximum continuous operating time is 30 seconds, followed by a break of 10 minutes.
This appliance is not suitable for mixing potatoes, cream, egg whites, dough, etc.
The appliance must not be used with hot liquids, as the pressure at the base will be too great.
The appliance must not be used with ice cubes.
If the motor stops during use, unplug the appliance and remove the blender bottle (B) from the motor unit (A). Let the appliance rest for at least 10 minutes before starting it again.
Once you have finished mixing, turn the blender bottle upright so that the blade unit (B1) is at the top and then unscrew it from the blender bottle (B3) Fig.4. Then place the rubber seal in the lid, and screw on the lid (C1+C2) provided Fig.5. The blender bottle is ready to drink from or take with you.
CLEANING YOUR APPLIANCE
Unplug the appliance and remove the blender bottle (B).
Handle the blender unit with care because the blade is sharp.
Rinse the blender bottle (B3) and blade unit (B1+B2) immediately after use under running water and also the detachable parts in warm water and a little washing-up liquid.
For easier cleaning, the blade unit (B1) can be detached from the bottle (B3) by unscrewing.
The blender bottle (B3), blade unit (B1), without the seal (B2), and lid (C2) can be washed in the top basket of the dishwasher using the "ECO" or "LIGHT WASH" programme.
To clean the motor unit (A), use a damp cloth and dry it carefully.
Never immerse the motor unit (A) in water or any other liquid.
Cleaning the rubber seal:
When cleaning the blade unit, the rubber seal must be removed from the blade unit to remove any food residues.
- Unscrew the blade unit (B1) from the bottle (B3). (Note that the blades are very sharp.) Turn the blade unit (B1) upside down and press the plastic stick (D) provided into the small hole on the underside of the blade unit. Fig.6.
- The seal will then loosen from the top of the blade unit and can now be cleaned with water and a little washing up liquid.
- Clean the seal and blade unit carefully (the blade unit only, without the seal, is dishwasher safe) and replace the seal in the slot on the blade unit. Make sure that the seal forms a tight seal around the base of the blade unit by pressing it down with the blunt end of the plastic stick. There is a risk of leakage if the seal is not correctly replaced.
WHAT TO DO IF YOUR APPLIANCE DOES NOT WORK
| Problems Causes Solutions | ||
| The appliance does not work. | It is not plugged in. Plug the | appliance in using a plug with the same voltage. |
| The bottle (B) is not correctly assembled or positioned on the motor unit (A). | Check that the bottle is correctly assembled; dismantle and assemble again Fig.1 and Fig.2 and check that it is far down enough on the motor unit. | |
| Maintain pressure on the blender bottle assembly (B) during operation Fig.3. | ||
| Excessive vibration. | The appliance is not on a flat, stable surface. | Put the appliance on a flat stable surface. |
| Volume of ingredients is too high. | Reduce the quantity of ingredients processed. | |
| Error in assembling the accessories. | Check that the bottle (B3) is correctly assembled with the blade unit (B1+B2). | |
| Leak from the bottle | Incorrect positioning of the seal (B2) on the blade unit (B1). | Make sure that the seal is correctly positioned, the lips of the seal should be visible and it should not be buckled Handle the blade units (B1) with care because the blades are sharp. |
| The blade unit (B1 +B2) is insufficiently or incorrectly locked on the bottle (B3). | Make sure that the blade unit and the bottle are fitted together correctly. | |
| The blade does not rotate easily. | Pieces of food are too big or too hard. | Reduce the size or quantity of the ingredients processed. |
| Add liquid to the bottle without exceeding the maximum level. | ||
Is your appliance still not working?
Contact customer service (see contact details in the separate booklet).