VT-4209 BW - Multicooker Vitek - Free user manual and instructions
Find the device manual for free VT-4209 BW Vitek in PDF.


| Product Type | Multicooker |
| Brand | Vitek |
| Model | VT-4209 BW |
| Color | Black and White |
| Dimensions (L x W x H) | Approx. 30 cm x 30 cm x 30 cm |
| Weight | Approx. 5 kg |
| Power Supply | 220-240 V, 50/60 Hz |
| Power Consumption | 700 W |
| Capacity | 5 L |
| Main Functions | Cooking, Stewing, Steaming, Baking, Frying, Rice, Porridge, Soup, Slow Cook, Keep Warm, Timer |
| Control Type | Digital touch panel with LED display |
| Inner Pot Material | Non-stick coating with aluminum core |
| Lid Type | Hinged with steam vent and locking mechanism |
| Safety Features | Overheat protection, automatic shut-off, steam release valve |
| Cleaning and Maintenance | Removable non-stick pot, steam collector, and sealing ring; wipe body with damp cloth |
| Accessories Included | Measuring cup, rice paddle, soup ladle, steamer basket, power cord |
| Spare Parts Availability | Sealing rings, inner pots, steam valves available separately |
| Repairability | Replaceable main board and heating element; service centers available |
| General Information | Designed for multifunctional cooking with 12 automatic programs; suitable for soups, stews, rice, and desserts |
Frequently Asked Questions - VT-4209 BW Vitek
User questions about VT-4209 BW Vitek
0 question about this device. Answer the ones you know or ask your own.
Ask a new question about this device
Download the instructions for your Multicooker in PDF format for free! Find your manual VT-4209 BW - Vitek and take your electronic device back in hand. On this page are published all the documents necessary for the use of your device. VT-4209 BW by Vitek.
USER MANUAL VT-4209 BW Vitek
Multi-cooker bread-maker 5G
Universal multicooker with 83 cooking programs. Main cooking programs are multi-cook, bread maker, deep fryer, yogurt or cottage cheese making.
Description
-
Deep-fry basket
-
Bread baking form
-
Hook for removing the paddle (4)
-
Kneading paddle
-
Multicooker body
-
Display
-
Control panel
-
Lid opening button
-
Lid
-
Viewing window
-
Steam valve
-
Steam release openings
-
Drip container
-
Heating element
-
Temperature sensor
-
Power cord connector
-
Protection screen locks
-
Protection screen
-
Tongs for removing the bowl
-
Bowl
-
Bowl (20) lid
-
Bread maker measuring cup
-
Multicooker measuring cup
-
Measuring spoon
-
Soup ladle
-
Spatula
-
Power cord
-
Steam cooking basket
-
Mesh for draining off cottage cheese
Control panel
-
«Multicook» button
-
«MULTICOOKER» button
-
Selected setting increase button «+»
-
Selected setting decrease button «-»
-
«BREAD MAKER» button
-
«START/STOP» button
-
«MENU» button
-
«OK» button
Attention!
For additional protection it is reasonable to install a residual current device (RCD) with nominal operation current not exceeding 30 mA. To install the RCD contact a specialist.
SAFETY MEASURES
Before using the multicooker, read this instruction manual carefully and keep it for further reference.
Use the multicooker according to its intended purpose only, as it is stated in this instruction manual. Mishandling the unit can lead to its breakage and cause harm to the user or damage to his/her property.
- Before using the unit, examine the power cord and the power cord connector located on the unit body closely and make sure that they are not damaged. Do not use the unit if the power cord or power cord connector is damaged.
- Before switching the unit on make sure that your home mains voltage corresponds to the unit operating voltage.
- The power cord is equipped with a "europlug"; plug it into the socket with reliable grounding contact.
- Do not use adapters for plugging the unit in.
• Make sure that the power cord is properly inserted into the connector on the unit body and into the mains socket.
• Use only the supplied power cord, do not use power cords of other units.
- Use only the removable parts supplied with the unit.
- Place the unit on a flat heat-resistant surface away from moisture and heat sources and open flame.
- Do not use the unit outdoors.
- Place the unit with free access to the mains socket.
- Use the unit in places with proper ventilation.
- Do not expose the unit to direct sunlight.
- Do not place the unit close to walls and furniture. The gap between the multi-cooker body and the wall should be at least 20 cm and 30-40 cm above the multicooker.
- Provide that the power cord does not contact with hot surfaces and sharp furniture edges. Avoid damaging the isolation of the power cord.
- Do not touch the power cord or power plug with wet hands.
- Never pull the power cord, when disconnecting the unit from the mains, take the power plug and carefully pull it out of the socket.
- Do not immerse the unit, the power cord and power plug into water or other liquids.
- If the unit was dropped into water, unplug it immediately and only then you can take it out of the water. Apply to the authorized service center for the further use of the unit.
- Do not insert foreign objects into the steam release openings, and make sure that no foreign objects get between the lid and body of the multicooker.
- Do not leave the operating unit unattended, always switch it off and unplug the unit when you do not use it.
- To avoid burns do not bend over the steam release lid. Be very careful when opening the multicooker lid during and after the cooking. Danger of burns by hot steam!
- When the unit is operating in «Roasting» mode, do not bend over the multicooker bowl to avoid burns by splashing hot oil.
- Keep the steam valve clean; clean it when it gets dirty.
- Never use the unit without the installed bowl, protection screen and steam valve. Do not switch the multicooker on without products and sufficient amount of liquid or oil in the cooking bowl.
- Do not use the multicooker if the silicone gasket on the protection screen is damaged.
- Follow the recommendations for amount of dry products and liquids.
- Do not remove the bowl during operation.
- Do not place or keep foreign objects in the baking form or the bowl.
- Do not place the unit on other household equipment.
- Do not cover the multicooker during operation.
Attention! When steam cooking food, watch the level of liquid in the bowl, add water to the bowl as needed. Do not leave the unit unattended!
- Do not carry the unit during operation. Carry the multicooker having preliminary unplugged it, remove the bowl with products and wait till the multicooker cools down completely.
- The upper lid, the bowl and body parts heat up during the multicooker operation, do not touch them, if you need to take out the hot bowl, use the tongs for removing the bowl or potholders.
• During operation do not touch hot surfaces.
- Do not put your hands into the process chamber during operation.
- When taking baked bread out hold the handle of the baking form and use pot-holders or heatproof oven mittens.
- In order not to damage baking form non-stick coating do not use sharp or metal objects when taking bread out.
- In case of improper use of the unit (non-compliance to the requirements of this manual or in case of excessive cooking time), bread burning and smoke appearance is possible. In this case switch the unit off and unplug it. Before removing the baking form let the unit cool down completely.
- When using the multicooker in deep fry mode make sure that oil level in the bowl is not below the mark «1L» and not above the mark «2L».
• Maximal weight of the products should not exceed 700 g.
- When working with hot oil, use only heat-resistant kitchen tools with thermally insulated handles.
- Never pour out hot oil, let it cool off.
- If possible, put dry ingredients into the bowl, as getting even of a little moisture into hot oil leads to oil splashing.
- Do not overload the unit with food products. It may lead to their inflammation.
- In case of oil burning, unplug the unit and cover it with a thick, non-burning cloth if possible.
NEVER POUR WATER ON FIRE!
- Do not move the unit until the frying oil cools down completely.
- Clean the unit regularly.
- For children safety reasons do not leave polyethylene bags, used as a packaging, unattended.
Attention! Do not allow children to play with polyethylene bags or packaging film. Danger of suffocation!
- Do not allow children under 8 years of age to touch the unit body, the power cord or the power plug during operation of the unit.
- Do not leave children unattended. Do not allow children to use the unit as a toy.
- Close supervision is necessary when children under 8 years of age or disabled persons are near the operating unit.
• This unit is not intended for usage by children under 8 years of age.
- Children aged 8 years and over as well as disabled persons can use this unit only if they are under supervision of a person who is responsible for their safety and if they are given all the necessary and understandable instructions concerning the safe usage of the unit and information about danger that can be caused by its improper usage.
- Do not use the unit outdoors
• To avoid damages, transport the unit in original package only.
- Never pull the power cord, when disconnecting the unit from the mains, take the power plug and carefully remove it from the mains socket.
- Never use the unit if the power cord or the power plug is damaged, the unit works improperly or after it was dropped. Do not try to repair the unit by yourself. Contact an authorized service center for all repair issues.
- Keep the unit out of reach of children and disabled persons.
• Use the multicooker and its removable parts for the intended purposes only.
- Do not place the bowl (20) on heating units or cooking surfaces.
- Do not use other containers instead of the bowl (20) or the baking form (2).
• Always make sure that the heating element (14) surface and the bottom of the bowl (20) and the form (2) are clean and dry.
- In order not to damage baking form non-stick coating do not use sharp or metal objects when taking bread out.
- Do not chop products in the bowl (20) to avoid damage of the non-stick coating.
• Never leave or keep any foreign objects in the bowl (20) or in the baking form (2).
- Stir the products in the bowl (20) only with the soup ladle (25) or spatula (26). You can also use wooden, plastic or silicon kitchen accessories.
- Do not stir products in the bowl (20) with metal objects which can scratch the non-stick coating of the bowl (20).
ENGLISH
- It is recommended to wash the bowl (20) immediately after cooking dishes with spices and seasonings.
• To avoid damage of the non-stick coating do not put the bowl (20) and the baking form (2) into cold water right after cooking; let them cool down first. - Do not wash the bowl (20) and the baking form (2) in a dishwashing machine.
BEFORE THE FIRST USE
In case of unit transportation or storage at low temperature, do not switch it on, let it warm up to room temperature.
- Unpack the unit, remove all package materials and any stickers that can prevent multicooker operation.
- Place the multicooker on a flat, heat-resistant surface away from all heat sources (such as a gas cooker, electric cooker or cooking unit).
- Place the unit keeping at least a 20 cm gap between the unit body and the wall and a 30-40 cm gap above the unit.
- Do not place the unit close to the objects that can be damaged by the released steam of high temperature.
Attention! Do not place the unit near bath tubs, kitchen sinks or other containers filled with water.
- Open the lid (9) by pressing the button (8) and remove the bowl (20).
- Wash all removable parts and accessories in warm water with a neutral detergent: the deep fry basket (1), the baking form (2), the hook (3), the kneading paddle (4), the holder for removing the bowl (19), the bowl (20), measuring cups (22, 23), the measuring spoon (24), the soup ladle (25), the spatula (26) and the steam cooking basket (28), then rinse them under running water and dry.
- Clean the unit body (5) with a damp cloth, then wipe it dry.
- Remove the steam valve (11) and wash it with warm water and neutral detergent, dry it thoroughly and set back to its place.
- Remove the protection screen (18) by pressing and pulling the locks (17). Wash the protection screen (18) with warm water and neutral detergent, dry it and set back to its place: insert the bottom part of the protection screen (18) into the grooves on the lid (9), press on the upper part of the screen until the locks (17) click.
• The lid (9) cannot be closed if the protection screen is not installed to its place.
USAGE
Control panel
- Every pressing of the control panel buttons is accompanied by a sound signal.
- Triple sound signal indicates that you pressed the wrong button.
«MULTICOOKER» mode
Attention!
- Never leave the operating unit unattended.
- To avoid burns be very careful when opening the lid (9), do not bend over the steam release openings (12) during unit operation and do not place open parts of your body above the bowl (20) and the baking form (2)!
- During the first operation of the multicooker some foreign smell from the heating element can appear. It is normal.
-
Do not use metal objects that can scratch the non-stick coating of the form (2) and the bowl (20).
-
Open the multicooker lid (9) by pressing the button (8). Place the bowl (20) in the multicooker process chamber.
-
Load the products into the bowl (20) according to the recipe (see recipe book).
Note: - Make sure that the level of products and liquids in the bowl(20) does not exceed the level of maximal mark «10» and is not lower than the level of minimal mark «2». - Maximal level mark for porridges (except rice) is «8».
General example of loading products and water (as example rice is considered)
- Measure rice with the measuring cup (23) (one measuring cup is equal to approximately 160 g of rice), wash it and place in the bowl (20).
- Water level required for certain amount of rice (measured in cups «CUP») is given in the scale inside the bowl (20).
- Pour water up to the corresponding mark.
Example: - After putting four measuring cups of rice, pour water till the mark «4CUP».
- For thin milk porridges the recommended proportion of rice and water is 1:3.
- Place the bowl (20) in the process chamber. Make sure that the outer surface of the bowl is clean and dry, and the bowl itself is placed evenly and is in secure contact with heating element (14) surface.
Note:
- do not use the bowl (20) for washing cereals and do not chop products in it, this can damage the non-stick coating.
- make sure that there are no foreign objects, dirt or moisture in the process chamber and on the bottom of the bowl (20).
- wipe the outer surface and the bottom of the bowl (20) dry before use.
- In the middle of the heating element (14) there is a temperature sensor (15). Make sure that the movement of the sensor is not limited.
- If you steam products, pour water into the bowl (20) so that boiling water doesn't reach the bottom of the basket (28). Put the food into the basket (28) and place it on the bowl (20).
- Close the lid (9) until click.
- Insert the power cord jack into the connector (16) and the power cord plug into the socket. There will be a sound signal, the display (6) will show the symbols «00:00».
- Press the button (31) «MULTICOOKER», the flashing «Soup» program symbol and the time symbols «0:30» will appear on the display.
- Select the cooking program by pressing consequently the button (36) «MENU». The corresponding program symbol will be flashing, the operation time set by default also will be shown on the display (see «Cooking programs» table).
- Confirm the program selection pressing the button (37) «OK».
Note: In «Boiling », «Roasting » Stewing » and «Deep fryer » cooking modes, press the «MENU» button (36) consequently to select one of the products: vegetables « 🍼️, fish « 🍼️», meat « 🍼️ » or chicken « 🍼️ ». Confirm your choice with the «OK» button (37).
- After selecting the cooking program or product intended for cooking the flashing operation time symbols will appear on the display (6), the operation time of the program is set by default (see the «Cooking programs» table).
- If necessary, you can change the cooking program operation time by pressing the buttons (32) «+» and (33) «-», confirm the cooking time by pressing the button (37) «OK», the time indications will light constantly on the display (6).
Note: - Setting of cooking time is not available for the «Rice» program. Skip steps 10-14. - Set the delayed start function, if necessary. To do this use the buttons (32) «+» and (33) «-» to set the cooking end time (from 30 minutes to 24 hours). If you want to start cooking immediately, skip this step.
Note: - The delayed start function is not available for «Roasting» and «Deep Fryer» programs. - In order to start the cooking program press the button (35) «START/STOP». The remaining cooking time will be shown on the display (6) (except for «Rice» program) and the dots will blink.
- If you activated the delayed start function, the delayed start symbol ▲» will appear on the display (6), after switching the unit to cooking mode the symbol « ▲ » will go out.
Note:
- To pause the cooking program press the button (35) «START/STOP», the symbol « ⭕ » will appear on the display (6), and the cooking time indications will be flashing.
- To resume the cooking program press the button (35) «START/STOP» again, the symbol « Ⓞ » on the display (6) will go out, and the dots will blink.
- In order to stop the cooking program press and hold the button (35) «START/STOP» for 3 seconds.
- When the cooking program is over, you will hear 4 sound signals, and the multicooker will be automatically switched to the keep warm mode, the symbol and operation time in keep warm mode will be shown on the display (6).
Note:
- This function is not available in «Cottage Cheese», «Boiling», «Roasting» and «Deep Fryer» programs.
- Keep warm mode duration for "Pizza" program is 1 hour.
- When the keep warm time is over, you will hear 4 sound signals and the symbol will appear on the display (6).
Note:
- Despite the unit keeps the ready dish warm for 24 hours, it is not recommended to leave the cooked food in the bowl for a long time, because this may spoil the food.
- Press and hold the button (35) «START/STOP» for 3 seconds to cancel the keep warm mode.
- Do not use the keep warm function for heating up the products.
- Watch the food during cooking, if necessary, stir the products with a plastic soup ladle (25) or spatula (26).
- Unplug the unit and disconnect the power cord from the connector (16) on the multicooker body (5).
- Open the lid (9) by pressing the button (8).
- Remove the bowl (20) using the tongs (19) or potholders.
- Let the unit cool down and clean it.
COOKING PROGRAMS AND THEIR DURATION
| Program | Duration (in hours) | Default time (hours) | Delayed start (maximal time) | Temperature maintaining |
| Soup | 0:05 – 2:00 | 0:30 | 24.:00 | 24.:00 |
| Rice | - | - | 24.:00 | 24.:00 |
| Porridge | 0:05 – 2:00 | 0:20 | 24.:00 | 24.:00 |
| Pilaw | 0:05 – 2:00 | 0:30 | 24:00 | 24:00 |
| Pizza | 0:05 – 2:00 | 0:30 | 24:00 | 1:00 |
ENGLISH
| Cottage cheese | 4:00 – 6:00 4:00 24:00 Not available | |||
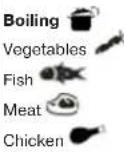 | 0:05 – 2:00 0:20 | 24:00 Not available | ||
| 0:05 – 2:00 0:25 | ||||
| 0:05 – 2:00 0:30 | ||||
| 0:05 – 2:00 0:25 | ||||
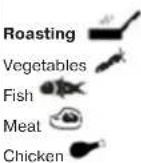 | 0:05 – 1:00 | 0:20 | Not available Not available | |
| 0:25 | ||||
| 0:30 | ||||
| 0:25 | ||||
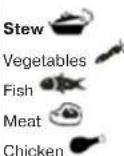 | 0:10 – 4:00 | 0:20 | 24:00 24:00 | |
| 0:30 | ||||
| 0:40 | ||||
| 0:30 | ||||
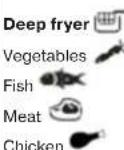 | 0:05 – 1:00 | 0:20 | Not available Not available | |
| 0:15 | ||||
| 0:20 | ||||
| 0:25 |
Note:
- Watch the cooking process and switch the multicooker off when the food is ready. Do not leave the unit unattended.
- For steam cooking use the «Boiling» program.
- In the «Roasting» program the unit operates similarly to a kitchen stove, watch the cooking process.
- Close the lid while the multicooker is operation in «Pizza» program.
- See recipes of dishes in the recipe book (supplied with the unit). All recipes are non-regulatory as the required amount and proportions of the ingredients may vary depending on local peculiarities of the food and altitude above sea level.
«COTTAGE CHEESE» cooking programs
Cookware
All the cookware used for cottage cheese making should be sterile. Scald all the cookware which comes in contact with food.
Wipe the outer surface and the bottom of the bowl (20) dry before use.
Cooking duration
Average cottage cheese preparation time is from 4 to 6 hours.
Extremely low temperature in the room or low temperature of the kefir used for making cottage cheese can increase the preparation time.
Storage life
Storage life of ready fermented milk products depends on the raw products quality, fermentation conditions (quality of milk, cleanness of the cookware used etc.) and storage conditions.
Average storage life of the prepared cottage cheese is no longer than 7 days. Place the bowl (20) in the multicooker process chamber.
- Open the multicooker lid (9) by pressing the button (8). Place the bowl (20) in the multicooker process chamber.
- Pour the required amount of kefir (or natural yogurt free of additives) in the bowl (20).
- Close the lid (9) and set the cooking time for «COTTAGE CHEESE» program 6 hours (see «Multicooker» mode).
- Do not move the unit and do not stir the food during cooking.
- After the cooking ends unplug the unit and disconnect the power cord from the connector (16) on the multicooker body (5).
- Open the lid (9), remove the bowl (20) from the process chamber using the longs (19).
- Pour the content of the bowl (20) into the mesh for cottage cheese (29) and hang it above the kitchen sink or the container for quark whey.
- When the quark whey drains away (approximately after 3-4 hours), remove the prepared cottage cheese from the mesh (29).
-
Open the lid (9) by pressing the button (8) and place the bowl (20) into the process chamber.
-
Pour vegetable oil into the bowl (20). Oil level must not be below the mark «1L» and above the mark «2L».
- Close the lid (9).
- Select «DEEP FRYER» program and select the type of product you will cook (see "Multicooker mode").
- After finishing the program setting, press the button (37) «OK» and then the button (35) «START/STOP». The unit will be switched to the oil heating mode, the flashing symbol 📋 will appear on the display.
- Once the oil reaches the required temperature, there will be 5 sound signals and the symbol 📋 will go out. The unit is ready for use.
- Grip the handle of basket (1) and install it into the holders on the basket (1).
- Put the necessary quantity of products into the basket (1) not exceeding 400 g, the products should be dry, if the products are frozen, then try to shake off as much ice from them as possible.
- Carefully open the lid (9).
- To avoid getting of burns by splattering hot oil, put on potholders, take the basket (1) by the handle and carefully immerse the basket (1) into the bowl (20).
- Grip the handle of the basket (1) and disconnect it from the basket.
- Close the lid (9) tightly.
- Press the «START/STOP» button (35), you'll hear a sound signal and the unit will continue operation.
- When the products are ready, open the lid (9).
- Put on the potholders, grip the handle of the basket (1) and install it into the holders on the basket (1).
- Hold the basket (1) by the handle, drain the oil and put the ready products into the corresponding cookware.
- Before cooking the next portion of products, let the unit heat up (the indicator is off).
- After finishing cooking products, unplug the unit and disconnect the power cord from the connector (16) on the multicooker body (5).
- Open the lid (9) and let the unit cool down.
- Remove the bowl (20) with the tongs (19), pour out the oil from the bowl and clean the bowl.
Note:
- Watch the food during cooking through the viewing window (10) or slightly opened lid (9). Be careful not to get burned by hot steam or splashing oil.
- To avoid getting of burns by hot steam do not bend over the unit and don't place your hands above the bowl (20) or steam release openings (12) in the steam valve (11).
TIPS
Oil
Use high quality refined vegetable oil (for instance, sunflower seed or corn oil).
- Pour oil into the bowl (20) before switching the unit on.
- Filter oil after each usage.
Perform filtration of oil in the following way:
• After cooking products unplug the unit and let the oil cool down completely.
ENGLISH
- Put filter paper or a thin cotton cloth into a metal sieve or a strainer and filter the oil.
- Do not mix up different types of oil.
- At long intervals between cooking of product portions, switch the deep fryer off.
- It is better to fry products with high content of water (for instance, potatoes) in small intervals; take the basket out and shake the content of the basket periodically.
- After frying of a food portion, remove the remaining products from the oil immediately, this way you can prolong the oil life.
- Regularly change oil (approximately after 8-12 uses).
- Oil should be changed if it starts bubbling while heating, if it has unpleasant taste or odor, as well as if it darkened or became dense.
- If you use the «Deep fryer» program seldom, store oil or fat in closed plastic or glass containers in a cool place (preferably in a fridge).
- Do not store the oil in the bowl (20).
Cooking recommendations
- When frying several types of products, put products requiring lower processing temperature first.
- As a rule, heat treated products require higher frying temperature and less cooking time than raw products.
«MULTICOOK» mode
The «MULTICOOK» mode supports 45 programs with user settings. Due to this mode you can set the cooking temperature and duration and heating type: lower heating element or «convection» (simultaneous operation of lower and side heating elements).
User program is divided into 4 steps, each of them may take up to 4 hours (240 minutes). Set the heating temperature for every cooking step. Lower heating element temperature (marked with the symbol «d») is set within the range from 40° to 180°C, for convection mode (symbol «c») select the temperature within the range from 70° to 160°C.
- Open the lid (9) by pressing the button (8) and place the bowl (20) into the process chamber.
- Put the food into the bowl (20) following the recommendations given in the recipe (see the recipe book).
Note: Make sure that the products and liquids level does not exceed the level of maximal mark «10» and is not lower than the level of minimal mark «2». Maximal level mark for porridges (except rice) is «8»
- Place the bowl (20) in the process chamber. Make sure that the outer surface of the bowl is clean and dry, and the bowl itself is placed evenly and is in secure contact with heating element (14) surface.
- If you steam products, pour water into the bowl (20) so that boiling water doesn't reach the bottom of the basket (28). Put the food into the basket (28) and place it on the bowl (20).
- Close the lid (9).
- Insert the power cord jack into the connector (16) and the power cord plug into the socket. There will be a sound signal, the display (6) will show the symbols «00:00».
User program settings
- Press the button (30) «MULTICOOK», the symbol 📋 and the first user program indication «P01» will appear on the display and then the user program settings data will be shown: 4 cooking steps will be shown on the display (6) - d1, d2, d3, d4 and c1, c2, c3, c4 («d» is the lower heating element, «c» is the convection), 100° is the temperature on the corresponding cooking step, 0:00 is the step duration.
- Consequently pressing the button (36) «MENU» select the number of the user program («P01», «P02» ... «P45») which you want to set.
- To set the user program press and hold during 3 seconds the button (30) «MULTICOOK». The first cooking step symbol «d1» will appear on the display (6).
- You can select the heating type («d» - lower heating element or «c» - «convection»).
- To switch to «convection» mode settings press the button (34) «BREAD MAKER», the symbol «c» will appear on the display (6).
- To switch to lower heating element settings press the button (31)
«MULTICOOKER», the symbol «d» will be shown on the display (6). -
Press the button (36) «MENU» the symbol and the set temperature for this cooking step will be shown on the display (6).
-
Use the buttons (32) «+» and (33) «-» to set the required heating temperature.
-
Press the button (36) «MENU», the symbol 📋 and the preset cooking duration will be shown on the display.
-
Set the cooking step duration with the buttons (32) «+» and (33) «-».
-
Press the button (36) «MENU», the next cooking step symbol will appear on the display.
-
Repeat the user program setting steps for other operation steps.
-
To save the settings press and hold during 3 seconds the button (37) «OK».
Note: If you don't want to save the program settings, press the (37) «OK» without holding it.
- To start cooking press the button (35) «START/STOP», the cooking time will be shown on the display (6) and the dots will blink.
- After the first cooking step is finished, you will hear sound signals and the next cooking step will switch on automatically.
- When the user program is finished, the multicooker will be switched off, you will hear sound signals and the symbol « ⬙» will appear on the display; switch the multicooker off, unplug it and disconnect the power cord from the connector (16) on the multicooker body (5).
- Open the lid (9) and let the unit cool down.
- Remove the bowl (20) using the tongs (19) and clean the unit.
Note:
- If you selected the user program which was not preliminary set, the symbol « » will appear on the display, and you will hear repeating sound signals. Press and hold the button (35) «START/STOP» for 3 seconds and then set the selected program (see chapter «User program settings»).
- To pause the user program press the button (35) START/STOP, the symbol “ ⭕” will appear on the display and the time indications will be flashing.
- To resume the user program press the button (35) START/STOP again, the symbol « Ⓞ» on the display (6) will go out and the dots will blink.
- To switch the user program off press and hold the button (35) «START/STOP» for 3 seconds.
"BREAR-MAKER" mode
Programs
1. Bread (basic mode)
It includes all the three stages of bread making: dough kneading, dough rising and baking.
2. Rye
Bake healthful bread of rye flour.
3. Baguette (French bread)
Bread making takes more time, the bread has large porous crumb and crispy crust.
4. Pie
This program allows using the unit as an ordinary electric oven. Use it for baking from ready-made dough or for baked bread additional browning.
5. Dough 1 (dough kneading)
Use this program to knead dough for home-baked pastry (pies, pizza, etc.).
6. Gluten free
Gluten or fibrin is the albumen found in the seeds of Gramineae plants (wheat, rye and oats are especially rich in it) and determining such characteristics of dough as elasticity and springiness. With the help of digestive enzyme most people including children successfully break up gluten that serves as a good source of albumen. But there is a group of people with genetic predisposition for gluten provoking coeliacia, quite a rare disease. When suffering from this disease it is necessary to eliminate gluten-containing foods from the diet. You can bake gluten-free dietarybread in our bread maker (usually of rice, corn, buckwheat flour or special baking mixes).
7. Wholegrain
Bake healthful bread of fine or crude flour. It is not recommended to use the delay function when making this bread as that may cause undesirable effects.
8. Jam
Use this program for homemade jam. Chop the fruit for jam beforehand.
9. Yogurt
Make the tastiest natural yogurt of milk and leaven. Use yogurt or prebiotics as a leaven. See the details in the "Recipe book".
10. Dough 2 (dough for paste)
Make dough for homemade pasta; add tomato paste or herbs in order to give dough additional color and aroma.
BAKING PROGRAMS DURATION
| Mode | Crust color | Weight, g | Cooking time, h | Ingredients adding time, h | Keep warm mode, h | Delayed start mode, h |
| Bread | Light | 500 | 3:05 | 2:09 | 1:00 | 15:00 |
| 750 | 3:10 | 2:14 | 1:00 | 15:00 | ||
| 1000 | 3:15 | 2:19 | 1:00 | 15:00 | ||
| Medium | 500 | 3:10 | 2:14 | 1:00 | 15:00 | |
| 750 | 3:15 | 2:19 | 1:00 | 15:00 | ||
| 1000 | 3:20 | 2:24 | 1:00 | 15:00 | ||
| Dark | 500 | 3:20 | 2:24 | 1:00 | 15:00 | |
| 750 | 3:25 | 2:29 | 1:00 | 15:00 | ||
| 1000 | 3:30 | 2:34 | 1:00 | 15:00 |
ENGLISH
| Rye | Light | 500 3:30 2 | 49 1:00 15:00 | |||
| 750 3:35 2 | 54 1:00 15:00 | |||||
| 1000 3:40 | 2:59 1:00 15:00 | |||||
| Medium | 500 3:35 2 | 54 1:00 15:00 | ||||
| 750 3:40 2 | 59 1:00 15:00 | |||||
| 1000 3:45 | 3:04 1:00 15:00 | |||||
| Dark | 500 3:45 3 | 04 1:00 15:00 | ||||
| 750 3:50 3 | 09 1:00 15:00 | |||||
| 1000 3:55 | 3:14 1:00 15:00 | |||||
| Baguette | Light | 500 4:00 - | 1:00 15:00 | |||
| 750 4:05 - | 1:00 15:00 | |||||
| 1000 4:10 | - 1:00 15:00 | |||||
| Medium | 500 4:05 - | 1:00 15:00 | ||||
| 750 4:10 - | 1:00 15:00 | |||||
| 1000 4:15 | - 1:00 15:00 | |||||
| Dark | 500 4:15 - | 1:00 15:00 | ||||
| 750 4:20 - | 1:00 15:00 | |||||
| 1000 4:25 | - 1:00 15:00 | |||||
| Pie | -- 0:30 - 1:00 0 | 10-1:00 | ||||
| Dough 1 | -- 1:30 1:14 - 1 | 5:00 | ||||
| Gluten free | -- 2:35 2:14 1:00 - | |||||
| Wholegrain | Light | 500 3:45 2 | 39 1:00 15:00 | |||
| 750 3:50 2 | 44 1:00 15:00 | |||||
| 1000 3:55 | 2:49 1:00 15:00 | |||||
| Medium | 500 3:50 2 | 44 1:00 15:00 | ||||
| 750 3:55 2 | 49 1:00 15:00 | |||||
| 1000 4:00 | 2:54 1:00 15:00 | |||||
| Dark | 500 4:00 2 | 54 1:00 15:00 | ||||
| 750 4:05 2 | 59 1:00 15:00 | |||||
| 1000 4:10 | 3:04 1:00 15:00 | |||||
| Jam | -- 1:00 - 20 - | |||||
| Yogurt | -- 6:00 -- 4:00 | -12:00 | ||||
| Dough 2 | -- 0:14 -- - | |||||
COOKING STAGES
| Stage number | Display symbol | Description |
| 1 | Preheating. | |
| 2 | Kneading | |
| 3 | Pause during which gluten bonds are formed in the dough-like mass. | |
| 4 | Repeat kneading | |
| 5 | Dough proofing lets you make bread with fine, thin-walled and homogeneously porous crumb. | |
| 6 | Baking Do not open the lid during the bread temperature processing as deflated dough will not rise. | |
| 7 | Keep warm Mode is not available for all baking programs |
User mode for bread-maker
This program allows the user to set the duration of all baking stages independently (preheating, kneading, proofing, etc.) and to set the temperature in the process chamber of the unit during baking.
Temperature in the process chamber during dough proofing can be regulated within the range from 20° to 50°C, and during baking - within the range from 70° to 160°C.
USER MODE FOR BREAD-MAKER STAGES
| Display symbol | Name | Available settings |
| Preheating. | 0-60 minutes. | |
| Dough kneading | 0-10 minutes. | |
| Proofing | 0-30 minutes. | |
| Dough kneading | 0-30 minutes. | |
| Proofing | 0-240 minutes. | |
| Baking | 0-240 minutes. | |
| Reheat | 0-60 minutes. |
USING OF MULTI-COOKER BREAD-MAKER
Install kneading paddle (4) on the axis into the baking form (2).
Note: - Before installing the paddle (4) on the axis, lubricate the axis with a few drops of vegetable oil, this will facilitate the removal of the paddle (4) from the cooked bread.
- Put the ingredients into the baking form (2) in the sequence described in the recipe. Usually the ingredients are added in the following order:
- liquids,
- dry ingredients (sugar, salt, flour),
- yeast and leaven.
ENGLISH
Note: - Yeast should not come in contact with the liquids or salt before the dough kneading. Make a cavity in the flour with your finger and put the yeast there.
- Wipe the crumbled ingredients or spilled liquids from the form (2) surface.
- Open the lid (9) by pressing the button (8), if the bowl (20) is placed in the process chamber, then remove it.
- Take the form (2) by the handle, put it into the process chamber and turn it clockwise until bumping.
Note: - In the heating element (14) there is temperature sensor (15). Make sure that the movement of the sensor is not limited.
- Close the lid (9).
- Insert the power cord jack into the connector (16) and the power cord plug into the mains socket. At that, there will be a sound signal, the display (6) will show symbols: «00:00».
- Press the button (34) «BREAD-MAKER», the flashing indicator of the «Bread» baking program will appear on the display.
- Select the necessary program by consequently pressing the button (36) «MENU». The symbol of the appropriate program will flash, and the display will show the duration of the program, set by default (see the table “Baking programs duration”).
- Confirm the selection of the program, by pressing the button (37) "OK", the symbol of the program will remain lit.
- Select the type of crust (light «Q», medium «» or dark «») by repeatedly pressing the "MENU" button (36), the symbol of the corresponding crust type will flash.
- Press the button (37) "OK", the weight of the product will remain lit.
- Select the type of crust (light, medium or dark) by repeatedly pressing the button (36) "MENU", the symbol of the appropriate crust type will flash.
- Press the button (37) "OK", the symbol of the crust type will remain lit.
- Set the delayed start function. For this purpose use the buttons (32) «+» and (33) «-» to set the required time, after which cooking will be over. If you want to start cooking immediately, skip this step.
Note: - Delayed start function is not available for the programs "Gluten free", "Jam" and "Dough 2".
- Press button (35) "START / STOP" to switch the cooking program on. The display will show the remaining cooking time and the symbol of the current cooking stage (see «Cooking stages»).
No
- If you have activated the delayed start function, the display will also show the symbol ☑, when the unit starts cooking, the symbol ☑ will go out.
- If the baking form (2) is set incorrectly, you will hear the successive sound signals and the display will show the symbols «Err». Switch the unit off by pressing and holding the button (35) "Start / Stop", open the lid and fix the baking form (2) by turning it clockwise until it is fixed.
- To switch the baking program off, press and hold the button (35) "START / STOP" and hold it for 3 seconds.
- In some baking programs (see table), you can add additional ingredients (nuts, dried fruits, etc.). During baking program operation, you will hear a sound signal, open the lid (9), add the required ingredients, and then close the lid, baking program will continue to operate.
- Four sound signals will indicate the completion of the baking program. The unit will be switched automatically to the keep warm mode, the symbol ⏻ will appear on the display and the display will show the time of unit operation in the keep warm mode.
Note: - Keep warm function is not available for programs «Dough 1», «Dough 2» and «Yogurt».
- When the keep warm mode is completed, you will hear 4 sound signals, the display will show symbol Ⓞ.
No
- Despite the unit keeps the ready dish warm for one hour, it is not recommended to leave the cooked food in the baking form (2) for a long time, because this may cause bread burning.
- To cancel the keep warm mode, press and hold the button (35) "START/STOP" for 3 seconds.
- Do not use the keep warm function for heating up food.
- At the end of the baking program, unplug the power cord from the mains socket and disconnect the power cord from the connector (16), located on the multi-cooker body (5).
- Open the lid (9) by pressing the button (8).
- Put on thermal protective potholders, take the form (2) by the handle, turn it counter-clockwise and remove it.
- Let the form cool down for 10 minutes.
- Separate the pastry from the form (2) walls and bottom using a spatula with non-stick coating.
- In order to remove the bread baked turn the form (2) upside down and shake it carefully.
- Remove the paddle (4) out of the bread with the hook (3) and let it cool down for 10 minutes.
- Cut the bread with a sharp bread knife.
User mode for bread-maker settings
-
Press the button (34) «BREAD-MAKER», the display will show the flashing indicator «Bread».
-
Press the button (34) «BREAD-MAKER» once again, the display will show the symbol of the first usee program «bp1».
-
By pressing the button (36) «MENU» consequently, select the program number («bp1», «bp2»... «bp5»).
-
To switch to settings of the selected program, press and hold for 3 seconds the button (34) «BREAD-MAKER», the display will show the symbol 🎨 (preheating) and the time of this stage.
-
Use the buttons (32) «+» and (33) «-» to set the preheating time.
-
Press the button (36) "MENU", the display will show the graphic symbol and the length of the next baking stage (see "User mode stages").
-
Repeat the steps 4-5 for the remaining baking stages (except keep warm stage).
-
Adjusting the duration of the baking stages, adjust the temperature inside the process chamber during proofing (the display will show the symbol ⏻ and the temperature (*)).
-
Use the buttons (32) «+» and (33) «-» to set heating temperature, press the button (36) "MENU".
-
Use the buttons (32) «+» and (33) «-» to set heating temperature during baking (symbol □).
-
Save the settings of the program, by pressing and holding for 3 seconds the button (37) "OK."
Note: If you do not want to save the program settings, press the button (37) "OK" without holding.
- Press button (35) «START/STOP» to switch baking on.
Note: - To switch the program on with preset settings, follow the steps described in paragraphs 1-3 and 12.
IMPORTANT RECOMMENDATIONS
Ingredients
Flour
The characteristics of flour are determined not only by the sort but also by the conditions of grain cultivation, processing method and storage. Try to bake bread using flour of different manufacturers and grades and find the one corresponding to your needs. The basic types of bread flour are wheat and rye flour. Wheat flour is used more widely, it is because bread of wheat flour has a pleasant taste and has high nutritional value.
Bread flour
Bread (refined) flour made of inner part of grain only, contains the maximal gluten quantity that provides the crumb elasticity and prevents bread dropping. Pastry made of bread flour is more puffy.
Whole-grain flour (wholemeal)
Whole-grain (wholemeal) flour is obtained by grinding whole wheat grains together with the membrane. This sort of flour is distinguished for its enhanced nutrition value. Whole-grain bread is usually smaller in size. In order to improve the consumer properties of bread whole-grain flour is often mixed with bread flour.
Corn and oatmeal flour
In order to improve the bread texture and additional flavor properties mix wheat or rye flour with corn or oatmeal one.
Sugar
Sugar enriches the pastry in additional flavors and gives bread golden color. Sugar is a nutritional medium for yeast growth. Add to pastry not only refined but brown sugar and sugar powder as well.
Yeast
Yeast growth is accompanied by emission of carbon dioxide, that contributes to the formation of porous crumb. Flour and sugar are a nutritional medium for yeast growth. Add fresh compressed yeast or fast-acting yeast powder. Dissolve fresh compressed yeast in warm liquid (water, milk, etc.), and add fast-acting yeast to the flour (it does not require preliminary activation, i.e. adding of water). Follow the recommendations on the packing or observe the following proportions:
1 tea spoon of fast-acting yeast powder is equal to 1,5 of tea spoon of fresh compressed yeast.
Store yeast in a refrigerator. Yeast is destructed at high temperatures, and the dough rises poorly.
Salt
Salt gives bread additional flavor and color, but slows down the yeast growth. Do not use excessive quantities of salt. Always use fine salt (coarse one can damage the form's non-stick coating).
Eggs
Eggs improve the structure and volume of the pastry, give additional flavor. Eggs should be whipped carefully before adding to the dough.
Animal and vegetable fats
Animal and vegetable fats make the pastry softer and increase its storage life. Cut butter into small cubes or let it melt a little before adding it.
Baking powder and soda
Soda and baking powder (leaven) shorten the time necessary for dough rising. It is necessary to mix soda with citric acid and a little flour beforehand (5 g of baking soda, 3 g of citric acid and 12 g of flour). This amount of the powder (20 g) is rated for 500 g of flour. Do not use vinegar for soda slaking, it will make the crumb less homogeneous and damper. Baking powder (leaven) is just to be poured into the form following recipe instructions.
Water
Water temperature plays the crucial role in bread making process. Optimal water temperature is 20-25°C, you may as well use milk instead of water or enrich bread flavor by using some natural juice.
Dairy foods
Diary foods improve the nutrition value and flavor of the bread. The crumb becomes more beautiful and savoury. Use fresh diary foods or powdered milk.
Fruit and berries
Use only fresh and quality fruit and berries for jam making.
DOSAGE
The secret of good bread lies not only in the quality of ingredients but also in precise abidance to their proportions.
- Use a kitchen scale or the measuring cup (22) and spoon (24), included in the delivery set.
- Fill the measuring cup (22) with liquid to the appropriate mark. Check dosage, placing the cup (22) on a flat surface.
– Clean the cup (22) carefully before measuring another type of liquid.
ENGLISH
- Do not compact dry ingredients when putting them into the measuring cup (22).
- It is important to screen the flour before measuring in order to saturate it with air, this provides the best baking quality. The heap should be removed with a knife.
INGREDIENTS LOADING
- The following order of ingredients loading is recommended (unless otherwise is specified in the recipe): liquids (water, milk, oil, whipped eggs, etc.). are poured on the bottom of the baking form (2), dry ingredients are fed afterwards, yeast powder is added last.
- See that flour does not become completely wet, put yeast in dry flour only. Yeast should not come in contact with salt before kneading as salt reduces yeast capacity.
- When using the delay function do not put perishable foods – for example, eggs, fruit, milk – into the form (2).
Attention!
All recipes are non-regulatory as the required amount and proportions of the ingredients may vary depending on local peculiarities of the food and altitude above sea level.
PROBLEMS DURING BREAD BAKING
| The dough rises too quickly Excessive quantity of yeast | , flour or insufficient quantity of salt |
| The bread won't rise | Not enough yeast |
| Old or inactive yeast | |
| Yeast came in contact with liquid ingredients or salt before kneading | |
| Wrong selection of flour sort, or flour is of poor quality | |
| Not enough sugar | |
| Soft water leads to more active yeast growth | |
| Intensive dough rising, dough gets out of the baking form | Excessive quantity of yeast or flour |
| Excessive quantity of dough | |
| Bread dropped in the middle | Yeast growth is poor because of high temperature the liquid or its excessive quantity |
| Excessive quantity of flour or lack of liquid | |
| Dense crumb, clumps | Not enough yeast and sugar |
| Excessive quantity of fruit, whole grains, etc. | |
| Flour of poor quality | |
| Excessive liquid temperature leads to quick yeast growth and early dough dropping | |
| No salt or not enough sugar | |
| Lack of flour | |
| Bread is slack-baked in the middle | Using much liquid and liquid ingredients (for example, yoghurt) |
| Excessive quantity of liquid ingredients | |
| Coarse crumb | No salt |
| Water is too hot | |
| Excessive quantity of dough | |
| Bread surface is slack-baked | Excessive quantity of flour (especially when you are making wheat bread) |
| Excessive quantity of yeast or lack of salt | |
| Excessive quantity of sugar | |
| Other sweet ingredients besides sugar are used | |
| Crumb of cut bread pieces is grainy and non-uniform | You have not cooled the bread down before cutting (excessive moisture did not have time to evaporate) |
ADDITIONAL FUNCTIONS
Memory
- In case of emergency power cutoff during the operation process the memory function with the duration of up to 7 minutes is activated.
- If the power supply is restored within 7 minutes unit will continue to perform the pre-set program from the moment it has been stopped at.
- If there is no power for more than 7 minutes it is necessary to load the ingredients again and program the unit.
CLEANING AND CARE
- At the end of operation, switch the unit off, unplug the power cord from the mains socket and disconnect the power cord from the connector (16), located on the multi-cooker body (5).
- Wait till the unit cools down.
- Clean the unit body (5) and lid (9) with a slightly damp cloth, and then wipe dry.
- Wash all removable parts with warm water and a neutral detergent.
Note: - If the paddle (4) can not be removed from the axle, fill the form (2) with warm water and wait for about 30 minutes. - Dry removable parts thoroughly, after that you can install them in the process chamber.
- Do not immerse the unit body, power cord and cord plug into water and other liquids.
STORAGE
- Before storage clean the bread maker and wait till it is completely dry.
- Keep the unit in a dry cool place out of reach of children and disabled persons.
TROUBLESHOOTING
| PROBLEM CAUSE SOLUTION | ||
| Symbols «E01» appeared on the display, accompanied by repeated sound signals | The unit has not cooled down after the previous baking cycle | Unplug the unit, take the form out, let the unit cool down at room temperature |
| Symbols «Err» on the display, accompanied by repeated sound signals | Improper placement of the baking form (2) | Switch the unit off, open the lid, place the baking form and turn it clockwise until it is fixed. |
ENGLISH
| Symbols «EEE» on the display, accompanied by repeated sound signals | Temperature sensor breaking | Switch the unit off and contact the authorized service center |
| Symbols «HHH» on the display, accompanied by repeated sound signals | Temperature sensor is not working because of short circuit | Switch the unit off and contact the authorized service center |
| Smoke from the ventilation openings Ingredients | got onto the heating element | Switch the unit off by unplugging the power cord from the mains socket. Take the form out, let the unit cool down. Wipe the walls of the process chamber and the heating element with a wet cloth. |
| The baked bread dropped, the bottom part of the bread is damp | The bread has stayed in the bread maker for too long after baking | When making bread according to this recipe switch the unit off right after the bread is ready |
| The bread has stuck to the walls of the baking form | The bottom part of the bread has stuck to the kneading paddle | Grease the paddles with oil before assembly |
| The bread structure is not homogeneous or the bread went wrong | Wrong mode is selected | View the available baking programs, select another program by pressing the «MENU» button repeatedly |
| Frequent opening of the lid during the operation process | Open the lid only upon the request of the program in order to add supplementary ingredients. | |
| A long power cutoff during the operation process | Load all necessary ingredients again and start the baking process from the very beginning | |
| The paddles movement is blocked | Take the form out and check if the drive is rotating. In case of any defect contact the authorized service center |
Delivery set
Multi-cooker bread-maker - 1 pc.
Deep-fry basket - 1 pc.
Baking form - 1 pc.
Hook for removing the paddle - 1 pc.
Kneading paddle - 1 pc.
Tongs for the bowl - 1 pc.
Bowl - 1pc.
Bowl lid - 1 pc.
Bread-maker measuring cup - 1 pc.
Multi-cooker measuring cup - 1 pc.
Measuring spoon - 1 pc.
Soup ladle - 1 pc.
Spatula - 1 pc.
Basket for steam cooking - 1 pc.
Cottage cheese bag - 1 pc.
Technical specifications
Power supply: 220-240 V \~ 50/60Hz
Maximum rated input power in multi-cooker mode 900 W
Maximum rated input power in bread-maker mode 800 W
Combined power: 1700 W, 230 V
The manufacturer preserves the right to change the specifications of the unit without a preliminary notification.
Unit operating life is 3 years
Guarantee
Details regarding guarantee conditions can be obtained from the dealer from whom the appliance was purchased. The bill of sale or receipt must be produced when making any claim under the terms of this guarantee.

This product conforms to the EMC-Requirements as laid down by the Council Directive 2004/108/EC and to the Low Voltage Regulation (2006/95/EC)
DEUTSCH
MULTIKOCHER-BROTBACKOFEN 5G
A production date of the item is indicated in the serial number on the technical data plate. A serial number is an eleven-unit number, with the first four figures indicating the production date. For example, serial number 0606xxxxxxx means that the item was manufactured in June (the sixth month) 2006.
DE


- Description
- Control panel
- Attention!
- SAFETY MEASURES
- NEVER POUR WATER ON FIRE!
- Attention! Do not allow children to play with polyethylene bags or packaging film. Danger of suffocation!
- ENGLISH
- BEFORE THE FIRST USE
- USAGE
- «MULTICOOKER» mode
- General example of loading products and water (as example rice is considered)
- Note:
- «COTTAGE CHEESE» cooking programs
- Cookware
- Wipe the outer surface and the bottom of the bowl (20) dry before use.
- Cooking duration
- Storage life
- TIPS
- Oil
- Perform filtration of oil in the following way:
- Cooking recommendations
- «MULTICOOK» mode
- Note: Make sure that the products and liquids level does not exceed the level of maximal mark «10» and is not lower than the level of minimal mark «2». Maximal level mark for porridges (except rice) is «8»
- User program settings
- Note: If you don't want to save the program settings, press the (37) «OK» without holding it.
- "BREAR-MAKER" mode
- Programs
- Bread (basic mode)
- Rye
- Baguette (French bread)
- Pie
- Dough 1 (dough kneading)
- Gluten free
- Wholegrain
- Jam
- Yogurt
- Dough 2 (dough for paste)
- User mode for bread-maker
- USING OF MULTI-COOKER BREAD-MAKER
- No
- User mode for bread-maker settings
- IMPORTANT RECOMMENDATIONS
- Ingredients
- Flour
- Bread flour
- Whole-grain flour (wholemeal)
- Corn and oatmeal flour
- Sugar
- Yeast
- Salt
- Eggs
- Animal and vegetable fats
- Baking powder and soda
- Water
- Dairy foods
- Fruit and berries
- DOSAGE
- INGREDIENTS LOADING
- ADDITIONAL FUNCTIONS
- Memory
- CLEANING AND CARE
- STORAGE
- Delivery set
- Technical specifications
- Unit operating life is 3 years
- Guarantee
- DEUTSCH
- MULTIKOCHER-BROTBACKOFEN 5G
- DE
Brand : Vitek
Model : VT-4209 BW
Category : Multicooker