VT-2544 BK - Meat Grinder Vitek - Free user manual and instructions
Find the device manual for free VT-2544 BK Vitek in PDF.

| Product Type | Meat Grinder |
| Brand | Vitek |
| Model | VT-2544 BK |
| Color | Black |
| Power Consumption | 500 W |
| Voltage / Frequency | 220-240 V, 50/60 Hz |
| Grinding Capacity | Approx. 1.5 kg/min |
| Dimensions (W x D x H) | 25 x 15 x 20 cm |
| Weight | 3 kg |
| Material | Stainless steel and plastic |
| Functions | Grinding, mincing, sausage filling |
| Safety Features | Overload protection, non-slip feet |
| Cleaning | Removable parts dishwasher safe |
| Spare Parts Available | Cutting blades, grinding discs |
| Warranty | 1 year |
Frequently Asked Questions - VT-2544 BK Vitek
User questions about VT-2544 BK Vitek
0 question about this device. Answer the ones you know or ask your own.
Ask a new question about this device
Download the instructions for your Meat Grinder in PDF format for free! Find your manual VT-2544 BK - Vitek and take your electronic device back in hand. On this page are published all the documents necessary for the use of your device. VT-2544 BK by Vitek.
USER MANUAL VT-2544 BK Vitek
ENGLISH
TRIMMER
The trimmer is intended for hair and beard styling and for cutting hair in the nose and ears.
Description
- AC/DC power adapter connection socket
- On/charging indicator
- Power switch «ON/OFF»
- Attachment installation place
- Storing/charging base
- Power adapter
- Cleaning brush
- Lubricating oil
Attachments
- Wide trimmer 30 mm
- Adjustable attachment for 30 mm trimmer (3/4/5/6/7 mm)
- Wide trimmer 40 mm (3/6/9/12 mm)
- Attachments for 40 mm trimmer
- Detail trimmer
- Nose and ears trimmer
- Shaver
- Outer shaving block
- Outer shaving block release buttons
SAFETY MEASURES
Before using the unit, read this instruction manual carefully; keep this manual for future reference. Use the unit according to its intended purpose only, as it is stated in this user manual.
Mishandling the unit can lead to its breakage and cause harm to the user or damage to his/her property.
- Before connecting the unit to the mains for battery charging for the first time, make sure that your home mains voltage corresponds to the AC adapter operating voltage.
- Use only the attachments and the power adapter supplied with the unit.
- Do not use the unit in places with high temperature and relative humidity more than 80% .
- Charge the battery at the temperature from +5^ to +35^ .
- Never use the unit if the attachments or the blades are damaged.
-
Always keep the trimmer blades clean and lubricated.
• After each use, clean the attachments with the brush to remove the cut-off hair. -
Never leave the operating unit unattended.
- Switch the unit off during intervals in operation or when you are not using it.
- The adapter cord should not:
- touch hot objects and surfaces,
- be immersed into water,
- run over sharp edges,
- be used as a handle for carrying the unit.
- The outer shaving net of the shaving attachment is very thin, to avoid damaging the shaving net, do not apply excessive effort while shaving or cleaning.
- To avoid injuries, do not use the shaver with damaged outer shaving net or inner shaving block.
- Never pull the power cord when disconnecting the unit from the mains, take the power adapter and carefully remove it from the mains socket.
- Clean the unit regularly.
- Do not immerse the unit body, the power adapter or the power adapter cord into water or other liquids.
- Do not touch the unit body or the power adapter with wet hands.
- Never leave the unit connected to the mains unattended.
- Do not allow children to touch the unit body, the power adapter and the adapter cord during the unit operation.
- This unit is not intended for usage by children under 8 years of age.
- This unit is not intended for usage by people (including children over 8) with physical, neural, mental disorders or with insufficient experience or knowledge. Such persons can use this unit only if they are under supervision of a person who is responsible for their safety and if they are given all the necessary and understandable instructions concerning the safe usage of the unit and information about danger that can be caused by its improper usage.
- Do not leave children unattended not to let them use the unit as a toy.
- For children safety reasons, do not leave polyethylene bags, used as a packaging, unattended.
Attention! Do not allow children to play with polyethylene bags or packaging film. Danger of suffocation!
- Never use the unit if the power adapter or the power adapter cord is damaged, if the
ENGLISH
unit works improperly or after the unit was dropped.
- Do not disassemble the unit by yourself, if any malfunction is detected or after the unit was dropped, apply to the nearest authorized service center.
- Transport the unit in the original package only.
- Keep the unit out of reach of children and disabled persons.
After unit transportation or storage at low temperature it is necessary to keep it for at least two hours at room temperature before switching on.
Battery charging
Full charging of the battery provides about 45 minutes of continuous unit operation.
- Insert the connector of the power adapter (6) into the socket (1) on the unit body or into the socket on the rear side of the base (5).
- If you are using the base (5), set it on a flat stable surface and then put the trimmer on the base.
- Plug the power adapter into the mains socket, the indicator (2) will light up red.
- Before the first usage of the unit, charge the battery for 8 hours. Further full recharging cycles are also no less than 8 hours.
- After charging remove the power adapter (6) from the mains socket and disconnect the adapter cord from the base (5) or from the trimmer body.
Notes:
Recharge the battery only after its complete discharge.
Charge the battery at the temperature from +5°C to +35°C.
Never leave the unit connected to the mains unattended.
After a long period of not using the unit (more than 2 months), charge the battery completely before using the unit.
On/charging indicator (2)
The indicator (2) glows red during charging; the indicator (2) glows green if the unit is on and operates from the battery; the indicator (2) glows orange if you operate the unit connected to the mains.
Trimmers
- Before installing and changing the attachments, switch the unit off by setting the switch (3) to the position «OFF»; if the unit is powered by the power adapter, unplug it.
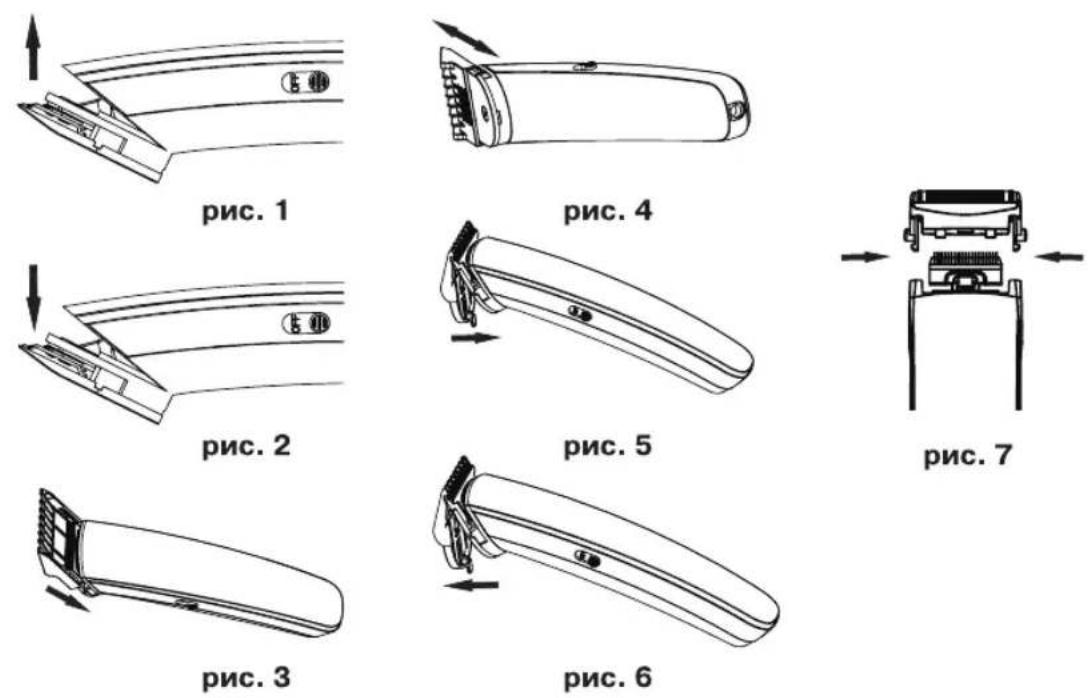
- To install any trimmer (9, 11, 13, 14 or 15) on the unit body, insert the lock on the bottom part of the attachment into the notch on the rear side of the unit body and then press on the upper part of the attachment until fixing (pic. 1).
- To remove the trimmer, press it from the side of the blades (pic. 2).
Installing the adjustable attachment for 30 mm trimmer
• Install the trimmer (9) on the unit body.
- Insert the trimmer (9) into the notches of the adjustable attachment (10) (pic. 3). Adjust the cutting length (3, 4, 5, 6 or 7 mm) by moving the attachment (10) relative to the trimmer (pic. 4).
- To remove the attachment (10), move it in the direction of the arrow «PUSH».
Attachments for 40 mm trimmer
• Install the trimmer (11) on the unit body.
- Install the upper part of the attachment (12) on the trimmer (11) and then fix the bottom part of the attachment (12) (pic. 5).
- To remove the attachment (12), pull the lock on its bottom part (pic. 6).
Lubricating oil
- To maintain the unit in a good condition, you should lubricate the trimmer blades (9, 11, 13) after every use of the unit.
- For lubricating the blades, use only the lubricating oil (8), supplied with the unit.
- The trimmer for nose and ears (14) doesn't require lubricating.
Using the unit
- For cordless use of the unit, charge the battery fully.
• Install the required trimmer and attachment.
Note: For corded operation, connect the power adapter (6) cord to the socket (1) and plug the power adapter into the mains.
ENGLISH
- Switch unit on by setting the switch (3) to the position «ON», the indicator (2) will light up.
- After finishing the unit operation, switch it off by setting the switch (3) to the position «OFF».
Notes:
Always switch the unit off during the breaks in operation.
When operating the unit from the mains, switch the unit off and unplug the power adapter before changing the attachments.
Hair cutting
Use the wide trimmers (9, 11) with corresponding attachments (10, 12) for hair cutting.
You can use the detail trimmer (13) for cutting designs on short hair.
- Hair should be clean and dry during hair cutting.
• Install the required trimmer (9, 11 or 13). - Before cutting hair, switch the unit on, setting the power switch (3) to the position «ON» and make sure that unit operates normally and the blades move smoothly. If there is too much oil on the blades, remove the excessive oil with a dry cloth.
- Switch the unit off by setting the switch (3) to the position «OFF», then install the corresponding attachment (10 or 12) on the trimmer (9 or 11).
- Seat the person so that his/her head is approximately at your eye level, cover the person's shoulders with a towel and set hair with the comb.
- Switch the unit on by setting the switch (3) to the position «ON».
Reminder
Always cut off a little amount of hair at a time; you can always return to the cut area again for additional cutting.
The best haircutting results are reached on dry hair, not wet.
Comb the hair to reveal uneven locks. It is better to leave longer hair after cutting for the first time.
After learning the unit better, you will learn to arrange your hair in any style you need.
Shaving
The best shaving results are achieved if your skin is dry.
Your skin may need 2-3 weeks to get used to this shaving system.
• Install the shaving attachment (15).
- Set the switch (3) to the «ON» position to switch the shaver on.
- Touching the skin slightly, move the shaver back and forth and rotationally at a time.
- After you finish shaving, switch the unit off by setting the switch (3) to the «OFF» position.
- Clean the shaving attachment.
Cutting beard and mustache
Use the trimmers (9, 11) with the attachments (10, 12) for beard styling; you can also use the detail trimmer (13).
- Install the trimmer (9 or 11) on the unit and install the corresponding attachment (10 or 12) on the trimmer.
- Until you learn your trimmer better, set the hair length to 9 or 12 mm.
- To cut the beard symmetrically, start cutting from the ear to the chin on the one side of the face, and then repeat the beard cutting on the other side.
- Comb the mustache and then cut it from the middle to the corners of the lips.
Note: Always cut off a little amount of hair at a time – you can always return to the cut area again for additional trimming.
- Finishing the beard cutting, remove the attachment, turn the blades of the unit towards yourself and define the desired shape. Do not press on the unit strongly, there is danger of injuries or cuts when open blades come in contact with the skin.
- When cutting hair on the cheeks, move the trimmer downwards; move it upwards in the neck area.
- Regularly cut the beard and mustache to keep their shape.
Nose and ears trimmer
Be careful when using the trimmer (14) for cutting hair in the ears and nose. Insert only the metal tip of the trimmer attachment into the auricle or the nostril.
- Install the attachment (14) on the unit body and check if it is set securely.
- Switch the unit on by setting the switch (3) to the position «ON».
- Move the metal tip of the trimmer smoothly back and forth and rotationally; carefully cut hair in the nose and/or ears.
ENGLISH
• After you finish using the unit, switch the unit off by setting the switch (3) to the position «OFF».
- Use the trimmer only for cutting hair in the ears and nose.
Cleaning and care
- Switch the unit off after the use.
- Remove the used trimmer and attachments from the unit body and clean the inside and outside of the attachments from the cut hair, using the cleaning brush (7).
- You can wash the comb attachments (10, 12) under a water jet, then wipe them and dry thoroughly.
- Do not use solvents or abrasives to clean the unit body, trimmers and attachments.
Lubricating the trimmer blades (9, 11, 13)
Regularly lubricate the blades using the oil (8) supplied with the unit.
- Apply one or two drops of oil on the blade teeth and the back part of the upper blade.
- Install each trimmer on the unit body and switch the unit on, make sure that the blades are moving smoothly.
- Switch the unit off, remove excess oil with a dry cloth.
Note: The trimmer for nose and ears (14) doesn't require lubricating.
Attention! Use only the oil supplied with the unit.
DO NOT USE vegetable oil, fat, oil mixed with any solvents for lubricating.
Solvents will evaporate, leaving thick grease that may slow down the blades motion.
Taking care for the shaving attachment (15)
Regular cleaning helps to maintain the shaving system in good and operable condition.
- Press the buttons (17) simultaneously and remove the outer shaving block (16) (pic. 7).
- Use the brush (7) to clean the outer and inner shaving blocks from inside and outside.
• Install the outer shaving block back to its place.
Storage
- Clean the unit and lubricate the blades of the trimmers with lubricating oil before taking the unit away for storage.
- Keep the unit away from children in a dry cool place.
Delivery set
- Unit body - 1 pc.
- Wide trimmer 30 mm - 1 pc.
- Wide trimmer 40 mm - 1 pc.
- Attachment for 40 mm trimmer- 4 pc.
- Detail trimmer for removing short hair – 1 pc.
- Nose and ears trimmer - 1 pc.
- Shaving attachment - 1 pc.
- Power adapter
- Storing/charging base - 1 pc.
- Lubricating oil - 1 pc.
- Cleaning brush - 1 pc.
- Instruction manual - 1 pc.
-
Pouch - 1pc.
-
Telescopic attachment for 30 mm trimmer-1 pc.
TECHNICAL SPECIFICATIONS
Input voltage of the power adapter: AC (alternating current) 100-240 V \~ 50/60 Hz Output voltage: DC (direct current) 3 V, 0.6 A Maximal power consumption: 6 W
The manufacturer preserves the right to change the specifications of the unit without a preliminary notification.
Unit operating life is 3 years
Guarantee
Details regarding guarantee conditions can be obtained from the dealer from whom the appliance was purchased. The bill of sale or receipt must be produced when making any claim under the terms of this guarantee.
CE This product conforms to the EMC-Requirements as laid down by the Council Directive 2004/108/EC and to the Low Voltage Regulation (2006/95/EC)
DEUTSCH
TRIMMER
A production date of the item is indicated in the serial number on the technical data plate. A serial number is an eleven-unit number, with the first four figures indicating the production date. For example, serial number 0606xxxxxx means that the item was manufactured in June (the sixth month) 2006.