One Duovagn - Stroller Beemoo - Free user manual and instructions
Find the device manual for free One Duovagn Beemoo in PDF.

| Product Type | Stroller (Double) |
| Brand | Beemoo |
| Model | One Duovagn |
| Dimensions (Unfolded) | Approx. 80 x 60 x 100 cm |
| Dimensions (Folded) | Approx. 60 x 50 x 80 cm |
| Weight | Approx. 12 kg |
| Maximum Capacity | Up to 22 kg per seat |
| Recommended Age | From birth to approx. 3 years |
| Material | Aluminum frame, polyester fabric |
| Wheel Type | 4 swivel wheels with brake |
| Recline Positions | Multiple (including flat) |
| Harness System | 5-point harness |
| Sun Canopy | Adjustable with UPF protection |
| Storage Basket | Large under-seat basket |
| Accessories | Rain cover, cup holder (may vary) |
| Cleaning Instructions | Wipe frame with damp cloth; hand wash fabric |
| Safety Standards | Complies with ASTM F833 & EN 1888 |
| Spare Parts | Contact Beemoo customer service for replacements |
Frequently Asked Questions - One Duovagn Beemoo
User questions about One Duovagn Beemoo
0 question about this device. Answer the ones you know or ask your own.
Ask a new question about this device
Download the instructions for your Stroller in PDF format for free! Find your manual One Duovagn - Beemoo and take your electronic device back in hand. On this page are published all the documents necessary for the use of your device. One Duovagn by Beemoo.
USER MANUAL One Duovagn Beemoo
natural_image
Line drawing of a two-wheeled baby stroller and two children's box (no text or symbols)

IMPORTANT!
READ CAREFULLY
AND KEEP FOR
FUTURE REFERENCE
Model: Beemoo One,
Duovagn
VIGTIGT!
LÆS OMHYGGELIGT OG
GEM TIL FREMTIDIG
REFERENCE
Model: Beemoo One,
Duovogn
VIKTIGT!
LÄS NOGA OCH
BEHÅLL FÖR
FRAMTIDA REFERENS
Modell: Beemoo One,
Duovagn
TÄRKEÄÄ!
LUE OHJEET
HUOLELLISESTI JA SÄILYTÄ
NE TULEVAA TARVETTA
VARTEN
Malli: Beemoo One,
Yhdistelmävaunut
VIKTIG!
LES N∅YE OG BEHOLD
FOR FREMTIDIG
REFERANSE
Modell: Beemoo One,
Duovogn
WICHTIG!
LESEN SIE DIESE HINWEISE
AUFMERKSAM UND
BEWAHREN SIE SIE FÜR
IMPORTANT: Read carefully and keep for future reference. Your child's safety may be affected if you do not follow these instructions.
- WARNING! Never leave the child unattended.
- WARNING! Ensure that all the locking devices are engaged before use.
- WARNING! To avoid injury ensure that the child is kept away when unfolding and folding this product.
- WARNING! Do not let the child play with this product.
- WARNING! This seat unit is not suitable for children under 6 months.
- WARNING! Always use the restraint system.
- WARNING! Check that the pram body or seat unit devices are correctly engaged before use.
- WARNING! This product is not suitable for running or skating.
- Never lift the pushchair with the child inside it.
- Never adjust the stroller while your baby inside it.
- This product is not suitable for overnight sleeping, your child may be at risk of serious harm or injury. This product does not replace a cot or a bed. Should your child need to sleep, then it should be placed in a suitable pram body, cot or bed.
- Use the stroller with only one child at a time. Never place purses, shopping bags, parcels or accessory items on the handle or canopy.
- Any load attached to the handle, backrest or sides affects the stability of the pram/pushchair.
- To avoid the risk of suffocation, keep all plastic bags and packaging out of reach of babies and young children.
- Never use stairs or escalators with your child in the pushchair.
- Always check that the parking device is fully engaged before letting go of your stroller.
- To prevent tipping, never let child climb the stroller. Always lift the child in and out of the stroller.
- Keep away from fire!
- This product is suitable for children up to 22kg or 4 years whichever comes first.
• To prevent a hazardous, unstable condition, do not place more than 3kg in the storage basket.
- Make sure your child's body is clear from the moving parts when adjusting the stroller.
- Be sure the stroller is fully open or folded before allowing child near the stroller.
- Never use stroller on stairs or escalators
- Keep away from high temperature objects, liquids, and electronics.
- Never allow your child to stand on the stroller or sit in the stroller with head toward front of stroller.
• To avoid injury ensure that the child is kept away when unfolding and folding this product.
- Never use or storage this product in the environment of wet, cold, high temperature, and keep away from fire or strong heat source.
- Do not attach items to the handle, seat back or sides of the stroller. Any additional load will affect the stability of the stroller and could cause the stroller to tip.
• Accessories which are not approved by the manufacturer shall not be used. Only replacement parts supplied or recommended by the manufacturer shall be used.
• Overloading, folding incorrectly, or using component parts from other manufacturers may cause the stroller to be damaged, broken or unsafe. Please read the instruction manual carefully.
• Always engage the parking device when parking the stroller.
- Pushchair designed to be used from birth shall recommend the use of the most reclined position for new born babies.
- The parking device shall be engaged when placing and removing children.
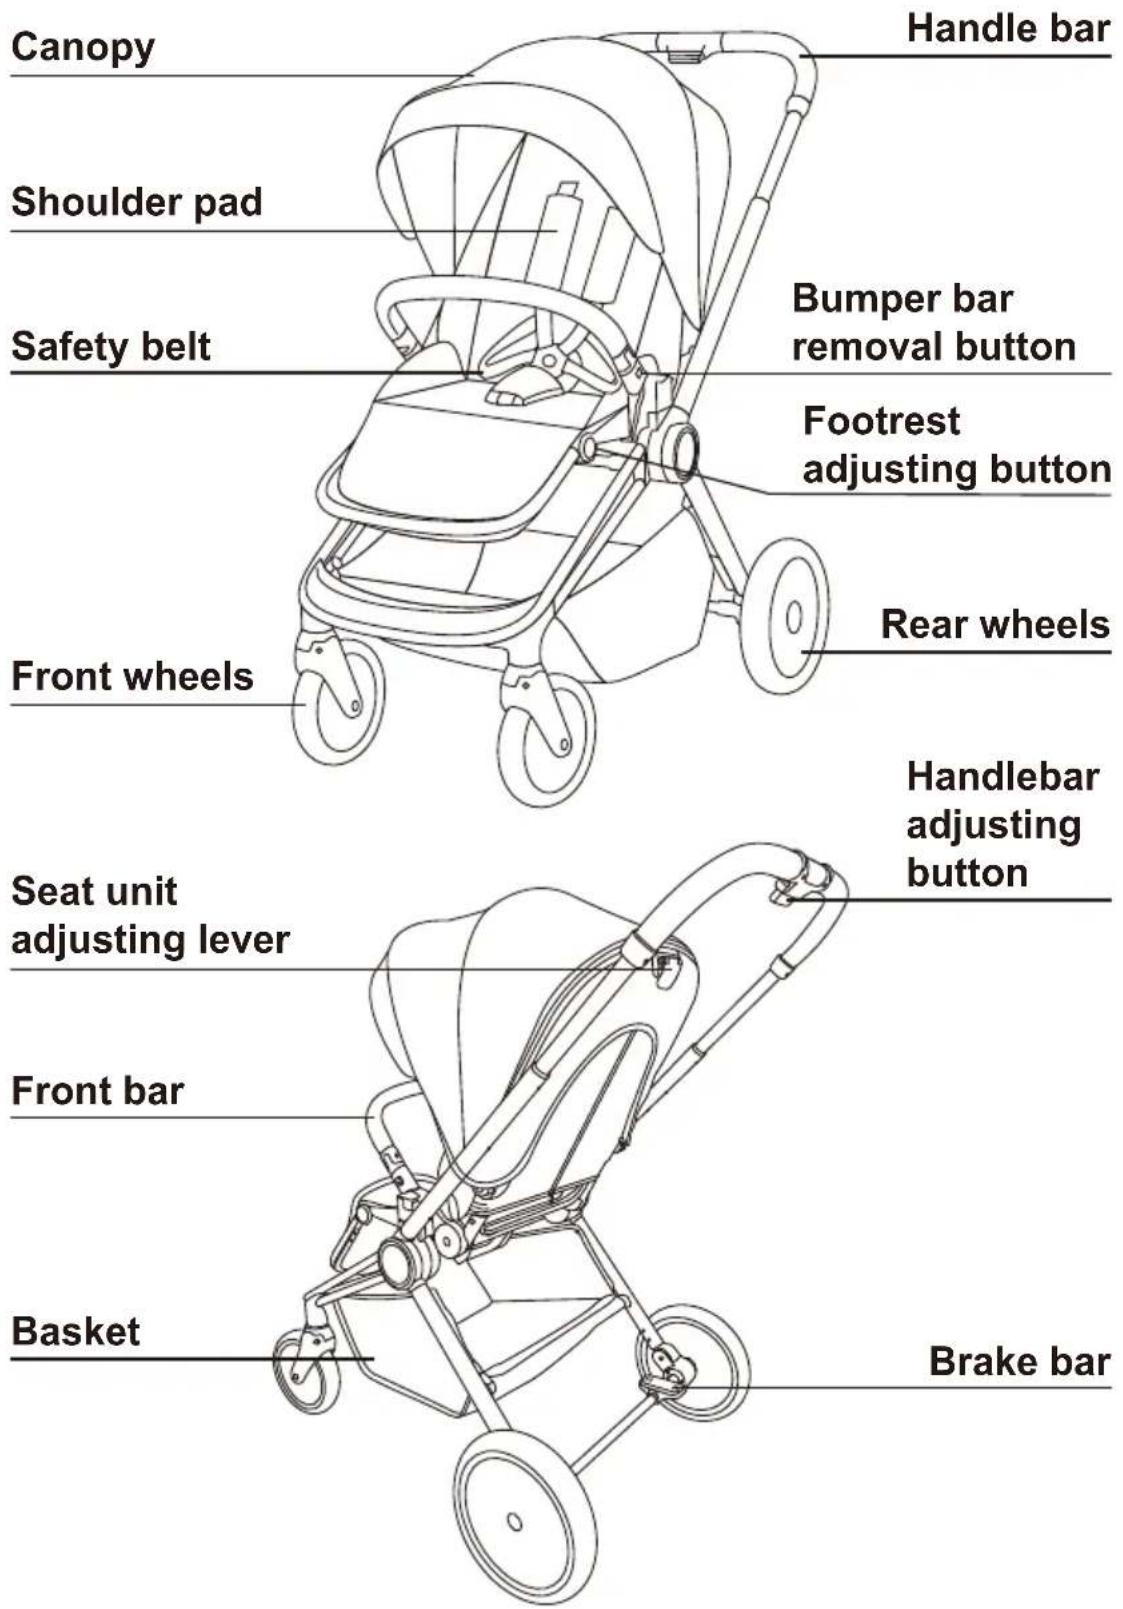
PARTS LIST
ASSEMBLY
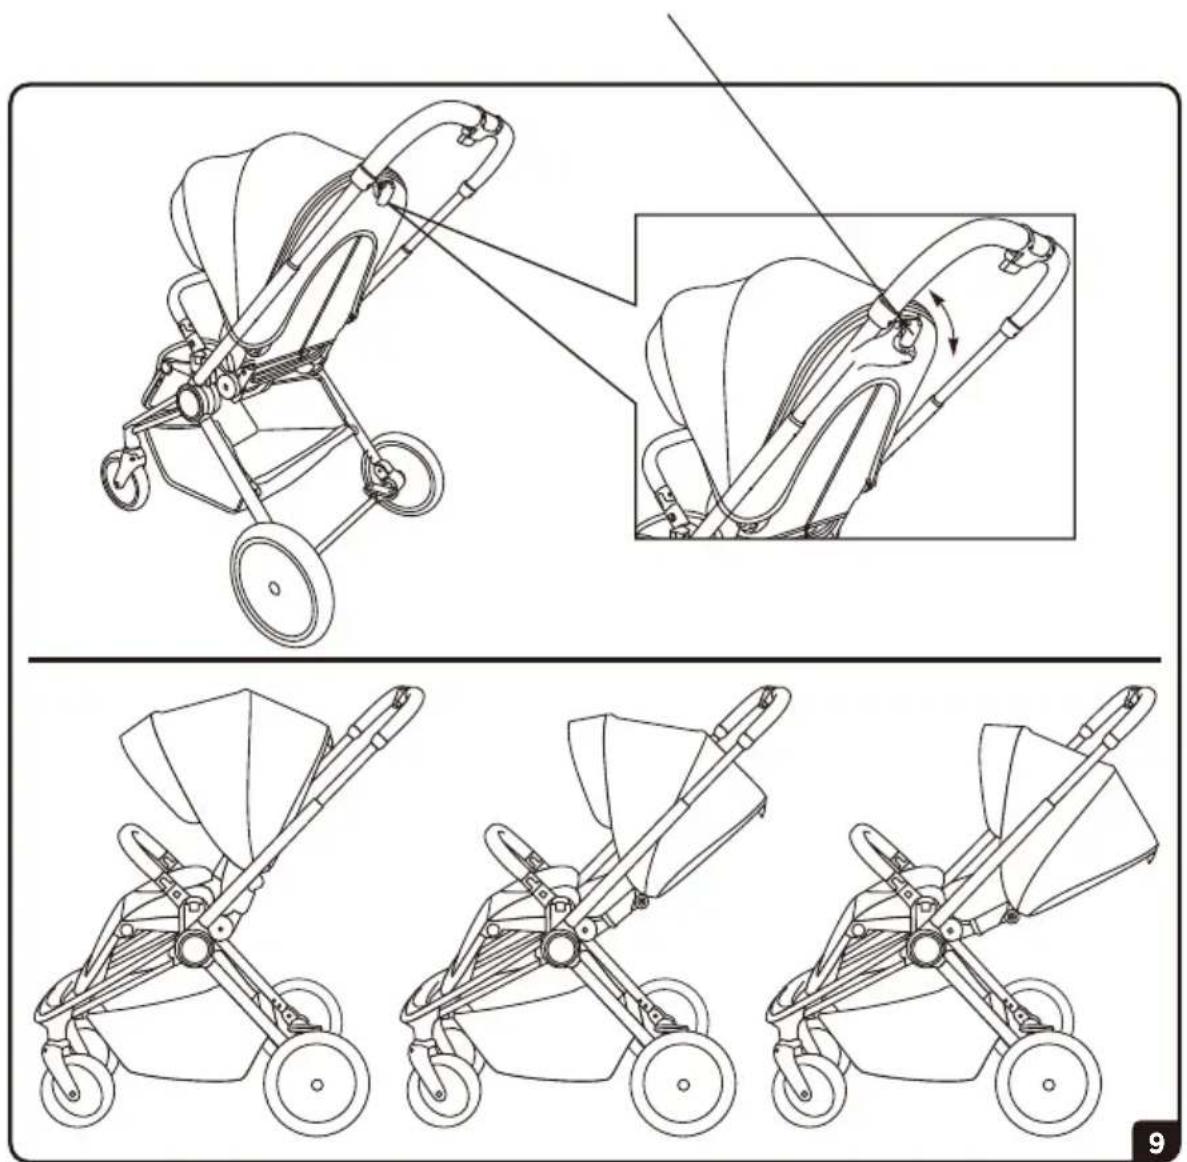
Adjustment button for handlebar

natural_image
Technical line drawing of a mechanical linkage assembly with an inset showing a close-up of the component (no text or symbols present)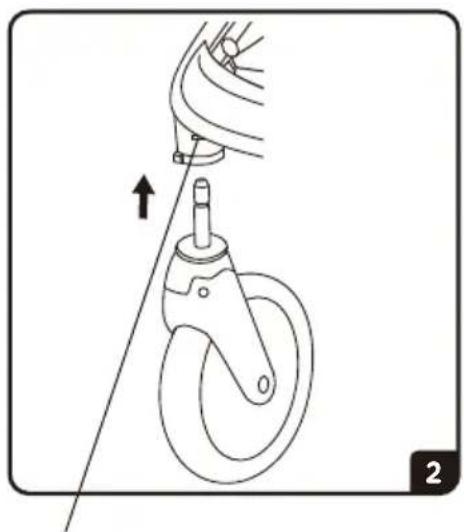
natural_image
Diagram of a mechanical device with a curved wheel and attached rod, showing motion direction (no text or symbols)Front wheel removal button
natural_image
Technical line drawing of a bicycle steering wheel assembly with a close-up inset showing the bracket (no text or symbols)Rear wheel removal button
Bumper bar removal button
natural_image
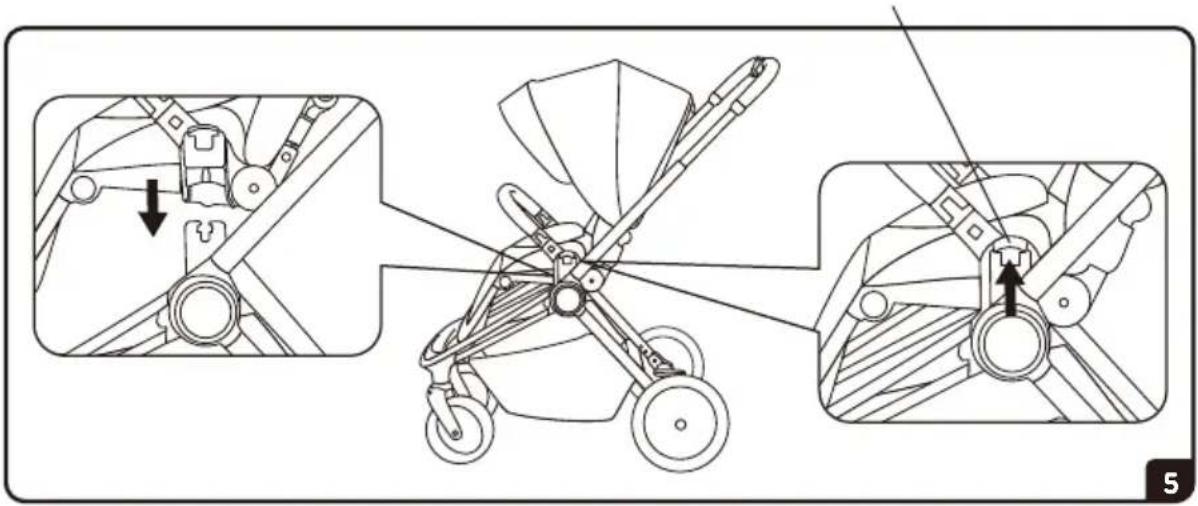
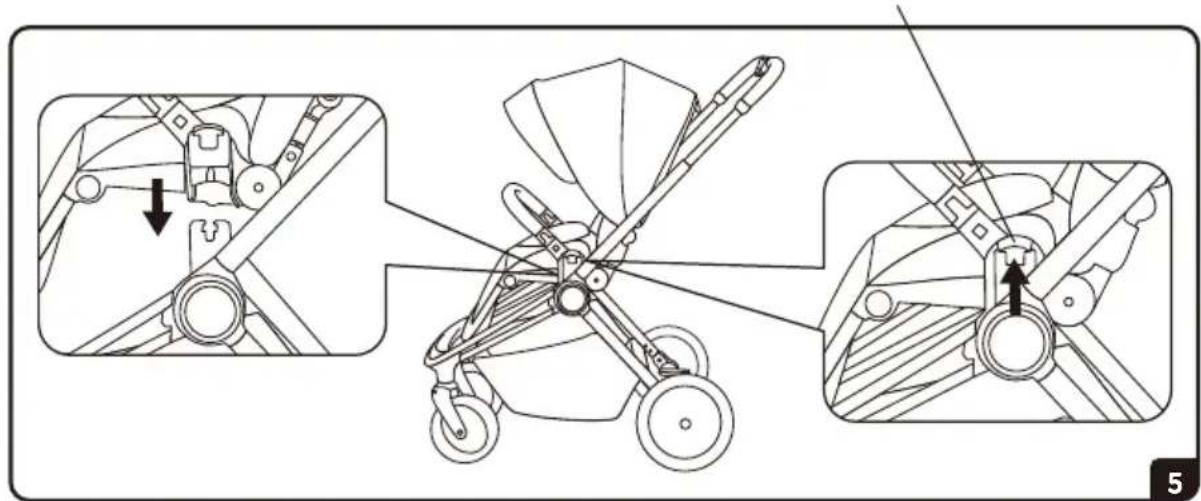
Technical line drawing of a stroller assembly with an inset close-up showing the mechanism (no text or symbols present)Seat unit release button
Low strap
natural_image
Illustration of two mechanical components labeled a and b, showing rotational motion with arrows indicating direction (no text or symbols beyond labels)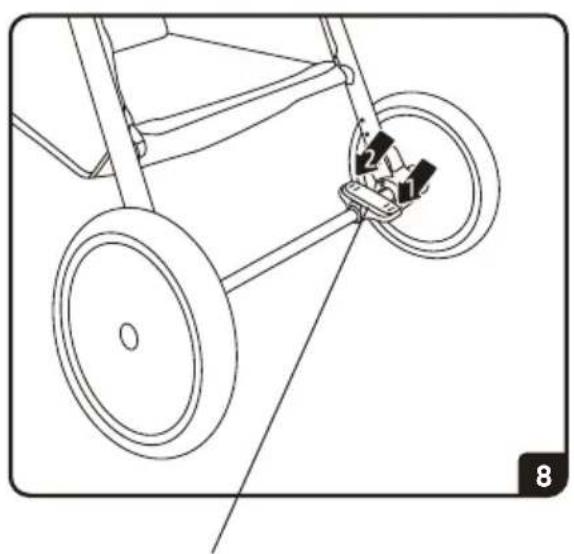
natural_image
Line drawing of a bicycle steering wheel with a guide mechanism (no text or symbols)Brake bar
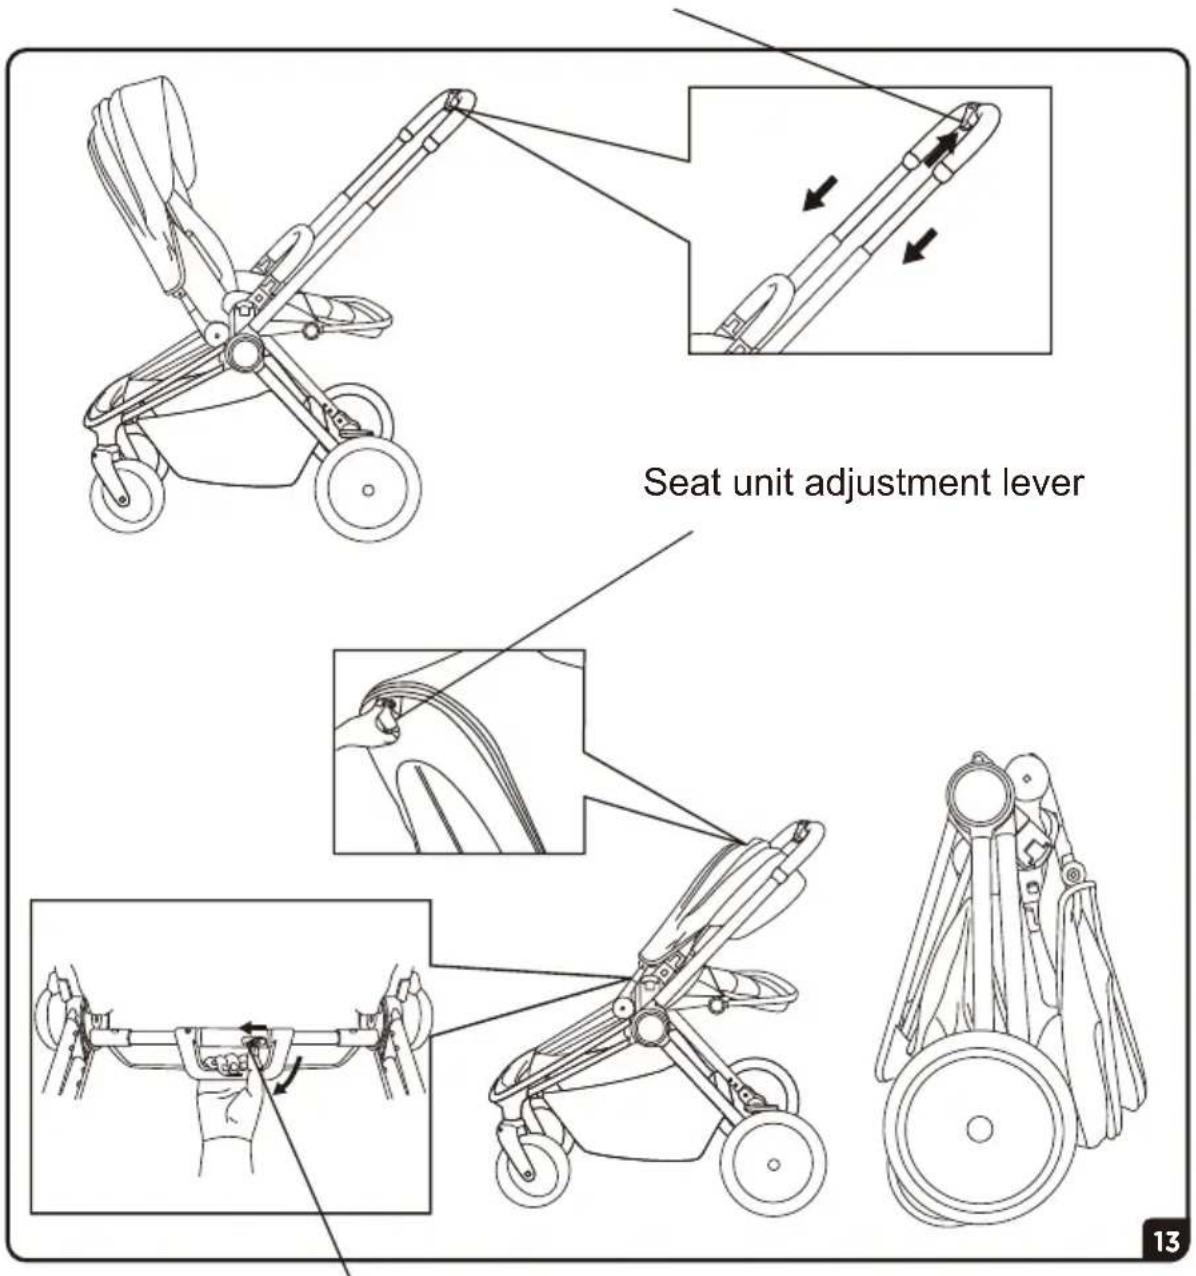
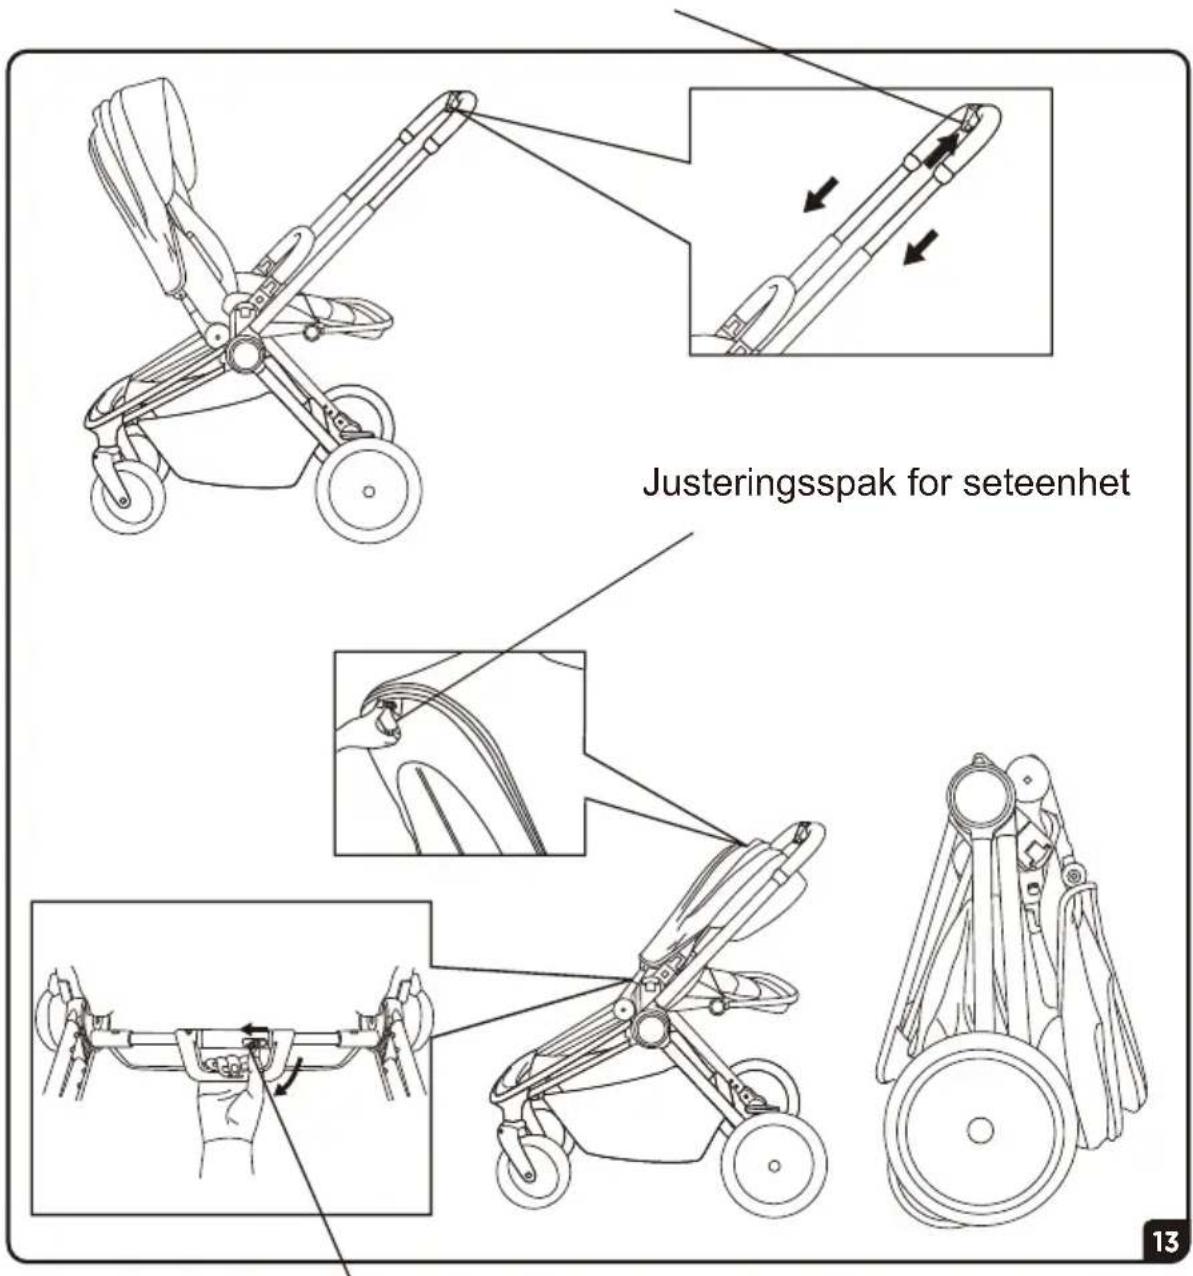
Seat unit adjusting lever
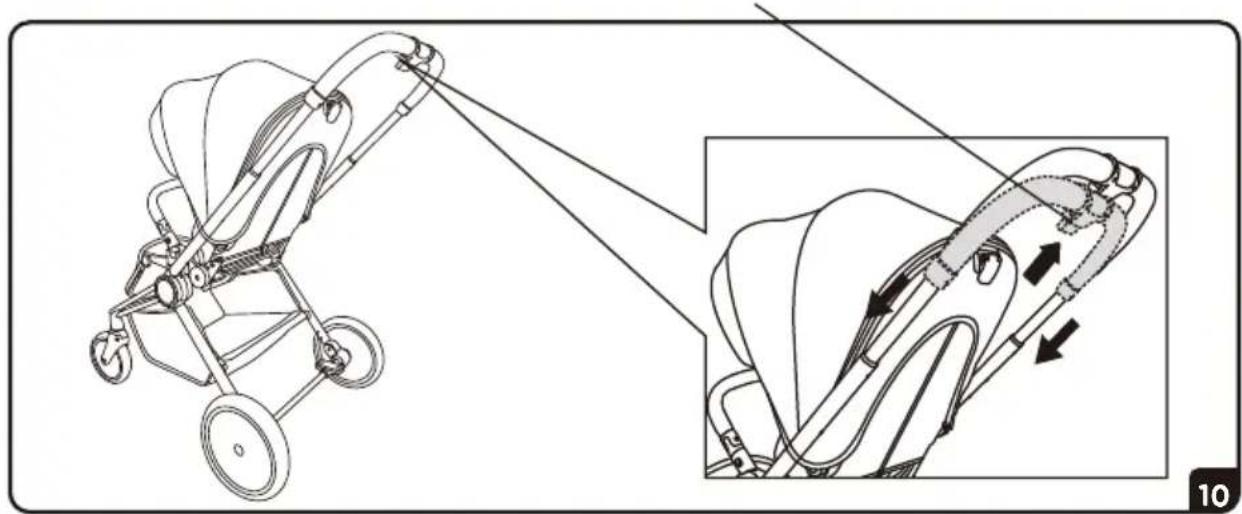
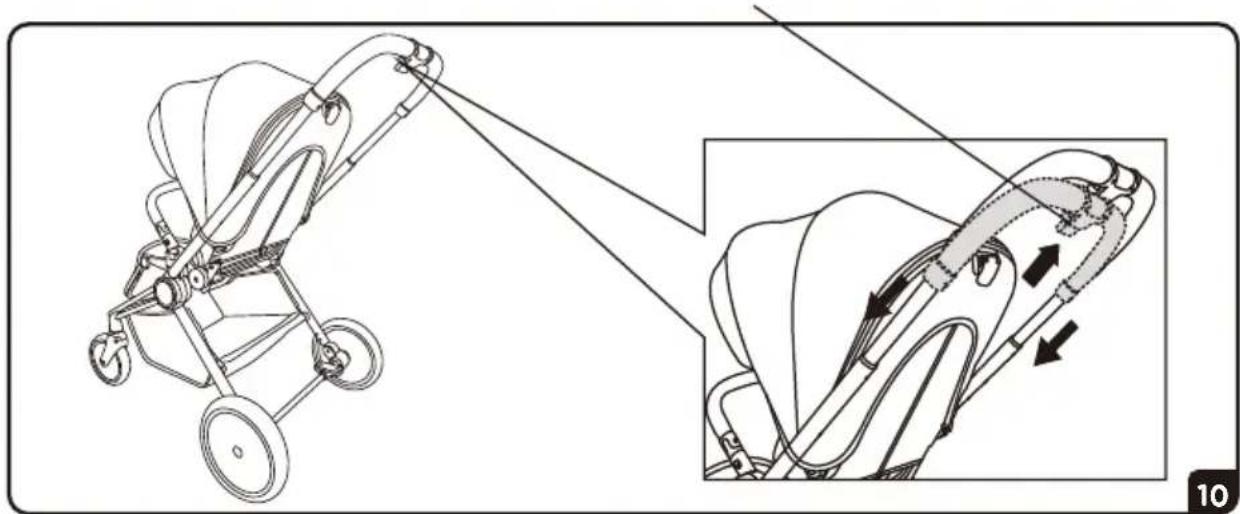
Handlebar adjustment button
natural_image
Technical illustration of a stroller with attached cable, showing mechanical assembly and motion direction (no text or symbols)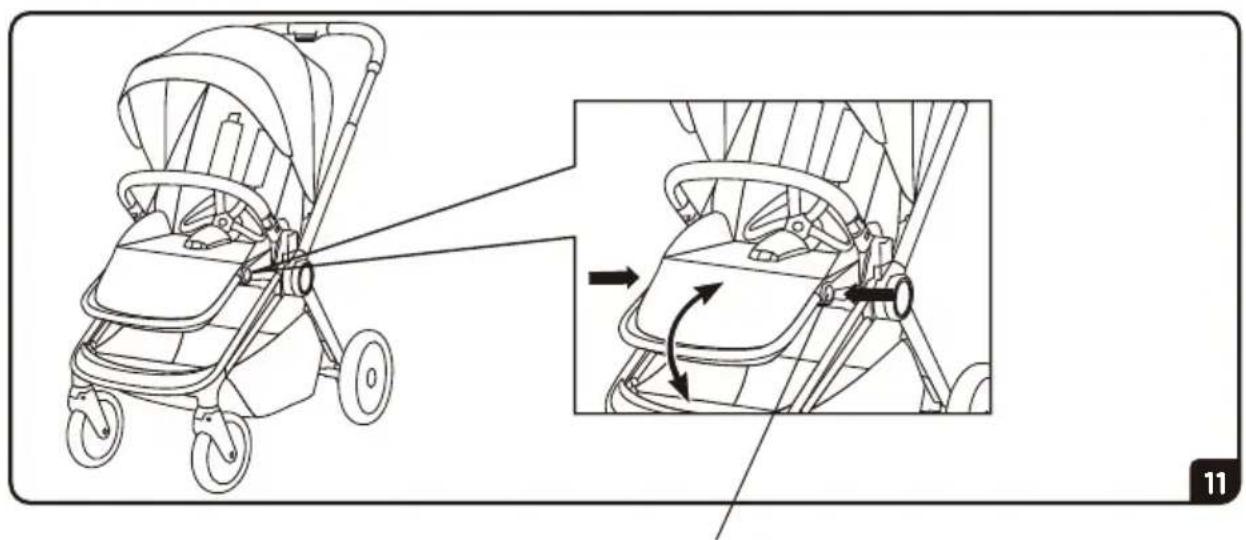
natural_image
Line drawing of a stroller with zoomed-in detail showing the seat and wheel assembly (no text or symbols)Footrest adjustment button
Handlebar adjustment button

Release button
Handlebar adjustment button
Release button
Please refer to the page where the corresponding assembly images are listed. You can find the numbered images on the separate page for easy reference and identification.
ASSEMBLY
- Unpack the pushchair frame from the box and set the wheels aside. Lift the handlebar away from the lower frame. The pushchair will click into place. Press the adjusting button on top of handle bar for different heights if need.
WARNING: Ensure that all the locking devices are engaged before use.
- Attach the front wheel by sliding it into the front wheel mount until it clicks.
Note! pull on the front wheel to make sure it is properly attached.
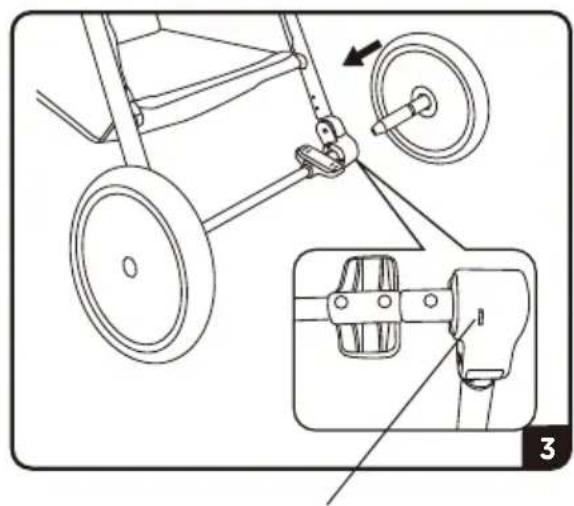
- Install the rear wheel by inserting the rear wheel axle into the wheel mount on the chassis.
Gently pull on the front wheel to make sure it is properly attached.
To remove front or rear wheel:
While pressing the removal button, gently slide the wheel out of wheel mount.
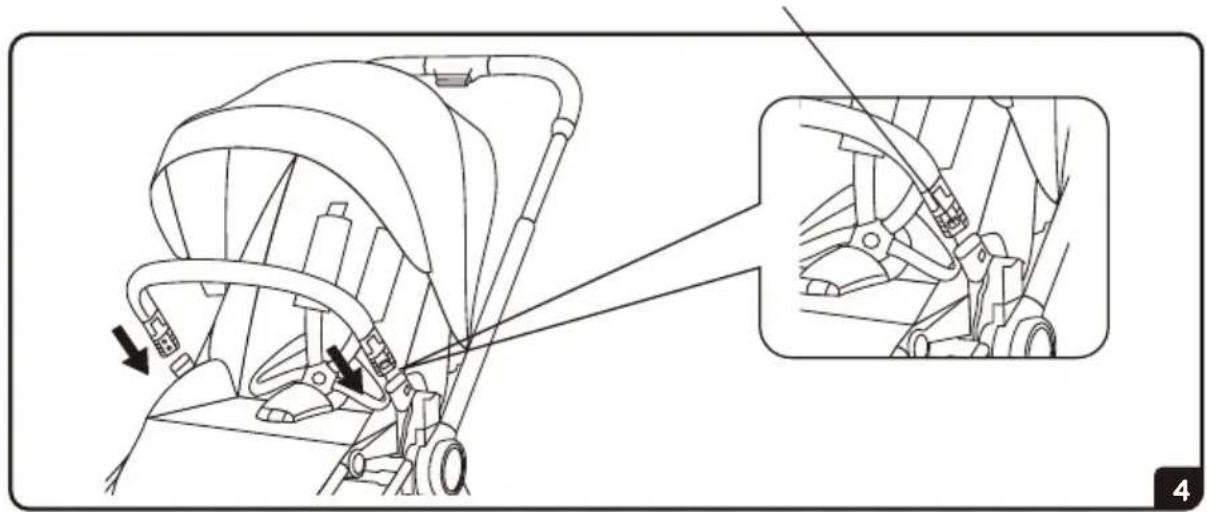
- Install the bumper bar by aligning both ends to bumper bar sockets and push until it clicks into place.
To detach, pull outward gently while pressing the removal button.
- Install the seat unit:
- Align the seat mounting brackets with the mounting brackets on the pushchair frame.
- Insert the seat onto the brackets until it clicks into place. Ensure that both sides of the seat are securely fastened into the frame before use.
NOTE: The seat may be installed either forward-facing or rear-facing.
Remove the seat unit:
- Press the release buttons on both sides of seat then lift the seat unit to remove.
WARNING: Always remove your child from the seat before removing the seat from the frame.
USER INSTRUCTIONS
-
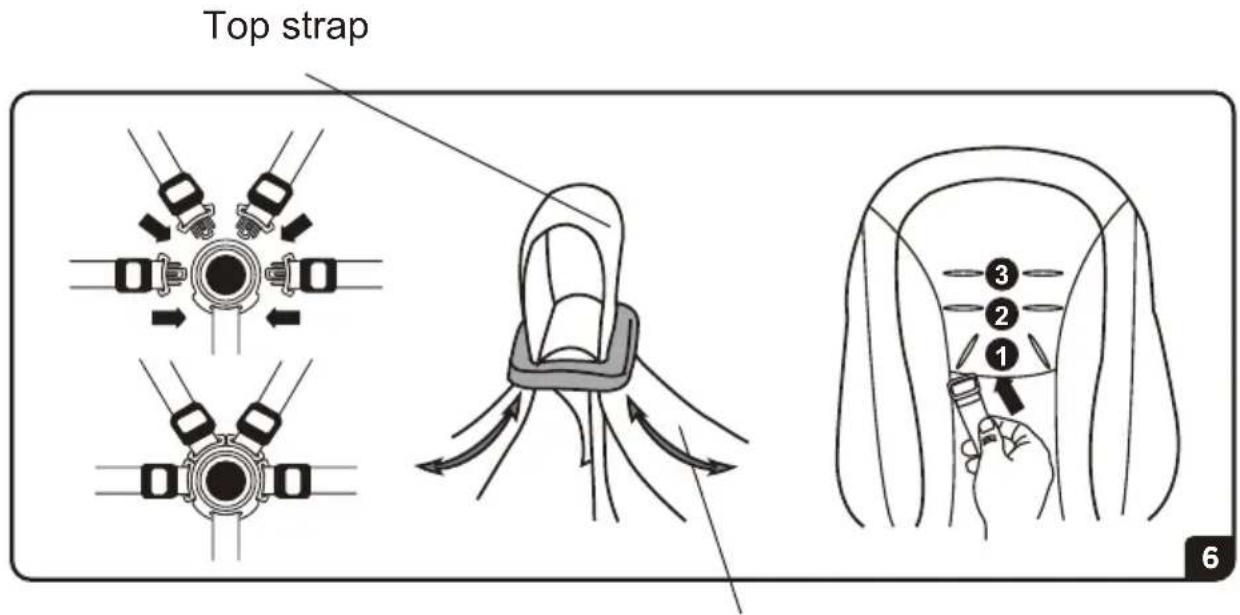
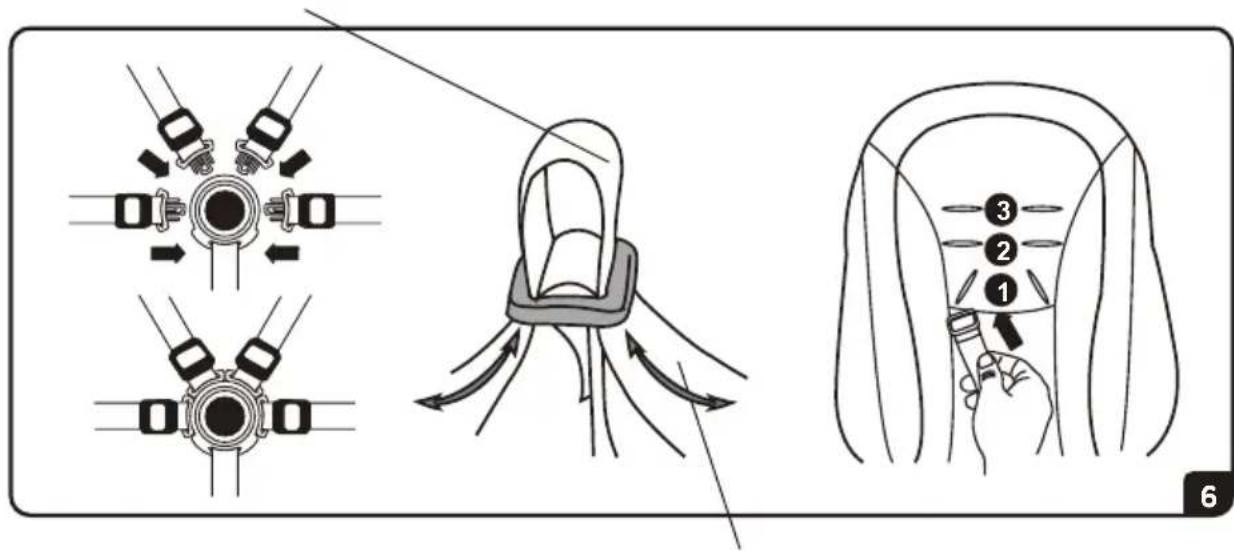
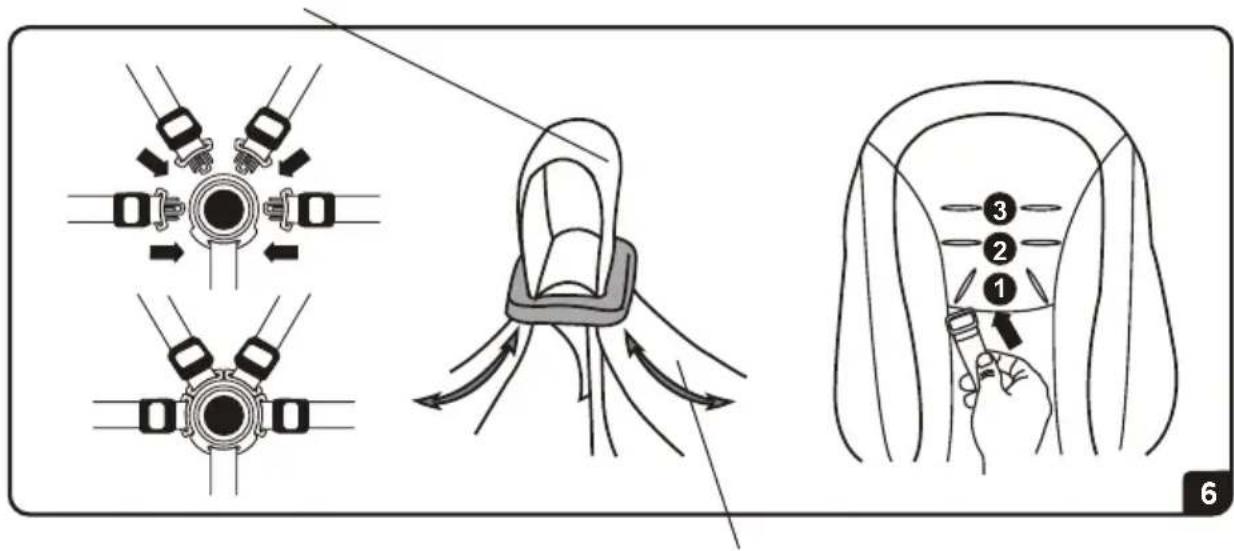
Using safety harness:
-
Assemble the shoulder strap buckle onto waist strap buckle on both sides.
- Insert the connected harness and waist strap buckles into the sides of the crotch buckle.
- Press button on the crotch buckle to release.
Adjusting safety harness:
- Hold the plastic slider and pull strap to tighten or loosen.
- To adjust the height of shoulder straps, turn the plastic stopper on the back of seat and pass it through the openings in the PE board and seat fabric. Reinsert stopper at seat opening closest to child's shoulders. Pass back through seat fabric and PE board. Tug on strap to ensure stopper is locked. Repeat on both sides.
WARNING:
• Always use the restraint system with the crotch strap in combination with the shoulder straps and waist belt.
- Avoid serious injury from falling or sliding out. Always properly adjust and fasten safety harness.
FUNCTIONS
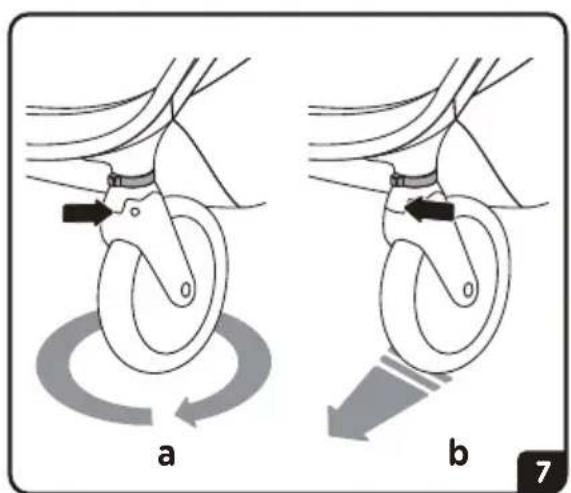
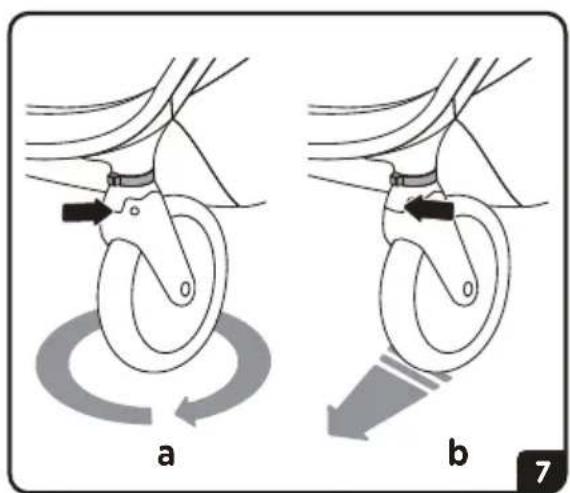
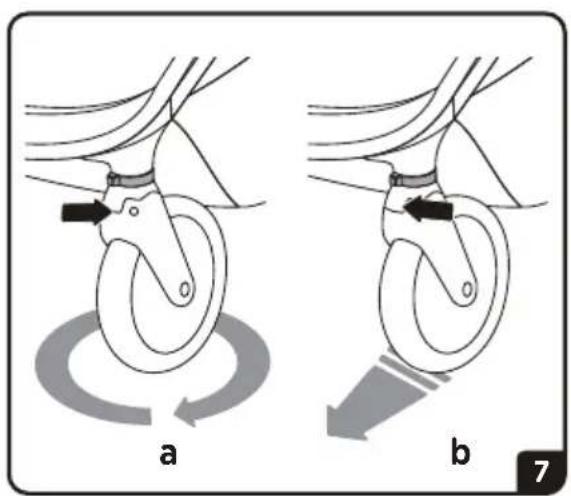
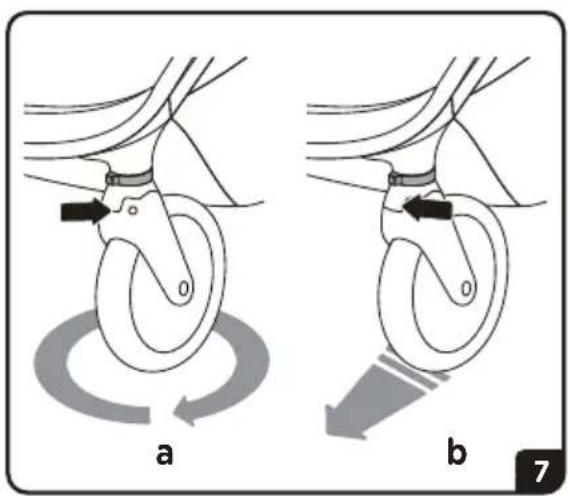
- Using the front wheel swivel lock:
Slide the locking clip to lock or unlock the front wheel.
IMPORTANT! Always lock the swivel wheels when using the stroller on rough surfaces as it will minimize wheel wobble. You may need to swivel the wheels to the proper position to engage the swivel lock.
- Using the brake/parking devices:
To lock the rear wheels, step down on the end of brake bar that is closer to you (1).
To unlock the rear wheels, step down on the end of brake that is in the front (2).
- Adjusting the position of backrest:
Lift the adjusting lever on the back of the seat and hold while raising or lowering the backrest to the desired position.
WARNING:
- The upright positions are not suitable for use with children less than 6 months old.
- This seat unit is not suitable for children under 6 months.
- Adjusting the handle bar:
- Press the handle adjustment button and slide the handle up or down to the desired length.
- Adjusting the footrest
- Press the footrest adjustment button on both sides while adjusting footrest to desired position.
FOLD YOUR STROLLER
-
Folding the stroller with seat facing forward:
-
Keep the handlebar in lowest position, lift the footrest until it folds up.
- Slide the release button located by the handle under the seat. Hold the button while lifting the stroller, fold the handlebar downwards, towards the rear wheels to unlock the chassis.
-
Make sure the transportation lock is properly engaged.
-
Folding the stroller with seat facing rearward:
-
Make sure the handlebar is in its lowest position, then fold the backrest towards the handle.
- Slide the release button located by the handle under the seat. Hold the button while lifting the stroller, fold the handlebar downwards, towards the rear wheels to unlock the chassis.
- Make sure the transportation lock is properly engaged.
CARRYCOT MANUAL
WARNING!
IMPORTANT: Read carefully and keep for future reference. Your child's safety may be affected if you do not follow these instructions.
- Never leave the child unattended.
- Ensure that all the locking devices are engaged before use.
- This product is only suitable for a child who cannot sit up unaided.
- WARNING: Only use on a firm, horizontal level, flat and dry surface.
- Do not let other children play unattended near the carry cot.
- Do not use if any part of the carry cot is broken, torn or missing.
• Always keep child in view while in stroller. - The product shall not be used, as soon as the child is able to sit by himself, roll over and can push itself up on its hands and knees. Maximum weight of the child: 9 kg.
- Do not add another mattress on top of the mattress provided or recommended by the manufacturer.
- Do not use a mattress thicker than 20mm.
- No additional mattress shall be added unless recommended by the manufacturer.
- The handle and the bottom of the carry cot should be inspected regularly for signs of damage and wear.
- Make sure that the handle is in the correct position of use before carrying or lifting the carrycot.
- The head of the child in the carry cot should never be lower than the body of the child.
- Be aware of the hazard of hitting the baby e.g., when putting on floor, going through doors.
-
Do not to leave anything in the carry cot that could present a danger of suffocation e.g. non-rigid toys, pillows etc.
-
Do not to place the carry cot close to another product, which could present a danger of strangulation, e.g. strings, blind/curtain cords etc.
• Overheating can endanger the life of your child! Take into account the ambient temperature and the child's clothing and ensure that the child is not too cold or too warm.
• We recommendation to ask your health professional for advice on safe sleeping. - Never use this product on a stand.
- The head of the child in the carrycot should never be lower than the body of the child.
- The carry handle and the bottom of the bassinet/carrycot should be inspected regularly for signs of damage and wear.
- Check that the bassinet/carrycot or seat unit or car seat attachment devices are correctly engaged before use.
- It is unsafe to use accessories not approved for use with this stroller.
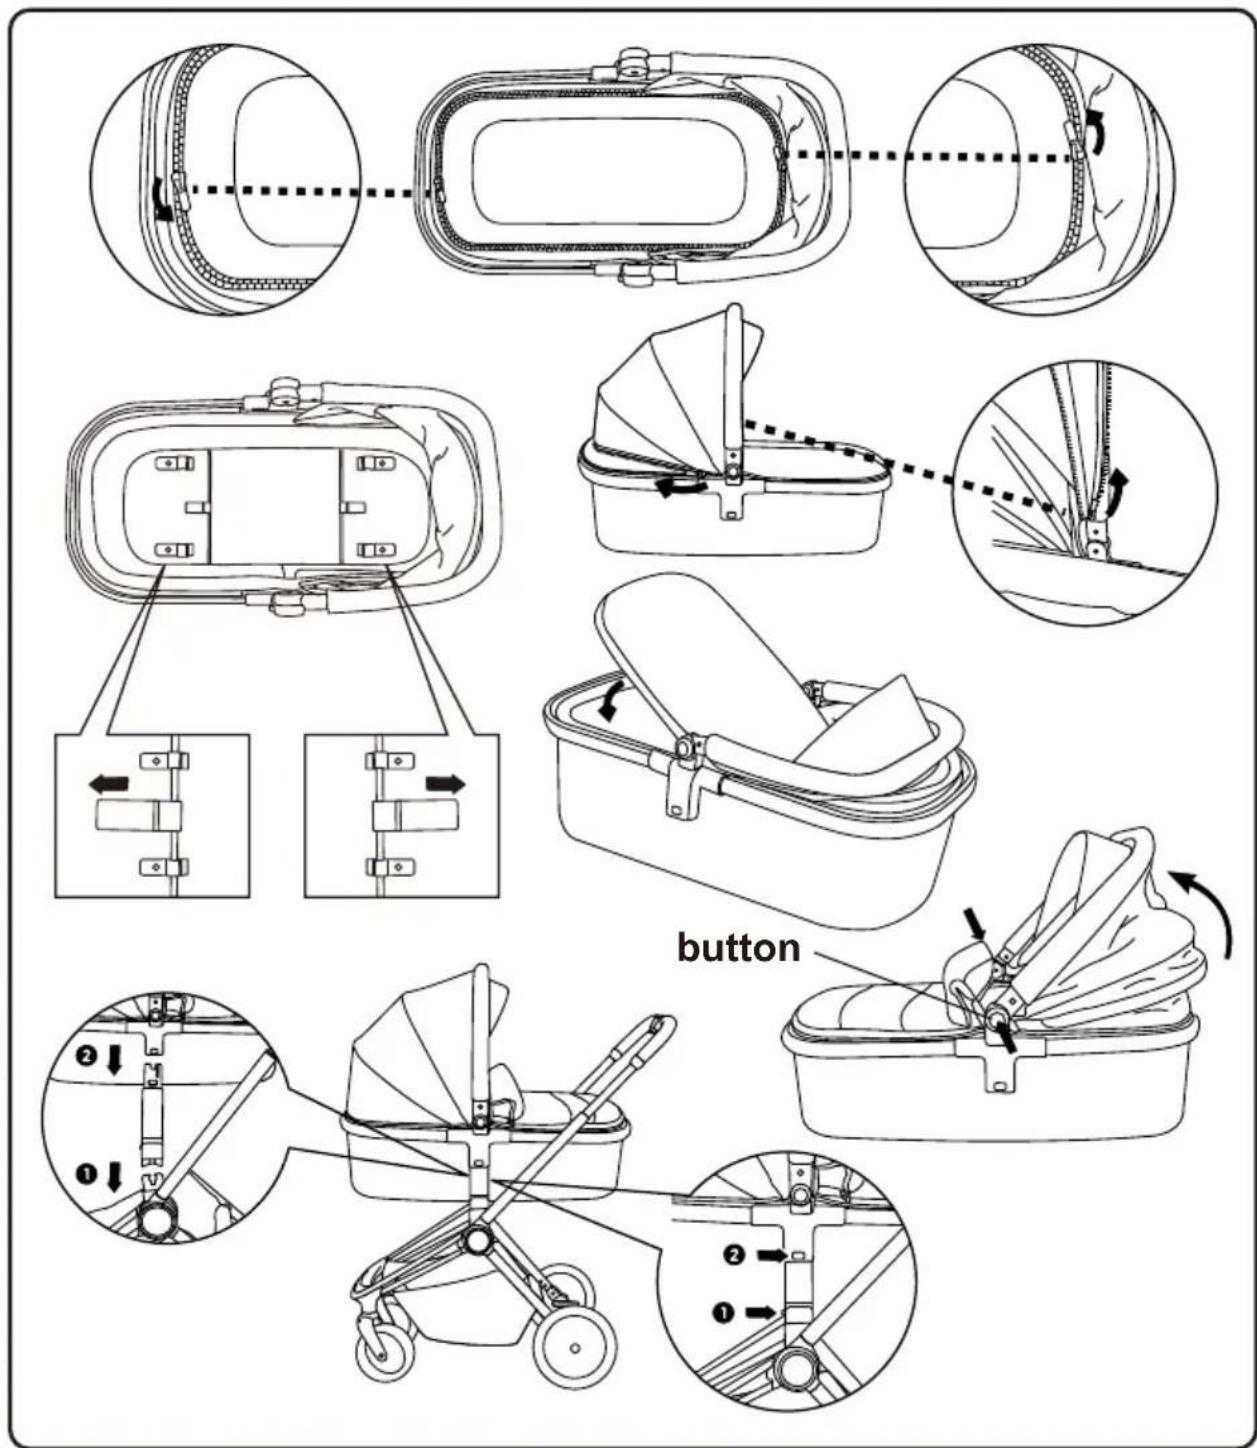
CARRYCOT SET UP
- Open the zipper inside of carrycot, remove the liner and reveal the bottom structures.
- Pull the tab on both supporting wire outward until they are fixed firmly to all four clips on the bottom.
- Zip-up the liner and lay the mattress flat.
- Pull the canopy forward while pressing the button on both sides until it is upright.
IMPORTANT!
• The child's head should be higher than his body in the carrycot.
- Make sure the handle is in the correct position before carrying or lifting.
- Carrycot must be used in conjunction with the adaptors.
CARRYCOT ATTACHMENT ON CHASSIS
- Fit the adaptors to the brackets on both sides on chassis.
- Place the carrycot down while aligning the latch of adaptor. A “click” sound indicates the carrycot is correctly installed.
- To remove the carrycot, press the buttons on both adaptors while lifting the carrycot.
IMPORTANT!
- ALWAYS remove your child from the bassinet/carrycot before installing on or removing from the stroller frame.
• The carrycot must always face towards the handle. - The carrycot must be removed from the frame before folding.
- Do not lift the stroller by the bassinet/carrycot.
- The parking device shall be engaged when placing and removing children.
MAINTENANCE
- To preserve the longevity of your stroller, it is important to perform simple, regular maintenance. From time to time, make sure that the joints and folding areas are still in good condition.
- To avoid risk or injury to your children, please check and maintain the stroller periodically.
- If not able to fold or unfold the product smoothly, check carefully and operate as the instructions specified to avoid unwanted damage.
Seat Fabric
- Do not use solvents, caustic or abrasive cleaning materials.
- To minimize shrinkage, simply reattach the seat to the frame to dry.
- Do not press, iron, dry clean, tumble dry or wring the fabric.
- If the seat covers need to be replaced, only use parts from an authorized dealer. They are the only ones that are guaranteed to have been safety tested and designed to fit this seat.

natural_image
Five abstract geometric line patterns with no text or symbolsPlastic/Metal Parts
- Wipe clean using a mild soap and warm water.
- You must not remove, dismantle or alter any part of the seat folding mechanism or brakes.
Wheel Care
- The wheels can be cleaned using a damp cloth. They will need to be dried completely with a soft towel or cloth.
Storage
- Sunshine can fade seat fabric and dry out tires, so storing your stroller indoors will prolong its good looks.
• DO NOT store outside.
- Ensure that the stroller is dry before storing for prolonged periods.
• Always store the stroller in a dry environment.
- Store the stroller in a safe place when not in use (i.e., where children cannot play with it).
• DO NOT place heavy objects on top of the stroller.
- DO NOT store the stroller near a direct heat source such as a radiator or fire.
WARNING!
natural_image
Technical line drawing of a mechanical linkage assembly with an inset showing a close-up of the component (no text or symbols present)
natural_image
Diagram of a mechanical device with a curved wheel and attached rod, showing a force or motion direction (no text or symbols)natural_image
Technical diagram of a bicycle steering wheel assembly with a close-up inset showing the mechanism (no text or symbols present)natural_image
Technical line drawing of a stroller assembly with two views of the handle (no text or symbols present)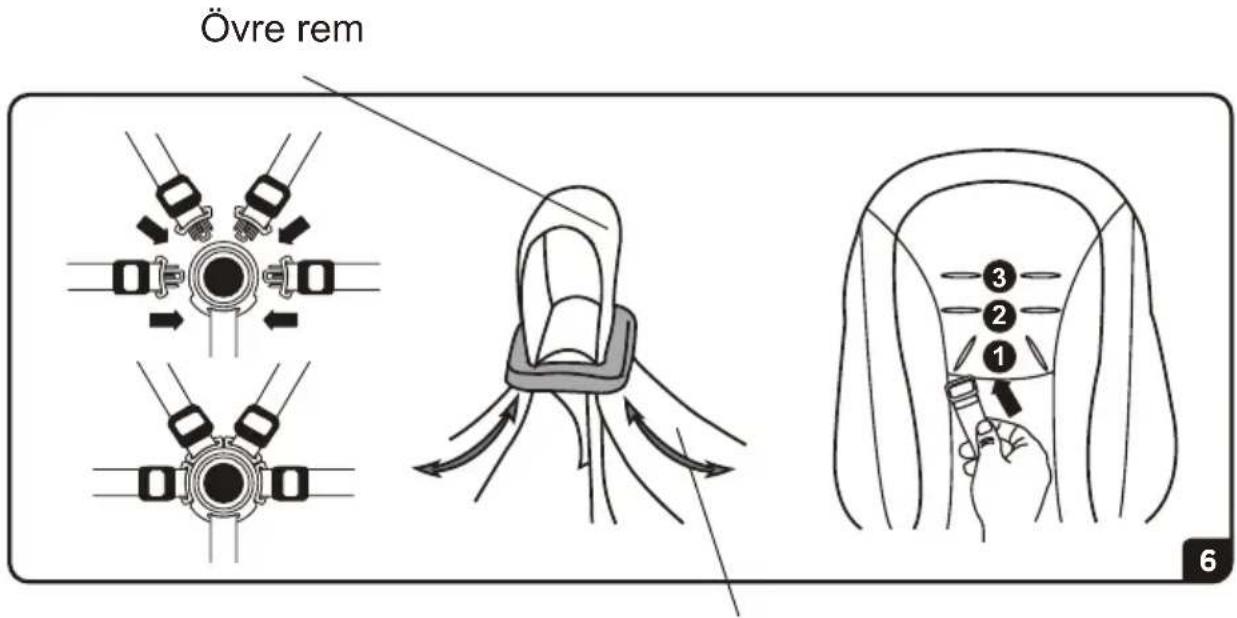
Undre rem
natural_image
Diagram showing two mechanical setups labeled a and b, illustrating a circular motion with arrows indicating direction (no text or symbols present)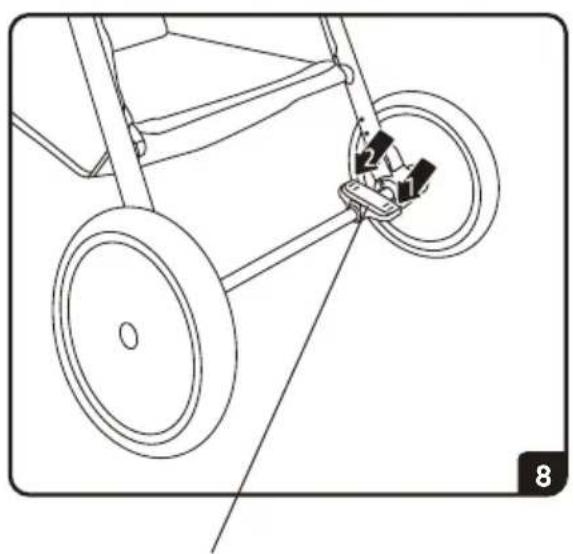
natural_image
Line drawing of a bicycle steering wheel with attached bracket (no text or symbols)Bromsaxel
natural_image
Technical illustration of a stroller with attached cable, showing mechanical assembly and motion direction (no text or symbols)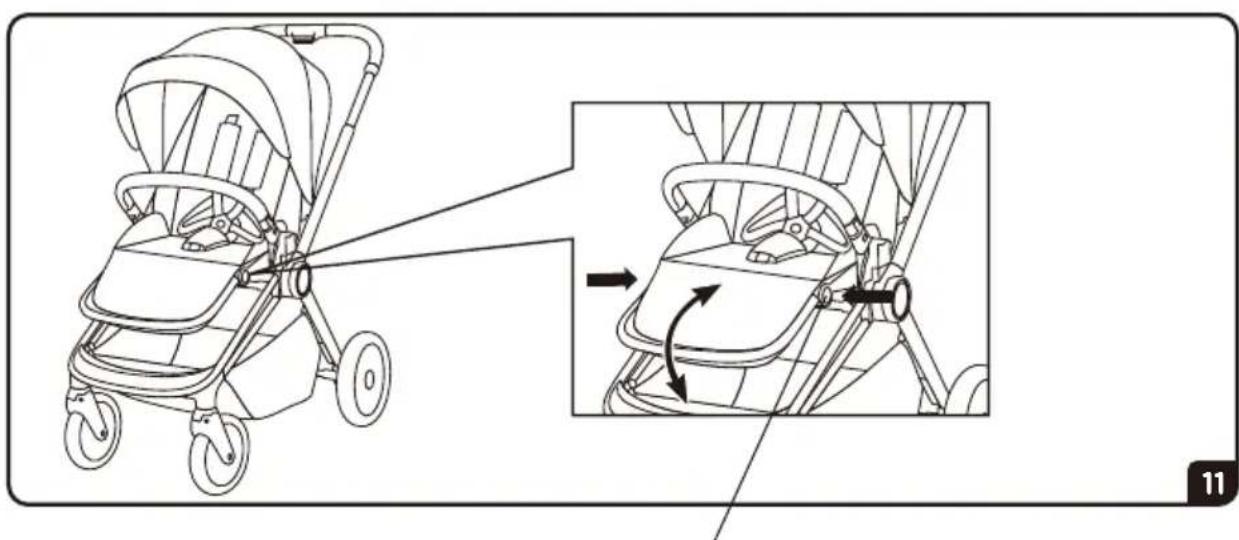
natural_image
Line drawing of a stroller with two views showing the side and front view of the seat (no text or symbols)Släppknapp
natural_image
Five abstract geometric symbols including squares, circles, triangles, and wavy lines (no text or labels)Plast/Metalldelar
natural_image
Technical line drawing of a mechanical linkage assembly with an inset showing a close-up of the component (no text or symbols present)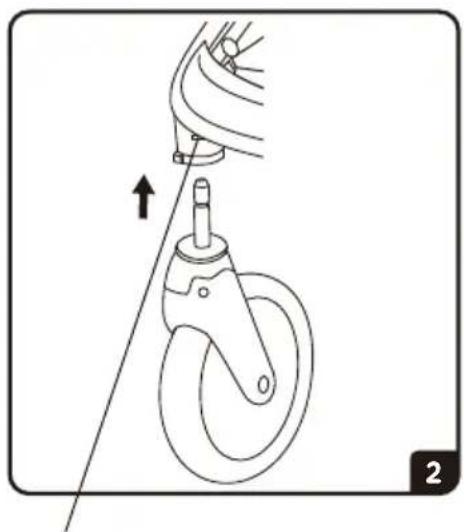
natural_image
Diagram of a mechanical device with a curved wheel and attached rod, showing a force or motion direction (no text or symbols)natural_image
Technical diagram of a bicycle steering wheel assembly with a close-up inset showing the mechanism (no text or symbols present)Bakhjul Knapp for fjerning
natural_image
Technical line drawing of a stroller assembly with directional arrows indicating motion (no text or symbols)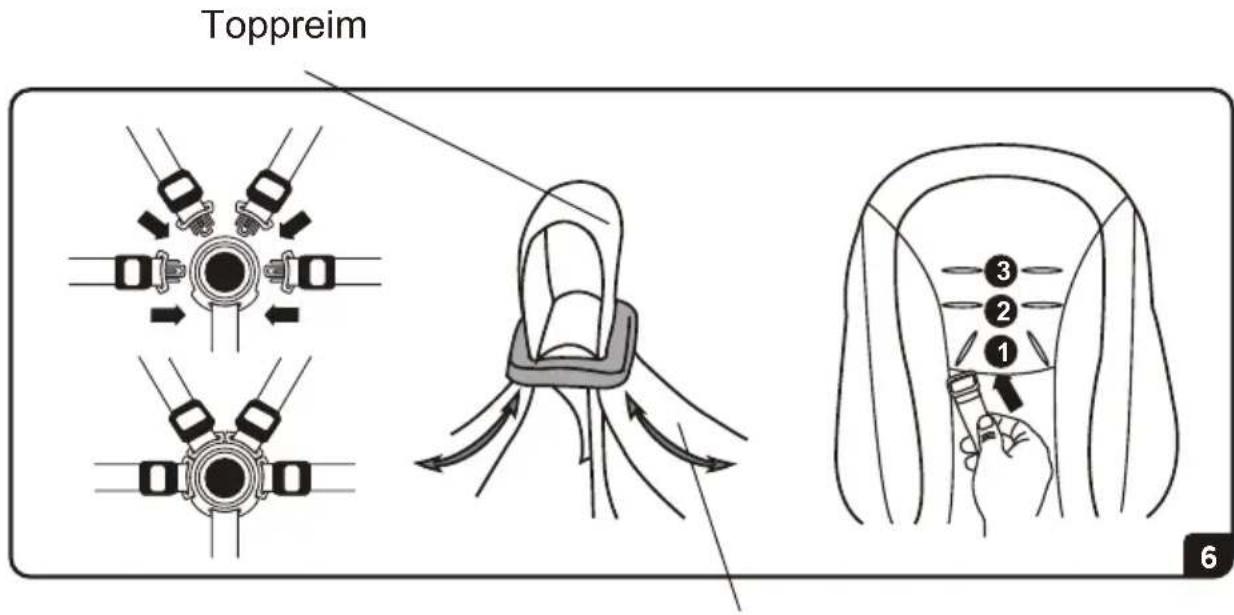
Lav stropp

natural_image
Illustration of two mechanical components labeled a and b, showing rotational motion with arrows indicating direction (no text or symbols beyond labels)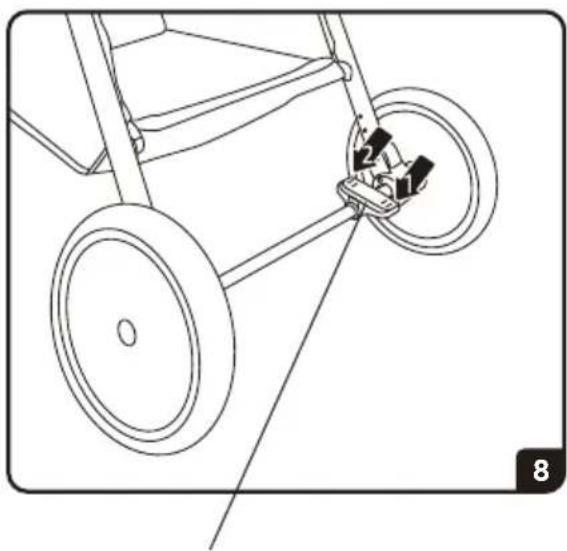
natural_image
Line drawing of a bicycle steering wheel with a bracket and guide rails (no text or symbols)Bremsestang
Justeringsknapp for styret
natural_image
Technical illustration of a stroller with attached cable, showing mechanical assembly and motion direction (no text or symbols)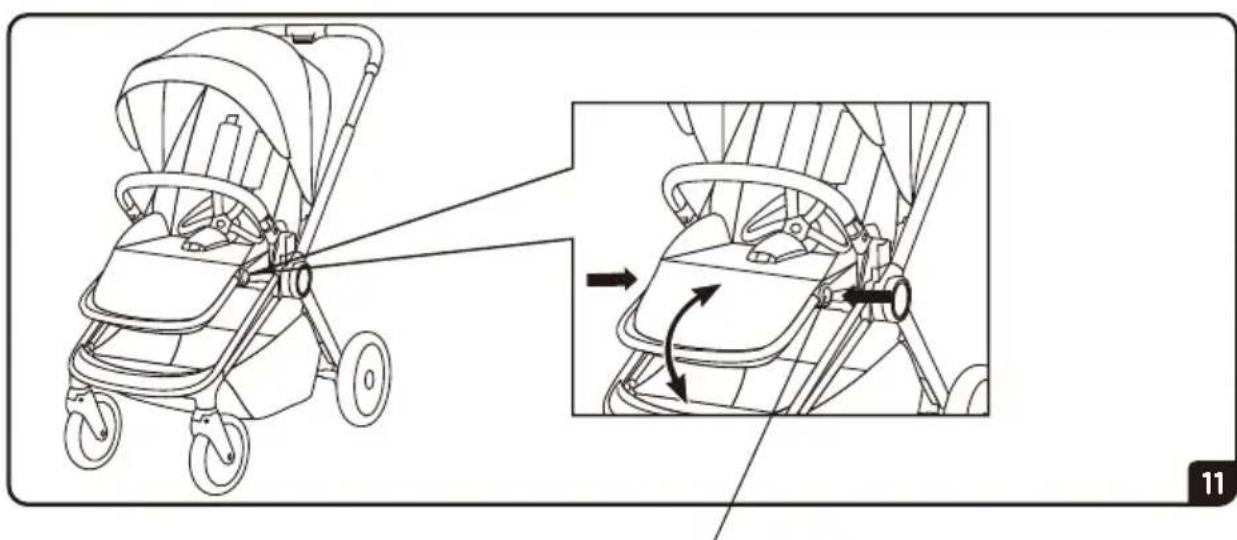
natural_image
Line drawing of a baby stroller with zoomed-in detail showing the seat and seat alignment (no text or symbols)Løsneknapp
Justeringsknapp for styret
Løsneknapp
natural_image
Five abstract geometric line drawings with crossed and straight lines, no text or symbols presentPlast-/metalldeler
natural_image
Technical line drawing of a mechanical linkage assembly with an inset showing the internal components (no text or symbols present)
natural_image
Diagram of a mechanical device with a curved wheel and attached rod, showing a force or motion direction (no text or symbols)natural_image
Technical diagram of a bicycle steering wheel assembly with a close-up inset showing the mechanism (no text or symbols present)natural_image
Technical line drawing of a stroller assembly with directional arrows indicating motion (no text or symbols)Sæde Udløserknap
∅verste sele
Nederste sele
natural_image
Illustration of two mechanical components labeled a and b, showing rotational motion with arrows indicating direction (no text or symbols beyond labels)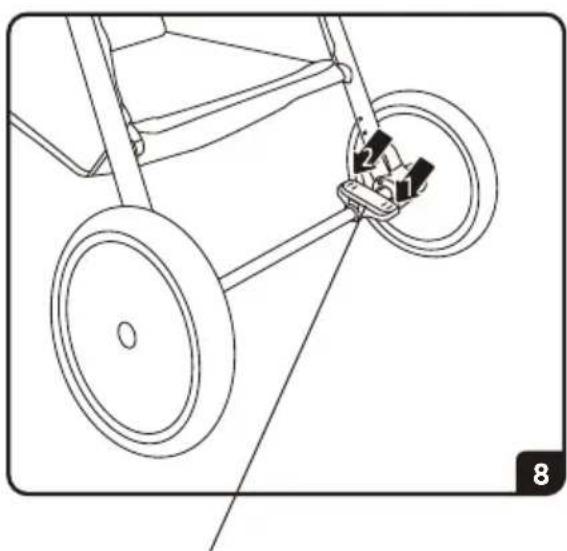
natural_image
Line drawing of a two-wheeled cart with wheels and a belt buckle (no text or symbols)Bremsestang
natural_image
Technical illustration of a stroller with attached cable, showing mechanical assembly and motion direction (no text or symbols)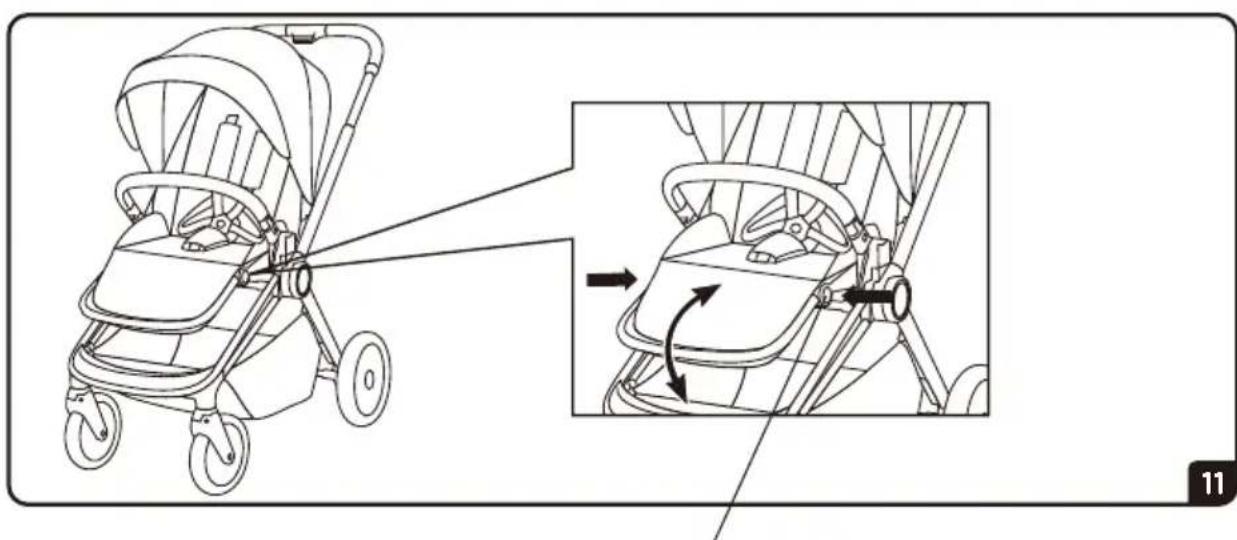
natural_image
Line drawing of a stroller with an inset showing the side view of the seat (no text or symbols present)Udløserknap
natural_image
Five abstract geometric line patterns with crossed and straight lines, no text or symbols presentPlastik-/Metaldele
natural_image
Technical line drawing of a mechanical linkage assembly with an inset showing a close-up of the component (no text or symbols present)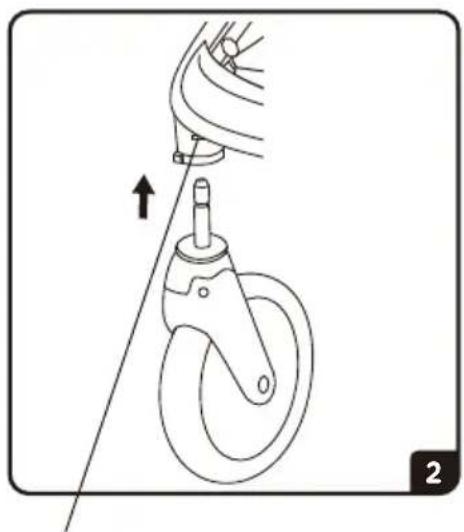
natural_image
Diagram of a mechanical device with a curved wheel and attached rod, showing motion direction (no text or symbols)natural_image
Technical line drawing of a bicycle steering wheel assembly with a close-up inset showing the bracket (no text or symbols)natural_image
Technical line drawing of a stroller assembly with directional arrows indicating motion (no text or symbols)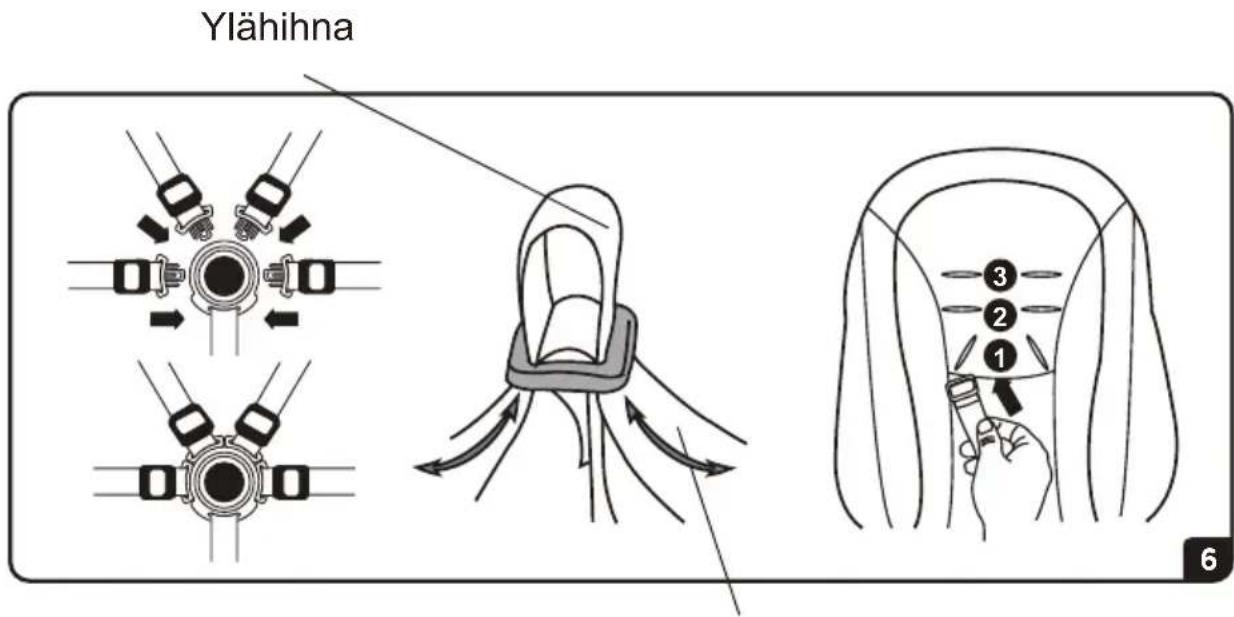
natural_image
Illustration of two mechanical components labeled a and b, showing rotational motion with arrows indicating direction (no text or symbols beyond labels)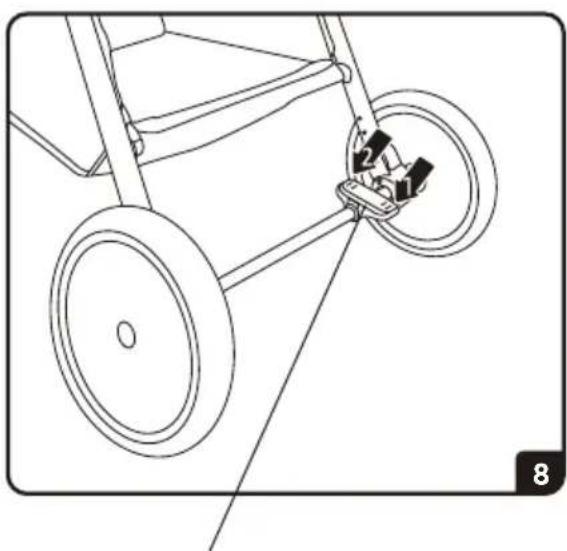
natural_image
Line drawing of a wheeled cart with wheels and a belt buckle (no text or symbols)Jarrutanko
natural_image
Technical illustration of a stroller with attached cable, showing mechanical assembly and motion direction (no text or symbols)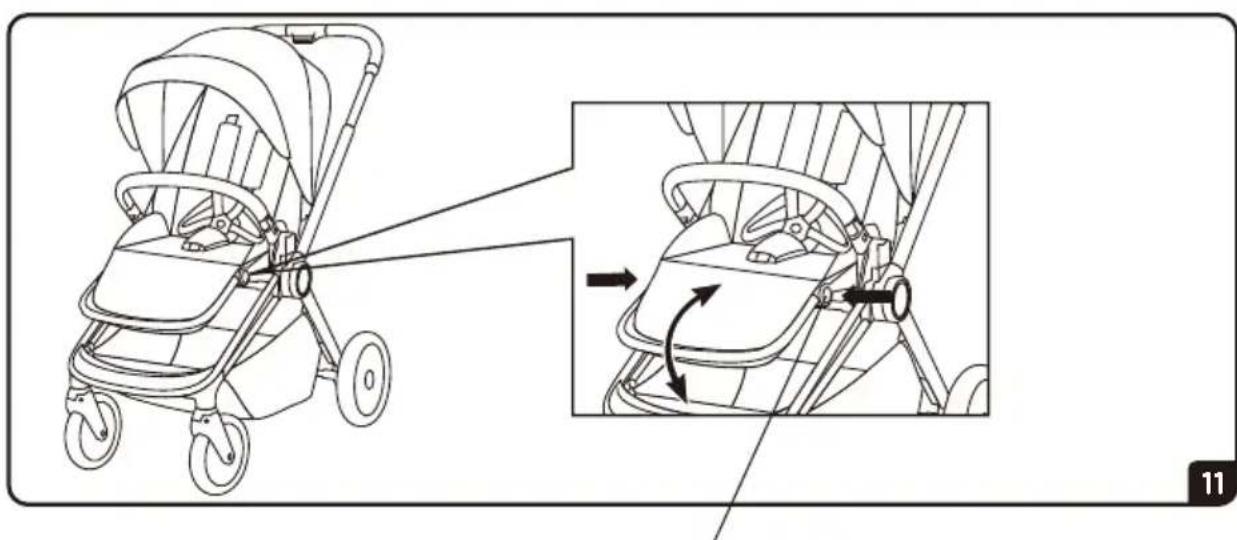
natural_image
Line drawing of a baby stroller with zoomed-in detail showing the seat and body positioning (no text or symbols)Vapautuspainike
natural_image
Five abstract geometric line patterns with no text or symbolsMuovi- / metalliosat
natural_image
Technical line drawing of a mechanical linkage assembly with an inset showing a close-up of the component (no text or symbols present)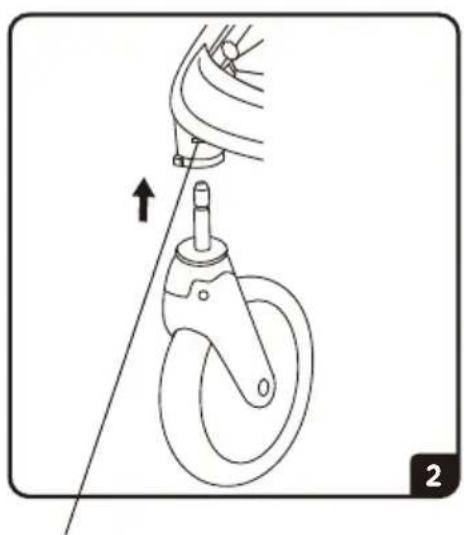
natural_image
Diagram of a mechanical device with a curved wheel and attached rod, showing a force or motion direction (no text or symbols)natural_image
Technical diagram of a bicycle steering wheel assembly with a close-up inset showing the mechanism (no text or symbols present)natural_image
Technical line drawing of a stroller assembly with directional arrows indicating motion (no text or symbols)Oberer Gurt
Unterer Gurt
natural_image
Illustration of two mechanical components labeled a and b, showing rotational motion with arrows indicating direction (no text or symbols beyond labels)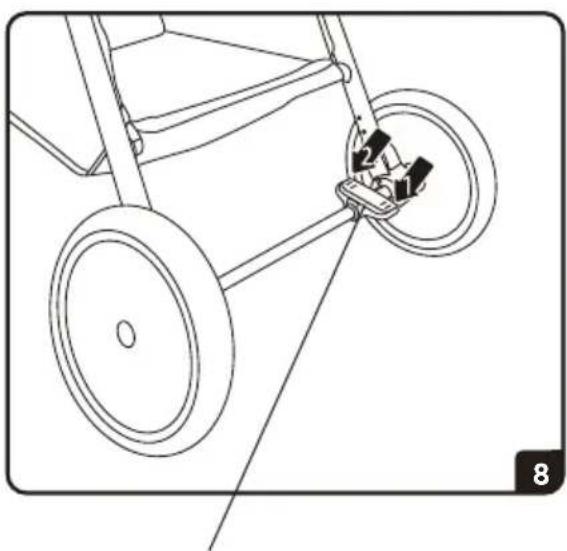
natural_image
Line drawing of a bicycle steering wheel with a belt buckle (no text or symbols)Bremsstange
natural_image
Line drawings of a baby stroller with hand positioning and side views, showing body positioning and adjustment (no text or symbols)natural_image
Technical illustration of a stroller with attached cable, showing mechanical assembly and motion direction (no text or symbols)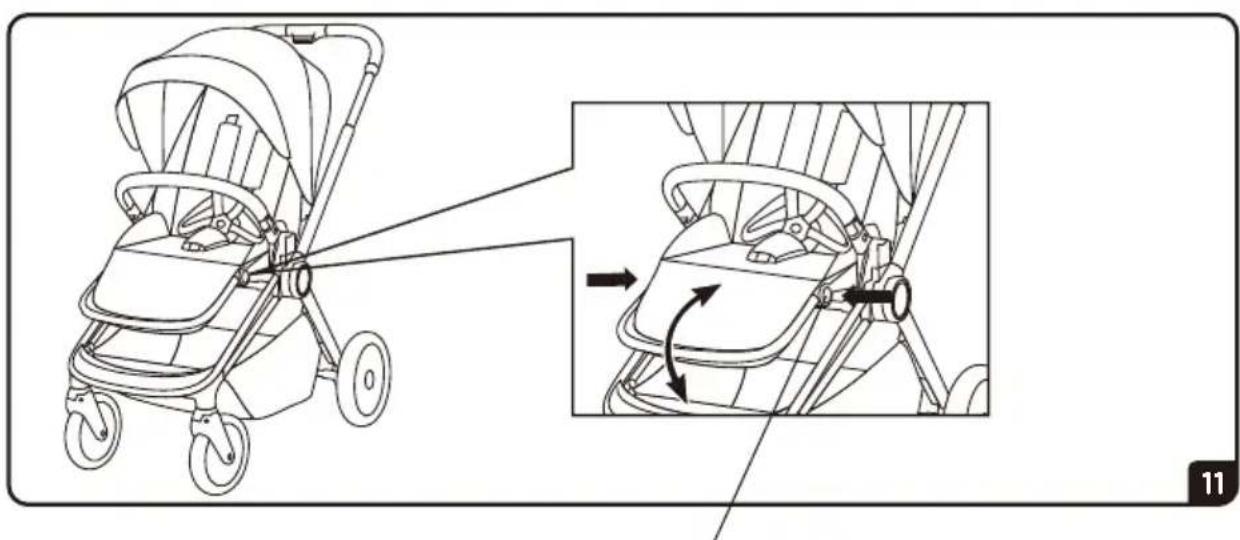
natural_image
Line drawing of a baby stroller with zoomed-in detail showing the seat and body positioning (no text or symbols)Entriegelungsknopf
natural_image
Five abstract geometric line drawings with crossed and straight lines, no text or symbols presentProduced by: Jollyroom AB
Sörredsvägen 111
SE- 418 78 Göteborg
SWEDEN
Contact:
+46(0)31 310 00 00

Produceret af: Jollyroom AB
Sörredsvägen 111
SE-418 78 Gøteborg
SVERIGE
Kundeservice:
+45 88 44 88 88

Producerad av:
Jollyroom AB
Sörredsvägen 111
SE-418 78 Göteborg
SVERIGE
Konsumentkontakt:
+46(0)31 310 00 00

Tuottanut:
Jollyroom AB
Sörredsvägen 111
SE-418 78 Göteborg
RUOTSI
Asiakaspalvelu:
09-42 41 55 55

Produsert av :
Jollyroom AB
Sörredsvägen 111
SE-418 78 Göteborg
SWEDEN
Kundekontakt:
+47 33 50 93 50

Produziert von:
Jollyroom AB
Sörredsvägen 111
SE-418 78 Göteborg
SCHWEDEN
Kundenservice:
+49 (0) 40 2999 7999