Easy Fly Lux 4 - Stroller Beemoo - Free user manual and instructions
Find the device manual for free Easy Fly Lux 4 Beemoo in PDF.

| Product Type | Stroller |
| Model | Easy Fly Lux 4 |
| Brand | Beemoo |
| Dimensions (unfolded) | Approx. 100 x 50 x 105 cm |
| Dimensions (folded) | Approx. 30 x 25 x 55 cm |
| Weight | 6.5 kg |
| Max Weight Capacity | 15 kg |
| Age Range | From 6 months to 3 years |
| Harness Type | 5-point harness with adjustable straps |
| Recline Positions | Multiple (including lie-flat) |
| Canopy Type | Extendable UPF 50+ canopy with ventilation window |
| Brake Type | Lockable rear wheels with foot brake |
| Folding Mechanism | One-hand compact fold with auto-lock |
| Suspension | Front wheel suspension for smooth ride |
| Wheels | 4 front swivel wheels with lock, rear fixed wheels |
| Accessories Included | Rain cover, shopping basket, cup holder, carry strap |
| Fabric Material | Breathable polyester, removable and washable seat pad |
| Cleaning Instructions | Hand wash seat pad with mild soap, air dry; wipe frame with damp cloth |
| Safety Standards | EN 1888:2019 |
| Warranty | 2 years limited warranty |
Frequently Asked Questions - Easy Fly Lux 4 Beemoo
User questions about Easy Fly Lux 4 Beemoo
0 question about this device. Answer the ones you know or ask your own.
Ask a new question about this device
Download the instructions for your Stroller in PDF format for free! Find your manual Easy Fly Lux 4 - Beemoo and take your electronic device back in hand. On this page are published all the documents necessary for the use of your device. Easy Fly Lux 4 by Beemoo.
USER MANUAL Easy Fly Lux 4 Beemoo
natural_image
Line drawing of a baby stroller with wheels and a circular warning symbol (no text or labels)
max 22 kg
tax 4 years
IMPORTANT!
READ CAREFULLY AND KEEP FOR FUTURE REFERENCE.
MODEL: Beemoo Easy Fly Lux 4
VIKTIGT!
LÄS NOGA OCH BEHÅLL FÖR FRAMTIDA REFERENS.
MODELL: Beemoo Easy Fly Lux 4
ADVARSEL!
LES N∅YE OG BEHOLD FOR FREMTIDIG REFERANSE.
MODELL: Beemoo Easy Fly Lux 4
ADVARSEL!
LÆS OMHYGGELIGT OG GEM TIL FREMTIDIG REFERENCE.
MODEL: Beemoo Easy Fly Lux 4
TÄRKEÄÄ!
LUE OHJEET HUOLELLISESTI JA SÄILYTÄ NE TULEVAA TARVETTA VARTEN
MALLI: Beemoo Easy Fly Lux 4
WICHTIG!
- WARNING! Never leave the child unattended.
- WARNING! Ensure that all the locking devices are engaged before use.
- WARNING! To avoid injury ensure that the child is kept away when unfolding and folding this product.
- WARNING! Do not let the child play with this product.
- WARNING! Use a harness as soon as the child can sit unaided.
- WARNING! This seat unit is not suitable for children under 6 months.
- WARNING! Always use the restraint system.
- WARNING! Check that the pram body or seat unit devices are correctly engaged before use.
-
WARNING! This product is not suitable for running or skating.
-
Follow the manufacturer's instructions at all times.
- That any load attached to the handle and/or on the back of the backrest and/or on the sides of the vehicle will affect the stability of the vehicle.
- That the vehicle shall be used only for one child for which it has been designed.
- The accessories which are not approved by the manufacturer shall not be used.
- Only replacement pars supplied or recommended by the manufacturer/ distributor shall be used.
- Do not carry extra children or bags on this stroller, unless in an approved accessory.
- Make sure children are clear of any moving parts if you adjust the stroller, otherwise they may be injured.
- Please ensure that the safety harness is adjusted and used at all times.
- Do not carry more than 3kg in basket or 0.5kg in any pocket (if supplied).
- The wight of the child using this stroller should not be more than 22kg.
- Recommended age: from 6 months or when your child can sit on its own and up to 4 years.
- Do not allow children to stand on the seat or footrest.
- Do not use on stairs or escalators.
- Do not use the stroller near an open fire, barbecue, or exposed flame.
• This product is not intended for commercial use.
- That the parking device shall be engaged when placing and removing the children.
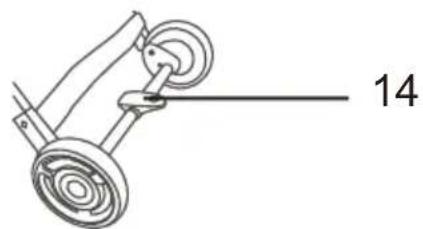
PART LIST
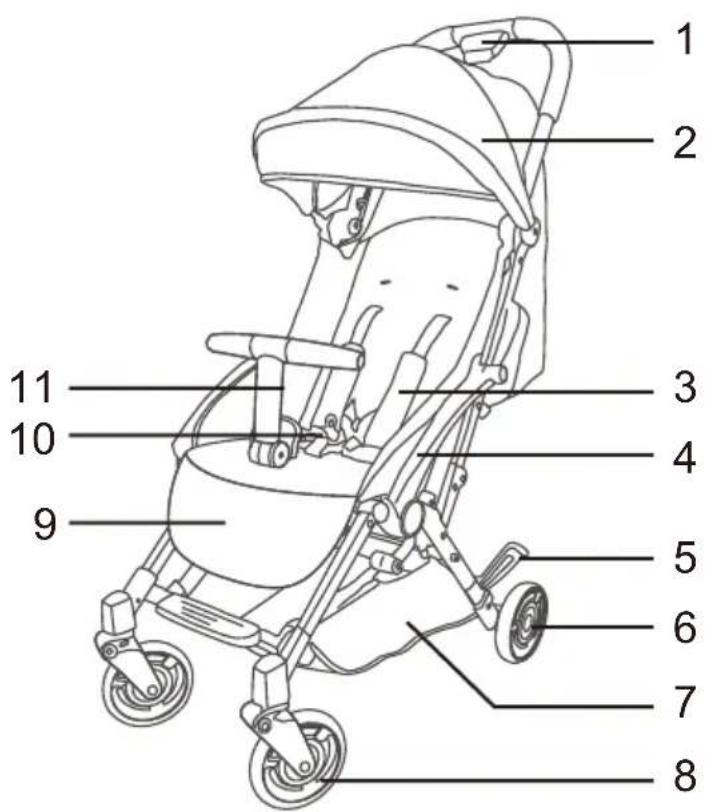
1.Folding Button
2.Canopy
3. Shoulder Protector
4.Armrest
5.Folding Latch
6.Rear Wheel
7.Basket
8.Front Wheel
9.Footrest
10.Harness Buckle
11.Front Bumper
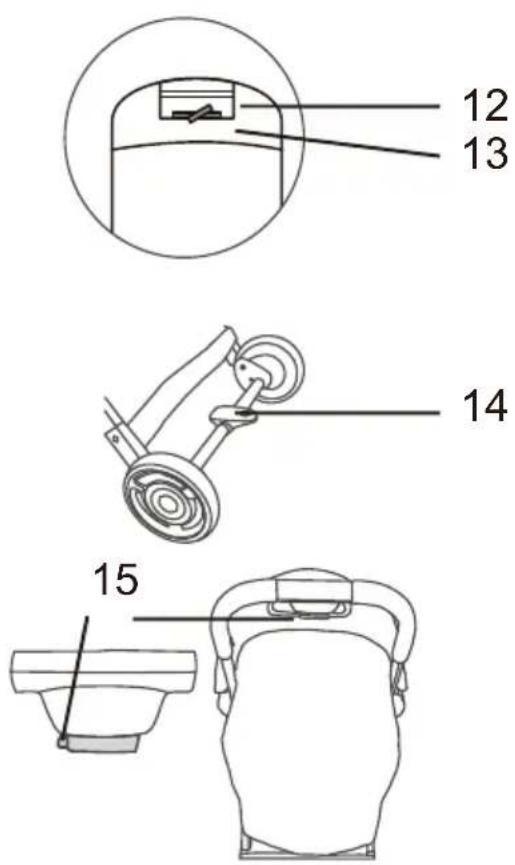
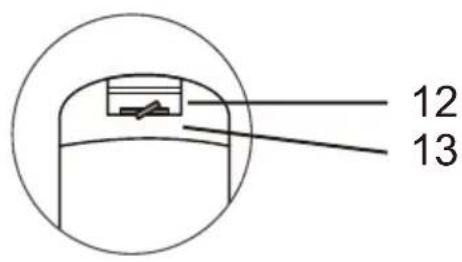
12.Backrest
13. Backrest Adjustable Button
14. Brake Lever
15. Handle Released Button
UNFOLDING & ASSEMBLING
1. To unfold frame
Release the locked folding latch, see F1. Hold the hand grip by one hand, pull up the buggy until unfolded complete, see F3.
F1 F2 F3
natural_image
Line drawing of a robotic exoskeleton device with a wheel and arm, showing no text or symbols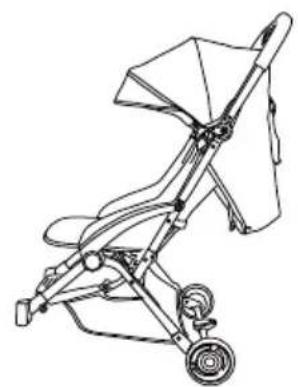
natural_image
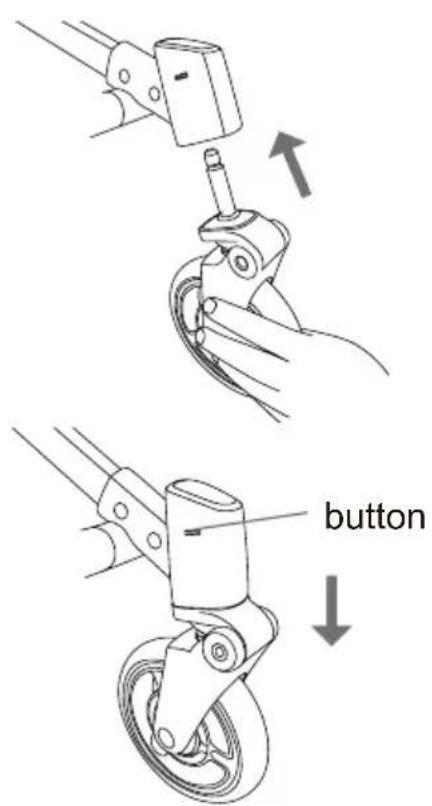
Line drawing of a baby stroller with wheels and seat (no text or symbols)2. To assemble the front wheels
Insert the steel pin of the front wheel into the front leg until the wheel clicks into position.
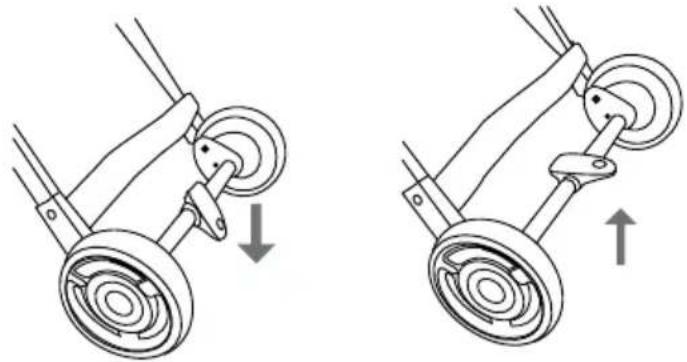
3. To detach the front wheels
Press down the steel button on the side of the leg and pull out the whee button.
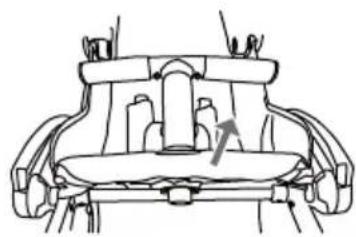
4.To assemble front bumper
Open the seat cover (see F4), face the backside of front bumper button (see F5), align front bumper pegs with the holes on seat adaptors, slide and move back with 90 degrees, press into until front bumper fix (see F6).
F4 F5 F6
5.To disassemble front bumper
Move the button under the seat with 90 degree s(see F7), in the meantime lift up front bumper (see F8), close the seat cover (see F9).
natural_image
Line drawing of a hand holding a tool with a curved arrow indicating motion (no text or symbols)F7 F8 F9
natural_image
Technical line drawing of a mechanical component with no visible text or symbols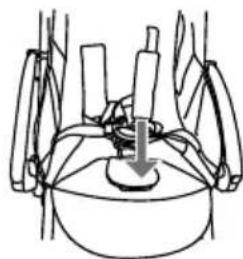
natural_image
Diagram of a mechanical assembly with a central component and surrounding blades (no text or symbols)USER INSTRUCTIONS
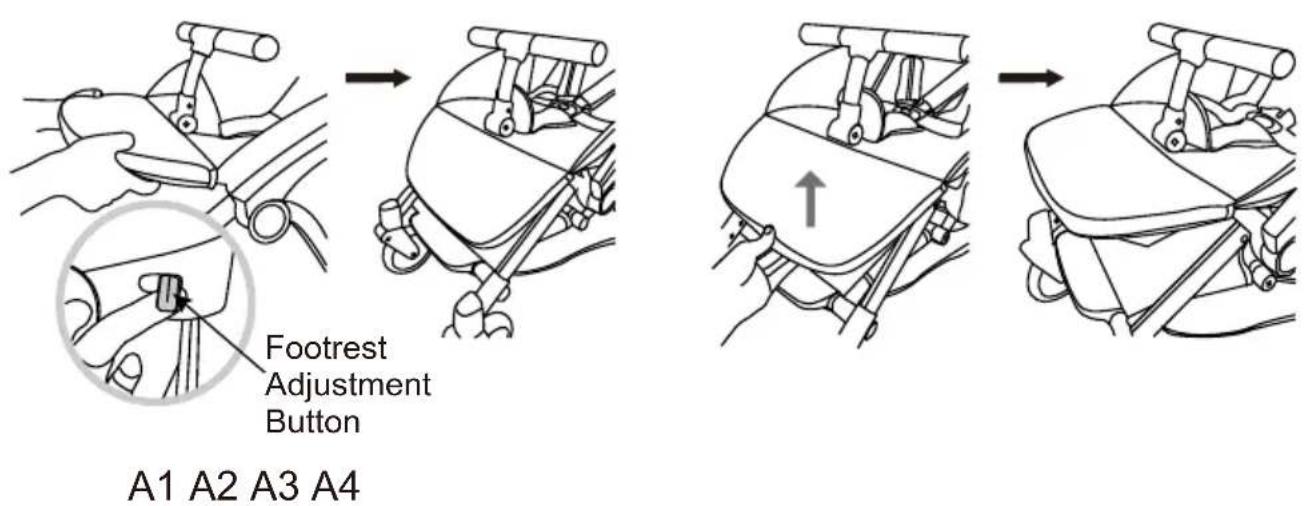
1. To use footrest adjustment
Pull out the footrest adjust button as A1 to lay down the footrest as A2. Pull the footrest as A3 and A4.
2. To use front bumper
Press the button and push forward, the front bumper will be release.
Pull backward until hear "click", the front bumper can be use.
3. To use brakes
Step down brake levers and the pushchair is braked.
Step up brake levers and the braking is released.
natural_image
Two identical line drawings of a wheeled vehicle with wheels and a pull-up mechanism, showing no text or symbols.
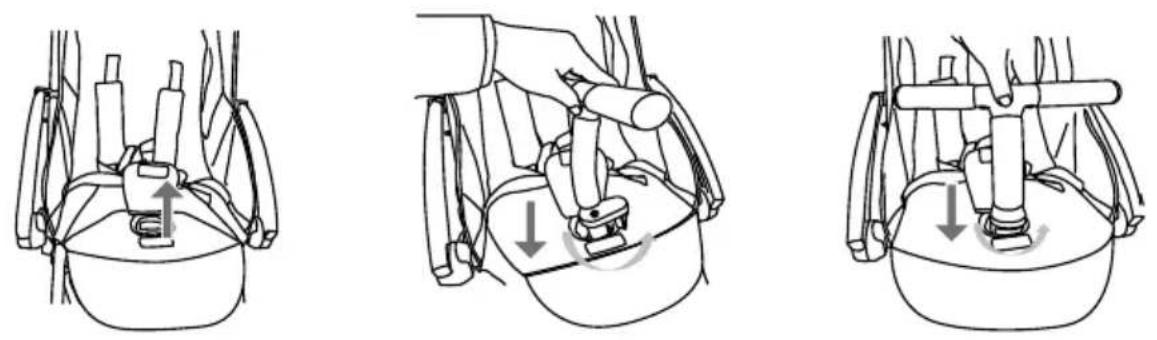
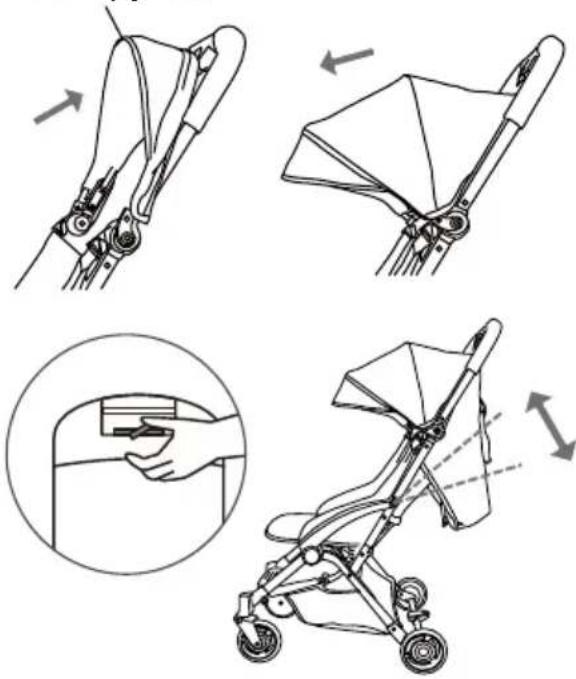
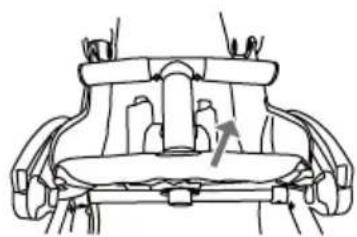
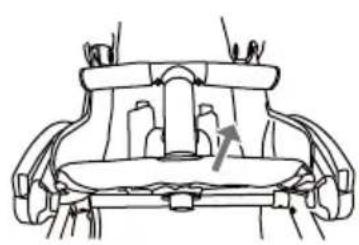
4. To use canopy
Push back the canopy rod, the canopy can fold step by step. Pull the canopy rod, the canopy can open step by step.
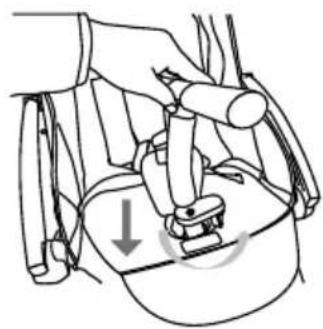
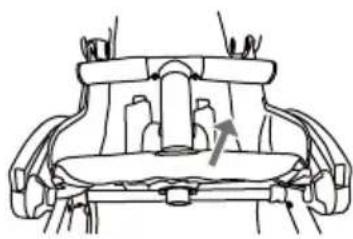
5.To use reclining back rest
Pinch the recline button and push up, the other hand hold the recline strap and adjust, the back rest can change between 105 degrees and 155 degrees.
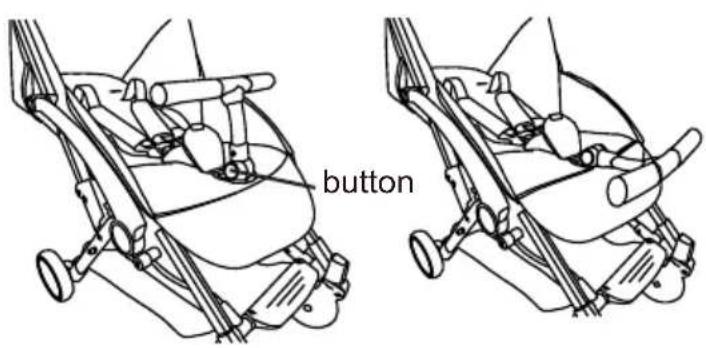
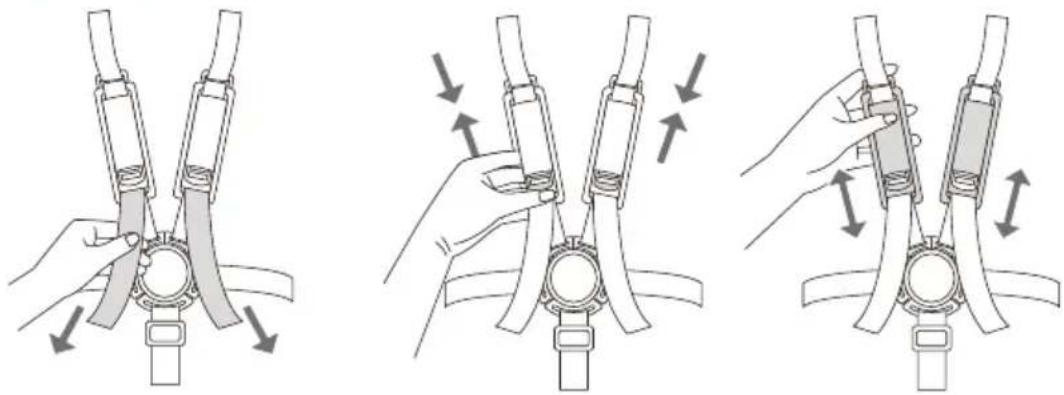
6.To use restrain system
To unlock buckle, press in on center button and pull harness out from each side. To lock buckle, push each side of harness back into buckle until each clicks in place.
canopy rod
natural_image
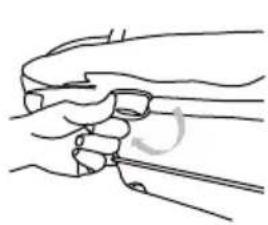
Line drawing of a steering wheel (no text or symbols)7.To adjust the harness length
WARNING! Always use the crotch strap in combination with waist belt.
natural_image
Three-step diagram showing hand positioning of a mechanical component with arrows indicating movement (no text or symbols)8.To fold
Note: The front bumper should always be in the folded-dow.
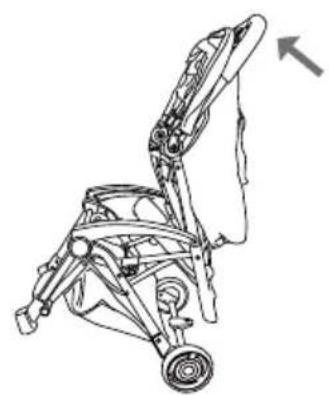
(1)Fold the canopy, press the bumper button and pull the bumper forward to the folded-down, see A5.
(2)Hold the handle, press button 1 first then button 2 to fold the stroller until it can stand by itself, see A6.
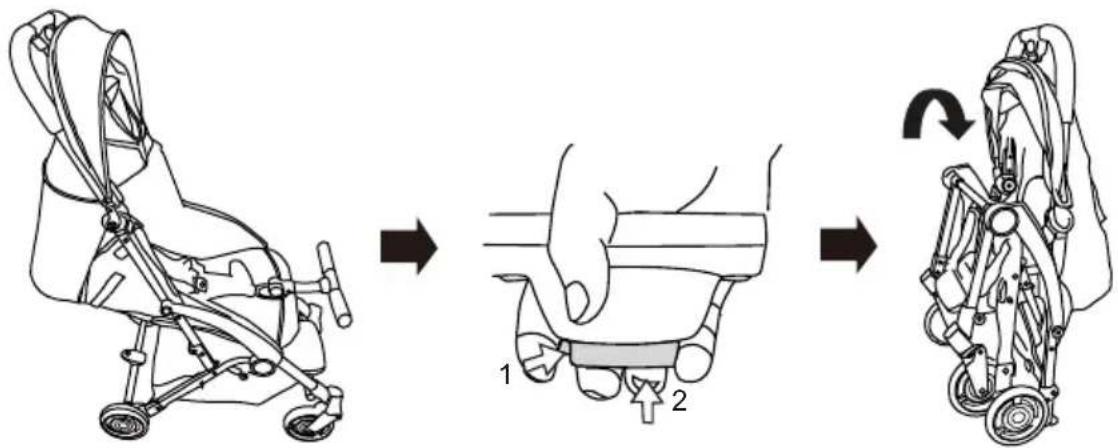
A5 A6
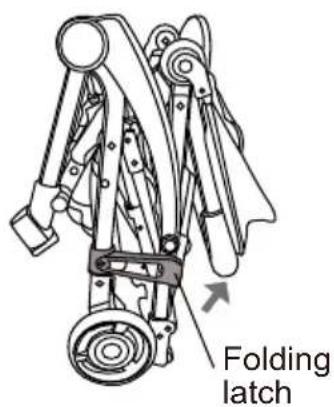
(3)Close the folding latch and and ensure it's locked, see A7.
(4) Hold the handle, press button 1 first then button 2, move back the he handle until in the end position, see A8.
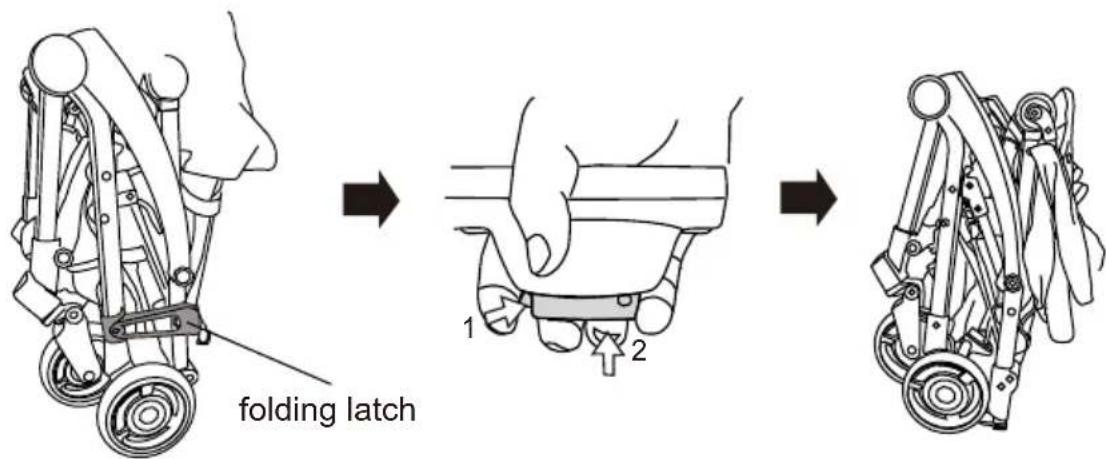
A7 A8
CARE AND MAINTENANCE
- To avoid risk of injury to your child, please check and maintain the stroller periodically.
- Check whether there are loose screws, damaged parts or crack in cloth. If necessary, replace the bad ones. Do the rehabilitate restrictly according to the instruction.
- Clean the fabric: use the brush or other clean tools. Other parts: use the home-usage soap.

natural_image
Five abstract geometric line drawings with intersecting and overlapping shapes (no text or symbols)WARNING
natural_image
Mechanical linkage diagram showing a wheel and shaft assembly (no text or symbols)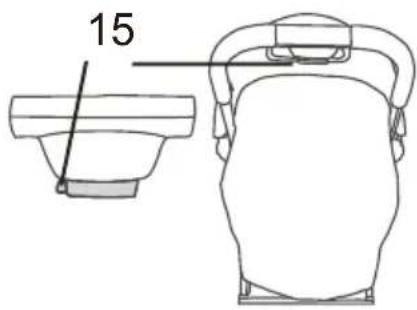
- Hopfällningsknapp
2.Sufflett
3.Axelskydd
4.Ram - Transportlås
6.Bakhjul - Varukorg
8.Framhjul
natural_image
Side profile sketch of a robotic arm with articulated joints and wheels, showing head and torso alignment (no text or symbols)
natural_image
Line drawing of a baby stroller with wheels and seat (no text or symbols)natural_image
Diagram of a mechanical assembly with no visible text or symbolsF4 F5 F6
natural_image
Mechanical diagram showing a hand operating a seatbelt with a downward arrow indicating force or motion (no text or symbols present)
natural_image
Mechanical assembly diagram showing a rotating component with a downward arrow indicating motion (no text or symbols)5. Demontering av frontbygeln
natural_image
Line drawing of a hand gripping a tool with an arrow indicating rotation (no text or symbols)F7 F8 F9
natural_image
Technical line drawing of a mechanical component with no visible text or symbols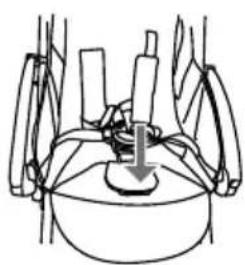
natural_image
Diagram of a mechanical assembly with a central component and surrounding parts (no text or labels)BRUKSANVISNING
natural_image
Two diagrams showing a bicycle steering wheel assembly with directional arrows indicating motion (no text or symbols present)4. Sufflett
natural_image
Technical line drawing of a robotic arm with two views showing joint movement (no text or symbols)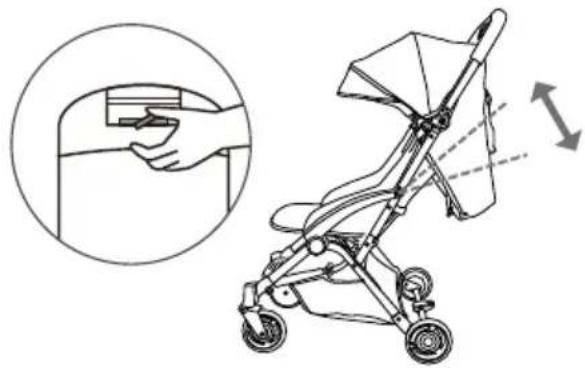
natural_image
Illustration of a baby stroller with hand holding a device, showing body positioning and height measurement (no text or symbols)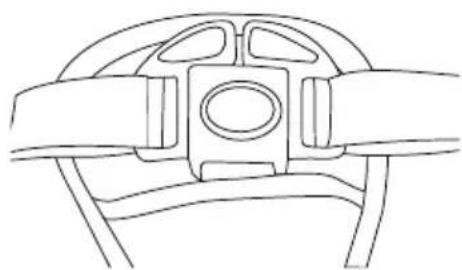
natural_image
Line drawing of a car steering wheel (no text or symbols)natural_image
Three-step illustration showing hand positioning of a mechanical component with arrows indicating motion (no text or symbols)A5 A6
natural_image
Five abstract geometric line drawings with intersecting and overlapping shapes (no text or symbols)ADVARSEL!
natural_image
Line drawing of a mechanical device with wheels and a head, showing no text or symbols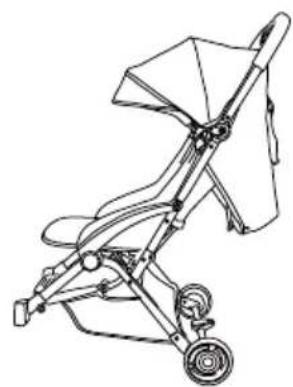
natural_image
Line drawing of a baby stroller with wheels and seat (no text or symbols)2. Slik monterer du framhjulene
Sett stålpinnen på framhjulet inn i forbenet til hjulet klikker på plass.
natural_image
Line drawing of a hand gripping a tool, no text or symbols presentF7 F8 F9
natural_image
Technical line drawing of a mechanical component with no visible text or symbols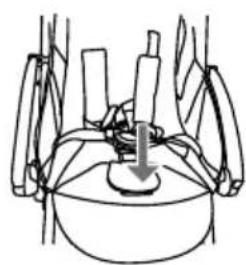
natural_image
Diagram of a mechanical assembly with a central component and surrounding components (no text or labels)BRUKERINSTRUKSJONER
natural_image
Mechanical diagram showing two different configurations of a pulley or wheel assembly with directional arrows indicating motion (no text or symbols present)
4. Bruk av kalesjen
natural_image
Technical line drawing of a robotic arm joint, showing two different views (no text or symbols present)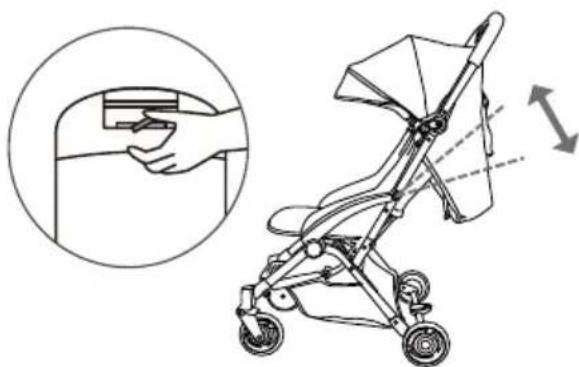
natural_image
Illustration of a baby stroller with hand positioning and side view showing device placement (no text or symbols)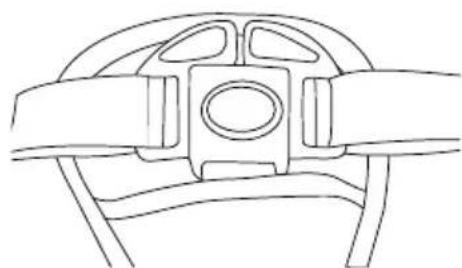
natural_image
Line drawing of a car wheel rim and seat (no text or symbols)natural_image
Three-step illustration showing hand positioning of a mechanical component with arrows indicating motion (no text or symbols)natural_image
Five abstract geometric line drawings with intersecting and overlapping shapes (no text or symbols)ADVARSEL!
natural_image
Line drawing of a mechanical device with wheels and attached arm, no text or symbols present
natural_image
Line drawing of a baby stroller with wheels and seat (no text or symbols)natural_image
Mechanical diagram showing two different configurations of a wheel and suspension mechanism (no text or symbols)4. Brug af kaleche
natural_image
Diagram showing two mechanical arm joint configurations with arrows indicating motion direction (no text or symbols)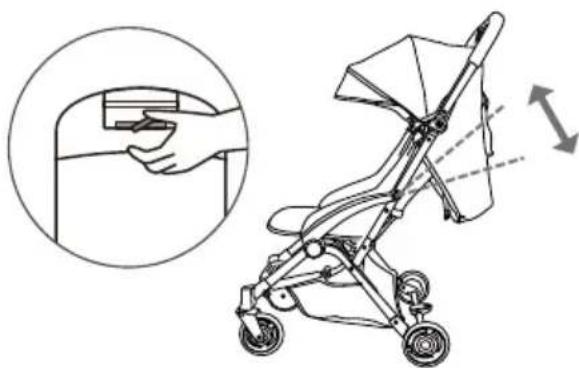
natural_image
Illustration of a baby stroller with hand holding a device, showing body positioning and height measurement (no text or symbols)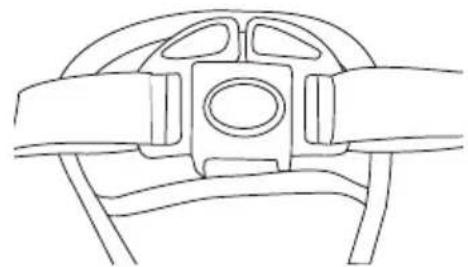
natural_image
Line drawing of a car steering wheel (no text or symbols)natural_image
Three-step diagram showing hand positioning of a mechanical component with arrows indicating movement (no text or symbols)8. Sammenfoldning
A5 A6
natural_image
Five abstract geometric line drawings with intersecting and curved shapes (no text or symbols)VAROITUS!
natural_image
Line drawing of a hand holding a tool with an arrow indicating rotation (no text or symbols)F7 F8 F9

natural_image
Technical line drawing of a mechanical component with no visible text or symbols
natural_image
Diagram of a mechanical assembly with a central component and surrounding parts (no text or symbols)KÄYTTÖOHJEET
natural_image
Mechanical diagram showing two different configurations of a pulley or wheel assembly with directional arrows indicating motion (no text or symbols present)
natural_image
Mechanical linkage diagram showing two different joint configurations (no text or symbols)
natural_image
Illustration of a baby stroller with hand positioning and side view of the seat (no text or symbols)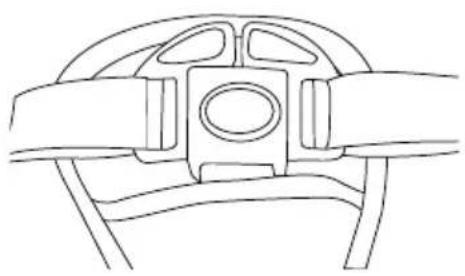
natural_image
Line drawing of a car steering wheel (no text or symbols)natural_image
Three-step illustration showing hand positioning of a mechanical component with arrows indicating motion (no text or symbols)A5 A6

natural_image
Five abstract geometric line drawings with intersecting and overlapping shapes (no text or symbols)WARNUNG!
natural_image
Mechanical linkage diagram showing a wheel and shaft assembly (no text or symbols)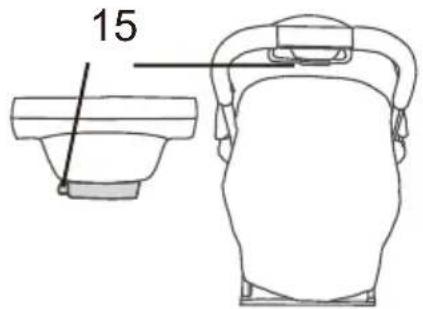
natural_image
Diagram of a mechanical assembly with no visible text or symbolsF4 F5 F6

natural_image
Line drawing of a hand using a tool to lift a car seatbelt, with a downward arrow indicating force or pressure (no text or symbols present)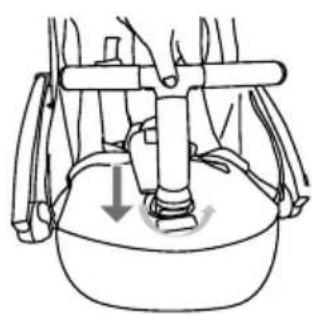
natural_image
Mechanical assembly diagram showing a piston and crankshaft mechanism (no text or labels)natural_image
Line drawing of a hand holding a tool, with no visible text or symbolsF7 F8 F9
natural_image
Technical line drawing of a mechanical component with no visible text or symbols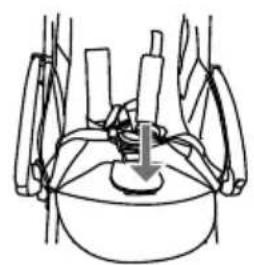
natural_image
Diagram of a mechanical assembly with a central component and surrounding components (no text or labels)BEDIENUNGSANLEITUNG
natural_image
Diagram showing two different types of bicycle steering wheel stoves with directional arrows indicating motion (no text or symbols present)natural_image
Technical line drawing of a mechanical linkage assembly (no text or symbols)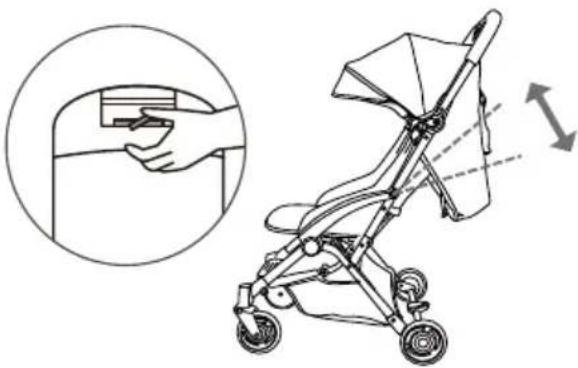
natural_image
Illustration of a baby stroller with hand positioning and side view of the seat (no text or symbols)
natural_image
Line drawing of a car steering wheel (no text or symbols)natural_image
Three-step illustration showing hand positioning of a mechanical component with arrows indicating motion (no text or symbols)A5 A6
natural_image
Five abstract geometric line drawings with intersecting and overlapping shapes (no text or symbols)Beemoo
