
T 977 - Audio Amplifier NAD - Free user manual and instructions
Find the device manual for free T 977 NAD in PDF.
| Type | 7-channel audio amplifier |
| Marque | NAD |
| Model | T 977 |
| Dimensions (W x H x D) | 435 x 194 x 476 mm |
| Net weight | 32.3 kg |
| Power supply | 120 V / 60 Hz or 230 V / 50 Hz |
| Continuous output power (8 ohms, 4 ohms) | ≥ 7 x 140 W |
| Total harmonic distortion | ≤ 0.03 % |
| IHF dynamic power (8 ohms) | 230 W |
| IHF dynamic power (4 ohms) | 390 W |
| IHF dynamic power (2 ohms) | 450 W |
| Damping factor | > 300 |
| Input sensitivity | 1.1 V |
| Voltage gain | 29 dB |
| Signal-to-noise ratio (A-weighted) | > 96 dB (1 W) / > 125 dB (140 W) |
| Frequency response | ±0.2 dB (20 Hz – 20 kHz), -3 dB at 3 Hz and 100 kHz |
| Standby power consumption | < 0.5 W |
| Idle power consumption | < 300 W |
| Rated power | 800 W |
| Signal inputs | 7 x RCA (INPUT) |
| Speaker outputs | 7 pairs of terminals (SPEAKER) |
| Special features | Soft Clipping™, PowerDrive™, Trigger 12V, thermal and short-circuit protection |
| Maintenance and cleaning | Unplug the device before cleaning; use a dry cloth |
| Safety | Ground terminal, spare fuse, do not expose to water |
| Spare parts and repairability | Fuse of same type and specifications; service by qualified technician |
Frequently Asked Questions - T 977 NAD
User questions about T 977 NAD
0 question about this device. Answer the ones you know or ask your own.
Ask a new question about this device
Download the instructions for your Audio Amplifier in PDF format for free! Find your manual T 977 - NAD and take your electronic device back in hand. On this page are published all the documents necessary for the use of your device. T 977 by NAD.
USER MANUAL T 977 NAD
1 Read instructions - All the safety and operating instructions should be read before the product is operated.
2 Retain instructions - The safety and operating instructions should be retained for future reference.
3 HeedWarnings - All warnings on the product and in the operating instructions should be adhered to.
4 Follow Instructions - All operating and use instructions should be followed.
5 Cleaning - Unplug this product from the wall outlet before cleaning. Do not use liquid cleaners or aerosol cleaners. Use a damp cloth for cleaning.
6 Attachments - Do not use attachments not recommended by the product manufacturer as they may cause hazards.
7 Water and Moisture - Do not use this product near water-for example, near a bath tub, wash bowl, kitchen sink, or laundry tub; in a wet basement; or near a swimming pool; and the like.
8 Accessories - Do not place this product on an unstable cart, stand, tripod, bracket, or table. The product may fall, causing serious injury to a child or adult, and serious damage to the product. Use only with a cart, stand, tripod, bracket, or table recommended by the manufacturer, or sold with the product. Any mounting of the product should follow the manufacturer's instructions, and should use a mounting accessory recommended by the manufacturer.
9

A product and cart combination should be moved with care. Quick stops, excessive force, and uneven surfaces may cause the product and cart combination to overturn.
10 Ventilation - Slots and openings in the cabinet are provided for ventilation and to ensure reliable operation of the product and to protect it from overheating, and these openings must not be blocked or covered. The openings should never be blocked by placing the product on a bed, sofa, rug, or other similar surface. This product should not be placed in a built-in installation such as a bookcase or rack unless proper ventilation is provided or the manufacturer's instructions have been adhered to.
11 Power Sources - This product should be operated only from the type of power source indicated on the marking label. If you are not sure of the type of power supply to your home, consult your product dealer or local power company. The primary method of isolating the amplifier from the mains supply is to disconnect the mains plug. Ensure that the mains plug remains accessible at all times. Unplug the AC power cord from the AC outlet if the unit will not be used for several months or more.
12 Grounding or Polarization - This product may be equipped with a polarized alternating-current line plug (a plug having one blade wider than the other). This plug will fit into the power outlet only one way. This is a safety feature. If you are unable to insert the plug fully into the outlet, try reversing the plug. If the plug should still fail to fit, contact your electrician to replace your obsolete outlet. Do not defeat the safety purpose of the polarized plug.
13 Power - Cord Protection - Power-supply cords should be routed so that they are not likely to be walked on or pinched by items placed upon or against them, paying particular attention to cords at plugs, convenience receptacles, and the point where they exit from the product.
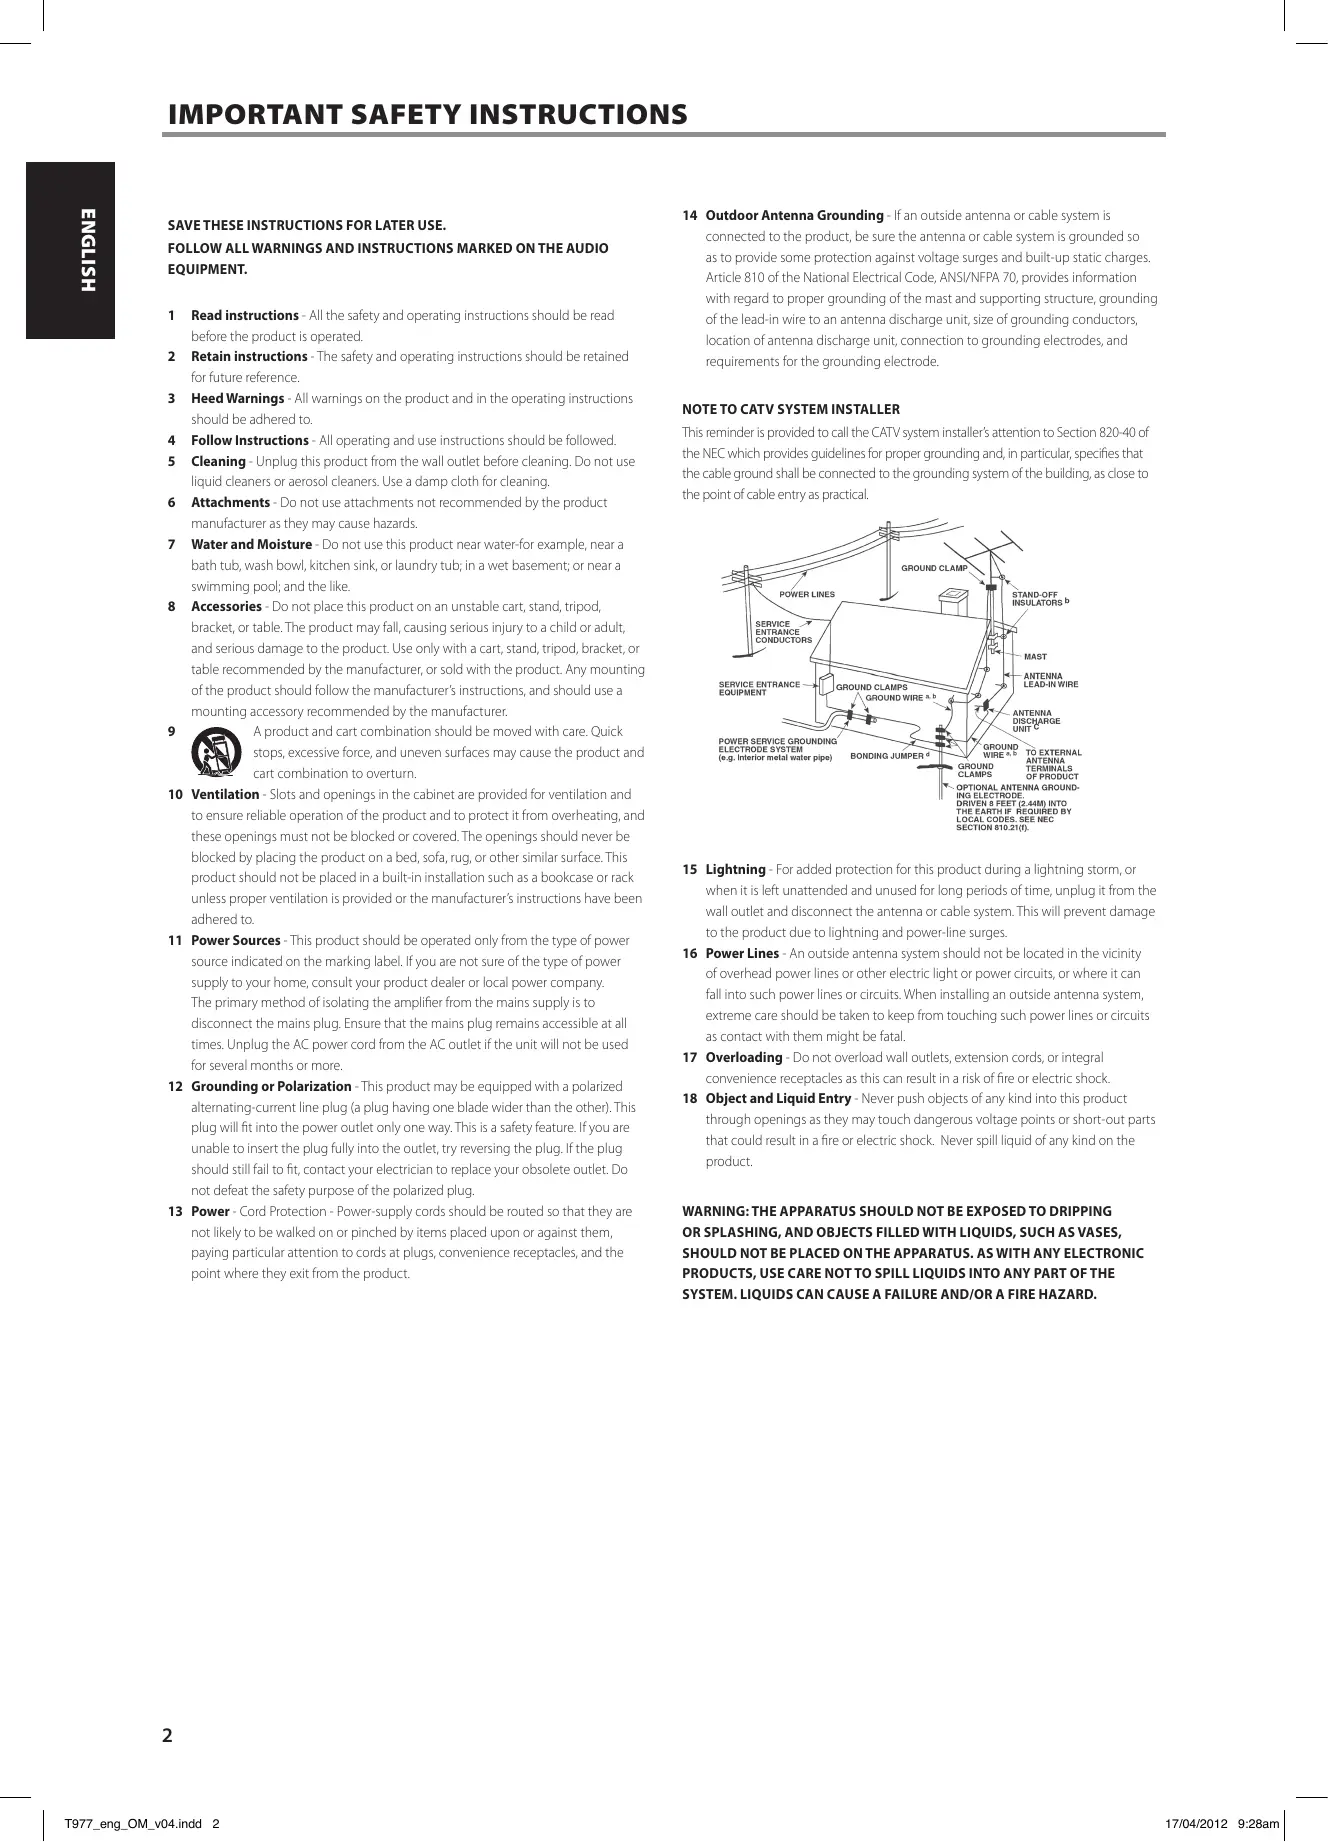
14 Outdoor Antenna Grounding - If an outside antenna or cable system is connected to the product, be sure the antenna or cable system is grounded so as to provide some protection against voltage surges and built-up static charges. Article 810 of the National Electrical Code, ANSI/NFPA 70, provides information with regard to proper grounding of the mast and supporting structure, grounding of the lead-in wire to an antenna discharge unit, size of grounding conductors, location of antenna discharge unit, connection to grounding electrodes, and requirements for the grounding electrode.
NOTE TO CATV SYSTEM INSTALLER
This reminder is provided to call the CATV system installer's attention to Section 820-40 of the NEC which provides guidelines for proper grounding and, in particular, specifies that the cable ground shall be connected to the grounding system of the building, as close to the point of cable entry as practical.
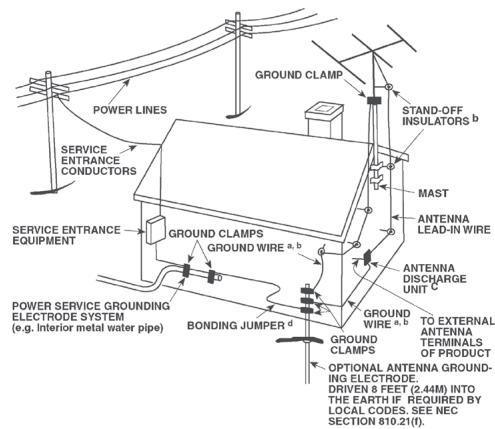
15 Lightning - For added protection for this product during a lightning storm, or when it is left unattended and unused for long periods of time, unplug it from the wall outlet and disconnect the antenna or cable system. This will prevent damage to the product due to lightning and power-line surges.
16 Power Lines - An outside antenna system should not be located in the vicinity of overhead power lines or other electric light or power circuits, or where it can fall into such power lines or circuits. When installing an outside antenna system, extreme care should be taken to keep from touching such power lines or circuits as contact with them might be fatal.
17 Overloading - Do not overload wall outlets, extension cords, or integral convenience receptacles as this can result in a risk of fire or electric shock.
18 Object and Liquid Entry - Never push objects of any kind into this product through openings as they may touch dangerous voltage points or short-out parts that could result in a fire or electric shock. Never spill liquid of any kind on the product.
WARNING: THE APPARATUS SHOULD NOT BE EXPOSED TO DRIPPING OR SPLASHING, AND OBJECTS Filled WITH LIQUIDS, SUCH AS VASES, SHOULD NOT BE PLACED ON THE APPARATUS. AS WITH ANY ELECTRONIC PRODUCTS, USE CARE NOT TO SPILL LIQUIDS INTO ANY PART OF THE SYSTEM. LIQUIDS CAN CAUSE A FAILURE AND/OR A FIRE HAZARD.
19 Damage Requiring Service - Unplug this product from the wall outlet and refer servicing to qualified service personnel under the following conditions:
a) When the power-supply cord or plug is damaged.
b) If liquid has been spilled, or objects have fallen into the product.
c) If the product has been exposed to rain or water.
d) If the product does not operate normally by following the operating instructions. Adjust only those controls that are covered by the operating instructions as an improper adjustment of other controls may result in damage and will often require extensive work by a qualified technician to restore the product to its normal operation.
e) If the product has been dropped or damaged in any way.
f) when the product exhibits a distinct change in performance this indicates a need for service.
20 Replacement Parts - When replacement parts are required, be sure the service technician has used replacement parts specified by the manufacturer or have the same characteristics as the original part. Unauthorized substitutions may result in fire, electric shock, or other hazards.
21 Safety Check - Upon completion of any service or repairs to this product, ask the service technician to perform safety checks to determine that the product is in proper operating condition.
22 Wall or Ceiling Mounting - The product should be mounted to a wall or ceiling only as recommended by the manufacturer.
23 Heat - The product should be situated away from heat sources such as radiators, heat registers, stoves or other products (including amplifiers) that produce heat.
WARNING
TO REDUCE THE RISK OF FIRE OR ELECTRIC SHOCK, DO NOT EXPOSE THIS PRODUCT TO RAIN OR MOISTURE.
CAUTION
TO PREVENT ELECTRIC SHOCK, MATCH WIDE BLADE OF PLUG TO WIDE SLOT, FULLY INSERT.

THE LIGHTNING FLASH WITH ARROWHEAD SYMBOL, WITHIN AN EQUILATERAL TRIANGLE, IS INTENDED TO ALERT THE USER TO THE PRESENCE OF UNINSULATED "DANGEROUS VOLTAGE"WITHIN THE PRODUCT'S ENCLOSURE THAT MAYBE OF SUFFICIENT MAGNITUDE TO CONSTITUTE A RISK OF ELECTRIC SHOCK TO PERSONS.

THE EXCLAMATION POINT WITHIN AN EQUILATERAL TRIANGLE IS INTENDED TO ALERT THE USER TO THE PRESENCE OF IMPORTANT OPERATING AND MAINTENANCE (SERVICING) INSTRUCTIONS IN THE LITERATURE ACCOMPANYING THE APPLIANCE.

The socket-outlet shall be installed near the apparatus and shall be easily accessible.
CAUTION
Changes or modifications to this equipment not expressly approved by NAD Electronics for compliance could void the user's authority to operate this equipment.
CAUTION REGARDING PLACEMENT
To maintain proper ventilation, be sure to leave a space around the unit (from the largest outer dimensions including projections) that is equal to or greater than shown below.
Left and Right Panels: 10cm
Rear Panel: 10 cm
Top Panel: 50 cm
NOTES ON ENVIRONMENTAL PROTECTION

At the end of its useful life, this product must not be disposed of with regular household waste but must be returned to a collection point for the recycling of electrical and electronic equipment. The symbol on the product, user's manual and packaging, point this out.

The materials can be reused in accordance with their markings.
Through re-use, recycling of raw materials or other forms of recycling of old products, you are making an important contribution to the protection of our environment. Your local administrative office can advise you of the responsible waste disposal point.
INFORMATION ABOUT COLLECTION AND DISPOSAL OF WASTE BATTERIES (DIRECTIVE 2006/66/EC OF THE EUROPEAN PARLIAMENT AND THE COUNCIL OF EUROPEAN UNION) (FOR EUROPEAN CUSTOMERS ONLY)

Pb
Batteries bearing any of these symbols indicate that they should be treated as "separate collection" and not as municipal waste. It is encouraged that necessary measures are implemented to maximize the separate collection of waste batteries and to minimize the disposal of batteries as mixed municipal waste.

Hg

Cd
End-users are exhorted not to dispose waste batteries as unsorted municipal waste. In order to achieve a high level of recycling waste batteries, discard waste batteries separately and properly through an accessible collection
point in your vicinity. For more information about collection and recycling of waste batteries, please contact your local municipality, your waste disposal service or the point of sale where you purchased the items.
By ensuring compliance and conformance to proper disposal of waste batteries, potential hazardous effects on human health is prevented and the negative impact of batteries and waste batteries on the environment is minimized, thus contributing to the protection, preservation and quality improvement of the environment.
NOTE: THE T 977 IS NOT AN AUTO VOLTAGE POWER AMPLIFIER. CONNECT ONLY TO THE PRESCRIBED AC OUTLET, I.E., 120V 60HZ OR 230V 50HZ.
RECORD YOUR MODEL NUMBER (NOW, WHILE YOU CAN SEE IT)
The model and serial number of your new T 977 are located on the back of the cabinet. For your future convenience, we suggest that you record these numbers here:
Model no:
Serial no.:
GETTING STARTED
QUICK START
In case you simply cannot wait to experience the performance of your new NAD T 977 Seven Channel Power Amplifier, the following QUICK START guide is recommended to help you get started.
Ensure that the T 977 is unplugged before making any connections. It is also advisable to power-down or unplug all associated components while making or breaking any signal or AC power connections.
1 Set the following initial conditions:
- Preamplifier's volume level set to minimum
Each channel INPUT level controls of T 977 set to minimum (MIN)
2 Connect your speakers to the SPEAKER terminals of T 977. Note suggested speaker connections as reflected in the rear panel channel allocations.
3 Connect your Preamplifier's PRE OUT to the T 977 rear panel's INPUT port.
4 Plug-in to a mains power source the T 977's supplied mains power cord. Before connecting the plug to the mains powers source, connect firmly first the other end to T 977's AC Mains input socket. The T 977 goes to standby mode as shown by the amber status condition of the Standby LED.
5 Plug-in also to a mains power source the Preamplifier's mains power cord. Power up your Preamplifier ahead of the T 977.
6 Press STANDBY button to switch ON the T 977 from standby mode. The Standby LED indicator will turn from amber to blue. When the T 977 is switched ON from standby mode, the Channel Status LEDs will initially turn red and then eventually turn blue. The T 977 is ready for operation.
7 Adjust the corresponding T 977 INPUT LEVEL CONTROL and/or Preamplifier's volume control according to desired listening levels.
SAVE THE PACKAGING
Please save the box and all of the packaging in which your T 977 arrived. Should you move or otherwise need to transport your T 977, this is by far the safest container in which to do so. We've seen too many otherwise perfect components damaged in transit for lack of a proper shipping carton, so please: Save that box!
NOTES ON INSTALLATION
Your NAD T 977 should be placed on a firm, level surface. Avoid placing the unit in direct sunlight or near sources of heat and damp. Allow adequate ventilation. Do not place the unit on a soft surface like a carpet. Avoid placing the T 977 inside a closed cabinet that is not well ventilated as this may compromise the T 977's performance and reliability.
Ensure that the T 977 is unplugged before making any connections. For best performance, use quality speaker leads of 16 gauge (1.5mm) thickness or more. If the unit is not going to be used for some time, disconnect the plug from the mains power source.
Should water get into your T 977, immediately press the Standby button and then disconnect the mains power cord from the mains power source. Have the unit inspected by a qualified service technician before attempting to use it again.
DO NOT REMOVE THE COVER; THERE ARE NO USER-SERVICEABLE PARTS INSIDE.
Use a dry cloth for cleaning.
BARE WIRES AND PIN CONNECTORS

WARNING: The terminals marked with this symbol are hazardous live. External wiring connected to these terminals requires installation by an instructed person or the use of ready-made leads or cords.
Bare wires and pin sockets should be inserted into the hole in the shaft of the terminal. Unscrew the speaker terminal's plastic bushing until the hole in the screw shaft is revealed. Insert the pin or bare cable end into the hole and secure the cable by tightening down the terminal's bushing. Ensure bare wire from the speaker cables does not touch the back panel or another socket. Ensure that there is only 1/2'' (1cm) of bare cable or pin and no loose strands of speakers wire.

1 STANDBY BUTTON
- Press this button to switch ON the T 977. The Standby LED indicator will turn from amber to blue.
- Pressing the STANDBY button again turns the unit back to standby mode.
IMPORTANTNOTICES
For the STANDBY button to activate, plug-in the supplied mains power cord to a mains power source. Before connecting the plug to the mains powers source, connect firmly first the other end to T 977's AC Mains input socket.
- The preamplifier or controller connected to the T 977 should be switched ON first before powering up the T 977.
2 STANDBY LED
- This indicator will light up amber when the T 977 is at standby mode.
- When T 977 is powered up from standby mode, this indicator will illuminate blue.
3 SOFT CLIPPING INDICATOR
- This indicator is illuminated blue if the rear panel SOFT CLIPPING switch is set to ON position.
Refer also to the item below about SOFT CLIPPING at the IDENTIFICATION OF CONTROLS - REAR PANEL.
4 CHANNEL STATUS LED
- These LEDs indicate the status of each of the seven channels of the T 977. When the T 977 is switched ON from standby mode, the Channel Status LEDs will initially turn red and then eventually turn blue.
- When the T 977 goes to standby mode via the front panel Standby button or via the rear panel trigger source, the Channel Status LEDs will light up red and then fade out.
- The Channel Status LEDs will turn red when one or more of the internal seven amplifiers go to protect mode. The other amplifiers that did not go to protect mode will continue to function as indicated by their respective illuminated blue LEDs.
PROTECT MODE
If one or more Channel Status LEDs turn red, this indicates that the protection circuitry of the T 977 had been engaged. Immediately press the Standby button and then unplug the mains power cord from the mains power source. Check if all speaker wires are connected correctly and that none of the wires are damaged, causing a short circuit. Another cause may be excessive heat build-up inside the amplifier. Make sure there is adequate ventilation around the amplifier and that none of its ventilation slots, top or bottom are blocked. After the amplifier has cooled down, it will function normally again. In case one or more of the Channel Status LEDs remained illuminated in red despite the checks mentioned above, immediately press the Standby button and then unplug the mains power cord from the mains power source. Have the unit inspected by a qualified service technician before attempting to use it again.
REAR PANEL

ATTENTION!
Ensure that the T 977 is unplugged before making any connections. It is also advisable to power-down or unplug all associated components while making or breaking any signal or AC power connections.
1 INPUT
Each of the seven independent power amplifiers within the T 977 has its own signal input connector.
- Connect the output from a preamplifier or processor to this set of inputs.
For optimum heat dissipation in an AV surround system, the following audio channel allocations are recommended:
Channel 1 = Front Left speaker
Channel 2 = Surround Left speaker
Channel 3 = Surround Back Left speaker
Channel 4 = Center speaker
Channel 5 = Surround Back Right speaker
Channel 6 = Surround Right speaker
Channel 7 = Front Right speaker
NOTES
Always turn OFF the T 977 and other components in the system before connecting or disconnecting anything to the INPUT sockets.
- Before switching ON the T 977 from standby mode for the first time, make sure all input level controls are set to minimum (MIN) level position. This prevents inadvertently beginning a session at excessive volume.
2 INPUT LEVEL CONTROL
- The T 977 is equipped with separate input level controls for each channel.
- Before switching ON the T 977 from standby mode for the first time, make sure all input level controls are set to minimum (MIN) level position.
Level Matching
In a surround sound or system with more than one set of speakers, differences in levels can occur due to varying inefficiencies among the speakers. In case your preamplifier or processor also has individual trims for each channel, set these to neutral or mid position (usually marked as 0dB). Adjust the INPUT LEVEL CONTROL so that the speakers driven by the T 977 have the correct level compared to the other speakers, judging from your listening position.
Extended Volume Control Range
Many systems have so much voltage gain that the speakers (or your ears) are overdriven at any volume control setting higher than 11 or 12 o'clock. As a result you are confined to using only the lower half of the volume control's range, where adjustments are imprecise and where channel balance errors tend to be greater.
If the input level is reduced, you can turn up the volume control of your processor or preamplifier, making more effective use of its range. (Suggestion: Adjust the input level controls so that your preferred maximum sound levels usually occur at about 2 or 3 o'clock on the volume control.) As an added benefit, this procedure suppresses any noise produced by the preamplifier's high level circuitry (e.g. any residual hum or hiss that does not go away when the Volume is turned down).
3 SPEAKER
- The T 977 is equipped with special high-current binding-post speaker terminals. Connect the respective SPEAKER FRONT L, FRONT R, CENTER, SURR R, SURR L, SURR-BL and SURR-BR channels to their corresponding loudspeakers. Make sure the "+" (red) terminal and "-" (black) terminal are connected to the corresponding "+" and "-" terminals of the loudspeaker. Use extra care to ensure that no stray wires or strands cross between posts or terminals at either end.
- Always use heavy duty (16 gauge; 1.5mm, or thicker) stranded wire to connect loudspeakers to your NAD T 977. The high-current binding post terminals can be used as a screw terminal for cables terminating in spade or pin sockets or for cables with bare wire ends.
- The T 977 is designed to produce optimum sound quality when connected to speakers with impedances within its operating range. Please make sure that all the speakers are rated 4 ohms minimum per speaker.
NOTE
Use stranded wire of at least 16 gauge (AWG). Connections to the T 977 can be made with banana plugs (120V version only) or by using bare wire or pins. Use the transverse hole through the post for bare-wire or pin connections. By loosening the terminal's plastic nut, make a clean, neat connection and re-tighten carefully. To minimize the danger of short-circuit, ensure that only 1/2-inch of exposed wire or pin is employed when connecting.
4 GROUND TERMINAL
- The T 977 is provided with a GROUND terminal on the rear panel. This terminal is connected directly to the chassis of the T 977.
- Use this terminal to properly ground the T 977. A ground lead wire (not supplied) or similar can be used to connect the T 977 to ground via this ground terminal. After insertion, tighten the terminal to secure the lead.
5 SOFT CLIPPING
- Enables NAD's proprietary Soft Clipping circuitry on all channels. At "ON" position, Soft Clipping gently limits the output of the T 977 to minimize audible distortion should the amplifier be over-driven.
- Soft Clipping may simply be left ON at all times to reduce the likelihood of audible distortion from excessive volume settings. However, for critical listening and to preserve optimum dynamics, you may wish to defeat it by setting this switch to "OFF" position.
- The SOFT CLIPPING indicator on the front panel will illuminate when the amplifier is in Soft Clipping mode.
6 +12V TRIGGER IN
- The +12V Trigger input allows the T 977 to be switched remotely from standby mode to ON and vice-versa by ancillary equipments such as a preamplifier, AV processor, etc. The controlling device must be equipped with a 12V trigger output to use this feature.
WARNING
The front panel Standby button is disabled as long as the male plug of the mono cable (with or without +12V DC) is connected to T 977's +12V TRIGGER IN. Unplug the mono cable for the T 977 to be normally switched ON (or back to standby mode) using the front panel STANDBY button.
7 FUSE HOLDER
- In the unlikely event a fuse needs to be replaced, unplug the mains power cord from the wall. Then, remove all connections from the amplifier. Use a flathead screw driver or similar to open the fuse holder via the slot indicated. With the screw driver in place, push and turn counterclockwise to open the fuse holder.
- Only replace the fuse with the same type, size, and specification.
IMPORTANT NOTICE
Do not use any substitute fuses of different types or with different ratings or values. Failure to observe this precaution may cause damage to the amplifier circuits and may create a fire hazard and/or defeat the safety built into the amplifier and may void the warranty.
8 AC MAINS INPUT
- The T 977 comes supplied with a separate detachable mains power cord. Before connecting the plug to the mains powers source, connect firmly first the other end to T 977's AC Mains input socket.
- Connect only to the prescribed AC outlet, i.e., 120V 60 Hz (for 120V version models only) or 230V 50 Hz (for 230V version models only).
Always disconnect the mains power plug from the mains power source first, before disconnecting the cable from the T 977's AC Mains input socket
POWERDRIVE
The T 977 uses NAD's proprietary PowerDrive™ amplifier technology for all channels to preserve accurate, linear reproduction regardless of the loudspeaker. This uniquely efficient power-supply topology provides the real-world benefits of high dynamic power that remains uncompromised by low-impedance speakers.
By adding a second high-voltage rail to our well regulated high-current power supply, we get an "overdrive" that can nearly double the continuous power on a short term dynamic power basis. PowerDrive offers greater amplifier stability and low impedance drive capability, resulting in less distortion when driving real speakers with real program material.
TROUBLESHOOTING
| CONDITION | POSSIBLE CAUSES | POSSIBLE SOLUTIONS |
| No power. | •Mains power cord unplugged from mains power source or from T 977's AC mains input. | •Connect the mains power cord to T 977's AC mains input and then plug into a mains power source. |
| •T 977 at standby mode. | •Press Standby button to switch ON the T 977 from standby mode. | |
| T 977 always at standby mode; cannot be switched ON using the front panel STANDBY button. | •A mono plug is plugged-in at the +12V TRIGGER IN port of the rear panel. | •Unplug the mono plug. |
| No sound. | •No input signal applied through the INPUT sockets. | •Check that there is active input signal applied through the INPUT sockets. |
| •INPUT LEVEL CONTROL set to minimum level. | •Turn up INPUT LEVEL CONTROL to the correct level. | |
| No sound one channel. | •Speaker not properly connected or damaged. | •Check connections and speakers. |
| •Input lead disconnected or damaged. | •Check leads and connections. | |
| One or more Channel Status LEDs remained illuminated in red. | •Protection circuit is engaged. | •Check if all speaker wires are connected correctly and that none of the wires are damaged, causing a short circuit. |
| •Make sure there is adequate ventilation around the amplifier and that none of its ventilation slots, top or bottom are blocked. |
OVERALL SPECIFICATIONS
| Continuous output power into 8 ohms and 4 ohms | ≥7 x 140 W (ref. rated THD, 20 Hz - 20 kHz, all channels driven) |
| Rated THD (250 mW to rated power, CCIF IMD, DIM 100) | ≤0.03 % (ref. 20 Hz - 20 kHz) |
| Clipping power | ≥185 W (ref. 1 kHz, 1% THD) |
| IHF dynamic power - 8 ohms | 230 W |
| IHF dynamic power - 4 ohms | 390 W |
| IHF dynamic power - 2 ohms | 450 W |
| Damping factor | >300 (ref. 8 ohms, 50 Hz and 1 kHz) |
| Input sensitivity | 1.1 V (ref. rated power) |
| Voltage gain | 29 dB |
| Signal-to-noise ratio, A- weighted | >96 dB (ref. 1 W) |
| >125 dB (ref. 140W) | |
| Frequency response | ±0.2 dB (ref. 20 Hz - 20 kHz) |
| -3 dB at 3 Hz and 100 kHz | |
| Time to go to Standby mode at no input signal | <30 minutes |
POWER CONSUMPTION
| Rated Power | 800 W (120V 60Hz, 230V 50Hz) |
| Standby power | <0.5 W |
| Idle power | <300W |
DIMENSION AND WEIGHT
| Unit Dimensions (W x H x D) | 435 x 194 x 476 mm (Gross)* |
| 17 1/8 x 7 11/16 x 18 3/4 inches | |
| Net Weight | 32.3 kg (71.2 lbs) |
| Shipping Weight | 36.5 kg (80.5 lbs) |
-
- Gross dimensions include feet, front panel button and extended speaker terminals.
Specifications are subject to change without notice. For updated documentation and features, please log on to www.NADelectronics.com for the latest information about T 977.

CONSERVEZ CES INSTRUCTIONS AFIN DE POUVOIR VOUS EN SERVIR ULTERIEUREMENT. TENEZ COMPTE DE TOUS LES AVERTISSEMENTS ET SUIVEZ TOUTES LES INSTRUCTIONS QUE VOUS TROUVEREZ SUR LE MATRIEL AUDIO.
8 INGRESSO CORRENTE DI RETE CA
WAARSCHUWING TEN AANZIEN VAN PLAATSING
BEWAAR DE VERPAKKING
3 INDICATOR SOFT CLIPPING
3 SPEAKER (HÖGTALARE)
EcINBHeMoKTe DoJaTaBcra BO3MOxHOCTOn OuTyNTb npOn3BOdnteJIbHOCTb BaIeO HOBOr CeMnKaHaJIbHOr YoCInIteTn NAD T 977, cIeNyUoee KPATKOE PYKOBODCTBO nOMoKeT Bam HaaTaB IcNoJIb3OBAbT bTO yCTpoIcTB.
IpyexJe cem ocyuieCTbIIO6bIe NOkJIuOeuHnIy6eIITecb TTO 977 OTKJIUoyenOT3JeKtpuueckoCetN.TaKxpeKOMeHNyETcR OTKLIQUHTb NITAHHe ININ BbIKLQUHTb I3 PO3eTKn UHypbl NITAHnBCex KOMHOHTOB, yuaCTByIoXINB NOkJIUoyEHnIN CInHaJIn NIN CTeBOrO NITAHn.
1 UctaHOBInTe CLeDyUOuNHe NaHJIbHbIe YcLIOBnA:
yCTaHOBHeN IIN MInHIMMaJIbHbI yPOBEHb ΓPOMKOTn IpeDyCINlTeJIa
- YpOBeHb BXOДA kαжДог кaHaJaT 977 yctaHOBJIeH ha MInHIMyM (MIN)
2 POnkIIOUHTe DnHAMKIN K TepMNHaAM DnHAMKOB Ha 3aDHeN PaHEIn. O6paTte BnIMaHne Ha IpeDnAeEMoe POnkIIOUHeHne DnHAMKOB Ha CXMe KaHAlOB 3aDHeN paHEIn.
3 ПоdkлочиPre OUT (BbIXOД ПЕДУСЛЛТЕЛЯ) к поту INPUT (BXOД), раснооженному на заней панели T 977.
4 PódklouhTe T 977 K éneKtpnueckoC cetn C nomoubI pnpilaraemoro Ka6eJI. IpeEi BkIouehnEM ka6eJI B po3eTK npOBepbTe, HadexHNo IIN Ka6eJI BCTaBJIeB pa3bEm T 977 IJ IPOKJIouehnK cetn IITaHnI. T 977 nepexOoTt B pexIM OxNiDaHnI, INHdNkATOp pexIMa OxNiDaHnI 3aRopaETc opaHKeBbIM LcBeTom.
5 TaKHe noDknIouHTe K 3JIeKTPnueCkO cTEn npEynCnIteNb C nOMoIbIO npInarAemoro Ka6eJy. BKnIouHTe npEynCnIteNb, npExJe yem BKnIOuHaTb T 977.
6 Haxmnte KhoNky STANDBY (PEKIM OXINDAHIA), yTObblBvBeCTn T 977 n3 peximaaOxINDAHIA. CBeTOnIOHbI INDkaTOP peximaaOxINDAHIA n3MeHNT cBTcCKeIToHO hCaHHI. Iocne BbBOa T 977 n3 peximaaOxINDAHIA INDkaTOP COCTOAHNA KaHana ChaHaI aTropITcK paChbIM cBTom, a NOTOM 6yET rOpTe bCINHM cBTom. T 977 rotOB Kpa6ote.
7 Otperynpyte npaMeTpby ypoBn BxOa T 977 n/nilr pomKoctb ycNInTeI B COOTBetCTBm C XeJeaembIM ypoBHeM.
COXPAHNTE YNAKOBOUHbI MATEPNAJI
IpojanyuCTa, coxpaHnTe Kopo6Ky u BeCb octaIbHo ynaKoBOUhbl
matern, B KOtOpom nocTAbJrTc BaW T 977. B clyuae BaWero
nepee3da nn KaKo-1n6o DpyroH Heo6XoDMOCTn nepeBOzKN daHORO
yctpoCTBa opRiHaJIbHaY ynaKOBKa YBJIeTc CaBIM LyUHIM N HAIboJeE
6e3oNaChbM cnOCo6Om erO TpaHCnpTIpOBKn. Ha NaSeI npakTnke
BCTpeuAIOCB OrpMOHe KOJIueCTBO npeBOCxOJbIX KOMNHOHTOB,
NoBpeXJeHHbX BO BPEM TpaHCnpTIpOBKn IO npunHe OTCyTCTBn
HaJaLKeJAeero ynaKOBouHOro MaTePnAna. TaK UTo, IooJaNyIcTa, coxpaHnte
kopo6Ky!
KaHaJI 5 =3aJHnI npaBbI nnHAMIK O6bEmHOrO 3Byka
KaHaJI 6 = IpaBbI dIHaMnO bEmHOrO 3Byka
KaHAn 7 = IpeaHnI npaBbI dHaMnK
ПОНМЕЧАНИЗ
Bce2da bkyuama T977 u dpyue komnoehmbu cuscmbi nepeo noKIOUeHEm ULI omKIOUeHEm IIO6bIX ycmpoUcmb B pa3beMbI INPUT (BXOJ).
- Pered nepbblm bbloobom T 977 u3 pekuma ojuadnue Heo6xodmo ycmahOBumb muHmuaNbHoe 3nauehe (MIN) dny bcex ypOBeu.
3mo ucknloaem 0o3mOxHocmb cnyauHou pa6omblcucmembHa
4pe3MepHO b6iCOKOZpOMKOCMu.
2 KOHTPOJIb yPOBnB BXOHOBO CnIHAGA/BXoHOH yPOBEHb
T977 06OpUdoBaH OTeIbHbIMn CpeIcTBaMn KOHTpOJIa 3ByKa IJIa KaJIOrO KaHaIa.
- Пелег порвим ВьЮДOM T 977 ИЗ рекима ожидалиу HeобхODIMO yctановп МИнимальhoe 3нauменe (MIN) ду BCex уpoBнe.
5 INEPEKJIIOUATEJIb SOFT CLIPPING
Icnoj3yETcTdIeBkIoueHnpeXmMa Soft Clipping, KOTOpbO便秘CneuBAet MArKOE orpaHnueHne BbIXoHOrO CnHaJaYcunlTeIIO dIe MInHMIm3aUyn ayDnOuCKaKeHn npi neperpy3KeycunlTeIIO.
- Pexim MoKeT 6bITB BKIOUeHbIM BcERda,чTObIиCKJIouHTb BO3MOxHOCtB NcKaJehnIa 3Byka pIn BcCOKNX yOBoHx rPOMKoCTN. OdHaKO npKpTINueCkOM IpocLnyuINBaHN I nIa CoXpaHeHn ONTMaJIbHOI dINHaMKN MOxHO OTKLIouHTb peXIM, nepeBeJa nepeKJIouHcTeJIb b nOLOJKeHne OFF ("BbIKl").
Korda T 977 nepekliouaetcB pekIM SOFT CLIPPING, INdkaToppeKIma SOFT CLIPPING 3aropaeTc cnHm CBetom.
6 +12V TRIGGER IN (BXOJHOI CNHAI TPNIITEPA + 12 B)
- 3T0T BxOД pO3BOLЯET yUdAeHNO BKIQUaTb T 977 ИИ nIpeBovITb erO B reXIM OxNlaHnI prn IOMoUc BCnOMorAtelbHOrO obOpudobHnI, yCunlTeJI, npeducnlTeJI, ayDIO- IN BvIeOpIooCEccopa n T.I. ДЯ nCpOJb3OBAHnI AToI ΦyHKcIIu YnpabJIauOoiye uCTpoiCTBO dOJIKNHO 6bItb OChaSeHOb BVIXODom TprirrepA (12 B).
PNEyPPEKDEHNE
Khonka pekuma okuadnua ha nepehedneu naheu omknloyueta,
eenu umekep moho-kaebna (c numaeh+12 B nocmnoHHo2o
moka unu be3 hezo) nodklouen K exody +12V TRIGGER IN T 977.
I npmaJIbHOZBkUOHeuHra (UNU BO3Bpama b pekum Okuadnua)
cnomoubIO KNOKU peKUMO kUADnua ha nepehedu naheu
Heo6xodmo omKnIOuymb MOHO-KabEnb T 977.
7 DEPKATEJIb IJIABKOTO IPEDOXPAHNTELI
Cnyuay, korga Tpe6yetc3aMeHa nIpaBKO rpeOxpaHnte, npoicXoJrT Heaacto, Ho eCIn TaKaJr Heo6xOIMOCtB BCE Je BO3Nikna, BbHbTe CnIOBOI npoBoD n3 po3eTK. 3aTeM OTKJIouHte OT yCNIIHTe Bce NODKnIOUeHHbIe K Hemy UCTPOICTBa. Ppr NOMOUI OTBePkn ININ aHAnOgUHOrO IHCTpyMeHTA OTKpOIte rHe3do DePkaTeN IPLABKO rpeOxpaHnte. HaadBIne OTBePtkoN ha rHe3Do n IOBepHNTe pOTIB uacOB O CTpeKN, YTObI OTKpbITb DePkaTeN IPLABKO rpeOxpaHnte.
- История в Качеве заимь толъков посяхашилъ takOTO же тида с takIM же размером и спсуфкадун.M.
BAXHOE3AMEYAHNE
He ucnolbyume nnaBkue npedoxpanumenu dpyzzo muna unu c dpyzumuxapakmepucmuKamu. NcnoIb3oBaHue dpyzux nlaBkux npedoxpanumei moKem npubecmu K nobpeXdenu cxem ycunmena, K nojaky u/Unu bixOy u3 cmpo npedoxpanumelhbx ycmpoucme ycunmena T 977,a maKke KaHHynupobauu zo rapamuu.
8 BXODДЛЯ CETNIIPEPEMHHO TOKA
B KOMPJIeK T NOCTaBkN T 977 BxOuNT OTeJIbHbI NpOBoD IJn PNOKJIIOUeHn K CetN PITaHn. IpeE PNOKJIIOUeHnEM WTeKepa K NICTOCHNI K PITaHnIO PNOKJIIOUHTe DpyroI KOHeI KabeJIa K pa3BeM y PITaHn O T CetN T 977.
Kabel cIeuyet nockluoyatb Toblko K po3eTke c coOTBeCTBvyuImn napametpamu, t.e. k po3eTke 120 B 60 T (ToIbko dIy moJIe 120 B) nIi 230 B 50 Tc (ToIbko dIy moJIe 230 B).
- Pered otKJIQUeHnEM KAbEa NITaHnI 13 HacteHHo po3eTKn HJxH0 OTKJIQUHTb eO O T pa3bema NITaHnI T 977 dIra cTeN nepemehHO TOka.
TEXHOLOTNIA POWERDRIVE
B ycnintene T 977 peaunzobaha cnpmehna texhnoirna NAD PowerDrive dans ycnintene, oecneuBaouaTochHoe nHeHoe Bocpon3BeheHne dIra BCex KaHaOB BHe 3aBcIMoCTn OT nCpOJIb3yEmbIX DnHaMKOB. 3Ta yNkaklbHO 3f0eKtNBHaa CXema nITaHn Daet peaJIbHyIO BO3MOxHOCtB nOLyUHTb BbICOKYIO DNHaMueCKyIO MOHOCtB, daJce pIN NCpOJIb3OBAHN IINHaMKOB C Hn3KIM COPTNIBeHnEM.
ДобавиВ Вторй Канл ВсOKОТоннряжень K CTаБИN3ИРOBaHOMY BсOKOTOчHOMY 6LOKу ПИТАнь, МБ ПОЛУаeМВОЗМЖОСТь ДИНAMИЧЕСКИ YБELIЧВаТь NOДABAeMуMOshOCtь NOчTNВДBA ра3а НΚОРОТКоВВЕмЯ. TexHOLOrn PowerDrive obecneuBaET bICOKи уРовьс HBCTaBbHocTи yCINITeRи NOДерЖиBaET pa60Tu pri NИЗКOM NOЛHOM COПOTINBNeHIN, ChTO NO3BOJЯт сИЗNTb уPовьн ИСКажENHЯ 3Byka pri n pa6Ote DInHaMnKOB B pIoCECE BOCpON3BVEdHENPealbHbIXпрогамM.
ПОИСК И YYSTРАЕНUE HENСПAPВHOCTEД
* - Ra6apuTHbIe pa3MebpI c HOKKaMn, BbICTyNaIOUcIMN KHOIpKaMn I BbICTyNaIOUcIIe KJIeMMbl I JINHaMNIKOB.
Xapaktpnctkn npndkat n3meneHHIO 6e3 npedbapntelhno ybeomlenia. Iy npuyehna oHOBHeHHo dokymetau n CBxekn HOpMaun Oycnntela T 977 cm. Be6-caNT www.nadelectronics.com.

www.NADelectronics.com
©2012 NAD ELECTRONICS INTERNATIONAL A DIVISION OF LENBROOK INDUSTRIES LIMITED
All rights reserved. NAD and the NAD logo are trademarks of NAD Electronics International, a division of Lenbrook Industries Limited.
No part of this publication may be reproduced, stored or transmitted in any form without the written permission of NAD Electronics International.
While every effort has been made to ensure the contents are accurate at the time of publication, features and specifications may be subject to change without prior notice.
T977_8LANG OMX_V01-APR2012
- NOTE TO CATV SYSTEM INSTALLER
- WARNING
- CAUTION
- CAUTION REGARDING PLACEMENT
- NOTES ON ENVIRONMENTAL PROTECTION
- INFORMATION ABOUT COLLECTION AND DISPOSAL OF WASTE BATTERIES (DIRECTIVE 2006/66/EC OF THE EUROPEAN PARLIAMENT AND THE COUNCIL OF EUROPEAN UNION) (FOR EUROPEAN CUSTOMERS ONLY)
- NOTE: THE T 977 IS NOT AN AUTO VOLTAGE POWER AMPLIFIER. CONNECT ONLY TO THE PRESCRIBED AC OUTLET, I.E., 120V 60HZ OR 230V 50HZ.
- RECORD YOUR MODEL NUMBER (NOW, WHILE YOU CAN SEE IT)
- GETTING STARTED
- QUICK START
- SAVE THE PACKAGING
- NOTES ON INSTALLATION
- DO NOT REMOVE THE COVER; THERE ARE NO USER-SERVICEABLE PARTS INSIDE.
- BARE WIRES AND PIN CONNECTORS
- STANDBY BUTTON
- IMPORTANTNOTICES
- STANDBY LED
- SOFT CLIPPING INDICATOR
- CHANNEL STATUS LED
- PROTECT MODE
- REAR PANEL
- ATTENTION!
- INPUT
- NOTES
- INPUT LEVEL CONTROL
- Level Matching
- Extended Volume Control Range
- SPEAKER
- NOTE
- GROUND TERMINAL
- SOFT CLIPPING
- +12V TRIGGER IN
- FUSE HOLDER
- IMPORTANT NOTICE
- AC MAINS INPUT
- POWERDRIVE
- TROUBLESHOOTING
- CONSERVEZ CES INSTRUCTIONS AFIN DE POUVOIR VOUS EN SERVIR ULTERIEUREMENT. TENEZ COMPTE DE TOUS LES AVERTISSEMENTS ET SUIVEZ TOUTES LES INSTRUCTIONS QUE VOUS TROUVEREZ SUR LE MATRIEL AUDIO.
- INGRESSO CORRENTE DI RETE CA
- WAARSCHUWING TEN AANZIEN VAN PLAATSING
- BEWAAR DE VERPAKKING
- INDICATOR SOFT CLIPPING
- SPEAKER (HÖGTALARE)
- COXPAHNTE YNAKOBOUHbI MATEPNAJI
- ПОНМЕЧАНИЗ
- KOHTPOJIb yPOBnB BXOHOBO CnIHAGA/BXoHOH yPOBEHb
- INEPEKJIIOUATEJIb SOFT CLIPPING
- +12V TRIGGER IN (BXOJHOI CNHAI TPNIITEPA + 12 B)
- PNEyPPEKDEHNE
- DEPKATEJIb IJIABKOTO IPEDOXPAHNTELI
- BAXHOE3AMEYAHNE
- BXODДЛЯ CETNIIPEPEMHHO TOKA
- TEXHOLOTNIA POWERDRIVE
- ПОИСК И YYSTРАЕНUE HENСПAPВHOCTEД
- ©2012 NAD ELECTRONICS INTERNATIONAL A DIVISION OF LENBROOK INDUSTRIES LIMITED
Brand : NAD
Model : T 977
Category : Audio Amplifier