
523 - Audio Amplifier NAD - Free user manual and instructions
Find the device manual for free 523 NAD in PDF.

| Product Type | Audio CD Changer (5 discs) |
| Dimensions (approx.) | 435 x 130 x 350 mm |
| Weight (approx.) | 5 kg |
| Power Supply | Mains (230 V AC, 50 Hz) |
| Number of discs | 5 (carousel tray) |
| Compatible formats | Audio CD (12 cm), CD-3 (8 cm) |
| Audio outputs | Stereo line output (RCA) |
| NAD link | Input/Output (mini-jack) for remote control relay |
| Remote control | Infrared with numeric keypad (0-10, +10) |
| Playback functions | Play, Pause, Stop, Skip forward/backward, Search forward/backward |
| Playback modes | Programmed (40 tracks), Random, Repeat (all discs, 1 disc, 1 track) |
| Display | Track calendar (20), elapsed/remaining time, disc/track number |
| Transport protection | Built-in system, no external locks required |
| Maintenance | Wipe the tray with a damp cloth; clean discs radially |
| Laser safety | Class 1 laser, safe for children |
| Remote control batteries | 2 x AA (R6P or equivalent) |
Frequently Asked Questions - 523 NAD
User questions about 523 NAD
0 question about this device. Answer the ones you know or ask your own.
Ask a new question about this device
Download the instructions for your Audio Amplifier in PDF format for free! Find your manual 523 - NAD and take your electronic device back in hand. On this page are published all the documents necessary for the use of your device. 523 by NAD.
USER MANUAL 523 NAD
© 1996.523. NAD ELECTRONICS LTD
GB • OWNER'S MANUAL
F • MANUEL D'INSTALLATION
D •BEDIENUNGSCANLEITUNG
E ·MANUAL DEL USUARIO
1 MANUALE DELLE ISTRUZIONI
s • BRUKSANVISNING
P ·MANUAL DO PROPRIETARIO
IMPORTANT SAFETY INSTRUCTIONS

ATTENTION:
RISQUE DE CHOC ELECTRIQUE NE PAS OUVIR

CAUTION: TO REDUCE THE RISK OF
ELECTRIC SHOCK, DO NOT REMOVE COVER (OR BACK). NO USER SERVICEABLE PARTS INSIDE. REFER SERVICING TO QUALIFIED SERVICE PERSONNEL.
WARNING: TO REDUCE THE RISK OF FIRE OR ELECTRIC SHOCK, DO NOT EXPOSE THIS UNIT TO RAIN OR MOISTURE.
The lightning flash with an arrowhead symbol within an equi- lateral triangle is intended to alert the user to the presence of uninsulated "dangerous voltage" within the product's enclosure that may be of sufficient magnitude to constitute a of electric shock to persons.

The exclamation point within an equilateral triangle is intended to alert the user to the presence of important operating and maintenance (servicing) instructions in the literature accompanying the product.

Do not place this unit on an unstable cart, stand or tripod, bracket or table. The unit may fall, causing serious injury to a child or adult and serious damage to the unit. Use only with a cart, stand, tripod, bracket or table recommended by the manufacturer or sold with the unit. Any mounting of the device on a wall or ceiling should follow the manufacturer's instructions and should use a mounting accessory recommended by the manufacturer.
An appliance and cart combination should be moved with care. Quick stops, excessive force and uneven surfaces may cause the appliance and cart combination to overturn.
Read and follow all the safety and operating instructions before connecting or using this unit. Retain this notice and the owner's manual for future reference.
All warnings on the unit and in it's operating instructions should be adhered to.
Do not use this unit near water; for example, near a bath tub, washbowl, kitchen sink, laundry tub, in a wet basement or near a swimming pool.
The unit should be installed so that its location or position does not interfere with its proper ventilation. For example, it should not be situated on a bed, sofa, rug or similar surface that may block the ventilation openings; or if placed in a built-in installation, such as a bookcase or cabinet, that may impede the flow of air through its ventilation openings, there should be at least 20cm (8 in.) of free space behind the appliance.
The unit should be situated from heat sources such as radiators, heat registers, stoves or other devices (including amplifiers) that produce heat.
The unit should be connected to a power supply outlet only of the voltage and frequency marked on its rear panel.
The power supply cord should be routed so that it is not likely to be walked on or pinched, especially near the plug, convenience receptacles, or where the cord exits from the unit.
Unplug the unit from the wall outlet before cleaning. Never use benzine, thinner or other solvents for cleaning. Use only a soft damp cloth.
The power supply cord of the unit should be unplugged from the wall outlet when it is to be unused for a long period of time or during a lightning storm.
Care should be taken so that objects do not fall, and liquids are not spilled into the enclosure through any openings.
This unit should be serviced by qualified service personnel when:
A. The power cord or the plug has been damaged; or
B. Objects have fallen, or liquid has been spilled into the unit; or
C. The unit has been exposed to rain or liquids of any kind; or
D. The unit does not appear to operate normally or exhibits a marked change in performance; or
E. The device has been dropped or the enclosure damaged.
Upon completion of any servicing or repairs, request the service shop's assurance that only Factory Authorized Replacement Parts with the same characteristics as the original parts have been used, and that the routine safety checks have been performed to guarantee that the equipment is in safe operating condition.
REPLACEMENT WITH UNAUTHORIZED PARTS MAY RESULT IN FIRE, ELECTRIC SHOCK OR OTHER HAZARDS.
ATTENTION
POUR EVITER LES CHOC ELECTRIQUES, INTRODUIRE LA LAME LA PLUS LARGE DE LA FICHE DANS LA BORNE CORRESPONDANTE DE LA PRISE ET POUSSER JUSQU'AU FOND.
CAUTION
TO PREVENT ELECTRIC SHOCK MATCH WIDE BLADE OF PLUG TO WIDE SLOT FULLY INSERT.
WARNING! INVISIBLE LASER RADIATION WHEN OPEN AND INTERLOCKS DEFEATED. AVOID EXPOSURE TO BEAM.
CLASS 1 LASER PRODUCT
LUOKAN 1 LASERPLAITE
KCLASS 1 LASERAPPARAT

SPECIAL CAUTIONS
This unit contains a semi conductor lase system and it classified as a "CLASS 1 LASER PRODUCT". So, to use this model properly, read this Instruction Manual carefully. In case of any trouble, please contact the store where you purchased the unit. To prevent being exposed to the laser beam, do not try to open the enclosure.
CAUTION: THIS PRODUCT UTILizes A LASER. USE OF CONTROLS OR ADJUSTMENTS OR PERFORMANCE OR PROCEDURES OTHER THAN THOSE SPECIFIED HEREIN MAY RESULT IN HAZARDOUS RADIATION EXPOSURE.
FOR U.S.A. MODEL
-
The laser is covered by a housing which prevents exposure during operation or maintenance. However, this product is classified as a Laser Product by CDRH (Center for Devices and Radiological Health) which is a department of the Food and Drugs Administration. According to their regulations 21 CFR section 1002.30, all manufacturers who sell Laser Products must maintain records of written communications between the manufacturer, dealers and customers concerning radiation safety. If you have any complaints about instructions or explanations affecting the use of this product, please feel free to write to the address on the back page of this manual. When you write to us, please include the model number and serial number of your unit.
-
In compliance with Federal Regulations, the certification, identification and the period of manufacture are indicated on the rear panel.
FCC INFORMATION FOR USER
CAUTION: Changes or modifications not expressly approved by the manufacturer for compliance could void the user's authority to operate.
NOTE: This equipment has been tested and found to comply with the limits for a Class B digital device, pursuant to Part 15 of the FCC Rules. These limits are designed to provide reasonable protection against harmful interference in a residential installation. This equipment generates uses, and can radiate radio frequency energy and, it not installed and used in accordance with the instructions, may cause harmful interference to radio communications. However, there is no guarantee that interference will not occur in a particular installation. If this equipment does cause harmful interference to radio or television reception, which can be determined by turning the equipment off and on, the user is encouraged to try to correct the interference by one or more of the following measures:
- Reorient or relocate the receiving antenna.
- Increase the separation between the equipment and receiver.
- Connect the equipment into an outlet on a circuit different from that to which the receiver is connected.
- Consult the dealer or an experienced radio/TV technician for help.
FOR CANADIAN MODEL POUR MODELE CANADIEN
THIS DIGITAL APPARATUS DOES NOT EXCEED THE CLASS B LIMITS FOR RADIO NOISE EMISSION FROM DIGITAL APPARATUS SET OUT IN THE RADIO INTERFERENCE REGULATIONS OF THE CANADIAN DEPARTMENT OF COMMUNICATIONS.
L'INTERFÉRENCE RADIO ÉLECTRIQUE GENÉRATION PAR CET APPAREIL NUMÉRIQUE DE TYPE B NE DÉPASSE PAS LES LIMITES ÉNONCÉES DANS LE RÉGLEMENT SUR LES PERTURBATIONS RADIO ÉLECTRIQUES, SECTION APPAREIL NUMÉRIQUE, DU MINISTÈRE DES COMMUNICATIONS.
DO NOT OVERLOAD WALL OUTLETS, EXTENSION CORDS OR INTEGRAL CONVENIENCE RECEPTACLES AS THIS CAN RESULT IN A RISK OF FIRE OR ELECTRIC SHOCK.
ADDITIONAL CAUTION: POWER BUTTON
CAUTION: When the switch is in the off position, the unit is still connected to the mains. Disconnect the power cable when the unit is not to be used for some time.
Be sure to remove all discs from the player before moving it, even if you only plan to move it across the room. If discs shift out of position in the carousel tray, they could jam when the tray turns or the drawer is opened.
A NOTE ON INSTALLATION
Install the Compact Disc player on a level, vibration-free surface. (Severe vibration, or operation in a tilted position, may cause the player to mis-track). The player may be stacked with other stereo components, as long as there is adequate ventilation around it.
If the player is placed in close proximity to a radio tuner (AM or FM), VCR, or television set, the operation of its digital circuits could produce static that would interfere with reception of weak broadcast signals. If this occurs, move the CD player away from other devices or switch it off when listening to broadcasts.
PLAYING COMPACT DISCS - A SIMPLE APPROACH
Numbers in brackets refer to the front panel drawing unless stated otherwise.
- Connect a stereo cable from the L (left) and R (right) Line Output sockets (2 in back panel drawing) to the corresponding CD inputs on your amplifier.
- Plug in the AC power cord (1 in back panel drawing).
- Press the POWER button (1) to turn on the player.
- Press the OPEN button (8) to open the disc drawer.
- Place your first CD, label side up, in the carousel tray's left-front circular recess (marked 'DIRECT PLAY'). Be certain that the disc is centred within the recess.
- Place your second CD in the right-front recess.
- Press the NEXT button (3) twice to move tray locations #3 and # 4 to the front loading positions. Place your third and fourth CDs in those recesses.
- Press NEXT (3) to bring tray location # 5 to the front, and insert your fifth CD.
- Press NEXT (3) as necessary until the display indicates Disc # 1.
- Press the PLAY button (7). The drawer closes automatically, the tray revolves to place Disc # 1 in playing position, and the first disc begins to play.
- When the first disc ends, the remaining discs will automatically play in sequence.
- At anytime you may press the SKIP > or < buttons (5) to select different tracks on the current disc, or press NEXT (3) to select a different CD.
- To hear a particular track, use the remote control to enter the corresponding Disc Select and Track Select buttons.
REAR PANEL CONNECTIONS
The numbers refer to the back panel drawing.
1. AC LINE CORD.
Connect this power cord to an AC mains wall outlet or to an AC convenience outlet at the rear of your amplifier.
2. LINE OUTPUT.
Connect a cable from these sockets to your amplifier. Plug one end of a stereo audio cable into the Left (upper) and Right (lower) output sockets. Connect the other end of the cable to your stereo amplifier's matching Left and Right CD inputs, or to any other "line-level" input sockets on (such as the AUXiliary inputs).
NOTE: Do NOT connect this cable to the amplifier's PHONO input sockets.
3. NAD LINK IN/OUT.
The NAD Link OUT connector (the upper socket) allows remote-control commands to be relayed from this player to other products equipped with a NAD-Link (or compatible) input. To use this option, connect a cable from the NAD Link OUT socket to the NAD Link IN socket on another product.
The NAD Link IN connector (the lower socket) allows this player to be operated by external control signals from a multi-room controller or remote relay system. Connect a cable from the controller to the NAD Link IN socket. Using both IN and OUT connections, remote control commands can be "daisy-chained" from one product to the next.
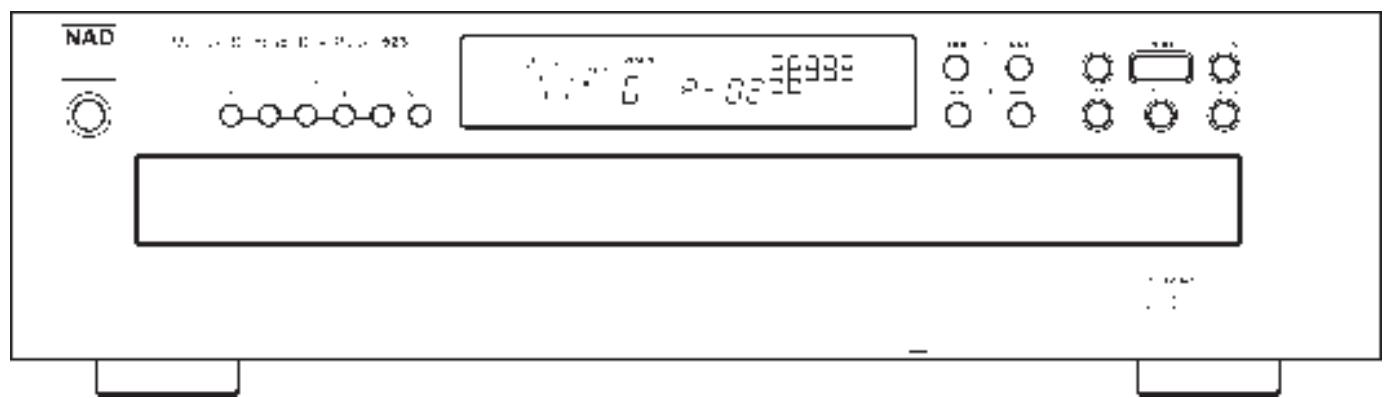
FRONT PANEL CONTROLS
Numbers of each section or in brackets refer to the front panel drawing unless stated otherwise.
1. POWER.
Press this button to switch on the power to the disc player. Press again and release to switch the power off. When the power is switched on, the carousel tray automatically revolves to place disc # 1 in the play position.
2. DISC 1 to 5
Press the appropriate Disc number button to immediately access the desired disc. When one of the DISC 1 to 5 buttons is pressed with the CD drawer open, the player will close the CD drawer and start to play the selected disc.
3. NEXT.
Turns the carousel tray to select the next-higher disc number. After # 5 it returns to # 1. If NEXT is pressed with the CD drawer open whilst playing a CD, the CD drawer will close first.
4. DISPLAY.
The display provides information about the disc selection, playback status, about the stored program, and about the laser's location on the disc being played.
TRACK and TIME information is obtained by reading an inaudible "sub-code" in the disc.
STATUS.
Symbols to the left of the disc list indicate whether the player is in PLAY or PAUSE. PLAY is indicated by an arrowhead pointing to the right (>) . PAUSE is indicated by two, red vertical bars (II). When neither is illuminated, the player is in the STOP mode.
DISC NO.
Numbers arranged in a circle indicate the presence of a disc at each tray location. All are lit when the drawer is opened in STOP mode. Whenever the player finds an empty tray location the corresponding indicator is switched off. A circled number shows which disc is selected for play or currently playing.
TRACK.
Each disc is segmented into numbered tracks when the CD is made. Typically each numbered track corresponds to a different song, symphonic movement, etc. The track numbers are identified on the CD package and are encoded in the disc by its manufacturer. In some CDs the tracks may be further sub-divided into "index" sections, which are not displayed.
During play, this display identifies the track being heard. In the Stop mode it indicates the total number of tracks on the current disc.
The NAD Model 523's display also incorporates a 'Track Calendar' on the right hand side in the display. Using squares with sequential numbers, the Calendar can display up to 20 tracks simultaneously. During Memory Play the Calendar displays the tracks which have been selected. As each track is played or skipped past, the corresponding number is blanked out.
TIME.
In the Stop mode this display shows the total playing time of the current disc. During play you can use the TIME button (see below) to select one of three displays:
The elapsed time since the beginning of the current track, in minutes and seconds. (This is the default setting, selected automatically when the player is switched on).
The time that remains until the end of the current track. SINGLE REMAIN lights up in the display.
The total playing time that remains until the end of the current disc. TOTAL REMAIN lights up in the display.
REMOTE RECEIVER.
Behind the rightmost portion of the window is the infrared sensor that receives commands from the remote control. If the line-of-sight path from the remote control to this window is obstructed by papers or other objects the player may not respond to remote commands.
5. SKIP.
SKIP BACK (↓).
The button causes the laser to jump backward to the beginning of each numbered track on the disc. The first press skips back to the beginning of the current
track. Press twice in rapid succession to skip back to the previous track. During Memory Play, SKIP < < · jumps back to the previous track in the programmed sequence.
SKIP FORWARD (▶▶I). During play, pressing SKIP Forward▶▶I causes the laser to jump forward to the beginning of the next track and resume play there. Thus, to sample each song on a disc, press PLAY and then tap SKIP Forward▶▶I after you've heard a few seconds of each track.
During Memory Play, SKIP jumps forward to the next track in the programmed sequence.
6. STOP.
This button stops play and re-sets the laser to the beginning of the current disc. During Memory Play you can press this button to stop playback without erasing the stored track list.
7. PLAY.
This button initiates playback. Press to start play or to resume play after Pause. If the disc drawer is open in STOP mode, the PLAY button will close the drawer and commence play.
8. OPEN.
Press this button to open the disc drawer. and press it again to close the drawer. The OPEN button also disengages the Random mode if it had been selected.
9. REPEAT.
This button engages an endless-repeat cycle. You may press the REPEAT button either before or after pressing PLAY; the effect is the same.
Pressing the REPEAT button once selects the REPEAT ALL DISC mode in which all five discs are played continuously in sequence.
Pressing REPEAT a second time selects the REPEAT 1 DISC mode, in which the entire current disc is repeated.
Pressing REPEAT a third time selects the REPEAT 1 mode, in which the current track is repeated over and over again.
Press the REPEAT button a fourth time to cancel the repeat cycle and return to normal operation.
NOTE: In the MEMORY mode the REPEAT command repeats the stored program.
In the RANDOM play mode the REPEAT ALL DISC command will repeat another Random cycle.
During repeat play you may press PAUSE to stop temporarily, and PLAY to resume.
10. PAUSE.
Press to stop playback temporarily, keeping the laser at its current position on the disc.
To release the Pause mode and resume playback at the exact point where it stopped, press PLAY. If you don't want to resume listening at the same point, you may use the SKIP and SCAN buttons to cue the laser to a different starting point, and then press PLAY.
11. TIME DISPLAY SELECTOR.
During normal (non-programmed) play, the display indicates the elapsed time since the beginning of the current track.
If you press the TIME button once, the display shows the time remaining until the end of the current track (SINGLE REMAIN). This function does not operate if the Track Number is greater than 20.
Press TIME again to display the total time remaining until the end of the disc or the total playing time remaining of a pre-programmed selection of the disc (maximum 2) and tracks (TOTAL REMAIN).
Press the TIME button a third time to return to the normal elapsed-time display.
12. SCAN
SCAN BACK The SCAN button causes the optical pickup to scan backward through the recording at high speed. This button works only while the player is in PLAY or PAUSE.
SCAN FORWARD▶. The SCAN▶ button causes the optical pickup to scan rapidly forward through the music. The behaviour of this function is similar to Scan
NOTE: For the first 4 seconds Scan works at approximately 20x the original speed, after holding either SCAN button for more than 4 seconds, the speed is approximately 100x the original speed.
When using SCAN the music will be heard in fragmentary form at reduced volume as the player scans through it. Use this "audible scan" to cue the player precisely to the spot where you want to resume play.
After a STOP command, or after loading a new disc, you must press PLAY (to activate the TIME display) before the scan circuit will work.
13.DISCDRAWER.
To open the disc drawer, press the OPEN button.
The drawer contains a revolving " carousel" tray that accepts a maximum of five discs. The DISC number in the display with a circle around it identifies the tray location that is aligned with the optical playback mechanism at the rear of the unit.
When the drawer is opened from STOP mode, the carousel revolves. The tray location indicated by the circled Disc Number display moves to the front-left loading position recess (marked 'DIRECT PLAY'). The front-right loading position is the next higher disc number. Thus if the display indicates Disc # 1, as it does when the power is first switched on, opening the drawer places location # 1 at front-left recess (marked iDIRECT PLAYi) and location #2 at front-right. Press NEXT repeatedly to bring tray locations # 3, #4, and #5 to the front.
NOTE: The transparent playing surface of each disc must face DOWN, and its label must face UP. CD-3 discs (CD "singles") can be played without the aid of an adapter. Place the disc in the drawer, centred in the smaller circular recess.
The NAD Model 523 CD player was not designed to accommodate a 'damping disc' placed on a disc, nor two discs stacked together. It plays audio discs, but not discs identified as CD-V, CD-I, CD-ROM or PHOTO CD and thus playback will be muted.
Do not attempt to turn the carousel tray by hand, or to stop its motion. Doing so may cause the control logic to mis-identify disc numbers, which can result in damage to discs during operation.
To play just one disc, place it within the large circular recess at the front-left loading position (marked 'DIRECT PLAY'), and press PLAY. The disc at front-left will be moved into playing position and will begin to play.
For multi-disc play, place CDs within any (or all five) circular recesses in the carousel tray, beginning at the front-left loading position. At each location you may place either a standard 12-cm CD or, in the smaller inner recess, an 8-cm CD-3 (CD "single").
To change discs during the playback of any disc the drawer may be opened and two discs may be replaced, as follows:
WHILST PLAYING: YOU MAY REPLACE:
| DISC# | DISC#(LEFT) | DISC#(RIGHT) |
| 1 | 3 | 4 |
| 2 | 4 | 5 |
| 3 | 5 | 1 |
| 4 | 1 | 2 |
| 5 | 2 | 3 |
Do not press NEXT or any of the DISC 1 to 5 buttons during this process. If you do, playback will immediately stop and the tray will close so that the current disc can be returned to its normal place in the tray.
NOTE: Take care that each disc is centred within its recess. A disc that protrudes outside of its recess could jam and suffer damage when the drawer closes and the tray revolves.
To close the drawer, press either OPEN or PLAY. Do NOT push the drawer closed by hand.
REMOTE CONTROL
A wireless remote control is provided with your CD player, enabling you to operate programming and playback functions from the comfort of your armchair.
BATTERIES
Batteries must be installed before the remote control can be used. In the future, if the player does not respond to remote commands, the batteries may be weak and should be replaced. The handset requires two 1.5-volt AA-size penlight cells (equivalent type R6P or R6PU). Alkaline cells are recommended for maximum operating life.
To open the battery compartment, press downward with a thumb nail in the half-circle notched area on the back of the handset and lift the cover of the battery compartment off. Install fresh AA cells, orienting them as shown on the diagram within the compartment. The coil springs should contact the negative (- end of each cell). Press the battery compartment cover back on in the correct position until it latches.
NOTE: In some cases, poor operation may be caused by slight corrosion or fingerprint oil on the battery contacts. Remove both cells, rub the metal contacts at both ends of each cell with a clean cloth or a pencil eraser, and reinstall the cells, being careful to orient them according to the diagram in the battery compartment.
If the remote control will not be used for several months (or longer), remove the batteries to protect the handset from battery corrosion.
The letters of each section or in brackets refer to the remote control drawing.
The remote control operates by emitting a digitally coded beam of infrared light through the LED in the top end of the handset. Aim the top-end towards the NAD Model 523 disc player while pressing the buttons on the handset. There must be a clear line-of-sight path from the handset to the IR sensor located in the player's display window.
NOTE: If either the LED in the top-end of the handset or the display window of the player is obstructed by papers or other objects, the player may not respond to remote commands. Remote-control operation may also be impaired if the front of the player is exposed to direct sunlight or a bright incandescent light.
The remote control contains features that are not on the player itself: A numeric keypad for direct entry of track numbers. The keypad buttons (0 to 10; +10) (A) are also required when programming the player for automatic play using the MEMORY button (B). The CLEAR button (C) deletes the last selected entry from memory Play. The RANDOM button (D) allows for random play of all discs.
The remaining remote-control buttons have the same effect as the corresponding buttons on the player's front panel apart from the PLAY button: On both the remote control and the front panel, Play commences playback from Stop or Pause. Unlike the PLAY button on the front panel however, pressing the PLAY button on the remote control whilst a disc is playing engages Pause.
A. TRACK SELECT KEYPAD (0 to 10; +10).
Jumps directly to the beginning of a numbered track and commences play. To play or select Track 5, simply press 5. To play or select Track 23 press +10 , +10 , 3.
B. MEMORY (ENTRY OR ERASE).
The player can be programmed for automatic playback of up to 40 tracks in any order. These tracks may be selected from a single disc or from any combination of up to five discs. The track list is entered through the remote control. Press MEMORY to engage the program mode. Press MEMORY again when you want to exit from Memory Play mode and erase your track list from the player's memory. Switching power off also erases a programmed track list.
Store your desired track sequence in the memory as follows:
- If MEMORY is illuminated in the display, press MEMORY on the remote control to erase the previous program.
- If you want to program tracks from only one disc, select that disc using one of the DISC 1 to 5 or NEXT buttons on either the front panel or the remote control before you engage the MEMORY mode. If your program will include tracks from two or more discs, the current disc number is unimportant.
- Press MEMORY on the remote control to engage the program mode. MEMORY will appear in the display.
- To program tracks from only the current disc, use the Track Select keys to enter the list of track numbers. For example to program tracks 3, 5,14, 9,12, and 7 (in that order) for automatic play, press the buttons as follows:
MEMORY
3
5
+10
4
9
+10
2
7.
To program a sequence of tracks from two or more discs, you must specify the disc number as well as the track number. To include all tracks of one of the discs first specify the disc number and press 0 on the track numeric keypad. For example, to play the following series of tracks: Disc 3 Track 5, Disc 1 Track 10, Disc 2 all Tracks, Disc 5 Track 7, Disc3 Track 14, press the buttons as follows:
MEMORY
DISC 3
5
DISC 1
+10
0
DISC 2
0
DISC 5
7
DISC3
+10
4
After each correct selection entry the display will show the total amount of programmed selections for approximately two seconds. In the example above the display will show P - 05 to indicate that 5 selections have been memorised.
NOTE: Each track counts as one selection. However, selecting all tracks of a disc by pressing 0 on the track numeric keypad after specifying the disc number counts as one selection.
The display's track Calendar will also show which tracks of the disc currently playing have been programmed for Memory play. As each track is played or skipped past its Calendar number is blanked out. (only for the first 20 tracks of that disc, as the Calendar displays up to a maximum of 20 tracks).
If you make an error during programming you must press MEMORY to clear the current program, press MEMORY again to restart and enter your track listing from the beginning.
NOTE: If you engage the Memory mode while playing a disc, the current track will be included as the first entry in the stored program. As long as MEMORY is shown in the display you can add further entries to the stored track list. Simply enter the new Disc Select and Track Select numbers as above.
As long as the MEMORY indicator remains illuminated, only the stored Memory program can be played. If you want to play a track not included in the program, you must either add it to the program (as above) or exit from the program mode by pressing MEMORY on the remote control. Exiting will delete the stored track list from the player's memory.
C. CLEAR.
With the CLEAR button you can delete the last selected entry from Memory play; press the CLEAR button once. Every successive time the CLEAR button is pressed, a Memory Play entry is deleted. Once the CLEAR button is pressed, the display will show for two seconds the current amount of programmed selections for Memory Play.
D. RANDOM.
Engages and disengages random track selection. The player will play each track of each CD in a random sequence.
Random can be combined with Repeat and/or Memory play.
NOTE: Random is also disengaged if the drawer is opened.
MAINTENANCE.
At periodic intervals, open the disc drawer and wipe it with a damp cloth to remove any loose dust.
DISC LOADING PROBLEMS
Whenever the carousel tray revolves to select a different disc, the optical pickup automatically scans a "table of contents" track at the beginning of the disc, containing coded information about its playing time and the location of each track.
If you accidentally place a disc in the drawer upside down, or if a disc fails to load properly into the playing mechanism, the pickup will be unable to find the contents track. After a few seconds of searching, the corresponding Disc No. in the display will disappear and the player will move on to the next disc. If this happens open the drawer and re-insert the disc.
HANDLING COMPACT DISCS
Handle Compact Discs with care. The playback of a disc will not be impaired by small dust particles, a few light fingerprints, or slight scratches. But large scratches, or a thick layer of oily fingerprints, can prevent the player from tracking the disc. (Incidentally, although the tracking laser "plays" the disc through its clear side, the actual data surface is embedded directly beneath the label, protected only by a very thin coating of lacquer. So a scratch that cuts through the label may damage the disc more than a similar scratch on the transparent "playing" surface. Thus you should treat both surfaces of the disc with care.)
Severe scratches or fingerprints may cause the player to mis-track (skipping ahead, or repeating the same passage). Less severe damage may produce very brief bursts of high-frequency noise. Compact discs should not be abused or handled carelessly.
For best results, grasp the disc only by its edges. Another safe method is to put a finger in the centre hole, using the thumb at the edge to hold the disc steady.
Each disc should be kept in its protective storage case when not in use. To open the standard Philips-type plastic CD case, grasp the top and bottom of the case with the fingers and thumb of the left hand; then grasp the left and right edges of the case with the fingers and thumb of the right hand, and pull the case open with the right thumb.
The disc is held in place within the case by an expansion hub in its centre hole. To remove the disc, press the hub with a finger to release the disc, then lift it out by gripping its edges between the fingers and thumb. To replace the disc in the case, simply align its centre hole with the hub and press the disc onto the hub.
Soiled discs may be cleaned by wiping with a soft cloth, either dry or moistened with water. Do NOT use conventional LP record-cleaning products (cleaning solutions, sprays, treated cloths, or anti-static preparations), nor any kind of chemical solvent (alcohol, benzene, etc.). A severely soiled disc may be washed in a warm-water spray, possibly with a small amount of a mild kitchen detergent added, and then wiped dry with a clean, soft towel.
When cleaning the disc, use only RADIAL strokes (from centre to edge). Never use a circular wiping motion like that used for cleaning ordinary LP records, because in wiping the disc there is a risk of scratching it. A radial scratch will do the least harm because it affects only a small portion of each circular data track, which can be fully compensated by the player's error-correction circuits. But a circular scratch that follows a data track may damage such a long continuous segment of data that it cannot be corrected.
ABOUT THE LASER
The Compact Disc player uses a solid-state semiconductor diode laser, mounted on a tracking servo mechanism, to play the disc. The laser illuminates the track of microscopic pits representing the digital data bits, while photo-diodes detect the reflected illumination from the disc and convert it into an electronic signal which is then decoded to recover the musical waveform in each stereo channel.
The Compact Disc player is completely safe for children to use. The laser operates at very low power and is concealed within the player mechanism. Even when the player is disassembled, the laser remains sealed
within an optical system that causes its light to focus only 1 millimetre from the lens and then diverge rapidly, reducing its intensity to negligible levels.
TROUBLE SHOOTING GUIDE
PROBLEM:
Power button is pressed, but power does not come on.
CAUSE:
AC line cord is not properly connected to live AC outlet
REMEDY:
Insert plug firmly
Disc is loaded in the disc tray, but play will not commence
Disc is up-side-down in tray; disc is dirty
Insert discs properly; clean the disc
Disc keeps skipping and/or search time to a different track is extremely long
Dirty or damaged disc
Clean (see chapter 'Handling Compact Discs) or replace disc
No sound
Incorrect connections; wrong input selected on amplifier (such as Tape Monitor)
Check all connections; select correct input and disengage Tape Monitor on amplifier
No sound in one channel
Incorrect connections; balance on amplifier set to one channel only
Check all connections; re-set balance on amplifier to mid-position
Some tracks cannot be programmed for Memory Play
Track number on selected disc doesn't exist; no disc in the tray
Select tracks present on the disc only; insert disc in tray
LECTEUR DE COMPACT DISCA CHANGEUR AUTOMATIQUE NAD 523
B. PROGRAMME [MEMORY] (ENTREE OU EFFACEMENT).
3. NAD LINK IN/OUT (ENTRADA/SALIDA DE CONEXION NAD)
GUIDA RICERCA GUASTI
PROBLEM
11. TIDSVISNINGSVÄLJARE.
2. DISC 1 to 5 (DISCO 1 a 5)
| Disc capacity | Five discs, 120mm or 80mm |
| Programming capability | 40 Tracks |
| Digital-to-Analogue conversion | 1 Bit PWM |
| Digital filter | 8 x oversampled linear |
| Frequency response 20Hz-20kHz | ±0.2dB |
| THD (at 0dB, 1kHz) | 0.003% |
| Dynamic range | 98dB |
| Linearity | ±1dB; 0 to -90dB |
| Signal to noise ratio (A-weighted, measured with all zeroes test disc) | 100dB |
| Channel separation @ 1kHz | >92dB |
| Wow and Flutter | Unmeasurable (Quartz accuracy) |
| Output level @ 0dB | 2.1V rms |
| Output impedance | 150 |
| Digital error correction | CIRC with double error correction in C1 and C2 |
| Remote control | Yes |
| PHYSICAL SPECIFICATIONS | |
| Dimensions (W x H x D) | 435 x 124 x 385 mm |
| Net weight | 6.1kg |
NOTE: NAD reserves the right to change specifications or design at any time without notice.
NAD ELECTRONICS LTD
(NEW ACOUSTIC DIMENSION)
LONDON
- IMPORTANT SAFETY INSTRUCTIONS
- ATTENTION:
- ATTENTION
- CAUTION
- SPECIAL CAUTIONS
- FOR U.S.A. MODEL
- FCC INFORMATION FOR USER
- FOR CANADIAN MODEL POUR MODELE CANADIEN
- ADDITIONAL CAUTION: POWER BUTTON
- A NOTE ON INSTALLATION
- PLAYING COMPACT DISCS - A SIMPLE APPROACH
- REAR PANEL CONNECTIONS
- AC LINE CORD.
- LINE OUTPUT.
- NAD LINK IN/OUT.
- FRONT PANEL CONTROLS
- POWER.
- DISC 1 to 5
- NEXT.
- DISPLAY.
- STATUS.
- DISC NO.
- TRACK.
- TIME.
- REMOTE RECEIVER.
- SKIP.
- SKIP BACK (↓).
- STOP.
- PLAY.
- OPEN.
- REPEAT.
- PAUSE.
- TIME DISPLAY SELECTOR.
- SCAN
- 13.DISCDRAWER.
- REMOTE CONTROL
- BATTERIES
- TRACK SELECT KEYPAD (0 to 10; +10).
- MEMORY (ENTRY OR ERASE).
- MEMORY
- CLEAR.
- RANDOM.
- MAINTENANCE.
- DISC LOADING PROBLEMS
- HANDLING COMPACT DISCS
- ABOUT THE LASER
- TROUBLE SHOOTING GUIDE
- PROBLEM:
- CAUSE:
- REMEDY:
- LECTEUR DE COMPACT DISCA CHANGEUR AUTOMATIQUE NAD 523
- PROGRAMME [MEMORY] (ENTREE OU EFFACEMENT).
- NAD LINK IN/OUT (ENTRADA/SALIDA DE CONEXION NAD)
- GUIDA RICERCA GUASTI
- PROBLEM
- TIDSVISNINGSVÄLJARE.
- DISC 1 to 5 (DISCO 1 a 5)
Brand : NAD
Model : 523
Category : Audio Amplifier