
66812 - Metal Lathe PROLINE - Free user manual and instructions
Find the device manual for free 66812 PROLINE in PDF.


| Product Type | Adjustable Torque Wrench |
| Brand | Proline |
| Model | 66812 |
| Accuracy | ±4% |
| Drive Size | 1/2" square drive with ball lock |
| Included Accessories | Replaceable ratchet, 10 fork terminals (13, 14, 15, 17, 19, 22, 24, 27, 30, 32 mm), plastic case, calibration certificate |
| Designed Use | Controlled right-ward tightening of screws, nuts and bolts with adjustable torque |
| Operation Direction | Left and right rotation via change-over switch |
| Torque Setting | Adjustable via adjustment ring with graduation and release button |
| Torque Indication | Click and feel when set torque is reached |
| Material | Steel with plastic handle |
| Storage | Included plastic case for protection during transport and storage |
| Warranty | 12 months |
| Calibration | Factory calibrated; recommended yearly recalibration |
| Safety | Do not use on live parts; avoid extensions; do not overload; keep away from children |
| Maintenance | Clean with dry cloth; do not immerse in solvents; do not disassemble |
Frequently Asked Questions - 66812 PROLINE
User questions about 66812 PROLINE
0 question about this device. Answer the ones you know or ask your own.
Ask a new question about this device
Download the instructions for your Metal Lathe in PDF format for free! Find your manual 66812 - PROLINE and take your electronic device back in hand. On this page are published all the documents necessary for the use of your device. 66812 by PROLINE.
USER MANUAL 66812 PROLINE
natural_image
Two adjustable wrenches with end caps, shown from different angles (no text or symbols visible)EN Operation manual TORQUE WRENCH....3
DE Gebrauchsanleitung DREHMOMENTSCHLÜSSEL 6
PL Instrukcja obsługi KLUCZ DYNAMOMETRYCZNY....9
RU Инструкция по эксплуатации ДИНАМОМЕТРИЧЕСКИЙ КЛЮЧ .....12
RO Instructiuni de utilizare CHEIE DINAMOMETRICĂ....15
LT Naudojimo instrukcija DINAMOMETRINIS RAKTAS....18
UK Інструкція з експлуатації ДИНАМОМЕТРИЧНИЙ КЛЮЧ....21
HU Használati útmutató NYOMATÉKKULCS 24
LV Lietošanas instrukcija DINAMOMETRISKĀ ATSLĒGA....27
ET Kasutusjuhend DÜNAMOMEETRILINE VÖTI....30
BG Инструкция за експлоатация ДИНАМОМЕТРИЧЕН КЛЮЧ....33
CS Návod na obsluhu DYNAMOMETRICKÝ KIÍČ......36
SK Návod na obsluhu DYNAMOMETRICKÝ KLÚČ 39
DEAR CUSTOMER,

Before you start to use the tool, read this manual and follow basic safety rules.

PLEASE NOTE! Symbol is used for important descriptions, information on hazardous conditions, hazards or safety tips.
The failure to comply with the below warnings, incorrect use and/or modification of the tool design makes any warranty rights invalid and releases the manufacturer from any liability for losses resulting from the tool operation incurred by people, animals, property or the tool.
Please keep this manual and tips, to refer to them any time. If the tool is given to another person, hand over also the user manual. We shall not be held liable for any accidents and damage resulting from the failure to comply with this manual and safety tips.
RESERVATION: As we improve our products all the time, we reserve the right to introduce modifications not included in this manual.

SAFETY RULES FOR TORQUE WRENCH USE:
a) Ensure your workplace is always neat and tidy and well lit. Insufficient light and mess may cause accidents.
b) A torque wrench is a hand-held tool, calibrated by the manufacturer. For this reason, handle it with appropriate care. For safety reasons, it is prohibited to introduce any unauthorised changes and/or modifications to the product.
c) Before every use check if the product is not damaged. If any damage is detected, do not use the product.
d) When you use a torque wrench, follow the applicable local safety and accident prevention regulations.
Depending on where and how you use the torque wrench, always use the appropriate protective clothes. Wear protective goggles during your work.
e) The torque wrench should always be protected from moisture, dust and dirt, oil and chemicals when working or during its storage. Do not let the wrench fall as it may be damaged and unfit for use.
f) The torque wrench may not be used for live parts. A risk of fatal electric shock!
g) Do not use any extensions (e.g. tubes) to increase the leverage effect when using the torque wrench as this changes the set torque value and may damage the wrench. Do not use also any articulated joints.
h) Do not overload the torque wrench. Do not exceed the maximum torque value stipulated in the tool specifications.
i) Always turn the wrench to ensure the load increases gradually to the required torque value. Do not exert any force on the wrench by hitting or pulling.
j) Do not use the wrench for unscrewing. The torque wrench must not be used for loosening bolts, nuts or screws. In 66812 model, pay attention to the arrow on the torque wrench arm, indicating the permissible work direction and wrench loading.
k) Do not use the torque wrench for hitting. The wrench may be damaged.
1) To ensure correct transfer of torque to the nut or bolt, keep the entire system coaxial. The torque wrench should be positioned perpendicularly to the screw / nut / bolt. Do not tilt it as this may give a false torque value when tightening.
m) When you tighten the screw, nut or bolt, hold the torque wrench in the handle centre. The force applied to the wrench handle should be perpendicular to the head axis.
n) If you suspect the torque wrench is not calibrated precisely or decalibrated (e.g. following the fall), do not use it. If you are unsure about the correct use of the tool or if you have any questions, the response to which is not included in this manual, contact our technical service.
o) The torque wrench is not a toy and should be kept away from children. When the product is used in schools, training centres, hobby workshops and self-help workshops, the trained personnel, who should also monitor its use, shall be responsible for it.
THE SET INCLUDES:
Models: 66800, 66801, 66802, 66803, 66804, 66805
- Torque wrench - 1 pc.
- Plastic case (for storage / protection in transport) – 1 pc.
- Calibration certificate -1 pc.
• Operation manual/Warranty card –1 pc.
Model: 66812
- Torque wrench -1 pc.
- Set of fork terminals with flat pin 14x18 mm – 10 pc. (13, 14, 15, 17, 19, 22, 24, 27, 30, 32 mm)
- Replaceable ratchet with flat pin 14x18 mm and square drive 1/2"-1 pc.
- Plastic case (for storage / protection in transport) –1 pc.
- Calibration certificate -1 pc.
• Operation manual/Warranty card -1 pc.
DESIGNED USE:
The torque wrench is designed solely for controlled right-ward tightening of screws, nuts and bolts with adjustable torque (see TECHNICAL DETAILS).
No other use than the one described above is permitted as it can result in product damage and possible hazard for the user.
Every wrench is calibrated by the manufacturer and its accuracy is ±4% . The wrench should be checked at least once a year if it is used with high intensity.
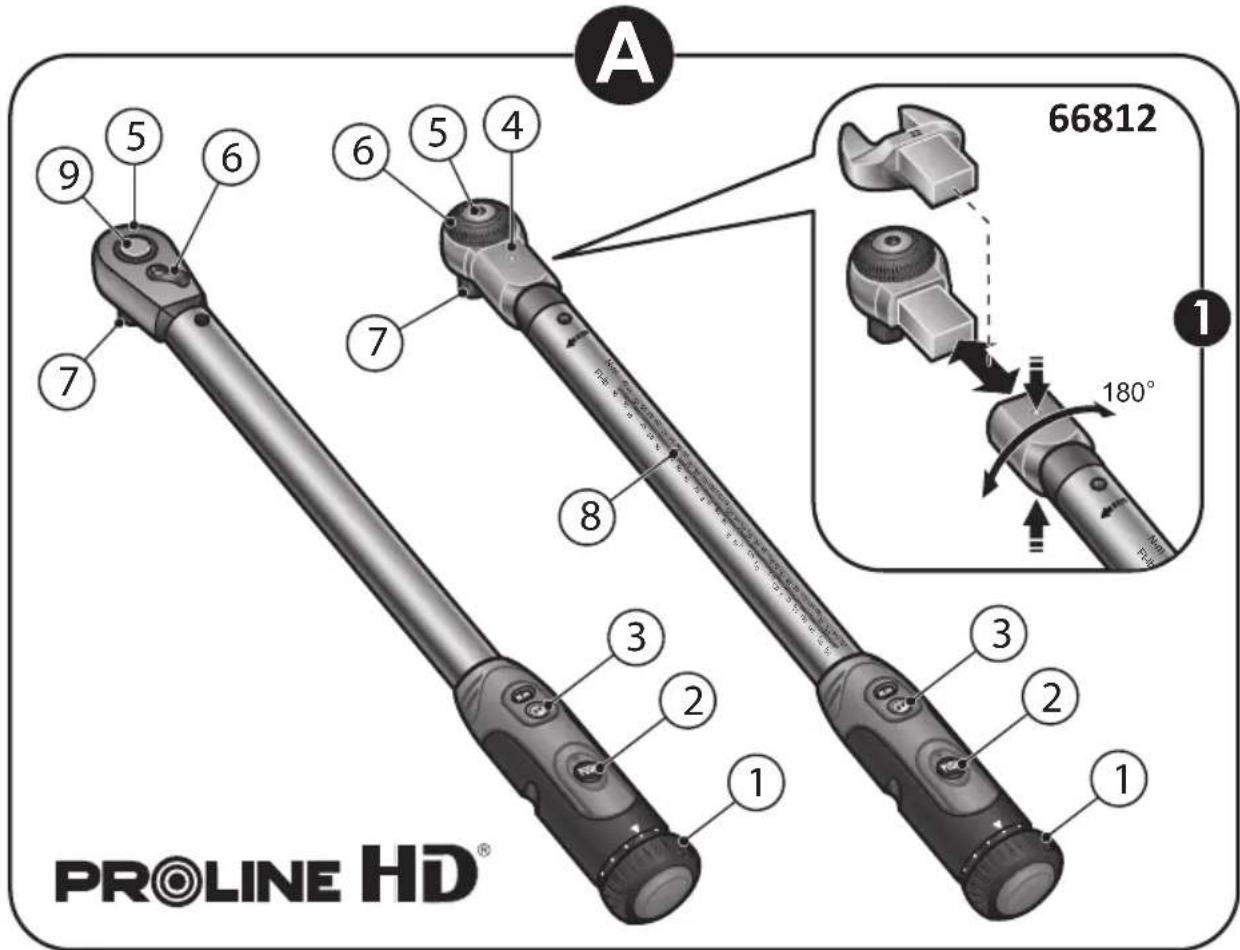
■ Operation components (see Fig. A).
- Adjustment ring with graduation
- Release button
- Graduation showing the current torque value with a convex lens
- Handle with a ball lock (only 66812 model)
- Ratchet with a drive
- Rotation change-over switch (leftwards / rightwards)
- Square drive with a ball lock
- Conversion scale
- Socket wrench lock pushbutton (only 66800, 66801, 66802, 66803 models)
USE:
■ Setting torque values
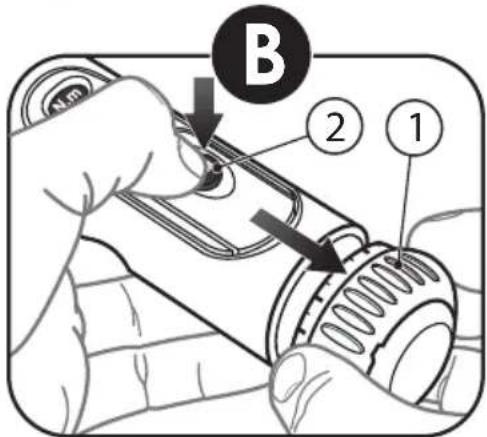
- Press the release button (2) and pull the adjustment ring at the same time (1) (see Fig. B).
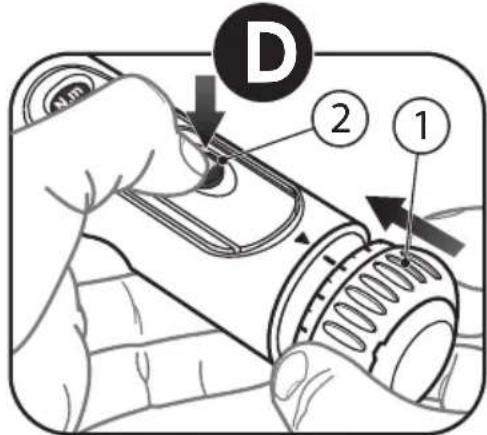
- Holding the wrench handle, turn the adjustment ring (1) until the graduation shows the required torque value (3) (see Fig. C).
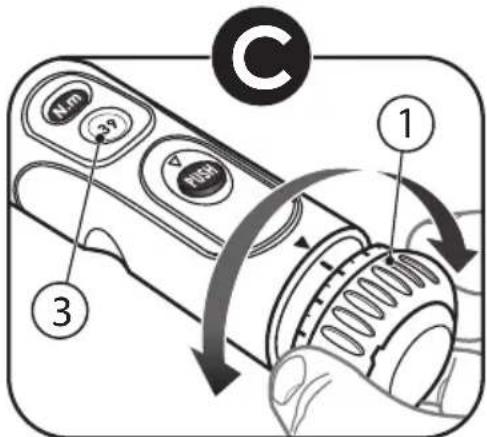
- After you have set the required torque, lock the wrench. This prevents inadvertent change of the torque value.
Press the release button once again (2), push the adjustment ring (1) furthest down the handle and release the button (2) (see Fig. D).
■ Torque wrench use
- Set the required torque (see above).
- Depending on the screw, nut or bolt, choose the appropriate tip which goes with the square drive (7). In 66812 model, you can use also the fork terminals included which are inserted in the handle with the ball lock (4).

PLEASE NOTE! The torque wrench should not be used with adapters for other square drive sizes. Use only tips of the size corresponding to the square drive of the (7) torque wrench.
In 66800, 66801, 66802 i 66803 models, press and hold the lock button when inserting or removing the socket wrench (9).
- Use the change-over switch (6) to set the rotation direction (left-or rightwards).

PLEASE NOTE! In 66812 model, besides the ability to change over the rotation direction leftwards and rightwards, you must comply with the following rule:
For right-hand threads, place the ratchet/fork terminal in the handle to ensure the drive/fork is on the opposite side of the housing than the measuring graduation, turning the screwed-in component clockwise. For left-hand threads, place the ratchet/fork terminal in the handle to ensure the drive/fork is on the same side of the housing as the measuring graduation, turning the screwed-in component anticlockwise.
Press the lock balls and remove the ratchet with the drive/fork terminal, turn the wrench to 180^ and insert the ratchet/fork terminal again. The operation direction should be identical to the one indicated by the arrow on the torque wrench arm (see Fig. A1). 4. Tighten the screws / nuts / bolts slowly and evenly with the torque wrench, until you reach the selected torque.

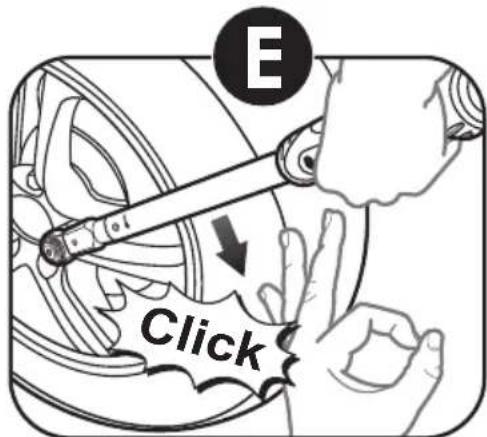
PLEASE NOTE! Hold the torque wrench only by the handle when working. To achieve precise measurement results, place your hand in the handle centre (see Fig. E).
When the set torque is achieved, you will feel and hear it (clicking sound). The higher the set torque is, the more intense the indication. Achieving the set torque is signalled for right-hand thread tightening. In 66812 model, you should install the ratchet with the drive/fork terminal appropriately (see above).
After you have achieved the set value, do not continue tightening as this will result in exceeding set torque.
- When the torque wrench is no longer required, loosen it entirely to relieve load of the spring mechanism. To that aim, turn the adjustment ring (1) leftwards, until you see STOP on the graduation (3).

PLEASE NOTE! If the torque wrench is not released, after a prolonged use the actual torque may differ significantly from the set value.
If the torque wrench is not used for a longer time, set the torque value to a lower range and use the wrench 5 to 10 times to ensure uniform grease distribution in the internal mechanism of the torque wrench.
■ Maintenance and cleaning
The product is maintenance free, do not disassemble it. Maintenance and repairs must always be carried out by specialists in an authorised service centre.
Clean the product with a dry, soft and clean cloth. Do not immerse the torque wrench in petrol or solvent as this damages the protective grease layer in the internal mechanism of the torque wrench.
■ Calibration test
The wrench has a certificate confirming that the tool accuracy was verified in the full range of torque values in ordinary operation conditions, e.g. ensuring the coaxiality of the wrench and screw. Torque tools are measurement tools and their accuracy should be verified regularly as for any other type of such tools. According to ISO 6789:2003, the torque wrench calibration should be repeated 1 year after the first use and then once a year. For more intense use, the intervals between calibration procedures should be shortened accordingly. Calibration should be carried out also after every torque wrench loading with the torque higher than 1,25 of the maximum work torque, after every repair and after every case of tool misuse which may affect its accuracy. The above does not prejudice against the applicable legal regulations concerning measurement tools and referring to any torque tools.
STORAGE:
When no longer used, the torque wrench should be stored in the transport case in the designed place, preventing tool damage during its storage and its use by non-authorised people.
WARRANTY:
- The tool is covered with a 12-month warranty.
- The warranty does not cover any mechanical damage or
damaged caused by incorrect operation of the product.
- The warranty expires if any repairs or modifications by non-authorised persons are discovered.
- The detailed terms and conditions of warranty, as well as the repair centre address, are specified on the warranty card.
MANUFACTURER:
PROFIX Sp. z o.o.,
03-228 Warszawa,
The policy of the PROFIX company consists in permanent improvements of the offered products and therefore the company reserves the right to make amendments to the product specification without a prior notice. The images included into the operation manual are only of the exemplary nature and may slightly differ from actual appearance of the device purchased.
This instruction manual is protected by copyright. Copying it without the written consent of PROFIX Co. Ltd. is prohibited.
Brand : PROLINE
Model : 66812
Category : Metal Lathe