
FORZA 5200 Fuego - Contact Grill ECG - Free user manual and instructions
Find the device manual for free FORZA 5200 Fuego ECG in PDF.


| Product Type | Contact Grill |
| Model | FORZA 5200 Fuego |
| Brand | ECG |
| Dimensions (Plates) | 240 × 330 mm each |
| Power Supply | 220–240 V ~ 50/60 Hz, 1650–2000 W |
| Standby Power Consumption | < 0.50 W |
| Temperature Range | 80–230 °C (adjustable in 15 °C increments) |
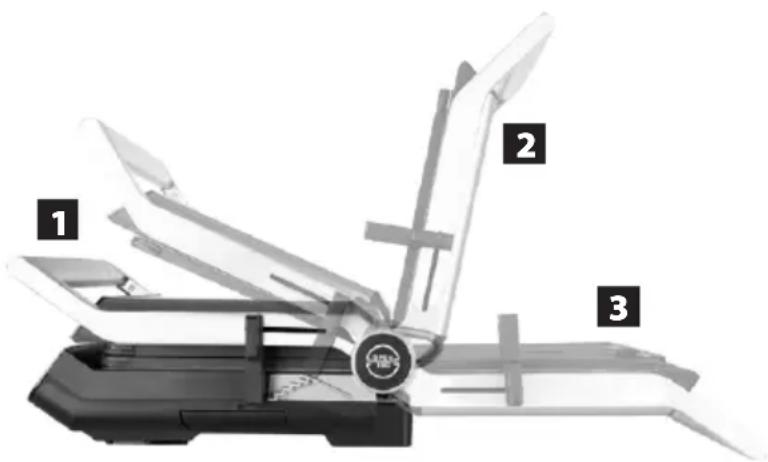
| Cooking Positions | Baking (closed), Grilling (top open 90°), BBQ (fully open 180°) |
| Plate Attachment | Magnetic mechanism for easy removal and cleaning |
| Height Adjustment | Slider with 5 positions for floating top plate |
| Timer | 1–99 minutes with audible alert (5 beeps) |
| Display & Control Panel | Digital display with bottom/top plate buttons, timer button, F/C toggle |
| Included Accessories | Drip tray, scraper, meat thermometer with minute timer (battery not included) |
| Drip Tray | Removable, dishwasher safe |
| Plate Material | Non-stick coating (smooth and ribbed surfaces) |
| Housing Material | Stainless steel cover, plastic body |
| Tilting Feet | Adjustable for leveling or draining fat |
| Safety Features | Automatic power-off after timer, overheat protection, cool-touch handle |
| Cleaning | Plates dishwasher safe; exterior wipe with damp cloth; do not immerse |
| Storage | Lock slider to close grill; store in dry place |
Frequently Asked Questions - FORZA 5200 Fuego ECG
User questions about FORZA 5200 Fuego ECG
0 question about this device. Answer the ones you know or ask your own.
Ask a new question about this device
Download the instructions for your Contact Grill in PDF format for free! Find your manual FORZA 5200 Fuego - ECG and take your electronic device back in hand. On this page are published all the documents necessary for the use of your device. FORZA 5200 Fuego by ECG.
USER MANUAL FORZA 5200 Fuego ECG
natural_image
Exterior view of a modern kitchen grater with a black grater and control panel (no visible text or symbols)FORZA 5200 Fuego
CONTACT GRILL
INSTRUCTION MANUAL
KONTAKTGRILL
BEDIENUNGSANLEITUNG
KONTAKTNÍ GRIL
NÁVOD K OBSLUZE
KONTAKTGRILL
KASUTUSJUHEND
KONTAKTNI GRIL
UPUTE ZA UPORABU
SASKARES GRILS
ROKASGRÄMATA
KONTAKTINIS GRILIS
INSTRUKCIJŲ VADOVAS
KONTAKTGRILL
HASZNÁLATI ÚTMUTATÓ
GRILL KONTAKTOWY
INSTRUKCJA OBSŁUGI
GRĂTAR DE CONTACT
INSTRUCTIUNI DE UTILIZARE
KONTAKTNÝ GRIL
NÁVOD NA OBSLUHU
KONTAKTNI ŽAR
NAVODILA
KONTAKT GRIL
UPUTSTVO ZA UPOTREBU
ΓΚΡΙΛΙΕΡΑ
ΕΓΧΕΙΡΙΔΙΟ ΟΔΗΓΙΩΝ
КОНТАКТНИЙ ГРИЛЬ
-
Handle
-
Magnet for fixing the grill plate
-
Grill plates
-
Height adjustment slider
-
Button to open the grill
-
Height adjustment
-
Drip tray
-
Display and control panel
a. Bottom Plate Button
b. Top Plate Button
c. Timer button
-
Stainless steel cover
-
Top cover
-
Bottom cover
-
Tilting feet
-
Scraper storage compartment
-
Scraper
-
Meat Thermometer with Minute Timer
Deutsch
Read carefully and save for future use!
Warning: The safety measures and instructions, contained in this manual, do not include all conditions and situations possible. The user must understand that common sense, caution and care are factors that cannot be integrated into any product. Therefore, these factors shall be ensured by the user/s using and operating this appliance. We are not liable for damages caused during shipping, by incorrect use, voltage fluctuation or the modification or adjustment of any part of the appliance.
To protect against a risk of fire or electric shock, basic precautions shall be taken while using electrical appliances, including the following:
- Make sure the voltage in your outlet corresponds to the voltage provided on the appliance label and that the socket is properly grounded. The outlet must be installed in accordance with applicable electrical codes according to EN.
- Never use the appliance when the power cord is damaged. All repairs, including cord replacements, must be carried out at a professional service centre! Do not remove the protective covers from the appliance; there is a risk of electric shock!
- Protect the appliance against direct contact with water and other liquids, to prevent potential electric shock.
- The appliance should not be left unattended when in operation.
- We recommend that you do not leave the appliance unattended when the power cord is plugged in. Disconnect the cord from the electrical outlet prior to any maintenance. Do not remove the power cord from the outlet by yanking the cord. Unplug the power cord from the outlet by grasping the plug.
- Do not use the appliance outside or in a wet environment. Do not touch the power cord or the appliance with wet hands. Risk of electric shock.
-
Pay extra attention when using the appliance near children.
-
Do not allow the power cord to touch hot surfaces or run the cord over sharp edges.
- The temperature of surfaces near the operating appliance can be hotter than usual. Place the appliance out of the reach of other objects so as to ensure free circulation of air necessary for its correct operation.
- Do not touch the grilling plates during or after use or hot parts of the baked product, until is cools off. Only touch the handle to prevent from burning yourself.
- Do not immerse the appliance in water or wash it with a stream of running water. Baking surfaces must be completely dried after washing before placing them back in the grill.
- Keep the appliance away from hot surfaces and sources of heat (for example, hot plates).
- Use the appliance only in accordance with the instructions given in this manual. The manufacturer is not liable for any damage caused by the improper use of this appliance.
- Do not connect the appliance to electrical outlets with remote switch or remotely controlled timer.
- This appliance is specified for household use.
- This appliance is intended for use by children 8 years of age and older and persons with reduced physical, sensory or mental capabilities, or lack of experience and knowledge, provided they are under supervision or given instruction concerning use of the appliance in a safe manner and understand the potential hazards. Children shall not play with the appliance. Cleaning and maintenance performed by the user should not be done by children unless they are older than 8 years and under supervision. Children under 8 years old must keep away from the appliance and its power supply.
Do not immerse in water!
DANGER FOR CHILDREN:
Children must not play with the packaging material. Do not let the children play with plastic bags. Risk of suffocation.
The surfaces marked in this way become hot during use.
BEFORE FIRST USE
After transporting or storing in cold conditions, the device must be allowed to acclimate at room temperature for at least 2 hours.
- Read the manual before use and save it for future reference.
- Remove packaging from the device.
- Wipe the baking surfaces with a damp cloth or sponge with a little dishwashing detergent and then clean water. Do not use abrasive cleaners or scrubbers. You can use a dishwasher to wash the plates, but take extra care when handling and washing and avoid phenomena that could damage the plates (contact with a metal object, etc.).
- Wipe the external surface of the appliance using wet cloth. Do not immerse the appliance in water and do not drain the water directly onto the baking surfaces located in the appliance!
- Wipe dry the surfaces and the body of the appliance with a cloth or paper towel.
Make sure that the plates in the appliance are properly secured.
- Do not forget to return the drip tray in its place.
- Unwind the power cable fully.
Note: When you use your appliance the first time, you may smell an odour coming from the plates. This is normal and it disappears gradually during use. For this reason, we recommend that the grill be "burned" without food before the first use until the smell or odour diminishes. Keep the appliance closed while burning. Air the room well.
COOKING MEALS
Warning:
Do not use the appliance to cook or defrost frozen food. All foods must be completely defrosted before processing by this appliance.
The plates and the metal surfaces of the appliance become very hot during operation. To prevent burns, use heat-resistant gloves and touch only the handle and parts designed for this purpose.
- Do not use metal utensils, which could scratch and damage the non-stick surface of the plates. When the food is cooked, remove it from the plates using wooden or heat-resistant plastic utensils.
Notes:
• You can use the grill in 3 positions. 1) Baking2) Grilling 3) BBQ.
- Reaching the working temperature takes about 2 to 3 minutes depending on the set temperature.
- Food preparation time depends on the type and thickness of the food.
- The foods should be thoroughly cooked before eating. If you are not sure, you should extend the cooking time a bit.
• Always rub the plates lightly with butter, baking fat or oil. - For a better inclination of the grill, adjust the legs located on the bottom.
BAKING PLATES
- The baking plates with smooth surface are suitable for cooking potatoes, mushrooms, chopped vegetables, seafood, various omelettes (omelettes, lobsters or tortillas) and all meats whose cooking requires quick sear and "locking", to stay juicy – e.g. steaks or pork tenderloin
- Baking plates with ribbed surface are suitable for baking (panini, sandwiches, toasts), larger pieces of vegetables, etc.
- It is also possible to combine the plates differently as needed. For example, if you use the grill in a fully open position, you can grill meat on a smooth stove and roast a side dish on a ribbed stove.
Removal and placement of baking plates
The baking plates are fixed in the body of the grill using a magnetic mechanism. To remove them, grasp the plate with both hands by the protrusions on its sides, lift the device away from the body and pull it towards you. To seat the plates back, repeat the procedure in reverse order, ensuring proper securing in the area of the protrusions at the back of the plate.
Always handle the plates after they have cooled down completely!
Grill on/off
- Make sure that the drip tray is properly inserted in the appliance.
- Make sure that the grilling plates are properly set and secured.
- Place the grill on a level and dry surface and plug the power cable in the electrical outlet. All symbols will be illuminated on the display, which will then turn off and only the main switch symbol will remain illuminated.
Note: After connecting the grill to the mains, automatic testing of the grill will take place.
- Now the grill can be switched on and the time and temperature can be set.
Always switch off the grill with the main switch and then disconnect it from the power grid.
Temperature settings
- Press F/C to select whether to set the temperature in degrees Celsius (°C) or Fahrenheit (°F).
- Press the plate symbol (top (8b) / bottom (8a)) for which you want to set the temperature and use the +/- symbols to select the desired temperature.
- Repeat the same procedure on the second plate.
- The plate symbol lights up green. The grill is fully preheated as soon as the light (s) go off.
- The temperature range is 80–230 ^ C. The temperature is switched after 15 ^ C.
Note: Leave the grill closed during heating up.
Timer setting (timer)
- Press the timer symbol (8c).
- Press the +/- symbols repeatedly to set the desired grilling time.
- The timer can be set by minute increments for 1–99 minutes.
Note: The countdown time is independent of the temperature of the plates and you can change the temperature during countdown any way you like. Countdown begins when the set value is permanently lit on the display. The set grilling time can be cancelled by turning off the plate.
After reaching the set time, the thermostat switches off the baking plates and warns about this event by repeatedly beeping (5times).
The positions of the baking surfaces and the adjustment of height of the floating plates
Baking: By sliding the slider on the side of the grill, you can determine whether the top plate will bake the food directly (contact grill) or leave a larger gap between the food and the top plate and you will only reheat the food from above.
Grilling: You can heat just the bottom plate and leave the upper plate fixed in 90^ position – position (2).
Setting the height of the baking surfaces:
Use the handle to open the lid with the upper plate (rider to adjust the height of the grill on the right side of the upper plate must be in the "OPEN" position).
- Lightly apply butter, shortening or oil on the plates.
- Place food on the bottom grilling plate.
Using the handle, close the upper plate. On the right side of the top plate is a slider that can fix the top plate at five different heights from the bottom plate. If you want to set the required height, raise the upper plate using the handle and move the rider in the position of the required height in the same time. Then slowly lower the top plate down until it rests on the stop.
BBQ (Opening the grill fully in 180° position):
- This position (3) provides a bigger grilling surface and allows separate cooking of foods, e.g. when grilling meat and vegetables in the same time.
Set grill to (BBQ) position
- Allow the grill to heat to the desired temperature.
- Grasp the handle, hold the "OPEN 180" button on the right side of the appliance and use the handle at the same time to carefully place the cooktop in a horizontal position. You can use the handle then as a support for the opened upper plate.
Adjusting the inclination of the grill
Some dishes (e.g. eggs or pancakes) require a perfect level, on the contrary, a slight inclination is suitable for the preparation of fatty meat, which will allow the baking to drain into the drip tray. To do this, the inclination of the grill can be adjusted using the tilting feet on the underside of the appliance.
GRILL THERMOMETER
Grill thermometer with timer:
- Timer setting in minutes
- Timer setting in seconds
- Unit setting selection (°C/°F)
- Socket for connecting the temperature probe
- Battery
- Switch between timer and thermometer functions
- Magnet
- Hole for possible hanging of the probe
- Temperature probe
Inserting the batteries:
Open the battery cover on the back. Insert the 1×1.5V AAA battery. Keep proper polarity of the battery. Do not use rechargeable batteries. Replace the battery cover.
Using the grill probe
- Plug the temperature probe into the socket located on the side of the device.
- Remove the protective cover from the probe tip.
- On the back of the thermometer, set the switch to COOK.
- Select the temperature unit using the (°C/°F) button.
- Set the desired temperature using the ▲▼ arrows.
- Insert the tip of the probe into the prepared food (meat). The temperature is displayed on the left of the display. As soon as the food reaches the selected temperature, the probe beeps.


Using the timer
- Slide the switch on the back of the timer to switch to TIMER mode.
- The display shows minutes (MIN) and seconds (SEC).
- Press the MIN or SEC ▲▼ buttons repeatedly to set the desired time. By holding down the buttons for a longer time, the data setting can be accelerated. The maximum time setting time is 99 minutes and 59 seconds.
- Press the S/S button to start the countdown. When the countdown is over, an acoustic signal will sound for 60 seconds. The signal can be stopped with the S/S button. This button can be pressed again to pause and restart the time during the countdown.
• To reset the set data, press the MIN and SEC buttons simultaneously. - The minute has the function of remembering the last set value. You can restart it at any time by pressing the S/S button.
Timer function
The thermometer can also be used as a stopwatch.
Set the display to 00:00, press the S/S button. Press the S/S button again to stop the stopwatch.
Maintenance
- Read the instruction manual before using for the first time.
- Do not expose the thermometer to excessive force, shock, dust, temperature, or humidity. These factors can lead to damage and shorter life of the electronics.
- It does not interfere with the internal connection of the device.
- Do not expose the thermometer to direct sunlight or immerse it in water.
- Do not use detergents or solvents for cleaning. Use only a slightly damp cloth.
- Do not disassemble or dispose of batteries in a fire. Return the used batteries to the place designated for the collection of this waste or to the store where you purchased them.
Technical specifications
Temperature measurement range: from -20°C to +250°C
Temperature resolution: 1°C
Time range: 99 minutes 59 seconds
Wire probe length: 1.4 m
Power: 1x 1.5V AAA battery (not included)
CLEANING AND MAINTENANCE
- Disconnect the appliance before cleaning from the power supply and wait until the appliance and the plates cool down entirely.
- Clean the external surfaces with only moistened cloth to prevent water, oil or grease from getting into the appliance.
- Remove the drip tray after each use and empty its contents. Then wash it with hot water and detergent solution, rinse thoroughly and dry it thoroughly before putting it back in the appliance.
- The baking plates can be left in the machine while cleaning and you can wipe them with a damp cloth. Or you can remove them (see the chapter Removing and setting the baking plates) and wash them under running water. Then dry them thoroughly. You can also use a dishwasher to wash the plates, but take extra care when handling and washing and avoid phenomena that could damage the plates (contact with a metal object, etc.)
- If baked food remains on the plates, you can apply a damp paper towel or damp cloth to the cooled plates and let the baked in food soak for a time.
- Do not clean the inside and outer surfaces using abrasive powders, abrasive cleaners or aggressive chemicals. You would damage the exterior finish of the appliance.
- Do not immerse the appliance in water or other liquids!
- Appliance storage: Make sure that the grill, including the grilling plates, is perfectly clean, dry, the drip tray is clean and dry, properly inserted into the appliance and the grill plates are correctly installed in the appliance. Close the grill and secure it by moving the slider in the "LOCK" position. Store the appliance in a dry and clean place.
TECHNICAL PARAMETERS OF THE GRILL
Temperature setting range: 80–230 °C
Plates sizes: 240 × 330 mm
Nominal voltage: 220–240 V \~ 50/60 Hz
Nominal input power: 1650–2000 W
Standby power consumption is < 0.50 W
USE AND DISPOSAL OF WASTE
Wrapping paper and corrugated paperboard – deliver to scrapyard. Packing foil, PE bags, plastic elements – throw into plastic recycling containers.
DISPOSAL OF PRODUCTS AT THE END OF LIFETIME
Disposal of electric and electronic equipment (valid in EU member countries and other European countries with an implemented recycling system)
The represented symbol on the product or package means the product shall not be treated as domestic waste. Hand over the product to the specified location for recycling electric and electronic equipment. Prevent negative impacts on human health and the environment by properly recycling your product. Recycling contributes to preserving natural resources. For more information on the recycling of this product, refer to your local authority, domestic waste processing organization or store, where you purchased the product.
This product complies with the requirements of the EU directives on electromagnetic compatibility and electrical
safety and heavy metal issues in electrical and electronic equipment. Also, it meets the relevant energy performance and requirements for direct contact with food.
The operating manual is available on internet at www.ecg-electro.eu.
Changes of text and technical parameters reserved.

08/05

SICHERHEITSHINWEISE
Heiße Oberfläche!
Do not immerse in water! – Neponořovat do vody!
Horký povrch!
PŘED PRVNÍM POUŽITÍM

Použití časovače
Pealispind on kuum!
ENNE ESMAKORDSET KASUTAMIST
Vruća površina!
PRIPREMA JELA
Pozor:
Karsta virsma!
Karštas paviršius!
Bateriju idėjimas:
Forró felület!
ÉTELEK KÉSZÍTÉSE
Figyelmeztetés!
SÜTÖLAPOK


Vroča površina!
PRIPRAVA JEDI
Svarilo:

Uporaba časovnika
BEZBEDNOSNA UPUTSTVA
Vruća površina!
PRIPREMA JELA
Pažnja:
Καυτή επιφάνεια!
ΠΛΑΚΕΣ ΨΗΣΙΜΑΤΟΣ
Гаряча поверхня!
250 69 Klíčany, Czech Rep. e-post: ECG@kbexpert.cz
Hrvatski
K+B Progres, a.s.
U Expertu 91 tel.: +420 272 122 111
250 69 Klíčany, Czech Rep. e-mail: informacije@kbprogres.cz
Bosanski
K+B Progres, a.s.
U Expertu 91 tel.: +420 272 122 111
250 69 Klíčany, Czech Rep. e-mail: informacije@kbprogres.cz
Latviešu valoda
K+B Progres, a.s.
U Expertu 91 tel.: +420 272 122 111
250 69 Klíčany, Czech Rep. e-pasts: ECG@kbexpert.cz
Lietuvių kalba
K+B Progres, a.s.
U Expertu 91 tel.: +420 272 122 111
250 69 Klíčany, Czech Rep. el. paštas: ECG@kbexpert.cz
Magyar
K+B Progres, a.s.
U Expertu 91 tel.: +420 272 122 111
250 69 Klíčany, Czech Rep. e-mail: ECG@kbexpert.cz
Polski
K+B Progres, a.s.
U Expertu 91 tel.: +420 272 122 111
250 69 Kličany, Czech Rep. e-mail: ECG@kbexpert.cz
Română
K+B Progres, a.s.
U Expertu 91 tel.: +420 272 122 111
250 69 Klíčany, Czech Rep. e-mail: ECG@kbexpert.cz
Slovenčina

- FORZA 5200 Fuego
- Deutsch
- Read carefully and save for future use!
- Do not immerse in water!
- DANGER FOR CHILDREN:
- BEFORE FIRST USE
- COOKING MEALS
- Warning:
- Notes:
- BAKING PLATES
- Removal and placement of baking plates
- Always handle the plates after they have cooled down completely!
- Grill on/off
- Always switch off the grill with the main switch and then disconnect it from the power grid.
- Temperature settings
- Timer setting (timer)
- The positions of the baking surfaces and the adjustment of height of the floating plates
- Setting the height of the baking surfaces:
- BBQ (Opening the grill fully in 180° position):
- Set grill to (BBQ) position
- Adjusting the inclination of the grill
- GRILL THERMOMETER
- Grill thermometer with timer:
- Inserting the batteries:
- Using the grill probe
- Using the timer
- Timer function
- Maintenance
- Technical specifications
- CLEANING AND MAINTENANCE
- TECHNICAL PARAMETERS OF THE GRILL
- USE AND DISPOSAL OF WASTE
- DISPOSAL OF PRODUCTS AT THE END OF LIFETIME
- SICHERHEITSHINWEISE
- Do not immerse in water! – Neponořovat do vody!
- PŘED PRVNÍM POUŽITÍM
- Použití časovače
- ENNE ESMAKORDSET KASUTAMIST
- PRIPREMA JELA
- Pozor:
- Bateriju idėjimas:
- ÉTELEK KÉSZÍTÉSE
- Figyelmeztetés!
- SÜTÖLAPOK
- PRIPRAVA JEDI
- Svarilo:
- Uporaba časovnika
- BEZBEDNOSNA UPUTSTVA
- Pažnja:
- ΠΛΑΚΕΣ ΨΗΣΙΜΑΤΟΣ
- Hrvatski
- Bosanski
- Latviešu valoda
- Lietuvių kalba
- Magyar
- Polski
- Română
- Slovenčina
Brand : ECG
Model : FORZA 5200 Fuego
Category : Contact Grill