
RP-AX56 - Wi-Fi repeater ASUS - Free user manual and instructions
Find the device manual for free RP-AX56 ASUS in PDF.

| Product Type | Wi-Fi 6 (AX) Repeater / AiMesh Node / Access Point |
| Brand | ASUS |
| Model | RP-AX56 |
| Wi-Fi Standard | Wi-Fi 6 (802.11ax) |
| Frequency Bands | Dual Band (2.4 GHz and 5 GHz) |
| Ports | 1 Gigabit LAN Port (Ethernet) |
| Buttons | WPS, Reset |
| LED Indicators | Multi-color LED (white, blue, yellow, red, purple) |
| Power Supply | Mains (direct power plug, 100-240 V) |
| Dimensions (approx.) | 100 × 100 × 50 mm |
| Weight (approx.) | 200 g |
| Mobile Apps | ASUS Extender, ASUS Router |
| Operating Modes | Repeater, AiMesh node, Access Point |
| Configuration | Via mobile app or WPS button |
| Wireless Security | WPA2-PSK (default) |
| Advanced Features | Ethernet backhaul, AiMesh compatibility |
| Maintenance | Clean with a soft, dry cloth |
| Operating Temperature | 0 °C to 40 °C |
Frequently Asked Questions - RP-AX56 ASUS
User questions about RP-AX56 ASUS
0 question about this device. Answer the ones you know or ask your own.
Ask a new question about this device
Download the instructions for your Wi-Fi repeater in PDF format for free! Find your manual RP-AX56 - ASUS and take your electronic device back in hand. On this page are published all the documents necessary for the use of your device. RP-AX56 by ASUS.
USER MANUAL RP-AX56 ASUS
natural_image
Line drawing of a Huawei Max 3.0 device with visible ports and grille (no text or symbols)Quick Start Guide
U16868 / First Edition / July 2020
Table of Contents
English....3
Български....11
Hrvatski....19
Čeština....27
Dansk....35
Nederlands 43
Eesti....51
Français....59
Suomi....67
Deutsch....75
Ελληνικά......83
תְרָהִיָה 91
Magyar 99
Italiano ....107
Lietuvių 115
Latviski 123
Norsk....131
Português....139
Polski....147
Русский....155
Română....163
Español....171
Srpski 179
Slovensky....187
Slovenščina....195
Svenska 203
Türkçe 211
Українська....219
Hardware Explanations
1 Plug RP-AX56 into a power outlet.
2 The LED will start breathing white for 3 seconds while booting up.
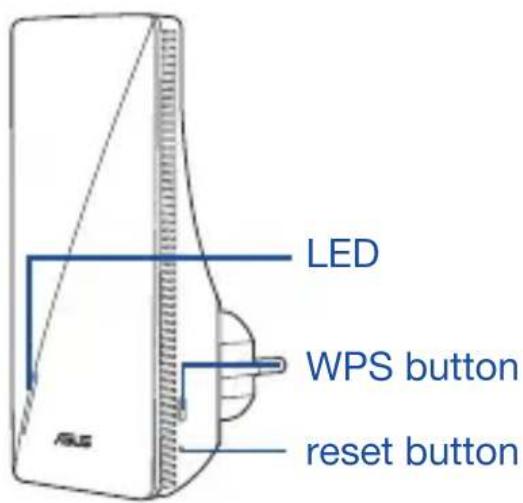
Button Explanations
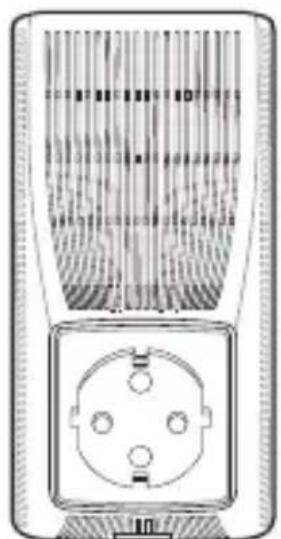
WPS BUTTON: Launch the WPS Wizard.
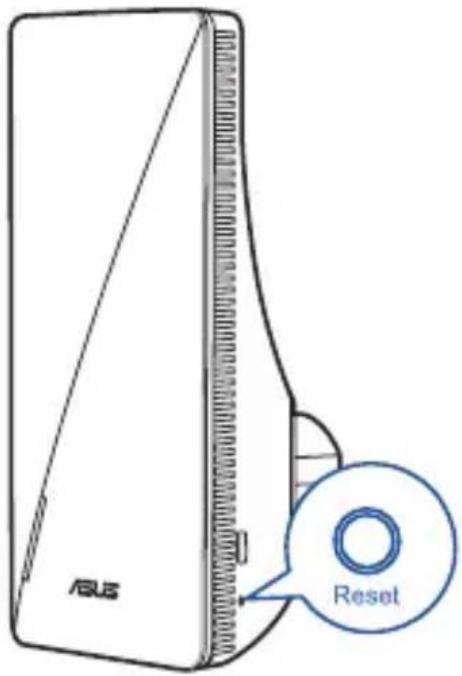
RESET BUTTON: Reset the system to its factory default settings.
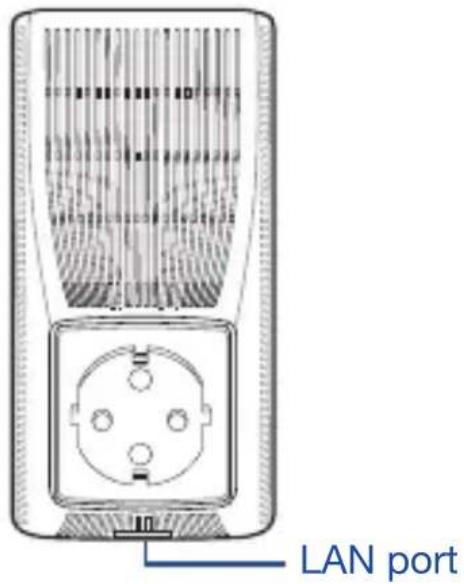
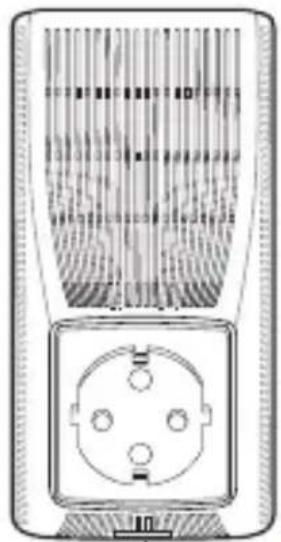
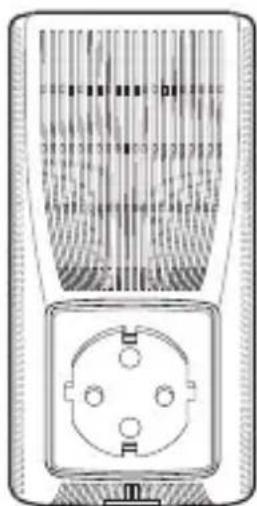
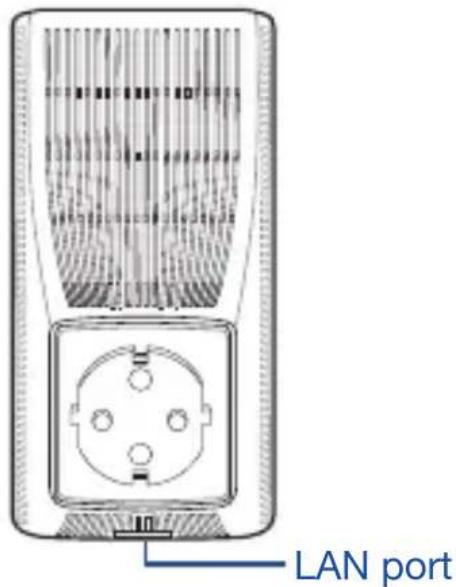
LAN PORT: Connect your PC to the LAN port with a network cable.
LED Explanations
| Repeater Mode | |
| Status LED Behavior | |
| Booting up Blinking White | |
| Booting up complete (haven’t connected to Router) | Solid Blue |
| Reset (use a pin to press the reset button for 5 seconds) | Blinking Yellow |
| Rescue mode Solid Purple | |
| Starting WPS Blinking Blue | |
| Connected to the router with Good Signal | Solid White |
| Connected to the router with Weak Signal | Solid Yellow |
| No Signal Solid Red | |
| AP mode (with wired connection) | Solid White |
| AP mode (without wired connection) | Solid Red |
| AiMesh Mode | |
| Status LED Behavior | |
| Booting up Blinking White | |
| Booting up complete (not connected to AiMesh Router) | Solid Blue |
| Reset (use a pin to press the reset button for 5 seconds) | Blinking Yellow |
| Rescue mode Solid Purple | |
| Connecting to the AiMesh Router | Blinking Blue |
| Connected to the AiMesh Router with Good Signal | Solid White |
| Connected to the AiMesh Router with Weak Signal | Solid Yellow |
| No Signal Solid Red | |
| Ethernet backhaul Solid White | |
BEFORE SETTING
WE SUGGEST...
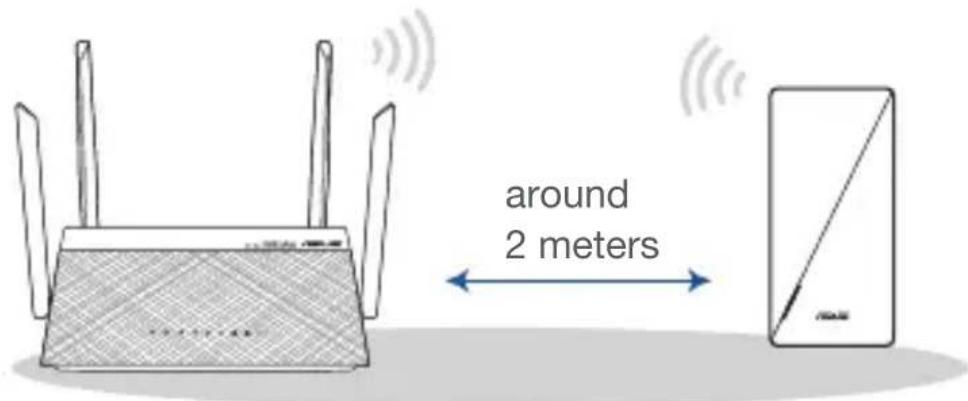
01 Placing your RP-AX56
1 Plug your RP-AX56 into a power outlet near your router/AP.
2 Check the LEDs and see the LED explanations.
3 Wait for the LED to flash and turn solid blue, indicating that your RP-AX56 is ready to connect to your existing router/AP.
SETUP METHODS
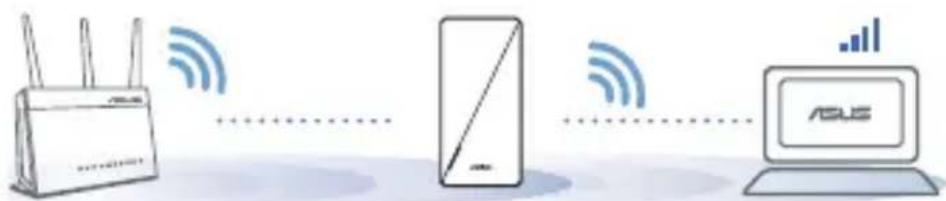
Set up RP-AX56 as a repeater
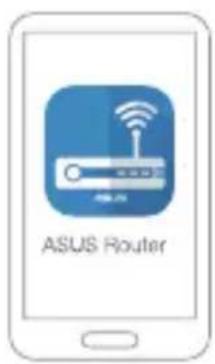
If you would like to connect RP-AX56 to other WiFi networks excluding AiMesh-supported routers, please download the ASUS Extender App.
METHOD 1
Download the ASUS Extender App


ASUS Extender APP
METHOD 2
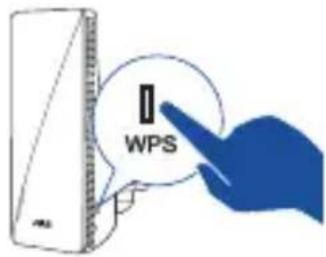
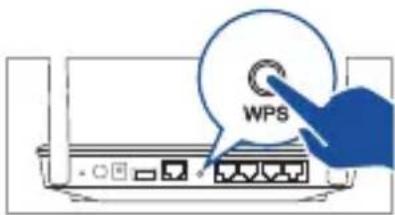
Connect via WPS
1 Press the WPS button on your router/AP.

2 Press the WPS button on your RP-AX56 for more than two (2) seconds until the LED starts to blink blue.
SETUP METHODS
Set up RP-AX56 as AiMesh Node
If you already have an AiMesh router and you are going to create an AiMesh system, please download and install ASUS Router App for RP-AX56 setup. Please select RP-AX56 as the AiMesh Node.
METHOD 1
Download the ASUS Router App


TROUBLE SHOOTING
If your AiMesh router cannot find RP-AX56 nearby or synchronization fails, please check followings and try again.
a Plug RP-AX56 into a power outlet near your router/AP. Ensure that it is within 3 meters from the AiMesh router.
b Your AiMesh router is upgraded to AiMesh-supported firmware.
i. Download AiMesh - supported firmware at: https://www.asus.com/AiMesh/.
ii. Launch a web GUI. You will be redirected to the ASUS Setup Wizard. If not, navigate to http://router.asus.com.
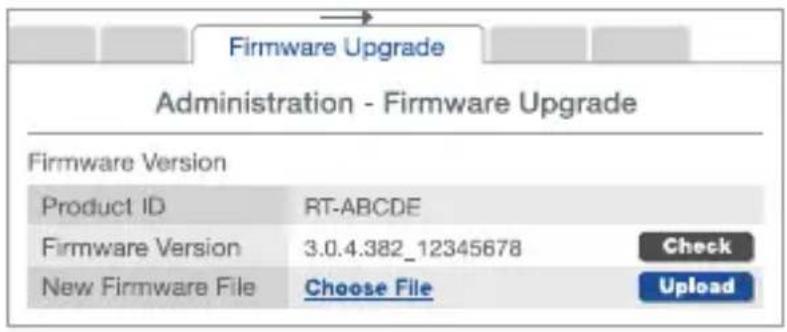
iii. Go to Administration > Firmware Upgrade. Click Choose File, and upload the AiMesh-supported firmware.
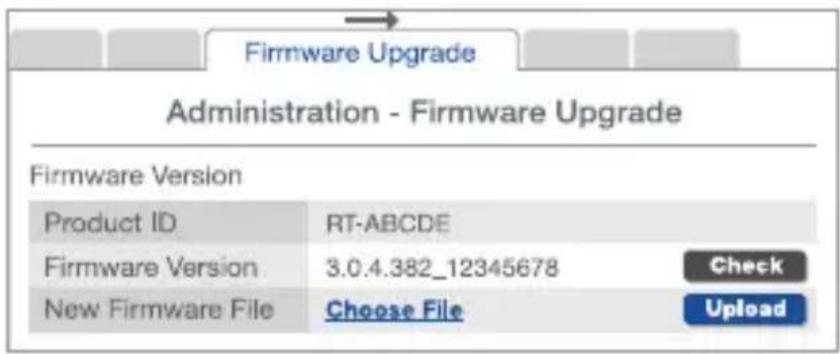
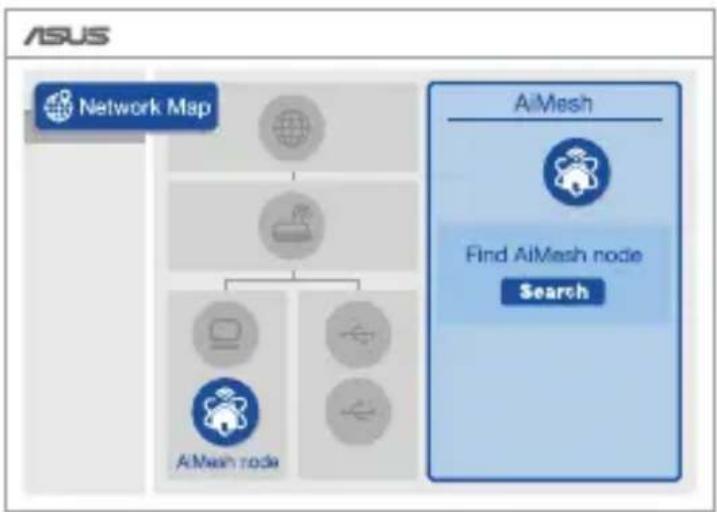
iv. After the firmware is uploaded, please go to the Network Map page to check and make sure that the AiMesh icon shows up.
flowchart
graph TD
    A["Network Map"] --> B["Network Map"]
    B --> C["AIMesh node"]
    B --> D["AIMesh node"]
    C --> E["Search"]
    D --> E
    style A fill:#f9f,stroke:#333
    style E fill:#bbf,stroke:#333
v. Use a pin to press the reset button on your RP-AX56 for at least 5 seconds. Release the reset button when the power LED is flashing slowly.
RELOCATION
Locate the AiMesh router and RP-AX56 at best place.
NOTES: To minimize interference, keep the routers away from devices like cordless phones, Bluetooth devices and microwave ovens.
We recommend that you place the routers in an open or spacious location.
FAQ
FREQUENTLY ASKED QUESTIONS
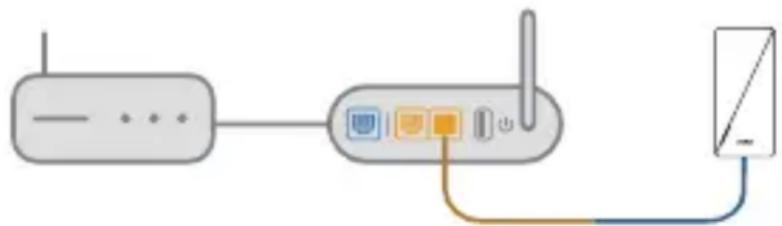
Q1: Could I setup wired connection between AiMesh routers and nodes (Ethernet backhaul)?
A: Yes. AiMesh system supports both wireless and wired connection between an AiMesh router and node to maximize throughput and stability. AiMesh analyzes the wireless signal strength for each frequency band available, and then determines automatically whether a wireless or wired connection is best to serve as the inter-router connection backbone.
1 Follow the setup steps to establish a connection between the AiMesh router and RP-AX56 via WiFi first.
2 Place the RP-AX56 in an ideal location for the best coverage. Run an Ethernet cable from the LAN port of the AiMesh router to the Ethernet backhaul port of RP-AX56.
natural_image
Diagram of a wireless router connected to a device via cable (no text or symbols)LAN to LAN (Ethernet backhaul) port
3 AiMesh system will auto-select the best path for data transmission, whether wired or wireless.
To know more about ASUS AiMesh, please go to https://www.asus.com/AiMesh/.
Q2: How to set up the Access Point(AP) mode on an ASUS Repeater?
1 Launch a web browser and enter http://repeater.asus.com.
2 If you are logging into the Web GUI for the first time, you will be automatically directed to the Quick Internet Setup (QIS) page. Click Advanced Settings.
3 Click Choose operation mode, then click Access Point(AP) mode.
4 Click Automatic IP, then click to set up the SSIDs separately.
5 For the first time, you'll need to set up the username and password for your RP-AX56. When typing is done, click Next. Access Point(AP) mode setting is finished.

ASUS Extender APP
МЕТОД 2
Свързване чрез WPS

ОТСТРАНЯВАНЕ НА НЕИЗПРАВНОСТИ
natural_image
Diagram of a wireless router connected to a smartphone via cable (no text or symbols)LAN към LAN (Ethernet backhaul порт)
NAČIN 2

OTKLANJANJE POTEŠKOĆA
NAPOMENE: Ako želite smanjiti smetnje, usmjerivače postavite dalje od uređaja kao što su bežični telefoni, Bluetooth uređaji i mikrovalne pećnice.
natural_image
Diagram of a wireless router connected to a device via cable (no text or symbols)Priključak sporedne mreže LAN na Ethernet
3 AiMesh sustav će automatski odabrati najbolji način prijenosa podataka, bežični ili žični.
Više pojedinosti o ASUS AiMesh potražite na https://www.asus.com/AiMesh/.
P2: Kako se podešava način rada za pristupnu točku (AP) na ASUS repetitoru?
1 Otvorite web preglednik i otvorite http://repeater.asus.com.
2 Ako se prvi put prijavljujete u web GUI, automatski ćete biti preusmjereni na stranicu Quick Internet Setup (Brza postava putem interneta) (QIS). Kliknite Advanced Settings (Napredne postavke).
3 Kliknite Choose operation mode (Odaberite način rada), zatim kliknite način rada Access Point(AP) (Pristupna točka).
4 Kliknite Automatic IP (Automatski IP), zatim kliknite za zasebno podešavanje SSID-a.
5 Prvi put ćete trebati podesiti korisničko ime i lozinku za RP-AX56. Po završetku upisa kliknite Next (Dalje). Način rada Access Point(AP) (pristupna točka) je završen.
Popis Hardwaru

ASUS Extender APP
ZPŮSOB Č. 2
Připojení přes WPS


ŘEŠENÍ POTÍŽÍ
natural_image
Simple diagram of a router connected to a device via cable (no text or symbols)
ASUS Extender APP
METODE 2
Forbindelse via WPS

FEJLFINDING
OFTE STILLEDE SP∅RGSMÅL
natural_image
Diagram of a wireless router connected to a device via cable (no text or symbols)LAN til LAN Ethernet backhaul-port
METHODE 2
Verbinden via WPS

PROBLEMEN OPLOSSEN
OPMERKINGEN:
natural_image
Diagram of a wireless router connected to a device via cable (no text or symbols)2. VIIS

RIKKEOTSING
MÄRKUSED:
natural_image
Diagram of a wireless router connected to a device via cable (no text or symbols)LAN Etherneti tagasiühenduse pessa

DÉPANNAGE
natural_image
Diagram of a wireless router connected to a device via cable (no text or symbols)Port LAN to LAN (Ethernet backhaul)
natural_image
Technical line drawing of a device with a curved panel and a small circular component, no text or symbols present.LED
WPS-painike
Nollauspainike
natural_image
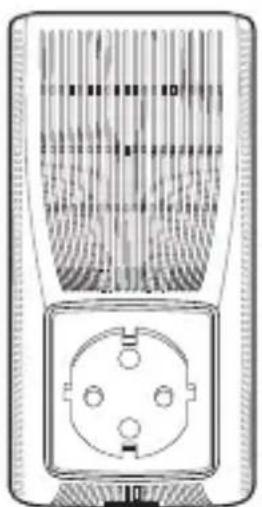
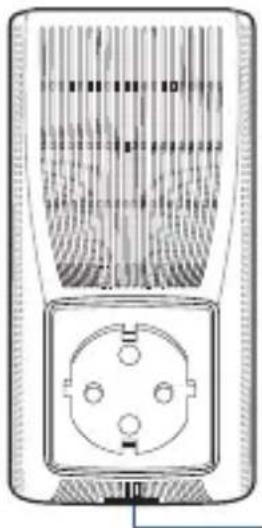
Diagram of a wall-mounted electrical socket with three pins and a central socket (no text or symbols)LAN-portti
MENETELMÄ 2

VIANETSINTÄ
HUOMAUTUKSET:
natural_image
Diagram of a wireless router connected to a device via cable (no text or symbols)LAN - LAN (Ethernet backhaul) -portti
METHODE 2

PROBLEMBEHANDLUNG
natural_image
Diagram of a wireless network device showing a router, switch, and mobile device (no text or labels)natural_image
Technical line drawing of a device with a curved panel and a small circular component, no text or symbols present.LED
WPS κουμπί
Κουμπί
επαναφοράς
natural_image
Technical line drawing of a dual-pin electrical socket (no text or symbols)Θύρα LAN
ΜΕΘΟΔΟΣ 2
Σύνδεση μέσω WPS


ASUS Router APP
ΣΗΜΕΙΩΣΕΙΣ:
natural_image
Diagram of a wireless router connected to a device via cable (no text or symbols)natural_image
Technical line drawing of a device with a curved panel and a handle, no visible text or symbolsLED
WPSWPS |xn? |xn?
019'K 12019'K 12
natural_image
Technical line drawing of a wall-mounted electrical socket with three leads (no text or symbols)LAN
בַרְשָׁה בַרְשָׁה
| Repeater | ||
| הכלההוּרָהוּרָהוּרָהוּרָהוּרָהוּרָהוּרָהוּרָהוּרָהוּרָהוּרָהוּרָהוּרָהוּרָהוּרָה�ּוּרָהוּרָהוּרָהוּרָהוּרָהוּרָהוּרָהוּרָהוּרָהוּרָהוּרָהוּרָהוּרָהוּרָהו' | הכלההוּרָהוּרָהוּרָהוּרָהוּרָהוּרָהוּרָהוּרָהוּרָהוּרָהוּרָהוּרָהוּרָהוּשִׁים(בְבַעֹאָהוּרָהוּרָהוּרָהוּרָהוּרָהוּרָהוּרָהוּרָהוּרָהוּרָהוּרָהוּרָהוּרָהוּרֵי) 5 (בְבַעֹאָהוּרָהוּרָהוּרָהוּרָהוּרָהוּרָהוּרָהוּרָהוּרָהוּרָהוּרָהוּרָהוֱ | |
| הכלההוּרָהוּרָהוּרָהוּרָהוּרָהוּרָהוּרָהוּרָהוּרָהוּרָהוּרָהוּרָהוּרָהו' | הכלההכלההכלההכלההכלההכלההכלההכלההכלההכלההכלההכלההכלההכלההכלההכלההכלההכלההכלההכלההכלההכלההכלההכלההכלההכלההכלההכלההכלההכלההכלההכלההכלההכלה | |
| הכלההכלההכלההכלההכלההכלההכלההכלההכלההכלההכלההכלההכלההכלההכלההכלההכלההכלההכלההכלההכלההכלההכלההכלההכלההכלההכלההכלההכלההכלההכלההכלההכchia | הכchia: 12 12 12 12 12 12 12 12 12 12 12 12 12 12 12 12 12 12 12 12 12 | |
| הכchia: 12 12 12 12 12 12 12 12 12 32 12 12 12 12 12 12 12 12 12 32 12 12 12 12 12 12 12 12 12 32 12 12 12 12 12 12 12 12 12 32 (AP_AP_AP_AP_AP_AP_AP_AP_AP_AP_AP_AP_AP_AP_AP_AP_AP_AP_AP_AP_AP_AP_AP_AP_AP_AP_AP_AP_AP_AP_AP_AP_AP_AP_AP_AP_AP_AP_AP_AP_AP_AP_AP_AP_AP_AP_AP_AP_AP_AP_AP_AP_AP_AP_AP_AP_AP_AP_AP_AP_AP_AP_AP_AP_AP_AP_AP_AP_AP_AP_AP_AP_AP_AP_AP_AP_AP_AP_AP_AP_AP_AP_AP_AP_AP_AP_AP_AP_AP_AP_AP_AP_AP_AP_AP_AP_AP_AP_AP_AP_APAP_AP_AP_AP_AP_AP_AP_AP_AP_AP_AP_AP_AP_AP_AP_AP_AP_AP_AP_AP_AP_AP_AP_AP_AP_AP_AP_AP_AP_AP_AP_AP_AP_AP_AP_AP_AP_AP_AP_AP_AP_AP_AP_AP_AP_AP_AP_AP_AP_AP|AP_AP_AP_AP_AP_AP_AP_AP_AP_AP_AP_AP_AP_AP_AP_AP_AP_AP_AP_AP_AP_AP_AP_AP_AP_AP_AP_AP_AP_AP_AP_AP_AP_AP_AP_AP_AP_AP_AP_AP_AP_AP_AP_AP_AP_AP_AP_AP_AP_AP,AP_AP_AP_AP_AP_AP_AP_AP_AP_AP_AP_AP_AP_AP_AP_AP_AP_AP_AP_AP_AP_AP_AP_AP_AP_AP_AP_AP_AP_AP_AP_AP_AP_AP_AP_AP_AP_AP_AP_AP_AP_AP_AP_AP_AP_AP_AP_AP_AP_APAP_AP_AP_AP_AP_AP_AP_AP_AP_AP_AP_AP_AP_AP_AP_AP_AP_AP_AP_AP_AP_AP_AP_AP_AP_AP_AP_AP_AP_AP_AP_AP_AP_AP_AP_AP_AP_AP_AP_AP_AP_AP_AP_AP_AP_AP_AP_AP_AP_AP_AP_AP_AP_AP_AP_AP_AP_AP_AP_AP_AP_AP_AP_AP_AP_AP_AP_AP_AP_AP_AP_AP_AP_AP_AP_AP_AP_AP_AP_AP_AP_AP_AP_AP_AP_AP_AP_AP_AP_AP_AP_AP_AP_AP_AP_AP_AP_AP_AP_AP AP_AP_AP_AP_AP_AP_AP_AP_AP_AP_AP_AP_AP_AP_AP_AP_AP_AP_AP_AP_AP_AP_AP_AP_AP_AP_AP_AP_AP_AP_AP_AP_AP_AP_AP_AP_AP_AP_AP_AP_AP_AP_AP_AP_AP_AP_AP_AP_AP_AP-AP_AP_AP_AP_AP_AP_AP_AP_AP_AP_AP_AP_AP_AP_AP_AP_AP_AP_AP_AP_AP_AP_AP_AP_AP_AP_AP_AP_AP_AP_AP_AP_AP_AP_AP_AP_AP_AP_AP_AP_AP_AP_AP_AP_AP_AP_AP_AP_AP_AP | 12 12 12 12 12 12 12 12 12 12 | |
| AiMesh | |
| הכלההוּרָהוּרָהוּרָהוּרָהוּרָהוּרָהוּרָהוּרָהוּרָהוּרָהוּרָהוּרָהוּרָהוּרָהוּרָה�ּוּרָהוּרָהוּרָהוּרָהוּרָהוּרָהוּרָהוּרָהוּרָהוּרָהוּרָהוּרָהוּרָהוּרָהו' | 01660 |
| הכלההוּרָהוּרָהוּרָהוּרָהוּרָהוּרָהוּרָהוּרָהוּרָהוּרָהוּרָהוּרָהוּרָהו' | 711996 |
| הכלההוּרָהוּרָהוּרָהוּרָהוּרָהוּרָהוּרָהוּרָהוּרָהוּרָהוּרָהוּרָהוּרָהו 5 | ( AiMesh ) |
| הכלההוּרָהוּרָהוּרָהוּרָהוּרָהוּרָהוּרָהוּרָהוּרָהוּרָהוּרָהוּרָהוּרָהו: | |
| הכלההוּרָהוּרָהוּרָהוּרָהוּרָהוּרָהוּרָהוּרָהוּרָהוּרָהוּרָהוּרָהוּרָהו | 511996 |
| הכלההוּרָהוּרָהוּרָהוּרָהוּרָהוּרָהוּרָהוּרָהוּרָהוּרָהוּרָהוּרָהוּשִׁשְׁשְׁשְׁשְׁשְׁשְׁשְׁשְׁשְׁשְׁשְׁשְׁשְׁשְׁשְׁשְׁשְׁשְׁשְׁשְׁשֵׁשׁשׁשׁשׁשׁשׁשׁשׁשׁשׁשׁשׁשׁשׁשׁשׁשׁשׁשׁשׁשׁשׁשׁשׁשׁשׁשׁשׁשׁשׁשׁשׁשׁש' | |
| הכלההוּרָהוּרָהוּרָהוּרָהוּרָהוּרָהוּרָהוּרָהוּרָהוּרָהוּרָהוּרָהוּרָהוі | 511996 |
| הכלההוּרָהוּרָהוּרָהוּרָהוּרָהוּרָהוּרָהוּרָהוּרָהוּרָהוּרָהוּרָהוі | 511996 |
| הכchiaוּרָהוּרָהוּרָהוּרָהוּרָהוּרָהוּרָהוּרָהוּרָהוּרָהוּרָהוּרָהוּרָהוּרָהוі | |
| הכchiaוּרָהוּרָהוּרָהוּרָהוּרָהוі | 511996 |
| הכchiaוּרָהוּרָהוּרָהוі | 511996 |
| Ethernetוּרָהו' |
RP-AX56 01

2 בַרְשׁ
WPS


ASUS Router APP
תְרָה בְּרָה
:https://www.asus.com/AiMesh
ASUS Setup-7 (ASUS Setup-7) Wizard .ii (ASUS Setup-7) Wizard http://router.asus.com
Firmware Upgrade < Administration _1 , iii Choose File _2 , (הכלה < _1 ) . AiMesh- _2 כרִיְבָּוֹתָה, (הכלה < _1 )
תְרָה בַרִי
הַלְרָׁהִיָהִיָהִיָהִיָהִיָהִיָהִיָהִיָהִיָהִיָהִיָהִיָהִיָהִיָהִיָהִיָהִיָהִם:
natural_image
Diagram of a wireless router connected to a device via cable (no text or symbols)LAN to Ethernet backhaul אַלְאָה
https://www.asus.com/AiMesh
2. MÓDSZER

ASUS Router APP
HIBAELHÁRÍTÁS
MEGJEGYZÉSEK:
natural_image
Diagram of a wireless router connected to a device via cable (no text or symbols)METODO 2

natural_image
Simple diagram of a router connected to a device via cable (no text or symbols)Porta LAN to LAN (Ethernet backhaul)
natural_image
Technical line drawing of a device with a curved panel and a handle, no visible text or symbolsLED
WPS mygtukas
Atkūrimo mygtukas
natural_image
Technical line drawing of a wall-mounted electrical socket with four pins (no text or symbols)LAN jungtis
2 BÜDAS
Prijungimas per WPS
1 Paspauskite WPS mygtuka, esanti ant kelvedžio / AP.

PROBLEMŲ SPRENDIMAS
natural_image
Diagram of a wireless router connected to a device via cable (no text or symbols)LAN i LAN (eterneto tranzitinio tinklo) prievadą
natural_image
Technical line drawing of a device with a curved top and side profile, showing internal components and alignment lines (no text or symbols)LED
WPS poga
Atiestatīšanas poga
natural_image
Diagram of a wall-mounted electrical socket with four pins, no text or symbols presentLAN pieslēgvieta
Pogu skaidrojums
WPS POGA: Palaidiet WPS vedni.