
AquaWash & Clean BWD41700 - Vacuum Cleaner BOSCH - Free user manual and instructions
Find the device manual for free AquaWash & Clean BWD41700 BOSCH in PDF.

| Brand | Bosch |
| Model | AquaWash & Clean BWD41700 |
| Product Type | Wet & Dry Vacuum Cleaner with Spray Extraction |
| Power Supply | 230 V AC, 16 A fuse |
| Noise Level | 85 dB(A) |
| Container Capacity (Dry) | 5 L (max liquid pickup) |
| Water Filter Module Capacity | 1.3–1.5 L |
| Cleaning Liquid Container Capacity | Approx. 0.5 L (estimated) |
| Dust Bag Type | Standard dust bag (1 piece included) |
| Outlet Filter | EPA filter (washable) |
| Motor Filter | Washable foam filter |
| Foam Filters | Two foam filters (Foam I and Foam II) |
| Suction Hose | Included, with telescopic suction tubes |
| Included Nozzles | Combination brush, crevice nozzle, small nozzle, small brush, parquet brush |
| Wet Cleaning Function | Spray extraction with atomizing nozzles (large and small) |
| Water Pickup Nozzle | Included (for liquid pickup) |
| Cord Rewind | Automatic with foot button |
| Safety Features | Float valve (auto shut-off when liquid max), safety lock on filter module |
| Weight | Approx. 8 kg (estimated) |
| Dimensions (L x W x H) | Approx. 450 x 300 x 350 mm (estimated) |
Frequently Asked Questions - AquaWash & Clean BWD41700 BOSCH
User questions about AquaWash & Clean BWD41700 BOSCH
0 question about this device. Answer the ones you know or ask your own.
Ask a new question about this device
Download the instructions for your Vacuum Cleaner in PDF format for free! Find your manual AquaWash & Clean BWD41700 - BOSCH and take your electronic device back in hand. On this page are published all the documents necessary for the use of your device. AquaWash & Clean BWD41700 by BOSCH.
USER MANUAL AquaWash & Clean BWD41700 BOSCH
AquaWash&Clean Vacuum cleaner
BWD4...
| [de] | Gebrauchsanleitung Staubsauger 3 | ||
| [en] | Instruction manual Vacuum cleaner 12 | ||
| [tr] | Kullanım kılavuzu Elektrik süpürgesi 20 | ||
| [pl] | Instrukcja obsługi Odkurzacz 28 | ||
| [cs] | Návod k použití Vysavač 36 | ||
| [sk] | Návod na obsluhu Vysávač 44 | ||
| [ro] | Instrucțiuni de utilizare Aspiratorul 52 | ||
| [uk] | Інструкція з експлуатації Пилосос | 60 | |
| [hu] | Használati utasítás Porszívók | 69 | |
| [ru] | Инструкция по эксплуатации | Пылесос | 77 |
| [kk] | Пайдалану нұсқаульғы | Шансорғыш | 86 |
| [bg] | Ръководство за употреба | Прахосмукачка 94 | |
| [ar] | إرشادات الاستفادم | المكنسة الكهربائية | 109 |
A
C

natural_image
Three-step diagram showing a robotic vacuum cleaner's internal components: opening, pressing down, and mounting a device (no text or symbols present)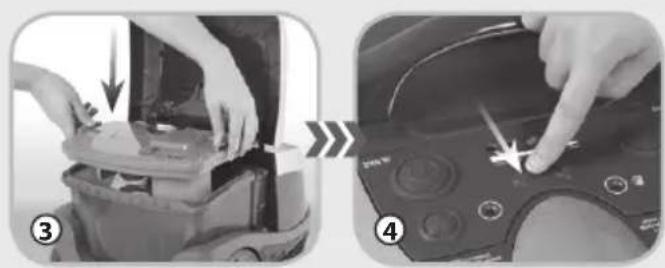
natural_image
Two-step diagram showing hands operating a device with arrows indicating motion, no text or symbols present.D

J
K
natural_image
Close-up of a vacuum cleaner's tip and handle with a paper texture, no visible text or symbolsL
natural_image
Close-up of a mechanical component with internal gears and a tool, no visible text or symbols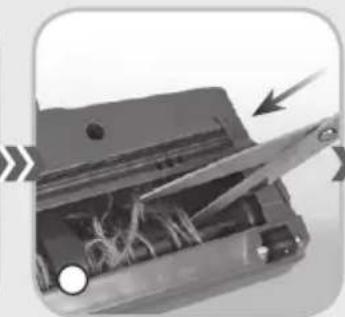
natural_image
Interior view of a mechanical device with visible internal components and directional arrows (no text or symbols)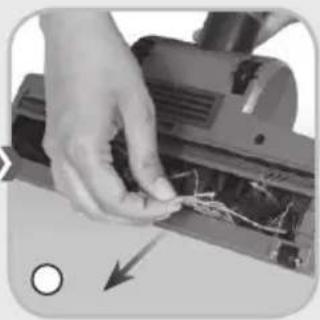
natural_image
Close-up of hands using a sewing machine to adjust cable or wire (no visible text or symbols)M
natural_image
Close-up of hands operating a vacuum cleaner device with a handle, no visible text or symbols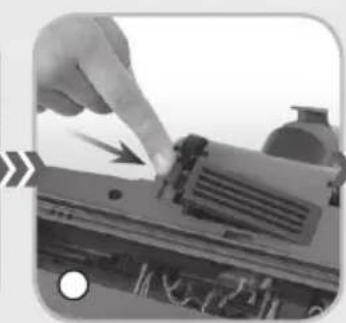
natural_image
Close-up of a hand pressing down on a mechanical component with a lightning bolt (no visible text or symbols)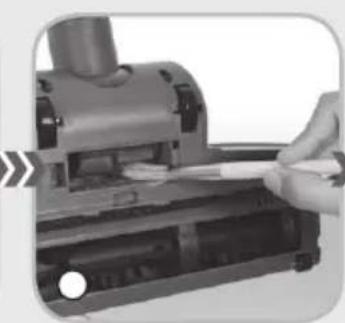
natural_image
Close-up of a hand using a handheld tool to press or install electronic components (no visible text or symbols)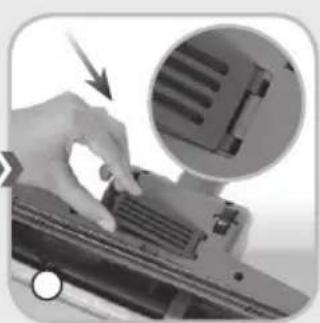
natural_image
Close-up of a hand using a computer to press or install a drive, with an inset showing a close-up of the drive component (no text or symbols visible)Congratulations on your choice of our appliance, and welcome among the users of Bosch products.
In order to achieve best possible results we recommend using exclusively original Bosch accessories. They have been specially designed for this product.
Please read this instruction manual carefully. Pay special attention to important safety instructions. Keep this instruction manual for future reference.
Safety instructions

DANGER! / WARNING!
Failure to follow the safety instructions may result in injury
- If the integrated power cord damaged, in order to avoid a hazard it should be replaced by the manufacturer or by a specialised service centre or by a qualified person.
• Always unplug the power cord from the wall outlet before cleaning, maintenance, assembly or dismantling the appliance.
- Turn off the appliance and unplug it from the wall outlet before approaching the moving parts or changing the accessories.
- This appliance can be used children aged from 8 years and above and persons with reduced physical, sensory or mental capabilities or lack of experience and knowledge if they have been given supervision or instruction concerning use of the appliance in a safe way and understand the hazards involved. Children shall not play with the appliance. Do not allow unsupervised children to clean and maintain the appliance.
- Do not operate the appliance if power cord, housing or the handle
are damaged. Take the appliance to a service centre.
- The appliance should be repaired by trained staff only. Unprofessional repair may result in a serious hazard to the user. In case of defects, please contact a qualified service centre.
- Do not touch the appliance with wet hands when it is connected to the mains power.
- Do not use the vacuum cleaner to clean people or animals, pay special attention to keep the nozzles away from eyes and ears.
- The appliance may only be used indoors, at room temperature and at a height of not more than 2000 m above sea level.
- Plastic bags and films must be kept out of the reach of children before disposal. Risk of suffocation.

NOTE!
Failure to observe these guidelines may result in damage to property
by
Only connect the vacuum cleaner to a 230 V AC mains power protected with a 16 A fuse.
Do not unplug the appliance by pulling the cord.
Do not allow the plug or the power cord to get wet.
Do not run the vacuum cleaner or the brushes over the power cord as this may damage the insulation.
Do not use the vacuum cleaner to pick up matches, cigarette butts or hot ash. Avoid picking up sharp objects.
Do not vacuum fine dust such as flour, cement, gypsum, printer and photocopier machine toners.
Do not pick up corrosive or toxic materials, petrol, kerosene or other flammable or explosive liquids.
The pump may only be switched on when the cleaning liquid tank is filled with the solution of cleaning agent and water. The pump makes loud noise when it runs dry.
During operation do not allow the vacuum cleaner to tip over and do not spill water on it.
Do not expose the vacuum cleaner to harsh conditions such as rain or frost.
- Do not use the vacuum cleaner without the foam filter installed in the filtration unit.
- Do not leave the operating vacuum cleaner unattended and do not leave it plugged in to a wall socket.
- Only operate the vacuum cleaner with all four caster wheels resting on a stable surface.

TIP
Product information and directions for use
● This appliance is intended for household use only.
- Clean the caster wheels periodically. The dirt accumulating on the caster wheels may prevent smooth rolling.
- Roll the vacuum cleaner carefully over doorsteps and uneven surfaces to prevent excessive splashing of the water inside the tank. This could result in spilling a small amount of water.
Static electricity
In the process of vacuuming of some surfaces in areas of low air humidity the device may become electrically charged. It is a natural phenomenon – it does not damage the device, and it is not considered to be a fault.
In order to minimize the phenomenon, we recommend you to:
● discharge the device by touching metal items in the room with the pipe,
- increase air humidity in the room,
use widely available antistatic agents.
Appliance features
The vacuum cleaner is designed to remove more than 2.5 litres of liquid, but it also vacuums dry surfaces and removes dust, fibres, threads and lint. The vacuum cleaner also features a wet-cleaning function by spraying and extraction, ie. by covering the surface to be cleaned with water and detergent solution, and then removing it along with the impurities by the air flow due to suction generated inside the appliance.
VACUUM CLEANER TYPES
| VIB | Dust bag / amount | Outlet filter | Suction hose | Telescopic suction tubes | Suction-brush | Small nozzle | Crevice nozzle | Small brush | Parquet brush | Turbo brush | Large atomizing nozzle | Small atomizing nozzle | Mattress nozzle | Water pick up nozzle | Electronic power control |
| 1 2 3 4 5 6 | 8 9 10 11 12 | 13 14 15 16 | |||||||||||||
| BWD421PRO 1 | piece HEPA | +++++ | ++++- | -++ | |||||||||||
| BWD421PET 1 | piece HEPA | +++++ | -+++ | +++ | |||||||||||
| BWD421POW | 1 piece HEPA | +++++ | - | - | - | + | |||||||||
| BWD420HYG 1 | piece HEPA | +++++ | - | - | +++++ | ||||||||||
| BWD41700 1 | piece EPA | + | + | + | + | + | + | - | - | + | + | - | - | - | |
| BWD41720 1 | piece EPA | + | + | + | + | + | + | + | - | + | + | - | + | - | |
| BWD41740 1 | piece EPA | + | + | + | + | + | + | - | + | + | + | - | - | - | |
Technical parameters
The type of the vacuum cleaner and the technical parameters are indicated on the rating label. Mains protection 16 A.
Does not interfere with radio and TV reception.
Noise level: 85 dB(A).
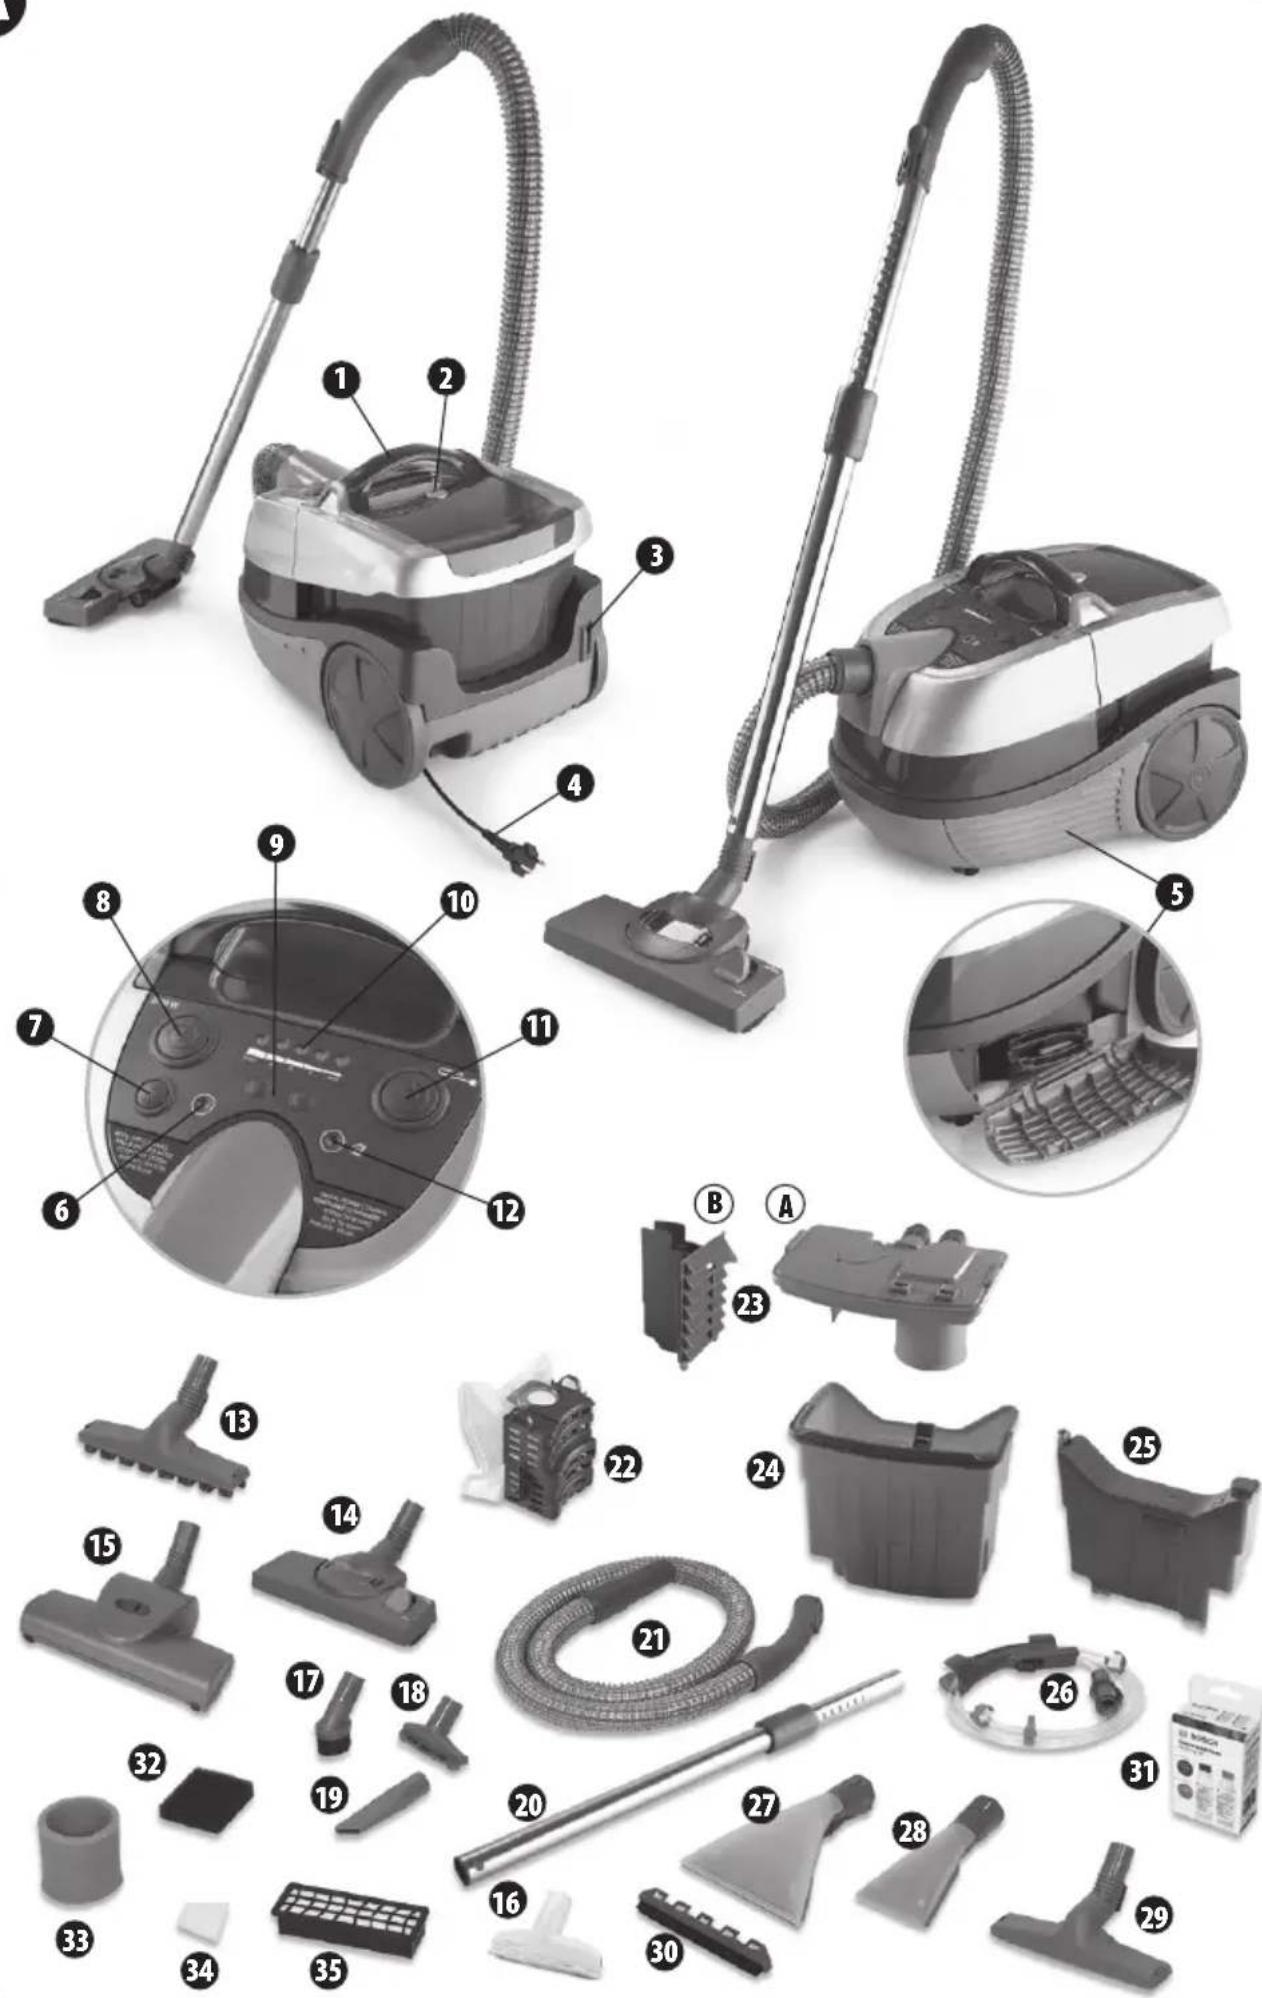
Appliance elements

1 Handle
2 Container lid opening button
3 Combination brush fastening
4 Plug and cord
5 Accessory compartment
6 Pump operation indicator
7 Pump switch
8 ON/OFF button
9 Power adjustment button +/- (BWD420HYG, BWD421PET, BWD421PRO)
10 Power level indicator (BWD420HYG, BWD421PET, BWD421PRO)
11 Cord rewind button
12 Clogged air inlet indicator (BWD420HYG, BWD421PET, BWD421PRO)
13 Parquet brush (BWD41720, BWD420HYG, BWD421PRO)
14 Combination brush with small item separator
15 Turbo brush (BWD41740, BWD421PET, BWD421PRO)
16 Mattress nozzle (BWD420HYG, BWD421PET)
17 Small brush
18 Small nozzle
19 Crevice nozzle
20 Telescopic suction tube
21 Suction hose
22 Dust bag holder
23 Water filter module:
Ⓐ Filtration unit
B Partition
24 Container
25 Cleaning liquid container
26 Spray unit – suction hose handle attachment
27 Large atomizing nozzle
28 Small atomizing nozzle
29 Water pick up nozzle (BWD41720, BWD420HYG, BWD421PET, BWD421PRO)
30 Rubber slat to the large atomizing nozzle
31 Washing set
32 Foam filter I (installed in the vacuum cleaner)
33 Foam filter II (installed in the vacuum cleaner)
34 Motor filter (installed in the vacuum cleaner)
35 EPA/HEPA outlet filter (installed in the vacuum cleaner)
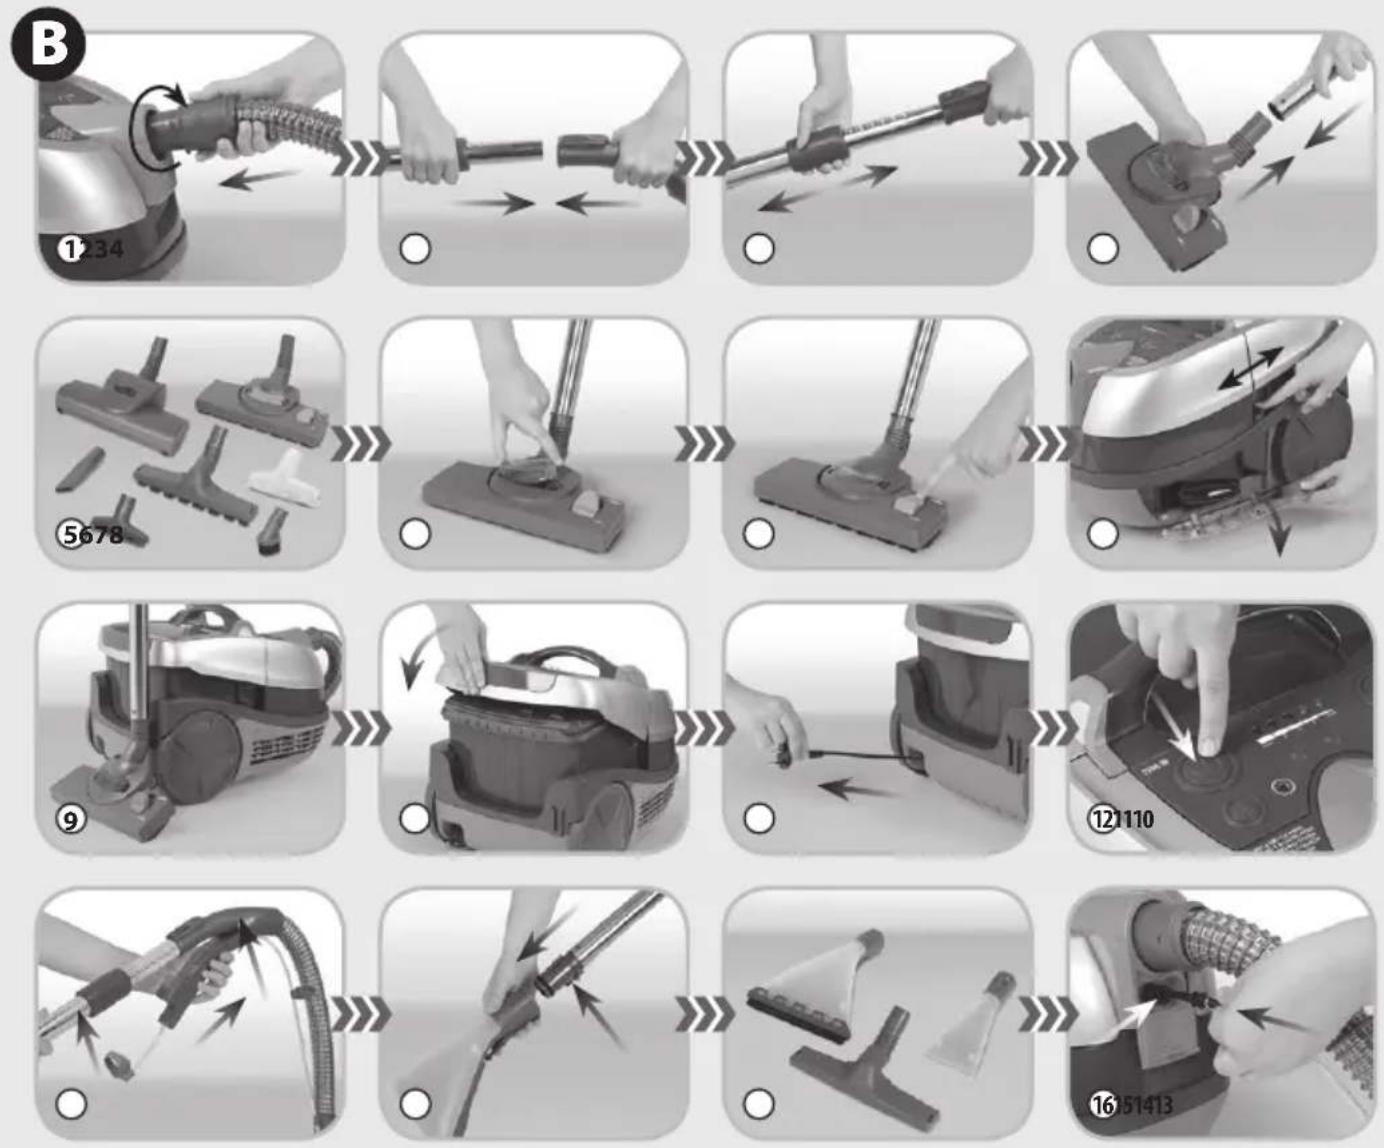
Preparing the vacuum cleaner for operation

① Insert the end of the suction hose to the vacuum cleaner opening so that the markings on the hose end and on the vacuum cleaner housing are opposite each other and turn the hose clockwise to the position 🔒.
② Connect the other end of the hose (handle) with the telescopic suction tube.
③ Hold the ring on the pipe and set chosen length putting it in or out.
④ Assemble the appropriate nozzle or brush to the other end of the suction tube.
⑤ Use the following nozzles and brushes for traditional using the water filter module: combination carpet & floor brush with small objects separator, small nozzle, small brush, crevice nozzle, mattress nozzle, parquet brush or turbo brush.
⑥ You may assemble a basket for picking up small objects in the combination brush with small item separator. In order to do so remove the basket cover and insert the basket.
⑦ To clean hard surfaces – wooden floors, plastic floors, ceramic tiles etc. pull out the brush by pressing the switch on the nozzle according to the figure
⑧ The vacuum cleaner is equipped with an accessory compartment. The compartment opens/closes with the use of a slider. To open/close the compartment side the slider downwards/upwards and take out/put away the desired nozzle.
⑨ The vacuum cleaner may be stored in a horizontal
position; in order to this, place the fastening hook of the combination nozzle/brush into its fastening. The hose may be left attached to the vacuum cleaner, but it is important to pay attention not to leave it heavily bent during storage.
⑩ Close the lid.
⑪ Grab the plug (4) and pull the cord out of the vacuum cleaner.
Plug in the appliance.

Before switching on the vacuum cleaner with the on/off button (8), make sure that the appropriate module is installed in the container (see section C, E, or F).
⑫ Switch on the vacuum cleaner by pressing the "on/off" button (8).
In order to prepare the vacuum cleaner for wet operation additionally:
⑬ Assemble the spray unit – the suction hose handle attachment (26).
Attach the hose fastenings to the suction hose and the telescopic suction tube.
⑭ Attach the end of the hose (sleeve) to the telescopic suction tube and insert the other end of the hose in the small atomizing nozzle or the large atomizing nozzle until you hear a characteristic click.
⑮ Use the following nozzles for the wet vacuuming and wet cleaning function or to pick up water: large atomizing nozzle, small atomizing nozzle or the water pick up nozzle.
⑯ Slide the stub pipe valve plug downwards.
Insert the stub pipe of the hose to the valve in the vacuum cleaner housing.
Make sure the stub pipe fastenings snap shut.

In case of difficulties in connecting the above mentioned elements moisten the gaskets e.g. with technical vaseline, water, etc.
Vacuum cleaner functions
TRADITIONAL CLEANING WITH DUST BAG

① Press and hold the container lid opening button (2) and lift the container lid.
② Put the holder (22) into the container. Make sure the holder is inserted correctly in the container guide slots and the safety lock is engaged. Unfold the bag in the container.

Do not put holder into a wet container. Thoroughly dry a wet container. Dust bag must not get wet.
③ Cover the container with the filtration unit.

holder is not attached properly, the safety lock will prevent covering the container with the filtration unit.
Prepare the vacuum cleaner for operation according to section B.
④ The vacuum cleaner starts at the same power level it had been working before it was turned off. Set the desired power value (BWD420HYG, BWD421PET, BWD421PRO) by pressing the power adjustment buttons +/- (9).

The vacuum cleaner is equipped with a power level memory function (BWD420HYG, BWD421PET, BWD421PRO). When you turn off the vacuum cleaner using the ON/OFF button (8), the power level is going to be stored in memory. After the vacuum cleaner is turned on next time, it is going to start working at the same power level it had been working before it was turned off.

The vacuum cleaner is equipped with the adjustment function for LED brightness of the power level indicator (10) and the clogged air inlet indicator (12) situated on the control panel (BWD420HYG, BWD421PET, BWD421PRO). To set demanded brightness of LEDs you should simultaneously press the power adjustment buttons + and - (9), and then holding them down you should turn on the vacuum cleaner by pressing the "ON / OFF" button (8). The LED for power levels MIN, 2, and MAX turn on, and the motor stays turned off. Next by pressing the power adjustment buttons +/- (9) you can respectively increase or decrease the brightness of power level indicator (10), and the clogged air inlet indicator (12). It is not possible to change LED brightness for the pump operation indicator (6). After setting a desired LED brightness, it is necessary to turn off the vacuum cleaner using the ON/OFF button (8). In this way you leave the LED brightness adjustment function mode, and the set LED brightness level is stored.

The vacuum cleaner is equipped with a power limiting function should the inlet opening be clogged or the dust bag full. It is manifested by a pulsing limitation of the motor power and the lighting up of the clogged air inlet indicator (12) while the vacuum cleaner is operating at full power (BWD420HYG, BWD421PET, BWD421PRO). In such a case switch off the vacuum cleaner by pressing the on/off button (8), unplug the appliance and clear the tubes or replace the dust bag.
Dust bag disassembly/assembly

① Remove the filtration unit from the container and pull out the holder (22).
② Lift the tab and slide the dust bag from the holder guide.
③ Slide the new tab all the way into the holder guide as
directed by the arrow printed on the bag until tab locks in the guide.
④ Put the holder (22) in the container and cover with the filtration unit in accordance with paragraphs C2 and C3.

If the dust bag is not properly attached to the holder, the safety lock will prevent covering the container with the filtration unit.

The number of the dust bags package that can be purchased is placed on a sticker affixed to the basket.
VACUUM CLEANING WITH THE USE OF THE WATER FILTER MODULE


Use antifoam agent before wet working with vacuum cleaner. Failure to use the antifoam agent results in LOSS OF WARRANTY. When you have finished wet working, leave the vacuum cleaner operating on maximum power for 30 s to let it dry.
① Press and hold the container lid opening button (2) and lift the container lid.
② Insert the partition in the container. Make sure the partition is inserted correctly in the container guide slots and the safety lock is engaged.
③ Fill the container with 1,3–1,5 liter of water. The water level should be in the range marked on the wall of the container.

Do not operate the appliance with an empty container while vacuum cleaning with the use of the water filter module.
④ Cover the container with the filtration unit.

If the partition is not inserted properly, the safety lock will prevent covering the container with the filtration unit.
Prepare the vacuum cleaner for operation according to section B.
The vacuum cleaner starts at the same power level it had been working before it was turned off. Set the desired power value (BWD420HYG, BWD421PET, BWD421PRO) by pressing the power adjustment buttons +/- (9).

Do not operate the appliance for too long without replacing the water in the container.

Use antifoam agent before wet working with vacuum cleaner. Failure to use the antifoam agent results in LOSS OF WARRANTY. When you have finished wet working, leave the vacuum cleaner operating on maximum power for 30 s to let it dry.
Before using the wet cleaning function thoroughly vacuum the surface to be cleaned.
Before operating the vacuum cleaner make sure the container is empty and the water filter module and the filters are clean.
① Press and hold the container lid opening button (2) and lift the container lid.
② Remove the container together with the water filter module (filtration unit and partition) from the vacuum cleaner.
③ Remove the cleaning liquid container (25) by pulling it by the handle and lifting it upwards.
④ Open the filler cap and fill the cleaning liquid container (25) with cleaning agent (a mixture of cleaning fluid G 500 O Tens (31) and cold water). Use the amounts stated on the fluid bottle label:
- "G 500 O Tens" manufactured by BUZIL, Germany.
Close the filler hole of cleaning liquid container with the cap.

Before wet cleaning the carpet, check the colour fasteness of cleaned carpet. Put a small amount of prepared solution on white cloth and clean manually the carpet at least visible place. If the cloth is dyed, it means that the carpet colours are not permanent and the carpet cannot be cleaned using cleaning fluid G 500 O Tens.
⑤ Insert the cleaning liquid container (25) back to the previous position and press the container to fix it correctly (proceed in the reverse order as in case of removing the container).
⑥ Insert the container together with the water filter module (filtration unit and partition) to the vacuum cleaner.
For protection against the formation of foam or at its formation, when cleaning fill the rear container with an anti-foaming agent (31) recommended by the company Bosch, in the amounts specified on the label:
“G 478 Buz ^® Defoam” manufactured by company BUZIL, Germany.
Prepare the vacuum cleaner for operation according to section B.

Use only the large or small atomizing nozzle for wet vacuum cleaning.
The vacuum cleaner starts at the same power level it had been working before it was turned off. Set the desired power value (BWD420HYG, BWD421PET, BWD421PRO) by pressing the power adjustment buttons +/- (9).
⑦ Press the pump switch (7).

The pump may only be switched on when the cleaning liquid container is filled with the solution of cleaning liquid and water. The lack of cleaning liquid manifests in a loud operation of the pump.
If the nozzle does not atomize water although the pump is switched on, check if the following items are correctly installed: the cleaning liquid container (press the container), the fastening of the stub pipe in the valve in the base of the vacuum cleaner or the fastening of the hose end in the atomizing nozzle, check if the atomizing nozzle is not clogged.
⑧ Press the button adjusting the inflow of water to the nozzle on the hose handle.
If you press the button in a pulsating manner, the water shall temporarily flow in a slower manner to the nozzle, if you press and slide the button backwards, the water shall be continuously supplied to the nozzle.
The handle is also equipped with a slider to adjust the suction power. Do not uncover this opening while picking up water or using the wet cleaning function.

Do not spray the cleaning liquid in one place on the carpet for too long in order not to soak the carpet.
You should to clean the carpet in such a way that during and immediately after cleaning nobody walks on the cleaned surface. After cleaning one part of the carpet stop the spraying process and dry the carpet by sliding the nozzle back and forth. Repeat until the whole surface of the carpet is dried.
After ending the spraying process switch off the pump and press the button adjusting the water inflow to the nozzle for a moment to "release the pressure".

The vacuum cleaner is equipped with a float which will automatically block the suction if the foam filter II (33) is heavily dirty or the liquid exceeds the maximum level. It is manifested by a pulsing limitation of the motor power and the lighting up of the clogged air inlet indicator (12) (BWD420HYG, BWD421PET, BWD421PRO). In such a case switch off the vacuum cleaner by pressing the on/off button (8), unplug the appliance, clean the filter and empty the container.

Make sure the carpet is not soaked. It may lead to a permanent deformation of the carpet (folding).
PICKING UP WATER
If you want to use the vacuum cleaner to vacuum liquid in the container, the vacuum cleaner should be prepared as in the case of vacuum cleaning with the use of the water filter module except that:
- The container should be empty (without water).
- You are to use atomizing nozzles (large or small), large atomizing nozzle with the gathering attachment or the nozzle for picking up water.

Do not operate the vacuum cleaner with a full container! Do not vacuum large amounts of liquid at a time (e.g. with the hose immersed into water).
If the water exceeds the maximum level during vacuuming, the float will automatically block the suction. The maximum capacity of the container is about 5 l. In such a case proceed in the manner described above in the part concerning the blocking of suction caused by a dirty foam filter (pulsating motor speed).
END OF OPERATION CLEANING AND MAINTENANCE
Switch off the vacuum cleaner by pressing the on/off button (8) and unplug the appliance.
Wind the cord by pressing the cord rewind button (9). While doing this hold the cord to make sure it is not tangled and the plug does not hit the vacuum cleaner housing.
Turn the end of the hose until the tops of the marks on the end of the hose end and on the vacuum cleaner housing are in the same position and pull the hose out of the opening.
Remove the stub pipe of the hose by pressing the red button on the valve and pull the stub pipe.
Disconnect the telescopic tube from the hose and the nozzle or brush.
Pour the dirty water out of the container.
It is recommended to wash the container, filters (disassembly below) and partition thoroughly after each use – changing water several times.
After using the wet cleaning function thoroughly wash all attachments used in this process (hose, tubes, accessories).

If you do not clean the above-mentioned parts or clean them insufficiently it may lead to the loss of the filtration capabilities of the inserts and foam and cause the formation of bacteria and mites.
Dry all the cleaned parts thoroughly before reassembly.
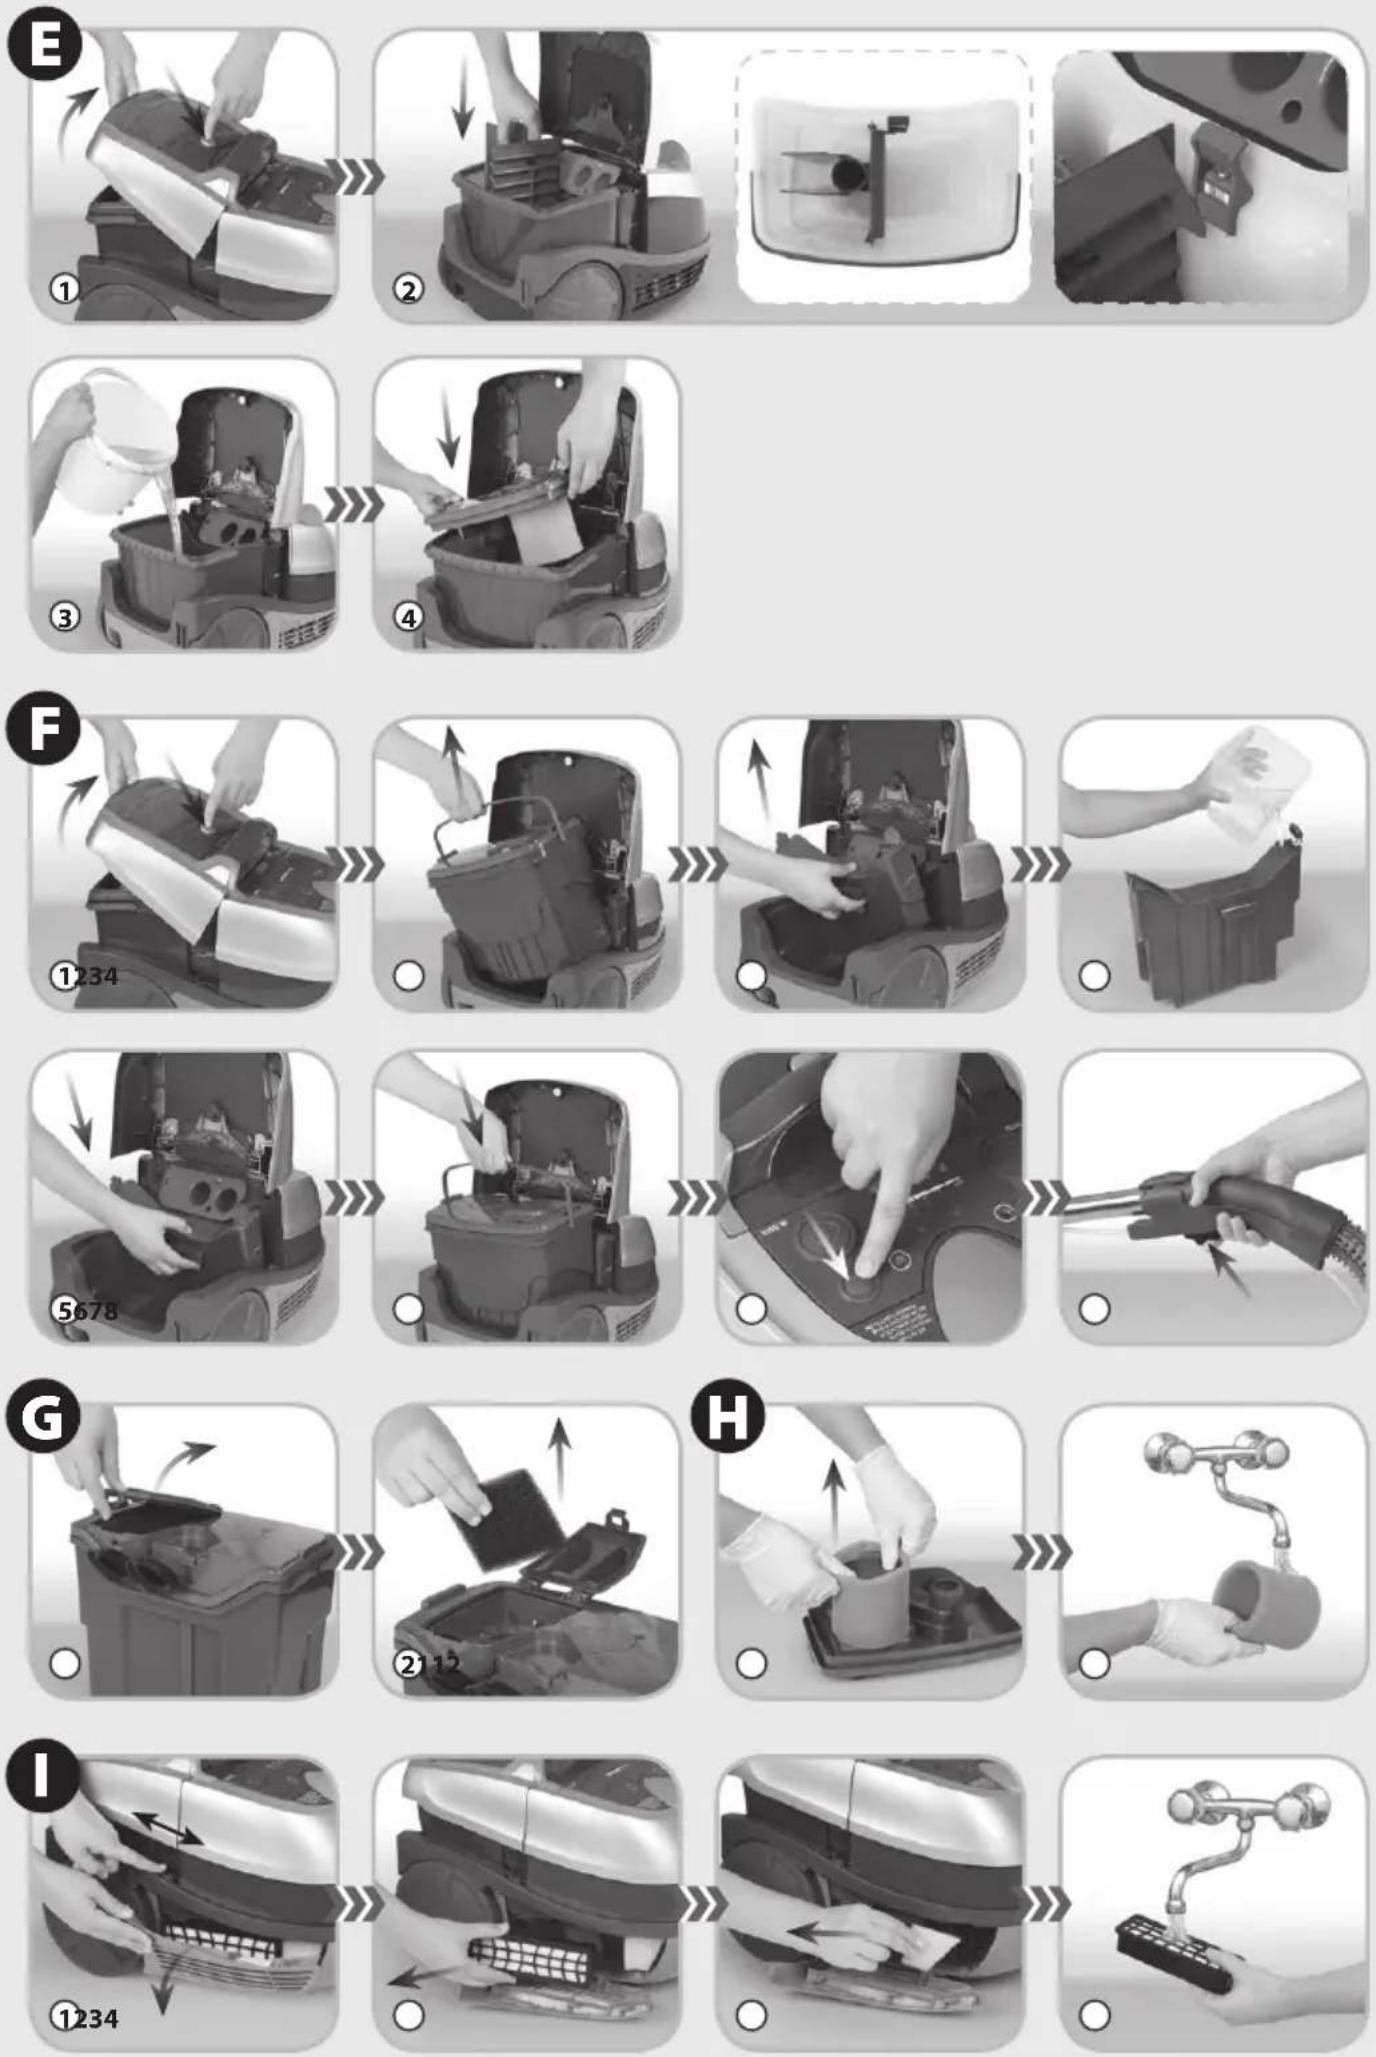
FILTER DISASSEMBLY
FOAM FILTER I

① Open the lid of the filtration unit by pulling the handle upwards.
② Take out the filter, wash it under running water, dry and reinsert.
Close the filtration unit lid by pressing it until you hear a characteristic click.
FOAM FILTER II

It is recommended to wear rubber protective gloves while dismantling the filter.
① Grab the foam filter with your fingers and remove it from the filtration unit body.
② Wash under running water, dry and reinsert.

not hand wash the filter foam, do not wring it, do not wash it in washing machines. Avoid crumpling, stretching and deforming. After cleaning dry the foam in room temperature. Never dry the foam on heaters, stoves, etc.
EPA/HEPA OUTLET FILTER AND COOLING AIR FILTER

The EPA/HEPA outlet filter should be replaced after about 30 hours of operation (6 months) or earlier in case of heavy dirt.
① Slide the slider of the filter cover interlock downwards and open the filter cover.
② Remove and replace the EPA/HEPA filter with a new one when the filter becomes dirty.
③ Remove and replace the motor filter with a new one when the filter becomes dirty.
④ It is possible to rinse the EPA/HEPA filter and the cooling air filter under running water. Remember to dry the above mentioned filters before reassembly.
Close the filter cover and slide the interlock slider upwards.
TURBO BRUSH
Turbobrush description
Turbobrush is a suction nozzle with rotating, turbine driven brush. It is intended only for vacuum cleaners to clean carpets and fitted carpets. Plastic casing ensures esthetic appearance. Rotating brush enables removing difficult rubbish, such as threads, rags, paper, etc. It is especially useful in houses with animals (cats, dogs), where removing fur from carpets is very burdensome. Brush roller is driven by turbine placed in the joint, by means of belt transmission. Proper position of the regulator ensures correct work of the turbobrush, depending on height of carpet hair and facilitates its movement along the carpet.
Safety instructions
When using the turbobrush observe the following safety precautions:

DANGER! / WARNING!
Failure to follow the safety instructions may result in injury
- Do not touch the rotating brush.
- Do not touch power cords of electrical devices with the turbobrush. This may damage insulation of these cords.
- Do not allow children near working turbobrush.
- Touching the rotating brush cause injury.
- This appliance can be used children aged from 8 years and above and persons with reduced physical, sensory or mental capabilities or lack of experience and knowledge if they have been given supervision or instruction concerning use of the appliance in a safe way and understand the hazards involved. Children shall not play with the appliance. Do not allow unsupervised children to clean and maintain the appliance.
Never use the turbobrush to:
-
Polish floors.
Suck: -
liquids,
- wet or damp dust,
hot ash, - burning objects, such as cigarettes, matches,
- sharp and hard items, such as: razors, pins, thumbtacks, pieces of glass, etc.,
- flour, cement, plaster, printer photocopier toner, etc.
or

CAUTION!
Not observance can result in damage to possessions
During work the roller of the rotating brush or suction inlet may get obstructed with rags, papers, etc.

Product information and directions for use
Turbobrush is equipped with wheels that prevent damage in case of unintentional use on hard floor.
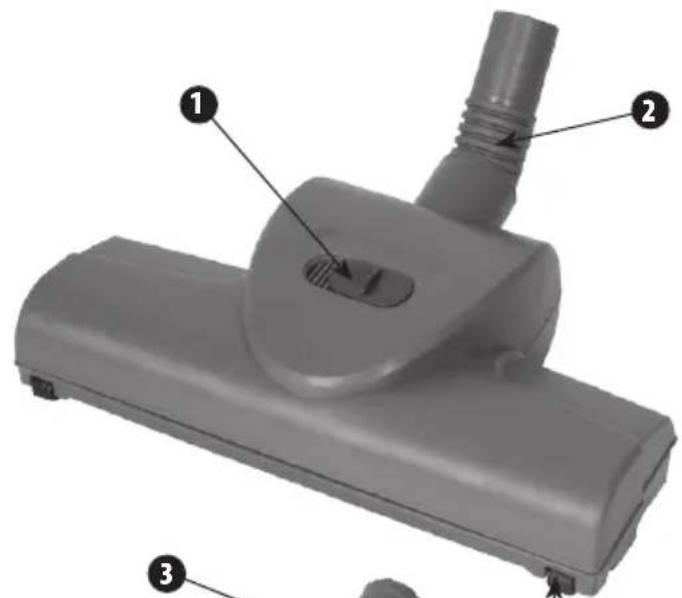
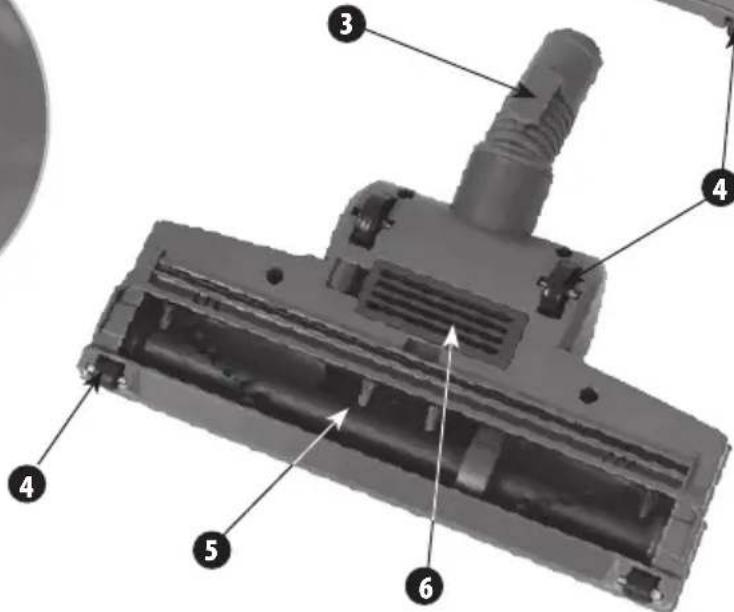
Product description
1 Regulator
by2 Connector
3 Fastening hook
4 Wheels
5 Rotating brush
6 Turbine cover

Assembling the turbobrush and the vacuum cleaner
Assemble the turbobrush and the vacuum cleaner according to instruction manual.
Using the turbobrush

avoid obstruction of rotating element remove big rubbish from the cleaned surface before cleaning.
Switch the vacuum cleaner on.
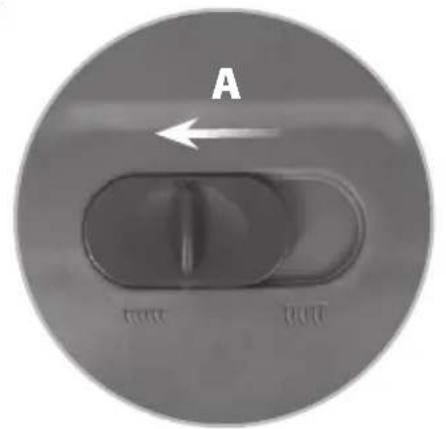
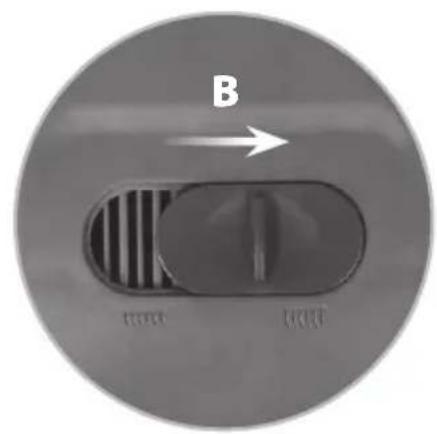
Set the regulator on the turbobrush body depending on the height of carpet hair.
- Short hair carpet – move the regulator towards the sign
- Long hair carpet – move the regulator towards the sign .....

In order to use the vacuum cleaner with the turbobrush safely, especially while cleaning long hair carpets and animal skins, it is recommended to test the suction power of the turbobrush on a small area of the cleaned surface.
Slowly push the turbobrush back and forth.

not hold the working turbobrush for a longer time in one place, but constantly move it, so as not to damage the carpet (fitted carpet).

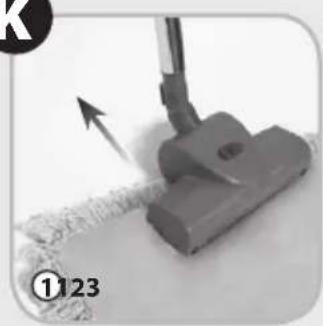
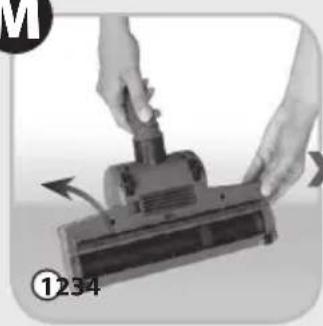
While cleaning carpet fringes always move the turbobrush in the direction indicated by the arrow (Fig. K). It prevents getting the fringes into the rotating brush.

The speed of the brush roller rotation depends on the amount of dust in the dust bag and cleanliness of filters. The roller may stop rotating on the carpet. Then the dust bag and filters should be replaced.
Maintenance and cleaning of the turbobrush

more cleaning and maintenance of the turbobrush it must be disassembled from the vacuum cleaner.
Cleaning of the rotating brush


ng operation the brush collects pieces of: threads, strings, hair, rags, etc. They reduce cleaning efficiency.
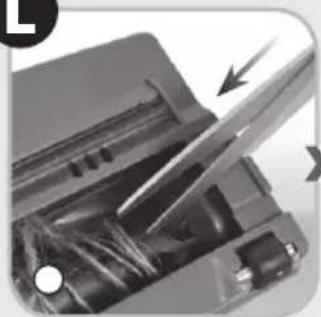
To remove dirt from the rotating brush follow the steps below:
① Place tips of scissors into the slot of the rotating brush.
② Move the scissors so as to catch the threads and hair tangled on the brush.
③ Cut them and take out manually or using small tongs. Be careful not to damage the bristle of the rotating brush.

Dirt such as matches, pieces of paper or clothing may obstruct the suction duct of the turbobrush, leading to significant reduction of the suction power and reduced speed or brush roller rotation (until it completely stops).
Cleaning of the suction duct of the

turbobrush
To remove dirt from the suction duct of the turbobrush follow the steps below:
① Turn the turbobrush with wheels upward.
② Press the fastening in the turbine cover and take the cover out from the turbobrush.
③ Remove dirt from the suction duct, turbine blades and turbine chamber.
④ Place the turbine cover so that its two ledges match the holes in the turbobrush body, press the cover until the it latches on the body. Characteristic clicking sound indicates the correct assembly of the turbine cover.
Cleaning the turbobrush

r clean the turbobrush with gasoline, solvents, oils and other chemicals that may cause discoloring of the housing.

Do not use granular cleaning agents that may scratch the housing.
● The turbobrush may be cleaned with damp cloth (possibly moisten with a washing-up liquid).

Store the turbobrush away from hot ovens, radiators, heaters, etc. High temperature may lead to permanent deformation of the turbobrush housing.
The manufacturer does not accept any liability for any damages resulting from unintended use or inappropriate handling.
The manufacturer reserves his rights for modifying the product any time in order to adjust it to law regulations, norms, directives, or due to construction, trade aesthetic or other reasons, without notifying it in advance.
TR
Business center FPI, floor 5, Cherni vrah Blvd. 51B
1407 Sofia
Tel.: 0700 208 17
mailto:informacia.servis-bg@bshg.com
www.bosch-home.bg
BH Bahrain
Khalafat Est.
P.O. Box 5111
Manama
Tel.: 01 7400 553
mailto:service@khalafat.com
To arrange an engineer visit, to order spare parts and accessories or for product advice please visit
www.bosch-home.co.uk or call Tel.: 0344 892 8979*
* Calls are charged at the basic rate, please check with your telephone service provider for exact charges
GR Greece, Ελλάς
BSH Ikiakes Siskeves A.B.E.
Central Branch Service
17 km E.O. Athinon-Lamias & Potamou 20 14564 Kifisia
Unit 1 & 2, 3rd Floor,
North Block, Skyway House,
3 Sham Mong Road
Tai Kok Tsui, Kowloon
Hong Kong
Tel.: 2565 6151
Fax: 2565 6681
mailto:bosch.hk.service@bshg.com
www.bosch-home.cn
HR Hrvatska, Croatia
www.bosch-home.com/hr
www.bosch-home.com/hu
IE Republic of Ireland
BSH Home Appliances Ltd.
M50 Business Park
Ballymount Road Upper
Walkinstown
Dublin 12
To arrange an engineer visit, to order spare parts and accessories or for product advice please call
Tel.: 01450 2655*
www.bosch-home.ie
* Calls are charged at the basic rate, please check with your telephone service provider for exact charges.
IL Israel,
C/S/B/ Home Appliance Ltd.
1, Hamasger St.
North Industrial Park
Lod, 7129801
Tel.: 08 9777 222
Fax: 08 9777 245
mailto:csb-serv@csb-ltd.co.il
www.bosch-home.co.il
IN India, Bhārat, भारत
BSH Household Appliances Mfg. Pvt. Ltd.
Arena House, Main Bldg, 2nd Floor,
Plot No. 103, Road No. 12,
MIDC, Andheri East
Mumbai 400 093
Toll Free 1800 266 1880*
www.bosch-home.com/in
* Mo-Sa: 8.00am to 8.00pm
(exclude public holidays)
IS Iceland
Smith & Norland hf.
Noatuni 4
105 Reykjavik
Tel.: 0520 3000
Fax: 0520 3011
www.sminor.is
IT Italia, Italy
www.bosch-home.com/it
LT Lietuva, Lithuania
Senuku prekybos centras UAB
Jonavos g. 62
44192 Kaunas
Tel.: 037 212 146
Fax: 037 212 165
www.senukai.lt
UAB "AG Service"
R. Kalantos g. 32
52494 Kaunas
Tel.: 070 055 655
Fax: 037 331 363
mailto:servisas@agservice.lt
www.agservice.lt
Baltic Continent Ltd.
Lukšio g. 23
09132 Vilnius
Tel.: 870 055 595
Fax: 052 741 722
mailto:info@balticcontinent.lt
www.balticcontinent.lt
UAB Emtoservis
S.R.L. "Rialto-Studio"
ул. Щусева 98
2012 Кишинев
Unit F 2, 4 Orbit Drive
Mairangi Bay
Auckland 0632
Tel.: 0800 245 700*
Fax: 0800 256 535
mailto:aftersales.nz@bshg.com
www.bosch-home.co.nz
* Mo-Fr: 8.30 am to 5.00 pm
(exclude public holidays)
PL Polska, Poland
SA Kingdom Saudi Arabia,

Abdul Latif Jameel Electronics
and Airconditioning Co. Ltd.
BOSCH Service centre,
Kilo 5 Old Makkah Road
(Next to Toyota), Jamiah Dist.
P.O.Box 7997
Jeddah 21472
Tel.: 800 127 9999
mailto:palakkaln@alj.com
www.aljelectronics.com.sa
SE Sverige, Sweden
BSH Home Appliances AB
Landsvägen 32
169 29 Solna
Tel.: 0771 19 70 00 local rate
Tel.: 0771 11 22 77 local rate
mailto:Bosch-Service-SE@bshg.com
www.bosch-home.se
SG Singapore,新加坡
BSH Home Appliances Pte. Ltd.
Block 4012, Ang Mo Kio Avenue 10
01-01 Techplace 1
Singapore 569628
Tel.: 6751 5000*
Fax: 6751 5005
mailto:bshsgp.service@bshg.com
www.bosch-home.com.sg
* Mo-Fr: 8.30am to 7.00pm, Sa: 8.30am to 5.30pm
(exclude public holidays)
SI Slovenija, Slovenia
BSH Hišni aparati d.o.o.
Litostrojska 48
1000 Ljubljana
Tel.: 01 583 07 00
Fax: 01 583 08 89
mailto:informacije.servis@bshg.com
www.bosch-home.com/si
SK Slovensko, Slovakia
www.bosch-home.com/tr
BSH Home Appliances Private Limited
台北市內湖區洲子街80號11樓
11F., No.80, Zhouzi St., Neihu Dist.
Taipei City 11493
Tel.: 0800 368 888
Fax: 02 2627 9788
mailto:bshtzn-service@bshg.com
Service-General SH.P.K.
Rruga Mag Prishtine-Ferizaj
70000 Ferizaj
Tel.: 0290 321 434
Tel.: 0290 330 723
mailto:a_service@
gama-electronics.com
XS Srbija, Serbia
BSH Kućni aparati d.o.o.
15th Road Randjespark
Private Bag X36, Randjespark
1685 Midrand – Johannesburg
Tel.: 086 002 6724
Fax: 086 617 1780
mailto:applianceserviceza@bshg.com
www.bosch-home.com/za
natural_image
Symbol of a trash bin crossed with no text or numbers, representing environmental restriction (no text present)de
This appliance is labelled in accordance with European Directive 2012/19/EU concerning used electrical and electronic appliances (waste electrical and electronic equipment - WEEE). The guideline determines the framework for the return and recycling of used appliances as applicable throughout the EU.
ru
natural_image
Symbol of a trash bin crossed with no text or numbers, representing waste sorting or disposal (no text present)
bg
GB Conditions of guarantee
For this appliance the guarantee conditions as set out by our representatives in the country of sale apply. Details regarding same may be obtained from the dealer from whom the appliance was purchased. For claims under guarantee the sales receipt must be produced.
Bosch Su Isitici (Kettle)
Bosch Mikser
Bosch Mutfak Robotu
www.bosch-home.com/tr
www.bosch-yetkiliservisi.com
bosch-infoteam@bshg.com
Thank you for buying a Bosch Home Appliance!
Register your new device on MyBosch now and profit directly from:
- Expert tips & tricks for your appliance
• Warranty extension options
• Discounts for accessories & spare-parts
• Digital manual and all appliance data at hand - Easy access to Bosch Home Appliances Service
Free and easy registration – also on mobile phones:
www.bosch-home.com/welcome
BOSCH HOME APPLIANCES SERVICE
Looking for help? You'll find it here.
Expert advice for your Bosch home appliances, need help with problems or a repair from Bosch experts.
Find out everything about the many ways Bosch can support you:
www.bosch-home.com/service
Contact data of all countries are listed in the attached service directory.