
XMS 333 U - CD Player ECG - Free user manual and instructions
Find the device manual for free XMS 333 U ECG in PDF.


| Product type | Portable CD player |
| Brand | ECG |
| Model | XMS 333 U |
| Dimensions (L x W x H) | 140 x 140 x 28 mm |
| Weight | 320 g |
| Power supply | 2 AA batteries or 5V mains adapter (not included) |
| Supported formats | CD audio, CD-R, CD-RW, MP3 |
| Main functions | CD playback, track programming, repeat, random play, stop/resume, 3.5 mm auxiliary input |
| Screen | Backlit LCD display |
| Audio output | 3.5 mm headphone jack, built-in speaker |
| Care and cleaning | Clean the exterior with a soft, dry cloth. Clean the lens with a CD player cleaning kit. |
| Safety | Do not expose to moisture, shocks, or extreme temperatures. Use only the recommended adapter. |
| Spare parts and repairability | No spare parts available. In case of failure, contact customer service. |
| General information | 2-year warranty. Made in China. User manual available for download. |
Frequently Asked Questions - XMS 333 U ECG
User questions about XMS 333 U ECG
0 question about this device. Answer the ones you know or ask your own.
Ask a new question about this device
Download the instructions for your CD Player in PDF format for free! Find your manual XMS 333 U - ECG and take your electronic device back in hand. On this page are published all the documents necessary for the use of your device. XMS 333 U by ECG.
USER MANUAL XMS 333 U ECG
natural_image
Black ECG desktop computer with digital display and remote control (no visible text or symbols on device body)XMS 333 U

CZ
CD MIKROSYSTÉM
NÁVOD K OBSLUZE
SK
CD MIKROSYSTÉM
NÁVOD NA OBSLUHU
PL
MINIWIEŻA CD
INSTRUKCJA OBSŁUGI
HU
CD MIKRO HIFI RENDSZER
HASZNÁLATI ÚTMUTATÓ
DE
CD-MIKROSYSTEM
BEDIENUNGSANLEITUNG
GB
CD MICROSYSTEM
INSTRUCTION MANUAL
HR/BIH
CD MIKRO SUSTAV
UPUTE ZA UPORABU
SI
MIKROSISTEM S CD PREDVAJALNIKOM
NAVODILA
SR/MNE
CD MIKRO SISTEM
UPUTSTVO ZA UPOTREBU
FR
MICROSYSTEME CD
MODE D'EMPLOI
IT
CD MICROSYSTEM
STROMVERSORGUNG....33
BASISFUNKTIONEN....33
PROBLEMLÖSUNG 36
SAFETY INFORMATION......38
FEATURES....39
DESCRIPTION 39
POWER....40
BASIC FUNCTIONS 40
TROUBLESHOOTING 43
TECHNICAL SPECIFICATIONS....43
SAFETY INFORMATION
Read carefully and keep for future use!
- Read this manual thoroughly before connecting and using the device. Keep the manual for future reference.
- Do not open the device box. There are no elements inside that can be configured by the user. Have a qualified service technician perform repairs on the device.
- Turn the equipment off when you are not using it. If you do not plan on using the device for a longer period of time, turn it off and unplug the device. (The plug enabling the complete disconnection from the power network should be easy to access.)
- Do not place the system in areas exposed to heat sources or direct sunlight.
- Do not place the system in areas exposed to moisture or rain.
- The device should not be exposed to dripping or splashing water and objects containing liquids should not be placed upon it, for example vases.
- Place the device on a horizontal, flat and solid surface with good ventilation. Do not cover the air vents. Doing so may damage the device by overheating.
- Use a soft and clean towel to clean the outer surface. Do not use chemicals or cleaning detergents for cleaning the device.
- This document is only an guide for using the device and is not considered an authoritative criterion for configuration.
- Use only accessories recommended by the manufacturer.
WARNING:
Do not expose batteries to excessive temperatures, e.g. direct sunlight, fire etc.
WARNING:
Danger of explosion if the batteries are replaced improperly. Batteries shall only be replaced with the same type.

The lightning symbol warns the user about dangerous voltage inside the device box, which could cause injury by shock upon coming into contact with the internal elements of the device.

The exclamation mark symbol warns the user about vital information in the manual.
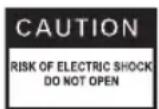
To reduce the risk of fire or electric shock, do not remove the cover of the device. Have a qualified service technician perform repairs on the device.
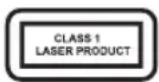
This symbol represents that the device is classified under the class 1 laser equipment group. Harmful radiation may result if the laser beam comes into direct contact with the human body.
FEATURES
Thank you for purchasing this device. Read this manual thoroughly before connecting and using the device. Keep the manual for future reference.
See table with technical data or precise specifications.
Note: the device is not compatible with all types of disks. Some disks may not play because the disk is dirty, scratched or otherwise of bad quality etc.
DESCRIPTION
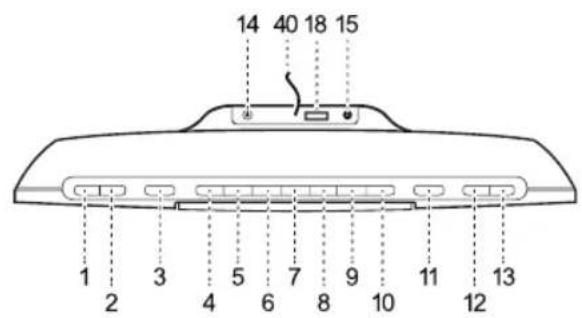
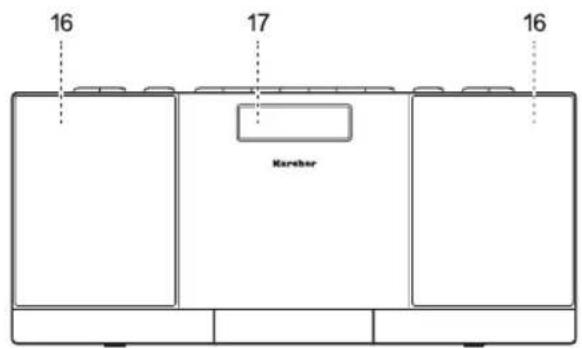
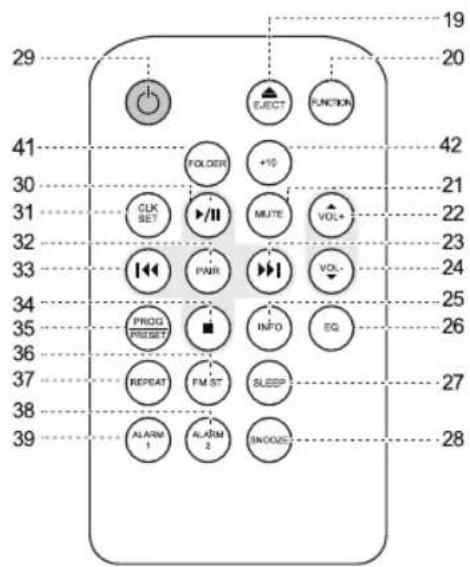
GB
- SNOOZE/VOLUME-
- SNOOZE / VOLUME+
- STANDBY button
- FUNCTION button
- EQ / CLK SET button
- FM-ST / REPT. button
- PRESET / PROG. button
- ALARM 1 / ALARM 2 button
- PAIR / STOP ■ button
- PLAY/PAUSE ▶ button
- EJECT ▲ button
- SKIP I button
- SKIP ▶ button
-
Input AUX
-
DC power input
- Speakers
- LCD display
- USB port
- EJECT ▲ button
- FUNCTION button
- MUTE button
- VOLUME+ button
- SKIP ▶ button
- VOLUME-button
- INFO button
- EQ button
- SLEEP button
-
SNOOZE button
-
STANDBY button
- PLAY/PAUSE ▶ button
- CLK SET button
- PAIR button
- SKIP I button
- STOP ■ button
- PROG / PRESET button
- FM ST button
- REPEAT button
- ALARM 2 button
- ALARM 1 button
- Antenna
- Folder
- +10
ECG

POWER
The device requires DC 9V DC power supply 2000 mA. The polarity of the DC connector: ⊙—●—⊕
Connect the cable of the supplied power adapter into the jack at the rear of the unit and the plug of the adapter into a suitable power outlet 100–240 V AC.
For the device to function it has to be connected to a power supply. The device cannot be powered by batteries.
BASIC FUNCTIONS
Turning the device on and off
- Connect the device to power supply as described above.
- The device is in a standby mode now, the display shows clock.
- Turn on the device by pressing STANDBY (③ on the device or ⑲ on the remote control).
- If you want to switch the device in the standby mode, press again the button STANDBY.
Setting the time
You can set the clock only in the standby mode.
- While the device is in the standby mode press the button CLK SET. The time format will appear.
- Using the buttons ◀◀/▶▶I choose between the 12 h and 24 h format.
- Press again CLK SET. The hours begin to flash.
- Using buttons ◀◀/▶▶ set the hour.
- Press again CLK SET. The minutes start to flash.
- Using buttons ◀◀/▶▶ set minutes.
- Press again CLK SET to confirm the set time. The clock is now set.
Setting alarm
The alarm can be set only in the standby mode.
The device allows to set two different alarm clocks. You can select CD playback, radio or buzzer alarm.
- While the device is in standby mode, press and hold for 2 seconds the button ALARM1 or ALARM2. The symbol ① or ② and the hour start flashing.
- Using buttons ◀◀/▶▶ set the required hour.
- Press again ALARM1 or ALARM2. The minutes start to flash.
- Using buttons ◀◀/▶▶ set minutes.
- By repeated pressing ALARM1 or ALARM2 select the alarm mode.
- Use buttons ◀◀ / ▶▶ to select between CD, radio or buzzer.
Activation/deactivation of the alarm
- If you want to activate previously set alarm clock, press the appropriate button ALARM (1 or 2) in the standby mode. The display shows the alarm clock symbol ① or ②. The alarm will sound in preset time.
- If you want to deactivate the alarm clock, press the appropriate button ALARM (1 or 2) in the standby mode. The alarm clock symbol ① or disappears from the display. The alarm is now deactivated and will not sound.
Checking the alarm clock
- Press INFO to find out to what time and mode are the alarm clocks set.
Stopping the sounding alarm
- When the alarm sounds, press ALARM1 or ALARM2 to stop it. The alarm clock icon disappears from the display. To make the alarm clock functional for the next day you have to activate it again.
Snooze function
The snooze function allows you to delay the active alarm by 9 minutes. If you want to do so, press the button SNOOZE once when the alarm is active. The alarm stops and starts 9 minutes later. During this time the alarm clock icon flashes. If you want turn off this function, press related button ALARM (1 or 2).
Sleep function with music (from the remote control)
This feature allows you to set a countdown, after which the device will automatically switch to standby mode.
- Press repeatedly the button SNOOZE during listening on the remote control and select the required time when the device should automatically shut off.
- You can select 90, 80, 70, 60, 50, 40, 30, 20 or 10 minutes. The display shows "SLEEP".
• If you want to check the remaining time until shut off, press SNOOZE once. - If you want to cancel the function, press SNOOZE repeatedly, until the display shows "00". The indicator "SLEEP" disappears from the display.
Equalizer setting
While listening, you can change the setting of the equalizer by pressing repeatedly the button EQ. You can choose between the Flat, Rock, Classic, Pop, Jazz modes.
GB
Radio
- Turn on the device as described above.
- Press repeatedly the button FUNCTION to select "RADIO". The display shows a radio frequency.
- Press repeatedly the buttons ◀◀ /▶▶ to select the required radio station.
- If you want to find automatically the closest available station, press and hold for 2 seconds the button or ▶
- If the station broadcasts stereo, you can press FM ST to achieve the highest quality sound. If the station broadcasts mono, it is better to switch off FM ST.
- For optimal reception quality extend as much of the FM antenna as you can.

Presets of radio stations
You can store up to 20 radio stations in the system memory.
- Tune in the station, which you want to save.
- Press and hold for 2 seconds the button PRESET. The number of the preset starts flashing (e.g. "P01").
- Use buttons ◄◀/▶◀ to select the required number of the preset from P01 to P20 where you want to save the currently played station.
- Press repeatedly PRESET to confirm your selection.
- Store other presets by repeating steps 1 to 4.
- If you want to retrieve the station saved in the memory, press repeatedly PRESET until the required preset is tuned in.
CD control
Disc playback
- Turn on the device and press FUNCTION to select the CD mode.
- Press ▲EJECT to open the disc tray.
- Insert the disc by pushing outward.
- Press again the button ▲ EJECT to close the disc tray.
- The device reads the disc and displays the total number of tracks.
- Press PLAY/PAUSE ▶ to start playback.
- If you want to pause the playback (pause) press the button PLAY/PAUSE ▶II once. Press again to continue playback.
- If you want to stop playback, press the button STOP ■.
ECG
Fast forward/rewind and skipping tracks.
- If you want to jump to the beginning of the currently played track, press briefly the button ◀. Press again to jump to previous track.
- If you want to jump to the next track, press briefly the button.
- If you want to move forward in the currently played track, press and hold the button ▶▶. Once you reach the required spot, release the button, regular playback will continue.
- If you want to move back in the currently played track, press and hold the button I. Once you reach the required spot, release the button, regular playback will continue.
Repeat modes
Any time during playback:
- press REPEAT once to repeat the current track. The display shows "REPT. 1".
- press the button REPEAT twice to repeat all tracks. The display shows "REPT. ALL".
- press the button REPEAT third time to deactivate the repeat function.
Programming
You can create a program of up to 20 tracks in any order.
- When you stop the CD, press the button PROG. "PROG." flashes and the first position of the program "P-01" appears.
- Use buttons ◀◀ / ▶▶I to select the track, which should be in the program in the first position.
- Press again PROG. The display shows "P-02".
- Repeat the steps 2 and 3 to program the order of up to 20 tracks.
- Press PLAY/PAUSE ▶ to start playback of the created program.
- If you want to delete the program, press twice the button STOP ■.
Playback of MP3 tracks from USB
The device is equipped with a USB connector to which you can connect a USB memory device and play MP3 tracks stored on it.
- Connect to the USB port a suitable USB memory device.
- Turn the device on a press FUNCTION to select the USB mode.
- The device reads the contents of the USB memory medium and the display shows the total number of tracks.
- Press PLAY/PAUSE ▶ to start playback.
- If you want to pause the playback (pause) press the button PLAY/PAUSE ▶II once. Press again to continue playback.
- The basic functions shift and skip tracks are the same as in CD mode.
- If the tracks on the USB memory medium are stored in multiple folders, you can toggle between the folders using the button FOLDER.
- If you want to skip 10 tracks at once, press +10.
- If you want to stop playback, press the button STOP ■.
Notes:
- USB memory medium must be always connected directly to the USB port of this device. Using extension cables is not supported. USB port of this device cannot communicate with PC.
- Time loading songs from a USB varies according to the speed of the storage medium and the number of tracks on USB. In some cases the loading may last longer than 60 seconds.
- Before removing the USB device switch off the unit to prevent damage. The manufacturer is not liable for loss of data on the USB device.
- This device does not support USB music players because of their basic software incompatibility. To play MP3 tracks you can only use USB memory media such as Flash.
- You can play only MP3 files. Due to the existence of many compression methods, it may happen that some MP3 files cannot be played.
AUX input
You can connect to the device an external audio output device such as an MP3 player, and listen to the sound through the speakers of this device.
- To connect an external device to the AUX connector of this device, use a standard audio cable with 3.5mm connectors (not supplied).
- Turn on the device and press FUNCTION to select AUX ("LINE") mode.
- Turn on the external device (e.g. MP3 player).
- Start playback on the external player and set the required volume level on the main unit.
- When you finish playback from an external device, do not forget to turn off the device.
TROUBLESHOOTING
Before bringing the device to the repair centre, please check the following table.
| Symptom Cause | Correction | |
| No power | The power supply is not properly connected to the socket. | Check the proper connection of the power supply. |
| SoundNo sound. | The volume is set to minimum.The sound is muted. | Increase the volume.Press PLAY/PAUSE. |
| Cannot play disk | The disk is inserted improperly.The disk is not compatible with this device.The disk is dirty. | Make sure the disk is inserted with the label facing upward.Clean the disk |
| After connecting a USB device, the device stops working | The connected USB device most likely is not a certified type. | The device does not play uncertified USB devices.In case the player stops working, turn it off, unplug the power cord from the socket and remove the USB device. Plug the power cord back in. The device should work normally. |
| The buttons on the device do not work | The device is experiencing interference caused by static electricity etc. | Turn the device off and unplug from the socket. Plug the power cord back in and turn on the device. |
| The remote controller does not work | The batteries are empty.The remote controller is not directed at the remote controller sensor.The remote controller is outside of its operating range. | Replace the batteries with a new set.Make sure the remote controller is directed at the remote controller sensor.Make sure the remote controller is close enough to the device. |
TECHNICAL SPECIFICATIONS
| Tuner FM band range 88 ~ 108 MHz | ||
| Number of FM station pre-sets 20 | ||
| CD Frequency characteristic 10 Hz ~ | 20 kHz | |
| S/N ratio (filter A) 60 dB | ||
| Dynamic range 85 dB | ||
| Distortion and noise 15 % (Max. power) | ||
| Fluctuation Jitter under 30 ns | ||
| Supported CD files CD / CD-R / CD-RW / MP3 CD | ||
| INPUTS | USB | USB 2.0 or USB1.1, 500 mA |
| Supported USB files | FAT12, FAT16, FAT32 | |
| Maximum size of USB device | 64 GB | |
| AUX-IN | 3.5 mm jack | |
ECG
| Amplifier Power output (max.) 2×5 W | ||
| Frequency characteristic 10 Hz ~ 20 kHz | ||
| Remote control Battery CR-2025 | ||
| Main unit dimensions (w × h × d) 34 × 19 × 10 cm | ||
| Net weight 1.2 kg | ||
| Gross weight 1.5 kg | ||
| Power AC ~100–240 V, 50/60 Hz | ||
| Standby power input 0.8 V | ||
| Operating conditions Temperature | 0~50°C | |
| Relative humidity 30~95 % | ||
USE AND DISPOSAL OF WASTE
GB
Wrapping paper and corrugated paperboard – deliver to scrapyard. Packing foil, PE bags, plastic elements – throw into plastic recycling containers.
DISPOSAL OF PRODUCTS AT THE END OF LIFETIME
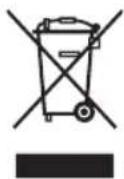
Disposal of electric and electronic equipment (valid in EU member countries and other European countries with an implemented recycling system)
The represented symbol on the product or package means the product shall not be treated as domestic waste. Hand over the product to the specified location for recycling electric and electronic equipment. Prevent negative impacts on human health and the environment by properly recycling your product.
Recycling contributes to preserving natural resources. For more information on the recycling of this product, refer to your local authority, domestic waste processing organization or store, where you purchased the product.
08/05
This product complies with EU directive requirements on electromagnetic compatibility and electrical safety.

The instruction manual is available at website www.ecg-electro.eu. Changes in text and technical parameters reserved.
CD MIKRO SUSTAV
SADRŽAJ
SIGURNOSNA UPOZORENJA 45
SVOJSTVA 46
OPIS....46
NAPAJANJE 47
OSNOVNE FUNKCIJE 47
OTKLANJANJE POTEŠKOĆA 50
TEHNIČKI PODACI 50
SIGURNOSNA UPOZORENJA
PROBLÉMU NOVĚRŠANA 106
TEHNISKÄ INFORMÄCIJA 106
DROŠĪBAS INFORMĀCIJA
PEČAT I POTPIS PRODAVATELJA


K+B Progres
PROIZVAJALEC ali DAJALEC GARANCIJE:
K+B Progres, a.s.; MBS: 61860123
250 69 Kličany, Czech Rep. e-post: ECG@kbexpert.cz
LT
K+B Progres, a.s.
U Expertu 91 tel.: +420 272 122 111
250 69 Kličany, Czech Rep. el. paštas: ECG@kbexpert.cz
LV
K+B Progres, a.s.
U Expertu 91 tel.: +420 272 122 111
250 69 Kličany, Czech Rep. e-pasts: ECG@kbexpert.cz
Dovozce neručí za tiskové chyby obsažené v návodu k použití výrobku. Dovozca neručí za tlačové chyby obsiahnuté v návode na použitie výrobku. Importer nie ponosi odpowiedzialności za błędy drukarskie w instrukcji obsługi do produktu. Az importör nem feel a termék használati útmutatójában felelhető nyomdahibákért. Der Importeur haftet nicht für Druckfehler in der Bedienungsanleitung des Produkts. The importer takes no responsibility for printing errors contained in the product's user's manual. Uvoznik ne snosi odgovornost za tiskarske greške u uputama. Uvoznik ne jamči za morebitne tiskovne napake v navodlih za uporabo izdelka. Uvoznik ne preuzima nikakvu odgovornost za štamparske greške sadržane u uputstvu za upotrebu proizvoda. Le fournisseur ne peut être tenu responsable des erreurs d'impression contenues dans le mode d'emploi du produit. L'importatore non sarà ritenuto responsabile per eventuali errori di stampa contenuti nel manuale dell'utente del prodotto. El importador no asume ninguna responsabilidad por errores de impresión en el manual del usuario del producto. Importija ci vastuta toote kasutusjuhendis leiduvate trúkivigade eest. Importuotojas neapsima atsakomybės del spausdinimo klaidų, pasitaikančių gaminio naudotojo vadove. Ražotajs neuznemas atbildibu par drukas kludam ierices rokasgramata. © GVS.cz 2016


- XMS 333 U
- SAFETY INFORMATION
- Read carefully and keep for future use!
- WARNING:
- FEATURES
- POWER
- BASIC FUNCTIONS
- Turning the device on and off
- Setting the time
- Setting alarm
- Activation/deactivation of the alarm
- Checking the alarm clock
- Stopping the sounding alarm
- Snooze function
- Sleep function with music (from the remote control)
- Equalizer setting
- Radio
- Presets of radio stations
- CD control
- Disc playback
- Fast forward/rewind and skipping tracks.
- Repeat modes
- Programming
- Playback of MP3 tracks from USB
- Notes:
- AUX input
- TROUBLESHOOTING
- USE AND DISPOSAL OF WASTE
- DISPOSAL OF PRODUCTS AT THE END OF LIFETIME
- CD MIKRO SUSTAV
- SADRŽAJ
- SIGURNOSNA UPOZORENJA
- DROŠĪBAS INFORMĀCIJA
- K+B Progres
- LT
- LV
Brand : ECG
Model : XMS 333 U
Category : CD Player