
XMS 1111 U - CD Player ECG - Free user manual and instructions
Find the device manual for free XMS 1111 U ECG in PDF.


| Product type | CD player |
| Brand | ECG |
| Model | XMS 1111 U |
| Approximate dimensions | 20 x 15 x 3 cm |
| Approximate weight | 0.5 kg |
| Power supply | Mains 230V ~ 50Hz |
| Power consumption | 10 W |
| Compatible formats | Audio CD, CD-R, CD-RW, MP3 |
| Main functions | Play, pause, stop, next/previous track, programming, repeat, shuffle |
| Audio output | 3.5mm headphone jack, RCA audio socket |
| Display | Backlit LCD screen |
| Control | Buttons on the device and included remote control |
| Maintenance and cleaning | Clean with a soft, dry cloth. Do not use abrasive products. Avoid moisture. |
| Safety | Do not expose to water or extreme temperatures. Unplug before cleaning. |
| Spare parts available | Remote control, power adapter, audio cable |
| Repairability | Repairability index not communicated, spare parts available on request |
| Warranty | 2 years |
| Box contents | CD player, remote control, power adapter, audio cable, user manual |
Frequently Asked Questions - XMS 1111 U ECG
User questions about XMS 1111 U ECG
0 question about this device. Answer the ones you know or ask your own.
Ask a new question about this device
Download the instructions for your CD Player in PDF format for free! Find your manual XMS 1111 U - ECG and take your electronic device back in hand. On this page are published all the documents necessary for the use of your device. XMS 1111 U by ECG.
USER MANUAL XMS 1111 U ECG
natural_image
Black ECG audio monitor with digital display and stand (no visible text or symbols on device body)XMS 1111 U

CZ
CD MIKROSYSTÉM
NÁVOD K OBSLUZE
SK
CD MIKROSYSTÉM
NÁVOD NA OBSLUHU
PL
MINIWIEŻA CD
INSTRUKCJA OBSŁUGI
HU
CD MIKRO HIFI RENDSZER
HASZNÁLATI ÚTMUTATÓ
DE
CD-MIKROSYSTEM
BEDIENUNGSANLEITUNG
GB
CD MICROSYSTEM
INSTRUCTION MANUAL
HR/BIH
CD MIKRO SUSTAV
UPUTE ZA UPORABU
SI
MIKROSISTEM S CD PREDVAJALNIKOM
NAVODILA
SR/MNE
CD MIKRO SISTEM
UPUTSTVO ZA UPOTREBU
FR
MICROSYSTEME CD
MODE D'EMPLOI
IT
CD MICROSYSTEM
Pohled shora


ECG
CZ
Nástěnná montáz
Nástenná montáz
natural_image
Technical line drawing of a device rear panel with labeled ports and connectors (no text or symbols)ZAČÍNAME
MONTAŽ I INSTALACJA....27
ZACZYNAMY 28
KORZYSTANIE Z URZĄDZENIA....29
KONSERWACJA....33
ROZWIAZYWANIE PROBLEMÓW....34
DANE TECHNICZNE....34
INSTRUKCJE BEZPIECZEŃSTWA
natural_image
Diagram showing a mechanical component with a downward arrow indicating motion or force, no text or symbols present.
ECG
PL
Montaż na ścianie
natural_image
Technical line drawing of a device rear panel with labeled ports and connectors (no text or symbols)ZACZYNAMY

Fali szerelés
natural_image
Technical line drawing of a device rear panel with labeled ports and connectors (no text or symbols)KEZDÉS
Wandmontage
natural_image
Technical line drawing of a device rear panel with labeled ports and connectors (no text or symbols)DE
VORABINFORMATIONEN
SAFETY INFORMATION....57
DESCRIPTION 58
REMOTE CONTROLLER....59
ASSEMBLY AND INSTALLATION....59
LET'S START 60
USING THE SYSTEM 61
CARE AND MAINTENANCE....65
TROUBLESHOOTING 65
TECHNICAL SPECIFICATIONS....66
SAFETY INFORMATION
Read carefully and keep for future use!
- Read this manual thoroughly before connecting and using the device. Keep the manual for future reference.
- Do not open the device box. There are no elements inside that can be configured by the user. Have a qualified service technician perform repairs on the device.
- Turn the equipment off when you are not using it. If you do not plan on using the device for a longer period of time, turn it off and unplug the device. (The plug enabling the complete disconnection from the power network should be easy to access.)
- Do not place the system in areas exposed to heat sources or direct sunlight.
- Do not place the system in areas exposed to moisture or rain.
- The device should not be exposed to dripping or splashing water and objects containing liquids should not be placed upon it, for example vases.
- Place the device on a horizontal, flat and solid surface with good ventilation. Do not cover the air vents. Doing so may damage the device by overheating.
- Use a soft and clean towel to clean the outer surface. Do not use chemicals or cleaning detergents for cleaning the device.
- This document is only an guide for using the device and is not considered an authoritative criterion for configuration.
- Use only accessories recommended by the manufacturer.
WARNING:
Do not expose batteries to excessive temperatures, e.g. direct sunlight, fire etc.
WARNING:
Danger of explosion if the batteries are replaced improperly. Batteries shall only be replaced with the same type.

The lightning symbol warns the user about dangerous voltage inside the device box, which could cause injury by shock upon coming into contact with the internal elements of the device.

The exclamation mark symbol warns the user about vital information in the manual.
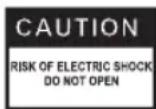
To reduce the risk of fire or electric shock, do not remove the cover of the device. Have a qualified service technician perform repairs on the device.

This symbol represents that the device is classified under the class 1 laser equipment group. Harmful radiation may result if the laser beam comes into direct contact with the human body.
ECG
DESCRIPTION
Front view Rear view


View from the top

GB


- LCD display
- CD Door
- Built-in Speakers
- Openings for wall mount
- DC IN power supply jack
- Stand
- FM antenna
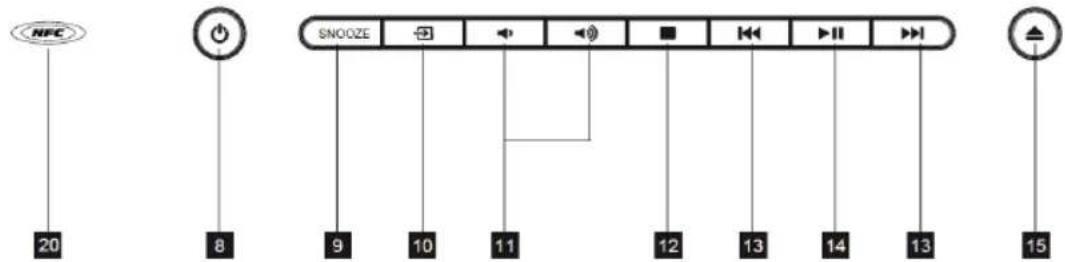
- Off /Standby mode
- SNOOZE button
- (FM/CD/AUX) function mode button
-
Volume up/down
-
Stop CD playback
- FM: Tuning up/down
CD: Previous/Next track
CD: Pause – move forward/back - CD: Play/Pause
- Open/Close CD door
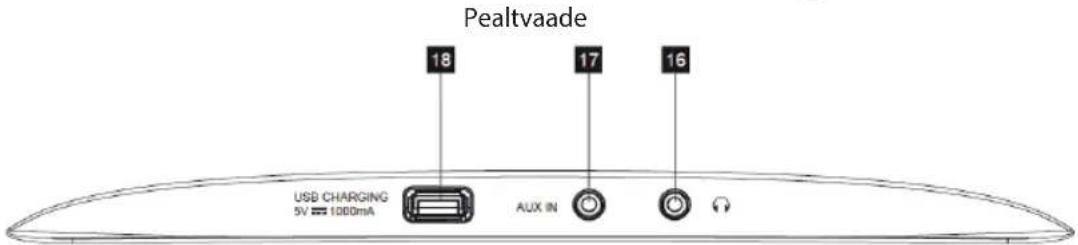
- Headphones jack
- AUX IN 3.5mm connector
- USB charging port
- Basreflex
- NFC sensor
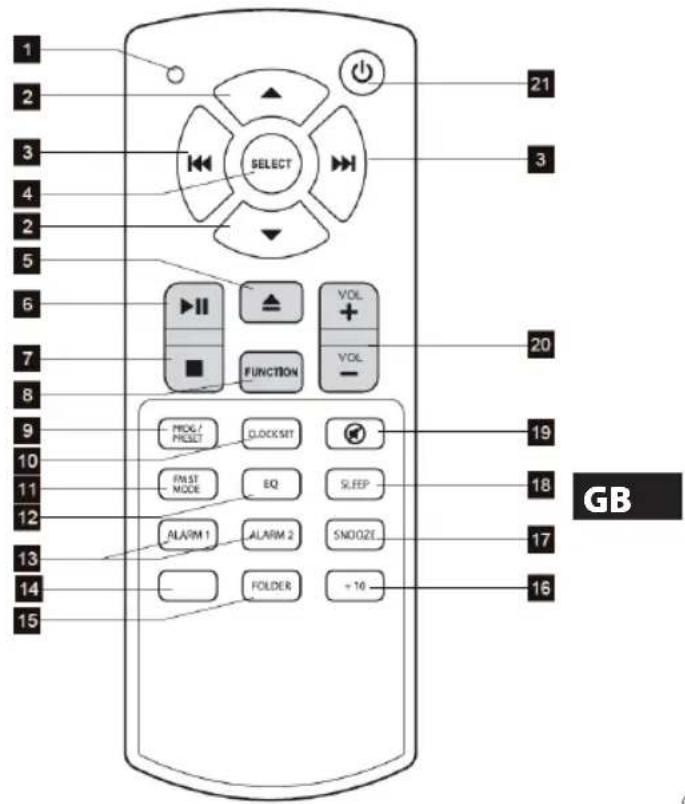
REMOTE CONTROLLER
1 Remote control function indicator
| 2 | ▲/▼ | Preset FM: Selecting position of a stationListening to FM: Retrieving preset stationCD: Previous/Next track |
| 3 | I◄◄/►►I | CD: Pause – move forward/backFM: Tuning up/down |
| 4 | SELECT | Selection confirmation in settings |
| 5 | ▲ | CD: Open/Close CD door |
| 6 | ►II | CD: Play/Pause |
| 7 | ■ | CD: Stopping playback |
| 8 | FUNCTION | Mode selector (RADIO/CD/AUX) |
| 9 | PROG/PRESET | CD: CD music programmingFM: Stations preset |
| 10 | CLOCK SET | Setting the time |
| 11 | FM ST/MODE | FM: Stereo/mono selectionCD: Random/repeat playback selection |
| 12 | EQ | Equalizer setting |
| 13 | ALARM 1/2 | Alarm clock setting 1/2, Alarm ON/OFF |
| 14 | Empty | |
| 15 | FOLDER | MP3 CD: Skip to next folder |
| 16 | +10 | MP3 CD: Skip 10 tracks |
| 17 | SNOOZE | Snooze button |
| 18 | SLEEP | Sleep timer with music |
| 19 | Mute | |
| 20 | VOL +/- | Volume up/down |
| 21 | On/Standby mode |
ASSEMBLY AND INSTALLATION
Stand attachment
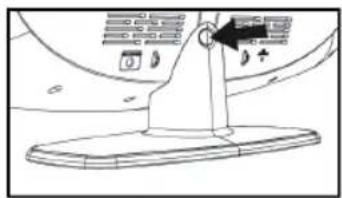
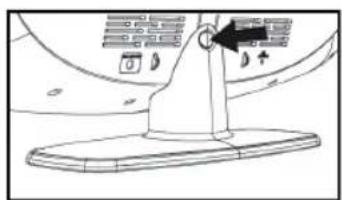
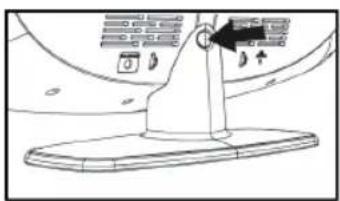
Align the top of the stand with the mounting pad on the bottom of the device. Sound of a click signals proper attachment. Make sure that the stand is properly in place and there is no danger of detachment from the device. If you want to remove the stand from the device, push on the mounting pad and remove the stand by pulling it. See picture.


ECG
GB
Wall mounting
• Make sure that the place where you want to attach the device is free from any cables or pipes inside the wall. We recommend that the wall mounting is done by professionals. Use the supplied installation material and template for wall mounting.
- Mark places on the wall for drilling holes for the plastic anchors. Make sure before you drill that the holes are marked horizontally.
- Drill 14 inch holes according to the marks.
- Insert the supplied plastic anchors in the drilled holes so that they are level with the wall.
- Insert spacers on the screws and screw them into the plastic anchors.
- Align the holes on the rear panel with the installed screws and hang the device, see picture.

LET'S START
Supplied accessories
Unpack the device carefully and make sure that you received with all included accessories with the device:
- Operating manual
- AC adapter
- Remote controller
- Instruction sheet for wall mounting with a template
• Wall mount kit (2 screws, 2 spacers, 2 plastic anchors)
Power
The equipment requires for operation external DC power 19V DC 2100 mA (AC adapter included). Remote controller requires 3V lithium battery CR2025 (included). Do not try to power the device from other sources.
This could damage the device and void the warranty.
- Connect DC connector of power adapter to DC IN connector on the rear side of the device.
- Insert the plug of the power adapter in an electrical outlet.
Remote control
The remote control is powered by lithium battery CR2025 (included). If you want to activate the remote control, remove the insulation strip located in the battery compartment. When the function or range of the remote control becomes impaired, replace the original battery with a new 3V lithium battery.
- Pull out the holder with battery from the remote control.
- Replace the CR2025 battery with a new one. Keep proper polarity of the battery. The remote control will not work with an incorrectly inserted battery.
- ATTENTION: There is a danger of explosion when battery is incorrectly replaced. Replace only with a battery of the same type.
- Insert the holder with the battery in the remote control.

Note regarding magnetically unshielded speakers
This appliance is not magnetically shielded and can cause color shift on the screen of some TV sets or monitors. In this case, the device should be placed farther away from the TV to prevent color distortion.
USING THE SYSTEM
Turning the device on and off
- Press the button POWER ⏻ in the standby mode on the device or on the remote control. The LCD display shows icon of the last selected input source.
- If you want to turn the device off, press again the button POWER ⏻ on the device or on the remote control. The LCD display darkens and a clock appears.
Note: If the device is not used for 20 minutes it switches automatically to standby mode.
Setting the clock (only from the remote control)
After connecting the power adapter, the LCD display shows flashing "12:00".
- When the device is in standby mode, press the CLOCK SET button on the remote control. The time format 12HOUR appears and the number "12" will continue to flash.
- Using buttons I<</▶▶I select between 12h and 24h format and confirm by pressing SELECT. The hours begin to flash.
- Using buttons ◄◀/▶▶ set the hour. Hold for faster change.
- Press SELECT to confirm the set hour. The minutes start to flash.
- Using buttons ◀◀/▶▶ set minutes. Hold for faster change.
- Press again SELECT to confirm the set time. The clock is now set.
Note: In the event of a power failure the clock of the device and the preset radio stations must be set again. The display will flash "12:00", indicating a power outage. Set the clock by repeating the procedure described above.
Finding time (only the remote control)
The clock is shown in the standby mode on the display of the device. If you want to find out what time is it when the device is on, press CLOCK SET on the remote control. The current time appears for 5 seconds and then the screen returns to the original display.
Set the alarm clock (only on remote control)
The device allows to set the alarm using CD playback, radio or buzzer.
- When the device is in the standby mode, press ALARM1 or ALARM2. The display shows alarm time AM 12:00. Press again and hold ALARM, the alarm hour starts flashing.
- Using buttons I<< /▶▶I set the desired hour and confirm by pressing the button SELECT. The minutes start to flash.
- Using button I◄◄ / ►► set minutes and confirm by pressing SELECT. The display will show the source of the alarm.
- Using buttons ◄◄/►►I select between CD, radio or buzzer and confirm by pressing SELECT. The volume level starts flashing.
- Using buttons ◀◀/▶▶ set the alarm volume and press SELECT to end the alarm clock setting.
Notes
- The device has two independent alarm clocks available, which you can set using buttons ALARM1 or ALARM2.
- If you select alarm using a CD and at the time of alarm there is no CD inserted, the device will use buzzer as the alarm.
- If you select alarm using radio, the device tunes the last received station.
Activation/deactivation of the alarm
- If you want to activate previously set alarm, press the appropriate button ALARM (1 or 2) so that the alarm clock symbol appears on the display ① or ②. The alarm will sound in preset time.
- If you want to deactivate the alarm, press the appropriate button ALARM (1 or 2) so that the alarm clock symbol disappears from the display (or). The alarm is now deactivated and will not sound.
Radio, CD or buzzer alarm
- CD, radio or buzzer will sound in the preset time. The alarm clock turns off after 60 minutes and is set automatically for next day (provided the SNOOZE button was not pressed). After alarm sounds, you can press the button SNOOZE to activate the snooze function. The alarm clock pauses for 9 minutes and then starts again. You can repeat the snooze function of the alarm again and again for the remaining 50 minutes.
- If you want the stop the alarm, press the appropriate button ALARM 1 or 2 on the remote control or the button POWER ⏻ on the device. The alarm clock automatically sets for next day.
Note: If you press during the alarm the button → on the device or the button FUNCTION on the remote control, the device will stop the alarm and switches to a selected mode.
- If you want to cancel alarm for next day press repeatedly ALARM 1 or 2, until the indicator of the alarm clock (①) / disappears.
Snooze function
The snooze function allows you to delay the active alarm by 9 minutes. If you want to do so, press during the alarm the SNOOZE button once. The alarm stops and starts 9 minutes later. During this time the alarm clock icon flashes. If you want to turn off this function, press the POWER ⏻ button. The icon SNOOZE disappears and the alarm clock icon stops flashing.
Radio
- Press POWER ⏻ to turn the device on.
- Press ☑ on the device or press FUNCTION on the remote control to select the radio mode, the display shows "FM" and radio frequency.
- Press repeatedly the buttons 🖼️/▶▶ to tune manually the required radio station. Use manual tuning to find stations, which were skipped during automatic tuning.
- If you want to tune automatically the closest available station, press and hold for 2 seconds the button or ▶, until the frequency on the display starts to change. Then release the button. Once the radio tunes to a station with a strong signal, the searching of frequencies stops.
- Adjust the volume using buttons on the device or VOL+/- on the remote control.
FM and Stereo FM reception
- If the station broadcasts in stereo, you can press FM ST/MODE to switch between the mono and stereo reception. An indicator "ST" appears on the display. If the station signal is weak, it is better to turn off the stereo reception.
- For optimal reception quality extend as much of the FM antenna as you can.
Presets of radio stations
You can store up to 20 radio stations in the system memory.
- Press POWER ⏻ to turn the device on.
- Press FUNCTION to select the radio reception mode.
- Using manual or automatic tuning, tune in the station that you want to store.
- Press the button PROG/PRESET. The number of the first preset starts flashing (e.g. "P01", if performed for the first time).
- Using the buttons ▲ or ▼ select the required number of the preset where you want to store the currently tuned in station.
- Press SELECT to confirm your selection.
- Store other presets by repeating steps 3 to 6.
Retrieving the preset stations from memory
- If you want to call up a station stored in memory, press repeatedly the button ▲ or ▼ in the standby mode until the required preset is tuned in.
Note: In the event of a power failure the clock of the device and the preset radio stations must be set again. The display will flash "12:00", indicating a power outage. Store again the presets using procedure described above.
CD control
Disc playback
- Press POWER ⏻ to turn the device on.
- Press the button ☑ on the device or FUNCTION on the remote control to select CD playback mode and then press ▲ OPEN/CLOSE to open the CD tray.
-
Insert the disc by pushing outward. Press again the button ▲ to close the CD tray.
-
The device loads the disc, "READ CD" appears. After a few seconds the display shows the total number of tracks and the length of the disc. Note: For MP3 CDs, the total number of tracks is displayed and time 00:00.
-
Press PLAY/PAUSE ▶ to start playback of the first track.
-
Adjust the volume using buttons on the device or VOL+/- on the remote control.
-
If you want to stop playback (pause), press the button PLAY/PAUSE ▶II once. The time of the track and the icon ▶II starts flashing. Press again to continue playback.
-
If you want to skip to a required track, press briefly or case of an MP# disc you can use the button FOLDER to skip to another folder or +10 to skip 10 tracks.
-
If you want to move forward or back in the currently played track, press and hold the button ▶▶1 or 1. Once you reach the required spot, release the button, regular playback will continue.
-
If you want to stop playback, press STOP ■.
Various playback modes
You can any time during CD playback press the button FM ST/MODE to toggle between various modes of playback.
When playing CD, the modes are switched in the following order:
Repeat 1 → Repeat all → Random playback → Regular playback
When playing MP3 CD, the modes are switched in the following order:
Repeat 1 → Repeat folder → Repeat all → Random playback → Regular playback
Repeat 1: The currently played track will replay repeatedly. The icon 📄 flashes.
Repeat folder: The songs of one folder are played repeatedly. Icon MP3, icon MP3 flashes.
Repeat all: All songs are replayed repeatedly. The repeat icon is on 📄
Random: The songs on the disc are played in random order. The icon "RAND" is on.
Programming of tracks (only remote control)
You can create a program where the songs are played in order selected by you. You can create the program only when the playback is stopped.
- When you stop the CD, press the button PROG/PRESET. The display shows "PROG" icon along with the track number "00" and a free program position (at the beginning of the programming shows "00 P-01").
- Use buttons ◄◀/▶◀ to select the required track. The number of the track appears before the number of the program position.
- Press SELECT to save the selected track in memory. The display shows the next program position (e.g. 02-P) and the track number returns to "00".
- Repeat steps 2 and 3 to program other tracks. A program may contain up to 20 tracks.
- Press PLAY/PAUSE ▶II to start playback of the created program.
- Press FM ST/MODE to select repeated or random playback of the program tracks.
- Stop playback by pressing the button STOP ■.
- If you want to delete the program, press STOP ■ twice. The indicator "PROG" disappears from the display.
External input AUX
You can connect to the device an external audio output device such as an MP3 player, and listen to the sound through the speakers of this device.
- To connect an external device to the AUX connector of this device, use a standard audio cable with 3.5mm connectors (not supplied).
- Insert one end of the cable into the connector AUX IN on the device and the other end of the cable in the output headphone jack of the player.
- Turn on the device and the external player.
- Press FUNCTION to select AUX mode, the display shows "AUX-IN".
- Start playback on the external player and set the required volume level on the main unit. Control all other function on the external player.
Notes
- If you connect the player to the device via the headphone jack of the player, you may need to adjust the volume also using the volume control on the player.
- When you finish the playback from an external device, do not forget to turn off the device by pressing POWER ⏻.
Setting the equalizer (remote control only)
While listening, you can change the setting of the equalizer by pressing repeatedly the button EQ. You can choose in the following way among 5 available modes.

flowchart
graph LR
    A["FLAT"] --> B["POP"] --> C["CLASSIC"] --> D["ROCK"] --> E["JAZZ"]
Mute button (remote control only)
- Press MUTE 📋 on the remote control to mute temporarily the sound output from the speakers of the device. The display shows and flashes the set volume level.
- Press MUTE 📋 again or VOL+/- to renew the normal volume.
Charging the phone or another portable device
This device is equipped with a USB port with output current of 1A, which allows you to charge your portable devices (iPod, iPhone, Android phone, etc.). Use USB charging cable supplied with the device to charge. Insert one end of the USB cable (not included) into the USB port on the upper part of the device. Connect the other end of the cable to the device, which you want to charge.
Watch the charging indicator on your device to make sure that the charging proceeds normally.
When the device is charged, disconnect the cable.
Attention
Before charging, refer to the user manual of the device you want to charge and make sure that the requirement of the charging current does not exceed 1A. Overloading the power supply circuit could permanently damage the device and void your warranty.
- Charging port provides an output voltage of 5V DC with a maximum current of 1000 mA. It cannot be used in a different voltage range.
- Make sure that the charged device requires charging at a voltage of 5V DC.
- This USB port is intended only for charging phones and portable devices and does not support data transfer or connection to a computer.
- Do not connect USB port of the device another external USB charger. It could damage both devices and void the warranty.
Notes
- Some smart phones and portable devices use their own USB connections and circuitry, so when connected to a USB port on this unit they may not start charging. Before attempting to charge, please refer to the manual for your device.
- Once connected to the USB port it is normal that the powered device warms up.
- Do not charge a phone continually for longer than 12 hours. After a full charge of the phone or other portable device, disconnect the device from the USB port.
Using headphones
Connecting the headphones (not included) to the headphones jack of the device allows for private listening. When using headphones, the speakers of the device are automatically disconnected.
- Avoid prolonged loud listening through headphones. Long-term loud volume can damage your hearing.
- If you hear ringing in your ears, reduce the volume or stop listening.
- Do not set an unnecessarily high volume, even if your headphones are of the open type. Too loud volume prevents reception of surrounding sounds.
CARE AND MAINTENANCE
- Do not expose the device to bumps and jolts, to dust or extreme temperatures.
- Do not tamper with the internal parts of the device.
- Clean the device using dry cloth. Do not use cleaners or solvents.
- Do not leave the device in direct sunlight or in hot, humid and dusty places.
- Keep the device away from heaters and sources of electromagnetic interference, such as e.g. fluorescent lights or motors.
- If when playing CDs occur stoppage or skipping in playback, clean the disc using special cloth. Wipe the disc with short moves from the center the edge.
Cleaning the device
- Before cleaning, disconnect the unit from the power supply to avoid electric shock.
• Clean the surface of the device using a duster or dry cloth. Do not use any chemical cleaning supplies. - If the front panel is dirty, you can clean it using a cloth slightly dampened with a weak detergent solution. Never use abrasive sponges and powders, which could damage the surface finish of the device.
- Prevent water from penetrating the device!
TROUBLESHOOTING
Before taking the device for repair please read the following instructions.
Reset the device
If the device does not respond or shows abnormal behaviour it may have been exposed to electrostatic electricity or surges that cause blockage of the internal processor of the unit. In this case, unplug the AC adapter, wait 10 minutes and then reconnect the power. The device resets, therefore you will have to set again the clock, the alarm and the preset radio stations.
Troubleshooting
| Symptom Cause | Correction | |
| No power | The power supply is not properly connected to the socket. | Check the proper connection of the power supply. |
| No sound | The volume is set to minimum or the audio is off. | Raise the volume using buttons VOL+. |
| Cannot play disk | The disk is inserted improperly.The disk is not compatible with this device.The disk is dirty. | Make sure the disk is inserted with the label facing upward.Use a compatible disc.Clean the disk |
| Skipping or intermittent sound from CD | Dirty or scratched disc.The lens of the player is dirty.The device is exposed to strong vibrations or jolts. | Clean the disc or use another disc.Use cleaning disc to clean the lens of the player.Put the device in place protected from vibrations. |
| The device does not react to commands | Static electricity etc. interferes with the device. | Turn the device off and unplug from the socket. Plug the power cord back in and turn on the device. |
| The remote controller does not work | The batteries are empty.The remote controller is not directed at the remote controller sensor.The remote controller is outside of its operating range. | Replace old batteries with new ones.Make sure the remote controller is directed at the remote controller sensor.Make sure the remote controller is close enough to the device. |
| Noise or distorted sound from the FM radio | The station is not properly tuned in.The FM antenna is not fully extended. | Tune the FM station correctly.Extend the FM antenna fully. |
TECHNICAL SPECIFICATIONS
| Tuner | FM band range 87.5 ~ 108 MHz | |
| Number of FM station pre-sets 20 | ||
| CD | Frequency characteristic 10Hz ~ 20kHz | |
| S/N ratio (filter A) 60 dB | ||
| Dynamic range 85 dB | ||
| Distortion and noise 15 % (Max. Power) | ||
| Supported CD files CD / CD-R / CD-RW / MP3 CD | ||
| INPUTS | USB USB 2.0 or USB1.1, 500 mA | |
| Supported USB files FAT12, FAT16, FAT32 | ||
| Maximum size of USB device 64 GB | ||
| AUX-IN | 3.5 mm jack | |
| Amplifier | Output Power / Total music maximum power | 2× 15 W / 2× 30 W |
| Frequency characteristic 10 Hz ~ 20 kHz | ||
| Remote control | Battery | 3 V CR2025 |
| Main unit dimensions (w × h × d) | 548 × 247 × 114 | |
| Net weight | 3.5 kg | |
| Gross weight | 4.0 kg | |
| Power | AC ~100–240 V, 50/60 Hz | |
| Standby power input | 0.9 V | |
| Operating conditions | Temperature | 0~50 °C |
| Relative humidity | 30~95 % | |
USE AND DISPOSAL OF WASTE
Wrapping paper and corrugated paperboard – deliver to scrapyard. Packing foil, PE bags, plastic elements – throw into plastic recycling containers.
DISPOSAL OF PRODUCTS AT THE END OF LIFETIME
Disposal of electric and electronic equipment (valid in EU member countries and other European countries with an implemented recycling system)
The represented symbol on the product or package means the product shall not be treated as domestic waste. Hand over the product to the specified location for recycling electric and electronic equipment. Prevent negative impacts on human health and the environment by properly recycling your product.
Recycling contributes to preserving natural resources. For more information on the recycling of this product, refer to your local authority, domestic waste processing organization or store, where you purchased the product.


08/05

This product complies with EU directive requirements on electromagnetic compatibility and electrical safety.
The instruction manual is available at website www.ecg-electro.eu.
Changes in text and technical parameters reserved.
GB
ECG
CD MIKRO SUSTAV
SADRŽAJ
SIGURNOSNA UPOZORENJA....68
OPIS UREĐAJA....69
DALJINSKI UPRAVLJAČ....70
SASTAVLJANJE I MONTAŽA....70
POČNIMO!......71
KORIŠTENJE UREĐAJA....72
BRIGA I ODRŽAVANJE....76
OTKLANJANJE POTEŠKOĆA 76
TEHNIČKI PODACI 77
SIGURNOSNA UPOZORENJA
natural_image
Diagram showing a car interior with a lift and a downward arrow indicating motion (no text or symbols)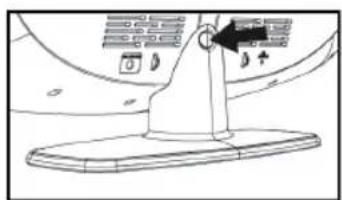
Zidna montaža
- Uvjerite se da na mjestu na kojem želite montirati uređaj nema podžbuknih instalacija - cijevi ili kablova. Zidnu montažu treba povjeriti profesionalcima. Za zidnu montažu koristite isporučeni montažni pribor i šablonu.
- Na zidu označite mjesta za bušenje rupa za tiple. Prije nego uvrtite vijke, libelom provjerite vodoravnost rupa.
- Slijedeći te oznake, izbušite rupe veličine 1/4 cola.
- U izbušene rupe umetnite tiple tako da budu u ravnini s plohom zida.
- Na vijke postavite odstojnike i uvrtite ih u tiple.
- Rupe na stražnjoj ploči uređaja poravnajte s pričvršćenim vijcima i objesite uređaj kao na slici.
POČNIMO!
Isporučeni pribor
natural_image
Technical line drawing of a device rear panel with labeled ports and connectors (no text or symbols)HR/BIH


ECG

ECG
Montaža na steno
natural_image
Technical line drawing of a device rear panel with labeled ports and connectors (no text or symbols)SI
ZAČENJAMO
Dobavljene pritikline

Zidna montaža
- Uverite se da na mestu na koje želite da montirate uređaj nema skrivenih instalacija u zidu – cevi ili kablova. Zidnu montažu treba poveriti stručnjacima. Za zidnu montažu koristite isporučeni montažni pribor i šablon.
- Na zidu označite mesta za bušenje rupa za tiplove. Pre nego što zavrnete zavrtnje, libelom proverite da li su rupe vodoravne.
- Sledeći te oznake, izbušite rupe veličine 1/4 cola.
- U izbušene rupe umetnite tiplove tako da budu u ravni s pločom zida.
- Na zavrtnje postavite odstojnike i zavrnite ih u tiplove.
- Rupe na zadnjoj ploči uređaja poravnajte s pričvršćenim zavrtnjima i okačite uređaj kao na slici.
POČNIMO!


natural_image
Technical line drawing of a device rear panel with labeled ports and connectors (no text or symbols)Isporučeni pribor
DONNÉES TECHNIQUES....110
AVERTISSEMENTS DE SECURITE

natural_image
Diagram showing a mechanical component with a downward arrow indicating motion or force, no text or symbols present.
ECG


FR
Montage mural
natural_image
Technical line drawing of a device rear panel with labeled ports and connectors (no text or symbols)COMMENÇONS
Accessoires fournis
natural_image
Diagram showing a mechanical component with a downward arrow indicating motion or force, no text or symbols present.
Montaggio a parete
natural_image
Technical line drawing of a device rear panel with labeled ports and connectors (no text or symbols)INIZIAMO

Vista desde arriba




Montaje de pared
natural_image
Technical line drawing of a device rear panel with labeled ports and connectors (no text or symbols)COMENCEMOS

Seinale kinnitamine


natural_image
Technical line drawing of a device rear panel with labeled ports and connectors (no text or symbols)ALUSTAMINE
Vaizdas iš viršaus


LT
ECG
Sieninis montažas
natural_image
Diagram showing a car interior with a seat, dashboard, and directional arrow indicating motion (no text or symbols)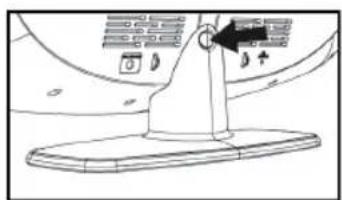
natural_image
Technical line drawing of a device rear panel with labeled ports and connectors (no text or symbols)PIRMIE SOJI
lekļautie piederumi
PEČAT I POTPIS PRODAVATELJA


K+B Progres
PROIZVAJALEC ali DAJALEC GARANCIJE:
K+B Progres, a.s.; MBS: 61860123
250 69 Kličany, Czech Rep. e-post: ECG@kbexpert.cz
LT
K+B Progres, a.s.
U Expertu 91 tel.: +420 272 122 111
250 69 Kličany, Czech Rep. el. paštas: ECG@kbexpert.cz
LV
K+B Progres, a.s.
U Expertu 91 tel.: +420 272 122 111
250 69 Kličany, Czech Rep. e-pasts: ECG@kbexpert.cz
Dovozce neručí za tiskové chyby obsažené v návodu k použití výrobku. Dovozca neručí za tlačové chyby obsiahnuté v návode na použitie výrobku. Importer nie ponosi odpowiedzialności za błędy drukarskie w instrukcji obsługi do produktu. Az importör nem feel a termék használati útmutatójában felelhető nyomdahibákért. Der Importeur haftet nicht für Druckfehler in der Bedienungsanleitung des Produkts. The importer takes no responsibility for printing errors contained in the product's user's manual. Uvoznik ne snosi odgovornost za tiskarske greške u uputama. Uvoznik ne jamči za morebitne tiskovne napake v navodlih za uporabo izdelka. Uvoznik ne preuzima nikakvu odgovornost za štamparske greške sadržane u uputstvu za upotrebu proizvoda. Le fournisseur ne peut être tenu responsable des erreurs d'impression contenues dans le mode d'emploi du produit. L'importatore non sarà ritenuto responsabile per eventuali errori di stampa contenuti nel manuale dell'utente del prodotto. El importador no asume ninguna responsabilidad por errores de impresión en el manual del usuario del producto. Importija ci vastuta toote kasutusjuhendis leiduvate trúkivigade eest. Importuotojas neapsima atsakomybės del spausdinimo klaidų, pasitaikančių gaminio naudotojo vadove. Ražotajs neuznemas atbildibu par drukas kludam ierices rokasgramata. © GVS.cz 2016


- XMS 1111 U
- CZ
- Nástěnná montáz
- Nástenná montáz
- ZAČÍNAME
- INSTRUKCJE BEZPIECZEŃSTWA
- PL
- Montaż na ścianie
- ZACZYNAMY
- Fali szerelés
- KEZDÉS
- Wandmontage
- VORABINFORMATIONEN
- SAFETY INFORMATION
- Read carefully and keep for future use!
- WARNING:
- DESCRIPTION
- REMOTE CONTROLLER
- ASSEMBLY AND INSTALLATION
- Stand attachment
- GB
- Wall mounting
- LET'S START
- Supplied accessories
- Power
- Remote control
- Note regarding magnetically unshielded speakers
- USING THE SYSTEM
- Turning the device on and off
- Setting the clock (only from the remote control)
- Finding time (only the remote control)
- Set the alarm clock (only on remote control)
- Notes
- Activation/deactivation of the alarm
- Radio, CD or buzzer alarm
- Snooze function
- Radio
- FM and Stereo FM reception
- Presets of radio stations
- Retrieving the preset stations from memory
- CD control
- Disc playback
- Various playback modes
- Programming of tracks (only remote control)
- External input AUX
- Setting the equalizer (remote control only)
- Mute button (remote control only)
- Charging the phone or another portable device
- Attention
- Using headphones
- CARE AND MAINTENANCE
- Cleaning the device
- TROUBLESHOOTING
- Reset the device
- USE AND DISPOSAL OF WASTE
- DISPOSAL OF PRODUCTS AT THE END OF LIFETIME
- CD MIKRO SUSTAV
- SADRŽAJ
- SIGURNOSNA UPOZORENJA
- Zidna montaža
- POČNIMO!
- Isporučeni pribor
- Montaža na steno
- ZAČENJAMO
- Dobavljene pritikline
- AVERTISSEMENTS DE SECURITE
- Montage mural
- COMMENÇONS
- Accessoires fournis
- Montaggio a parete
- INIZIAMO
- Montaje de pared
- COMENCEMOS
- Seinale kinnitamine
- ALUSTAMINE
- Sieninis montažas
- PIRMIE SOJI
- lekļautie piederumi
- K+B Progres
- LT
- LV
Brand : ECG
Model : XMS 1111 U
Category : CD Player