
HBSE 100 - Orbital sander AEG - Free user manual and instructions
Find the device manual for free HBSE 100 AEG in PDF.

| Product type | Orbital sander |
| Brand | AEG |
| Model | HBSE 100 |
| Power consumption | 1010 W |
| No-load belt speed | 230 – 350 m/min (electronic speed control) |
| Belt width | 100 mm |
| Belt length | 560 mm |
| Sanding surface | 100 x 140 mm |
| Weight | 4.2 kg |
| Power supply | 230 V ~ 50 Hz (single-phase alternating current) |
| Double insulation | Yes (can be plugged into outlet without ground connection) |
| Radio interference suppression | Complies with EN 55014 |
| Noise level (intensity) | 91 dB (A) |
| Noise level (pressure) | 104 dB (A) |
| Forearm vibration | < 2.5 m/s² |
| Electronic speed control | Yes (adjustment wheel) |
| Dust extraction system | Integrated dust bag, can be connected to a vacuum cleaner |
| Safety functions | Switch with continuous lock, protection against unintentional restarts |
| Compatible materials | Wood, plastics, metal |
| Maintenance and cleaning | Keep ventilation slots clean; use only AEG accessories |
| Spare parts and repairability | Parts available from AEG customer service upon request with the type and 10-digit number |
Frequently Asked Questions - HBSE 100 AEG
User questions about HBSE 100 AEG
0 question about this device. Answer the ones you know or ask your own.
Ask a new question about this device
Download the instructions for your Orbital sander in PDF format for free! Find your manual HBSE 100 - AEG and take your electronic device back in hand. On this page are published all the documents necessary for the use of your device. HBSE 100 by AEG.
USER MANUAL HBSE 100 AEG
natural_image
Line drawing of a manual power tool with meshed base and attached circuit board (no text or symbols)GB Instructions for use
Please read and save these instructions.
D Gebrauchsanleitung Bitte lesen und aufbewahren.
F Instruction d'utilisation Prière de lire et de conserver.
I Istruzioni d'uso
Si prega di leggere le istruzioni e
di conservarle.
E Instrucciones de uso
Lea y conserve estas
instrucciones por favor.
P Instruções de serviço
Por favor leia e conserve em seu poder.
NL Gebruiksaanwijzing
Lees en let goed op deze adviezen.
| Introduction | You have high standards and expect to purchase quality goods – quality offered by Atlas Copco.We have built a durable and reliable electric power tool for you.Please read the instructions for use before first operation so you can handle your power tool effectively and safely.We are sure that buying an AEG Electric Power Tool from Atlas Copco was the right choice! | |
| Technical Data | HBS 100 HBSE 100Nominal power 1010 W 1010 W....Belt speed no load 350 m/min 230–350 m/min....Sanding width 100 mm 100 mm....Belt length....560 mm....560 mmSanding surface....100 x 140 mm....100 x 140 mmWeight....4,2 kg....4,2 kg | |
| Advice for your safety | ■ Please pay attention to the safety instructions in the attached leaflet!■ Dust that arises when working in wood or using the tool on industrial material can be dangerous to health. In this case connect the tool to a suction device (e.g. Atlas Copco absorption system AS 3 W).■ Appliances used at many different locations including open air must be connected via a current surge preventing switch.■ Always wear goggles when using the machine. It is recommended to wear gloves, sturdy non slipping shoes and apron.■ Sawdust and splinters must not be removed while the machine is running.■ Do not pierce the motor housing as this could damage the double insulation (use adhesives).■ Always disconnect the plug from the socket before carrying out any work on the machine.Only plug-in when machine is switched off.■ Keep mains lead clear from working range of the machine. Always lead the cable away behind you.■ When sanding metal the dust suction facility should not be used, because of the risk of fire from flying sparks. | |
| Measured sound value | Typically the A-weighted noise levels of the tool are:Sound pressure level = 91 dB (A).Sound power level = 104 dB (A).Wear ear protectors! | |
| Measured vibration value | Typically the hand-arm vibration is below 2.5 m/s ^2 . | |
| Mains connection | Connect only to a single-phase AC current supply and only to the mains voltage specified on the rating plate. Connection to sockets without earth protection is possible as the appliance features protective insulation to DIN 57 740/ VDE 0740 and CEE 20. Radio suppression complies with the European standard EN 55014.When fitting the plug, make sure that the brown (live) wire of this appliance is connected to the plug terminal marked L or coloured red, and the blue (neutral) wire of this appliance is connected to the plug terminal marked N or coloured black. Under no circumstances must the wires of this appliance be connected to the earth terminal of the plug marked either E, with the earth symbol or coloured green or green/yellow. | |
| Use | The belt sander can be used for sanding wood, plastics and metal.Do not use this product in another way as stated for normal use. | |
| ENGLISH | 2 | HBS 100, HBSE 100 |
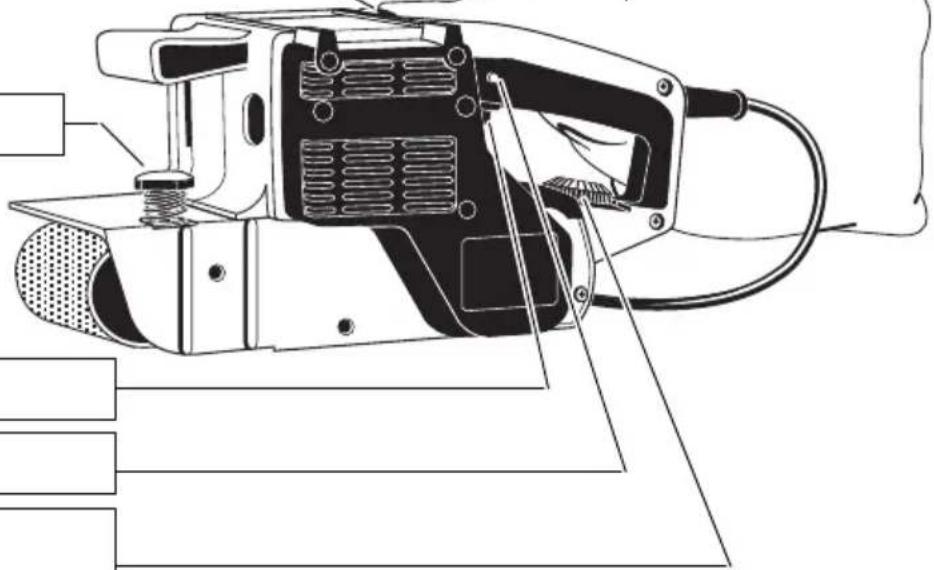
Brief description
Suction connector
Adjusting screw for belt
On-/off switch
Locking button
Electronic thumb wheel (only applicable for HBSE 100)
Integrated dust removal
Dust bag
natural_image
Technical line drawing of a power tool with labeled components and foot (no text or symbols present)Modifications: Text, diagrams and data are correct at the time of printing. In the interest of continuous improvement of our products, technical specifications are subject to alteration without prior notice.
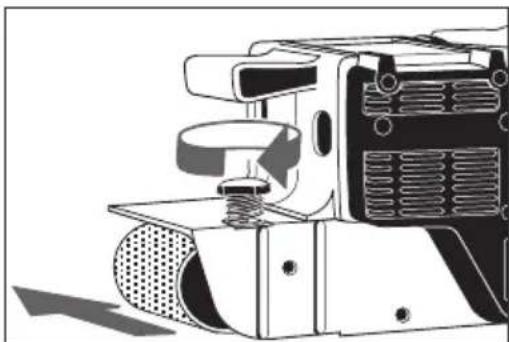
Changing the belt

Always disconnect the plug from the socket before carrying out any work on the machine.

Prior the changing belt, adjust sanding belt by turning the belt adjusting screw approx. 2–3 cm in the direction of the open side of the machine beyond the rollers, whilst the machine is running, as the new sanding belt can sometimes brush against the machine housing.
- Pull the clamping lever forwards
- Remove the worn belt and fit the inside of the belt is pointing in the same direction as the arrow on the machine.
- Push the clamping lever back again
- Taking a test run, position the sanding belt with the aid of the belt adjusting screw so that it is flush with the outer edge of the sanding belt support.
natural_image
Technical line drawing of a mechanical device with no visible text or symbols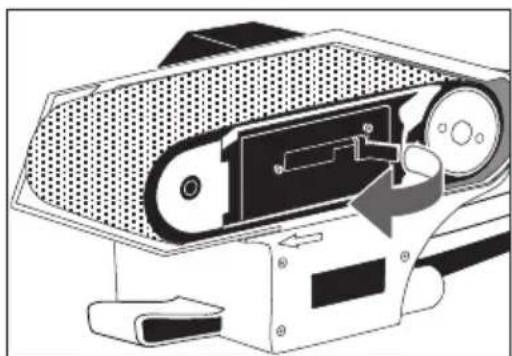
natural_image
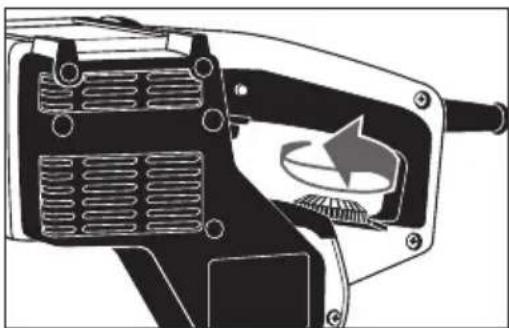
Diagram of a mechanical device with a handle and circular component, no visible text or symbolsSetting speed of rotation
(only applicable for HBSE 100)
The speed is adjusted by means of the electronic thumb wheel.
A = lowest speed
F = highest speed

natural_image
Technical illustration of a mechanical device with internal components and a circular arrow symbol (no text or labels)ENGLISH
natural_image
Technical line drawing of a mechanical device with no visible text or symbols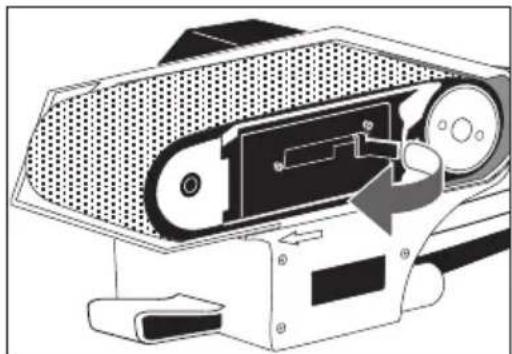
natural_image
Diagram of a computer monitor with an open lid and scroll wheel, showing internal components without any text or symbols.Drehzahl einstellen
(nur bei HBSE 100)
natural_image
Technical illustration of a mechanical device with internal components and a circular arrow symbol (no text or labels)DEUTSCH
natural_image
Technical line drawing of a power tool with visible components and wiring (no text or symbols)natural_image
Technical line drawing of a mechanical device with no visible text or symbolsnatural_image
Diagram of a computer monitor with a hand inserting a button into the screen (no text or symbols present)natural_image
Technical illustration of a mechanical device with internal components and a circular arrow indicating rotation (no text or symbols)FRANÇAIS
| Mise en marche/arrêt | Marche momentanéeMise en marche: appuyer sur l'interrupteurMarche/ArrêtArrêt: lâcher l'interrupteur Marche/ArrêtMarche continueMise en marche: appuyer d'abord sur l'interrupteur marche/arrêt puis sur le bouton de blocage, lâcher l'interrupteur marche/arrêt.Arrêt: appuyer sur l'interrupteur marche/arrêt et lâcher.Avant la mise en route, maintenir la machine en l'air avec les deux mains. |  | |
 | |||
| Conseils pratiques | Il n'est pas nécessaire, lors du ponçage, d'exercer une pression particulière sur la machine, son propre poids suffit. | ||
| Aspiration de la poussière |  | Pour le poncage du bois, utiliser le sac à poussières.Si le rendement de l'aspiration baisse, vider le sac.Pour les travaux dégageant beaucoup de poussière, il est possible, tant en utilisation portative que stationnaire, de raccorderla ponceuse à l'aspirateur NTE 1100, RSE ou tout aspirateur industriel. Pour se faire, utiliser un adaptateur et un tuyau (en option).En raison des risques d'incendie, il est déconseilléd'avoir recours au sysréme d'aspiration pour le ponçage des métaux. |  |
| Entretien | Tenir toujours propre les orifices de ventilation de la partie moteur.N'utiliser que des pièces et accessoires AEG. Pour des pièces dont l'échange n'est pas décrit, s'adresser de préférence aux stations de service après-vente AEG (voir brochure Garantie/Adresses des stations de service après-vente).Si besoin est, une vue éclatée de l'appareil peut être fournie. S'adresser, en indiquant bien le numéro à dix chiffres porté sur la plaque signalétique, à votre station de service après-vente (voir liste jointe) ou directement à Atlas Copco Electric Tools GmbH, B.P. 320, D-71361 Winnenden. | ||
| Accessoires | Consulter nos catalogues qui vous renseignent sur notre programme d'accessoires avec leur référence. | ||
| FRANÇAIS | 10 | HBS 100, HBSE 100 | |
| Premessa | La vostra richiesta ed aspettativa è quella di acquistare merce d'elevata qualità - qualità offerta da Atlas Copco. Noi costruamo per voi utensili elettrici durevoli e affidabili.Si prega di leggere attentamente le istruzione al primo utilizzo cosicché si possa utilizzare l'utensile elettrico in modo più sicuro e corretto.Siamo sicuri che acquistare gli utensili elettrici AEG di Atlas Copco sia la scelta migliore. | ||
| Dati tecnici | HBS 100 HBSE 100Potenza assorbita 1010 W 1010 W. . . . . . . . . . . . . . . . . . . . . . . . . . . . . . . . . . . . . . . . . . . . . . . . . . . . . . . . . . . . . . . . . . . . . . . . . . . . . . . . . . . . . . . . . . . . . . . . . . . . .Larghezza levigatura 100 mm 100 mm. . . . . . . . . . . . . . . . . . . . . . . . . . . . . . . . . . . . . . . . . . . . . . . . . . . . . . . . . . . . . . . . . . . . . . . . . . . . . . . . . . . . . . . . . . . . . . . . . . .Lunghezza nastro . . . . . . . . . . . . . . . . . . . . . . . . . . . . . . . . . . . . . . . . . . . . . . . . . . . . . . . . . . . . . . . . . . . . . . . . . . . . . . . . . . . . . . . . . . . . . . . . . . . Dimensioni levigtura . . . . . . . . . . . . . . . . . . . . . . . . . . . . . . . . . . . . . . . . . . . . . . . . . . . . . . . . . . . . . . . . . . . . . . . . . . . . . . . . . . . . . . . . . . . . . . . . . . . Peso . . . . . . . . . . . . . . . . . . . . . . . . . . . . . . . . . . . . . . . . . . . . . . . . . . . . . . . . . . . . . . . . . . . . . . . . . . . . . . . . . . . . . . . . . . . . . . . . . . . | ||
| Norme di sicurezza | ■ | Si prega di leggere con attenzione le istruzioni riguardanti la sicurezza, nel volantino allegato.■ Per lunghe lavorazioni nel legno o con altri materiali che producono poveri dannose alla salute, e' prescritto l'utilizzo sull'utensile dell'aspirazione polvere (Atlas Copco AS 3 W).■ Gli apparecchi mobili usati all'aperto devono essere collegati interponendo un interruttore di sicurezza per guasti di corrente.■ Durante l'uso dell'apparecchio utilizzare sempre gli occhiali di protezione. Inoltre si consiglia di usare sistemi di protezione per la respirazione e per l'udito, oltre ai guanti di protezione.■ Non rimuovere trucioli o schegge mentre l'utensile è in funzione.■ Evitare di forare la carcassa dell'utensile per non danneggiare l'isolamento. (Utilizzare placchette adesive).■ Prima di effettuare qualsiasi lavoro sulla macchina togliere la spina dalla presa di corrente.Inserire la spina solo con interruttore su posizione "OFF".■ Tenere sempre lontano il cavo di collegamento dall'area di lavoro dell'attrezzo.■ Per levigatura di metallo non aspirare la polvere causa scintille e pericolo di incendio. | |
| Livello di rumorosità | La misurazione A del livello di rumorosità di un utensile è di solito:Livello di rumorosità = 91 dB (A).Potenza della rumorosità = 104 dB (A).Utilizzare le protezioni per l'udito! | ||
| Livello di vibrazione | Le vibrazioni sull'elemento mano-braccio di solito sono inferiori a 2.5 m/s^2 . | ||
| Collegamento alla rete | Alimentazione dell'utensile: corrente alternata monofase. Importante: la tensione della rete deve corrispondere a quella riportata sulla targhetta dell'utensile. Il collegamento é possibile anche con prese non munite di contatto di protezione: é previsto infatti un isolamento di protezione conforme a norme DIN 57740/VDE 0740 (CEE 20). La schermatura contro i radiodisturbi é conforme alla norma europea EN 55014. | ||
| Possibilità' di utilizzo | La levigatrice a nastro è adatta per trattare superfici piane di legno, plastica e metallo.Utilizzare il prodotto solo per l'uso per cui è previsto. | ||
| ITALIANO | 11 | HBS 100, HBSE 100 | |
Breve indicazione
Attacco aspirazione
natural_image
Technical line drawing of a mechanical device with no visible text or symbols
natural_image
Diagram of a mechanical device with internal components and directional arrows (no text or symbols)natural_image
Technical illustration of a mechanical device with internal components and a circular symbol (no text or labels)ITALIANO
natural_image
Technical line drawing of a mechanical device with no visible text or symbolsnatural_image
Diagram of a computer monitor with a scroll wheel and directional arrow indicating action (no text or symbols)natural_image
Technical illustration of a mechanical device with internal components and a circular arrow indicating rotation (no text or symbols)ESPAÑOL
natural_image
Technical line drawing of a power tool with labeled components and wiring (no text or symbols)natural_image
Technical line drawing of a mechanical device with no visible text or symbolsnatural_image
Diagram of a mechanical device with internal components and directional arrows (no text or symbols)natural_image
Technical illustration of a mechanical device with internal components and a circular arrow symbol (no text or labels)PORTUGUES
natural_image
Technical line drawing of a mechanical device with no visible text or symbols
natural_image
Diagram of a computer monitor with an open lid and scroll wheel (no text or symbols)Toerental instellen
natural_image
Technical illustration of a mechanical device with internal components and a circular arrow symbol (no text or labels)NEDERLANDS
natural_image
Technical line drawing of a mechanical device with no visible text or symbols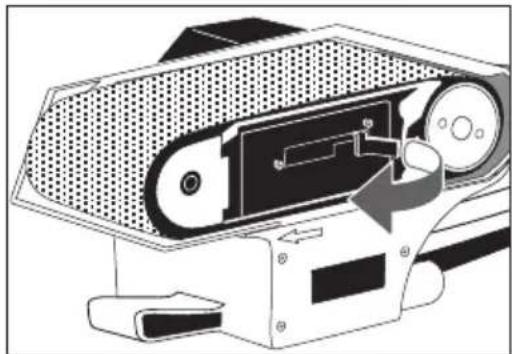
natural_image
Diagram of a mechanical device with internal components and directional arrows (no text or symbols)Omdrejnings- tal indstil- les
(Kun på HBSE 100)
Omdrejningstallet indstilles med det elektroniske stillehjul.
A = mindste omdrejningstal F = største omdrejningstal
natural_image
Technical illustration of a mechanical device with no visible text or symbolsnatural_image
Technical line drawing of a mechanical device with no visible text or symbols
natural_image
Diagram of a mechanical device with internal components and directional arrows (no text or symbols)natural_image
Technical illustration of a mechanical device with internal components and a circular arrow indicating rotation (no text or symbols)SVENSKA
27
HBS 100, HBSE 100
natural_image
Technical line drawing of a mechanical device with no visible text or symbolsnatural_image
Diagram of a mechanical device with a handle and circular component, no visible text or symbolsnatural_image
Technical illustration of a mechanical device with internal components and a circular arrow symbol (no text or labels)EC-DECLARATION OF CONFORMITY
We declare under our sole responsibility that this product is in conformity with the following standards or standardized documents. EN 50144, EN 55014-1, EN 55014-2, EN 60555-2, EN 60555-3, HD 400 in accordance with the regulations 98/37/EC, 73/23/EEC, 89/336/EEC
DEUTSCH
DÉCLARATION "CE" DE CONFORMITÉ
D-71361 Winnenden Germany
http://www.atlascopco.de
Brand : AEG
Model : HBSE 100
Category : Orbital sander