CR-15 - Coffee machine FAGOR - Free user manual and instructions
Find the device manual for free CR-15 FAGOR in PDF.
| Product type | Espresso machine with steam function |
| Brand | FAGOR |
| Model | CR-15 |
| Pump pressure | 15 bars |
| Water tank capacity | 1.5 L |
| Heating element | Aluminum, fast heating |
| Warming plate | Yes, on top |
| Steamer | With device for perfect foam |
| Filter holder | With filter basket (7 g or 14 g) |
| Drip tray | Removable with grid |
| Power supply | See rating plate (220-240 V ~ 50/60 Hz) |
| Power | Approximately 1100 W (estimated for 15 bar pump) |
| Safety | Thermal fuse, automatic shut-off in case of water shortage |
| Maintenance | Clean filters, tank and steamer |
| Dimensions (approx.) | 30 x 25 x 30 cm (estimated) |
| Weight (approx.) | 4 kg (estimated) |
Frequently Asked Questions - CR-15 FAGOR
User questions about CR-15 FAGOR
0 question about this device. Answer the ones you know or ask your own.
Ask a new question about this device
Download the instructions for your Coffee machine in PDF format for free! Find your manual CR-15 - FAGOR and take your electronic device back in hand. On this page are published all the documents necessary for the use of your device. CR-15 by FAGOR.
USER MANUAL CR-15 FAGOR
The manufacturer reserves the right to modify the models described in this User's Manual.
natural_image
Illustration of a coffee maker with a right-hand arrow indicating rotation (no text or symbols on the device itself)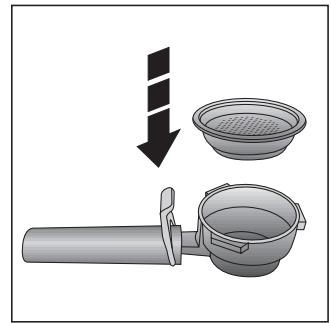
natural_image
Illustration of a kitchen sink with a grater and a downward arrow indicating process (no text or symbols)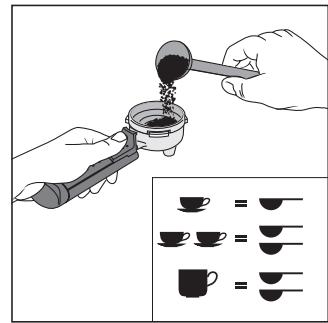
Fig. E Eik. E Obr. E Фиг. E E Abb. E E. Ábra Rys E Рис. E
Fig. F Eik. F Obr. F Фиг. F F الشكل Abb. F F. Ábra Rys F Рис. F
Fig. G Eik. G Obr. G Фиг. G G Abb. G G. Ábra Rys G Рис. G

natural_image
Illustration of a coffee maker with a cup and side arm, no visible text or symbols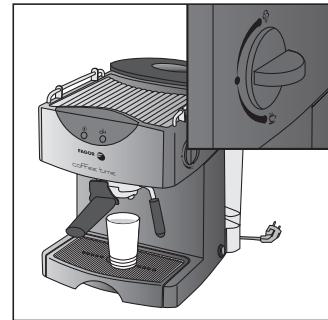
natural_image
Illustration of a coffee machine with a glass cup and side arm, no visible text or symbolsFig. H Eik. H Obr. H Фиг. H H Abb. H H. Ábra Rys H Рис. H
Fig. I Eik. I Obr. I Фиг. I I Abb. I I. Ábra Rys I Рис. I
Fig. J Eik. J Obr. J Фиг. J J Abb. J J. Ábra Rys J Рис. J
natural_image
Illustration of a hand pouring liquid from a small container into a larger bowl (no text or symbols)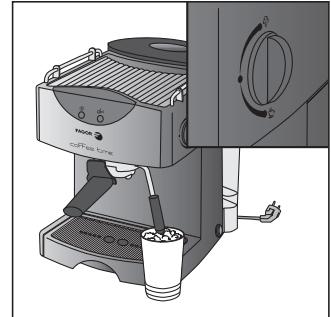
natural_image
Illustration of a coffee maker with a cup and side arm, no visible text or symbols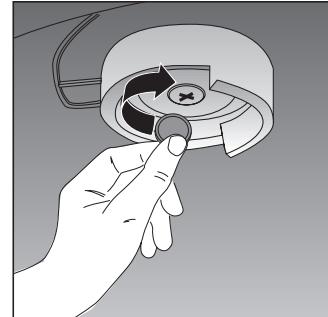
natural_image
Hand holding a circular mechanical component with a knob, no visible text or symbols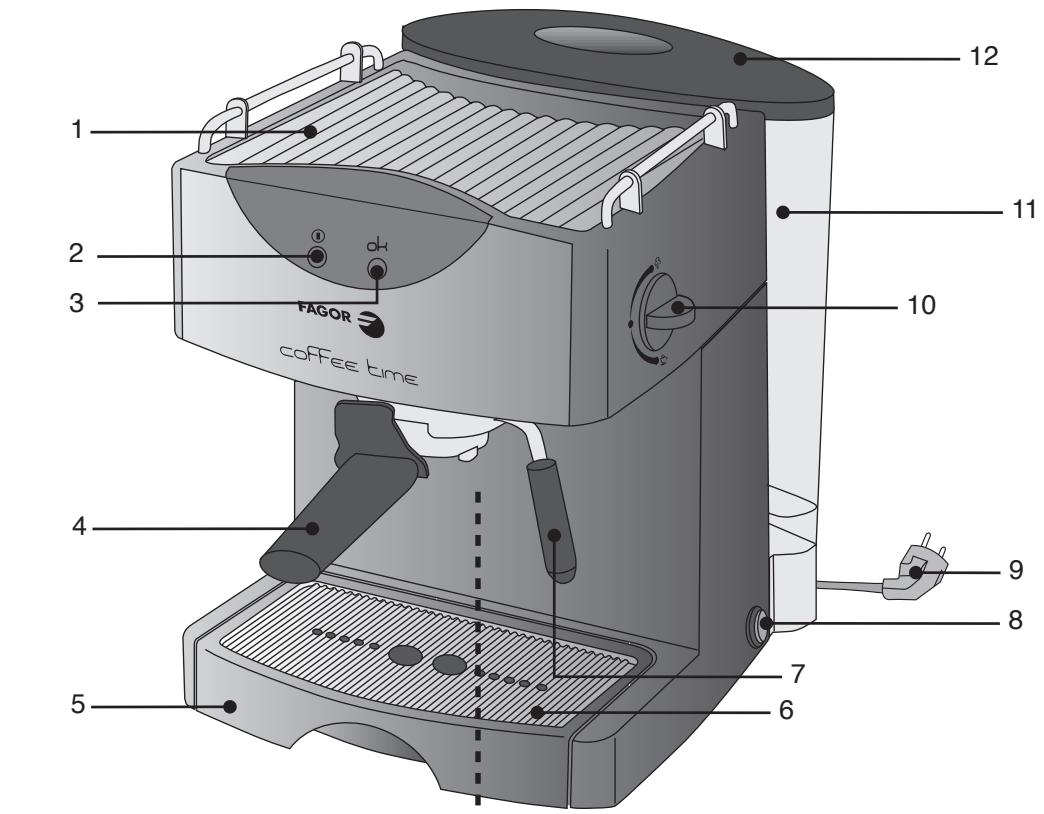

natural_image
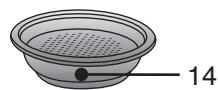
Technical diagram of a mechanical component with concentric rings and a labeled feature '15' (no text or symbols beyond the label)- Cup warming plate
- Indicator light ①
- Indicator light ok
- Filter holder
- Drip tray
- Drip tray
- Steamer
- I/O switch
- Plug
- Function selector dial
- Water tank
- Water tank lid
- Dosage spoon
- Filter
- Upper filter
Interference suppression: The
interference of this appliance has been suppressed in accordance with interference suppression standards.
Electromagnetic compatibility: This
appliance complies with the CEM standards of electromagnetic compatibility.
2. TECHNICAL CHARACTERISTICS
See characteristics plate.
This product complies with the European Directives on Electromagnetic Compatibility and Low Voltage.
3. SAFETY PRECAUTIONS
- Before using this appliance for the first time, read the following instructions carefully and keep them for future reference.
- Make sure that the mains voltage in your home corresponds to that indicated on the appliance.
- In the event of incompatibility between the mains socket and the appliance plug, replace the socket with a suitable one, using a qualified professional.
- The electrical safety of the appliance is only guaranteed if it is connected to an
efficient earth installation, as foreseen in applicable electrical safety regulations. If in doubt, contact a qualified professional.
- The use of adaptors, multiple sockets and or extension cables is not recommended. Where it is not possible to avoid their use, only adaptors or extensions that comply with applicable safety regulations should be used, and ensuring that the indicated voltage limit is not exceeded.
- After removing the packaging, check that the appliance is in perfect condition, if in doubt, contact the nearest Technical Support Service.
- Packaging elements (plastic bags, polystyrene foam, etc.), should not be left within the reach of children because they can be dangerous.
- The appliance is for domestic use only. Any other use is considered unsuitable or dangerous.
- The manufacturer shall not be responsible for any damages that may arise from improper or inadequate use, or for repairs conducted by non-qualified personnel.
- Do not touch the appliance with wet or damp hands or feet.
- Keep the appliance separate from water or other liquids, to avoid electric shock; do not connect the appliance to the mains if it is on a damp surface.
- Place the appliance on a dry, firm and stable surface.
- Do not allow children or the disabled to handle the appliance unsupervised.
- This appliance should not be used by physically, sensorially or mentally handicapped people or people without experience or knowledge of it (including children), unless they are supervised or instructed in the use of the appliance by a person responsible for their safety.
- Children should be watched to ensure they do not play with the appliance.
- For greater protection, we recommend installing a residual current device (RCD) with an operational residual current not exceeding 30 mA. Ask your installer for advice.
- Do not leave the appliance unattended when it is turned on because it can be dangerous.
- When removing the plug never pull on the cable.
- Unplug the appliance before cleaning or maintenance.
- In the event of fault or malfunction where the appliance is not to be used, turn off the appliance and do not attempt to repair. If a repair is required, contact a Technical Assistance Service authorised by the manufacturer and request the use of original spare parts.
- If the cable for this appliance is damaged, contact an authorised Technical Assistance Service for it to be replaced.
- Do not leave the appliance exposed to the elements (rain, sun, ice, etc.).
- Do not use or let any part of the appliance come into contact or near hot surfaces (kitchen gas or electric hobs or ovens).
- Do not use detergents or abrasive sponges to clean the appliance.
- Do not touch the hot surfaces. Use the handles.
- Do not let the cable come into contact with the hot parts of the appliance.
- Do not turn on the appliance without water in the tank.
- Do not heat flammable liquids with the steamer.
- The drip tray and grill should be correctly seated before switching on the appliance.
- Attention! The steamer and filter holder get very hot during operation and pose a risk of burns.
- When operating, the coffee maker works under pressure and there is a risk of burns. When preparing coffee the filter holder should be correctly seated.
- Do not remove the filter holder when the machine is operating.
- Ensure the vessel used to heat liquid in with the steamer is made of metal or ceramic, never use a glass vessel.
- Before proceeding with maintenance or cleaning, unplug the coffee maker and wait until it cools down.
- Do not operate the coffee maker when water is overflowing from the drip tray or when the grill is not correctly seated.
- Before plugging in or unplugging the appliance, ensure that the power switch is in the 0 position.
4. DESCRIPTION OF CHARACTERISTICS
- Reduced size – Powerful pump.
The unit is equipped with a powerful 15 Bar pump, capable of producing an excellent cup of espresso or cappuccino.
- Heater.
The unit is equipped with an aluminium heater that heats rapidly and produces excellent vapour. It has a large hot water capacity.
• How to improve froth.
The unit incorporates a froth assistance device located in the steamer. Enjoy abundant amounts of milk froth in minutes, without having to learn the “technique” of a perfect milk frother.
- Removable drip tray.
The drip tray can be removed to facilitate cleaning.
- Water tank.
The water tank, with a 1.5L capacity has a hinged lid, which can be removed to help fill with water and can be filled from the upper part of the appliance at any time, even whilst it is in use.
- Safety system.
The heater contains a heating element with thermal fuse and protection against self-burning in the event of becoming dry.
5. BEFORE USING FOR FIRST TIME
Before using for the first time the following accessories should be washed in warm non-abrasive soapy water and thoroughly rinsed: water tank (11), filter holder (4), filter (14), dosage spoon (13) and steamer (7). The coffee maker should also be cleaned internally. To do so, fill the tank (11) with water and operate the appliance without coffee several times in a row.
6. SETUP
- Remove the tank (11) (fig. B) and open the lid (12). Fill the tank (11) with fresh clean water until the MAX mark, and replace it in the coffee maker.
- Ensure that the I/O switch (8) is in the “0” position and that the function selector (10) is in the “•” position and plug the coffee maker into the mains.
- Press the I/O switch (8) to position "I" to connect the coffee maker. The red indicator light ① (2) will turn on to indicate that the coffee maker is connected.
- When the green indicator light OK (3) turns on, the coffee maker has achieved the working temperature and is ready to make coffee.
7. CUP WARMING
Place coffee cups upside down on the cup warming plate (1). When the coffee maker is warm, the plate will heat up the cups placed on it. Hot cups help create and maintain cream.
8. PREPARING AN ESPRESSO COFFEE
- Having setup the coffee maker, when the green indicator light turns on OK (3) place the filter (14) in the filter holder (4) (fig. C) and fill it according to how much coffee you wish to make (fig. D):
- A spoonful of ground coffee (7g) for one cup of coffee.
- Two spoonfuls of ground coffee (14g) for two cups of coffee.
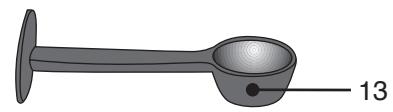
We recommend you use the dosage spoon (13) provided to measure one cupful (7g). Press the coffee down in the filter (14) with the underside of the dosage spoon (13) and remove any coffee spills from the edge of the filter holder (4).
- Place the filter holder (4) in the discharge head, rotating it firmly from left to right (fig. E).
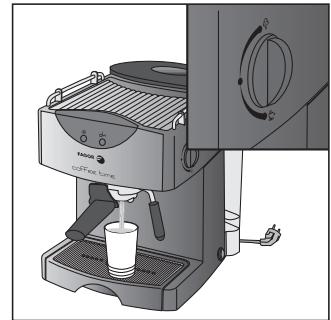
- Place one or two cups on the drip tray (6), under the coffee outlets in the filter holder (4).
- Turn the selector dial (10) to the position (fig. F). Coffee will start to be dispensed.
- To stop filling the cups, turn the function selector dial (10) to the • position (fig. G). Wait until the coffee has stopped dripping before removing the filter holder (4).
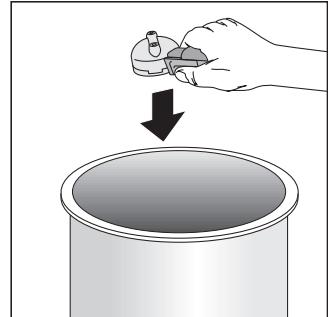
- After each use, remove the filter holder (4) and - pushing the filter fastener forwards - empty out the used coffee (fig. H).
- When you have finished using the coffee maker, press the I/O switch PREPARING CAPPUCCINO to the 0 position to switch-off the appliance, and unplug the unit from the mains.
9. PREPARAR CAPUCHINO
A cappuccino consists of 1/3 espresso coffee, milk and milk froth.
- Once you have setup the coffee maker, make an espresso coffee (see the section on “Preparing an espresso coffee”).
- Fill a tall stainless steel vessel approximately 1/3 full of cold skimmed milk. The milk must be cold and the vessel must have been refrigerated, therefore it should not be submerged in hot water.
- Insert the steamer (7) in the milk that is to be warmed up and turn the function selector dial (10) to the ⚙ position (fig. 1). Vapour will start to come out. Hold the vessel under the steamer (7) lightly shaking the vessel to create more froth. This will allow the vapour to mix with the air and create creamy froth. The froth should be thick with compact bubbles to produce good taste and lasting consistency.
- Once you have finished creating froth, turn the function selector dial (10) to the position and remove the vessel.
- Pour the frothy milk onto the espresso coffee and fill the cup to the top with the remaining milk.
- When you have finished using the coffee maker, press the I/O switch (8) to the 0 position to turn of the appliance, and unplug the unit from the mains.
CAUTION: During operation the metal steamer pipe gets very hot. Do not touch the steamer until it has totally cooled down.
10. HEATING LIQUIDS
- After setting up the coffee maker, insert the steamer (7) in the liquid you wish to warm (Do not completely fill the vessel containing the liquid you wish to warm).
- Turn the function selector dial (10) to the ⚙ position (fig. 1). Vapour starts to come out. Hold the vessel under the steamer until the liquid is warm.
- Once the liquid has been warmed sufficiently, turn the function selector dial (10) to the • position and remove the vessel.
CAUTION: During operation the metal steamer pipe gets very hot. Do not touch the steamer until it has totally cooled down.
11. TIPS ON HOW TO MAKE A GOOD CUP OF COFFEE
- Use good quality coffee adequately ground.
- Store open packets of coffee in a container in the fridge.
• Pre-warm the filter and cups. - The quality of the water you use directly affects the taste of the coffee. Always use mineral water.
• Periodically clean the upper filter. - Always use fresh skimmed milk to make cappuccino froth.
- Refrigerate the milk vessel in the fridge prior to making the froth.
- Ensure that the vessel is made of metal or ceramic, never use a glass vessel.
- Clean the steamer after each use with a damp cloth.
12. CLEANING AND MAINTENANCE
Unplug the appliance and wait for it to cool down before undertaking any maintenance or cleaning operations.
Never submerge the coffee maker in water nor use abrasive cleaning products or aluminium scourers.
- Clean the outside of the coffee maker with a soft damp cloth and dry it fully afterwards.
- Clan the water tank (11), the drip grill (16), the drip tray (5) and the filter (14) using warm water and a neutral soap solution.
- Clean the steamer (7) with a damp cloth.
- Periodically, or when necessary, clean the upper filter (15). Use a coin to loosen the screw (figure J) and brush the filter, a child's toothbrush is ideal for this. After cleaning the upper filter (15), fasten the screw using the coin.
13. PROBLEM SOLVING
| Problem | Possible cause | Resolution |
| Coffee is not sufficiently hot. | The cup and filter are cold. | Pre-warm the cups, the filter and the filter holder. |
| Coffee exists from the sides of the upper filter. | The upper filter is not properly adjusted; or there is dust in the side of the upper filter; or coffee residues in the upper filter seals; or seals are worn. | Check the upper filter; remove any coffee remains from the filter; clean the seals with a damp cloth; Contact the service centre to obtain new seals. |
| The pump makes a lot of noise. | No water in the tank; or not correctly installed; or ground coffee is not fresh, too dry. | Refill the water tank; correctly install the tank; use freshly ground coffee. |
| No water comes out. | No water in the tank; or not correctly installed; or filter holder blocked; or coffee is ground too fine or too compacted; or scale in machine. | Refill the water tank; correctly install the tank; clean the filter holder and use a more thickly ground coffee; descale the machine. |
| Coffee comes out too fast. | Coffee ground too thick; or not enough coffee; or coffee not sufficiently compacted. | Use finer ground coffee; add more coffee; firmly compact the coffee. |
| Few or no bubbles in coffee. | Coffee ground too thick; or coffee not sufficiently compacted; or coffee not sufficiently dry or fresh. | Use finer ground coffee; firmly compact the coffee; use fresh coffee. |
| Froth is not as expected. | The steamer system is blocked; or the milk isn't fresh; or the milk isn't cold; or no water in the tank. | Clean the steamer; use fresh milk; use cold milk; refill the water tank. |
| Too much water left in the filter holder after the coffee is ready. | The ground coffee is not firmly compacted; or the amount of coffee is not sufficient. | Add more coffee; firmly compact the coffee. |
| No vapour comes out | No water in the tank. | Refill the water tank. |
14. INFORMATION FOR THE CORRECT DISPOSAL OF ELECTRICAL AND ELECTRONIC APPLIANCES
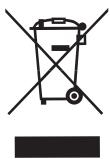
At the end of its working life, the product must not be disposed of as urban waste. It must be taken to a special local authority differentiated waste collection centre or to
a dealer providing this service. Disposing of a household appliance separately avoids possible negative consequences for the environment and health deriving from inappropriate disposal and enables the constituent materials to be recovered to obtain significant savings in energy and resources.
To remind you that you must collaborate with a selective collection scheme, the symbol shown appears on the product warning you not to dispose of it in traditional refuse containers.
For further information, contact your local authority or the shop where you bought the product.
FR
1. DESCRIPTION (Fig. A)
- Plateau anti-gouttes amovible.
- manufacturers kanowishinuo