
SVC144FW - Electric broom GORENJE - Free user manual and instructions
Find the device manual for free SVC144FW GORENJE in PDF.

| Product Type | Electric Broom (Stick Vacuum Cleaner) |
| Model | SVC144FW |
| Brand | Gorenje |
| Dimensions (approx.) | Height: 110 cm, Width: 25 cm, Depth: 20 cm |
| Weight (approx.) | 3 kg |
| Power Supply | Rechargeable Li-ion battery, 22.2 V, 2000 mAh |
| Charging Time | First three charges: 12 hours; thereafter: 4-5 hours |
| Runtime | Approx. 30-45 minutes (depending on power level) |
| Power Levels | 2 (Max for normal cleaning, Min for extended runtime and quieter operation) |
| Dust Capacity | 0.5 L |
| Filtration | HEPA filter |
| Noise Level | Lc < 78 dB(A) |
| Attachments Included | Electric turbo brush, narrow nozzle, small brush |
| Detachable Handheld Unit | Yes, for portable cleaning |
| LED Charge Indicator | Blue flashing while charging, off when fully charged; 4 LEDs indicate battery level |
| Safety Features | Automatic shut-off on low current, roller brush stop protection |
| Usage | Indoor, dry surfaces only (not for liquids) |
| Maintenance | Clean dust cup after each use; clean HEPA filter twice a year or when blocked; clean roller brush as needed |
| Warranty on Battery | 6 months |
Frequently Asked Questions - SVC144FW GORENJE
User questions about SVC144FW GORENJE
0 question about this device. Answer the ones you know or ask your own.
Ask a new question about this device
Download the instructions for your Electric broom in PDF format for free! Find your manual SVC144FW - GORENJE and take your electronic device back in hand. On this page are published all the documents necessary for the use of your device. SVC144FW by GORENJE.
USER MANUAL SVC144FW GORENJE
SVC 216 FR
SVC 144 FW
SVC 144 FBK
SVC 216 FS
| Navodila za uporabo | SI |
| Upute za uporabu | BIH HR |
| Uputstvo za upotrebu | BIH SRB MNE |
| Упатства за употреба | MK |
| Instruction manual | EN |
| Instrucțiuni de utilizare | RO |
| Návod k obsluze | CZ |
| Návod na obsluhu | SK |
| Instrukcja obsługi | PL |
| Használati útmutató | HU |
| Инструкции за употреба | BG |
| Інструкція з експлуатації | UK |
| Руководство по эксплуатации | RUS |
| Instructionsmanual | DK |
| Käyttöuhjeet | FI |
| Bruksanvisning | NO |
| Bruksanvisning | SV |
SI Navodila za uporabo .... 3
Splošna opozorila
natural_image
Technical line drawings of a device component (a) and its internal wiring (b), showing assembly and connection details without any text or symbols.natural_image
Technical line drawing of a car interior showing a vehicle being lifted by a lift (no text or symbols present)Polnjenje sesalnika
natural_image
Three-step illustration of a vacuum cleaner's side arm showing motion and change (no text or symbols)natural_image
Line drawing of a vacuum cleaner with attached power outlet and cable (no text or symbols)natural_image
Line drawing of a remote control handle with two arrows indicating downward motion (no text or symbols)natural_image
Line drawing of a vacuum cleaner with an arrow indicating left motion (no text or symbols)natural_image
Line drawing of a handheld vacuum cleaner (no text or symbols)natural_image
Technical line drawing of two vacuum cleaner designs on a grid floor (no text or symbols)Dodatni nastavki
natural_image
Technical line drawings of two different handwheels (a and b) showing internal components and mounting brackets (no text or symbols)natural_image
Line drawing of a vacuum cleaner with a downward arrow indicating motion (no text or symbols)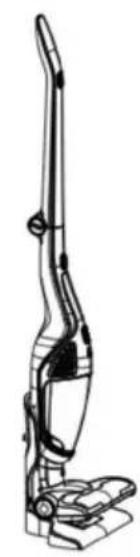
natural_image
Line drawing of a vacuum cleaner with handle and base mount (no text or symbols)natural_image
Line drawing of a handheld vacuum cleaner with internal structure and an arrow indicating motion (no text or symbols)natural_image
Technical line drawing of a device component with an arrow indicating direction (no text or symbols)natural_image
Technical line drawing of a mechanical component with an arrow indicating direction (no text or symbols)natural_image
Technical line drawing of a mechanical device with an inset showing a mechanical assembly (no text or symbols)Opća upozorenja
natural_image
Technical line drawings of a device component (a) and its wiring connection (b), showing internal components and cable assembly (no text or symbols)Nakon toga u kućište usisivača montirajte električnu turbo četku, i podignite dršku usisivača kao što to prikazuje donja slika.
natural_image
Technical line drawing of a car interior showing two views of the seat and a component, with no visible text or symbols.Punjenje usisivača
natural_image
Three-step illustration of a vacuum cleaner's body and legs, showing motion changes (no text or symbols)Usisivač je opremljen zaštitnom napravom koja isključi rad uređaja kada se smanji snaga električne struje. Tada je potrebno ponovno napuniti bateriju usisivača. Ručni usisivač učvrstite na kućište ako ste ga koristili samostalno, i sve zajedno stavite na postolje, odnosno na postaju za punjenje. Priključni kabel s adapterom ukopčajte u utičnicu električne instalacije. Kada signalna lampica odnosno pokazivač stanja napunjenosti baterije počne bljeskati plavo, uređaj se puni.
natural_image
Line drawing of a vacuum cleaner with attached power outlet and cable (no text or symbols)Nakon nekoliko sati signalna lampica prestaje bljeskati plavo i na kraju se ugasi. To znači da je punjenje baterije završeno. Preporučljivo je bateriju ostaviti da se puni još sat do dva duže. Izvucite kabel odnosno punjač iz utičnice. Postupak punjenja je završen.
Pažnja: nakon prva tri punjenja ispraznite bateriju što više (do kraja), a zatim je punite barem 12 sati. Nakon toga možete bateriju puniti sukladno gornjim uputama.
Uporaba usisivača
Skinite usisivač sa podnožja za punjenje. Uključujete ga i isključujete prekidačem za upućivanje i isključenje. Nakon uključenja upali se signalna lampica.
Uz prekidač za uključenje/isključenje nalazi se i prekidač (gumb) za podešavanje snage rada (pogledati donju sliku). Usisivač ima dva stupnja snage rada. Maksimalna snaga prikladna je za normalna čišćenja. Za manja jednostavnija čišćenja, snagu usisivača podesite na minimum. Na minimalnom stupnju snage rada usisivač će raditi duže, a njegov rad je osjetno tiši. Pritiskom na prekidač podešavate snagu rada.

natural_image
Line drawing of a curved object with a control panel and two downward arrows indicating motion (no text or symbols)natural_image
Line drawing of a vacuum cleaner with an arrow indicating left motion (no text or symbols)natural_image
Line drawing of a handheld vacuum cleaner (no text or symbols)natural_image
Technical illustration of two vacuum cleaner designs with mounting base (no text or symbols)Dodatni nastavci
Dodatne nastavke koristite zajedno s ručnim usisivačem, kao što je prikazano na slici dolje.
natural_image
Technical line drawings of two different hand tools or vacuum cleaner designs (no text or symbols present)natural_image
Technical line drawing of a two-h Lisbon vacuum cleaner with a downward arrow indicating motion (no text or symbols)natural_image
Line drawing of a handheld vacuum cleaner with internal components and an arrow indicating motion (no text or symbols)natural_image
Technical line drawing of a device component with an arrow indicating direction (no text or symbols)Otvorite ciklonski poklopac kako prikazuje donja slika, i očistite ciklonski stožac.
natural_image
Technical line drawing of a mechanical component before and after assembly (no text or symbols)natural_image
Technical line drawing of a mechanical assembly with an inset showing a mechanical component (no text or symbols present)Opšta upozorenja
natural_image
Technical line drawings of a device component (a) and its wiring connection (b), showing internal components and cable assembly (no text or symbols)Nakon toga na kućište usisivača nataknite električnu turbo četku, i podignite dršku usisivača kao što to prikazuje donja slika.
natural_image
Technical line drawing of a car interior showing two views of the seat with arrows indicating movement (no text or symbols)Punjenje usisivača
Pre no što stavite usisivač na podnožje s priključnim kablom, na kućište usisivača obavezno morate pričvrstiti ručni prenosni usisivač koji sadrži bateriju za punjenje. Pogledati donje slike za bolje razumevanje.
natural_image
Three sequential illustrations of a hand vacuum cleaner in motion, showing body positioning and movement direction (no text or symbols)Usisivač je opremljen zaštitnom napravom koja isključi rad aparata kada se smanji snaga električne struje. Tada treba iznova napuniti bateriju usisivača. Ručni usisivač uglavite na kućište ako ste ga koristili samostalno, i sve zajedno stavite na postolje, odnosno na stanicu za punjenje. Priključni kabl sa adapterom uključite u utičnicu električne instalacije. Kada signalna lampica odnosno indikator stanja baterije počne da trepće plavim svetlom, aparat se puni.
natural_image
Line drawing of a vacuum cleaner with attached power outlet and cable (no text or symbols)Nakon nekoliko časova signalna lampica prestaje da trepće plavim svetlom i na kraju se ugasi. To znači da je punjenje baterije završeno.
Preporučljivo je bateriju ostaviti da se puni još sat do dva duže. Izvucite kabl odnosno punjač iz utičnice. Postupak punjenja je završen.
Pažnja: nakon prva tri punjenja ispraznite bateriju što više (do kraja), a zatim je punite barem 12 časova. Nakon toga možete bateriju puniti u skladu s gornjim uputstvima.
Upotreba usisivača
Skinite usisivač sa podnožja za punjenje. Uključujete ga i isključujete prekidačem za upućivanje i isključenje. Nakon uključenja upali se signalna lampica.
Uz prekidač za uključenje/isključenje nalazi se i prekidač (dugme) za regulisanje snage rada (pogledati donju sliku). Usisivač ima dva stepena snage rada. Maksimalna snaga primerena je za normalna čišćenja. Za manja, jednostavnija čišćenja, snagu usisivača podesite na minimum. Na minimalnom stepenu snage rada usisivač će
raditi duže, a njegov rad je mnogo tiši. Pritiskom na dugme regulišete snagu rada.
natural_image
Diagram of a remote control panel with two arrows indicating direction (no text or symbols)natural_image
Line drawing of a vacuum cleaner with an arrow indicating left motion (no text or symbols)natural_image
Line drawing of a handheld vacuum cleaner (no text or symbols)natural_image
Technical line drawing of two vacuum cleaner designs on a grid surface (no text or symbols)Dodatni nastavci
natural_image
Technical line drawings of two different hand tools or vacuum cleaner designs (no text or symbols present)Uzak nastavak na slici a) primeren je za čišćenje raznih uskih otvora i uglova. Manja četka sa dlakama na slici b) primerena je za osetljive površine, nameštaj, i sl.
Čuvanje aparata
Nakon upotrebe odložite aparat na postolje za punjenje. Nemojte naslanjati aparat na ivice nameštaja (stola ili stolice), odnosno u ugao, jer može pasti i oštetiti se.
natural_image
Line drawing of a vacuum cleaner with a downward arrow indicating motion (no text or symbols)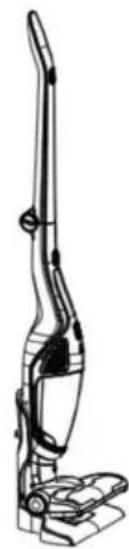
natural_image
Line drawing of a vacuum cleaner with handle and base mount (no text or symbols)Čišćenje i zamena delova
Posudu za prašinu očistite nakon svake upotrebe. U slučaju veće količine prašine može doći do blokade HEPA filtera, zato i njega treba očistiti ili čak zameniti. Na rotirajućoj četki može da se uhvati kosa, koju će biti potrebno izvaditi ručno, inače usisivač neće moći efikasno da radi.
Čišćenje posude za prašinu i sklopa filtera
natural_image
Line drawing of a handheld vacuum cleaner with internal structure and an arrow indicating direction (no text or symbols)natural_image
Technical line drawing of a device component with an arrow indicating rotation (no text or symbols)Otvorite ciklonski poklopac kako prikazuje donja slika, i očistite ciklonski stožac.

natural_image
Technical line drawing of a mechanical component before and after assembly (no text or symbols)natural_image
Technical line drawing of a vehicle's internal components, showing a mechanical assembly with a magnified inset (no text or symbols)Nakon čišćenja složite rastavljene delove četke i vratite poklopac na svoje mesto.
Otklanjanje kvarova i smetnji u radu
| Problem Moguć razlog Rješenje | ||
| Ne radi Baterija je prazna.Prenosni usisivačnije pravilnopostavljen. | Punjenje.Pravilnopostaviteprenosniusisivač nakućište. | |
| Smanjenausisnasnaga | Posuda za prašinu jepuna.Zapušen HEPA filter.Zapušen otvor ulazavazduha, odnosnoblokiran valjakelektrične četke. | Isprazniteprašinu izposude.Očistite ilizamenite HEPAfilter.Očistiteelektričnu četku. |
| Baterijausisivačane može dase napuni. | Punjač nijepriključen u utičnicu.Utikač punjača nijeuključen u utičnicuna postolju kućišta.Prenosni usisivačnije pravilnopostavljen nakućište. | Priključitepunjač uutičnicu.Uključite utikačpunjača uutičnicu napostolju kućišta.Pravilnopostaviteprenosniusisivač nakućište. |
| Baterijatraje kratkovremenakonpunjenja. | Prekratko vremepunjenja.Istrošena (stara)baterija. | Napunitebateriju u skladus uputstvima.Zamenitebateriju. |
OČUVANJE ŽIVOTNE SREDINE
Nakon završetka životnog veka aparat nemojte baciti zajedno s ostalim kućanskim otpadom, nego ga odvezite na službeno zbirno mesto za
recikliranje takvih aparata. Time ćete doprineti očuvanju okoline.
GARANCIJA I SERVIS
Za informacije ili u slučaju poteškoća u korišćenju aparata obratite se Centru za pomoć korisnicima Gorenje u vašoj državi (spisak telefonskih brojeva naći ćete u međunarodnom garantnom listu). Ukoliko u vašoj državi nema takvog centra, obratite se na lokalnog prodavca proizvoda Gorenja, ili na odeljenje malih kućanskih aparata Gorenje.
Napomena: Garancija na bateriju usisivača vredi 6 meseci.
natural_image
Technical line drawings of a device with two views: (a) a mechanical component and (b) a connected electrical plug (no text or symbols)natural_image
Technical line drawing of a car body panel showing front and side views with no text or symbolsnatural_image
Three-step illustration of a vacuum cleaner's body and legs, showing motion changes (no text or symbols)natural_image
Line drawing of a vacuum cleaner with attached power outlet and cable, no text or symbols presentnatural_image
Line drawing of a curved object with a small inset component and two downward arrows indicating motion (no text or symbols)natural_image
Line drawing of a vacuum cleaner with an arrow indicating left motion (no text or symbols)natural_image
Line drawing of a handheld vacuum cleaner with handle and ventilation slots (no text or symbols)natural_image
Technical line drawing of a vacuum cleaner with two views (top and side), no text or symbols presentnatural_image
Technical line drawings of two mechanical components labeled a) and b), showing internal structure without any text or symbols.natural_image
Technical line drawing of a two-h Lisbon vacuum cleaner device with a downward arrow indicating motion (no text or symbols)natural_image
Line drawing of a handheld vacuum cleaner with a handle and internal structure (no text or symbols)natural_image
Technical line drawing of a device component with an arrow indicating transformation (no text or symbols)natural_image
Technical line drawing of a mechanical component with an arrow indicating transformation (no text or symbols)natural_image
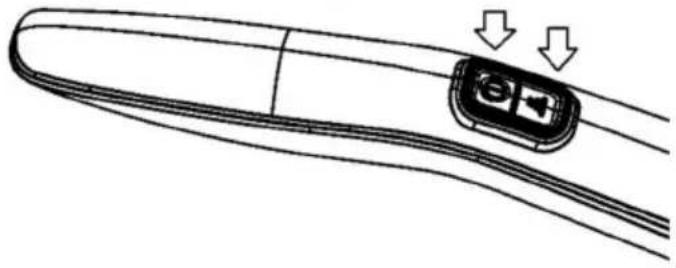
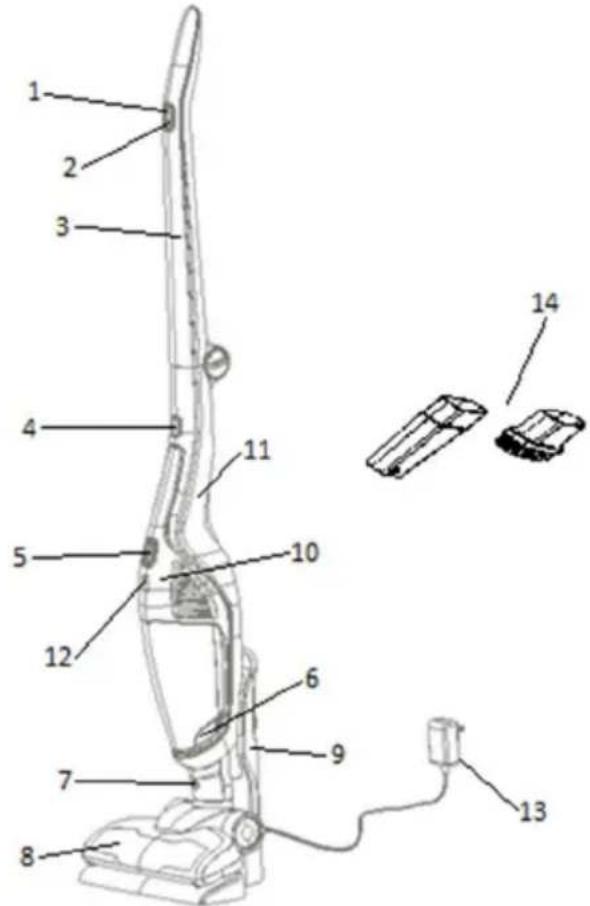
Technical line drawing of a mechanical assembly with an inset showing a spring-loaded component (no text or symbols present)- ON / OFF button
- Power adjustment switch
- Handle
- Button to release the handy VC
- ON / OFF button on handy VC
- Button to release the dust cup
- Button to release the electrical brush
- Electrical brush
- Holder
- Handy vacuum cleaner
- Housing of vacuum cleaner
- Battery charging signal light/indicator
- Adapter with power cord
- Extra attachments
General safeguards
When using this appliance, basic precautions should always be followed:
- Please read the safety instructions carefully and use the appliance only in accordance with these instructions.
- Do not leave the appliance unattended during use.
- This appliance is not intended for use by persons (including children) with reduced physical, sensory or mental capabilities, or lack of experience and knowledge, unless they have been given supervision or instruction concerning use of the appliance by a person responsible for their safety. Children should be supervised to ensure that they do not play with the appliance.
- Caution: Assemble the appliance carefully before using it.
- The appliance is only to be used indoors, in dry rooms. The appliance must not be used for liquids.
- Operate the appliance only with parts recommended by the manufacturer.
- Do not use the device if it has been dropped, damaged, kept outdoors, or has fallen into water.
- Do not insert any object into the openings.
- Keep the opening free from dust, hairs or other objects which might reduce the cleaning power.
- Keep your hair, loose clothes, fingers and any other body parts away from openings or moving parts.
- Do not use the vacuum cleaner for: embers, burning cigarette stubs, matches, ect., liquid materials
(e.g.wet carpet foam), hard, sharp objects (e.g.splinters of glass).
- Keep the suction openings away from your face and body.
- The appliance is to be stored indoors, in dry rooms only, put the appliance aside after use.
- The appliance is not to be used for toner dust or similar materials.
- Never use your vacuum cleaner for vacuuming the building material (such as fine sand, lime, cement dust etc.). Absorbed building material can damage your appliance.
- The appliance fulfils the applicable German and European electrical standards as well as the radio interference suppression regulation.
- This appliance can be used by children aged from 8 years and above and persons with reduced physical, sensory or mental capabilities or lack of experience and knowledge if they have been given supervision or instruction concerning use of the appliance in a safe way and understand the hazards involved.
Children shall not play with the appliance.
Cleaning and maintenance shall not be made by children unless they are older than 8 and supervised.
• Noise level: Lc < 78 dB(A)
This appliance is marked according to the European directive 2012/19/EU on Waste Electrical and Electronic Equipment (WEEE).
This guideline is the frame of a European-wide validity of return and recycling on Waste Electrical and Electronic Equipment.
Danger
Never immerse the appliance, the charging base or the adapter in water or any other liquid, no rinse it under the tap.
Important warnings
- Check if the voltage indicated on the charger or on holder with power cord (charging base) corresponds to the local mains voltage before you connect the appliance.
- Do not use the vacuum cleaner or the charging base (or adapter – depends on your chosen model of vacuum cleaner) if it is damaged.
- If the charging base (or adapter) is damaged, always have it replaced with one of the original type in order to avoid a hazard.
- The adapter contains a transformer. Do not cut off the adapter to replace it with another plug, as this causes a hazardous situation.
- Never use the vacuum cleaner without the filters.
- Vacuum cleaner use only for home and in the inner rooms.
Caution
- Remove the power cord (or adapter) from the wall socket before you clean the holder.
- Charge the vacuum cleaner only with the adapter and charging base which is enclosed. It is normal, that during charging, the adapter feels warm to the touch.
- Always switch off the vacuum cleaner after use.
- Never block the exhaust air openings during vacuuming.
- Switch off the appliance when you charge it.
- Always use the vacuum cleaner with the filter unit assembled.
Before first use
Remove any protective foil or plastic from the appliance.
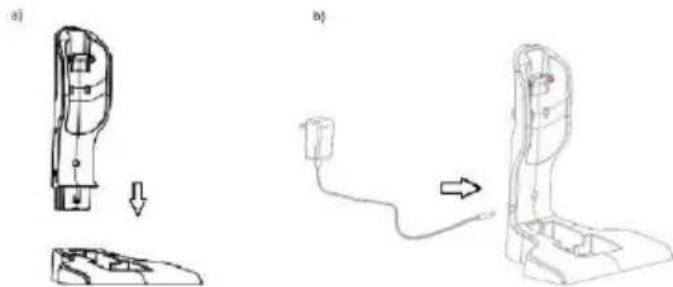
Assembling vacuum cleaner
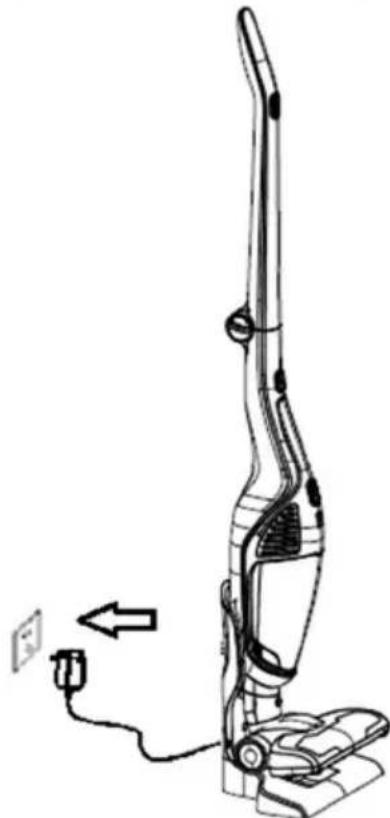
First, assemble the stand and insert the adapter with the power cord as shown in the figure below.
natural_image
Technical line drawings of a device with a cable and plug, showing assembly steps (no text or symbols)Then, insert the electric turbo brush in the vacuum cleaner housing and lift the vacuum cleaner handle as shown in the figure below.

natural_image
Technical line drawing of a car interior showing two views of the seat with a forklift and a load mechanism (no text or symbols)Charging of vacuum cleaner
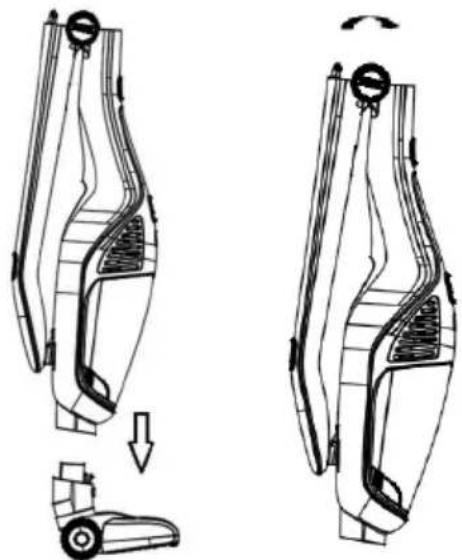
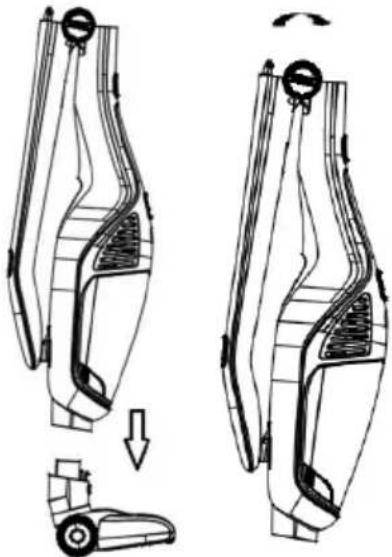
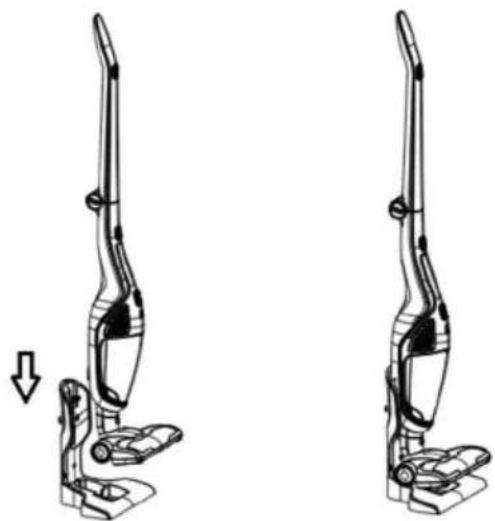
Before putting vacuum cleaner on the charging base, you must insert handy vacuum cleaner into the housing. Handy vacuum cleaner contains rechargeable battery. Check pictures below for better understanding.
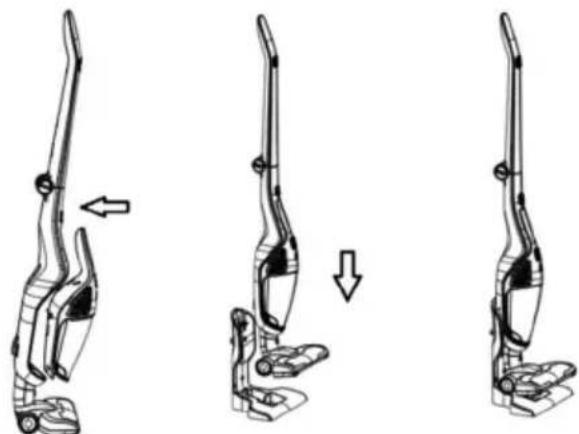
natural_image
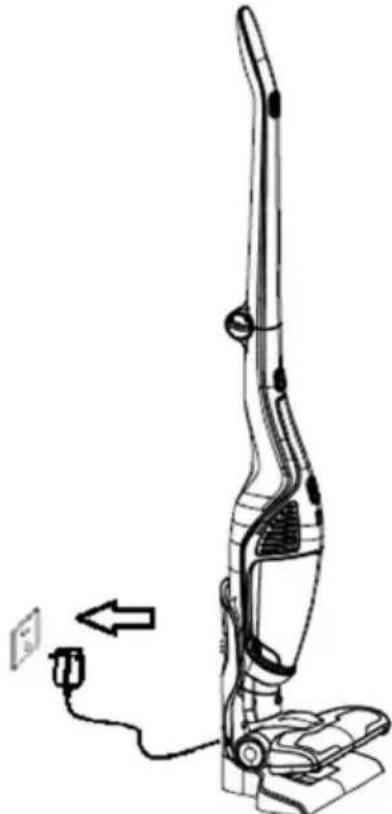
Three-step illustration of a handbag device showing left, side, and top views (no text or symbols)The vacuum cleaner is fitted with a protection device that shuts off the appliance in case of low current. When this happens, the vacuum cleaner battery has to be recharged. Place the manual vacuum cleaner on the housing if you are using it separately, and place the housing on the stand or the charging station. Connect the adapter to the mains outlet. When the
battery charging signal light or indicator starts to flash blue, the appliance is charging.

natural_image
Line drawing of a vacuum cleaner with attached power outlet and cable (no text or symbols)After several hours, the signal light starts flashing and goes out. This means that the battery is fully charged. We recommend charging the battery for 1–2 hours longer. Then, remove the power cord or the charger from the outlet. The charging procedure is complete.
Attention: For first three charging, empty the battery as much as possible and then charge it for 12 hours. In the future, you can charge your battery normally as written above.
Using vacuum cleaner
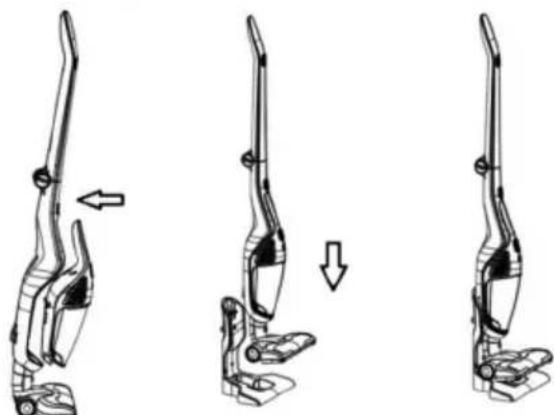
Take the vacuum cleaner from charging base, press the on/off button to start and stop. The indicator lights up after start.
There is a power adjustment switch next to the on/off switch, on the figure below. The vacuum cleaner has two power levels. Maximum power level is suitable for normal cleaning. Minimum power level is recommended for smaller, simpler cleaning tasks. At minimum power, the vacuum cleaner will operate longer with a single charge, and it is also more silent. Press the switch to adjust power.

natural_image
Line drawing of a remote control handle with two arrows indicating clockwise motion (no text or symbols)Led stripes on the appliance indicate the vacuum cleaner charge level. For example, when all four lights are on, the battery is almost completely full. When the battery is completely empty, the appliance will automatically switch off and the lights will flash for a few seconds. Then, the lights will turn off as well.
natural_image
Line drawing of a vacuum cleaner with an arrow indicating left motion (no text or symbols)Attention: When the handy VC is on body, use the on/off button on handle. If you use the on/off button on handy VC to start, use it to stop as well. Also press the on/off button on the handle to off position.
When using handy VC separately, press on/off button to start, and the indicator will light up. By pressing it again, the VC stops working and the indicator turns off.
natural_image
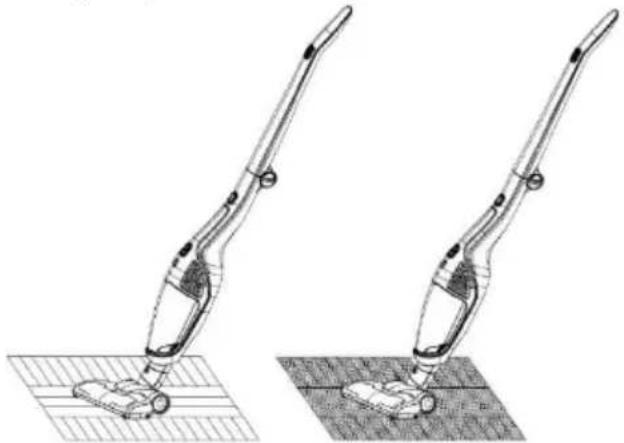
Line drawing of a handheld vacuum cleaner (no text or symbols)Using the electrical brush
For cleaning short-haired carpets, hard floors (parquet) or floor tiles use electrical brush.
Attention: It is not recommended to use it on carpets. If you use it on carpet for longer time, the stop protection of roller brush will turn on. It will star to work again after for 3-5 minutes.
What is the stop protection of roller brush? The stop protection of roller brush is necessary in order to avoid injury. When a child is playing with the VC and his/her finger touches the roller brush, the protection turns on.
natural_image
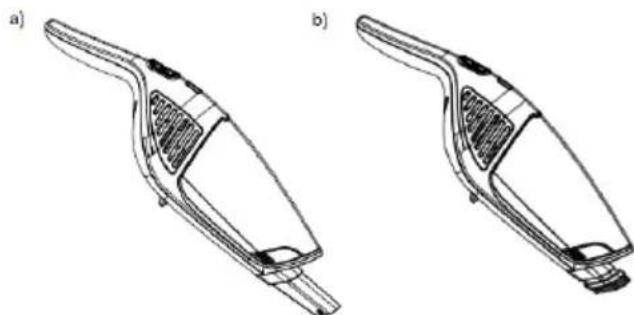
Technical line drawing of two vacuum cleaner designs on a grid surface (no text or symbols)Extra attachments
Use the attachments with your vacuum cleaner as shown in the image below.
natural_image
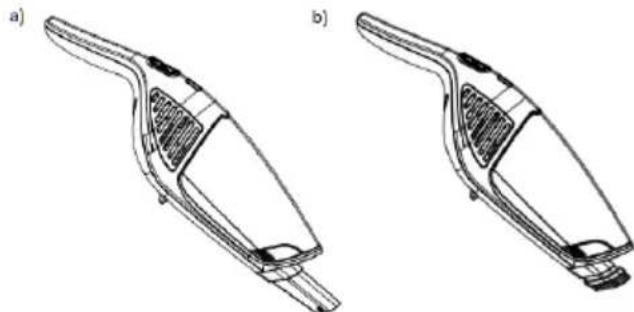
Technical line drawings of two different handwheels (a and b) showing internal structure and mounting points (no text or symbols)Narrow nozzle attachment on figure a) is suitable for grooves and corners. Small brush on figure b) is suitable for more sensitive or delicate surfaces, furniture etc.
Storage
Put the VC to the charging base body after use. Don't put it into the corner or on side of desk or chair. Avoid injury of falling down.
natural_image
Line drawing of a two-h Lisbon vacuum cleaner with a downward arrow indicating motion (no text or symbols)When the on/off button is still "on" and you put VC in the charging base body, the VC will stop working automatically.
Cleaning and changing parts
Clean the dust cup after each usage. If there is too much dust and HEPA is blocked, it needs to be cleaned or changed. The hair could twine around the roller of brush after longer use. It needs to be cleaned in order to get more efficient vacuum clener.
Dust cup and filter system cleaning
Push the button to release the dust cup and turn the dust cup. Separate the dust cup and body.

natural_image
Line drawing of a handheld vacuum cleaner with internal structure and arrow indicating motion (no text or symbols)Take the dust cup out, as the picture shows, so you can empty it.
natural_image
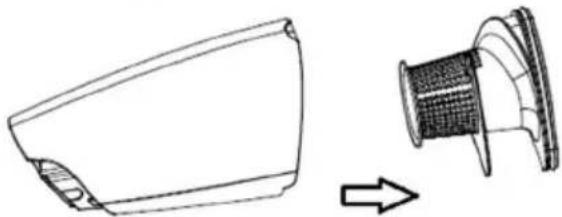
Technical line drawing of a device component with an arrow indicating transformation (no text or symbols)Turn the cyclone cover as the picture below shows, and clean the cyclone cone.

natural_image
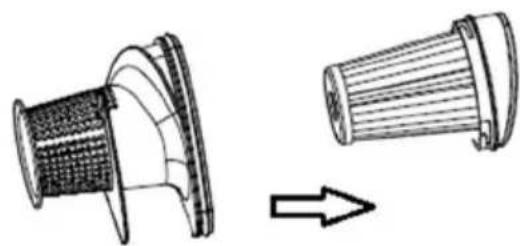
Diagram showing a mechanical component before and after transformation, with no visible text or symbols.Take out the HEPA as the picture shows and clean or change it.
Cleaning and changing the HEPA filter
- Clean the filter at least twice a year or when it is blocked.
- We suggest to clean HEPA filter after each long usage.
- With regular cleaning and maintenance of HEPA filter, you will achieve good results of cleaning, and a longer life of the appliance.
- To achieve this, we recommend the following cleaning methods:
- cleaning with brush,
- shaking the dust from filter,
- cleaning the dust from HEPA filter with compressed air.
- Cleaning HEPA filter provides a smooth air flow and allows optimal suction power.
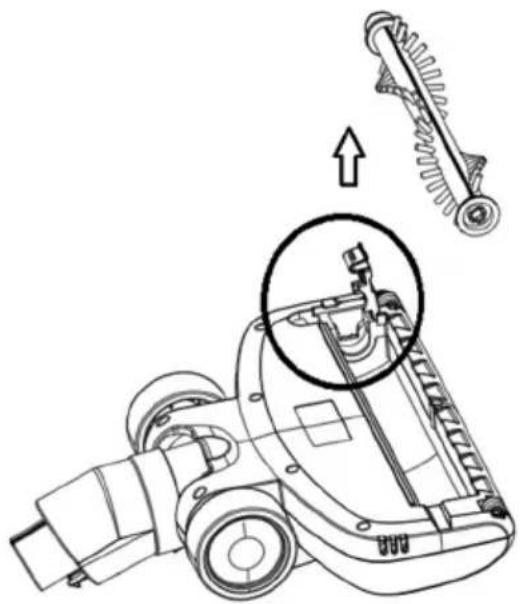
Electrical brush cleaning
Remove the cover, take the roller out and clean it. (Do not clean it with water).
natural_image
Technical line drawing of a mechanical assembly with an inset showing a mechanical component (no text or symbols present)Place the roller and cover after cleaning or changing back to the correct position.
Problems and solution
| Problem | Possible reason | Solution |
| Not working. | The battery is dead.The handy VC is not assembled correctly. | Charge.Assemble the handy VC correctly. |
| Suction power has decreased. | The dust cup is full.Block in HEPA.Block in the air inlet tunnel or on the roller of electrical brush. | Pour out the dust.Clean or changeHEPA.Clean the electrical brush. |
| The VC is not charging. | The charger is not connected on socket.The connector of charger is not connected to the hole of base body.The handy VC is not assembled to the body. | Connect the charger on socket.Connect the charger with base body of VC.Assemble the handy VC on body. |
| Use very short time after charging. | Not enough charging time.The battery is aging. | Charge according to instruction.Change the battery. |
ENVIRONMENT
Do not throw away the appliance with the normal household waste at the end of its life. Hand it in at an official collection point for recycling. By doing this, you help to preserve the environment.
GUARANTEE & SERVICE
If you need information or if you have a problem, please contact the Gorenje Customer Care Centre in your country (the phone number is in the worldwide guarantee leaflet). If there is no Customer Care Centre in your country, go to your local Gorenje dealer or contact the Service department of Gorenje domestic appliances.
Note: The warranty on the battery of vacuum cleaner is 6 months.
For personal use only!
GORENJE WISHES YOU A LOT OF PLEASURE WHEN USING YOUR APPLIANCE
Descriere generală
natural_image
Technical line drawings of a device component, showing a side view and cable connection (no text or symbols)natural_image
Technical line drawing of a car interior showing two views of the roof and a small vehicle component (no text or symbols)natural_image
Three-step illustration of a vacuum cleaner's leg and arm, showing motion changes (no text or symbols)natural_image
Line drawing of a vacuum cleaner with attached power outlet and cable (no text or symbols)natural_image
Diagram of a remote control device with two arrows indicating action points (no text or symbols present)natural_image
Line drawing of a vacuum cleaner with an arrow indicating left motion (no text or symbols)natural_image
Line drawing of a handheld vacuum cleaner (no text or symbols)natural_image
Technical line drawing of a vacuum cleaner with two views (top and side), no text or symbols presentnatural_image
Technical line drawings of two different handheld vacuum cleaner designs (a and b), showing internal structure and mounting brackets (no text or symbols)natural_image
Technical line drawing of a two-h Lisbon vacuum cleaner device with no text or symbolsnatural_image
Line drawing of a handheld vacuum cleaner with internal structure and directional arrow (no text or symbols)natural_image
Technical line drawing of a device component with an arrow indicating direction (no text or symbols)natural_image
Technical line drawing of a mechanical component with a meshed top and a side view showing internal structure (no text or symbols)natural_image
Technical line drawing of a mechanical assembly with an inset showing a mechanical component (no text or symbols present)natural_image
Technical line drawings of a device component, showing assembly and wiring (no text or symbols)natural_image
Technical line drawing of a car interior component showing two views with arrows indicating movement (no text or symbols)Nabíjení vysavače
natural_image
Three sequential illustrations of a vacuum cleaner's leg and arm, showing motion changes (no text or symbols)natural_image
Line drawing of a vacuum cleaner with attached power outlet and cable (no text or symbols)natural_image
Line drawing of a curved object with a small rectangular component and two downward arrows indicating motion or force (no text or symbols)natural_image
Line drawing of a vacuum cleaner with an arrow indicating left motion (no text or symbols)natural_image
Line drawing of a handheld vacuum cleaner (no text or symbols)natural_image
Technical line drawing of two vacuum cleaner designs on a grid surface, showing mechanical components and mounting points (no text or symbols)Extra příslušenství
natural_image
Technical line drawings of two different hand tools or devices, labeled a) and b), showing internal components without any text or symbols.natural_image
Technical line drawing of a two-h Lisbon vacuum cleaner with a downward arrow indicating motion (no text or symbols)natural_image
Line drawing of a handheld vacuum cleaner with internal components and an arrow indicating motion (no text or symbols)natural_image
Technical line drawing of a device component with an arrow indicating transformation (no text or symbols)natural_image
Technical line drawing of a mechanical component before and after assembly (no text or symbols)natural_image
Technical line drawing of a mechanical assembly with an inset showing a mechanical component (no text or symbols present)natural_image
Technical line drawings of a device component, showing a disassembly and wiring connection (no text or symbols)natural_image
Technical line drawing of a car seat assembly showing two views with arrows indicating movement (no text or symbols)Nabíjanie vysávača
natural_image
Three sequential illustrations of a vacuum cleaner's leg and arm, showing motion changes (no text or symbols)natural_image
Line drawing of a vacuum cleaner with attached power outlet and cable (no text or symbols)natural_image
Line drawing of a curved object with a small rectangular component and two downward arrows indicating motion or force (no text or symbols)natural_image
Line drawing of a vacuum cleaner with an arrow indicating left motion (no text or symbols)natural_image
Line drawing of a handheld vacuum cleaner (no text or symbols)natural_image
Technical line drawing of two vacuum cleaner designs on a grid surface (no text or symbols)Nadstavce
natural_image
Technical line drawings of two different hand tools or vacuum cleaner designs (no text or symbols present)natural_image
Technical line drawing of a two-h Lisbon vacuum cleaner with a downward arrow indicating motion (no text or symbols)natural_image
Line drawing of a handheld vacuum cleaner with a handle and internal structure (no text or symbols)natural_image
Technical line drawing of a device component with an arrow indicating direction (no text or symbols)natural_image
Technical line drawing of a mechanical component with a side view showing transformation (no text or symbols)natural_image
Technical line drawing of a mechanical assembly with an inset showing a mechanical component (no text or symbols present)Uwagi ogólne
natural_image
Technical line drawings of a device component (a) and its wiring connection (b), showing internal components and cable insertion (no text or symbols)natural_image
Technical line drawing of a car interior showing a vehicle being lifted by a crane, with no visible text or symbols.natural_image
Three-step illustration of a hand vacuum cleaner in motion, showing body positioning and movement direction (no text or symbols)natural_image
Line drawing of a vacuum cleaner with attached power outlet and cable (no text or symbols)natural_image
Line drawing of a remote control handle with two arrows indicating clockwise motion (no text or symbols)natural_image
Line drawing of a vacuum cleaner with an arrow indicating left motion (no text or symbols)natural_image
Line drawing of a handheld vacuum cleaner (no text or symbols)natural_image
Technical line drawing of two vacuum cleaner designs on a grid surface (no text or symbols)Dodatkowe końcówki
natural_image
Technical line drawings of two different handheld vacuum cleaner designs (a and b), showing internal structure and mounting features without any text or symbols.natural_image
Technical line drawing of a two-h Lisbon vacuum cleaner device with a downward arrow indicating motion (no text or symbols)natural_image
Line drawing of a handheld vacuum cleaner with a handle and internal structure (no text or symbols)natural_image
Technical line drawing of a device component with an arrow indicating direction (no text or symbols)natural_image
Technical line drawing of a mechanical component before and after assembly (no text or symbols)natural_image
Technical line drawing of a vehicle's internal components with an inset showing a mechanical assembly (no text or symbols)natural_image
Technical line drawings of a device assembly (a) and a cable connection (b), showing internal components and wiring (no text or symbols)natural_image
Technical line drawing of a car interior showing two views of the roof and a vehicle (no text or symbols)A porszívó töltése
natural_image
Three sequential illustrations of a vacuum cleaner's leg and arm, showing motion changes (no text or symbols)natural_image
Line drawing of a vacuum cleaner with attached power outlet and cable (no text or symbols)natural_image
Line drawing of a remote control handle with two arrows indicating downward motion (no text or symbols)natural_image
Line drawing of a vacuum cleaner with an arrow indicating left motion (no text or symbols)natural_image
Line drawing of a handheld vacuum cleaner (no text or symbols)natural_image
Technical line drawing of two vacuum cleaner designs on a grid surface (no text or symbols)További tartozékok
natural_image
Technical line drawings of two different hand tools or vacuum cleaner designs (no text or symbols present)natural_image
Diagram of a two-view robotic vacuum cleaner mechanism (no text or symbols)natural_image
Line drawing of a handheld vacuum cleaner with a handle and internal structure (no text or symbols)natural_image
Technical line drawing of a device component with an arrow indicating direction (no text or symbols)natural_image
Diagram showing a mechanical component before and after transformation, with no visible text or symbols.natural_image
Technical line drawing of a mechanical assembly with an inset showing a mechanical component (no text or symbols present)natural_image
Technical line drawings of a device component (a) and its wiring connection (b), showing internal components and cable insertion (no text or symbols)natural_image
Technical line drawing of a car interior showing two views of the seat and a small vehicle (no text or symbols)natural_image
Three-step diagram of a handbag device showing left, side, and top views with arrows indicating motion (no text or symbols)natural_image
Line drawing of a vacuum cleaner with attached cable and power outlet (no text or symbols)natural_image
Diagram of a curved device with a highlighted internal component and two downward arrows indicating motion or force (no text or symbols)natural_image
Line drawing of a vacuum cleaner with an arrow indicating left motion (no text or symbols)natural_image
Line drawing of a handheld vacuum cleaner (no text or symbols)natural_image
Technical line drawing of a vacuum cleaner with two views (top and side), no text or symbols presentnatural_image
Technical line drawings of two different hand tools or devices, labeled a) and b), showing internal structure without any text or symbols.natural_image
Technical line drawing of a two-h Lisbon vacuum cleaner device with a downward arrow indicating motion (no text or symbols)natural_image
Line drawing of a handheld vacuum cleaner with internal structure and handle (no text or symbols)natural_image
Technical line drawing of a device component with an arrow indicating direction (no text or symbols)natural_image
Technical line drawing of a mechanical component with an arrow indicating transformation (no text or symbols)natural_image
Technical line drawing of a mechanical assembly with a magnified inset showing internal components (no text or symbols)natural_image
Technical line drawings of a device component (a) and its internal wiring (b), showing assembly and connection details without any text or symbols.natural_image
Technical line drawing of a car interior showing two views of the roof and a lift (no text or symbols)Заряджання пилососа
natural_image
Three sequential illustrations of a vacuum cleaner's leg and arm, showing motion changes (no text or symbols)natural_image
Line drawing of a vacuum cleaner with attached power outlet and cable (no text or symbols)natural_image
Diagram of a remote control panel with two arrows indicating action or movement (no text or symbols present)natural_image
Line drawing of a vacuum cleaner with an arrow indicating left motion (no text or symbols)natural_image
Line drawing of a handheld vacuum cleaner (no text or symbols)natural_image
Technical line drawing of two vacuum cleaner designs on a grid surface, no text or symbols presentnatural_image
Technical line drawings of two different handbags or clips (a and b), showing internal structure and mounting points (no text or symbols)natural_image
Technical line drawing of a two-h Lisbon vacuum cleaner device with no text or symbolsnatural_image
Line drawing of a handheld vacuum cleaner with a handle and internal structure (no text or symbols)natural_image
Technical line drawing of a device component with an arrow indicating transformation (no text or symbols)natural_image
Technical line drawing of a mechanical component with two views, one showing internal structure and the other showing a conical tip (no text or symbols)natural_image
Technical line drawing of a mechanical assembly with an inset showing a spring-loaded component (no text or symbols present)natural_image
Technical line drawings of a device component (a) and its wiring connection (b), showing internal components and cable insertion (no text or symbols)natural_image
Technical line drawing of a car interior showing two views of the seat and a vehicle (no text or symbols)natural_image
Three-step diagram of a vacuum cleaner's side profile showing left, down, and up states (no text or symbols)natural_image
Line drawing of a vacuum cleaner with attached power outlet and cable (no text or symbols)natural_image
Line drawing of a remote control handle with two arrows indicating clockwise motion (no text or symbols)natural_image
Line drawing of a vacuum cleaner with an arrow indicating left motion (no text or symbols)natural_image
Line drawing of a handheld vacuum cleaner (no text or symbols)natural_image
Technical line drawing of two vacuum cleaner designs on a grid surface, showing mechanical components and mounting points (no text or symbols)natural_image
Technical line drawings of two different vacuum cleaner designs (a and b), showing internal structure and mounting brackets (no text or symbols)natural_image
Technical line drawing of a two-h Lisbon vacuum cleaner with a downward arrow indicating motion (no text or symbols)natural_image
Line drawing of a handheld vacuum cleaner with a handle and internal structure (no text or symbols)natural_image
Technical line drawing of a device component with an arrow indicating direction (no text or symbols)natural_image
Technical line drawing of a mechanical component with an arrow indicating direction (no text or symbols)natural_image
Technical line drawing of a mechanical assembly with an inset showing a mechanical component (no text or symbols present)natural_image
Technical line drawings of a device component (a) and its internal wiring (b), showing assembly and connection details without any text or symbols.natural_image
Technical line drawing of a car interior showing two views of the seat with arrows indicating movement or assembly (no text or symbols)natural_image
Three sequential line drawings of a vacuum cleaner's leg and arm, showing motion changes (no text or symbols)natural_image
Line drawing of a vacuum cleaner with attached power outlet and cable, no text or symbols presentnatural_image
Line drawing of a remote control device with two arrows indicating action buttons (no text or symbols present)natural_image
Line drawing of a vacuum cleaner with an arrow indicating left motion (no text or symbols)natural_image
Line drawing of a handheld vacuum cleaner (no text or symbols)natural_image
Technical line drawing of two vacuum cleaner designs on a grid surface (no text or symbols)Tilbehørsdele
natural_image
Technical line drawings of two different hand tools or vacuum cleaner designs (no text or symbols present)natural_image
Technical line drawing of a two-h Lisbon vacuum cleaner with a downward arrow indicating motion (no text or symbols)natural_image
Line drawing of a handheld vacuum cleaner with internal components and an arrow indicating motion (no text or symbols)natural_image
Technical line drawing of a device component with an arrow indicating transformation (no text or symbols)natural_image
Diagram showing two views of a mechanical component with a directional arrow indicating rotation (no text or symbols present)natural_image
Technical line drawing of a mechanical assembly with an inset showing a mechanical component (no text or symbols present)Yleiset turvaohjeet
natural_image
Technical line drawings of a device component, showing assembly and wiring (no text or symbols)natural_image
Technical line drawing of a car interior showing two views of the seat with arrows indicating movement or change (no text or symbols present)Pölynimurin lataus
natural_image
Three-step diagram showing a hand holding a vacuum cleaner, with arrows indicating motion direction (no text or symbols)natural_image
Line drawing of a vacuum cleaner with attached power outlet and cable (no text or symbols)natural_image
Line drawing of a remote control panel with two arrows indicating movement or change (no text or symbols)natural_image
Line drawing of a vacuum cleaner with an arrow indicating left motion (no text or symbols)natural_image
Line drawing of a handheld vacuum cleaner (no text or symbols)Sähköharjan käyttö
natural_image
Technical line drawing of a vacuum cleaner with two views (top and side), no text or symbols presentnatural_image
Technical line drawings of two different hand tools or vacuum cleaner designs (no text or symbols present)natural_image
Technical line drawing of a two-h Lisbon vacuum cleaner device with a downward arrow indicating motion (no text or symbols)natural_image
Line drawing of a handheld vacuum cleaner with internal spring mechanism (no text or symbols)natural_image
Technical line drawing of a device component with an arrow indicating transformation (no text or symbols)natural_image
Technical line drawing of a mechanical component with an arrow indicating transformation (no text or symbols)natural_image
Technical line drawing of a mechanical assembly with an inset showing a mechanical component (no text or symbols present)Generelle sikkerhetsregler
natural_image
Technical line drawings of a device component (a) and its internal wiring (b), showing assembly and connection details without any text or symbols.natural_image
Technical line drawing of a car body panel showing front and side views with no text or symbolsLade støvsugeren
Før du setter støvsugeren i ladestasjonen, må du sette handy-støvsugeren i holderen. Handystøvsugeren har oppladbart batteri. Sjekk bildene nedenfor for å få en bedre forståelse.

natural_image
Three-step illustration of a hand vacuum cleaner's leg and foot, showing motion changes (no text or symbols)natural_image
Line drawing of a vacuum cleaner with attached power outlet and cable (no text or symbols)natural_image
Line drawing of a remote control handle with a highlighted internal component and two downward arrows indicating motion (no text or symbols)natural_image
Line drawing of a single vacuum cleaner with an arrow indicating left motion (no text or symbols)natural_image
Line drawing of a handheld vacuum cleaner (no text or symbols)natural_image
Technical line drawing of two vacuum cleaner designs with mounting base (no text or symbols)Ekstra tilbehør
natural_image
Technical line drawings of two different hand tools or devices, labeled a) and b), showing internal components without any text or symbols.natural_image
Technical line drawing of a two-h Lisbon vacuum cleaner with a downward arrow indicating motion (no text or symbols)natural_image
Line drawing of a handheld vacuum cleaner with internal components and an upward arrow indicating motion (no text or symbols)natural_image
Technical line drawing of a device component with an arrow indicating transformation (no text or symbols)natural_image
Technical illustration of a mechanical component with two views, one showing internal structure and the other showing ribbed texture (no text or symbols)natural_image
Technical line drawing of a mechanical assembly with an inset showing a mechanical component (no text or symbols present)GORENJE ∅NSKER DEG LYKKE TIL MED DET NYE APPARATET