
SC 6800C - Steam cleaner KARCHER - Free user manual and instructions
Find the device manual for free SC 6800C KARCHER in PDF.
User questions about SC 6800C KARCHER
0 question about this device. Answer the ones you know or ask your own.
Ask a new question about this device
Download the instructions for your Steam cleaner in PDF format for free! Find your manual SC 6800C - KARCHER and take your electronic device back in hand. On this page are published all the documents necessary for the use of your device. SC 6800C by KARCHER.
USER MANUAL SC 6800C KARCHER
Description of the Appliance EN 7
Quick Reference EN 8
Operation EN 8
How to Use the Accessories EN 10
Maintenance and care EN 13
Troubleshooting EN 14
Technical specifications EN 15
Special accessories EN 15
General information
Dear Customer,

Please read and comply with these original instructions prior
to the initial operation of your appliance and store them for later use or subsequent owners.
Proper use
Use the steam cleaner only for private households.
The appliance is intended to be used with steam and can be used with the appropriate accessories as described in these operating instructions. You will not need any detergent. Please adhere to the safety instructions.
Symbols in the operating instructions
Danger
Immediate danger that can cause severe injury or even death.
Warning
Possible hazardous situation that could lead to severe injury or even death.
Caution
Possible hazardous situation that could lead to mild injury to persons or damage to property.
Symbols on the machine


CAUTION - Please read the operating instructions!

Steam
CAUTION - Danger of scalding
Environmental protection

The packaging material can be recycled. Please do not place the package to the ordinary refuse for disposal, but go for the proper recycling.

Old appliances contain valuable materials that can be recycled. Please arrange for the proper recycling of old appliances. Please dispose your old appliances using appropriate collection sys
Notes about the ingredients (REACH)
You will find current information about the ingredients at:
www.kaercher.com/REACH
Scope of delivery
The scope of delivery of your appliance is illustrated on the packaging. Check the contents of the appliance for completeness when unpacking.
In the event of missing accessories or any transport damage, please contact your dealer.
Warranty
The warranty terms published by the relevant sales company are applicable in each country. We will repair potential failures of your appliance within the warranty period free of charge, provided that such failure is caused by faulty material or defects in manufacturing. In the event of a warranty claim please contact your dealer or the nearest authorized Customer Service centre. Please submit the proof of purchase. (See address on the reverse)
Safety instructions
Danger
The appliance may not be used in areas where a risk of explosion is present.
If the appliance is used in hazardous areas the corresponding safety provisions must be observed.
- Never use the appliance in pools containing water.
The device should not be used to clean electrical appliances such as oven, exhaust, micro-wave, televisions, lamps, hair-dryer, electrical heating systems, etc.
Check the faultless condition of the appliance and the accessories before using it. Otherwise, the appliance must not be used. Please check in particular the power cord, the maintenance lock, and the steam hose.
If the power cord is damaged, please arrange immediately for the exchange by an authorized customer service or a skilled electrician.
Please arrange for the immediate exchange of a damaged steam hose. You may only use a steam hose that is recommended by the manufacturer (see spare parts list for the order number).
- Never touch the mains plug and the socket with wet hands.
- Never use the appliance to clean objects containing hazardous substances (e.g. asbestos).
- Never touch the steam jet from a short distance with your hands and never direct the steam jet to persons or animals (risk of scalds).
The maintenance lock must not be opened during operation.
Warning
The appliance may only be connected to an electrical supply which has been installed in accordance with IEC 60364.
The appliance may only be connected to alternating current. The voltage must correspond with the type plate on the appliance.
In wet rooms, e.g. bathrooms, connect the appliance to sockets with a series connected RCD adapter.
- Unsuitable extension cables can be hazardous. Only use a splashproof extension cable with a minimum section of 3 × 1 mm^2 .
The connection between power cord and extension cable must not lie in water.
If couplings of the power cord or extension cable are replaced the splash protection and the mechanical tightness must be ensured.
The operator must use the appliance correctly. When working with the appliance, he must consider the local conditions and pay due care and attention to other persons, in particular children, who are nearby.
This appliance can be used by children aged from 8 years and above and persons with reduced physical, sensory or mental capabilities or lack of experience and knowledge if they have been given supervision or instruction concerning use of the appliance in a safe way and understand the hazards involved. Children shall not play with the appliance. Cleaning and user maintenance shall not be made by children without supervision.
- Never leave the appliance unattended when it is in operation.
- Be very careful while cleaning tiled walls with sockets.
Caution
Make sure that the power cable or extension cables are not damaged by running over, pinching, dragging or similar. Protect the power cable from heat, oil, and sharp edges.
- Never fill solvents, solvent-containing liquids or undiluted acids (e.g. detergents, benzene, paint thinner, and acetone) into the water reservoir as these substances affect the materials used on the appliance.
The appliance must not be carried during cleaning.
The appliance must provide of a stable ground.
Use and store the unit only in accordance with the specifications in the description and/or figure.
The steam switch must not be locked during the operation.
- Protect the appliance from rain. Do not store outside.
Safety Devices
Caution
Safety devices protect the user and must not be modified or bypassed.
Pressure controller
The pressure controller keeps the boiler pressure during the operation as constant as possible. The heating is turned off if the maximum operating pressure of 4 bar is reached in the boiler and is reactivated in case of a pressure drop in the boiler due to steam tapping.
Boiler thermostat
If, in case of a malfunction, there is no water in the boiler, the temperature in the boiler rises. The boiler thermostat turns off the heating. Once the boiler is filled, normal operation can continue.
Safety thermostat
The safety thermostat turns off the appliance if the boiler thermostat and the pressure controller fails and the appliance overheats in case of a malfunction. Please contact your local KÄRCHER customer service to arrange for the reset of the safety thermostat.
Maintenance lock
The maintenance lock acts as a pressure control valve at the same time. It seals the boiler against the steam pressure that builds up in the boiler.
If the pressure controller is defect and the steam pressure in the boiler rises, the pressure control valve, and steam is emitted through the maintenance lock to the outside.
Please contact your local KÄRCHER customer service before you put the appliance into operation again.
Description of the Appliance
These operating instructions describe the maximum equipment. Depending on the model, there are differences in the scopes of delivery (see packaging).
Illustrations on fold-out page!

A1 Appliance connector with cover
A2 Water reservoir
A3 Carry handle for water reservoir
A4 Selector switch
A5 Operating panel
a Display - OFF position
b Display - water shortage (RED)
c Display - heater (GREEN)
d Steam level 1
e Steam level 2
Steam level 3
g Steam level 4
Steam level Vapohydro function
i Display - iron detection
j Display - steam gun detection
A6 Locking door for accessories compartment
A7 Maintenance lock
A8 Carrying handle
A9 Holder for accessories
A10 Accessories storage
A11 Storage for mains connection cable
A12 Storage holder for floor nozzle
A13 Mains cable with mains plug
A14 Running wheels (2 ea.)
A15 Steering roller
B1 Steam gun
B2 Steam lever
B3 Unlocking button
B4 Child lock
B5 Steam hose
B6 Steam plug
C1 Detail nozzle
C2 Round brush
C3 Power nozzle
C4 Extension of point spray nozzle
D1 Hand nozzle
D2 Terry cloth cover
E1 Extension tubes (two tubes)
E2 Unlocking button
F1 Floor nozzle
F2 Retaining clip
F3 Terry floor cloth
G1 Window wiper
Option
H1 Steam pressure iron
H2 Upper steam button
H3 Display - heater (ORANGE)
H4 Lower steam button
H5 Steam lock
H6 Temperature controller
H7 Steam plug
Quick Reference
Illustrations on Page 2
1 Fill the water reservoir up to the "MAX" marking.
2 Insert the steam plug into the appliance connector.
3 Plug in the main plug. Switch on the appliance by turning the selector switch.
4 Display - steam gun lights up green. Display - steam level lights up white and/or VapoHydro level lights up red. Display - heater blinks green. Wait until the heater display lights up permanently.
5 Connect the accessories to the steam gun. The steam cleaner is ready to use.
Operation
Illustrations on fold-out page!

Attaching the Accessories
Illustration 2
Open the cover of the appliance socket.
Tightly insert the steam plug into the appliance connector. The plug must click into place audibly. To disconnect: Press the cover of the appliance connector down and disconnect the steam plug from the appliance connector.
Illustration A-B
Connect the required accessories (see Chapter "How to use the accessories") to the steam gun. Insert the open end of the accessory on the steam gun and push onto the steam gun until the unlocking button of the steam gun locks into place.
Illustration C
Use the extension tubes if necessary. To do so, connect one or both extension tubes to the steam gun. Insert the required accessories on the free end of the extension tube.
Removing the Accessories
Danger
Hot water may drip out of the accessory parts while you are detaching them! Never detach accessory parts while steam streams out - risk of scalding!
Move the child protection unit toward the back (steam lever locked).
Illustration D
To detach the accessory parts, press the unlocking button and pull the items apart.
Filling the Water Reservoir
The water reservoir may be refilled at any time.
Caution
Do not use condensation water from the drier!
Do not fill with detergent or other additives (for example fragrances)!
Do not use pure distilled water! Max. 50% distilled water and 50% tap water.
Do not use collected rain water!
Illustration 1
You can remove the water reservoir to fill it or you can fill it directly on the appliance.
Take off water reservoir
Pull the water reservoir straight up.
Fill the water reservoir up to the "MAX" marking while positioned vertically under the water tap.
Insert the water reservoir and press downwards until it arrests.
Directly on the appliance
Pour water from a container into the funnel inlet. Fill up to the "MAX" marking.
Turning on the Appliance
Place the unit securely on a firm surface.
Insert the mains plug into a socket.
Rotate the selector switch to one of the steam levels from the OFF position. Display - steam gun lights up green. Display - steam level lights up white and/or VapoHydro level lights up red. Display - heater blinks green.
Note: If there is no or not enough water in the steam boiler, the water pump starts and supplies water from the reservoir into the steam boiler. The filling process may take several minutes.
Wait until the heater display lights up permanently. The steam cleaner is ready to use.
Note: The appliance briefly closes the valve every 60 seconds. This will prevent the valve from sticking. There will be a slight audible click. The steam delivery is not impaired by this.
Refilling Water
In case of water shortage, the water shortage display lights up red and a signal can be heard.
Note: Every time there is not enough water in the steam boiler, the pump automatically supplies water from the water reservoir into the steam boiler. If the water reservoir is empty, the water pump is not able to fill the steam boiler and the steam tapping is blocked.
Fill the water reservoir up to the "MAX" marking.
Note: The water pump tries to fill the steam boiler in short intervals. If the filling is successful, the steam tapping is released immediately, and the red display goes out.
Adjusting the Steam Quantity
The emerging steam is regulated by a selector switch. This selector switch offers five settings for different grades of contamination. The following shows application examples for the steam levels, types of contamination and objects:
Steam level 1
Light contaminations, i.e.:
Dust
Objects / surfaces, for example:
Plants, sensitive, painted or coated surfaces
Steam level 2
Light to medium contamination or fresh contamination, i.e.:
- Finger prints, dust, food residue, raindrops, toothpaste traces
Objects / surfaces, for example:
- enclosed heaters, mirrors, windows, plastic/metal surfaces
Steam level 3
Medium to strong contamination or older, crusted contamination, i.e.:
slight grease layer, finger prints, fly feces, spray from food or toothpaste
Objects / surfaces, for example:
- Surfaces in kitchen, bathroom, window, ceran stove top, wall tiles, tiled floors, PVC, linoleum
Steam level 4
Heavy contamination, i.e.:
old crusted food residue, detergent residue, light lime scale, heavy grease layer, dried water spots, soap scum
Objects / surfaces, for example:
- Tiled floors, PVC, linoleum, wall tiles, grout between tiles, sink, shower tub, bath tub,
Steam level 5 - Vapohydro function
Jagged, angled areas that can be sprayed with water, such as:
- hard crusts, dirt that has settled in grout and corners, soap scum, light lime scale
Objects / surfaces, for example:
- Bathroom fixtures, interior window frames (not wooden frames), bathroom shelves, stove burners, shower stalls, drains
Adjusting the steam quantity
Set selector switch to the required steam volume.
While operating the steam switch, always direct the steam gun at a separate piece of cloth until the steam is emitted evenly.
Turning Off the Appliance
Rotate the switch to the OFF position to turn off the appliance.
Disconnect the mains plug from the socket.
Press the cover of the appliance connector to the bottom and disconnect the steam plug from the appliance connector.
Empty the residual water from the water reservoir.
Storing the Appliance
Illustration F - G
Store the power nozzle and the round brush in the accessory compartment.
Insert the manual nozzle onto each extension pipe.
Put the extension pipes into the large accessory holders.
First, insert the extension and then the point spray nozzle into the accessories compartment.
Hook the floor nozzle into the parking position.
Wrap the steam hose around the extension pipes and insert the steam pistol into the floor nozzle.
Stow away the mains cable in the accessory holder for the mains cable.
How to Use the Accessories
Important application instructions
Cleaning floor surfaces
It is recommended to sweep or vacuum the floor prior to using the steam cleaner. This way, the floor is already cleared of dirt/ loose particles prior to the wet cleaning.
Refreshing textiles
Prior to treatment with the steam cleaner, always check the reaction of the textiles in an inconspicuous location: Steam at first, then let dry and then check for colour or shape changes.
Cleaning of Coated or Lacquered Surfaces
When cleaning painted or plastic-coated surfaces, as found on kitchen and living room furniture, doors, parquet; wax, furniture polish, plastic surfaces or paint can come loose or stains can be created. When cleaning these surfaces, briefly steam a cloth and wipe the surfaces with it.
Caution
Never direct the steam jet at glued edges as the edge band may loosen. Do not use the steam cleaner on unsealed wooden or parquet floors.
Cleaning of Glass
In case of low outside temperatures, especially in the winter, warm up the window pane by slightly steaming the entire glass surface. This will prevent tensions on the surface which might lead to glass breakage.
Then clean the window surface with the hand nozzle and attachment. Use a squeezegee to remove the water or wipe the surfaces dry.
Caution
Do not direct steam onto the sealed locations of the window frame to prevent damage.
Steam gun
You can use the steam gun without any additional accessories, e.g.:
- to remove odours and wrinkles from hanging clothes by steaming them at a distance of 10 to 20~cm .
to remove dust from plants. Here, keep a distance of 20-40 cm. - for moist dusting, by briefly steaming the cloth and wiping the furniture with it.
Detail nozzle
The closer this nozzle is to the contaminated area, the higher the cleaning effect, as the temperature and the steam are highest at the nozzle output. Especially suited for cleaning difficult access locations, joints, fittings, drains, sinks, toilets, blinds and heaters. Heavy lime scale can be drenched in vinegar prior to steam-cleaning. Let the vinegar penetrate for about 5 minutes.
Round brush
The round brush can be installed onto the detail nozzle as an accessory. Attached brushes can therefore be used to remove heavy soiling.
Caution
Not suited for the cleaning of sensitive surfaces.
Illustration B
Attach the round brush to the detail nozzle.
Power nozzle
The power nozzle can be installed onto the detail nozzle as an accessory.
The power nozzle increases the emission speed of the steam. Therefore, it is well-suited for cleaning very tough dirt, blowing out corners, grooves, etc.
Illustration B
Attach the power nozzle to the detail nozzle according to the round brush.
Extension of point spray nozzle
Hard to reach areas can be cleaned using the extension to the point spray nozzle.
This will facilitate the cleaning of hard to reach areas, such as corners or small
cracks. It is also very suitable for drain cleaning.
Hand nozzle
Pull the terry cloth cover over the hand nozzle. Especially well-suited for small washable areas, shower stalls and mirrors.
Floor nozzle
Suited for all washable walls and floor coverings, e.g. stone floors, tiles and PVC floors. Work slowly on very dirty surfaces to allow the steam to act on the dirt for a longer period of time.
Note: Detergent residue or care emulsions that are still present on the surfaces to be cleaned, can lead to smears when steam cleaned. However, these will disappear with repeated cleaning procedures.
Illustration E
Attach the floor cloth to the floor nozzle.
1 Fold the floor cloth the long way and place the floor nozzle on top of it.
2 Open holding clamps.
3 Place the cloth ends into the openings.
4 Close the holding clamps.
Caution
Do not insert fingers between the clamps.
Parking the floor nozzle
Illustration
During work breaks, hook the floor nozzle into the parking holder.
Window wiper
Application:
- Windows, mirrors
Glass surfaces on showers - other smooth surfaces
Perform a fat dissolving basic cleaning using the hand nozzle and a terry cloth cover before using the window wiper.
Apply steam to the glass surface from a distance of approximately 20~cm until the surface is moistened evenly.
Strip the glass surface in straight lines from the top to the bottom using the rubber lip of the window wiper. Wipe the rubber lip and the bottom edge of the window dry after each strip.
Steam iron
Danger
The steam pressure iron must not be used if it has been dropped, shows visible signs of damage or if it leaks.
The steam pressure iron is hot and so is the steam jet! Point out to other people the possible risk of being scalded or burnt. Never direct the steam jet at people or animals (risk of scalding). Do not touch any electrical leads or combustible objects with the hot steam pressure iron.
Warning
The steam pressure iron and its connecting cable must be kept out of reach of children under the age of 8 during the heating and cooling down periods.
The steam pressure iron must be used and placed on a stabile surface.
Note: We recommend using the Kärcher ironing table with active steam extraction (2.884-933.0). This ironing table has been designed to match your new steam cleaner. It facilitates and, thus, accelerates the ironing process substantially. In any case, you should use an ironing table which is covered with a mesh-type underlay allowing the steam to pass through.
Note: The steam level 5 (VapoHydro function) is blocked while the steam pressure iron is plugged in to prevent the laundry to be ironed from getting wet.
Make sure that there is fresh tap water in the boiler of the steam cleaner.
Tightly insert the steam plug of the iron into the appliance connector. The plug must click into place audibly. Display - iron will light up green permanently.
Start-up the steam cleaner according to the description.
Recommended steam levels:
| Level | Textiles |
| 1 | Slightly wrinkled clothes |
| 2-4 | Cotton fabrics |
| 3-4 | Jeans |
Wait until the steam cleaner is ready to use.
Steam ironing
All fabrics can be steam ironed. Delicate imprints or fabrics should be ironed on the reverse or according to the manufacturer's specifications.
Note: For these sensitive textiles, we recommend using the KÄRCHER non-stick ironing sole BE 6006 (Ordner no. 2.860-142.0).
Adjust the temperature control of the steam iron within the notched range (***/MAX).
As soon as the heater display of the iron switches off, you can start ironing.
Note: The sole plate must be hot to prevent the steam from condensing on the sole plate and dripping onto the garment to be ironed.
Use the top or bottom steam switch.
- Steaming at intervals: Press the steam switch. Steam will be emitted while the switch is pressed.
Continuous steaming: Pull the latch for the steam switch toward the rear until it locks in. Steam will escape continuously. To unlock, push the lock forward.
Direct the first burst of steam at the start of the ironing process or after ironing breaks at a separate piece of cloth until the steam is emitted evenly.
You can hold the iron in an upright position to apply steam to curtains, dresses, etc.
Dry ironing
Note: Even if you iron without steam, there must be water in the boiler.
Adjust the temperature of the iron according to the garment you want to iron.
| • | Synthetics |
| •• | Wool, silk |
| ••• | Cotton, linen |
Note: Please observe the ironing and washing instructions in your garment.
As soon as the heater display of the iron switches off, you can start ironing.
Maintenance and care
Danger
Always disconnect the mains plug and allow the steam cleaner to cool down before performing any maintenance work.
Rinsing the steam boiler
Rinse the steam cleaner boiler at the latest after 8 boiler fillings.
Disconnect the mains plug from the socket.
Allow the steam cleaner to cool down.
Empty the water reservoir or remove it from the appliance.
Remove the accessories from the accessory compartments.
Illustration H
Open the locking door of the accessory compartment.
Remove the accessories from the accessory compartment.
Open the maintenance lock. For this, place the open end of an extension pipe onto the maintenance lock, lock it into the guide and unscrew it.
Fill the boiler with water and shake it strongly. This dissolves lime scaling residing on the boiler bottom.
Completely empty the steam boiler to remove existing water (see fig. 1).
Dscaling the Steam Boiler
As limescale builds up on the boiler walls, we recommend to de scale the boiler in the following intervals (RF = reservoir fillings):
| Degree of hardness | ° dH | mmol/l | RF | |
| I | soft | 0-7 | 0-1,3 | 100 |
| II | medium | 7-14 | 1,3-2,5 | 90 |
| III | hard | 14-21 | 2,5-3,8 | 75 |
| IV | very hard | >21 | >3,8 | 50 |
Note: Please contact your Conservancy Board or the local water supply company to inquire about the hardness of your water.
Disconnect the mains plug from the socket.
Allow the steam cleaner to cool down.
Empty the water reservoir or remove it from the appliance.
Remove the accessories from the accessory compartments.
Illustration H
Open the locking door of the accessory compartment.
Remove the accessories from the accessory compartment.
Open the maintenance lock. For this, place the open end of an extension pipe onto the maintenance lock, lock it into the guide and unscrew it.
Completely empty the steam boiler to remove existing water (see fig. 1).
Warning
Only use products approved by KÄRCHER to exclude any damages of the appliance.
User the KÄRCHER decalcifier sticks (order no. 6.295-206) to decalcify the water. Please follow the dosing instructions on the packaging while using the decalcifying solution.
Caution
Use caution when filling and emptying the steam cleaner. The descending solution can have an aggressive effect on delicate surfaces.
Pour the descending solution into the boiler and allow it to react for approximately 8 hours.
Warning
Do not screw the maintenance lock onto the appliance during the decalcifying.
Do not use the steam cleaner as long as there is decalcifying agent in the boiler.
Completely empty the descending solution after 8 hours. A small amount of the solution will remain in the boiler. Therefore, you should rinse the boiler two to three times with cold water to remove any residues of the descaler.
Completely empty the steam boiler to remove existing water (see fig. 1).
Screw the maintenance lock in using the extension pipe.
Fill water reservoir (see page 8).
The steam cleaner is ready to use.
Care of the Accessories
Note: The floorcloth and the terry cloth cover have been pre-washed and can be used immediately for working with the steam cleaner.
You can wash dirty floorcloths and terry cloth covers in the washing machine at 60^ . Do not use a liquid softener as this would affect the ability of the cloths to pick up dirt. You may tumble dry the cloths.
Troubleshooting
Often, failures have simple causes and you can do the troubleshooting yourself using the following overview. If you are in doubt or if the failure is not listed here please contact the authorized customer service.
Danger
Always disconnect the mains plug and allow the steam cleaner to cool down before performing any maintenance work.
Repair works may only be performed by the authorized customer service.
Long heating-up time
Steam boiler is decalcified
Descale the steam boiler.
No steam
Display - water shortage blinks red and signal is emitted.
No water in the water reservoir.
Fill the water reservoir up to the "MAX" marking.
Display - water shortage lights up red.
No water in the steam boiler. Overheating protection of the pump was triggered.
Turn off the appliance.
Fill the water reservoir up to the "MAX" marking.
Turn on the appliance.
Water reservoir has not been inserted properly or is calcified.
Remove the water reservoir and rinse it.
Insert the water reservoir and press downwards until it arrests.
Steam lever cannot be pressed anymore
Steam switch is secured with the lock / child-proof lock.
Move the child protection unit forward.
Steam iron "spits out" water!
Set the thermostat to level ...
Rinse or decalcify the boiler of the steam cleaner.
After breaks during ironing, water drops will come out of the steam pressure iron.
During longer breaks from ironing, the steam in the steam line can condense.
Direct the first burst of steam at a separate piece of cloth.
High water output
Steam boiler is decalcified
Descale the steam boiler.
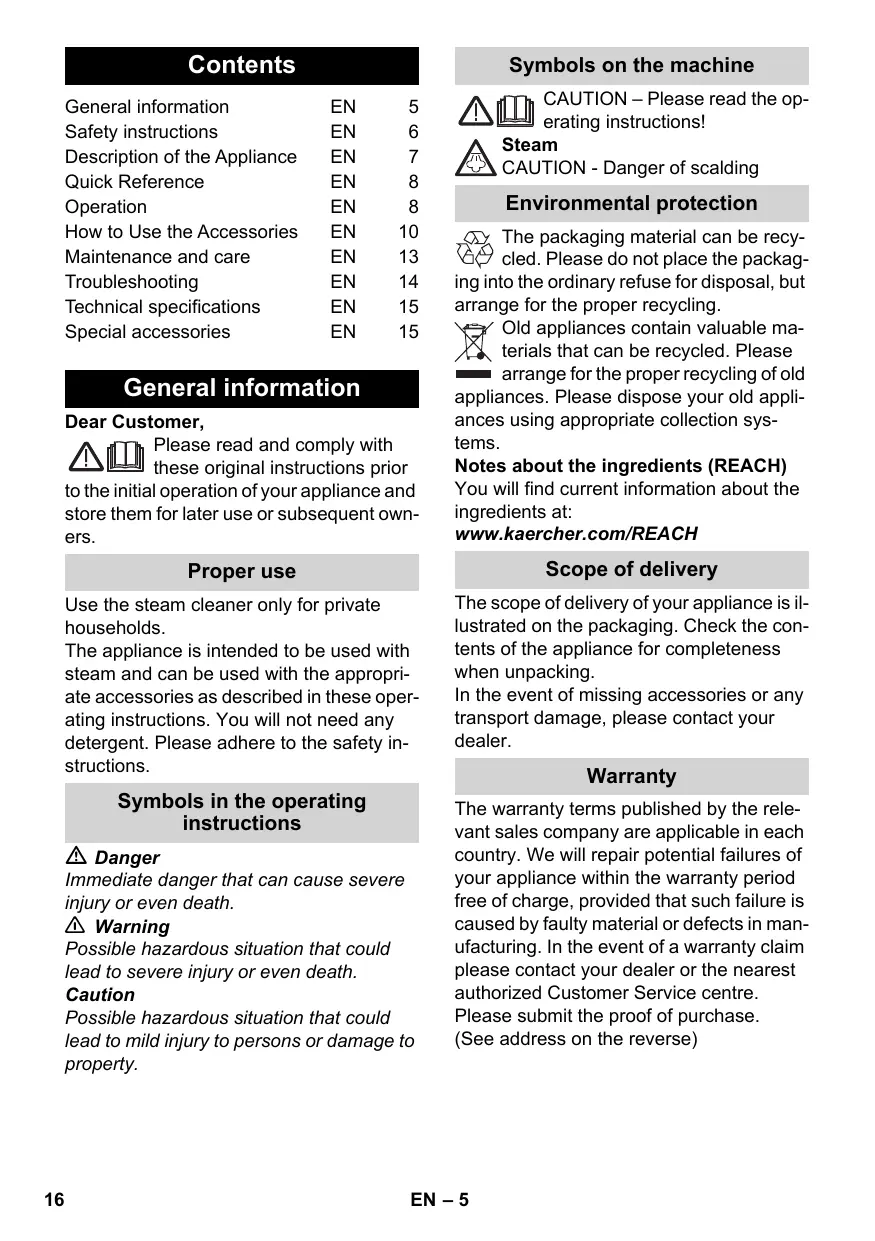
Spare parts
Use only original KÄRCHER spare parts. You will find a list of spare parts at the end of these operating instructions.
Technical specifications
| Electrical connection | |
| Voltage | 220-240 V |
| 1~50 Hz | |
| Protection class | IPX4 |
| Protective class | I |
| Performance data | |
| Heating output | 2250 W |
| Heating output steam iron | 700 W |
| Operating pressure max. | 0,4 MPa |
| Heating time | 3 Minutes |
| Steam volume | |
| – Continuous steaming | 60 g/min |
| – Steam push max. | 150 g/min |
| – Vapohydro | 250 g/min |
| Filling quantity | |
| Water reservoir | 1,5 l |
| Boiler capacity | 0,5 l |
| Dimensions | |
| Weight (without accessories) | 6,0 kg |
| Length | 439 mm |
| Width | 301 mm |
| Height | 304 mm |
Subject to technical modifications!
Special accessories
Order number
| Microfibre cloth set, bath | 2.863-171 |
| 2 soft floor cloths made of plush velour, 1 abrasive cover for the hand nozzle, 1 polishing cloth for the mirrors and fixtures | |
| Microfibre cloth set, kitchen | 2.863-172 |
| 2 soft floor cloths made of plush velour, 1 soft cover made of plush velour, 1 cloth for the streak-free cleaning of stainless steel surfaces | |
| Microfibre cloth set, soft floor | 2.863-173 |
| 2 soft floor cloths made of velvet velour | |
| Microfibre cloth set, soft cover | 2.863-174 |
| 2 soft covers made of plush velour | |
| Terry-cloth rags | 6.369-357 |
| 5 floor cloths made of cotton | |
| Terry-cloth covers | 6.370-990 |
| 5 covers made of cotton | |
| Round brush kit | 2.863-058 |
| 4 round brushes for the detail nozzle | |
| Round brush kit with brass bristles | 2.863-061 |
| Removal of especially stubborn dirt ideal for insensitive surfaces. | |
| Round brush with scraper | 2.863-140 |
| Round brush with two rows of heat-resistant bristles and a scraper. Not suitable for sensitive surfaces. | |
| Turbo steam brush | 2.863-159 |
| For cleaning tasks where you would usually have to scrub. | |
| Textile care nozzle | 4.130-390 |
| For freshening up clothes and textiles. | |
| Decalcifying sticks (9 pieces) | 6.295-206 |
| Active ironing board AB 1000 | 2.884-933 |
| For excellent ironing results with substantial time-saving (only for 230 V). | |
| Steam pressure iron | 2.863-209 |
| Non-stick ironing sole | 2.860-142 |
| Suitable for ironing sensitive materials. | |
Contenu
www.kaercher.com/REACH
Fornitura
www.kaercher.com/REACH
Leveringsomvang
Geen water in de watertank.
Watertank vullen tot marking "MAX".
www.kaercher.com/REACH
www.kaercher.com/REACH
www.kaercher.com/REACH
Leveringsomfang
www.kaercher.com/REACH
Leveringsomfang
Leveringsomfang for apparatet er vist pa emballasjen. Kontroller at innholdet i pakken er fullstendig, när du pakker ut.
Stille inn dampmengde
www.kaercher.com/REACH
www.kaercher.com/REACH
Toimitus
www.kaercher.com/REACH
Sigmaεuασία
To npapadotEO uAIKO tns ouakeuuns ateikovicietai OTn ouakeuaoia. KatrTnv aTOauokueuaia 1evTe To TEPiExOevo TNS wTPOCS TIV TAnpots Ta.
Eav Aeitouv EApntmuata n Exov Tpokknei Znuiic Kata t n eTapopap, Tnapaaloue EvnuepwoTev TpOunrEutn Oac.
Eyyunon
www.kaercher.com/REACH
Teslimat kapsami
KpaTkoe pyKOBoIDCTBO RU 8
3Kcnnyaataua RU 8
IcnoIb3OBAHnne pInHaJNeXhOCTeRU 11
YxOД n TexHnueckoe 06cnyKnBa-Hne RU 13
PomouB B cIyuae HenoIaOK RU 15
Texnueckne daHHbIe RU 16
CneuaaIbHbIe npHaadJeXHoCTn RU 16
06zne yka3aHnA
Ybaxaembl nokynateJIb!

Ipeep nepBbIM npImMeHneM Ba- wero np60pa npOHTaTe 3Tu
OpnHaIbHyIO INCTpyKcIIO NO 3KcNpyaTauNIOncIe 3TOrO DeIcTByIte COOTBeTCTBeHNO I COxpaHnte ee IJIA DaJIbHeIwero N0JIb3OBaHINJIN DJIeJeUoIero BlaJeIbca.
IcnoJb3OBAHne no Ha3HaueHnIO
IcnoIb3yIte npI6Op dIg OUHCTKn napom NCKJIIO- YIeJIbHO B DOMaUHem XO3YJCTBE.
Pnp6op npedHa3nauhen IpynpoeHnry OunchKn napom. OunchKy moXho npOBOuNTb C npimeHHeHem PNOxOJaXn PpHnHaJIeXHoCTe, ONiCaHHbIX B pyKOBoDCTBe NO 3KnIyataun.
MoIoune cpeICTBa He TpeByoTcR. CneIyet co6JIIOaTb INCTpyKUIN IO TexHnke 6e3oNaChOCTN
CnmbolbIBypkoBoDCTBeNo 3KcnpnyatauIN
Onachocmb
ДяненocpeodcmeHNO ap03aue ouanachocmu, komopar npuobum K mxeJIbIM yeeyam unu K cmepu.
△PnpdynpexkdeHue
Длгьозможнουnomehцальноona cho cumyaцu,komopая можемпразсMuКяжелblIM yeebym UNKcpemu.
BhumaHue!
Длгь lo3moxhno nomenuaIbHо onachou cumyaIu, komopar moKem npueecmu KneakummpaMam unu no8leby MamepuaIbHb yuep6.
CnmbonblHa annpapate

BHHMAHNE-O3HaKoMbTeCb c H-CTpykUeNo 3KcPnyatauIN

Nap BHIMAHNE - onachoctb oXkora
3aunTaOkpykaIoUeI cpebl

YnakobouhIe MaTePnaIbI pInrOdHbI DnB BToPunHoi O6pa6OTKn. Po3TOMy He Bbl-
6paBaiTe ynaKOBky BMeCTe C DomaUHMN OTXoamn, a cdaTte ee B Odn H3 PnyHkTOB npIema BTOpuHOrO cbipj.

CtapbIe npi6opbl coepkat cehhble nepepaBaTaBaembIe MaTePnAbl, noJIeXaUne nepedaue B nyHKtbl npiEmKn
BtopnHoro cbypI. IooTOMy yTuIN3npuYte CTapbIe np6Opbl uepe3 COOTBeTCTByIOJIne CNTEmbl pniEMKn OTXoIOB.
A15 Haprablaiouoi npoiK
B1 Napoboi nictolet
B2 Pbyar noaun npaa
B3 KhoIIka De6IOKINPOBKN
B4 3aunta ot deTei
B5 ⅢlaHr npaunapa
B6 Ⅲtekep noaun npap
C1ΦopcyHkaToueyHoN cTpyu
C2 Kpyrnaa 电
C3 BbICOKonpOn3BODInTeNbHaΦOpCyHka
C4 YdINHnTeIbHbI 3JIeMeHT φOpCyHKn TOp-ueyHOI CTrpyN
D1 PyuHaJΦOpCyHka
D2 Yexon n3 maxpoBOn TkaHn
E1 YdnnHnTeIbHbIe Tpy6kn (2 st.)
E2 KhoNka De6JokupOBKn
F1 Φópcyнka dnia quctkn nona
F2 3aXMM
F3 TkaHbIyMbITbI NOla
IpoJoxdaTb, noka He 3aROpNTcN INdNkaTOp "HarpeB".
ChyTne npHaJdxKHOCTe
Onachocmb
Ipu Chmau npunaednexhocme u3 npubopa mokem bimekamb oopraa boda! He chuma-me hacaek eo epem nodau npapa - yapo3a obeapuaanur!
YctaHOBnTb 3aunTy OT DeTeB HnHexe noIIOxKeHne (pbUar nOaun npa 3abNknpoBaH).
PncyHOK D
Дясгтупринадnexхостенхамte ha KhoIGNу pa36лokирови n OТдЛNTe DeTaJI npdyr ot dpyra.
HanoJIHHtB 6ak Dnla BOdbl
Pe3epByap dIЯ BODbl MOKeT 6bITb HAnOJIHeH BJIIO6OI MOMENT.
BhumaHue!
He ucnolb3yume cKoHdeHcupoBaHHyO bdy u3 cyuunbHO MaunBu!
He do6aIyme moouce cpeocmeu npdyue do6aKu (Hanpumep, apomamuzamopbl)!
He ucnolb3oamb yucmyu ducmunnpoeaHny oody! MAc. 50% ducmunnpoeaHou eobu u 50% eodonpoedohou eobi.
He uonb3o8amb co6paHHy oOxdeeyo body!
PncyHok
Pe3epByap dIy BODbl MOXHO ChrTb IJIHAnOIHNHeHn HAnOJHeH HeNOCpeDCTBeHHo Ha npnbope.
ChyTb pe3epByap IJN BODbl
→ BbITaHTb pe3epByap dIy BOdbi BepTnKaJIb-HO BBepX.
→ 3anonHnTb pe3epByap dIy BOdbI IOD BOIO- npoBOhBIM KpaHOM BepTKaJIbHO DO OT-MeTKn ,MAX".
YctaHOBtbpe3epByapIINBAObI INpndaBaTb Bn3doUeNka.
HenocpeDCTBHeHNo Ha npn6ope
→Bovu n3 emKocTn 3aInTb B 3aInBHyo BOpoHky.3aOnJHHt Do OTMeTKN ,MAX"
BkJIIOUeHne npIbopa
YcTaHOBInTe npN6Op Ha TBepDyU NOBepXHOCTb.
→ BCTaBbTe WtEnCeIbHyO BnIKy 3JIeKTpOnnTaHnB 3JIeKTpopo3eTky.
IpebeceTn nepeKIOHateIb n3 noIOxKeHnBblKIn BnoIOxKeHne, COOTBeTCTByIOuCe KOnuYeCTBy npa.
Houkamop "Papoeou nucmonem" cemumc3eJeHbM.
Ndukamop "Koluecmeo npa" ceumc 6 beIbIM u/Unu "VapoHydro" ceumcra KpaChbIM.
ИнDUkamop "Haapee"Muzaem 3eJIeHbIM ueemom.
Yka3aHue: Ecnu 0dbI e napobom Komne 3anu-mo cnuukom mano unu Oha omymcmyem, mo cpaBomaem o0raHou hacoc u 6ydem ha- hemamb body u3 pe3epayapa dny o0bI e npobou komei. Ipocecc HanoJIHeHu Mokem dIumbcn HeckOJIbKO MuHym.
IIOJOKaTb, noka He 3aROpNTc HnDnKaTOp "HarpeB".
Pn6op dny nCTkn npom rTOB K paOte.
Ka3Hue: YcmpoCmgo KaKdbie 60 ckyH na He npodonjumenbHoe ePme nepekpbiaem klanan. 3mo npedomepaam 3akunueaune klanana. Ppu 3mOM MOxHO ycnblawmbuxu uenok. BInyck npa Ebuoy 3mo2o He bdyem Hapyuwen.
DolNB BObl
Прин HexBaTke BOdBi B pe3epByape ДЯ N BoDbl Mnraet INdNkaTop "HeIoCTaTOK BOdBi", a TaK-Ke 3ByuHT 3ByKOBoC nRHaI.
Yka3aHue:Bceea, npu HeDocmamOHM KOInuYeCMeB e0dbI e napoBOM KOMJIe, HAcOC aMomAmUeCKu nOdaem bdy c 6oJHOpe3epEyapa e napoBouKomeN. Ppu NycmOppe3epEyape dny eobI, 6oJHOu HAcoc 6oJbWe He moKem numMb NapoBouKomeU npouCxOdu m 6nokupoKa nOdau npa.
→ 3anonHnTb pe3epByap IINI BObl DO OTMeTKN MAX".
Yka3aHue:Yepe3 He6oIbWue npomexymku epemHu 60raHou Hacoc nbimaemc ChOea 3a-nonHmb napoBou komeJ. Ecnu 3anOnHeue npoWNo ycneuho, mo nodauna npa eO3o6HoJIyemc, KpaChbui uHduKamop aachem.
PerynipoBka kOJIuYeCTBa npa
UnpablenHeKoJIuYeCTBOM npa ocUeCTBnE tca c NOMOUsbI nepeKlnouateTJI. IpeKlnouaTeIb npedlaeraet nTb BapnaHTOB bbl6opa KOniueCTBa npa dIg 3arpy3HEnI pa3JInHoN CTeneH.NHXe npBVeDeHbI npIMepbI KOJIuYeCTBa npa, CTeneH 3aqr3HEnI n OUYIaeMbIX ppeMeTOB:
KolnueCTBO napa 1
He3NaHTeBbHbe 3aRpa3HeHnHa, HapuImep:
PiIb
IpeDMeT / NOBepXHOCtB, HApIMeP:
pacteHnIyBCTBtTeNbHbIe,IaKIpOBaHnHbIeNIIOKpaUeHHbIeNOBepxHOCTn
KoJIuYeCTBo npa 2
He3HaunTeIbHbIe I cpeDnHe 3aRpa3HeHnA, JIo6o CBexKe 3aRpa3HeHnA, HApPImep:
OTNeayatkn nalbceB, nbIb, OCTaTK nIuI, KaIIn DoXyra, 6pbI3r 3y6HOI naCTbl
IpeMeT /IOBepxHocTb, HapnmeP:
3aKpbTbIe paDnAToPbI, 3epKaIa, OKHa, PIIaCTIKOBbIE INIIM MeTaJIINueCKNe NOBepXHOCTN
KoJIuYeCTBo npa 3
CpeHne n CnIbHbIe 3aRpa3HeHnI, IIn6o cTaPbIe, yCTOnYNBbIe 3aRpa3HeHnI, HApIMep:
TOHKARJIKPOBAIJIeHKA,OTNeUaTKI NaJIb-UEB,INcPaxXHeHn HaceKOMblx,6pb3rN eblNJIN 3y0HOH naCTbl
IpeMeT /IOBepxHocTb, HapnmeP:
NOBePxHOCTN B KxHEn BaHHoN,OKHa, ce-paHOBbIe NOKpbITn, PnNTKa DnOobKn CTeH, HApONbHa NpNTka, PBX, pHoJeM
KoJIneCTBO npa 4
CnIbHbIe 3aIpa3HeHHaHapmEp:
CTapbIe OCTaTKN\PiUIN,OCaTKn MOUINX CpeIcTB,He3NaHTeJIbHaNHa HAKINb,IPOuHAR JxipOBaIJIeHKa,BblCOXUne IYTHa BOdI,OCaTKnMbIla
PpeMeT / nobepxHocTB, Hapnmep:
HANOJIbHaJaIINTkA,INBX,IINHOJeym,IINITKaIJNIOZOBKnCTeH,IINTOUHbIeCTbIKu, YMbIbAlbHnKn,DyU,BaHHa,O6OpyDoBa-Hne IJRABaHHoH
KoIuYeCTBo npa 5 -ФункцЯ Vapohydro
Pactpeckabuinecra, nckpmbneHHbte oBnactn, KOtOpbIE MOxHO o6pa6aTbIBaTB BoDo, Hapn-Mep:
- JXECTKNE KOPKN, 3acoXsua Tpr3b B UeJx N YrJax, OCTaTKMblJa, He3HaHTeJbHaa HAKINb
IpeMeT /IOBepxHOCTb, HApnpMep: - obopydobahne Дявано, BHyTpehHnme OKOHbIe paMbI (He DepeBraHHbIe), NOKN B BaHHO, PJIITbI OuaRoB, DuSeBbIe Ka6NHKn, CTOKN
YctaHObKa KOJImYeCTBa npa
→Рыаг подачни па установпь на тpeбу-емое колиессво пара.
→ Haxmnte Ha pbyar noidaun npap, npn 3tOM ChauJaHa npapBnaJ npoBOH nICTOJeT Ha TkaHb, Poka nap He 6ydt BixOOnTb paBHOpMepHO.
BbiknoueHne np6opa
IpebeCtN BbIKJUoyateIb BNoIOXeHne "BbIKJI" N BbIKJUOHTb yCTpoIcTBO.
→ BbItaunTe WTeNceIbHyIO BuNky I3 po3eTkn.
Haxmnte Ha KpbIuKy pa3bema npi6opa n BItaunTe wTKepe npa unpa n3 pa3bema npi6opa.
YdaJIITbOCTaTOK BOIbI N3 pe3epByapa IJIBAIObl.
XpaenHe np6bopa
PucyHok F-G
→ Pa3mecNTb BbICOKPON3BODHTeJIbHyO φopcyHky IN KpyrIyU ΜεTky B OTCeke Длгпнадлжноcte.
→ HanaTe b pyuHyo hacaKy Ha ydInHnTeIb-HyTuPy6Ky.
BCTaBtB ydHnHInTeIbHyIO TpyKb B depKaTeIb DnI npHaadJIeXHoCTeI.
→ BCTaBtB BycTpoIcTBo IJnXpaHEnHn PnHaIeKHOCTe ChauJa YdInHInTeIb, 3a-TEM -ΦoPCyHKY TOueHNo CTpyN.
BCTaBnTbΦopcyHkyIЯ nOJa BnapKOBoHoe KpeJIeHne.
→ O6MoTaTb ⅦJaHr IoJaHn npa BOKpy yIINHHTeJIbHbIX Tpy60K I NOMeCTNTb npaBOI NICTOJET BΦOpCyHKy DЯ IOna.
→ CeTeBoI shHyp yIoxNtB MecTe Ipn Xpa-HeHnI ceTeBOrO shHypa.
IcnoJIb3ObaHne npHaJdlexHoCTeI
Baxhble yka3aHnno nCNoJb3ObaHnO
OuHCTnTb NOBepxHOCTb IOna
Ipepe npimmeHneHem yctpoNCTBa IyIcSTkn napom pekomehnyeTc nOIMecTn INI pOnblieCocNTb POJI. TaKIM o6pa3OM MOXHO OCBOoDITb IOI OT rpy3n/paccbInaHHoro Mycopa nepepe npOBedeHem BnaXHoYbOpKn.
OcbexeHne TeKCTnJbHbIX n3deNm
Ipeep npoBeHeHem o6pa6OtKn c NOMOsbOpnp6opap dnyuCTKn napom CneJeTy Bcerda npoBepaTb yToHnBOcTb TeKCTnIbHbIx N3deJIn K Bo3DeNCTBnIO npa. PpexKe BCero, CTeJyET o6pa6OtaTb napom N3dEJIe, 3aTEM npocUHTb erO n, HakoHeu, npoBepntb yCTOn-NUBOcTb OKpackn n HaJIuNue DeΦopMaunn.
YnCTka NOBepxHOCTeC NOKpbITnA MNI JAKINPOBAHHbIX NOBepxHOCTeI
ПричNTKE пakiroboHbIX NOBepxHOCTeи Ип NOBepxHOCTe C NOKpbItnEm, HApPIMep, KxOH-HO Me6eINu Me6eINДЯ KBaPTnbl, DBepeN, napKeta, BOC, Me6eINbHaJNoIITypa, NCKycCTBeHHoe NOKpbITNe IIN Kpacka MOrYt pACTBOpHTbcraIIHn Ha HIX MOrYT Bo3HNKHyTb PRTHaДЯ npOBedeHry NcEduyET cIerka OTnapTb caFteKyu 3aTeM npOTepetb eI nepeHuCJIeHHbIe NOBepxHOCTN.
BhumaHue!
He napraeIyme nap ha npukneeHble kpmku, nockoIbky obknaDka moKem omKneumbcry. He uCnoIb3yme npubop dnyucmku depeEaHHbix unu napKeMhbix nono8 63 noKpbimura.
Ynctka CTeknna
Прии Изкinx BHeшнix Temпepatpax,прждь BCERO,ЗИМоI,проггеite OKOHoe CTekNo.Бla-ROdApЯ 3OTMy Bbl CMOxeTe JERKO obpa6oTaTb napOM BCIO NOBepxHOCTb CTekJa.TakIM O6pazOM yДаCTcN I3бжATb HapPЯЖENIA NOBepxHOCTN,KOTOpOE MOKET npVBecTN K BOU CTekJa. 3aTEM NOBEPXHOCTb OKHa HeO6xOДMIO OuHCTnB CпрIMeHEnEM рУHоJ φОрсУнИ canФeТК.NДЯ уДаленя BODbl cLneDyET IСПЛьЗOBaTB HabaKdy ДЯ мОй OkOH Или HaCyxo ПОТeРeТ b NOBepxHOCTb.
BhumaHue!
Iap He Hanaepaenom Ha yynnomHenHbte yacmku 0e3ne okOHNo paMbI dny npedomepaueHnaee noepexdeHua.
Papoboi nictolet
BbICOKN BbIXoD BoDbI
Bnapobom kotIe o6pa3oBaJacb haknbl
→ YdaIaIte HauKInb N3 npoBOrO KOtNa.
3anauchbyleactn
IcnoIb3yIte TOnbKO opunHaJIbHbIe 3aNaChbIe
actn fnpMbI KARCHER. OnPcHme 3aNaChbIX
chaTeH HaxoDntcB KOHcE daHNoi INCTpyKcNl
IO 3KcPnyatauN.
TexHnueckne daHHbIe
3JeKtpueckne npaMeTpbl
www.kaercher.com/REACH
Szallitasi tétel
www.kaercher.com/REACH
Obsah dodávky
www.kaercher.com/REACH
Dobavni obseg
Obseg dobave Vaše napravje prikazan na embalaži. Pri jemanju stroja iz embalaže preverite popolnost vsebine.
Pri manjkajocem priboru ali transportnih skodah obvestite VaSega prodajalca.
Garancija
V vsaki državi veljago garancijski pogoji, ki jih določa naše prodajno predstavništro. Morebitne motnje na naprvi, ki so posledica materialnih ali proizvodnih napak, v Času garancije brezplačno odpravljamo. V primeru uveljavljanja garancije, se z originalnim računom obrnite na prodajalca oziroma najblžji uporabníski servis.
www.kaercher.com/REACH
Zakres dostawy
H6 regulator temperature
Mult stimate client,

www.kaercher.com/REACH
Articolele livrate
www.kaercher.com/REACH
Rozsaḥdodávky
www.kaercher.com/REACH
Opseg isporuke
www.kaercher.com/REACH
Obim isporuke
Sadržaj isporuke Vašeg uredaja je prikazan na ambalaži. Pre vadenja uredaja iz ambalaže proverite da li je sadržaj potpun.
Ako pribor nedostaje ili je došlo do ošćenja prilikom transporte, molimo da o tome obavestite svog prodavca.
Garancija
U svakoj zemlji vaze garantni uslovi koje je izdala naša nadležna distributivna organizacija. Eventualne smetnje na urežaju za vreme trajanja garancije uklanjamo besplatno, ukoliko je uzrok greška u materijalu ili proizvodnji. U slučaju koji podleže garanciji obratite se sa potvrdom o kupovini Vašem prodavcu ili najblžoj ovlascenoj servisnoj sluzbi. (Adresu cete naci na poledini)
Sigurnosne napomene
Opasnost
Upozorenje
Zabranjen je rad u područjima ugroženim eksplozijom.
■ Prilikom upotrebe uredaja u opasnim područima treba poštovati odgovarajuće sigurnosne propise.
Uredaj nemojte koristiti u bazenima u kojima ima vode.
Ure'daj se ne sme koristiti za ciiscenje elektricnih aparata i uredaja kao sto sunpr. klasicne i mikrotalasne pecnice, aspiratori, televizori, lampe, fenovi za kosu, elektricne grejalice i slično.
Pre upotrebe proverite da li su urejai pribor u ispravnom stanju. Ako stanje nije besprekorno, ne sme se upotrebljavati. Posebno proverite priključni strujni kabl, zatvarač za izvodenje radova održavanja i parno crevo.
Ostecen strujni priključni kabl odmah dajte na zamenu ovlascenoj servisnoj sluzbi/elektricaru.
Osteceno parno crevo odomah zamenite. Sme se upotreblavati samo parno crevo kojeg je preparucio proizvodač (kataloški broj vidi u spisku rezervnih delova).
Mrežni utikač in uticnicu nikada ne dodirujte vlažnim rukama.
- Parom ne Čistite predmete koji sadrze materije štěne po zdravlj (npr. azbest).
Mlaz pare na maloj udaljenosti nikadane dodirujte rukom niti usmeravajte prema ljudima ili zivotinja (opasnost od opekotina).
Zatvarač za izvodjenje radova odžavanja se tokom rada ne sme otvarati.
Ure'daj sme da se priključuje samo na elektrčni priključak kojeg je izveo elektroinstalater u skladu sa IEC 60364.
Ure'daj priključujte samo na izmeničnu struju. Napon se mora podudarati sa tipskom pločicom urežaja.
U vražnim prostorijama, kao što je npr.
kapatilo, urežaj priključujte na uticnice
sa predspojenom FI zaštitnom
sklopkom.
Neodgovarajuci produkti kablovi mogu biti opasni. Upotreblavajte samo produktne kablove zašićene od prskanja vode sa prečnikom od najmanje 3x1 mm².
Spoj strujnog i produktu nag kabla ne sme lezati u vodi.
Kod zamene spojeva na strujnom priključnom ili produktom kablu mora se obezbediti zašita od prskanja i mehanička Čvrstina.
Korisnik mora uredj upotrebljavati u skladu sa njegovom namenom. Mora voditi raçauna o lokalmim uslovima i kod rada sa uredjem paziti na ljude u okolini.
Deca starija od 8 godina i osobe sa smanjenim fiziickim, senzornim ili mentalnim mogucnostima opazanja ili s ograničenim iskustvom i znanjem smeju koristiti ovaj uredaj samo uz nadzor ili akou upućene u to kako sigurno koristiti uredaj kao i u eventualne povezane opasnosti. Deca ne smeju da se igraju s uredajem. Deca ne smeju obavljati poslove oderžavanja i cisćenja uredaja bez nadzora.
Ure'daj za vreme rada nikada ne ostavlajte bez nadzora.
- Opreznost pri cisćenju popločanih zidova sa utićnicama.
Oprez
Pazite da se mrežni ili produzni vod ne unisti ili osteti gazenjem, gnečenjem, vučenjem ili slicnim. Mrežni vod zašitite od vruçine, ulja i oštrih rubova.
Urezeroarza vodu nikada ne sipajterastvarae,tecnosti sa rastvaraicima ilinerazredene kiseline (npr. sredstva za ciiscenje,benzin,razredivace i aceton),jer mogu nagristi materijaleupotrebljene u uredaju.
Tokom cisćenja se urećaj ne sme nositi.
Uredaj mora imati stabilnu podlogu.
Ure'daj koristite i skladišite samu skladu sa opisom odnosno slikom!
Tokom rada ne pritežite polugu za paru.
Ure'daj za'sitite od kise. Nikada ga ne cuvajte na otvorenom.
Sigurnosni elementi
Oprez
Sigurnosni elementi sluze za zašitu korisnika i ne smeju se ni menjati niti zaobilaziti.
Regulator pritiska
Regulator pritiska tokom rada održava što je moguce ujednačeniji pritisak u kotlu. Grejanje se isključuje kod postignutog maksimalnog radnog pritiska u kotlu i ponovo uključije pri padu pritiska u kotlu usled trošenja pare.
Termostat kotla
www.kaercher.com/REACH
OsemHaIOcTaBkata
OeMbT Ha doctabka Ha ypea e n3o6pa3eH Ha onakOBkata. Pn pa3oNAKObaHe npOBepete daJIIN cbIbpxKaHneTo e nbIHO.
PnI INNCBaUIN pInHaJNExHOCTHn IIN npIN TpaHCnOpTn UeTe NMOJI yBeDoMeTe Baunr TBproBeu.
TapaHua
BbB Bcya CtpaHa Baxat rapaHOnHnTe ycNoBnI, Ny6NkyBaHN OT OTOp3nPaHATAOT HacDnCTPbEyTopcKaΦnpMa.EBeHTyAnH NOBpeHNa Ba7nY yepd ige CTpaHm B pamKnTe Ha rapaHIOHnCpOK 6e3PiATHO, Ako ce Kacae 3a DeEeKT B MaTePnaHNe IIN npi PpON3BOJCTBO.B rapaHIOHEn cIpya CE o6bphete KbM DnCTPbEyTopa IIN NaH-6JI3KnO TOp3nPaH cepBN3,KATO pndCTaBnTE KACOBaTBeJeKka. (Adpcnte ige HamePte Ha 3aHaTaCTpaHnI Za)
Yka3aHna 3a 6e30nacHOCT
Onachocm
3a6pahehaepabomamaebe3pueoanacHu nomeuehn.
Ipu pa6oma c ype8a 8 onacHu 30Hu da ce cna3eam cbombeHume Mepku 3a 6e3o-nachocm.
Ypeda da He ce u3noI3ea e baceuHu, Kou-mo cBbpxkam oda.
UpeDa He mpr6ea da ce u3noJ3ea 3a no- yucmeBaHe Ha eNeKmpoypeDu, Hnnp. fypHu, KxHHeNcKu abcop6amOpu, MUKpoBJIHOBu neTu, meNe6U3Opu, lamPi, CeWoApu, eNeKmpueeCKu omnonHeu u m.H.
Ipedu u3no13eAhe yeda u npuHaednHexoCmume da ce npoeepa 3a cbomeem-Cmbauo Ha u3ucBeaHura ma cbcmohue. Ako ypedb m He e o omluHo cbcmohue, u3no13eAhemo My e 3abpaHeno. MoI npoepeme cneuaanHO 3axpaHeaunKa6en, peu3uoHomo Kaane U napocmpuyHna Mapky.
IoppepeHmpexko3axpanhaKabmmpa6ea He3abaHo da ce 3ameHu om omu3upan cepu3/cneuaJucm-eNeKpmo-mexnuk.
Ipoepednna napocmpyeh Mapkyu mpr6ba da ce cmenu he3a6a8no. I03oJeno e camo u3non3eaHemo ha npenopbuaH om npou3eodumena napocmpye Hapky (BxK Homepa 3a npobku 8 cncbKa Ha pe3epeHume yacmu).
Hukoa a He dokoceaume konhma ma u uen-cena c enakhu pue.
Ja He ce obnueam c npa npedemu, Koumo cbobpxam onacn 3a 3paepemo euecmea (Hap. a36ecm).
Paphama cmpy He mpr6ea da ce dokocea c pka om 6nuzko pa3cmohue unu da ce Hacoyea KbM xopa u XusomHu (cbueecmyea onachocm om u3aaphe).
Ipo epeme Ha pa6oma He 6uBa da ce omepa pypeu3uOHmo kanaue.
△PnpdynpexdeHue
Ypeb m Moke da ce eknouca cmo KbM enekmpuuecku KOhmakm, u3bnHeH om enekmpomexnuk cbanaccho IEC 60364.
Cepb3eaume ypeda camo KbM npomeHnue mok. HanpexeHuemo mp6ea da cbomemcmea ha zumupaHomo ebpyx maBenkama na ypeda HanpexeHue.
Bbe enaxHu nomuehenu, Hanp. 6aH, Eknoueume ypea e KOhmaKmu c npedapumenHO Eknoueha npomuoElaOea 3a-uma.
Henodoxoamme yobjxumenu Moa m da ca onachu. IV3no3baume eduncmbeHo oboocmoue yobjxumene H k6e n c Hnpeuho ceheHue MUHUMYM 3x1 MM2.
Bp3kama Mexdy uencena u ybIjkmenHua Ka6eH He 6uea da nonada b8e oda.
Ipu noDMraHa Ha cbeUHeHua HaMpexoBu uu yobJxumEnHua Kaebmmpa da ce eapamupa 3auuma om 6oDHu npbcku umexaHua 3dpaBua.
Pompe6umenmmp6ea da u3no13ea yepda cnped npednucnnaema.Tou mpe6ea da ce cb6pa38ea c daedeocmume Ha mrcmo u da eHumaea npu paoboma cypeda danu haokolno hma xopa.
To3u ypeo moKe da ce u3noJ3ea om deua HAD 8 aodunu u om luuca c oapauHueHu fu3uYeCKU, cEH3OpHu UU yMcTeeHu cnoc6bHocmu unu c lunca Ha onum u no3HaHua, ako me bdam pod had3op unu ako ca noIyUuUncmpkyuu 3a 6e0nacHomo u3-103BaHe ha ypea u c6bp3aHume c Hezo onachocmu. Deuama He 6uea da uepaem Cypea. POnucMeHemo u npDpBxKama om cmpaHa nompe6umen He 6uea da ce u3BpuWam om deua 6e3 HAD3op.
Ipo epeme ha paBoma ypeobm da He ce oc-ma8e 63n430p.
Bhumane npu noucmahe ha cmehu c nnoku c KOhmaqmu.
BhumaHue
BhumabaumKaebmHa ypeda unu ybJxumenma He ce noepedumu cKbcamnopadu Hacmbnahe,npesbahe, onbahe unu dpye. Pase me Kaeba om monnuna, macna u ocmpu p6oee.
Hukoa He Hanueaime e6e oodnpu pe3epoap pa3meopumenu, cbobpkau pa3meopumenu meynocmu unu He pa3pehenkuceunu (Ha np. noucmeau npenapa mu, 6eh3un, pa3pedumenu 3a 6ou u aue
moH),mbu kamo me ue pa3aam u3no138aHume e ypea Mamepuanu.
Ipo epeme Ha noucmeahe ypeobm He 6uea da ce Hocu.
Ypebymmpa6ba da ce nocmae ebpxy cmaunha ochoea.
Pabomeme unu cxbxpanhaeaume ypeda camo e cbombeemcmeue c onucahuem pecn. u3obpaekehemo!
Ipu pa6oma He 3aknueaime nocma 3a npapa.
I Nazeme ypeda om dbk. He 20 cxbpnaeaume Ha omkpumo.
PpeDn3n npucno6JeHna
BhumaHue
IpeDn3Hume npucno6bneu r cyjxam 3a 3a- uuma na nompe6umela u He mpr6ea da ce npomeh umu 3ao6ukanm.
PerylaTop 3a HajraHeta
По врeme Ha paBoTa perуIaTOpbT 3a HaJIraHTo NOДьрЖa MaKcIMaJIHo NOCTOЯHHO HaJIraHTo B KOTeJa. При DoCTnIraHe HaMaKcIMaJIHOTo pa60THo HaJIraHe B KOTeJa HaIrpBaHTo CnIPA, aПри NOHIXaBaHe Ha HaJIraHTo B KOTeJa BCJIeDCTBHe HA OTdEJIaHTo Ha napata OTHOBO CE BKIIQUBa.
KoteJIeH TepMoCTaT
Korato B cnuyaHa rpeuKa B KOTeHa HMa BO Da, TemnepaTypaTa B Hero Ce NobuShaBa. KoTeHNrT TepMOCTa N3KJIUOyBa HarpBaHTo. HopmaHata ekCnloaataun e Bb3MOxHa OTHoBO, Korato CE HanbIHN KOTeJIbT.
IpeDnaeH TepMoCTaT
Ako perynatopbHT Ha nlaRaHeTo N KOTenHnTepMoCTaT OTkaxe B cnyaHa rpeuKa N ypeDbT perepee, toraba npdePna3HnT TepMoCTaNTKIIIOvBa ypeDa. 3a BpbUaHe B INXoJHO NIOJKeHne Ha npdePna3HnT TepMoCTaTe o6bPheTe KbM OTOpN3IpaHnca cepBn3 Ha KARCHER.
Pebu3nOHkoNaue
Pebn3noHHOTKaNauee cIeBpeMeHNO BeHTn3a CbpxHaJraHe.To 3aTbapra KOTenaCpeu npoNtBaHaNe Ha napOBTO HAnrAne.AKOpereyIaNTopbT 3a HAnrAHeTo Ce NOBpeNi npOBOTO HAnrAne B KOTenaCe NOKaUn,BeHTnJIbT 3a CbpxHaJraHe Ce OTBapra NnapaTa CeOTBeXJa HabbN pIpe3 PEBn3noHHOTKaNaue.
PneMeTN / NOBbpxHocTN, HapnMpE:
paCTeHnIyVBCTBtEJIHNIJaKnpaHNIOBbpxHOCTNIIINIOBbpxHOCTCNOKpTITNA
Tapa hcteneh 2
JIekn do cpeHn 3aMbpcBaHnI nI npecHn 3aMbpcBaHn, HapnPmep:
OTNeuTaBcN OT npbCTN, npax, OCTaTbCNIOT XpaHa, DbXIDOBH KAKN, npbCKN OT NaCTa 3a 3b6n
PpeMeTN / NOBbpxHocTN, HapnMpE:
3aTbOpEn paDnAToPn, orNeJaIa, npO3Op- n, pIaNCTMaCObN/MeTaJIHn NOBbPxHOCTn
Napha ctenen 3
CpeHnI Do CnHn 3aMbpcBaHnna IIN No-CTapn, NOpEnHaJIu 3aMbpcBaHnna, HApnPmEp:
JIeK Ma3eH fIJIIM,OTNeuATbUcN OT pIbCTn, HApJIIOBAAHNA OT MyXN,INpbCKN OT XpaHNTeJIHN pOdyKTNIIN NaCTa 3a 3b6n IpeDMET/NOBbpXHOCTN,HaPIMep:
NOBbpxHOCTN B KxHnTa N 6aHnTa, PpO3OpU, KepamuH N KOTJIoH, CTeHn N IIOuKn, IIOBOE NOKPHTN C NIOuKn, PVC, IINHOJeym
Napha cTeen4
CunHn 3ambpcBaHnHa npImep:
CTapn OTlaRaHnO T XpaHInTeJnH NPOdyKTH, OCTaTBcNOT NOUcTBAuN INpeNaPAtN,JIeKN OTlaRaHnO TBAPOBNK,CINHeh Ma3EH QNJIM,3acbXHaJIN NeTHa OT BODa,OCTaTB- cNOTcanyH
PpeDMeT/NOBbPxHOCTN,HaNPmEeP:
- noIOBe nOKpNTn C nIOUcKn, PVC, IINHoneym, CTeHHn IIOUcKN, yMnBaJIHNuN, BaHa 3a DyU, BaHa, rapHnTpyn 3a 6aHa
Iapna ctenen 5-Фyнкцу Vapohydro
HaceuHn, yCyKaHn 3OHN, KOnTO MoRat Da 6b- daT HAnpbckAHn C BOda, HAnpIMep:
- ynpntn 3ambpcaBaHnna, Mpbcotn noIenBaua nO pynte n bTnTe, OCTaTbCu OT canyH, JeKn OTnlaHnry OT BapOBNK npedmetn / NOBbpxHOCTn, HapnPmep:
-rapnHTpyn 3a 6aHn, npo3Opueh npaMkn (6e3 dIpbBeHn paMKn), pOJIuN 3a 6bA, KOt- IONH, dyu KaBHH, KaHaJIn
Pergunpahe Ha KoJnueCTBOTo npapa
→ HacrpoIte npekbcaa 3a n36op Ha Heo6-XoDMOTO KOJIueCTBO npap.
→ 3aDééiCTBaIte IocTa 3a napata, pπu TOBA IIpbBO HacoOyBaIte NapocTpyHnI NICTOJIeT KbM HЯKaBb KaBpNa, DOKaTO napata 3a-NoUHe Da I3JIN3a paBHomePHO.
N3kIIOUeTe ypeDa
→ 3aBbPTeTe npeKbCBAca Ha no3nIg OFF, 3a Da n3KJIouChte ypeDa.
→ ɪЗbaɪdæte ʌeɪncεŋa OT KOHTaKtə.
→ HatncheTe kanaKaHa KOHTaHa ypeDa HADONY n3BaTe npocTpynHnI yencen OT KOHTaTa.
I3neTe BOdaTa OTo BOdHnpe3epBoap.
CbxpaheneHa ypeda
Φnypa F-G
→Пиберетe сиюваТДIOЗИ TOUKOВАТСТPyИнадIOЗВУЕКМEDЖETO 3a ПиHAД-ЛжХОCTN.
IocTaBeTe pBHaTAtIIO3a Ha yIbJIKTeJIHata Tpb6a.
→ IocTaBeTe yIbJIxNITeHNITe Tpb6n B Hoca- uHTe 3a npHaJNeKHOCTn.
→Пьрв постаBetудьжениeto,a cneiTOBA TOUKObaT a CTpyHaДIO3a B MЯСТОTo 3a CBxpaHEnHe Na pInHaДпeХнOCTnTe.
3aKaYeTe IIO3aTa 3a NoD B Hocaua 3a napKIPAHe.
→ 3aBnTe Mapkyu 3a npa OKoN OyIbJNKeTENHITe Tpb6n I NOCTaBeTe NICTOJIeta 3a npa B DIO3aTa 3a NOI.
→Пиберетe3axpaHbaUЯKa6eJВМЯCTOTO 3a cxbxaHeneHa 3axpaHbaUЯ Ka6eJ.
ИЗПОЛЗВАнеHa npиHAДпEXHOCТиTe
BaxHn yka3aHnna 3a ynOtpe6a
TouncBaHe Ha NIOOBN IOBbpxHOCTN
Пренорьа CBп徳и n3нол3Ва He Na-рocTунИУ рeД NOДБТ Да CBпсЕ ИПИЗСМУч.Тaka OSUп徳и BλжНОTO NOHCTBAHe NOДБТ ce OCBOбoxДавa OT МрсOTЯ/CBOбODиЧаCTUи.
OcbexabaHe Ha TEKCTHJ
Ipei n trpetae c npoctpyHn yep MoJn BnHa n da npOBepBaTe yctOnuBocCTTa Ha TeKCTnHInTe TbKaHN Ha cKnPTo MeCTo: PbPBO 6JIeNte C npa, CneT TOBa OCTaBeTe Da n3cbxHe N Hakpar npOBepTe 3a n3MeHHe Na CBeta n φopMaT.
IOnuCTBaHe Ha NOBbPxHocTn C NOKpHTne JINJnak
При поочиствае на лakирани плкрптс спл actма совьхостс, кato Hanp. kyxненский и CTайни мебени, врати, napket, могат да ce OTдяг Tбск, мебelenн пak, n3kyctbehin порптуни boи nbи и да се obpaуват netha. При поочистваенто на Teзп NOBьхостсн haboete edna Кьрпс с пара и n3бьршete NOBьх-HOCTITE C HeJ.
BhumaHue
He hacouaume napama kzm 3anenenu pboe,mbu kamo nenunomo moke da ce omdeiu. He u3non3aume ypeda 3a noucmbane Ha He 3aneyamahu dbpehnu nodoeu unnapkem.
NouchBaHe Ha CTbKIO
При НИСКИ ВьншИ Temператуглеле CTьклata на позорцит, п dedи BCИЧКО пe3 3IMaTа, KaTO ЛЕКО habрьскатс пацялata CTьклесна NOBpхнoc. ПToТИ начIH сИЗ-6ЯВВAT habржени на NOBpXHOCCTTа, KOnTO MOrat Дд дOBedд ДсУпВане Ha CTьКЛOTO. Habря поис te NOBpXHOCCTTа на розорецca CpbUHaTд IO3a И NOKpIBaNOTO. 3a ИЗТERJI-He Na BODATA INIIN3BaIte npICSTabka 3a pOZOpuIN INI IN3БbpSWeTe NOBbpXHOCTTa Do cyxO.
BhumaHue
He hacoueuaime napama KbM 3aneyamahume Mecma Ha pamkama Ha npo3opeua, 3a da He eu noepedume.
NapoctpyuennncToJet
Bne moxe da n3non3BaTe napoctpyHnnaTOnet n6e3 npuHaadnexKHOCTn, HapnpMeP:
3aOTCTpaHЯBaHe Ha MUPn3Mn IbHKn OTOkAueHn Dpexn, KaTo rN Happbckate Cnapa OT pa3ctoHne TO 10-20 cm.
3a nouchtahe Ha npax No zBET. Pn TOBa cna3BaIte pa3ctOJHne ot 20-40 cm.
3a Bnaxho NOHCtBaHe Ha npax, KaTo HanoIte KbPnata 3a Kpatko C npapa I cneI TOba I36bIpSeTe MebeJIte C Heia.
CtpynHaI03a
KoJIkOTO NO-6n30 e TЯ da 3aMbpcHOTOMrCTO, TOKNOBa NO-BnCOK eΦeKTbT OT NocHTBaHeTO, TbN KATO TemnepaTypa nnapa ca Hau-BnCOKn Ha n3XoJa Ha nJIo3ata. Oc6eHo npakTuH OHaNouchTBaHe Ha TpydNo DOctbIHN MeCTa, fyn, apMaTyPi, KaHaII, yMnBaHNIu, ToaNETn, UOpn IIPi padNaTopu. Ipei NoocCTBaHe C npapa CnHnTE BapOBNKOBu OTnarAHm MOrTa da 6bDat HanpBcKaHn cOueT, OCTabete da noDeiCTBa 5 MInHyt, CneD TOBa oBeJeTe C npapa.
Kpbrra yetka
Kpbflata Yetka MoKe da ce MOHTnpa KaTo DoTbJIHeHne KbM TOnKOBaTa CtpuHa DIO3a. Taka6IlaOdapeHne Ha YeTKIne MORat IecHO da 6bDaT OTCTpAHeHne N yOpNTte 3AmbpCraBaHnia.
BhumaHue
He e noxdoxoeta 3a noucmbane Ha yecmbu-menHu noBbpxHocmu.
→ Φιγρα Ε
3aKpeneTe Kpbflata Yetka KbM TOKOBaTaCTpyHnA H03a.
CnloBaI03a
CINOBATAIIO3aMOKeJaCEMOHTnpaKaToIoTbJIHeHHeKbMTOUKOBAtACTpyHaIIO3a.
CnIObataIIO3aYbEJIuCyBaCKOpocTtHaN3JI3aHeHa napata.IopaTTOBA TReNoXODJaTa 3aNoUcTbaHe HaOCo6eHo yOpuTn 3AmbpcBaHnI, PPOdUxBaHe Ha bTIn, fHyrN t.H.
→ Φιγρα 3
3aKpeneTe cHOBaTa dIO3a KbM TOcKObTaCTpyHa DIO3a B CbOTBcTcTBnE C KpbflataYeTa.
YdIbIxHHe Ha ToUcKOBaTa CtpuHa IIO3a 3a TpyNDIOCTbIHN MeCTa DOnbIHNTEJIHO MoXeTe Da MOHTnPaTe YdIbIXeHHeTO KbM TOUcKOBaTa CTPyHa IIO3a. TObA ObNeKcYabA IOCTrIaHTo HA CKPITN MeCTa, KaTO HApN. bTIn NII IN TECHNI MEXDINHH INPOCTpAHCTBa. MHOro e NOxDxOJa7a n 3a NoOYNCTBaH e KaHAni.
PbUHaIIO3a
MOnI NOCTaBeTe Ha pBUnHaT aHIO3a XabIneHOTO nOKpRbAio. OcObeHo NODxoJa 3a MaJIK MNeuCi ne NobPxHOctn, DyUka6bHn I orNeJa.
IpoobaIIO3a
IopxOJa7a 3a Mneu Ce CTeHNn IpoOBn IokpTna, Hnp. KaMeHHN IPOOBe, PIOChN IIOOBe ot PVC.CnHNo 3aMbpceHnte NOBbpxHOCTNa o6pa6oTBaIte 6abHo, 3a da Bb3eJcTBA npata No-dblro BpeMe.
Yka3aHue: Ocmambuzme om npenapamu 3a noucmeane unu nodbpxauemuyncuu, koumo oue ce hAmupam Ha noucmeaHama noebpxhocm, npu noucmeane ce npa Moaam da do6edam do HepabHomepHu mecma, Koumo u3ye38am npu MHO2OKpamHo npunoxKeHue.
→ Φιγρα Β
3aKpeTe nOobTa Kbpna Ha dI03aTa 3a noi.
1 HaBHeTe IIOBaTa KbPna No DbJnxHa nOCTaBeTe IIO3aTa 3a NOd BbPxH He.
2 OToBopeTe 3aIbpxkaunTe cko6n.
3 IocTaBeTe KpaIaTaHa KbPnTa B OTBOpnte.
4 3aTbOpTe 3aIbPkaUnte cKobu.
BhumaHue
He cnaaume npbcmume cu mekdy ckobume.
Iapknpahe Ha yetkaTa 3a nOd
→ Φιγρα Φ
Ipi npkekbcbahe Ha pa60ta 3aKaayete YeKata 3a NOD B Hocaya 3a Napknpahe.
Pnpctabka 3a np030pucn
Ynotpe6a:
- PpOzOpZn, orIeJana
CTbKJIeHn NOBbPxHOCTn Ha duUka6HHN
-ДргггладкnoBbpxHOCTN
Ppei nIbPBoT ONoUcTbaHe c PnucTaBka 3a npO3Opz HApPaBeTe OCHOBHO NouHCT-
BaHe 3a pa3TBapRHe Ha Ma3HHNHTe C pBcHata IIO3a N C XabJIneHOTO NOKPbAINO.
O6IiBaIeTc npa cTbKJIeHInTe NOBbpxHOCTn paBHOMepHO OT pa3CToHne OKIo 20 cm.
C rymenia ObaI Ha npicstabkata 3a npo- 30pU n3BbPbBaIte DVBxKeHna OTrope HANO y no CTbKJIeHaT a nobbpxHOCT. CneD BCaKO dBxKeHne NOcCyuBaIte C KbpNa rymenia OBaI n DOJHnI T kpaI Ha npOzope- Za.
IOTn
Onachocm
IOMyma c napHo haJIrae He 6bua da ce u3noJ38a, e cnuyau ye e naHaJa, ako uma budmu yepexdaHua Uu He e xepmemuHa.
Iopeuia uma c napho haJraane u zopeua cmpy npapa! OsbpHeme bHumane Ha dpyau nuca 3a eb3moxha onachocm om u3aapnna. Hukoae He hacooyame naphama cmpya KbM xopa unu kueomnu (onac-hocm om u3aapnhe). C oopeuama uma c napho haJraane He dokocseune enekmu-yecku kaBenu unu eb3Pnmaehmu npedmemu.
PpeynpeckdeHue
Ipo epeme Ha 3aaprae anu oxnaedane Iomura m npno Hnraae u npucbeunmu meHnma Kabei mpr6ea da 6bdam u3- bH o6cea Ha deca Ha 6b3pacm nod 8 eoduHu.
IOMyma c napHo haJraahe mpy6ea da ce u3noJ3ea u da ce ocma8e bpy cma6uHa no8bpxHocm.
Yka3aHue: Hue npenopbyeame yonpmpe6ama Ha oBckama 3a aIadene KARCHER cakmuho ombejdahe Ha napama (2.884-933.0).Ta3u Maca 3a 2Iadene e onmumnlo cbanacybaHa c Na-nodxodya 3a Baushra yped. T RaIneKyaBa u yckopba 3naumelno npoueca Ha 2Iadene. Ppu ecuku cnyuau mpr6ba da ce u3non36a oBcKa c napponpnycknuea, peweembyha ochoea.
Yka3aHue: Ppu nocmaea ha umu c npHo HaJIraaHe napHa cmeneH 5 (fynkuu VapoHydro) e blokupaHe, makaYe dpexume 3a anade Heeue He ce Mokpym.
YBepTeCe,Ye B KOTeHa Ha napoctpyHnna ypei mma npccha BOda OT BOOpnpoBOda.
Ioctabete napoctpyHnHaIOTnTaIObpeB KOHTaKaHa ypeJa. PnTOBa Tp6Ba da ce Yye QnkCupaHTo Ha Ukepa. Houkaun - OmuMa cemu nocmoHno 3eHeo.
PapoctpyHnIypeIa ce 3aJeIcTbA B cb-OTBeTCTBNE C OINCAHNTO. PpenOpbYHTeHn napHn cTeenHn:
Pomou npn Hen3npaBHOCTN
Mhoro yeTo npuHnTe 3a nobpeHa ca elementapHn n C NOMOHTa Ha cneHnTe yka3aHnMoKe camn Da Tn OTcTaPAnHe. Ako He cTe cnIpyHn nn NobpeHnTe He ca ONncAHn Tyk, ObbpHeTe CE KbM OTOpN3npAHHa cepBn3.
Onachocm
OcbnykeaHemo da ce u3ebpwea camo npu u3eadoen uencenu oxlaede npocmpyen ypeod.
PemohmHume deuHcmu no ypea da ce u3-ebpuusam eduHcmeHo om omopuzupaan cep6u3.
YdbjkaBaHe Ha BpeMeTo 3a 3arpaBaHe
PapoctpyHnT KOTeI cBdbpKa BapOBuK
BoDnIaT pe3epBoap He e nOCTaBeH npaBnIHO IIN IMA KOTJIeH KaMbK.
→ CbaIeTe BoHnIpe3epBoap I ro n3nnakHe-Te.
→ IocTaBeTe BoDnHpe3epBoap HaTncHeTe HaOny,doKaTo CeΦnKcnpa.
JocTa 3a npapaTa He moKe da ce BkJIIOUH
JIoCTbT 3a npapa e ocunpyen c 6IoknpoBkaTa / 3aunItata ot Deca.
NocTaBete 3aunntata 3a Deua Hanpei.
NapHataIOTnI,IIIOeBODa!
→Пoctabete TepmoperyaTopaHa ctenen…
N3nnakHete KOteJa Ha napocTpuy Hnry ypeI nnrTO NOuNCTeOT BapOBNK.
Cnei nay3n B rnaheTo OT IOTyTa c napHo NaIraHe N3nn3aT KaIKN BOda.
Pnno-npOdbJnxIteHn nay3n B rIaJeHeTo npapa MoKe Da KOHdeH3npa B napOpboBa.
→Пьрваразарнаструяда се насочи Кьм OTделна Кьрna.
Bucoko n3nyckaHe Ha Boda
NapoctpyHnT KOTeJ CbDbpxa BapOBVK
→Поочствае на варовикав napoctrpyня KOTeJ.
Pe3epBnH qactn
I3non3BaIte cAmO opunHaJIHn pe3epBn YacTn Ha KARCHER.CncbK Ha pe3epBnTe YacTn Ⅲe HamePte B KpaJ Ha HactoJIoTO YnbTbaHe 3a pa6ota.
TexHnueckn daHHN
| Еléktriческо зхранвае | |
| Нар每一天е‿ | 220-240 V 1~50 Hz |
| Градус на зашитаIPX4 | |
| Клас зашита儿TЯ | |
| РавOTно на лягане макс. 0,4 MPa | |
| Вре me 3a подраване儿Mнутɪ | |
| Колочestvo пара‽60 r/MinH | |
| - Празьлжинто 150 r/MinH | |
| - Рдокатно узпунсане\/250 r/MinH | |
| Колочestvo на льнени | |
| Вожен розерboaор | 1,5 l |
| Парен котел | 0,5 l |
| Размени | |
| Терло (бez п ri naclж-ности) | 6,0 kг |
| Дължина | 439 MM |
| Широчина | 301 MM |
| Височина | 304 MM |
3ana3ame cu npaeomo ha mexHuyecku u3MeHenu!
EJemeHTN OT CNEUaJIHaTa OKOMJIeKTOBka
Homep 3a npbukn
www.kaercher.com/REACH
Tarnekomplekt
Aurupuhasti on tooks valmis.
Käitamine
Jooniseid vt volditaval lehekuljel!

Lisavarustuse monteerimine
Joonis 2
Avage seadme pistikupesa kate.
Aurupuhasti on tooks valmis.
Markus: Seade sulgeb iga 60 sekundi jarel luhikeseks ajaks ventili. See hoab araventili kinnikiilumise. Seejuures kostub vaikne klopsatus. See ei mojuta auru valjumist.
Vee lisamine
www.kaercher.com/REACH
Piegades komplekts
Jusu aparata piegades komplektsi ir attelots uz iefakojuma. Izsainojot pbaraudiet, vaisatsir pilnigs.
www.kaercher.com/REACH
Komplektacija
Ctapi npncTrooi MICTaHIMatepiAIN, 10 MOkyTb BKNOPNCTOByBaTnCRA
nOBtOHO.Tomy,6yNbIaCKa,yTNIi3yIte CTapi npICTpo'3a DOnOMOrO CneuaIbHnx CnCTem 3bOpy cmTTA.
Ihctpykuii i3 3acTocyBaHHK KOMnOHeHTiB (REACH)
AkyaJIbHi BiIOMOCTI npo KOMHOENTn HabeJeHi Ha Be6-By3JI 3a aIpecoIO:
www.kaercher.com/REACH
KomnJIeKToNocTaaHHe
KOMIIeKtaIgI npIcTpoI 3a3haYeHa hyaNakOci.Ipn po3nakyBaHHi npIcTpoI nepeBipITN KOMIIeKtaIIO.
Y pa3i Hectaui DoDAtKOBOrO 6bIaNHaHHa 60 uKoJKeHb, OTPMAmHX nID Yac TpaHCnOpTByBaHHa, cIiN NOBIOMTe pO ue B TOPROBbHy opraH3auiHO, JaKa npOdaJa anapat.
Tapahtria
YKOxHi KpaIHi DIIOTb yMOBn rapaHTi,HaadaHOI BiIDNoBIDHOO φIpMOH-npOaBcEM. HenoJaKn Bpo60ti npCtPOu MN ycBaEMo 6e3nPaTHo npTfOM TepmiHy dI rapaHTi, JAKUO BOHN BnKlnKaHI 6paKOM MaTePiaNy Ch NOMnKamn BnROToBJIeHHy. Y BnPaJky CUnHocTi rapaHTi 3BePTiBcRdo npOaBcUy H Na6LnKChn ABTOPOBAHNI CepBICN UeHTp 3 DOkymHeTaNBM NiD TBePdXKeHHm NOKyni. (AApceN DnB. Ha 3bOpoti)
Ppabuna 6e3neKn
ObepexHo!
Poboma y b6yoxhe6e3neuHX yMo8ax He 0360jraemcb.
Ipu eukopucmaHHi npucmpo 8 He6e3neuHux 3ohax cnid dompumyeamucra iDnoBihux npaun mexhiku 6e3neku.
Eknyamaia npcmpo 6baceHi, oMicmmb yody, zaboponeha.
Ppucpii He moXHa eukopucmooyamu dna yuueHnHa eekmpuunx npucmpoie, Hapuknad, dyxobok, eumxhux haeicie, MikpoxaIbOeux neeu, meeneizopie, lamn, fehie, eekmpuHux obiaipieaie moio.
Ipepe uokopumnHm neeepipme cnpaBncmb npucmpo ma akcecayie. Kkuo 0bnaDHaHHa 3haxodumbcy Hbe3doaHOMy cmaHi, uOzo He moKHa eukopcmoeyamu. Oocblueo pemelbno neeepime Kaebb MepzHozo KueneHn, npobky dny mexHicNo o6cnyoeyeaHnma wana h nodayi napu.
UwKodJeu KaBJIb MepexKHOZoXuBHeHnIOeUHeN6yMu HeaAHO3aMIHeHu yNoBHOaxKeHOcIyKbOIOceEicHOzOobcIyOeByaHn/φaxieem-EnekmpukOM.
Uwkodxehu wlahe nodaqui napu nidnae Heauii 3amhi. Do3oIaembcya BukopucmaHHn minbku wlaHae nodaqui napu, peKomeHdoBaHux eupo6HuKOM (Homep dny 3amOBeHnH y cnuCKy 3anachux yacmuH).
Hikonu He mopkaumecb Mepexhoo omekepy ma pozemku oonozumu pykamu.
He yucmum npoio npedmemu, uO micmmb peoounu, ukioluei dny 3doopoe (Hapuknaad, a36ecm).
UyKOHOmy pa3i He mopkaUmeccmpymennapu pyko1o 3bni3koieidcmamiHa HnpaeJMa II Ha IIOdeu ma meapun (He6e3neka onikie napoi).
Ipo6ka dny mexnHoo o6cnyooyeAHnHe Ma e iDkpuamuc nio yac eknnyamaui.
△Ponepeoehn
Ppucpiu moxe bymu nio'edhaui nuue do eekmpuuhoMepexi,uo noeunha 6ymu 8cmaHOeHa eekmpomohmepom 3eiho 3 IEC 60364.
Ppucmpiu cni dEmukamu nuue do 3minnoo cmpymy. Happya noeunna eidnoeidamu Eka3aHUM Ha fipmoei mabnuci npucmpoko daHUM uodo hapyuu.
U cupux npumiueneHHx, HanpuKnaad, y eahnux kimhamax, ekniouaume npucmpiun bku e po3emku i3 nepeekuoyehum 3anobixkHM bumukayem muny FI.
HeiOnoiHn odoxyeaui moymb 6ymu Hebe3neHmu. BukOpucmoeyme mIbku 6pu3ko3axuuehu nOdoxyeaui i3 nepemuHOM npoody He meHu 3x1 MM2.
3'ehaHnHa MepeKhoBunku ma nodoxxyaHa He noBuHHe Jekamu y eodi.
Ipu 3amini cnojnyhux enemehmie Ha Ka6eJI mepexHo2o JkuElenHnA abo nodoexyuea i noBuHna 3abe3neyuyeamuc 6pu3ko3axuueHHra mExaHnHa miuHicMb.
Kopucmyaay noeunen eukopucmoeyamu npucmpiu y iidnoeiodocmi do incmpykuii. Bin noeunen epaxooyamu ymou Micueoymi ma 3eepmamu ybaay Ha mpemix oic ndac pobomu 3 npucmpoeM.
Leu npucmpiu do3e0nembc8 bukopcmoeyamu dimm cmapwe 8 pokie i ocobam 3 obmxeHUMU pfizHUMU, cehcoHUMa abo po3yMoBUM moKlueoocmmu, a makoX ocobam, uO He MaIomb nompioDocbiy u 3HaHb, Kaoo eoHu 3haxodumymcbr iD haJiaDom oc6u, uO biIOBidae 3aix 6e3neky, i ompumaomb eiD ii nonepedhi po3'rcHenry biDnocHo 6e3neHoi ekCnpyamaui npucmpo. He do3e0nJaMe dimam apamu 3 npucmpoem. He do3e0nJaMe dimm npoeodum ouuueHHma o6cnlyoeyeanna npucmpo6e3 HaJiay.
He MoXHa 3aIuWam npucmpiu 6e3 Haanay niO yac pobomu.
ObepejNcMb npu yuueHnI kaxeJbHex cmIn 3 eJeKmpuHuMu po3emKaMu.
yeaza!
Cniokyuime 3a mum, uo6 mepexhi kaeni abo noobxuehi He moxha byno nowkodmu hacmynuwu ha hux, y pezylbami nepeunhann, po3ipbaHHa 60 nodibhoo yukodxeHHa. 3axuaume mepexheni kaebibid kapu, ma na ma oocpux noeepxohb.
YxodHomy pa3i He eukopucmo8yume po3uHnku, pioHn, 0o Micmpb03uHnku a6o Hepo3eedehi Kucnomu (Haip., MuHi 3acobu, 6eh3un, po3piKyeayi pap ma auemoh) i He 3aIueaIme ix y bak dny bodu, ockInbku BOHu aapecuEHO ennuabomha Mamepianu, eukopucmaH e npcmpoi.
Ipehenoc npucmpoio ndac po6im 3 ouuueHHa3aboponeHui.
IpucmpiHHeo6xio hO po3miamaHa miCuHIOcHOeI.
Ekcnnyamyeamu ma 36epiaamu npucmpiu 3aioHo do onucy ma manIOHKie!
Iid yac pobomu He do3oJIembc8 6nokyeaHna baxen npaui napu.
3axuzaume npucpii eio douy. He 3epeiaeme nioikpumum He6om.
3axnchi npictpoi
yeaza!
3axuchi npucmpoi cnayyomb dny 3axucmy Kopucmyaue. Budo3miHa 3axuchux npucmpoi yu HexmybaHn Hmu He donyckaembcr.
PerylaTOp Tncky
PeryIaTOp TnCKy UtpmUe MaKcImaJIbHO noCTiHnTnCK y pe3epByapi nID qac po60Tu npuAny. HarpiBaHHB BMNkaeTbcra pni DOcRHeHHi MaKcImaJIbHO rO 3NaueHHo pOboQOro TnCKy U pe3epByapi, i npn padHHi TnCKy B pe3epByapi BHaCNIIOk BiD6opy napn HarpiBaHHa 3HOby BMNkaeTbcra.
Tepmoctat KOTna
JaKIO npn BUNHKHeHHI HeCnpaBHOCTi y KOTJI He Mae BOIN, TEMpepaTya B HbOMy NiDnUuyeTbcra. TepMOCTaKOTJIA BUMNKaE HarpiB. 3BvauHn peXm po6ToN 6Ye 3HOBy DOCTUYHNI, KOJI KOTeI 6Ye 3AnOBHeHNI.
3axnchm TepmoCTaT
Як soo Perулготup TUCKY Ta TeMpOCTa KOTna BИшов i3 Laу npu BИннКHeHHi HeCnpaBHoCTi i npucTpii neperpibcra,TO npucTpii BIMnKaecbca 3a DoNOMORIO 3axnCHOrO TepMOCTaTy. 3BepHITbcIdo BiDiny 3a6e3neHnH 3axnCHnMI TepMOCTaTamN B BiINOBIhHi cLyKoi OBCnyroByBaHH KJIeHTIB KOMNaHII "KARCHER".
Побka ДяTekhiHoro obcnyroByaHHa
Пробka дяTekhiHOrO obcnyroBvBaHnЯ e OdnohyacHO i peyuKuHm KnaHAnOM.BoHa 3amKae KOTeI BID BUNHKAIOHOro TnCKy napi. RaKuo peryIaTOp TnCKy noUKOJKeHO i TnCK napi B KOTJI 3pocTaE,TOpeyuKuHm KnaHAp BIDUnHReTbCra i npa BHXoNDt Ha3OBHi uepe3 np6kY dN JTexHrO BOcnyroBvBaHnR.. 3BepHIbCra,6yd NaCa,do BiDIny BiINHOJIeHHra pO6To n pnpCTpoU B BiDNoBIdHni CnyK6i obcnyroBvBaHnKJIeHTIB KOMNaHII KARCHER.
Onnc npncptpo
YcIbOMy noc6Hnky 3 ekcnnyatauui HabeJeHO ONUC pncTPOU 3 MAKCmMaJIbHOO KOMJIeKtaueIO. KomNKeTauaB iDpi3HReTbcra 3aJIeXHO BID MoDeJI (DNB. yNaKyBaHH).
306paXeHHaNb.Ha po3Bopoti!

A1 ⅢepebHa po3eTka npnlaу 3 Kpuukoio
A2 Pe3epByap IЯ BODI
A3 Pучka peЗервару Дя Вори
A4 Iepemnkae
A5 PanaheIb ynpablinnHa
a IHHkaTOp "IonoXeHnB VIMNK"
b IHHkaTOp "HeCTaHa BOAn" (UEPBOHnI)
c IndikaTop "Harpib" (3EJIeHnI)
d KjIbKiCTb npa1 1
e KInbKiCTb nap 2
f KjIbKiCTb nap 3
g KjIbKiCTb nap 4
h KjIbKiCTb napi, dyHkci Ja Vapohydro
i HndkaTOp "Po3ni3HabHH npackn"
j Izhinkatop "Po3ni3HabAHnnapoBoroniCTOJeta"
A6 3amok BiDcki DnA akcecyapib
A7 Ipo6ka dny texhiHoro o6cnyroBybaHHa
A8 Puyka
A9 TpImaMdIpnHaJIeXHoCTeI
A10 36epiraaHЯ akcecyapib
A11 Miche dny 36epirannn MepexHoro shhya
A12 IapKyBaJIbHc KpinJIeHHa HacaKn dIpy nIiIIOrI
A13 MepexeBn Ka6eB 3i StenceJbH0U BNIKOHO
A14 Pobouki koneca (2 wTuKn)
A15 CnpmaMOyBaJIbHn BaJIeIb
B1 Napobni nictoJeT
B2 BaxiNb noaChi napi
B3 Khonka po36JIOkyBaHHa
B4 3axnt bid ditei
B5 IapobmIuHa
B6 Ⅶtekep noaui napu
C1 Conno tokoboro ctpymenr
C2 Kpyrna zitka
C3 BucokonpojdykTmbHa fOpcyHka
C4 IopOBxByBaIbHnI eIeMeHT opcyHKn KpaIKOBORO CTpyMeHa
D1 Puyne conno
D2 POKPITT3 enoHky
E1 IopobKyBaJIbHI Tpy6Kn (2 WtYkn)
E2 Khonka po36JokyBaHHa
F1 Conno nny nony
F2 3atncka
F3 RaHcipka dIy MmTTI ndn
G1 HacaIka IJIa MMTT BIKOH
Onci
H1 Пpacka Дяпасувань napою niD TnCKOM
H2 Bvmka npn (hixhi)
H3 IIndkaTop "Harpib" (IOMAPAHUeBn)
H4 Bvmka napu (Bepxhi)
H5БLOkyBaHHBmMkaa napi
H6 PeryjIaTOp tempeIaTpIa
H7 Ⅲteke npoai npn
Kopotka iHcTpykciia
→ДИВ.МалнOHиHa CTOpiHci 2
1 HanoBnHTn pe3epeByap IJRA BOI NO BIDMITKIN "MAX".
2 BctabTe wTekep noaui napu B wTeencelbHy po3ety npnay.
3 BCTaBTe 5TEnCeIbHy BuIky. YbiMKnHryTn npncTpi, oBepeHyBUn nepemikau.
4 Indukamop "Papoeu nicmonem" cibumbc3eHnM.
Ihukamop "Kilbkicmb napu" cibumbc8iNum, a "VapoHydro" cibumbcyaepoHUM.
IHukamop Haepie6bnumae 3eJeHUM.
3aekatn, nokn He 3acBITNCs iHdkatop "Harpi".
5Писднaite hacaKydo napoboro nictoneta.
Iapobn cenapaatop roTobn do pOboTN.
Eknnnyatauaia
3o6paXeHHaNb.Ha po3Bopot!

3MOHTyBaTHO6JIaHaHHA
→ ManIOHOK 2
Bidkpntn kpiuky po3'emy npictpoio.
1WTekep napi miuho 3aKpiinTuB WTeencelbHni po3eTu npictpo3 KOKyXOM. Pn cybomy wTekep nobHHen 3aikcByatncs i3 KnaucHHam. Ira6iO'edHaHn: PnPunChTu KpuKhpy Po3'Emy npictpoDoHN3y Ta BNTarHyTu WTekep napi i3 po3'My npictpo0.
MaJIIOHOK A-B
3'εdHaTn Heo6xIe Hne npiJaDAn (INB. pO3di "3actocyBaHna PpIaDra") 3 napOBm nicToTeom.ДЯцBo rHaJrHiB BiIckPITn KpaPnpHaJIeXHoCTi Ha napOBn nicToNET Ta HacyHbTe Ha napOBn niCToNET HactInbKn, 106 KhONka poO3bLOkyBaHna napOBOro nicToJeTa 3aΦikCyBaIacr.
→MaJIIOHOK C
Pn Heo6xHocT BVKOpncToBvIte
noOBKyBaIbHi Tpy6Kn. IyIcBoI
3'EnHaIe 3 napOBm nICToTeOM OHy aO
DbI noOBKByBaIbHi Tpy6Kn. HacyNbTe
Heo6xHnPiInHaIeXHoCTi Ha BInbNk Kpa
noOBKyBaIbHOI Tpy6Kn.
BiD'ehHaHnHa HacaOk
△ObepexHo!
Ipu 3njammi npunanexhocmei npucmpoMoKe eumikamu zapraa oda! He 3nima'umeHacadku nid yac nodaui napu - noap03oObeapoeaHnra!
BCTaHOBnT 3axnCT BiD iTei B HnXHne nOJKeHHra (BaKilb noaui napu 3a6JokOBaHni).
→ MaJIIOHOK D
ДяЗЯТТпинанжностеН HatNCiTb Ha KhoIGNy po36LOkyBaHn Ta BiOkpeMeTe DeTaI OndHy BiD OndHOI.
HanoBHTn pe3epByap nla BODn
Pe3epByap IJRA BOIN MOXHa HAnOBHIOBaTIN B 6yDb-IAKNI Yac.
y8aza!
He eukopucmoeyamu KOHDcHcam 3 cywapku dny bini3Hu!
He hanoeHIOBAM 3acobAm dny uueHHa6o iHuwu do6aKamU (HanpuKnaad apomamu3amopamu)!
He eukopucmoeyamu yucmy ducmunboaany oody! Maks. 50% ducmunboaHO i oodu i 50% eoonpoiHO i oodu.
He eukopucmoeyamu 3ibpany doooy body!
→MaHHOHOK
ДянанOBHeHЯ BOdoIO MOxHa 3HЯТи pe3epeByap ДявBoDN a6o HAnOBHOBaTи IOrO BOdoIO 6e3nocepEHNbO Ha npICCTpoI.
3HHTpe3epByapyIyBOIN
→ПOTЯнMupe3eRByapДЯВОИ ВERTKanbHoуropy.
→ 3anobHnTn pe3epByap nla BOINBepTKaJIbHO nID BOOpPObiDnM kpaHOMdo nO3NaUKN MAX".
BCTaHOBuTn pe3epByap IЯ BOnI Ta HATNCHTN Ha HbOrO Do φikcauii.
Be3nocepedHbO Ha npuiJaI
→ HAnITN BoDy 3 EMHOCti y 3aJIINBHy BnPBy. 3aNoBHNtN Do nO3HaUKN ,MAX".
YbimKHeHH npnlaNy
Cunbhi 3a6pydHeHHnHa npKnaI:
- CTapi 3aJIuShKи iKi, 3aJIuShKm MInOuHx 3acO6iB, He3NaUHm HaKUn, MiUHa JxIpOba nnIbKa, BnCOxLi nJaMn BoDn, 3aJIuShK mJna
PpeMeT / nobepxHn, Hanpknla:
πiДIIOROBa pIITka, IBX, IInHoneym, pIITka DЯ OБицювань CTeHIB, pIITKOBi CTnKN, yMnBaJIbHnKn, dYs, BaHа, oBnaDHaHnЯ DЯ BAHHN
KilbkiCTb nap5-ФункцiVapohydro
Oblacti, zo po3tpickaIncr, BkKnBneHi, kmi MoKHa o6p6bIaTn BOIOU, HApNknJaI:
Kopctki Kipkn, ycoxna rpg3b B uinihax i Kytax, 3aIIuMKn Mnna, He3NaHn HAKIN
PpeMeT / nobepxHn, Hanpknla:
- 06laJaHaHnIyBaHHN, BHyTpIiHi BiKOHHi pAMn (He DepeB'JHi), nonu y BaHHI, nHTN BOHNu, dyuOBI kaibKn, cTOKn
YctaHObKa KInbKocti napu
BCTaHOBHTn nepemkaH na Heo6xIDHy kIbKicTb napy.
→ Hatncihtb Ha Baxkilb noaChi napn, npu cboMY cnoatky HappaBnaHOn npoBni nicToJeHa TkaHHy, nokn npa He 6ynde BHXOJNTPiBHOMipHO.
BmKHeHn npuHaDy
IpeBecTN BUMKauB NOJIOKeHHa "BUMNK" Ta BUMKHyTu npucTpii.
→ BntTnHtB MepeXhN I TeKeP 3i ITeNCeIbHOI PO3ETKn.
→ PπιNTnCHiMb Kπιψκу ΜτεnceЛьHoI p03eTkn
πριλάγ Μθημίγα Μτεκερ
ποδaú παρη 3i ΜτεnceЛьHoI p03eTkn.
PnpnbpaTe noBepxHIO nIiNorn
Ipeep3actocybaHHm npicctpoIO nJa
nHsEHHnnapoO peKOMeHyTcBcN iDMeCTn
a6o npOnnloocOHTn iDlNorry. TaKIM YHOM
MOxHa 3BiNbHTn iDlNorpy BiD rpa3i/
He3akpinHeHHx cactOK nepeepnpoeDeHHM
BOlororo npnbipahnn.
OcbixeHHra TeKCTnJIbHnx BnP06iB
Ipeed npoBeDeHnemObpo6Kn 3 DoonomoroOp npinCTPOIO DnA YnueHnna paoo CnId 3aBxdn nepeBiprTn CTiKicTB TeKCTnIbHnx Bnpo6IB do BnNBy nap. Hacampeed, cnid obpo6ntn npao Bnpi6, notim npocuWnt nOro Ta, HapeSti, nepeBiprTn CTiKicTB fap6yBaHHra Ta HaraBHicTb Deopmaui.
OuichiHnnoBepxohb 3 NOKpTTaM TaJaKOBaHnx NobepxOHb
Причшенилakobани nobepxohb abo nobepxohb i3 nokpTTam, Hanprknad, kyxohnix me6blb ta me6blnbдя KBaTpnp, dBepei, napKeTy, Bick, Me6JIeBa noIITypa, StTyHne nokpTTa abo Фарбma MoKytbp 0p3uHnITncs abo Ha Hnx MoKyTb BUnHKHyTu ПЯМ. Дп npOBedeHнчишени слд 3лERka BiДnapNTu
xycKy i NOTIM npoTeptn HeIO nepepaxobaHI NOBepxHi.
y8aa!
He HanpaBnaIme npay Ha npukneHi kpaKu, ockInbKu obkndka moke eidKeimucr. He eukopucmoeyume npucmpi dny uuehenn depees'hux abo napkemhux ndnoe 6ez nokpumm.
OuHnckna
Пинзькх 30Вишix Tempepatypax, Hacampeed, y3IMky, nporpiite BIKOHne CKIO. 3aBdAnu cIbOMy Bn 3MOKeTe Ierko O6pObTu napoBCIO NOBepxHIO cKnA. Y taKni cNociB Bdactbcra YHNKHHTN Happyu NOBEPXHi, 0c MoKe np3BecTNO pO3bNTTcKnA. PToIM NOBepxHIO BIKHa CnID OChCTNU i3 3AcTOCyBaHnM pyHoi fOpcyHKn TA cepBETKn. DInBaJAEHHRA BoIN CnID BIKOPNCTOByBatN HacaDkY dJa MMTTBiKOH a6o DoCyxa npoteptN NOBepxHIO.
yeaza!
Iapy He Hanpaenjomb Ha yuinbnehi dInrHku 6iia eikHOi paMu dna zanobiaaHnHa ii yukoJxehn.
Iapobn nictolet
Iapobn nictolet MOXHa BnKOpNCTOByBatn 6e3 npHnAnExKHocTei, HApNKnaD, dIy:
- ycyhenh3aapanix Ta cknlaok Ha Bucynx npedmetax Ondary npn oboo3 biDctani 10-20 cm.
BnDanaHnNpIy 3 pocInH. DOpTpMMyTeCb BiDCTaHI 20-40 cm.
ДЯЗВОЛОЖЕнHAпOTИРаJIБHOТКАнHи.ШВИДКОобрбITьТКАнHy napOуТа npOTpIb HeI O Me6Nl.
ΦopcyHka ToUKOBOrO CTpyMeHra
Ym6nKYe 3a6pydHe He Mieue, TmBnue efeKT YnIeHnO, OckIbKn HaBnuIa Tempepatra Ta Bxid napn 3a6e3neuTybcr Ha BxOdi 3 fOpcyhKn. Oc6bnBO nIxOanTb dIy OunSeHHB BaxkOoCTynHnx Micb, CTNkIB, apMaTyp, cToKiB, paKOBnH, TyanetIB, kAnHO3i abo paiaTopib onaJIeHn. CInbHn BaHnHn HAIIT nepeD yIeHNm npoIO MOXINBO 3bpi3Hytn oUtOM aO IoIMOnHOo aO IoIMOnHOo KICNoTOIO, 5 XBNHn DaTI NODjTn, a NiCJr UboO obpOHTn npoIO.
Kpyrna zitka
Kpyrny 9iTky MOxNIBO BCTAHOBNTHa cOnnI kpanKOBOrO CTpymEnra B JKOcTI DOnOBHeHH. 3aBdAnu YIeHnIO 9iTkoJO E MOxNIBicTB IerKOrO BnDaleHH CTIKNX 3a6pydHeHb. Yasa! He npuzhahe dJra OuyueHHy yumnubux noeepxohb.
→MaJIIOHOKB
3aφikcyBatn KpyIy uIITky Ha conPi KpaKOBORO CTpymehr.
EneKtpnHn po3nHIOBaay
BnCOKOpnoyKTnBHy fOpcyHky MoXJnBO BCTaHOBtN Ha fOpCyHci TOckOBOrO CTpyMeHIO B JKOCTI DOnOBHeHH.
BnCOKoPnoDyKTHNbHa fOpcyHka nIDBnuye WBnIDKICtB BnnapOBvBaHHa.3iieI npuHn BOHa DObpe NiXOde IJRA YNuSeHHa OcObJIbBO CTIKORO 3a6pydHeHHa, BnDyBaHHa KytIB, CTNKIB, TOIO.
→MaJIIOHOKB
BncoKoPnoDyKyTnBHy fopcnyKyu 3riJHO 3 KpyIIOU 7iTkoIO 3afoiccyBaTu Ha fopcynuToUKOBOrO CTpyMeHIO.
IpoobKByBaJIbHn eIeMeHT φOpcyHKn KpankOBOrO cTpyMeHЯ
Для Oчишени Вадковоctунх Мсць.TAKOK MOХна ДдотКОВ ВСТанOBИТ NIDOBЖУВЧ Ha Форсунк КрankobORO CTpymener. Lп NOBERSUDE OCTYДо зirHyTNx Mсць, HANpIKnIaD, KyTIB abo By3bKINx npocstopiB.Takokdoбpe nIxOdntb Для Oчишени CTOKIb.
Pунcaфорсунka
HaJrHItb Ha pyuHy fOpCyHKy OXoN 3 maxpOBoI TkaHHn. Oc6JIbNO do6pe npCTOCOBaHa dIy HeBENKnx NOBepxOHb, 0MIOtbcra, dywOBNX Ka6iHOK Ta dzepkAn.
Opcsnka nna nndor
PnncocobHa DnB Cix MnHnx CTiHHx Ta
noOBHX NOKpTTIB, HApNKnAd, Kam'HNX
niDnor, PnNTKn Ta noniBihInxNopny. Ha cnIbHO
3a6pydHenx NOBexHx npaOioTe nobIbHO
DnToro, 06 36blwHTn TprBaNICTdi napn.
Pumimka:3anuKu 3acoby dny uueHna a6o
emybcii dny doaJny, k3aunawombsra Ha
OuyuyeaHi NoeepxHi, MoKymb ppu uuehenHi
napo ymeopoeamu cmyu, kie eudanombcnpu baaamopao0my ouuueHHi.
→ ManIOHOK
3aKpiNTTKaHnHy dIy MTTTnPiNOrnHaΦopcyHci dIy niDnOrn.
1 CknaTn TkaHnHy dny MMTT pyiIIOr n B3IOBx Ta NOMICTN Ha He iΦopcyHky Ipy iIIOr.
2 BiDkPnT 3aTnCKn.
3 Iomictnti KiuTt KaHHN B OTBOpN.
4 3aKpTuN 3aTnCKn.
yeaza!
He 3acoeyeamu naIbui mix 3amuckamu.
PapkybaHHFopcyHKn dny nIdIorn
MaJIIOHOK F
→ HanoBnHTn pe3epeByap IJIa BOI IO BiIMtKIn "MAX".
Togntb chepboHni iHnkaTop "HectaBoNDi".
Hemae BOdy npabOBmy kOtIi. CnpaIOBAB 3axnCT BiD nepeharpiBaHHHaCoca.
→ BnKIOHcIb npncTpii.
→ HanoBnHTn pe3epeByap IJRA BOIN IO BiIMtKn "MAX".
→ BBimKhyTn npncTpii.
Pe3epByap dЯ BODI BCTaHOBNeHO HEnpaBnJIbHO a6O Ioro BKpITO BaHrHIM HAblBOTOM.
→ BnHrTu Ta npOMTu pe3epByap dIa BOuN.
BCTaHOBtI pe3epByap IЯ BOnI Ta HATINHa HbOro Do fikcauii.
Baxinb noaqui napn He moxHa HaTncHytn Baxinb noaqui napn 3afoicKcobAHm 6nokyBaHHam / 3axHCTOM BiD BKJIIOUeHHa DITbMn.
→ IpepeBecTn B nepeHc nOIOXKeHHa 3axNCT BiD dItei.
TexhiuHxapakTeepntkN
J 1 J 1 J 1 J 1 J 1 J 1 J 1 J 1 J 1 J 1 J 1 J 1 J 1 J 1 J 1 J 1 J 1 J 1 J 1 J 1 J 1 J 1 J 1 J 1 J 1 J 1 J 1 J 1 J 1 J 1 J 1 J 1 J 1 J 1 J
jIJIgbiJc aolc jzjla
Jboc
y
Jauie lgljll JScy jgabw
1 111
Lg 105
e aae aoe 50
.aaal
jbs
w 12, y/ a/ all / lac/sj> y
a a a a a a a a a a a a a a a
.
ooj jooj Joofo 0o
a aal oJrJb jn no JlaJl
jLgJl#y
a 1
"
jglj
gol ofoa a yjz jy
JU) KAERCHER JJI JJI
wio gio 8ic oJr1.6.295-206
jgl//1c a110/1 20000000000
lalb jllj lge pduwly
j//j lo a///a//d//j o//
.
JcIw 8 JgJgJgJg
aJus Jus Jus Jus
J 10
Jj Jj jjj
o>gololol no aLglg
(100alljbal) lola
oogwlaaiiaaalaae oas
.2a
.(a2axll jbi) clll ijj sJo
g jjll aaiill jge 2a.1
.
aJolll aJlill
Jusg aioy/ aiaio Jua: sai
Jla/1gol2w/9 wla//
jLJI jg>
wslg a oJl wli Jw .
aJwJg aJwJg aJwJg Jg
p2xuW y. a gio 60° oJr> a>dsic
Jwll Jsaw 1yall aio
J 1
Jg Jg Jg Jg Jg Jg Jg Jg Jg Jg Jg Jg Jg Jg Jg Jg Jg Jg Jg Jg Jg Jg Jg Jg Jg Jg Jg Jg Jg Jg Jg Jg Jg Jg Jg Jg Jg Jg Jg Jg Jg Jg Jg Jg Jg Jg Jg Jg Jg Jg Jg
| TF | \( \mu_{\text{J}}/\mu_{\text{J}} \) | Hd° | \( \mu_{\text{J}}/\mu_{\text{J}} \) | \( \mu_{\text{J}}/\mu_{\text{J}} \) |
| 100 | 1,3-0 | 7 -0 | \( \mu_{\text{J}} \) | 1 |
| 90 | 2,5-1,3 | 14-7 | \( \mu_{\text{J}}/\mu_{\text{J}} \) | 2 |
| 75 | 3,8-2,5 | 21-14 | \( \mu_{\text{J}} \) | 3 |
| 50 | 3,8< | 21< | \( \mu_{\text{J}}/\mu_{\text{J}} \) | 4 |
c0a aJgJxJyI JxJyJ 1111111111111
Jgull ss no aksll w
.
JgI JI J I J
.1a>laI Jolg> 20 aJla>laI Ej; 1
1a> gJal oJdWll eJc 291
.1a>laI
a> g 0 aal all j
g g. aaiall aig odsw 2g 1 1 1 1 1 1 1 1 1 1 1 1 1 1 1 1 1
oojgall olall no ayxlal jai p . (Ioljogall jbal) loai
J 100020000000000000000000000000000000000000000000000000000000000000000
aIg aIJI
ab = 8
y 12, y/ a/ll Jla/ c/ j.
JxJyAaLc Jue
Jc Jc Jc Jc Jc Jc Jc Jc Jc Jc Jc Jc Jc Jc Jc Jc Jc Jc Jc Jc Jc Jc Jc Jc Jc Jc Jc Jc Jc Jc Jc Jc Jc Jc
Jgll ss m aKsll w y CwI 1 Jd Jy Jy
a>gI clll jj gJ J
. 1 a>laI Jolg> n m a Ia>laI E jil . 1 1 1 1 1 1 1 1 1 1 1 1 1 1 1 1 1 1 1
a> gGJ 1 aJxJlJI Jy j
gog g .aiall aig oal w 29
gl daiil oogwai jgiail
gagwai g .aiall aig oal w
gog Jogwll ol
Jg.ogg gJgJgJgJgJgJgJgJgJgJgJgJgJgJgJgJgJgJgJgJgJgJgJgJgJgJgJgJgJgJgJgJgJgJgJgJgJgJgJgJgJgJgJgJgJgJgJgJgJgJgJ
o>gJl olal JyLjI g j. . (Ojgl) lal
Jololol Jrjraaiaiaia
aio ofo/oofoofofofofofofofofofofofofofofofofofofofofofofofofofofofofofofofofofofofofofofofofofofofofofofofo
ocl/1JcJb//aKy y 1jg
a//uysla/1c /ka//bLw
k_2 = 5
gJleJI JJIJIJIJIaO JIeWuP
Jai jll 21
jlll ciaol baiol:gbaiall
zallll lllb jzjg jzj
a.16b.gzio
glplaww:jaiww
Ooo, 2 Jll Jll gdd. ailo
laol gclly plawr jzj. oaaa
ploU ploal
a2b9 JlJzJg a26Jg 1gge
a g jg 1 sJ ic w
sglwlljlll j
jlll jolSall lck
Jkss LgSLoIg 1g
.
J
J 1/2
A. y/11 9 clo JliD
la oIgSall JrJrJrJrJrJrJrJrJrJrJrJrJrJrJrJrJrJrJrJrJrJrJrJrJrJrJrJrJrJrJrJrJrJrJrJrJr
yJlAaBg o w
aclal
J 1
JIL 1
Jus/1g S//UuLp/2y/1y:ab>30
. 1y/laI aeb
olksa Jy jiljlll 2
Ss
sll alglb ploxlwly aai:
Jbll baw aolb JKAERCHER
S//a/1b.2.884933.0)
yj/1jg//go a//a,0i
Jsu Sll aLac ju2g juu
alglb pUxw/ jy Jb sJlc wU
JcW JcI Iooia aioj/0s
.4S
a aiojio ofo so oio ic:abzo
ploawll jlsy a jjzbw
sJyll aaljll jawl -
a
JgJgJgJgJgJgJgJg
.10gill 2,2,2a,bw p12w1
J 1
sglwllpww20g>laa aahlwo
Jsw 1jll baww
pIswJawI Jcl noJluw
.9gill a,bw a,bw a,bw201 9gJ
aJg aIbIaI aJg
jRJ 1000
j1x1 = l2x2
olsgaill
jbs
1j/1j//0s0p0jzawy
g/2019 101
.aaS20 16 C
jlll lilg aicw gss jlll ofo
aIooalao/laolalbla/
gj j1/ajgj 1yj
aLly/12)U/Lg/1g/
1/110gSo y.
clw/9iwlq5 Lwogaio aiLull
JLeuWUdLg
#
o 1
pI8Jy/JeBlyJglc
.
1c 82099 j/10gso p/2xuw
cui zhu
Jia aaaaagg gaaa Jgogg aaww laL .aaaaa aaii IgIgjll
Jaaal 1
11 a0g
g 1aal aabw yj baw gao w
pLwJnJgJwEeAaIaIoo
.11
a. y( 0,14,1)
aJyIg IbjgAal JcLg aJ aawlio
JJIJIJIJIJIJIJIJIJIJIJIJIJIJIJIJIJIJIJIJIJIJIJIJIJIJIJIJIJIJIJIJIJIJIJIJIJIJIJIJIJIJIJIJIJIJIJIJIJIJIJIJIJIJIJIJIJIJIJIJIJIJIJIJIJIJIJIJIJIJIJIJIJIJIJIJIJIJIJIJIJIJIJIJIJIJIJIJIJIJIJIJIJIJIJIJIJIJIJIJIJ
a a a a a a a a a a a a a
Jolol
J 1
Jgbl 02J Jzll
aie// 1uizug bull/1go lla:
Sau.
a/babll 1c bbl jdl
SiaI p2iW/10 aioy
国
a 1 a0g g a 1
gio pI gbl aiaoiylaaiaoo 1
1g9g a0rJ1a0g
.2
Lg 3
s > L
.1 4
#
L/1Jy d0g y
a aag
Eg
aagg gaae Jaae aJ>
.0gill ola liw g a
J 2
gagalln jalj gjg aagagglal alk a jn Jn Jn Jn Jn Jn Jn Jn Jn Jn Jn Jn Jn Jn Jn Jn Jn Jn Jn Jn Jn Jn Jn Jn Jn Jn Jn Jn Jn Jn Jn Jn Jn Jn
aIaIaIacIi, aIg.aIgall
gll Jgogll golal
gagagagagagagagagagagagagagagagagagagagagagagagagagagagagagagagagagagagagagagagagagagagagagagagagagagagagagagagagag
Jaaai jia g Jg Jg Jg
J.
jao>glJzllaaggallarjzllal
Jaaasg jlgjlll
p5 5 0al algeo 2g
Jl 1
0jzssll oJ
Jaoe jzS oJyIaI aI JyI yIyI yIyI yIyI yIyI yIyI yIyI yIyI yIyI yIyI yIyI yIyI yIyI yIyI yIyI yIyI yIyI yIyI yIyI yIyI yIyI yIyI yIyI yIyI yIyI yIyI y
.
aww/2//2baw/1c/bu/awlio
Boo
29.4a@g, oJxuall olwral
J
a
y1/2a/b+ jglg2//p2uuiy.
aui/1uSglg/aui
jll
c>dsloic l6ic 1gill c> a9
logaaiaeaiajlaol
gj jll a gj gjj jc .sljj Jd
J.
sllg a jzjll bawll lclbss
jll 100
a9p 0jw l jb w a
pdoalol no alld. wla9 gdl
jglgllbawl aaxy gglglla
0g > g01/p( g > y) 1 gol ( g > y)
g> g uuuu y i> jgi//lb/
golal 1
J
J 1
JlJI Jsw Jc Jcxlo
J 1
aJzjI aJg jyB jS aaleal
20-10 aLoo
aIy 10g. 10y
40-20 40-20
a gjg jybjc a,bjj JwJ
o o 9 o j 9 a 9 g j
yIg 2000
jIJI J
G-0
aaljllg ailllgl aeg
aalll 100
oogwlo jlc agdll aagall s
.
aJolgJl jy dJdJll oJgwo lo g
1
29 40g p a daii o 191
1
oJ 1
.
oogwlo Jg>Jzll gbsj 1
aagj jll
.
JUJUJUJUJUJUJU
a. a.
a
aolp
a
aaii iis
puiugjduuuljgl>lo
a a/1g
JbJI JbJI
J
jJy jJy Jg>go Jolll
Jusll aos Jc Jusly 1
.aojU
Jl 1
a 1y
JL
JgJl
J 1
JgJg
Jgill Jn no aKlll
//15s y9.4aawo o8o gaw
Jy/1gjooaJy
cllll joo oolc
cllll jj j cllll jg dsc
J 111111111111111
aagoo oJwJg
a15/1 a15/2 cll 1 aas c/s lal5:abgalo
j>1/1jlll jk0g0g/1c s
aJl jj
.
#
- yla/da2o 0o cSo slo pdo
101/1g/ab21go aoe 1
!(jbcJiaJIJuwJc)S
aJl lao clo pUzuw/pccl
.àéiJl 50%50
1a0a2o pi jko slo plo/luuow/losc
10g
jgl jgl jgl jgl jgl jgl jgl jgl jgl
aJz
sogas Jkwh all jw p
aill " aolc jgll uljg Jpa
sagac Jkaw aizogj 1Jg."
.
jgllll ljj Jss
Jawal alg
.aa
jgljg j0
.
111 aXe 111 1j
"
J1/1111/1/9
JU U, VapoHydro Sgua
y
I 1
.
y
.ooa a
wdo 5
J
j 1
.1222222222
J
!agall aal jblj all

Jal
20g
JJIJI JIJIg aJg jIJI IJI JIJI
.
mss
a 1 j 1 1
Egaaog:
jgljwglbcjclaiaol:laill
Jaa Jaa Jaa Jaa Jaa Jaa Jaa
jL
B-AoJg
Jzjbl) a0jUU Ue>doJI Jgog
Jll Jssssssssssssssssssssssss
Jl Jc
Jlll Wnnn nn nnnn nn nnnnnnnnnnnnnnnnnnnnnnnnnnnnnnnnnnnnnnnnnnnnnnnnnnnnnnnnnnnnnnnnnnnnnnnnnnnnnnnnnnnnnnnnnnnnnnnnnnn
JkJyj JyJy
JJJ Jgss
.
Coo
!al/lll jg/19 jlg2// 00g laldei
Jusull juulllcuaa y
y.jjJg JboS//o jgs//a
a>gao//sloy/ auiy 1
JU
puiuai / iLao / oJoi / Jae
g/1quc 120j2gauo
1gillbgs cleswyl
Iaiaial piaio
b2io 1cJrRb2ioaI b2io 1b2io 1
JJI JIJI IJI JIJIJIJIJIJIJIJIJIJIJIJIJIJIJIJIJIJIJIJIJIJIJIJIJIJIJIJIJIJIJIJIJIJIJIJIJIJIJIJIJIJIJIJIJIJIJIJIJIJIJIJIJIJIJIJIJIJIJIJIJIJIJIJIJIJIJIJIJIJIJIJIJIJIJIJIJIJIJIJIJIJIJIJIJIJIJIJIJIJIJIJIJIJIJIJIJIJIJIJIJIJ
s J 00 aai jg aJyI I g JI 1
y/ jge//jog y
1g9 00 aaa a.IEC60364laal
22 1jg>1 j0g p
1g>1 g0 jg>1 g>1 g/la U
1c 2g>ga// gla// lc 2sia//
1g>1
pai y.1olala//jio aip//slo//
muoaoa/b jgl//jzoo
.FI JLOJIaiaoy JOUg
Jai/ Jw Jaa//
Jiay jy g. yjx yuia//
Ia// a20 Jai//
Jy 13 ygao//
Jy 13 ygao//
Jy ygao//
Jy ygao//
Jy ygao//
Jy ygao//
llw g/ aS/11 115 100g jddic
210 11L/11 aLa> 1c 1s/11 1yjla//
.4S/11 S/11 4yJla/1g sla//
jgljll Jlaaiw/ piaiua/ l c j i jg .022a/ 10g/ll 1g g abaa / aikl / gbl/ ojic/ jilw/ aoLw/ lc o2g plaiw/ ic / kall jgi/ jglj
jgljllc o0g>gall jgogll
!JdshuJdJdJd

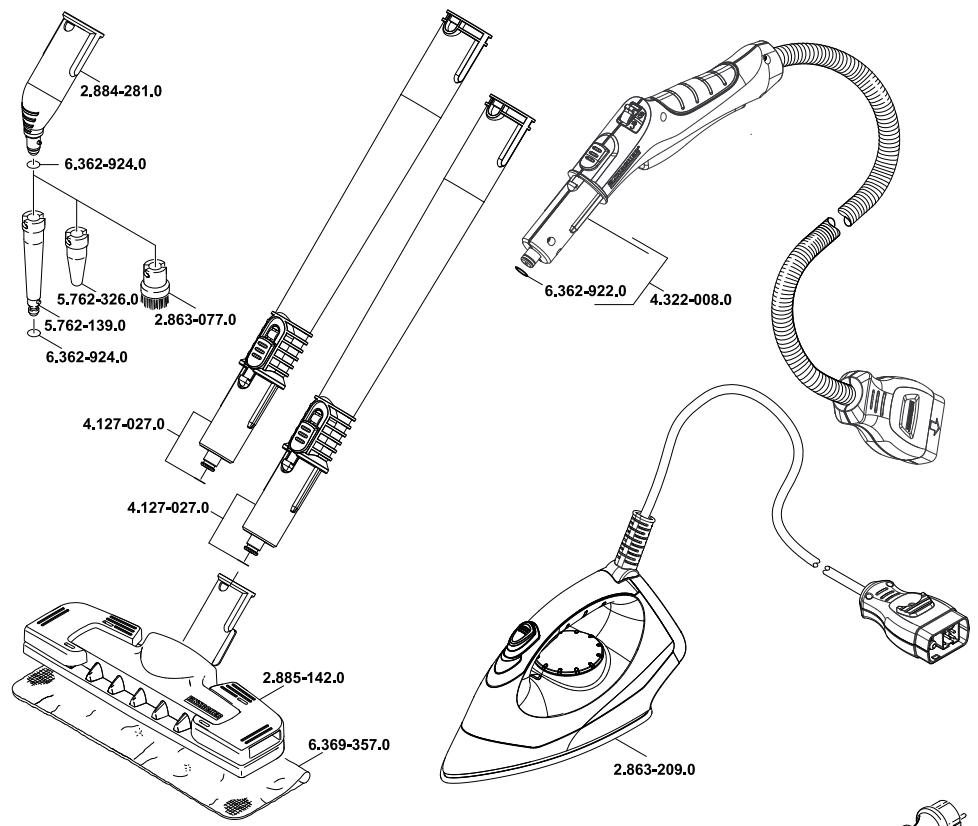
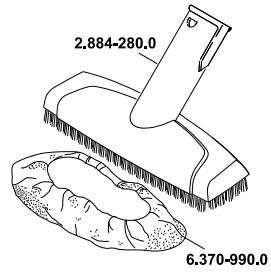


http://www.kaercher.com/dealersearch
