
QB504D - Food processor TEFAL - Free user manual and instructions
Find the device manual for free QB504D TEFAL in PDF.


| Type of product | Food processor |
| Brand | Tefal |
| Model | QB504D |
| Main bowl capacity | Stainless steel bowl: up to 1.8 kg of dough |
| Blender capacity | 1.5 L thick mixtures, 1.25 L liquid mixtures |
| Mincer capacity | Up to 3 kg of meat |
| Juice extractor capacity | Up to 500 g of fruit/vegetables per batch |
| Mini chopper capacity | 10-150 g depending on ingredient |
| Speed settings | 8 speeds (or 6 depending on model) plus pulse |
| Functions | Mixing, kneading, beating, emulsifying, whisking, blending, mincing, grating/slicing, juicing, chopping |
| Accessories included | Stainless steel bowl, lid, kneader, mixer, balloon whisk, blender jug, mincer attachment, vegetable slicer with drums, juice extractor, mini chopper |
| Bowl material | Stainless steel |
| Blade material | Stainless steel |
| Safety features | Motor only starts when cover and head are locked; auto-stop if unlocked |
| Cleaning | Most accessories dishwasher safe; motor unit and attachment holder wipe clean with damp cloth; metal mincer parts hand wash |
| Power cord length | Adjustable (see diagram A7) |
| Warranty | Refer to service booklet |
| Country of origin | Not specified (check product label) |
Frequently Asked Questions - QB504D TEFAL
User questions about QB504D TEFAL
0 question about this device. Answer the ones you know or ask your own.
Ask a new question about this device
Download the instructions for your Food processor in PDF format for free! Find your manual QB504D - TEFAL and take your electronic device back in hand. On this page are published all the documents necessary for the use of your device. QB504D by TEFAL.
USER MANUAL QB504D TEFAL
natural_image
Illustration of various kitchen utensils and kitchenware including a bowl, blender, and motor (no text or labels)Masterchef Gourmet
natural_image
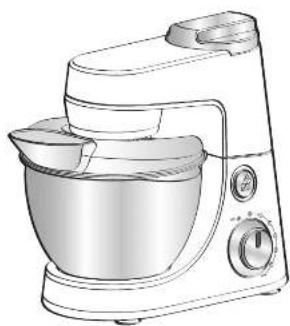
Line drawing of a modern kitchen mixer with control panel and side-mounted dish (no text or symbols)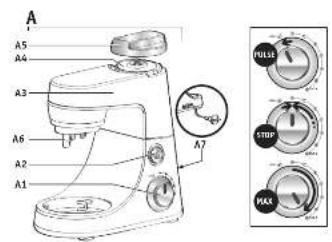
EN Warning : please read the safety instructions carefully before initial use.
BEFORE FIRST USE
- Before using for the first time, wash all accessory parts in soapy water
(except for the attachment (E): see § Clearing] Rinse and dry.
- Place the appliance on a flat, clean and dry surface. Make sure that the selector button (A1) is in «0» position and plug in your appliance.
- You have several options for starting your appliance: (see diagram A1):
- Intermittent operation (pulse):
Turn the selector button (A1) to the «pulse» position. Using a succession of pulses can give you better control when preparing certain foods.
- Continuous operation:
Turn the selector button (A1) to the desired position from «1 to 6/max» or «1 to 8» (depending on model), depending on the food you are preparing. You can change it as required during preparation.
• To stop the appliance, turn the button (A1) to x0x.
Important: The appliance will start only if the cover (A5) and the head (A3) are locked. The appliance will stop immediately if you unlock the cover (A5) and/or the head (A3) during operation. Lock the cover and/or the head, turn the control button (A1) to the «0» position, and then start the appliance normally by selecting the desired speed.
1 - MIXING / KNEADING / BEATING / EMULSIFYING / WHISKING
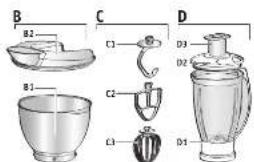
You can prepare up to 1.8 kg light dough and heavy dough made with up to 500 g flour using the stainless bowl (B1) and its Gd (B2) depending on the food.
ACCESSORIES USED : Stainless steel bowl (B1), Lid (B2), Kneader (C1) or mixer (C2) or balloon whisk (C3).
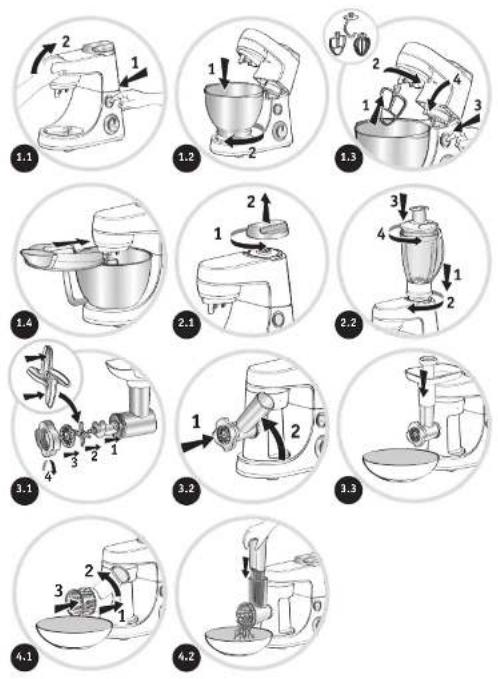
1.1 - ASSEMBLING THE ACCESSORIES
Follow the diagrams from 1.1 to 1.4.
1.2 - USAGE, TIPS AND DISMANTLING
- Start by turning the selector button (A1) to the desired position according to the recipe.
- You can add food through the hole in the lid (B2) during preparation.
• To stop the appliance, turn the button (A1) to »0».
Tips :
KNEADING (Maximum time of use: 13 minutes)
- Use the kneader accessory (C1) at speed 0.1s. You can knead up to 500 g of flour (e.g. white bread, grain bread, short crust pastry, etc.).
MIXING (Maximum time of use: 13 minutes).
- Use the mixer (C2) at speed «1 to 6/max» or «1 to 8» (depending on model).
- You can mix up to 1.8 kg of light dough (light cake mixture, sponge cake, biscuit or cookie dough). - Never use the mixer (c2) to knead heavy dough and fresh pasta dough (lasagne, rigaton), bigoli, etc.).
- BEATING / EMULSIFYING / WHISKING (Maximum time of use: 10 minutes).
- Use the balloon whisk (c3) at speed «1 to 6/max» or «1 to 8» (depending on model).
- You can prepare: mayonnaise, aioli, sauces, whisked egg whites (up to 10 egg whites), whipped cream (up to 500 ml), meringues etc.
- Never use the balloon whisk (C3) to knead heavy dough or mix light dough.
Dismantling the accessory: Wait for the appliance to come to a complete stop and proceed in the reverse order of the assembly. diagrams from 1.4 to 1.1.
2 - BLENDING / MIXING (DEPENDING ON MODEL)
Depending on the nature of the food, you can use the blender (D) to prepare up to 1.5 L of thick mixtures and 1.25 L of liquid mixtures.
ACCESSORIES USED : Blender jug (D).
2.1 - ASSEMBLING THE ACCESSORIES
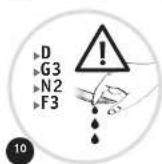
Follow the diagrams from 2.1 to 2.2 and 10.
2.2 - USAGE, TIPS AND DISMANTLING (Maximum time of use: 3 minutes).
- Start by turning the selector button (A1) to the desired position (from speed «4 to 6/Max» or «7 to 8» (depending on model) or «pulse») according to the recipe. Use the «Pulse» position for better mixing control and for a better blending of your preparation.
- You can add food through the hole in the measuring cap (D2) during preparation.
Tips :
- You can prepare :
- finely blended soups, cream soups, stewed fruit, milkshakes and cocktails.
- liquid batter (pancake, fritters, Yorkshire pudding, waffles, clafoutis and custard flans).
- If ingredients stick to the sides of the bowl when mixing, stop the appliance and wait until the blades have stopped completely. Remove the blender and push the food down onto the blades using a spatula, and put your blender back on the appliance to continue processing..
Dismantling the accessory : Wait for the appliance to come to a complete stop before removing the blender jug and proceed in the reverse order of the assembly, diagrams from 2.2 to 2.1 and 10.
3 - MINCING (DEPENDING ON MODEL)
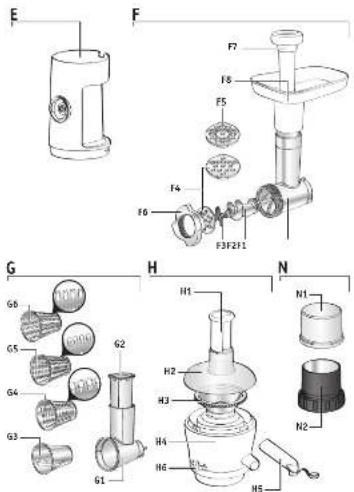
ACCESSORIES USED : Attachment holder (E), Assembled mincer head (F)
3.1 - FITTING THE MINCER ATTACHMENT
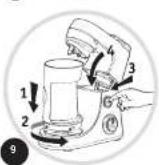
Follow the diagrams 9, 10, and then from 3.1 to 3.3.
3.2 - USAGE, TIPS AND DISMANTLING
- Run the appliance by turning the selector (A1) to speeds «3 to 4» or «5 to 7» (depending on model).
- Push the meat, piece by piece, down the feed tube, using the pusher (F7). Never push the ingredients down the feed tube with your fingers or any other utensil.
- You can chop up to 3 kg of meat, Maximum time of use: 10 minutes.
Tips :
- Prepare all of the foodstuffs to be minced (for meat, remove the bones, gristle and tendons and cut it into pieces of approximately 2 x 2 cm).
- Make sure that frozen meat is thoroughly thawed.
Dismantling the accessory : Wait for the appliance to come to a complete stop and proceed in the reverse order of the assembly diagrams 10, from 3.3 to 3.1 and then 9.
4 - GRATING / SLICING (DEPENDING ON MODEL)
ACCESSORIES USED : Attachment holder (E), Assembled vegetable slicer (G), Drums (depending on model)
4.1 - ASSEMBLING THE ACCESSORIES
Follow the diagrams 10, 9 and then from 4.1 to 4.2.
4.2 - USAGE, TIPS AND DISMANTLING
- Run the appliance by turning the selector (A1) to speed «3 or 5» (depending on model) to slice and to speed «4 or 7» (depending on model) to grate.
- Place the food in the feed tube on the body and press down with the pusher (G2).
Never push the ingredients with your fingers or any other utensil.
- You can prepare up to 2 kg of food, maximum time of use: 10 min.
- Use the drums to:
- Grate coarsely (G4) / grate finely (G5) : carrots, celery, potatoes, cheese, etc.
- Slice thickly (G3) : potatoes, carrots, cucumbers, apples, beetroot, etc.
- Potato shredder (G6): potatoes, parmesan, etc.
Dismantling the accessory : Wait for the appliance to come to a complete stop and proceed in the reverse order of the assembly, diagrams 10, 4.2, 4.1 and 9.
5 - EXTRACTING JUICE FROM FRUIT AND VEGETABLES (DEPENDING ON MODEL)
ACCESSORIES USED : Assembled juice extractor (H)
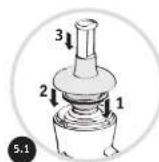
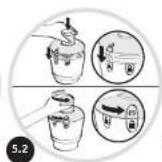
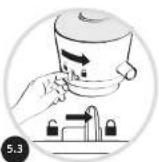
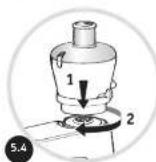
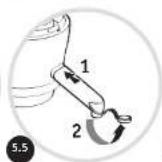
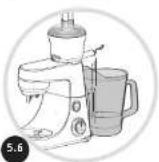
5.1 - ASSEMBLING THE JUICE EXTRACTOR
Follow the diagrams from 5.1 to 5.6.
5.2 - USAGE, TIPS AND DISMANTLING (maximum time of use: 10 minutes.)
- Cut the fruits and/or vegetables into pieces.
- Run the appliance by turning the selector (A1) to speed «3 or 5» (depending on model).
- Insert the ingredients down the feed tube in the lid (H2) push them slowly using the pusher (H1).
- Do not process 500 g of food more than 5 times continuously, without allowing your appliance to cool down completely
- Important: clean the filter (H3) and the juice collector (H4) after every 300g of ingrédients.
Tips :
- You can make juice from: carrots, tomatoes, apples, grapes, raspberries, etc. but it is not possible to extract juice from certain fruits and vegetables: bananas, avocado pears, blackberries, some varieties of apples, etc...
- Peel fruits with thick skins; remove stones and the core of pineapples.
- Drink the juices immediately after preparation.
Dismantling the accessory : Wait for the appliance and rotary filter to come to a complete stop before removing the accessory from the appliance. Proceed in the reverse order of the assembly, diagrams from 5.6 to 5.1.
6 - FINELY CHOPPING SMALL QUANTITIES (DEPENDING ON MODEL)
ACCESSORIES USED : Mini chopper lid (N1), Mini chopper bowl (N2)
EN
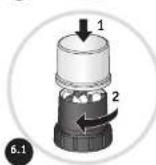
6.1 - ASSEMBLING THE ACCESSORIES
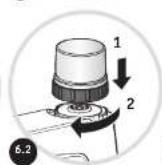
Follow the diagrams 10, 6.1 and 6.2.
6.2 - USAGE, TIPS AND DISMANTLING
- You can finely chop with the mini chopper :
- fresh herbs : 10g max. / 10secs max. / speed «4 or 7» (depending on model)
- dried fruits / Beef (boneless and trimmed meat) : 100g max. / 10secs max. / speed «1»
- vegetable puree : 150g max. / 20secs max. / «pulse» or speed «1»
- This grinder is not designed for hard products like coffee beans, hard spices nor liquids.
Dismantling the accessory : Wait for the appliance to come to a complete stop and proceed in the reverse order of the assembly, diagrams 10, 6.2 and 6.1.
7 - ADJUSTING THE CORD LENGTH (see A7)
8 - ROUGH CHOPPING SMALL QUANTITIES (DEPENDING ON MODEL)
ACCESSORIES USED : Assembled grinder.
- Chop in a few seconds by pulsing: dried figs, dried apricots, etc. Quantity / max time : 100g / 5s
CLEANING
- Unplug the appliance.
- Do not immerse the motor unit (A) or the attachment (E) in water or under running water. Wipe them with a dry or slightly damp cloth.
- Disassemble completely and rinse the accessories quickly after use.
Handle the blades with care to prevent injury. (diagram 10).
- Wash, rinse and dry the accessories: they are dishwasher-safe, except for all the metal components in the mincer head: body (F), the kneader (C1) and the mixer (C2).
WHAT TO DO IF YOUR APPLIANCE DOES NOT WORK
please refer to the chapter «before first use».
Your appliance still does not work? Contact an authorised service centre (see the list in the service booklet).
AVAILABLE ACCESSORIES
See page 93 and visit the brand website.
Caution: this booklet contains instructions for additional accessories. Please keep safe for future reference. Please contact the Customer Service for further information on how to purchase accessories.
See page 93 and visit the brand website.
Caution: this booklet contains instructions for additional accessories. Please keep safe for future reference. Please contact the Customer Service for further information on how to purchase accessories.
- dried fruits / Beef (boneless and trimmed meat) : 100g max. / 10secs max. / speed «1»
- vegetable puree : 150g max. / 20secs max. / «pulse» or speed «1»
- This grinder is not designed for hard products like coffee beans, hard spices nor liquids.
- Unplug the appliance.
- Do not immerse the motor unit (A) or the attachment (E) in water or under running water. Wipe them with a dry or slightly damp cloth.
- Pēc lietošanas pilnībā demontējiet un ātri noskalojiet piederumus.
- Start by turning the selector button (A1) to the desired position according to the recipe.
- You can add food through the hole in the lid (B2) during preparation.
- To stop the appliance, turn the button (A1) to «0».
Sfaturi:
FRĂMÂNTARE (Timp de utilizare maxim: 13 minute.)
ACCESORII UTILIZATE: Attachment holder (E), Assembled mincer head (F)
3.1 - MONTAREA ADAPTORULUI PENTRU TOCĂTOR
Slijedite sličice 9., 10., a zatim i one od 3.1. do 3.3.
3.2 - PUNEREA ÎN FUNCTIUNE
Caution: this booklet contains instructions for additional accessories. Please keep safe for future reference. Please contact the Customer Service for further information on how to purchase accessories.
- Start by turning the selector button (A1) to the desired position according to the recipe.
- You can add food through the hole in the lid (B2) during preparation.
- To stop the appliance, turn the button (A1) to «0».
Nasveti:

- EN Warning : please read the safety instructions carefully before initial use.
- BEFORE FIRST USE
- - MIXING / KNEADING / BEATING / EMULSIFYING / WHISKING
- - ASSEMBLING THE ACCESSORIES
- Follow the diagrams from 1.1 to 1.4.
- - USAGE, TIPS AND DISMANTLING
- Tips :
- - BLENDING / MIXING (DEPENDING ON MODEL)
- - ASSEMBLING THE ACCESSORIES
- - USAGE, TIPS AND DISMANTLING (Maximum time of use: 3 minutes).
- - MINCING (DEPENDING ON MODEL)
- - FITTING THE MINCER ATTACHMENT
- - USAGE, TIPS AND DISMANTLING
- - GRATING / SLICING (DEPENDING ON MODEL)
- - ASSEMBLING THE ACCESSORIES
- - USAGE, TIPS AND DISMANTLING
- Never push the ingredients with your fingers or any other utensil.
- - EXTRACTING JUICE FROM FRUIT AND VEGETABLES (DEPENDING ON MODEL)
- - ASSEMBLING THE JUICE EXTRACTOR
- - USAGE, TIPS AND DISMANTLING (maximum time of use: 10 minutes.)
- - FINELY CHOPPING SMALL QUANTITIES (DEPENDING ON MODEL)
- - ASSEMBLING THE ACCESSORIES
- - USAGE, TIPS AND DISMANTLING
- - ADJUSTING THE CORD LENGTH (see A7)
- - ROUGH CHOPPING SMALL QUANTITIES (DEPENDING ON MODEL)
- CLEANING
- WHAT TO DO IF YOUR APPLIANCE DOES NOT WORK
- AVAILABLE ACCESSORIES
- Sfaturi:
- - MONTAREA ADAPTORULUI PENTRU TOCĂTOR
- - PUNEREA ÎN FUNCTIUNE
- Nasveti:
Brand : TEFAL
Model : QB504D
Category : Food processor