
StrongVision PRO 2G - Uncategorized Evolveo - Free user manual and instructions
Find the device manual for free StrongVision PRO 2G Evolveo in PDF.


| Product Type | Trail Camera (Hunting Camera) |
| Brand | Evolveo |
| Model | StrongVision PRO 2G |
| Network | GSM 900/1800 MHz (2G) |
| Display | Color TFT 2.4" |
| Motion Sensor | PIR, adjustable sensitivity (3 levels), detection angle 120° |
| Night Vision | IR LED 940nm, 58 LEDs, range up to 20 m |
| Camera Sensor | 8 MP color CMOS (night: black & white) |
| Lens | F=3.1, FOV=67° |
| Photo Resolution | 30, 24, 20, 16, 12 MP (selectable) |
| Video Resolution | 1080p, 720p, WVGA, VGA |
| Power Supply | 10 x AA 1.5 V batteries (alkaline or NiMH) or optional Li-Ion battery SGV CAM-BAT3 (8000 mAh), external DC 12 V 2 A |
| Memory Card | SD card up to 64 GB |
| SIM Card | Mini SIM (PIN disabled required) |
| Dimensions (H x W x D) | 187 x 118 x 87 mm (with antenna bent to 90°; height with straight antenna 347 mm) |
| Operating Temperature | -10°C to +50°C |
| Storage Temperature | -15°C to +60°C |
| Ingress Protection | IP65 |
| Security | Optional 4-digit password (universal: 1314) |
| Connectivity | USB-C for PC connection, antenna connector (screw-on) |
| Activation Speed | 0.8 s (ideal conditions) |
| Burst Mode | 1, 3, 6 or 9 frames per trigger |
| Time Lapse | 5, 30 min, 1, 2, 3, 6, 12, 24 h intervals |
| File Format | Photo: JPEG, Video: MP4/H.264 |
Frequently Asked Questions - StrongVision PRO 2G Evolveo
Note: Email/MMS sending requires a SIM with data/GPRS.
User questions about StrongVision PRO 2G Evolveo
0 question about this device. Answer the ones you know or ask your own.
Ask a new question about this device
Download the instructions for your Uncategorized in PDF format for free! Find your manual StrongVision PRO 2G - Evolveo and take your electronic device back in hand. On this page are published all the documents necessary for the use of your device. StrongVision PRO 2G by Evolveo.
USER MANUAL StrongVision PRO 2G Evolveo
natural_image
Exterior view of a black and transparent camera module with a vertical antenna and connector (no text or symbols visible)CZ
SK
EN
HU
RO
DE
IT
Obsah / Content / Tartalom / Soddisfare / Continut / Inhalt
Česky....3
Slovensky 38
English 72
Română 139
Deutsch.... 173
Italiano 210
Obsah
Easy SMS Setup
email*petr&email.com*
https://webftp.evolveo.com/ftp/digital_camera/
natural_image
Black and white photo of a military-style container with camouflage pattern and two labeled buttons (1 and 2), no visible text or symbols on the main body.Copyright © Abacus Electric, s.r.o.
www.evolveo.com
www.facebook.com/EvolveCZ
Dovozce / Výrobce
Abacus Electric, s.r.o.
Easy SMS Setup
email*petr&email.com*
- Odoslanie e-mailov s obrázkami na dve e-mailové adresy, pričom znak @ v adrese nahrad'te znakom &:
natural_image
Black rectangular electronic device with labeled ports (LOCK, UNLOCK, UNLOCK) and a black cable, no visible text or symbols beyond labels.Naskenujte tento QR pomocou mobilného telefónu a dostanete sa na náš videonávod na YouTube.com
3.2. Nastavenia MMS
natural_image
Black and white photo of a military-style container with camouflage pattern and two labeled buttons (1 and 2), no visible text or symbols on the main body.Copyright © Abacus Electric, s.r.o.
www.evolveo.com
www.facebook.com/EvolveCZ
Dovozca / Výrobca
Abacus Electric, s.r.o.
- Easy SMS Setup + Contents of the package 75
- First launch.... 76
- MMS settings.... 79
- EMAIL settings 82
- Technical specifications.... 85
- Description of the device 88
- Media Browser....93
- Shooting directly from the menu 93
- Advanced settings 94
- SMS commands .... 101
- Troubleshooting.... 102
Video manual:
https://youtu.be/rHEhr3NW7Wo
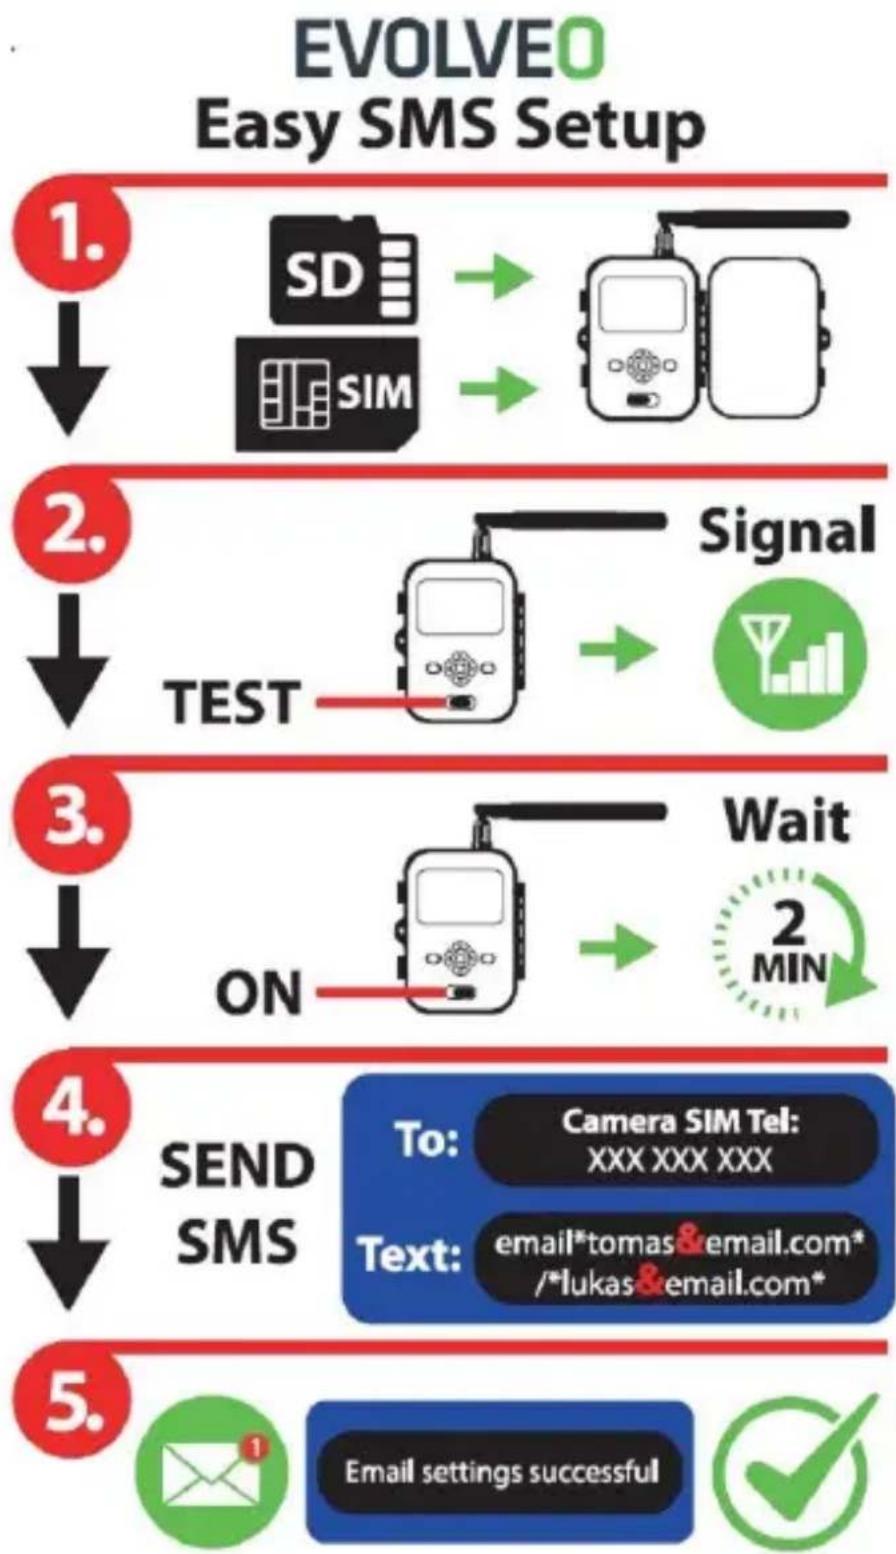
Easy SMS Setup
Easy SMS setup is a feature that allows you to set up sending captured images directly to your email inbox remotely via SMS.
For remote setup, you need to follow a few steps:
- An SD card must be inserted in the device - which must not contain the parameter.dat file.
- An activated SIM card with data transfer enabled must also be inserted.
- 1.5V alkaline AA batteries or a charged SGV CAM-BAT3 8000mAh battery must be inserted in the device
- StrongVision PRO 2G camera must be in ON mode
- Open SMS text messaging on your mobile phone and create a new
- Enter the phone number of the SIM card inserted in the camera as the recipient.
- Send emails with images to one email address, replace the @ sign in your address with an & sign:
a. Please enter your email address in the body of the message in the following format: email*petr&email.com*
- Send emails with images to two email addresses, replace the @ sign in your address with an & sign:
a. In the body of the message, type your email addresses in this format:
email*petr&email.com*/*petr2&email.com*
- As soon as the camera receives the settings, you will receive an SMS from the phone number of the SIM card inserted into the photo trap (charged according to
the tariff used) Email settings successful!
- Based on the settings, the photo trap will send images to the specified emails.
- Emails can be changed during use by sending the commands in section 7 or 8 of this chapter.
- If you send an SMS with the settings and do not receive a confirmation SMS back, you need to check:
a. Whether the Photo Trap is in ON mode
b. Whether the PIN request is deactivated on the inserted SIM card
c. Whether the photo trap has a sufficient signal in the given location - in test mode it is displayed on the display.
d. Whether the batteries in the camera are sufficiently charged
e. Make sure you use the & sign instead of the @ sign in your email address
-
When you want to set up sending by MMS or use your own SMTP server, you must use the EVOLVEO Config software
-
If you decide to use your own settings, you must delete the SYSCFG.TXT file from the SD card of the device that was set up using the SMS command. If you leave the file on the SD card, the camera will use the settings from this file and ignore the PARAMETER.DAT file created by EVOLVEO CONFIG
Warning:
This service uses the EVOLVEO MAIL email service, which is free and set as default on the device. APNs are automatically set according to your SIM card operator.
flowchart
graph TD
    A["1. SD SIM"] --> B["2. TEST"]
    B --> C["3. ON"]
    C --> D["4. SEND SMS"]
    D --> E["5. Email settings successful"]

    subgraph Setup
        direction TB
        A --> A1["↓"]
        B --> B2["↓"]
        C --> C2["↓"]
        D --> D2["↓"]
        E --> E1["To: Camera SIM Tel: XXX XXX XXX"]
        E --> E2["Text: email*tomas&email.com* /*lukas&email.com*"]
    end

    subgraph Signal
        direction LR
        B --> B2
        C --> C2
        D --> D2
        E --> E1
        E --> E2
        E --> E2
        E --> E2
        E --> E2
        E --> E2
    end
1. Contents of the package
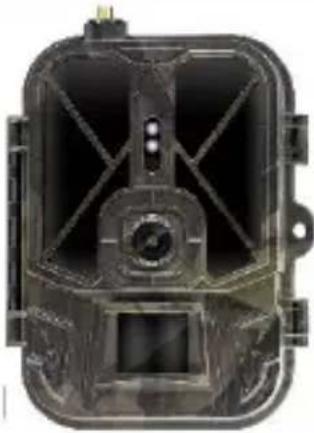 | Hunting Camera | |
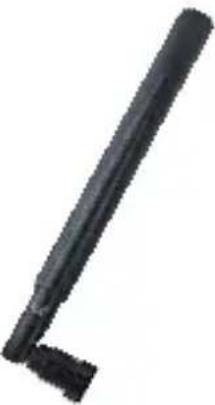 | Antenna | |
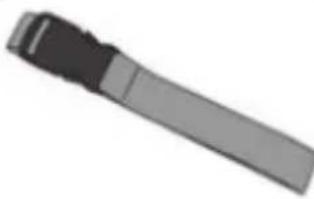 | Strap for fastening | |
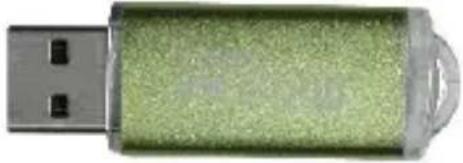 | Micro SD card reader | |
 | Instructions |
2. First launch
Before starting the device for the first time, remove any protective film that is placed over the camera lens and IR sensor. These could otherwise hinder motion recognition or affect image quality.
Inserting Batteries:
A 10 x AA 1.5V battery case is inserted into the device from the factory, remove and insert the AA batteries before use. The battery case has a connector on it which, if the case is inserted into the camera, powers the camera directly, in no case are the inserted batteries charged! You can also purchase an 8000mAh Li-Ion battery for the device, which will extend the battery life and allow for more economical operation. Li-Ion batteries can be found at www.evolveo.com under the code SGV CAM-BAT3.
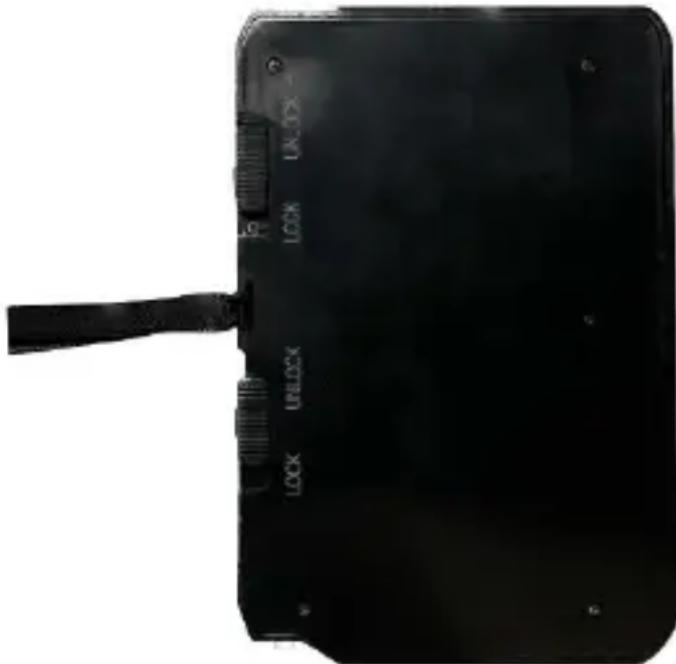
The batteries are placed in the battery case, which is secured with two locks. To release, the locks must be moved to the "UNLOCK" position
natural_image
Black rectangular device with labeled buttons (LOCK, UNLOCK, UNLOCK) and a black handle, no visible text or symbols beyond labels.▶ Always use AA batteries of the same type and manufacturer, and the batteries must always have the same charge. If you use different types of batteries, the device may be damaged. Such damage is not
covered by the statutory warranty.
▶ If you know that you will not be using the device for an extended period of time, remove the batteries from the device. Leaving them in the device may cause damage to the device that is not covered by the warranty.
▶ Due to the large number of modes and settings, the battery life of an active device cannot be specified exactly. Night mode or video recording have high power consumption requirements and significantly reduce battery life. We can only recommend the use of high quality Alkaline or Lithium rechargeable batteries for longer battery life.
Warning: Insert batteries into the device when it is switched off
TIP: For ease of operation, a spare SGV CAM-BAT3 battery can be purchased, which can be pre-charged using the integrated charging connector and replaced with an already discharged battery at the installation site.
2.13. Insert an SD card into the device, the camera supports SD cards up to 64 GB, the SD slot is located on the side of the device next to the control panel.
2.14. Insert a MINI-sized SIM card into the device, the SIM slot is located on the side of the device next to the control panel.
WARNING:
- The SIM must not be protected by a PIN code - make sure the SIM is unlocked before using it for the first time.
- The SIM card must be activated, before using the SIM card for the first time, make sure it is activated according to your operator's procedure.
2.15. TEST mode - Turn on the camera by switching the main switch to the middle "TEST" position. In TEST mode, the device
will boot into the main menu, press the MENU button to switch to the carousel main menu. Use the arrow keys to navigate through the menu and confirm the selected settings with the "OK" button.
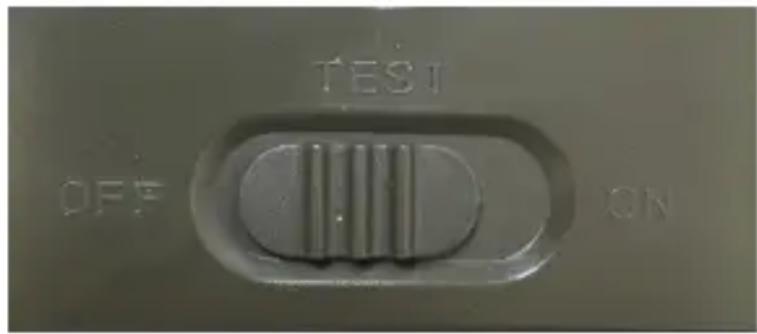
2.16. Language settings - the device is factory set to English - to change to your preferred language, do the following: Press the "MENU" button, use the up or down arrow to scroll through the menu to "Language" and confirm by pressing the "OK" button, use the arrow to select your language and confirm with the "OK" button, press the "MENU" button again to return to the home screen.
2.17. EVOLVEO Config - is a program that must be installed on your Windows PC. The program is used to set up the photo trap, without this program you cannot set up sending photos via EMAIL or MMS. Evolveo Config can be downloaded from www.evolveo.com
2.18. ACTIVATIONS: If you have everything set up, you can activate the device by switching the main switch to the ON position. The device will start a countdown on the display and the red LED above the camera lens will flash on the front panel. When the LED flashes, the camera is operational and starts taking pictures based on the settings.
Warning!
It is always possible to have only one mode active, either sending MMS or sending EMAIL, if both settings are selected at the same time, the camera will not send any data!!
3. MMS settings
3.1. Configuration
To set up the photo trap you need to use the EVOLVEO Config tool, which you can download at the link below. This tool creates a PARAMETER.DAT file that needs to be saved to the SD card of the device. Always insert the SD with the file into a switched off device, otherwise the settings will not be loaded.
The configuration software is designed for MS Windows only
EVOLVEO Config can be downloaded here:
https://webftp.evolveo.com/ftp/digital_camera/
Extract the file EVOLVEO_CONFIG.zip
Not sure how to set it up?
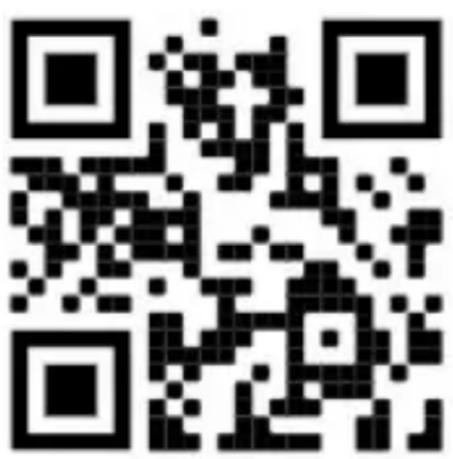
Scan this QR with your mobile phone and you will be taken to our video tutorial on YouTube.com
3.2. MMS settings
Auto MMS mode:
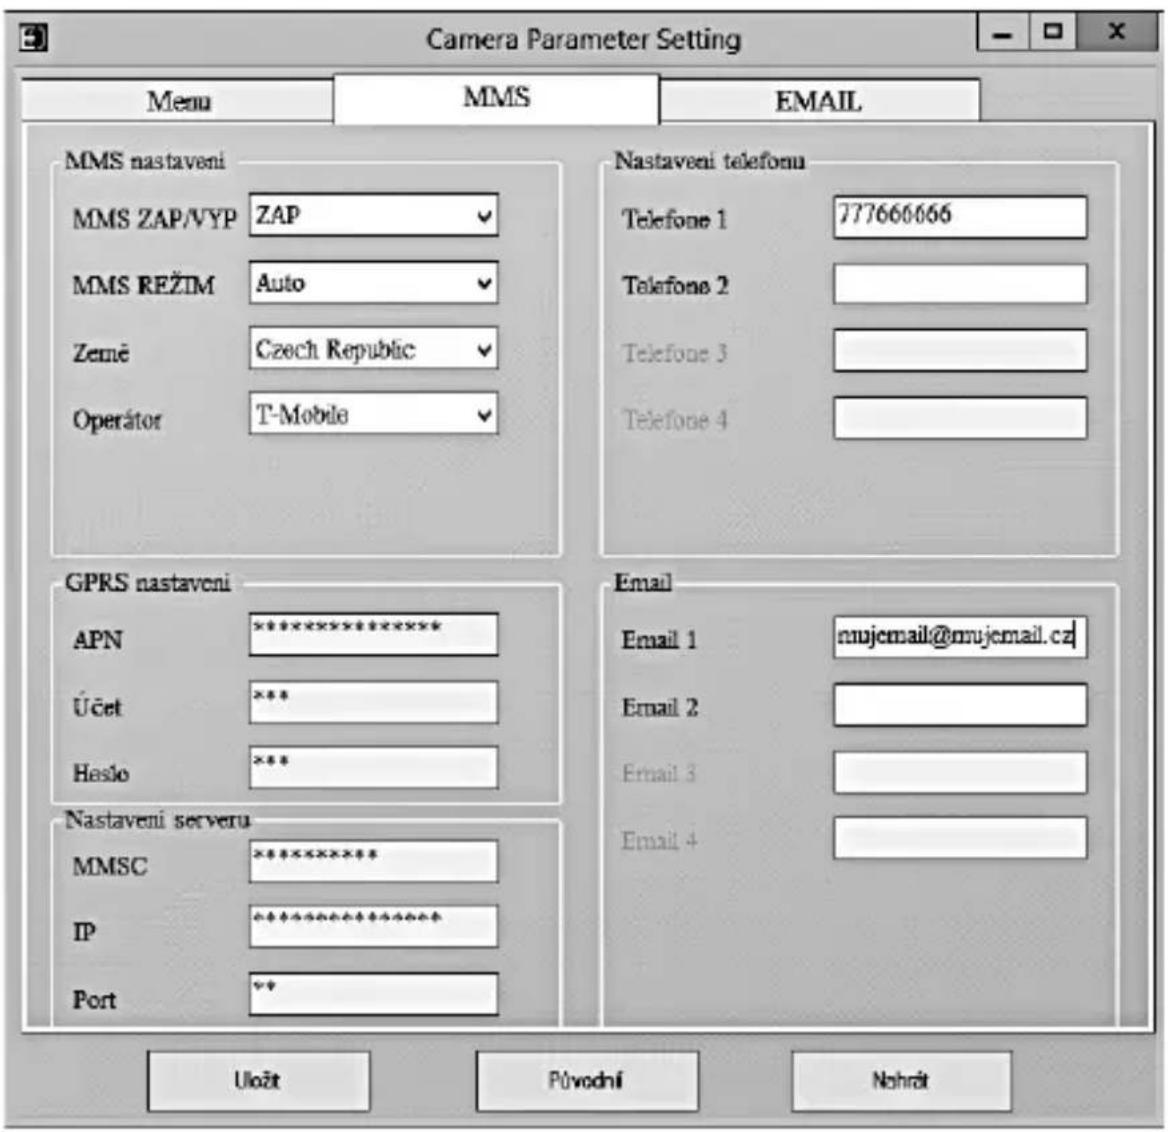
In the MMS tab, select MMS ON and then select "Auto" and the photopast will then offer you the preset settings for your operator in the next settings. MMS is charged by your operator and in most cases is a more expensive service than sending an email.
- Choose a country
- Select Operator
- Fill in the empty column on the right with the recipient's phone number.
- Fill in your email address to receive photos. In this setting, the sent EMAIL is charged in the same way as MMS. If you want to send emails using a data plan, go to the email tab in EVOLVEO Config.
3.3. Manual MMS mode:
If no selection information is configured, select Manual MMS mode.
Contact your operator and manually enter the parameters required to send MMS messages: APN, account, password, MMSC, server IP address and port. Then fill in the phone number, email address, or both where the MMS messages should be sent.
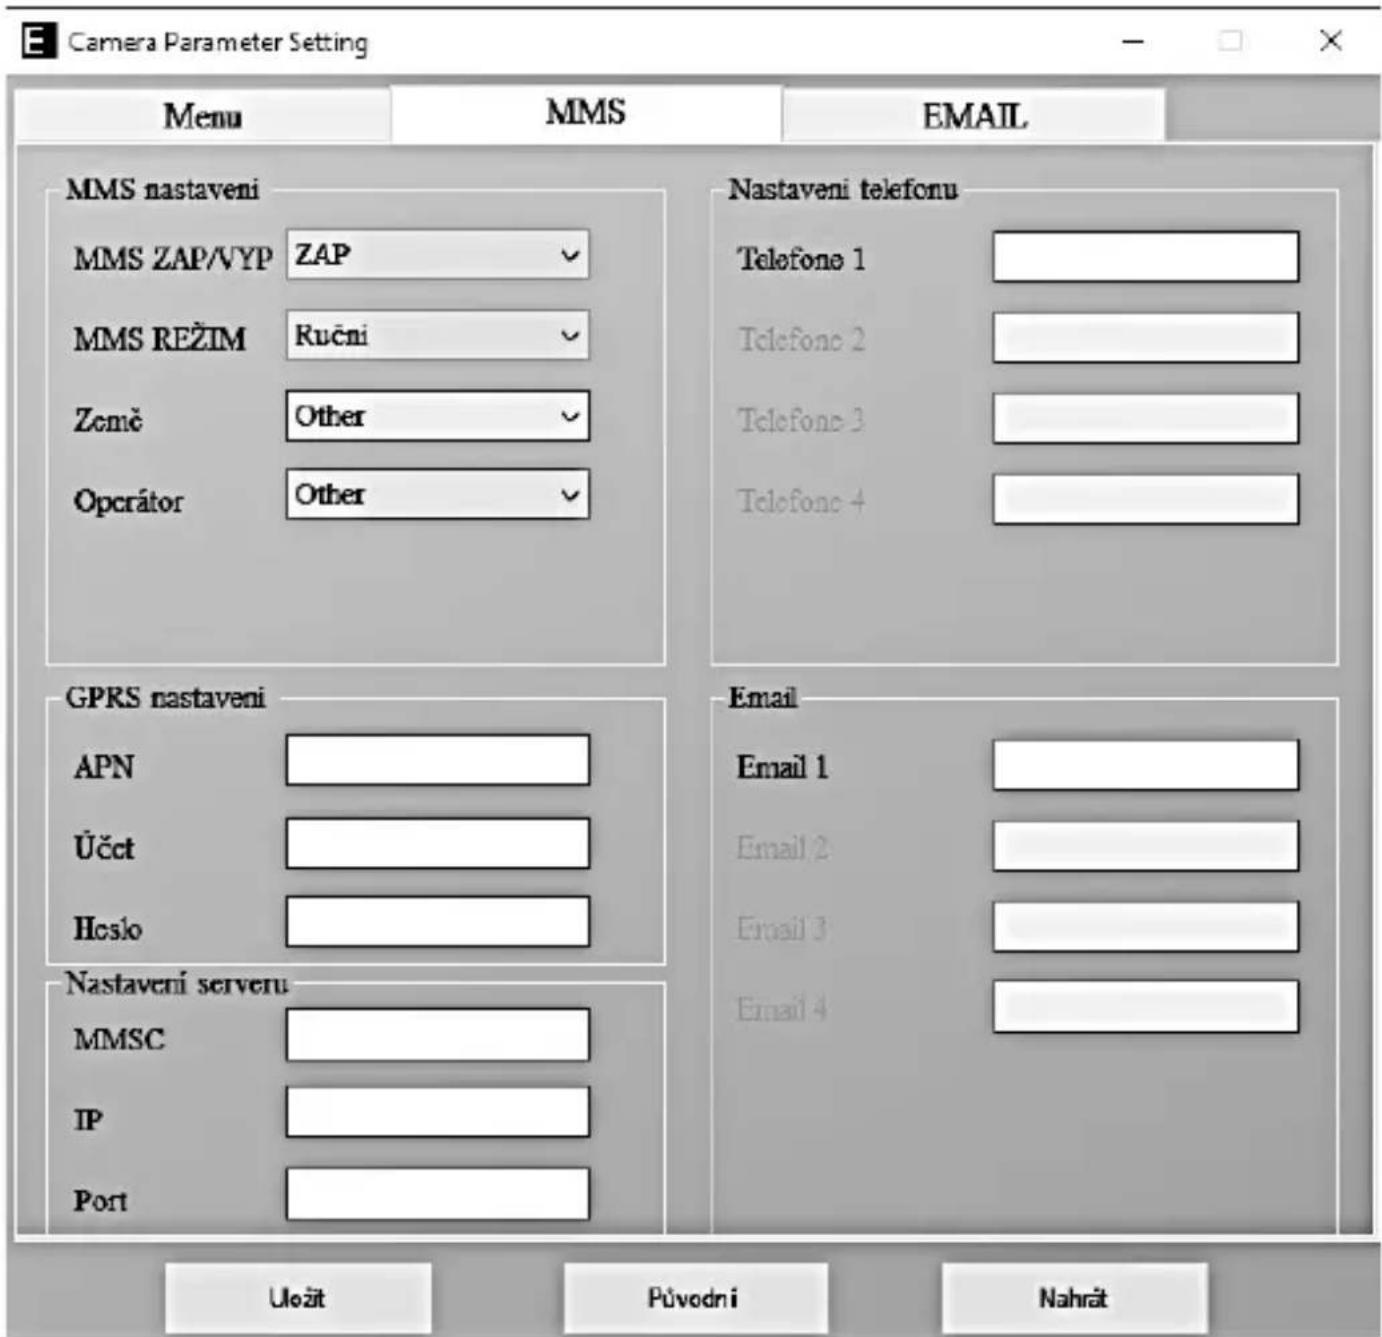
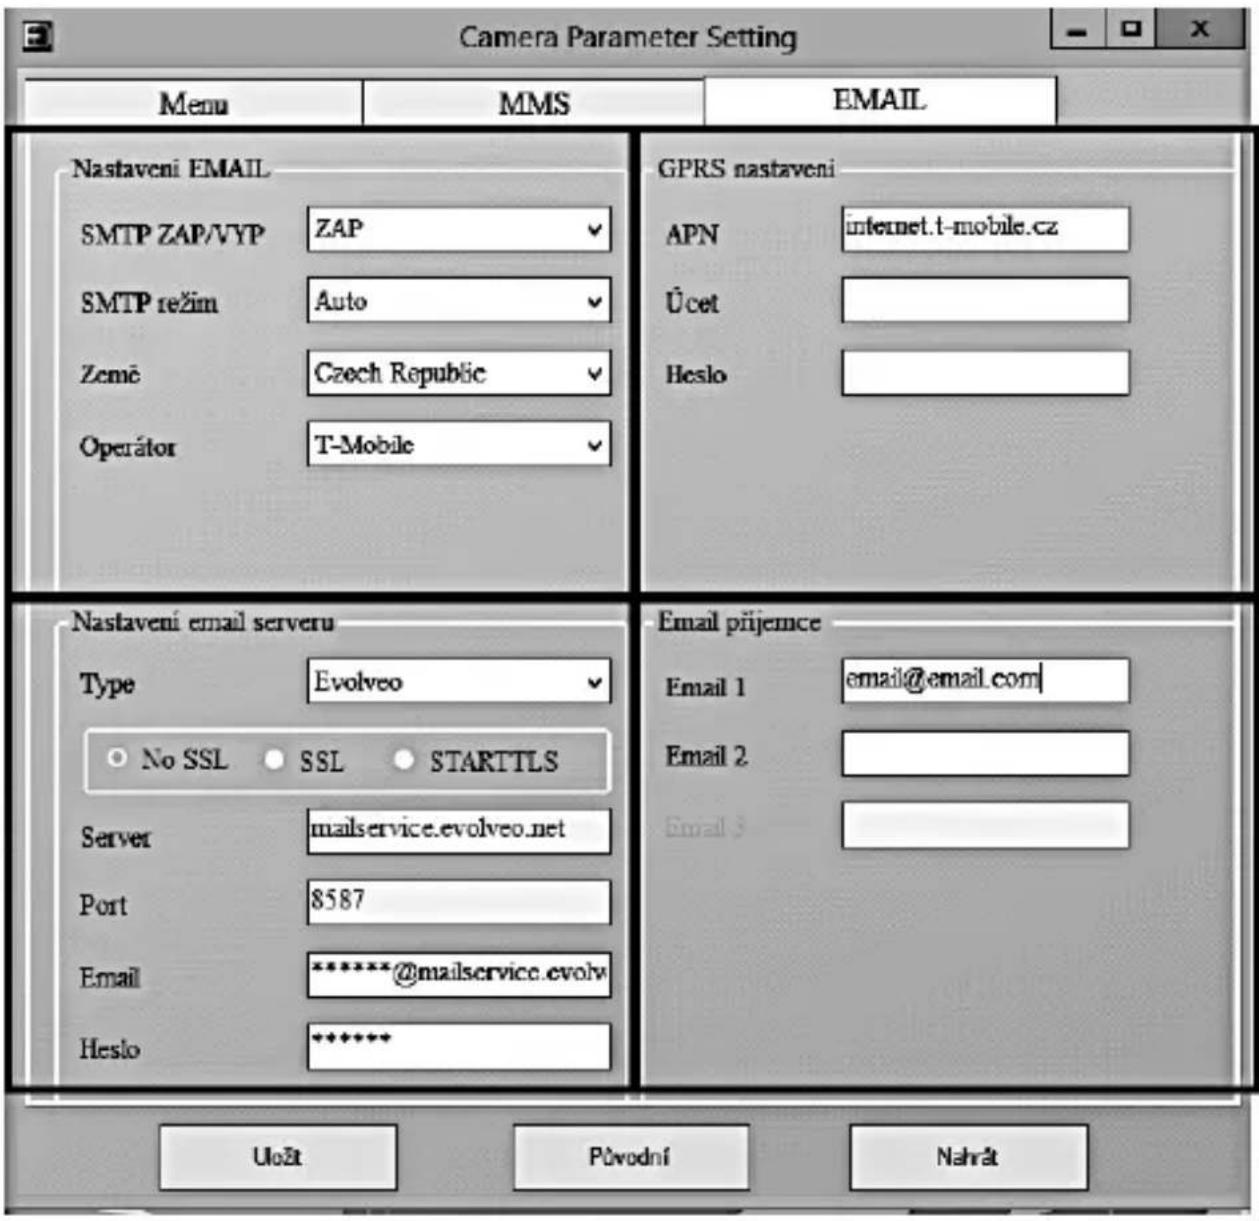
This method of sending images is also called data transmission. This is currently a very popular method where the image is sent from email to email and only the data is charged. The recommended settings are shown below the text in the figure from EVOLVEO Config.
a) SMTP select "ON"
b) SMTP Mode select "AUTO"
c) Country select "Czech Republic"
d) Choose your operator - for example for Kaktus - T-mobile CZ
2) GPRS Settings:
If you have selected SMTP mode "AUTO" there is no need to set anything. In case you have entered EMAIL Settings manual, fill in according to the data provided by your operator
3) Email server settings:
We recommend using the EVOLVEO email server!
a) TYPE: EVOLVEO
b) Further settings will be done automatically - no need to change anything.
4) Recipient's email:
Fill in the email addresses to which you want to send your images.
WARNING: camera sends only photos to email. In the case of a set series of frames, always take only the first frame of the series.
The quality of the photos sent by email is always lower than the quality of the images on the SD card. 2G/GPRS is a slow data transfer, so the images for the email are scaled down. The quality of the images sent can be set in the device menu: Settings/Image size
Manual SMTP mode
If no selection information is configured, select Manual MMS mode.
The user must first contact the SIM card provider to obtain the APN, account, password and fill them out; contact the sending email provider for server and port information.
g. Enter the sending email address.
h. Enter the password for the sending email address on the left.
i. Enter the delivery email address on the right.
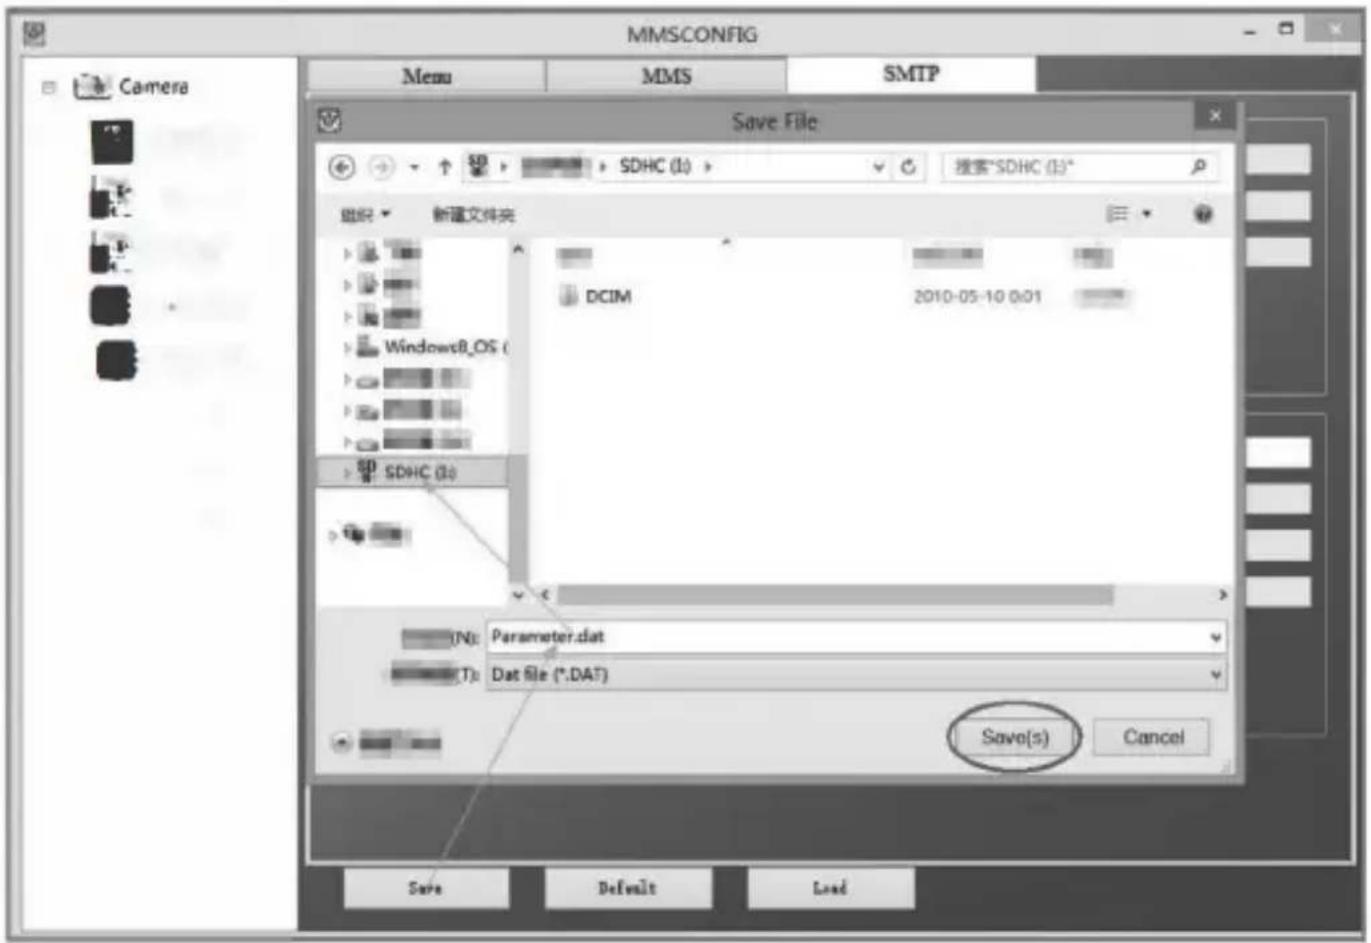
Save the "Parameter.dat" file to your Micro SD card
Enter ON mode
Once all settings are complete, turn the switch to the ON position to start the automatic mode. The motion indicator will flash red for about 5 seconds and then the camera will start working. As soon as a person or animal enters the PIR sensor's field of view, it immediately starts taking pictures or recording video.
Warning: To avoid possible false triggering caused by temperature and motion interference, do not point the camera at a heat source (e.g., the sun, a hot rock, or metal) or near branches or wands. The ideal direction for focusing is north and open spaces without a heat source. Also remove any wands from the area near the camera.
5. Technical specifications
5.1 General
| Display | Colour TFT 2.4" |
| Motion sensor | PIR - adjustable sensitivity (3 levels) |
| Motion sensor detection angle | 120° |
| Night light | IR LED 940nm, 58 LEDs under front anti-reflective cover |
| IR LED range | 20 m * |
| Dimensions | H x W x D. 187**x118x87mm |
| Operating Temperature | -10 °C to +50 °C |
| Storage Temperature | -15 °C to +60 °C |
| Coverage | IP65 |
| Security | 4-digit optional password |
| Operating temperature | -10°C - +55°C |
*If there are no other objects in the area in front of the camera from which the IR light can reflect, night images may be dark. Ideally, the
area in front of the camera should contain objects from which the IR light will reflect, such as rocks, bushes, logs, etc. Ideal range is between 8-12 m from the camera
** Including mounted antenna bent to 90°, height including straightened antenna 347 mm
5.2 Photographs
| Sensor | 8Mpix color CMOS (night photo black and white) |
| Lens | F=3.1; FOV=67 ° |
| Photo resolution | 30/24/20/16/12MP |
| Exposure (ISO) | Auto/100/200/400 |
| Timelapse mode (Timelapse) | 5 min/30 min 1/2/3/6/12/24h |
| Multi-frame mode (Burst) | 1/3/6 or 9 frames |
| Information on the photo | Time and Date, Temperature (°C, °F), Moon phase, optional name |
| Recording modes | Photography, Photography & Video, Timelapse |
| File format | .JPEG |
| Activation speed | 0,8 s * |
| Delay interval | The amount of time the device is inactive after the last motion-based start. Instant, 10 s, 1/3/5/10/15 or 30 min |
*The PIR sensor detects movement based on changes in surface temperatures. This figure is in an ideal environment, when the object in front of the camera has a sufficient surface temperature difference, and crosses perpendicularly the scanned area (passes from side to side) If the object will approach the camera frontally, it will take longer to recognize the motion.
5.3 Video
| Video resolution | VGA, 720 p, 1080 p |
| Record length | 5/10/30/60 or 90 seconds |
| File format | MP4/H.264 |
| Liveview (Liveview) | <180kBps ** |
**Frequent use of this feature may impact the amount of data consumed!
5.4 Power supply
| Built-in Battery | 10x 1.5v AA batteries, or SGV CAM-BAT3 Li-Ion rechargeable battery |
| Power source | DC 12V 2 A - does not charge batteries inserted in the AA cell cage. |
| Connector for external power supply | DC Jack 3.5x1.3 mm |
| External batteries | A 12 V battery can be connected to the external power connector using a cable: SGV-CAM-PWRC |
5.5 Connectivity
| Supported mobile network frequencies: | GSM:900/1800 |
| Memory card | SD up to 64 GB |
| SIM card | Mini SIM card - PIN requirement turned off |
| GSM antenna | Screw-on with seal for 4G networks, can be replaced by external antenna with extension cable: SGV-CAM-EXTA |
| Internal memory | The device has no internal memory |
| USB | Can be connected to a PC using a USB-C cable (not included) |
6. Description of the device
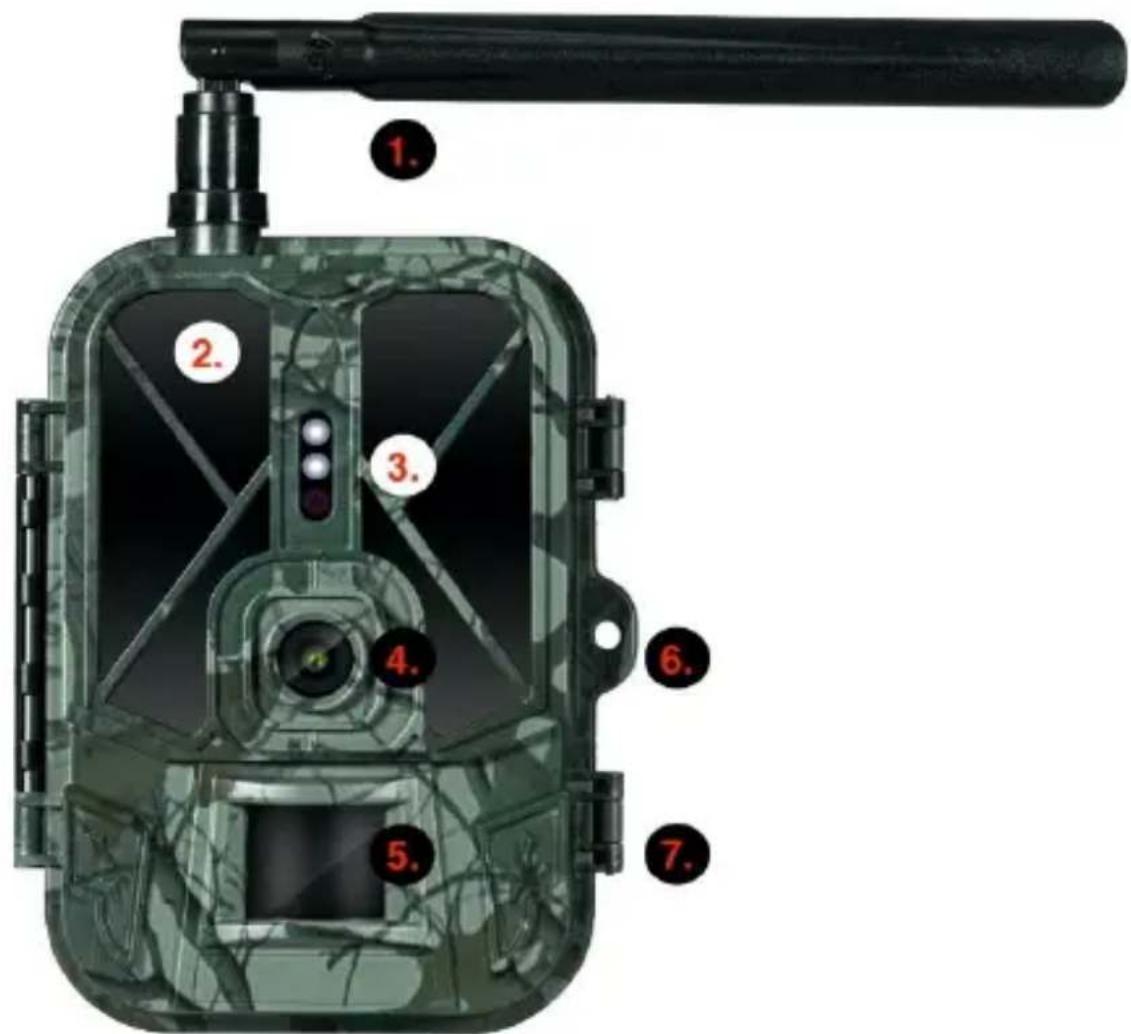
| 1. | Antenna (Rubber cap must always be used) |
| 2. | IR Illuminator |
| 3. | Indication LED, Ambient light sensor |
| 4. | Camera lens |
| 5. | PIR sensor (Motion sensor) |
| 6. | Place for locking |
| 7. | Latches |
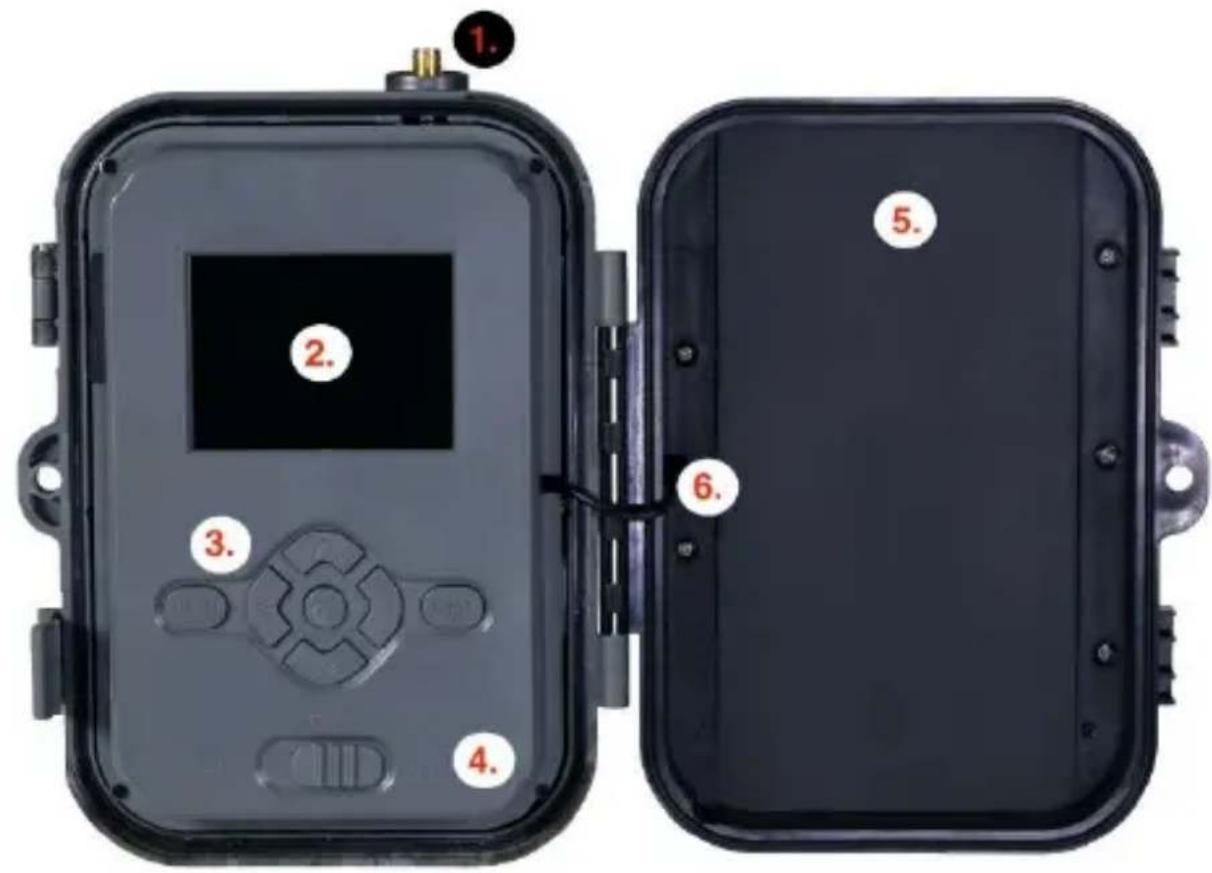
| 1. | Antenna connector (For outdoor use, the antenna must always be attached) |
| 2. | 2.4" Colour LCD display |
| 3. | Control buttons |
| 4. | Main position switch: OFF – TEST -- ON |
| 5. | Battery case for 10x AA 1.5V cells |
| 6. | Power connection cable - must not be broken. In case of damage, remove the battery and send the device to an authorized service center. |
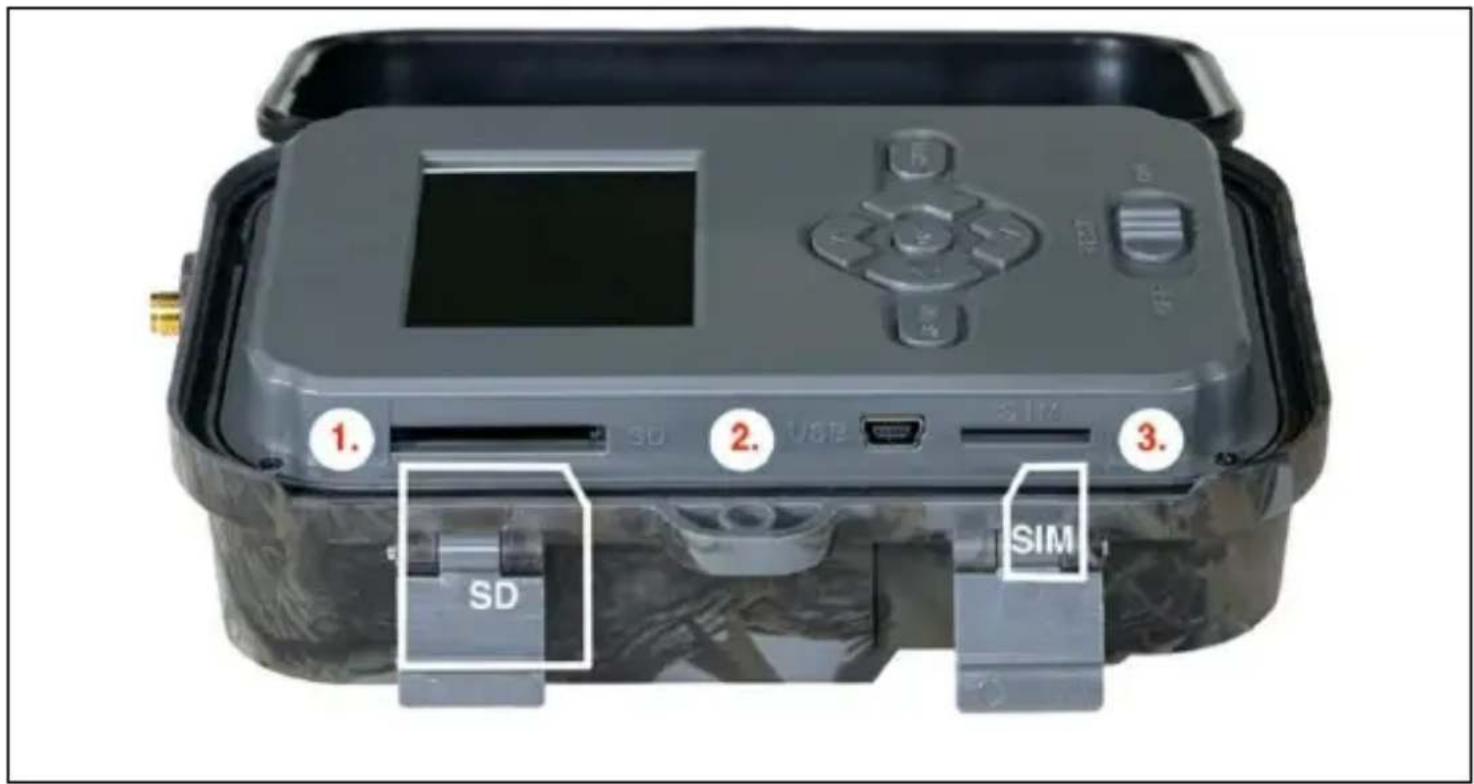
| 1. | SD card slot (max. size 64 GB) |
| 2. | USB-C connector for PC connection (Mass Storage) |
| 3. | SIM card slot (Mini SIM format) |
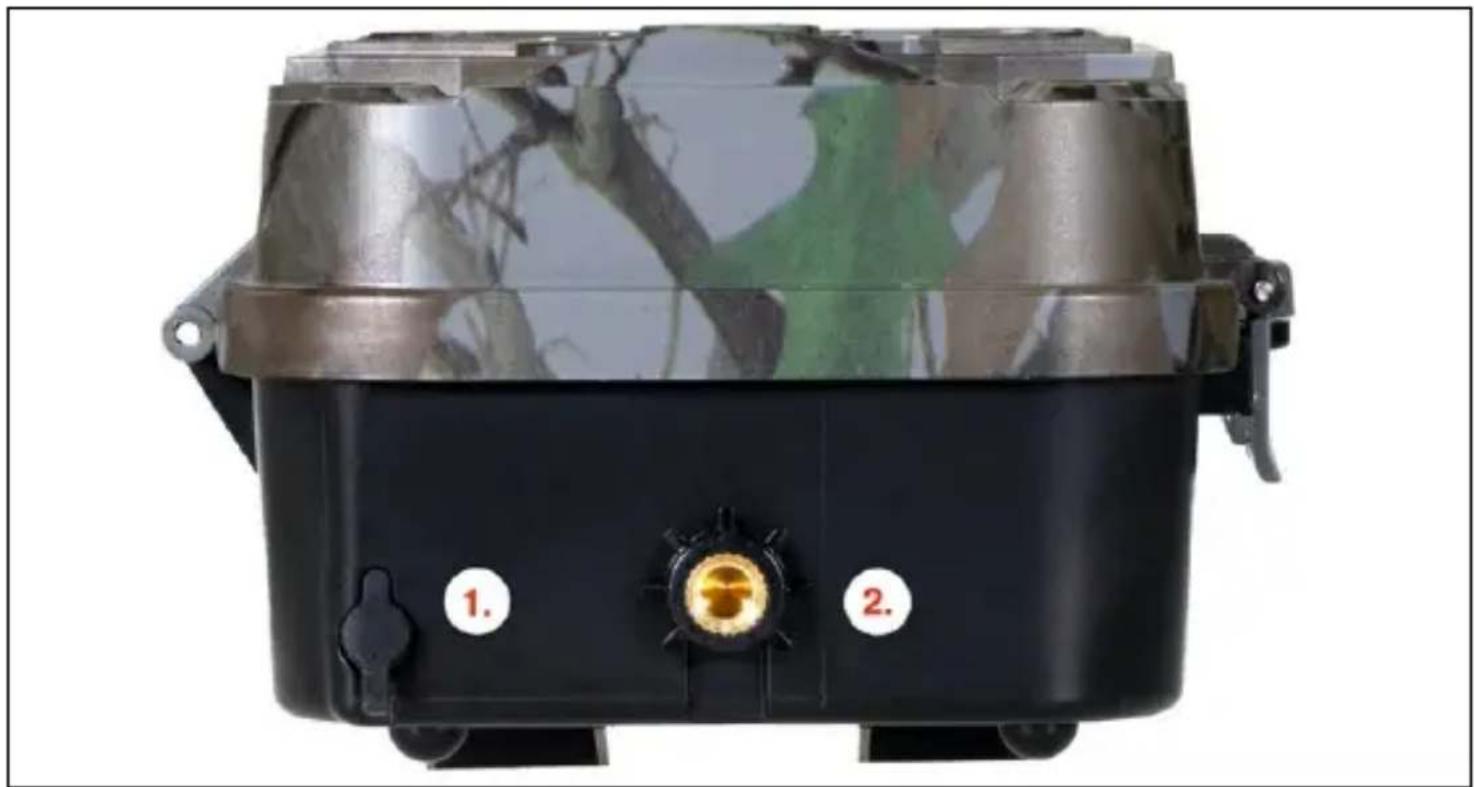
natural_image
Black and white photo of a military-style container with camouflage pattern and two labeled buttons (1 and 2), no visible text or symbols on the main body.| 1. | Connector for DC 12V/ 1.5A power supply (Charges the inserted battery!) |
| 2. | Tripod thread 1⁄4" can be used SGV CAM-H1 |
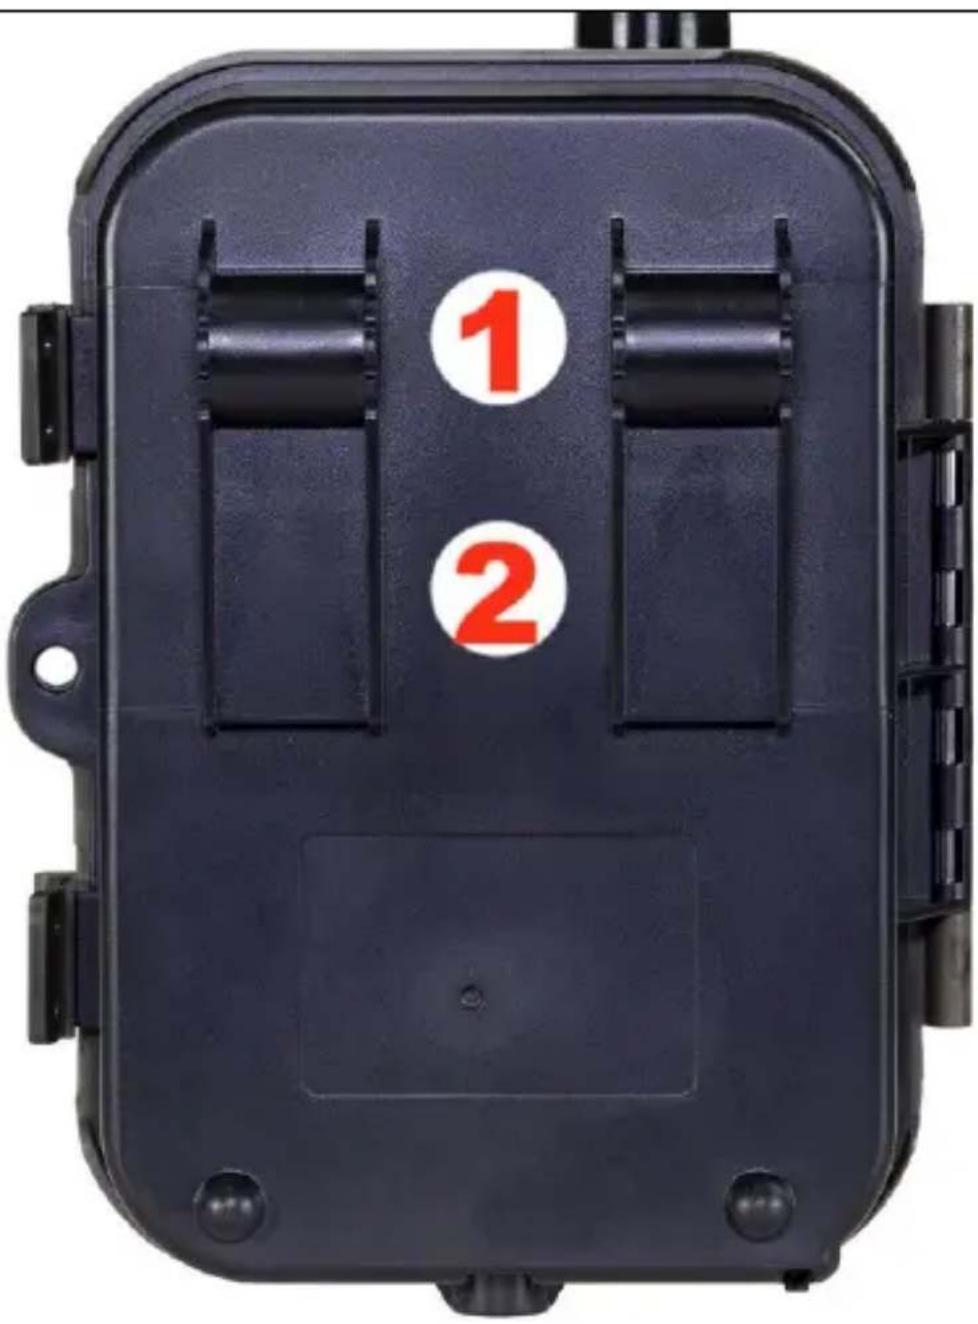
| 1. | Attachment for rope lock (SGV CAM-LOCK) max. diameter 12 mm |
| 2. | Fastening for belt |
7. Media Browser
It is possible to view the recorded footage directly on the camera display.
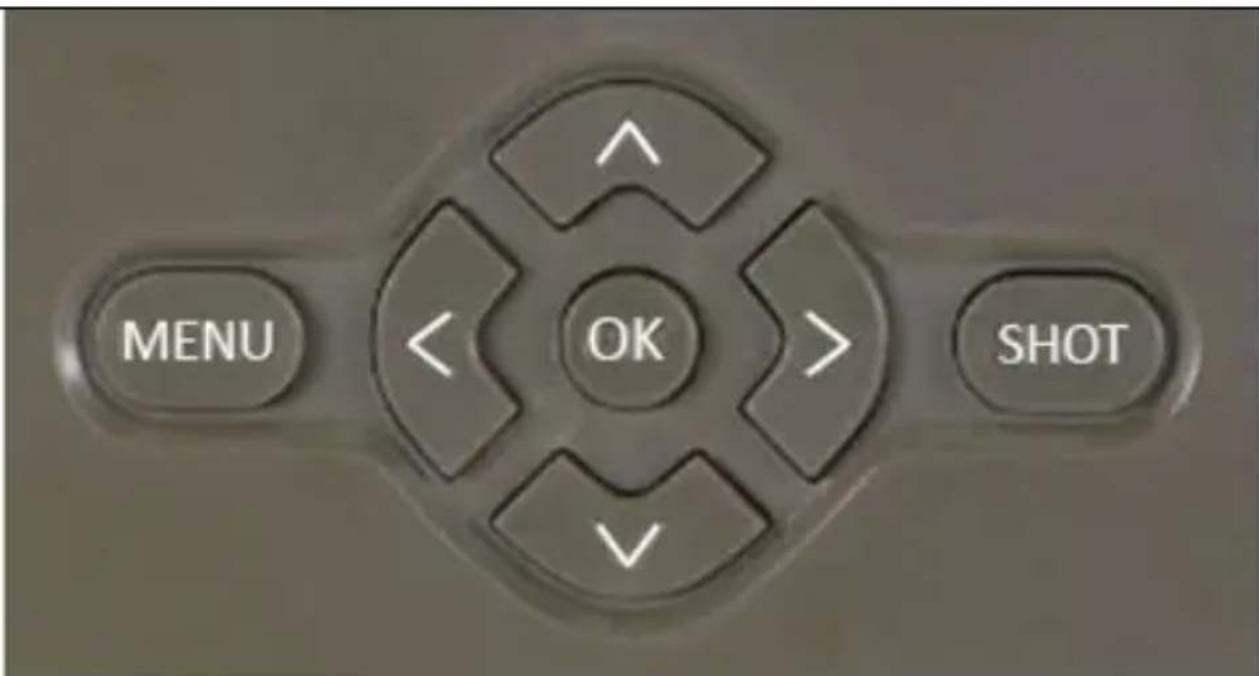
To view, switch to TEST mode, press the Right Arrow button on the Home screen.
Control by arrow keys:
- Next picture: up arrow
- Previous picture: down arrow
- Play video: left arrow
- Stop Video: right arrow
- Return to main menu SHOT button
8. Shooting directly from the menu
The camera can also be used to take photos or record video using only the buttons. Switch the camera to TEST mode. It is then serviced afterwards:
• The up or down arrow switches between Photo or Video mode
- Press the SHOT button to take a picture
9. Advanced settings
Menu
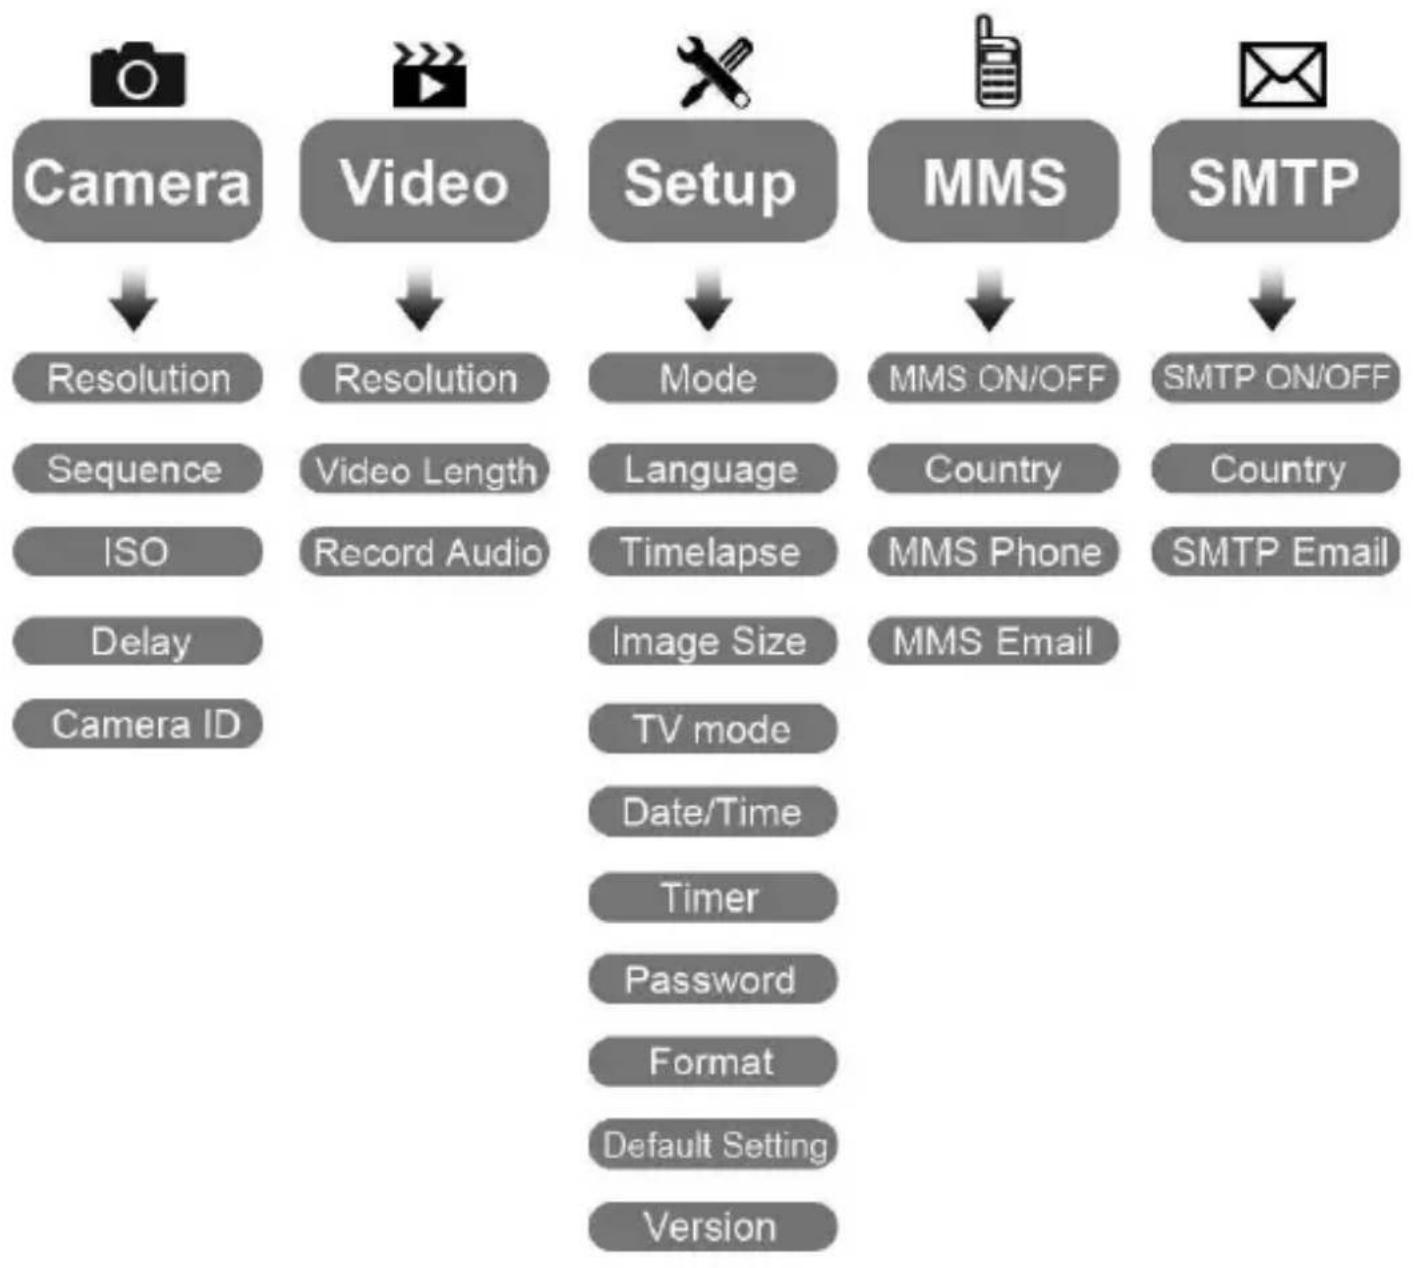
flowchart
graph TD
    A["Camera"] --> B["Resolution"]
    B --> C["Sequence"]
    C --> D["ISO"]
    D --> E["Delay"]
    E --> F["Camera ID"]

    G["Video"] --> H["Resolution"]
    H --> I["Video Length"]
    I --> J["Record Audio"]

    K["Setup"] --> L["Mode"]
    L --> M["Language"]
    M --> N["Timelapse"]
    N --> O["Image Size"]
    O --> P["TV mode"]
    P --> Q["Date/Time"]
    Q --> R["Timer"]
    R --> S["Password"]
    S --> T["Format"]
    T --> U["Default Setting"]
    U --> V["Version"]

    W["MMS"] --> X["MMS ON/OFF"]
    X --> Y["Country"]
    Y --> Z["MMS Phone"]
    Z --> AA["MMS Email"]

    AB["SMTP"] --> AC["SMTP ON/OFF"]
    AC --> AD["Country"]
    AD --> AE["SMTP Email"]
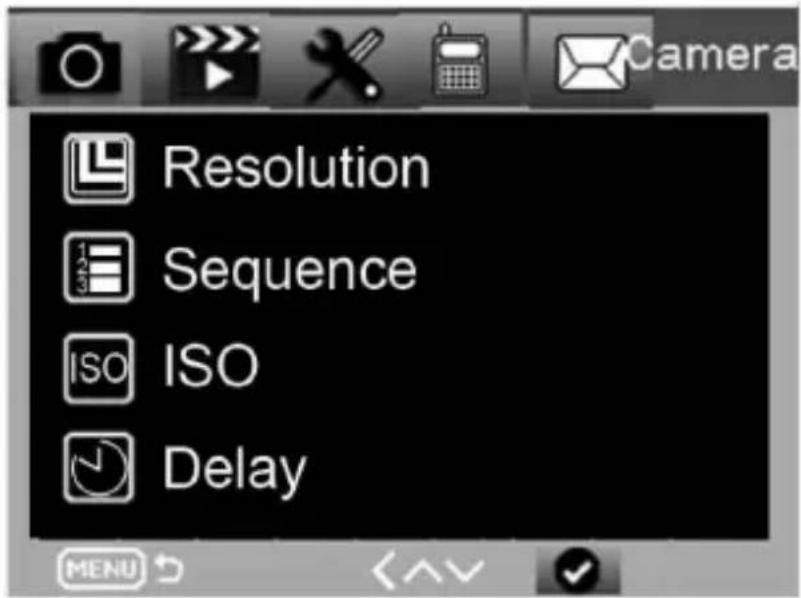
| Camera | Submenu | Description |
| Resolution | 20MP,16MP, 12MP | Photo size |
| Sequence | 1/3/6/9 | The number of frames to be taken each time. |
| ISO (sensitivity) | Auto,100,200,400 | Level of exposure |
| Delay | 1/5/10/30 sec/min | Delay between frames |
| Camera ID | 0-0-00-0-0 | Camera ID (camera identification data) |
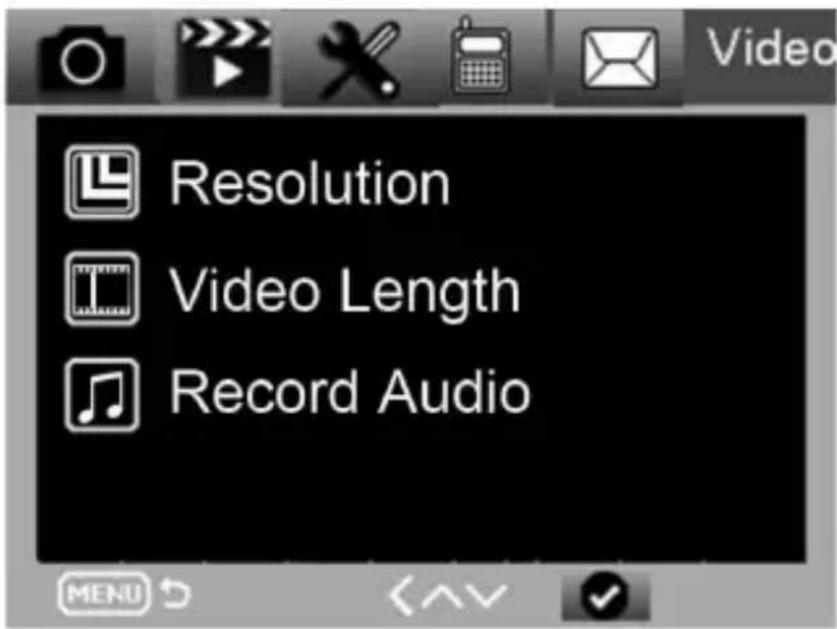
| Video | Sub menu (Submenu) | Description |
| Resolution | 1080P, 720P, WVGA, VGA | Video size (Video size) |
| Video Length (Video Length) | 10 s,30 s, 60 s, 90 s | The time length of video (Length of video) |
| Record audio (Record audio) | On (On)/ Off (Off) | If On is selected, the video sound is recorded |
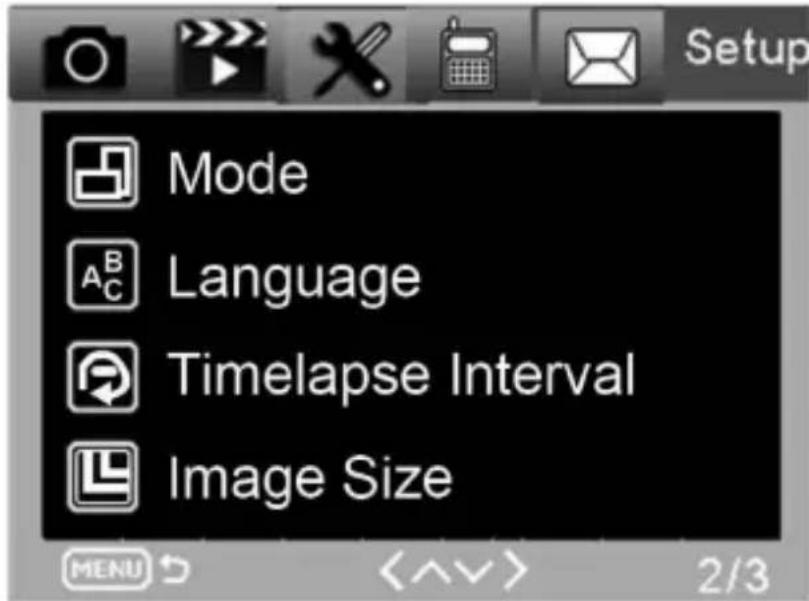
| Settings | Sub menu (Submenu) | Description | ||
| Mode | Camera, video, camera & video, time-lapse | Photo, video, photo & video, regular photo | ||
| Language | English, French, German, etc. | Camera menu language | ||
| Time collection interval | 5/30/60 Min | Taking photos or recording video continuously after every 5/30/60 minutes | ||
| Image size | Small / Normal / Big | Image transfer size Small <50 KB, Normal <100 KB, Big (large) <150 KB | ||
| TV mode | NTSC, PAL | TV playback mode | ||
| Settings | Sub menu (Submenu) | Description | ||
| Date/Time | 2018-09-03 16:37:25 | ear-Month-Date-Hour:Minute: Second | ||
| Timer | ON, OFF | If On is selected, the camera will only operate during the set time range. | ||
| Password: | **** | 4-digit numbers (1314 universal password) | ||
| Format | Micro SD card | All files in the card's memory will be deleted. | ||
| Default settings | Returns the menu settings to the default settings | Cancel/OK | ||
| View Full Version | 03/09/2018 16:37:25 | SW version | ||
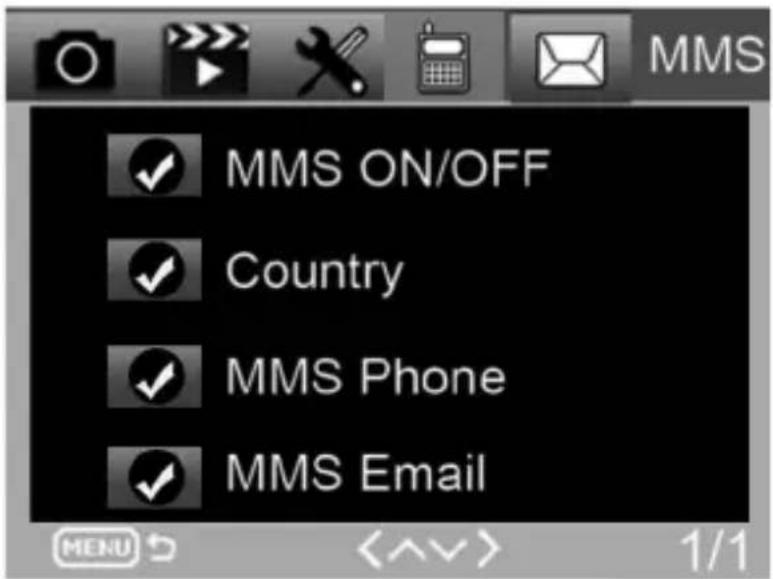
| MMS | Submenu | Description |
| Turning MMS on/off | OFF/ON | MMS On/off |
| Country | Set inMMSCONFIG | Operator name |
| MMS phone | Set inMMSCONFIG | Recipient's phone number for MMS delivery |
| MMS E-mail | Set inMMSCONFIG | Recipient's email address for MMS delivery |
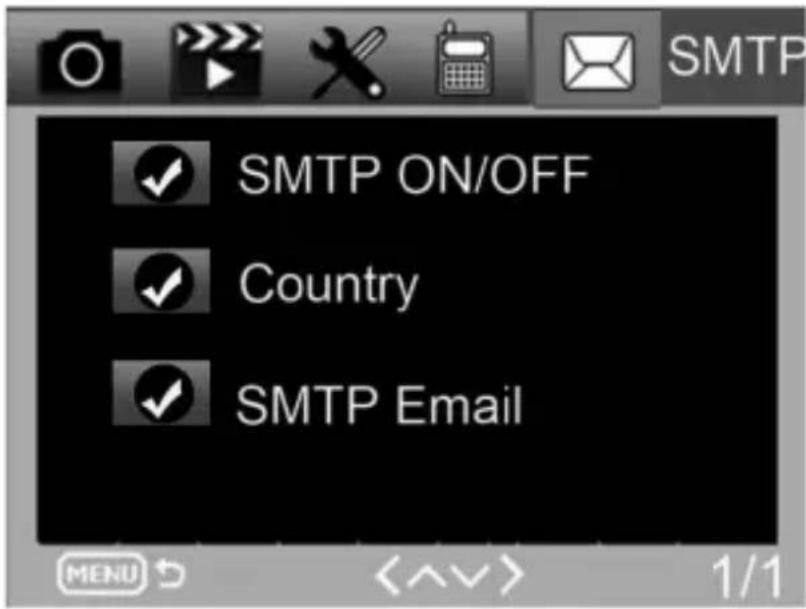
| SMTP | Submenu | Description |
| Turning SMTP on/off | OFF/ON | SMTP Off/Enabled |
| Country | Set in MMSCONFIG | Operator name |
| SMTP E-mail | Set in MMSCONFIG | Recipient's email address for delivery of images |
10. SMS commands
The photo trap can be remotely controlled by SMS commands. Create a new SMS message in your phone, enter the phone number of the SIM card that is inserted in the photo trap. In the body of the message, enter a command in the format shown in this table:
SMS commands are:
| Command | Functions | Meaning of |
| *530* | Switching on the photo trap | He starts working |
| *531* | Photo trap in sleep mode | The photo trap switches to power saving mode, in this state it saves images to the SD card but does not send data or MMS. |
| *500* | Capture | The photo trap takes a picture and sends it to the set EMAIL. |
| *505* | Capture and receive a picture (MMS mode) | The photo trap takes a picture, then sends it to the current phone. Only if the photo trap is set to MMS. |
| *520* | Get information about the image. | The photo trap sends information about the number of possible pictures and the battery level. |
11. Troubleshooting
The photo trap didn't pick up the object of interest.
- Check the PIR sensitivity. In warm weather conditions, set the sensor level to "Low" and in cold weather conditions, set the sensor level to "High"
- Try to position the photo trap so that there is no heat source in its field of view.
- Placing the photo trap near water can sometimes cause the photo trap to take photos without any subject being present.
- Try to point the lens above the ground.
- Try to place the photo trap on fixed and non-moving objects, e.g.: wide trees.
- If the motion sensor detects motion above the IR backlight range at night, reduce the distance setting by adjusting the sensor sensitivity.
- The rising or setting sun can trigger the sensor.
- The photo trap needs to be aimed elsewhere.
- If the person/animal moves quickly, it may disappear from the field of view of the photo trap before the image is taken. Move the photo trap further back or redirect it.
The camera has stopped taking pictures
- Make sure there is enough space on the memory card. If the card is full, the photo trap stops taking photos.
- Check the batteries to make sure that there is enough power in the alkaline, NIMH or lithium batteries for the camera to function properly.
- Make sure the switch is in the "ON" mode and not "OFF" or "TEST". If the MMS/SMTP function is turned on, the camera will send a photo forabout 1 minute before it can take another photo.
- Format the memory card before using it for the first time.
Flash range during night recording does not meet expectations
- 4 AA batteries are not enough for night vision camera, please insert 8 AA batteries to ensure longer battery life.
- Make sure the batteries are fully charged or there is sufficient power left.
- High quality 1.5V NIMH or Lithium rechargeable AA batteries can offer much better infrared flash range than alkaline batteries.
- To achieve sharp, high-quality images, mount the camera in a dark environment with no obvious light sources.
- For sharp, high-quality night shots, mount the camera in a dark environment without any obvious light sources.
- Certain surroundings (such as trees, walls, ground, etc.) within the flash range can provide better nighttime images; please do not aim the camera in a completely open area where there is nothing to reflect the IR flash back. If you shine a flashlight into the sky at night, you won't see anything at all, just like a photo trap.
The photo trap takes pictures but does not send them to the phone/E-mail.
- If you choose manual mode, the information you enter may have a problem, please contact your SIM card operator to confirm all the information is correct such as Apn, server, port.
- If you switch to the MMS function, you do not need to enter the international dialling code before the phone number, just enter your phone number.
- If you switch to the SMTP feature, make sure your email server and port are correct, some email servers will reject emails as SPAM, you can try to find your email in the SPAM box, or contact vendor to send you a test email to try it out.
- Do not rename the Parameter.dat file, you can verify your phone number and email in the photo trap menu, please save the parameter.dat to the root folder on the memory card, otherwise the photo trap will not be able to recognize the parameter.dat.
For more information and VIDEOS, please visit our YouTube channel: www.youtube.com/c/EvolveoEu
Disposal: The crossed-out container symbol on the product, in the accompanying documentation or on the packaging means that in EU countries, all electrical and electronic equipment, batteries and accumulators must be disposed of separately at the end of their useful life as separated waste. Do not dispose of these products in unsorted municipal waste.


DECLARATION OF CONFORMITY
Abacus Electric, s.r.o. hereby declares that the EVOLVEO StrongVision PRO 2G complies with the
requirements of the standards and regulations that are relevant for this type of equipment.
The full text of the Declaration of Conformity can be found at http://ftp.evolveo.com/ce
Copyright © Abacus Electric, s.r.o.
www.evolveo.com
www.facebook.com/EvolveCZ
Importer / Manufacturer
Abacus Electric, s.r.o.
Planá 2, 370 01, Czech Republic
Made in China
All rights reserved.
The appearance and technical specifications of the product are subject to change without notice.
Tartalomjegyzék
natural_image
Black rectangular electronic device with labeled ports (LOCK, UNLOCK, UBEBOX) and a black cable extending from the side (no readable text beyond labels)https://webftp.evolveo.com/ftp/digital_camera/
natural_image
Black and white photo of a military-style container with camouflage pattern and two labeled buttons (1 and 2), no visible text or symbols on the main body.Copyright © Abacus Electric, s.r.o.
www.evolveo.com
www.facebook.com/EvolveCZ
Importör / Gyártó
Abacus Electric, s.r.o.
Easy SMS Setup
https://webftp.evolveo.com/ftp/digital_camera/
3.2. Setări MMS
Modul MMS automat:
natural_image
Black and white photo of a military-style container with camouflage pattern and two labeled buttons (1 and 2), no visible text or symbols on the main body.Copyright © Abacus Electric, s.r.o.
www.evolveo.com
www.facebook.com/EvolveCZ
email*petr&email.com*
https://webftp.evolveo.com/ftp/digital_camera/
natural_image
Black and white photo of a military-style container with camouflage pattern and two labeled buttons (1 and 2), no visible text or symbols on the main body.Copyright © Abacus Electric, s.r.o.
www.evolveo.com
www.facebook.com/EvolveCZ
natural_image
Black rectangular electronic device with labeled buttons (LOCK, UNLOCK) and a cable, no visible text or symbols beyond labelsnatural_image
Black and white photo of a military-style container with camouflage pattern and two labeled buttons (1 and 2), no visible text or symbols on the main body.Copyright © Abacus Electric, s.r.o.
www.evolveo.com
www.facebook.com/EvolveCZ


- Obsah / Content / Tartalom / Soddisfare / Continut / Inhalt
- Obsah
- Easy SMS Setup
- Abacus Electric, s.r.o.
- Nastavenia MMS
- Video manual:
- Warning:
- Contents of the package
- First launch
- Inserting Batteries:
- Warning: Insert batteries into the device when it is switched off
- Warning!
- MMS settings
- Configuration
- MMS settings
- Auto MMS mode:
- Manual MMS mode:
- 2) GPRS Settings:
- 3) Email server settings:
- 4) Recipient's email:
- Manual SMTP mode
- Enter ON mode
- Technical specifications
- Description of the device
- Media Browser
- Shooting directly from the menu
- Advanced settings
- Menu
- SMS commands
- Troubleshooting
- The photo trap didn't pick up the object of interest.
- The camera has stopped taking pictures
- Flash range during night recording does not meet expectations
- The photo trap takes pictures but does not send them to the phone/E-mail.
- For more information and VIDEOS, please visit our YouTube channel: www.youtube.com/c/EvolveoEu
- DECLARATION OF CONFORMITY
- Tartalomjegyzék
- Setări MMS
- Modul MMS automat:
Brand : Evolveo
Model : StrongVision PRO 2G
Category : Uncategorized