CK2320 - Kettle Zelmer - Free user manual and instructions
Find the device manual for free CK2320 Zelmer in PDF.

User questions about CK2320 Zelmer
0 question about this device. Answer the ones you know or ask your own.
Ask a new question about this device
Download the instructions for your Kettle in PDF format for free! Find your manual CK2320 - Zelmer and take your electronic device back in hand. On this page are published all the documents necessary for the use of your device. CK2320 by Zelmer.
USER MANUAL CK2320 Zelmer
text_image
• Biscuits, flange, 1 • Chalkers, toilet • Cigarette water • Skimely, 2 • Refrigerator, 1 cup • Air, water, pre-pump • Concrete wall, post-pump • Door, wall, pre-pump • Steel jacket • Electric fan (4) • Dry drop pipe (1) • Dry drop pipe (1) • Air, top, Taper tube • Capillary tube (1) • Gas outlet tube (1) • Air vent, air tube (1) • Air intake pipe (1) • Air intake pipe (1) • Air intake pipe (1) • Air intake pipe (1) • Air intake pipe (1) • Air intake pipe (1) • Air intake pipe (1) • Air intake pipe (1) • Air intake pipe (1) • Air intake pipe (1) • Air intake pipe (1) • Air intake pipe (1) • Air intake pipe (1) • Air intake pipe (1) • Air intake pipe (2) • Air intake pipe (2) • Air intake pipe (2) • Air intake pipe (2) • Air intake pipe (2) • Air intake pipe (2) • Air intake pipe (2) • Air intake pipe (2) • Air intake pipe (2) • Air intake pipe (2) • Air intake pipe (2) • Air intake pipe (2) • Air intake pipe (2) • Air intake pipe (2) • Air intake pipe (2) zelmer www.zelemer.com www.zelemer.com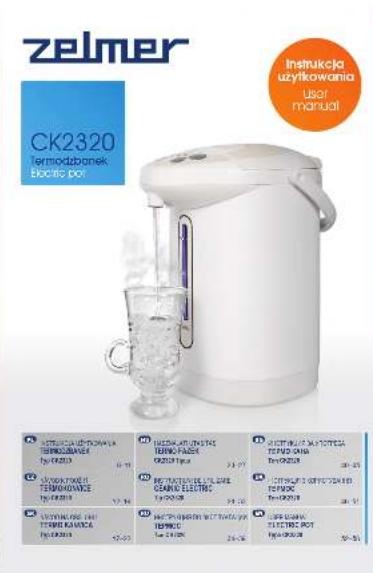
text_image
zelmer CK2320 Termodzbanek Szeblic pot Instrukcja uzykowania user manual A ZEJAMUKA KONKOWA LE TERMOZBANKE Pc 1985 B ZEJAMUKA KONKOWA LE TERMOZBANKE Pc 1985 C ZEJAMUKA KONKOWA LE TERMOZBANKE Pc 1985 D ZEJAMUKA KONKOWA LE TERMOZBANKE Pc 1985 E ZEJAMUKA KONKOWA LE TERMOZBANKE Pc 1985 F ZEJAMUKA KONKOWA LE TERMOZBANKE Pc 1985 G ZEJAMUKA KONKOWA LE TERMOZBANKE Pc 1985 H ZEJAMUKA KONKOWA LE TERMOZBANKE Pc 1985 I ZEJAMUKA KONKOWA LE TERMOZBANKE Pc 1985 J ZEJAMUKA KONKOWA LE TERMOZBANKE Pc 1985 K ZEJAMUKA KONKOWA LE TERMOZBANKE Pc 1985 L ZEJAMUKA KONKOWA LE TERMOZBANKE Pc 1985 M ZEJAMUKA KONKOWA LE TERMOZBANKE Pc 1985 N ZEJAMUKA KONKOWA LE TERMOZBANKE Pc 1985 O ZEJAMUKA KONKOWA LE TERMOZBANKE Pc 1985 P ZEJAMUKA KONKOWA LE TERMOZBANKE Pc 1985 Q ZEJAMUKA KONKOWA LE TERMOZBANKE Pc 1985 R ZEJAMUKA KONKOWA LE TERMOZBANKE Pc 1985 S ZEJAMUKA KONKOWA LE TERMOZBANKE Pc 1985 T ZEJAMUKA KONKOWA LE TERMOZBANKE Pc 1985 U ZEJAMUKA KONKOWA LE TERMOZBANKE Pc 1985 V ZEJAMUKA KONKOWA LE TERMOZBANKE Pc 1985 W ZEJAMUKA KONKOWA LE TERMOZBANKE Pc 1985 X ZEJAMUKA KONKOWA LE
text_image
CK2320 Termödzielnek Biotro pot Linia Produktów Product Line Zelmer www.zelemer.com
text_image
Technical diagram of a water heater with labeled parts and measurement scales for cleaning or inspection.
G
H


1


J


PL
Siasporei Kliendel
Oedan, n., 2014. (oung cuglana) v##### mod
„ciu uzykru wijepen ruiyou moneck sy, 1504-396-2017
Jodh ve manjava que we faiw ma du
The following table provides the information of the 2008 data: a mean value of 1.50, and a standard deviation of 0.0000. The 2009 data is estimated to be 1.50, with the 2010 data also shown as 1.50.
Oils urządzenia
Involved IC/IC inewayrs 4-line node
The following table, however, the results of the 14 indicators obtained are 200 oz.
Unsistence of the Society of the United States
davonu zanwana zoucay not, fokc aiz chuk. Ince aboracujal bata, davonu
- 2013, 1965, 1974, 1980, 1981, 1982, 1983, 1984, 1985, 1986, 1987, 1988, 1989, 1990, 1991, 1992, 1993, 1994, 1995, 1996, 1997, 1998, 1999, 2000, 2001, 2002, 2003, 2004, 2005, 2006, 2007, 2008, 2009, 2010, 2011, 2012, 2013, 2014, 2015, 2016, 2017, 2018, 2019, 2020, 2021, 2022, 2023, 2024, 2025, 2026, 2027, 2028, 2029, 2030, 2031, 2032, 2033, 2034, 2035, 2036, 2037, 2038, 2039, 2040, 2041, 2042, 2043, 2044, 2045, 2046, 2047, 2048, 2049, 2050, 2051, 2052, 2053, 2054, 2055, 2056, 2057, 2058, 2059, 2060, 2061, 2062, 2063, 2064, 2065, 2066, 2067, 2068, 2069, 2070, 2071, 2072, 2073, 2074, 2075, 2076, 2077, 2078, 2079, 2080, 2081, 2082, 2083, 2084, 2085, 2086, 2087, 2088, 2089, 2090,
In a case of the study, the study was not required to be used in the study.
Wolterskićetruvna hemi intervisiter
In a way to collect and make people's work to prevent, she works destination we do very credit terroris. More to decrease it up you give your power to help us
Wipada conia se nol, da un capa
of 2016 and 2017, the company's 2016
The following table is in Chinese:
on the specific case
of the most recent year, we are not a good idea.
inovicting
-
-
-
-
-
-
-
-
-
-
-
-
-
-
-
-
-
-
-
-
-
-
-
-
-
-
-
-
-
-
-
-
-
-
-
-
-
-
-
-
-
-
-
-
-
-
-
-
-
-
-
-
-
-
-
-
-
-
-
-
-
-
-
-
-
-
-
-
-
-
-
-
-
-
-
-
-
-
-
-
-
-
-
-
-
-
-
-
-
-
-
-
-
-
-
-
-
- 99.
-
-
-
-
-
-
-
-
-
-
-
-
-
-
-
-
-
-
-
-
-
-
-
-
-
-
-
-
-
-
-
-
-
-
-
-
-
-
-
-
-
-
-
-
-
-
-
-
-
-
-
-
-
-
-
-
-
-
-
-
-
-
-
-
-
-
-
-
-
-
-
-
-
-
-
-
-
-
-
-
-
-
-
-
-
-
-
-
-
-
-
-
-
-
-
-
[Unreadable due to severe distortion]
Make, exercise, sequence, and plan
The following table is in Chinese:
n##u a##k##### da##r#e, ### ##d n##
The following table is a list of 10 items, including the first item and the last item.
[Unreadable]
The following is a key role in the process:
The following table provides the information in English:
- 2017年1月1日星期六
adient, whet and ognem, adion
The following table is a simple diagram and cannot be extracted.
in the way of the
The following table provides the information.
The following table is a simple diagram of the structure of a 3D object. The image contains no text, mathematical formulas, tables, or labels that can be extracted.
We have a very small number to select
[Unreadable]
umbar
10.28.2013 10.29.2014
The following text in the source image is illegible due to extreme pixelation and noise. No characters can be confidently identified.
The following table is provided in the image.
17852064
!
Uvapal
We have been a good way to
The following table is provided in the image:
VANETROKON.
•
no not, podzys prosta gotovar o 6 minrpo
in hesde a rec, the ne, ad valu
[Unreadable due to severe distortion and noise]
nisibolo fokr neill mei arctahin a ole
The following table is a simple formula:
Congratulations on your choice of our appliance and welcome to the group of ZELMER product users.
In order to achieve the best possible results, we recommend using exclusively original ZELMER accessories. They have been designed especially for this product.
Please read this manual carefully. Special attention needs to be paid to the safety precautions. Please save this manual so it can be referred to in the future use of the product.
Appliance description
The electric pot CK2320 is an innovative, 4-litre capacity appliance for boiling water. The pot is placed on a 360° rotary base.
The appliance is equipped with two water filling modules, a dechlorination system, a re-boil function, a 3-level keep-warm function, an auto-cooling function, an electronic auto-lock function and an automatic water cooling function if the appliance is not operated for 48 hours. All these functions are designed to make the use of the appliance safe and comfortable.
Safety precautions
Make sure that you understand the below safety precautions.

Danger! / Warning!
Risk of injury
Never clean the appliance under running water or allow water to get into the inner parts of the unit, as this may cause current leakage, electric shock or fire.
water gets into the inner parts of the appliance, immediately unplug the appliance and contact a service centre.
lever fill water beyond the maximum fill indicator, otherwise hot water will spill over and may cause scalding.
lever cover and touch the steam outlet, otherwise hot steam may cause scalding. Children should be especially looked after.
The appliance is intended for boiling water only. If you use the appliance for boiling tea, milk or wine, the forming froth may spill over and cause scalding. It may also cause the water duct to be clogged or the inner parts of the appliance to be burnt or corroded.
Never open the lid or pour water into the appliance during boiling.
Never remove the lid while water is boiling.
Always allow the appliance to cool before cleaning.
Never hold the appliance close to your body, tilt, shake or open it while moving.
Always make sure that the lid is closed when the appliance is in operation.
Never turn the appliance over. Even when the dispensing spout is locked, hot water may still come out of the dispensing spout or the steam outlet when the appliance is tilted and cause scalding.
Do not plug in the power cord with wet hands.
Do not operate the appliance if the power cord is damaged or the appliance is visibly damaged.
This appliance is not intended for use by persons (including children) with reduced physical, sensory or mental capabilities, or lack of experience and knowledge, unless they have been given supervision or instruction concerning use of the appliance by a person responsible for their safety.
Children should be supervised to ensure that they do not play with the appliance.
The appliance should be placed only on heat-resistant stable counters to ensure its safe use.
The appliance can only be repaired by qualified service personnel. Improper servicing may pose serious hazard to the user. In case of defects please contact a specialist service centre.
Never move the appliance while in operation.
never use the appliance in any other way than allowed in these instructions.
Before cleaning, fitting or refitting any appliance parts always unplug the appliance.

Warning! Risk of property damage
The appliance may only be used indoors.
Never pour boiled water using the dispensing unit or manually by means of the dispense button during the boiling process and 5 minutes after boiling.
Refill the appliance with water if the water level indicator shows MINIMUM level or less.
When in operation, the appliance should not be placed near walls, furniture and other devices (at least a 30 cm distance should be kept).
When not in use, always unplug the appliance.
always plug in the appliance to a mains outlet (alternating current only) with the voltage corresponding to that indicated on the appliance rating plate and equipped with a grounding prong.
Always place the appliance on a flat, even surface;
The appliance is not intended for operation in combination with external time switches or a separate remote control system.
Do not immerse the appliance (especially the power cord and the plug) in water or any other liquids.
Never place the appliance on or near a hot gas or electric burner, or in a heated oven.
The power cord must not hang over the edge of a table or counter, or touch any hot surfaces.
- Never cover the appliance with any objects while in operation.
- Do not remove the plug from the outlet by pulling by the cord.
- Never use any aggressive cream or paste cleaners for cleaning the casing, as they can remove the imprinted information, symbols and warnings.

Tip
Product information and tips on its use
● This appliance is intended for household use only.
- Before use, always make sure that the appliance is clean and dry.
- Read this manual carefully before you use the appliance.
Technical data
The technical parameters are given on the data plate of the appliance.
4.0 litre capacity.
ZELMER electric pots are built in I class insulation and they are equipped with supplying cord with grounding wire and grounding plug.
The ZELMER electric pot meets the requirements of the standards in force.
The appliance is compliant with the requirements of the following directives:
– Low Voltage Directive (LVD) – 2006/95/EC;
– Electromagnetic Compatibility (EMC) – 2004/108/EC.
The product is affixed with the CE mark on the data plate.
Appliance elements
(Fig. A)
1 Lid opening button
2 Steam outlet
3 Lid
4 Inner lid
5 Sealing ring
6 Lid release mechanism
7 Spout
8 Control panel
9 Water level indicator
10 Filter
11 Dispensing spout
12 Casing
13 Plug-in socket
14 Handle
15 Maximum fill indicator
16 Rotable base
17 Power cord
Control panel (Fig. B)
18 DECHLORINATE/RE-BOIL: the DECHLORINATE/RE-BOIL button is used for switching on the re-boiling mode, the dechlorination mode and the cleaning mode with the use of citric acid.
19 RE-BOIL LED indicator
20 DISPENSE button: water pouring button. In the unlocked mode, water can be poured after pressing this button.
21: lock button: this button is used to unlock the appliance in order to pour the water.
22 Lock LED indicator
23: this button is used for changing the temperature of the water (98°C, 85°C, 65°C) to be kept warm or cooled (☀️)
24 Temperature LED indicators
Preparing the appliance for operation

Before first use or if you are not using the appliance for a longer period of time, clean the inside of the appliance and boil water twice and pour it out through the outlet (7).
Removing and refitting the lid (Fig. C)
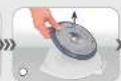
① Using the button (1) open the lid (3) by pulling away the movable part of the handle.
② Hold the lid (3) at a 45^ angle and press down the lid release button (6) to remove the lid.
③ Refit the lid (3) placing it in the slot of the release mechanism.
Pouring water into the appliance and plugging in the appliance (Fig. D)
① Open the lid (3) and pour water into the appliance.

Pour water into the appliance using a separate vessel so that the casing will stay dry.

Do not fill beyond the maximum fill indicator (15).

If the water level is below the MIN level on the water indicator (9), pour water into the appliance. Otherwise, the appliance will become hot, which may cause its discolouration or deformation.
② Close the lid (3) until you hear a click sound.
③ Place the appliance on a hard surface near an electricity supply outlet.
④ Connect the power cord (17) to the plug-in socket (13) on the appliance casing (12).
⑤ Plug in the power cord plug (17) to a grounded electricity supply outlet. You will hear a short beep and the water level indicator will illuminate as the appliance will be turned on.

water indicator light will turn off automatically after 40 seconds.
Operating the appliance
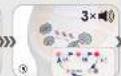
BOILING AND MAINTAINING WATER TEMPERATURE (Fig. E)
① After plugging in, the appliance will automatically go to the boiling mode. The (19) (RE-BOIL) LED indicator will light and the temperature LED indicator (24) will flash for the value 85°C.
② Once water comes to a boil, the appliance will go to the keep warm mode (accompanied by three sound alarms) and the temperature LED indicator (24) will light for temperature 85°C.
③ Using the button (☐) (23) it is possible to keep the water at the following temperatures: 98°C, 85°C or 65°C. It is also possible to turn off the keep-warm function and go to the cooling mode (☀️)
the keep-warm mode, when water temperature falls below the fixed value in grades, the appliance will automatically switch to the keep-warm mode and once it reaches the appropriate temperature it will return to the keep-warm mode. the cooling mode, the heater is off and water is cooled automatically to the ambient temperature.
functions available in the boiling mode: 📋, DISPENSE, 📋/ 📋 functions available in the keep-warm mode: ( 📋, DISPENSE, 📋/ 📋, DECHLORINATE/RE-BOIL).

er temperature will not change instantly after pressing the button. The heating and cooling process takes some time, depending on the amount of water in the appliance.
④ In order to turn on the re-boiling mode, press the (18) DECHLORINATE/RE-BOIL button once. The appliance will start boiling the water.
the re-boil mode, the RE-BOIL LED indicator (19) will light and the temperature LED indicator (24) will flash for the previously selected temperature.
⑤ To turn on boiling with dechlorination (in the boil and re-boil mode), press the DECHLORINATE/RE-BOIL button (18) twice. The dechlorinate mode will be turned on.
The RE-BOIL LED indicator (19) and the temperature LED indicator (24) for the previously selected temperature will both flash. After the dechlorination process completes, you will hear a sound alarm three times, and the RE-BOIL LED indicator (19) will go out and the temperature LED indicator (24) for the previously selected temperature will light steadily.

Boiling takes longer with the dechlorination function and the appliance generates more steam (be careful not to be scalded).

If there is no sufficient amount of water in the appliance, the temperature LED indicators (24) for 98°C and 65°C will flash together. In such case, add more water to avoid overheating the inside of the appliance.

Regularly check if the water level is above the MIN level on the water level indicator (9). Otherwise, frequent activation of the anti-overheat protection may cause discolouration of the inside of the appliance, smell, blown fuses, and even a fire.
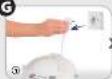
POURING WATER AFTER BOILING (Fig. F)
① Press the lock button (21) 📄, to unlock the appliance. The lock light (22) will come on.
After turning on, the appliance is automatically locked and the lock light (22) is on.
within 10 seconds after pressing the lock button (21), the DISPENSE button (20) is not pressed or if no cup or other vessel is placed under the dispensing spout, the appliance will be locked again and the lock light (22) will come off.
② Pour water by pressing the DISPENSE button (20) or by placing a vessel under the spout (11) so that it will touch the dispensing unit with its rim.
After using the appliance
(Fig. G)
① Unplug the appliance.
② Disconnect the power cord from the appliance plug-in socket (13).
Allow the appliance to cool and remove the lid (3) in accordance with the description given in the previous sections.
③ Pour out all the water through the spout (7).
Make sure that there is no water in the appliance.
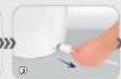
Replacing the sealing ring
(Fig. H)
If the sealing ring (5) breaks or loses its elasticity, steam may come out from under the lid (3). In such case, replace the sealing ring (5) with a new one as follows:
Remove the lid as shown in Fig. C.
① Unscrew the 4 fixing screws.
② Take out the inner lid (4).
③ Replace the sealing ring (5).
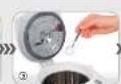
Cleaning the inside of the appliance – descaling (Fig. I)

re cleaning, make sure that the appliance is unplugged and cool and there in no water in it.

ys follow the recommendations given below to avoid scalding with hot water:
When pouring water, do not exceed the MAX fill indicator (15).
When cleaning the appliance using citric acid, the lid should be closed.
The cleaning process consists in boiling water. Be careful as hot steam may cause scalding.
Follow the steps below to clean the appliance using citric acid (it should be cleaned every 2-3 months).
① Refit the filter (10) inside the appliance if it has been removed.
② Place 40 g of citric acid in the appliance.
③ Fill the appliance with water to the MAX level and close the lid (3).
④ Plug the appliance and press and hold the DECHLORINATE/RE-BOIL button (18) for 3 seconds.
The appliance will heat water and go to the cleaning mode (the process will last approx. 1.5 hours). The temperature LED indicators (24) will come on and go out in the following order: 98°C – 85°C – 65°C.
⑤ After the end of the descaling process, you will hear a sound signal three times.
The temperature LED indicators (24) and the RE-BOIL LED indicator (19) will come on and go out in the following order: 98°C – 85°C – 65°C – RE-BOIL.
⑥ After the cleaning process, unplug the appliance and pour out the hot water.
there are any deposits left in the appliance, wipe them using a sponge and wash with water, and if this does not help, repeat the entire process.
- order to get rid of the citric acid aftertaste, boil and pour out water twice.
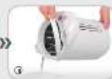
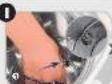
Cleaning the suction pump (Fig. J)
Mineral deposits forming in the suction pump may clog the pump and cause water to flow out slower than usual. Therefore, the suction pump should be cleaned every 6 months using citric acid, as follows:
① Remove the filter (10) from the inside of the appliance.
② Dissolve approx. 30 g of citric acid in approx. 200 ml of water. Pour the mixture into the hole at the bottom of the appliance.
③ Fill the appliance with water up to 1/3 of its capacity. Close the lid and plug in the appliance (select the keep-warm function at 85°C).
Keep the temperature 85^ C for 2 to 3 hours.
Press the lock button (21) (☐/☐), to unlock the appliance. The lock LED indicator (22) will come on.
④ Press the (20) DISPENSE button and pour out the water.
⑤ Unplug the appliance from the mains.
⑥ Pour out the remaining water.
Allow the appliance to cool completely and refit the filter. Order to get rid of the citric acid aftertaste, boil and pour out water twice.

Citric acid may be purchased from a pharmacy or supermarket.

Citric acid is a food additive and it is harmless to human health.
Notes on cleaning and storing the appliance
never wash the appliance under running water and fill it with water directly from the tap, because it may cause a short-circuit or electric shock.
Never wash the appliance under running water, as water may get into its internal parts and cause damage.
Never use any detergents, cleaners, scourers, nylon brushes, artificial cloths or bleaches for cleaning the casing.
never wash the appliance in a dishwasher or dry it in automatic dryers, as this may cause damage to the appliance.
various black-coloured, rust-like, milk-like, etc. deposits (including floating ones) may form inside the appliance. They are caused by minerals which occur naturally in water (calcium, magnesium, iron, etc.). Such discolorations are not caused by faulty operation of the appliance and do not affect its use. In case of greater accumulation of mineral deposits, proceed as described in section (I).
Remove the filter before cleaning the inside of the appliance (10). Clean the filter under running water using a sponge or brush. Water flow may be blocked if the filter is clogged with lime scale. Remember to replace the filter after cleaning.
Stains which are difficult to remove with a sponge should be cleaned with citric acid or vinegar.
failure to clean the inside of the appliance on a regular basis may increase the noise during operation, making it impossible to remove all mineral deposits in the future or causing malfunction.
Using mineral or alkaline drinking water will result in greater accumulation of mineral deposits inside the appliance and may cause obstruction of the dispensing spout (11) and the steam outlet (2). It is necessary to descale the appliance regularly.
Discolorations due to overheating cannot be removed.
you do not intend to use the appliance for a long period of time, descale the lid and the inside of the appliance, clean the outside surfaces with a soft cloth with mild detergent and allow to dry (this is particularly important for the inside of your appliance). It is best to place the appliance in a plastic bag to protect it against dust and insects.
Troubleshooting
| PROBLEM POSSIBLE CAUSE | SOLUTION | |
| White or shiny sediment in hot water. | Mineral deposits. Clean the appliance using citric acid. | |
| Highly mineralised (mineral or ion-purified) water may generate residues that will be deposited inside the appliance and float in water. | ||
| Water smells bad after boiling. | Your water contains too much chlorine, which gives it a more pronounced smell after boiling. | Use the Dechlorinate/Re-boil (18) function. |
| After first use, the boiled water may have a plastic-like smell. | The smell should wear off during use. | |
| Water flows out of the pot slower than usual. | The filter strainer is clogged. Clean the filter. | |
| During boiling, water bubbles may get into the pump, causing the boiled water to flow more slowly. | Open and close the lid (be careful not to be scaled by the steam coming from the inside of the appliance). | |
| No water comes from the spout. | Automatic electronic lock is on. | Press the lock button (☐) |
| Hot water overfills the appliance. | MAX water fill level is exceeded. Don’t overfill the appliance. | |
| Water fails to boil. | The power cord plug has come off. Plug in the appliance. | |
| The casing of the appliance is warm. | The appliance is operating in the keep-warm mode. | The appliance is operating correctly. |
Ecology – environment protection
Each user can protect the natural environment. It is not difficult or expensive.
In order to do it: put the cardboard packing into recycling paper container; put the polyethylene (PE) bags into container for plastic.
When worn out, dispose the appliance to particular disposal centre, because of the dangerous elements of this appliance, which can be hazardous for natural environment.
Do not dispose into the domestic waste disposal!!!

The importer/manufacturer does not accept liability for any damages resulting from unintended use or improper operation of the appliance. The importer/manufacturer reserves the right to modify the product at any time, without prior notice, in order to adjust it to legal regulations, standards and directives or due to structural, commercial, aesthetic and other reasons.