ZHB 1620 B - Hand blender Zelmer - Free user manual and instructions
Find the device manual for free ZHB 1620 B Zelmer in PDF.

| Product Type | Hand blender |
| Brand | Zelmer |
| Model | ZHB 1620 B |
| Power Consumption | 700 W |
| Voltage | 220-240 V |
| Frequency | 50/60 Hz |
| Weight | 0.8 kg |
| Dimensions (L x W x H) | 38 x 8 x 8 cm |
| Cord Length | 1.2 m |
| Speed Settings | 2 speed levels + turbo |
| Turbo Function | Yes |
| Blending Shaft Material | Stainless steel |
| Whisk Included | Yes |
| Beaker Capacity | 800 ml |
| Dishwasher Safe Parts | Blending shaft, whisk, beaker |
| Overheat Protection | Yes |
| Safety Lock | Yes |
| Main Functions | Blending, pureeing, whisking |
| Body Material | Plastic |
| Guarantee | 2 years |
| Repairability Index | 8.0 / 10 |
Frequently Asked Questions - ZHB 1620 B Zelmer
User questions about ZHB 1620 B Zelmer
0 question about this device. Answer the ones you know or ask your own.
Ask a new question about this device
Download the instructions for your Hand blender in PDF format for free! Find your manual ZHB 1620 B - Zelmer and take your electronic device back in hand. On this page are published all the documents necessary for the use of your device. ZHB 1620 B by Zelmer.
USER MANUAL ZHB 1620 B Zelmer
Congratulations on your choice of our appliance and welcome among the users of Zelmer appliances!
For best results we recommend using original Zelmer accessories only. They have been designed specifically for this product.
Please carefully read this manual. Pay special attention to important safety instructions. Keep these operating instructions for future reference.
Safety precautions and proper use
Please read the entire manual before using this appliance.

DANGER! / WARNING!
Failure to follow safety recommendations may result in injury
- Do not operate the appliance if its power cord, housing or the handle are damaged.
- If the power cord is damaged, in order to avoid a hazard it should be replaced by the manufacturer or by a specialised service centre or by a qualified person.
- The appliance should be repaired by trained staff only. Improper repair may result in a serious hazard to the user. In case of defects, please contact a qualified service centre.
- The appliance shall only be used indoors.
- Do not remove the blender from the blow when the appliance is in operation.
- Do not touch any moving parts. Blades of the blender arm, chopper bowl and food processor and discs with interchangeable inserts. They are very sharp! Careless handling can lead to injury.
- Before using the food processor, make sure its lid is closed.
- This product shall not be used by children. Keep the appliance and the power cable out of reach of children.
- Switch off and unplug the appliance before you exchange the accessories or approach the parts moving during operation.
• Always unplug the appliance from the electrical outlet when it is left unattended and before assembling, disassembling and cleaning.
- Appliances can be used by persons with reduced physical, sensory or mental capabilities or lack of experience and knowledge if they have been given supervision or instruction concerning use of the appliance in a safe way and understand the hazards involved.
- Children shall not play with the appliance.
- Exercise caution when cleaning, emptying the container and handling the cutting blades. Careless handling can lead to injury.

NOTE!
Failure to observe these guidelines may result in damage to property.
Always connect the appliance to the power outlet (alternating current only) with voltage matching that indicated on the name plate.
Do not unplug the appliance by pulling the cord.
Do not expose the blender and its attachments to temperature above 60^ C, because damage can result.
Do not immerse the motor unit, whisk gear unit, chopper bowl gear unit and food processor lid with a gear unit in water, nor wash them under running water.
Do not overload the appliance with too much food product or by pushing it too hard.
Do not wash the elements of the motor unit.
Do not clean the external elements with aggressive detergents, such as emulsions and pastes.
They might for example remove graphic symbols, such as: scale, marks, warning signs, etc.
Do not wash the metal parts in the dishwasher. Aggressive cleaning agents used in a dishwasher will cause these parts to darken. Wash these parts by hand using traditional dishwashing liquid.
Do not use the blending arm without immersing it in the food product. Do not immerse the blending arm in liquid down to more than half of its length.
Be careful not to pour water inside the blending arm.
Do not exceed the quantities and times indicated in the tables.
Do not process without a pause more than one serving. Before re-using the appliance allow it to cool to room temperature.
Do not press the and . buttons at the same time.
The appliance is equipped with overheat protection that will turn it off when used for too long or under excessive load. When overheated, disconnect the appliance from the power source. To do this, unplug the appliance from the wall outlet and allow it to cool for at least 10 minutes. If the overheat protection is tripped too often, contact an authorized Zelmer service centre.

Product information and directions for use
The appliance is intended for domestic use. Different warranty conditions apply when appliance is used for catering.
The manufacturer shall not be liable for any damage caused by the improper operation or use of the blender or its attachments.
Features and components

1 Motor unit
1a Power cord
1b Clip
2 On / off button
3 TURBO T button
3a Speed indicator
4 Speed control
4a Speed indicator
5 Release buttons
6 Wall bracket
6a 4x40 screw with 7,5x35 wall plug
BLENDING ARM COMPONENTS
7 Blending arm
7a Rubber cap
8 Blending container with measuring scale
9 Additional blending container
10 Measuring cup
11 Lid/base
WHISK COMPONENTS
12 Whisk gear unit
13 Whisk
CHOPPER COMPONENTS
14 Chopper gear unit
15 Chopper blade
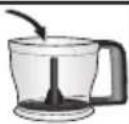
16 Chopper bowl
17 Chopper bowl lid
FOOD PROCESSOR COMPONENTS
18 Food processor gear unit
19 Pusher
20 Food processor bowl
21 Food processor blade
22 Dough mixer
23 Disc insert holder
23a Thin slicing insert (A)
23b Thick slicing insert (B)
23c Shredding insert (F)
23d Grating insert (G)

food processor is not included with the hand blender, it can be ordered from customer service (order no. 11008024).
Specifications
Technical specifications are listed on the product name plate. Nosie level (LWA)/(A) with attachments:
-Blending arm 57 dB/A
-Whisk 75 dB/A
-Chopper
-Food processor
75 dB/A
74 dB/A
Product specifications

√ Blender standard attachments
○ Additional accessories and attachments are available in supermarkets, convenience stores and online.
* Colour
Start the appliance and set the desired speed
After installing the appropriate attachment, plug the power cord into a wall outlet and press to ⏻ start the appliance. Use the infinitely adjustable speed control dial to set the desired speed.
– Turn right to reduce the speed
– Turn left to increase the speed.
Press at any time to obtain maximum speed regardless of the speed control setting.
Once you plug in the motor unit the indicator will show the set speed.
Additional indicator lights up when the button is pressed.

appliance operates only when you press the or button. Release the button to stop the blender motor unit.
WALL BRACKET

① Drill a hole in the wall, hammer in the wall plug and use the screw provided to attach the bracket to the wall.
Prepare the blender for operation

re first use wash all attachments that come into contact with food in hot water with a little dishwashing liquid.
CONTAINERS

Use the containers (8, 9, 10) and the lid/base (11) as follows:
① Blending – containers (8, 9).
② Measuring cup (10).
③ Thermo insulating container (double-walled) – place container (8) inside the container (9).
④ Food storage – containers (8, 9) and lid/base (11).
⑤ Lid/base (11) can be used as a base for container (9) and also as a lid for containers (8) and (9).
⑥ Blender storage when you finish your work – containers (8, 9, 10) and lid/base (11) with attachments.
BLENDING ARM

Hand blender with its blending arm can be used when preparing food, baby food and drinks. It is ideal to shred the cooked and raw vegetables, soft (seedless) fruits, blend liquids, prepare sauces, creams, soups, mayonnaise, etc.

re attaching or removing the blending arm, make sure that the appliance is unplugged from the wall outlet.
① Fill a container of your choice with a food product.

ding containers are provided with the appliance. You can also use other containers.
② Remove the rubber cap, attach blending arm to the motor unit until it locks.
③ Plug in the appliance.
④ Place the blade with guard in the food product to be processed.

blender works better if food products to be processed are in liquid.
⑤ Press ⏻ to start the appliance and set the desired speed.

It is recommended to use T speed for most food products. Use speed control for blending liquids, hot products and to mix in the ingredients (such as cereals in yogurt).

void splashing press or only when the blade with guard is immersed in the food products to be processed.

appliance operates only when you press the or button.
● Always turn off the blender before you remove the blade with guard from the blended food products. Once finished, turn off and unplug the appliance from the wall outlet.
Tips on operating the appliance
- To detach the blending arm follow the attaching procedure in reverse order.
- In the event of water ingress inside the blending arm, turn it upside down and leave to dry.
- In the event of water ingress inside the blending arm, turn it upside down and leave to dry.
- Once the blending arm (7) is completely dry, replace the rubber cap (7a) to ensure safe storage.
WHISK

Use your hand blender with whisk attachment to whip foam, cream, yolks with the sugar, make cream, dough for pancakes and omelettes.

re attaching or removing the whisk, make sure that the appliance is unplugged from the wall outlet.
① Before you begin, attach whisk to its gear unit.
② When assembled, attach and lock to motor unit.
③ Plug in the appliance.
④ Place the whisk in the container with the food product to be processed.
⑤ Press ⏻ to start the appliance and set the desired speed.

appliance operates only when you press the or button.
- Once finished, turn off and unplug the appliance from the wall outlet.
Tips on operating the appliance
- To detach the whisk follow the attaching procedure in reverse order. Use the Turbo speed for best results.
- Once finished, turn off and unplug the appliance from the wall outlet.
- For whipping you can also use containers (9) and (10) provided with the blender.

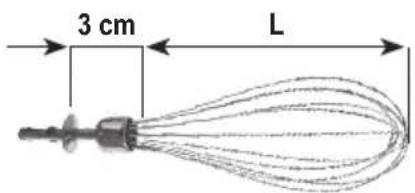
Tilt the whisk slightly and gently move it around the bowl for best results.

Do not immerse the whisk beyond its working length (L).
CHOPPER

Your hand blender is equipped with a chopper to chop meat, cheese, nuts, onions, garlic, carrots, etc.

Before attaching/detaching the gear unit from the motor unit, make sure that the appliance is unplugged from the wall outlet.
① Place the chopper bowl on a hard, fl at and dry surface.
② Place chopping blade in the bowl and insert it onto the protrusion in the centre of the bowl.
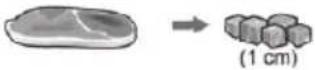
③ Place the food product to be processed in the bowl. Do not fill the bowl above the MAX mark.

Cut larger chunks of the product into smaller 1 cm cubes.
④ Place gear unit onto the bowl making sure that tabs are aligned with the grooves in the bowl and turn clockwise all the way until resistance.
⑤ Attach motor unit to the gear unit, and lock.
⑥ Plug in the appliance.
⑦ Press T to turn on the appliance.
⑧ Once finished, turn off and unplug the appliance from the wall outlet.
To disassemble the chopper unit follow the assembly procedure in reverse order.
⑨ You can store the products in the mini chopper bowl (16), To protect the processed food product cover bowl with lid (17).

Chopper blades are very sharp. Be especially careful when you install, remove or clean the blades.

Do not chop hard products such as coffee beans, nutmeg and ice cubes.

Never remove the gear unit off the bowl before the blades come to a full stop.

Do not operate the motor unit without any attachments.
Tips on operating the appliance
If the food product sticks to the blade or to the bowl:
• turn off the appliance,
- detach the motor unit and remove the gear unit,
- remove the products from the blade and the bowl walls,
• re-assemble the appliance and resume your work.
Vary the processing time depending on your needs to obtain coarsely or finely chopped food products.
Recommended speed and approximate processing times of selected food products.
 |  Recommended product weight Recommended product weight |  | 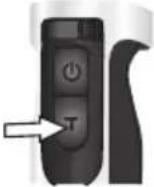  | Maximum number of cycles |
 | 100 g 100 g | 10-20 s 3 | ||
| [ZWZS] | 150 g 150 g | 30-40 s 3 | ||
 | 100 g 150 g | (2-5) x 1 s 5 | ||
 | 15 g(500 ml) | 15 g (7-10) x 1 s 5 | ||
 | 20 x  |  | (3-8) x 1 s 5 | |
| 150 g 200 g (5-10) x 1 s 5 | ||||
| 100 g 200 g (3-8) x 1 s 3 | ||||
| 100 g 200 g (3-8) x 3 s 3 | ||||
| 50 g 50 g 30-40 s 3 | ||||
Maximum number of cycles
FOOD PROCESSOR
Description
ZELMER hand blender is equipped with a food processor for chopping, slicing, shredding and grating of cheese, vegetables, meat, nuts and fruits.
Food processor components
Food processor blade – for chopping raw or cooked meat, cheese, nuts or vegetables, itd.
Dough mixer – for mixing the dough.
Disc insert holder
- Thin slicing insert (A) – for slicing fruits and vegetables into thin slices
- Thick slicing insert (B) – for slicing fruits and vegetables into thick slices.
- Shredding insert (F) – for shredding fruits and vegetables.
- Grating insert (G) – for grating fruits and vegetables into pulp.
Pusher – for pushing the product to be processed by the disc with interchangeable inserts, and for closing the inlet tube of the gear unit.

disc inserts must not be used for cutting very hard foods (Parmesan cheese, chocolate).

Do not use the food processor elements for crushing ice, as this will damage the bowl and will dull the blades.
Prepare food processor for operation

re attaching/detaching the gear unit from the motor unit, make sure that the appliance is unplugged from the wall outlet.
Use food processor (chopping blade and dough mixer)

① Place the food processor bowl on a hard, flat and dry surface.
② Place chopping blade or dough mixer in the bowl and insert it onto the protrusion in the centre of the bowl.
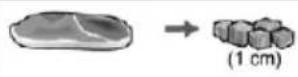
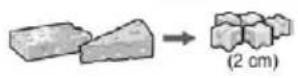
③ Pour the food product to be pressed in the bowl. Do not fill the bowl above the MAX mark or 1250 ml.

larger chunks of the product into smaller 1 cm cubes.
④ Place the hopper on the bowl, sliding the tabs into the bowl slots and turn the hopper fully clockwise.
⑤ Attach motor unit to the gear unit and lock, insert pusher into funnel.
⑥ Plug in the appliance.
⑦ Press ⏻ or T to turn on the appliance.
⑧ Set the desired speed.

Do not remove the pusher during food processor operation.

Once finished, turn off and unplug the appliance from the wall outlet.

To disassemble the food processor follow the assembly procedure in reverse order.

Food processor blades are very sharp. Be especially careful when you install, remove or clean the blades.

r remove the gear unit off the bowl before the blades or dough mixer come to a full stop.

Do not operate the motor unit without any attachments.
Tips on operating the appliance
If the food product sticks to the blade or to the bowl:
- turn off the appliance, - detach the motor unit and remove the gear unit,
- remove the products from the blade and the bowl walls,
• re-assemble the appliance and resume your work.
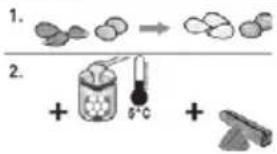
Application example
Bread dough
Basic recipe:
250g flour
- 140 ml water
7g sugar
- 7g margarine
0,5 g yeast
4 g salt
Tools: Bowl and kneading hook of the multifunction accessory
- Put all ingredients in the bowl except the water.
• Mix ingredients at turbo speed.
- After severalseconds pour the water through the feed tube.
• Process everything at turbo speed.
Our recommendation: 30 seconds switch time
Maximum switch-on time: 60 seconds
Maximum quantity: 1 x basic recipe
Note: You can make maximum 2 x the amount of the basic recipe succession.
Short pastry
Basic recipe:
250 g flour
• 125 g margarine or butter (room temperature)
125 g sugar
1 egg
• 1/2 packet of baking powder
• 1 packet of vanilla sugar
• 1 pinch of salt
Tools: Bowl and kneading hook of the multifunction accessory
• Put all ingredients in the bowl.
• Mix ingredients at turbo speed.
• Leave pastry dough to stand in a cool environment.
Process further if required.
Maximum quantity: 1 x basic recipe
Recommended speed and approximate processing times of selected food products.
 |  Recommended product weight Recommended product weight |  |  | [DK0X] |  | [4AS2] |  |  | Maximum number of cycles |
 | 250 g 350 | g 25-30 s 3 | √ | — | — | — | T | ||
 | 200 g 250 | g 30-70 s 3 | √ | — | — | — | T | ||
 | 300 g 300 | g 3 | — | — | √ | — | — | T | |
 | 250 g 350 | g (5-10) x 2 s 5 | √ | — | — | — | T | ||
 | 15 g 20 g | (4-7) x 2 s 5 | √ | — | — | — | T | ||
 | 10x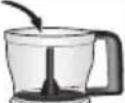 Recommended product weight Recommended product weight | 20x | (3-8) x 1 s 3 | √ | — | — | — | T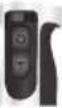 | Maximum number of cycles |
 | 350 g 500 g 3 | — | — | √ | — | — | |||
 | 300 g 300 g 3 | — | — | √ | √ | √ | |||
 | 350 g 500 g 3 | — | — | — | √ | — | |||
 | 350 g 500 g 3 | — | — | — | √ | √ | |||
 | 250 g 500 g (6-15) x 4 s 5 |  |  |  |  |  | |||
 | 30 g 40 s |  |  |  |  | [2T68] | 3 | ||
| 200 g + 3 g 5 s | |||||||||
Disc holder with inserts

(slicing, shredding and grating inserts)
① Place the food processor bowl on a hard, flat and dry surface.
② Install the desired insert (e.g. 23a) in the disc holder (23a) To avoid injury, install and remove inserts holding the disc holder (23) with both hands and thumbs.
③ Place disc in the bowl and onto the protrusion in the centre of the bowl.
④ Place gear unit onto the bowl making sure that tabs are aligned with the grooves in the bowl and turn clockwise all the way until resistance.
⑤ Attach motor unit to the gear unit, and lock.
⑥ Plug in the appliance.
⑦ Place food products in the tube of the gear unit.
⑧ Gently place the pusher into the tube of the gear unit as not to push the product before operating the motor unit (only push the product further when the motor unit operates).
⑨ Set the desired speed using the speed control dial.
⑩ Press T/O to turn on the appliance.
When you have finished your work


① Release the buttons T
② Unplug power cord from wall outlet.
③ Unlock using the release buttons and detach the motor unit (after the appliance comes to a full stop).
④ Remove the pusher from gear unit tube.
⑤ Unlock and remove the gear unit.
⑥ Remove disc holder with insert.
⑦ Remove the insert.
⑧ Empty the bowl.
Tips on operating the appliance
Shredding and grating inserts
Place the food product to be processed in the tube, place pusher in the tube (but do not push) and turn on the motor unit. Gently push the pusher when the appliance operates.
Stop the appliance when the bowl is filled up to 1250 ml, empty the bowl and collect shredded/grated food product from bowl walls.
Slicing insert
It is recommended to put products into the tube vertically so that the entire cross-section of the tube is filled.
Place the food product to be processed in the tube, place pusher in the tube (but do not push) and turn on the motor unit. Gently push the pusher when the appliance operates.
Stop the appliance when the bowl is filled up to 1250 ml, empty the bowl and collect residue food product from the disc.