
VT-1477 - Blender Vitek - Free user manual and instructions
Find the device manual for free VT-1477 Vitek in PDF.


| Product Type | Blender |
| Brand | Vitek |
| Model | VT-1477 |
| Dimensions (H x W x D) | 30 x 15 x 15 cm |
| Weight | 1.5 kg |
| Power | 600 W |
| Jug Capacity | 1.5 L |
| Jug Material | Plastic (BPA-free) |
| Blade Material | Stainless steel |
| Speed Settings | 2 speeds + pulse |
| Functions | Blending, pureeing, crushing ice, mixing |
| Safety Features | Non-slip feet, auto shut-off, lid lock |
| Cord Length | 1 m |
| Dishwasher Safe Parts | Jug and lid (top rack) |
| Blade Replacement | Available as spare part |
| Warranty | 2 years |
Frequently Asked Questions - VT-1477 Vitek
User questions about VT-1477 Vitek
0 question about this device. Answer the ones you know or ask your own.
Ask a new question about this device
Download the instructions for your Blender in PDF format for free! Find your manual VT-1477 - Vitek and take your electronic device back in hand. On this page are published all the documents necessary for the use of your device. VT-1477 by Vitek.
USER MANUAL VT-1477 Vitek
natural_image
Technical line drawing of a mechanical component with a cylindrical shaft and flange (no text or symbols)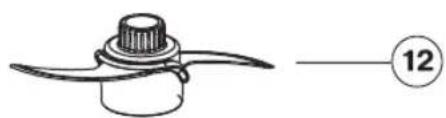
natural_image
Simple line drawing of a propeller with a central hub and spout, labeled with number 12 (no text or symbols on the diagram itself)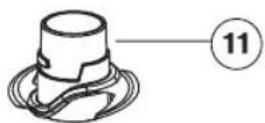

natural_image
Diagram of a circular mechanical component with internal components and a numbered label (14), no readable text or symbols present.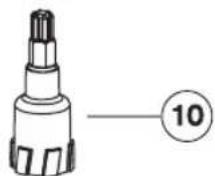
natural_image
Diagram of a circular object with internal patterns and a numbered circle (13), no readable text or symbols present.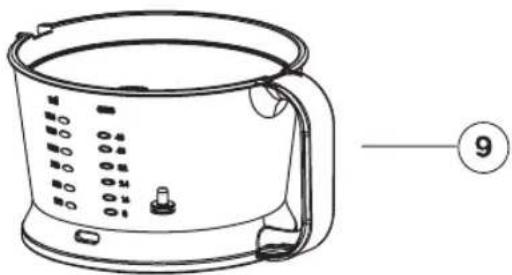
natural_image
Line drawing of a portable coffee maker with control knob and handle (no text or symbols)ENGLISH
BLENDER SET WITH FOOD PROCESSOR
DESCRIPTION
- Detachable blender attachment
- Motor unit
- Maximal speed button "TURBO"
- On button
- Attachment rotation speed control
- Whisk reduction gear
- Whisks for beating/mixing of liquid products
- Measuring beaker
- Bowl
- Driving shaft
- Lower chopping knife with protective cover
- Upper chopping knife with protective cover
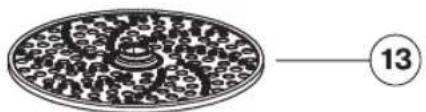
- Potato mud cutting attachment
- Shredding/slicing disc knife
- Bowl lid
- Geared lid
- Clamps
- Geared lid fixing buttons
- Motor unit fixing button
- Feeding chute
- Pusher
- Small pusher/measuring beaker
SAFETY MEASURES
Before using the unit, read these instructions carefully. Keep these instructions for future reference.
- Before using the unit for the first time, make sure that electricity supply corresponds to the voltage of current specified on the unit housing.
- The blender set allows quick and effective operation, but continuous operation time should not exceed 1 minute while using blender and whisks attachment and 20-30 seconds while chopping products in the bowl. Make at least a two-minute interval between operation cycles.
- When using the blender attachment, cool down hot products, maximal temperature of products should not exceed 80°C.
• Do not use the unit outdoors. - Use only the attachments supplied with the unit.
- Use the unit only for the intended purposes as described in the manual.
-
Before using the unit for the first time wash all the removable details that will contact products thoroughly.
-
Before using the unit make sure that all the details are set properly.
• Use the unit on the flat stable surface. - Products to be chopped with blender attachment or chopping knives should be put into the bowl before switching on the unit.
- Do not overfill the bowl with products and watch the level of poured liquids.
- The blades of blender attachment, chopping knives and disc knives are very sharp and dangerous. Handle these attachments very carefully!
- If hindered rotation of the chopping or disc knives appears, unplug the unit and carefully remove products, that prevent blade rotation.
- Remove products and pour out liquids from the bowl only after complete stop of knife.
- Do not touch the rotating parts of the unit. Do not allow hair or clothes edges get into the blades rotating zone of blender.
• Never leave the operating unit unattended.
• Always unplug the unit before cleaning or if you do not use it. - Do not use the unit near hot surfaces (gas or electric stove, oven).
- Provide that the power cord does not touch sharp objects and hot surfaces.
- Do not pull the power cord and do not twist it.
- Do not touch the plug with wet hands.
- Do not use the unit if the power cord is damaged.
- Do not try to repair the unit yourself. If there are any damages in the unit, apply to the authorized service center.
- In order to avoid risk of electric shock or fire, do not immerse the unit into water or other liquids. If the unit fell into water:
- do not touch water;
- unplug the unit immediately, and only then take it out of water;
– apply to the authorized service center for testing and repairing the unit. - Never allow children to use the unit as a toy.
- This unit is not intended for usage by children or disabled persons. In exceptional cases a person who is responsible for safety should give them all the necessary instructions on safety measures and information about danger, which can be caused by improper usage of the unit.
- The blender set is intended for household usage only.
ENGLISH
Before using the unit
- Before using the unit wash the blender attachment (1), whisks (7), measuring beaker (8), bowl (9), shaft (10), knives (11, 12), shredding/slicing disks (13, 14), bowl lid (15) and pushers (21, 22) with warm water and neutral detergent, then rinse and dry.
- Wipe the motor unit (2), whisk gear (16) and geared lid (16) with a soft slightly damp cloth.
Attention! Do not immerse the motor unit (2), whisk reduction gear (6), geared lid (16), power cord and power plug into water or any other liquids.
Do not put the attachments and bowls in a dish washing machine.
Selection of attachment rotation speed
- To select the attachment rotation speed press and hold the (4) button and rotate the speed control (5).
- To increase the attachment rotation speed turn the handle (5) counterclockwise, to reduce - clockwise.
- For operation at the maximal rotation speed, press and hold the (3) "TURBO" button.
Using the blender
Use the blender attachment (1) for chopping, mixing the products as well as for Smoothie cooking - a cocktail from fruits and fruit puree with milk, yoghurt, crushed ice or ice cream.
WARNING: before assembling make sure that the power plug is not inserted into the socket.
- Insert the blender attachment (1) into the motor unit (2), and turn it until bumping.
- Insert the plug into the socket. The blender is ready for operation.
- Immerse the blender attachment (1) into the bowl with food, that you want to chop/mix; you can use the measuring beaker (8) for it.
- Press and hold the on button (3), select the required rotation speed by turning the speed control (5) or press and hold maximal attachment rotation speed button "TURBO" (4).
Note: Products should be put into the bowl before switching on the unit.
Before starting to chop/mix, we recommend to peel fruit, remove inedible parts, such as bones, and cut fruit into 2x2 cm cubes.
- After you finish using the unit, take the plug out of the socket and remove the attachment (1).
Attention!
- Do not remove the attachment (1) during blender operation.
- In order not to damage the blades, do not process too hard products such as cereals, rice, coffee beans, frozen food.
- The maximal allowable continuous operation time should not exceed 1 minute with subsequent 2 minute break.
USING WHISKS
Use the whisks (7) only to make cream, biscuit dough or mixing ready desserts.
WARNING: before assembling make sure that the power plug is not inserted into the socket.
- Insert the whisk reduction gear (6) into the motor unit (2), and turn the reduction gear (6) until bumping.
- Insert the whisks (7) into the reduction gear (6).
- Insert the plug into the socket.
- Put the whisks (7) into the bowl with food.
- Press and hold the on button (3), select the the required whisk rotation speed by turning the speed control (5) or press and hold maximal whisk rotation speed button "TURBO" (4).
- After you finish using the unit, take the plug out of the socket, disconnect the whisks (7) from the reduction gear (6), and remove the reduction gear (6) from the motor unit (2).
Attention!
- Do not use the whisks (7) to make tight dough.
- Products should be put into the bowl before switching on the unit.
- The maximal allowable continuous operation time should not exceed 1 minute with subsequent 2 minute break.
USING THE CHOPPING KNIVES
The chopping knives (11, 12) are used to chop meat, cheese, onion, herbs, garlic, carrots, walnuts, almonds, fruits.
Attention! Do not chop very hard products, such as nutmegs, coffee beans and cereals.
ENGLISH
Before you start chopping:
- Cut meat, cheese, onion, garlic, carrots into approximately equal slices.
- Remove stems of herbs, peel the nuts.
- Remove bones, sinews and cartilage from meat.
- To achieve the best results refer to the table below.
Be careful: the knives are very sharp! Always hold the knives by the upper plastic shank.
- Set the driving shaft (10) on the axis of the bowl (9).
- Fix the lower knife (11) on the driving shaft (10) preliminary having removed the protective cover.
- It is recommended to use the upper knife (12) for more effective chopping.
- Remove the protective cover (12) from the knife and fix it over the lower knife (11).
- Holding the upper part of the driving shaft (10) turn the upper knife (12) clockwise until bumping.
- Put the products meant for processing into the bowl (9).
- Put the lid (15) on the bowl (9).
- Press the fixing buttons (18) of geared lid (16), put the geared lid (16) on the bowl lid (15), release fixing buttons (18) and make sure that the clamps (17) are firmly fixed on the bowl (9).
- Insert the motor unit (2) into the geared lid (16), turn the motor unit (2) clockwise till the clamp (19) clicks.
- Press and hold the on button (3), select the the required chopping knives rotation speed by turning the speed control (5) or press and hold maximal chopping knives rotation speed button "TURBO" (4).
- During operation hold the motor unit (2) with one hand and hold the bowl (9) by the handle with another hand.
- After you finish using the unit, take the plug out of the socket.
- To remove the motor unit (2) press the clamp button (19) and turn the motor unit (2) counterclockwise.
- Remove the geared lid (16) by pressing the fixing buttons (18).
Note: It is impossible to remove the geared lid (16) without removing the motor unit (2).
- Remove the lid (15).
- Carefully remove the knives (11, 12) from the bowl (9) by taking the top of the driving shaft (10).
- Take the chopped products out of the bowl (9).
- Clean, wash and dry all the details used for products processing right after the end of operation.
Attention! Follow the described sequence of operations strictly.
The maximal allowable continuous operation time should not exceed 30 seconds with subsequent 2 minute break.
USING THE DISK KNIVES
- Set the driving shaft (10) on the axis of the bowl (9).
- Fix the potato mud cutting attachment (13) or the shredding/slicing disc knife (14) on the driving shaft (10).
- Put the lid (15) on the bowl (9).
- Press the fixing buttons (18) of the geared lid (16), put the geared lid (16) on the bowl lid (15), release the fixing buttons (18) and make sure that the clamps (17) are firmly fixed on the bowl (9).
- Press and hold the on button (3), select the the required attachment rotation speed by turning the speed control (5) or press and hold maximal attachment rotation speed button "TURBO" (4).
- Put the products into the chute (20) of the geared lid (16) and press them gently with pusher (21 or 22).
Attention! During the operation use only the pushers (21, 22) supplied with the unit; do not use any other objects, do not push the products with your hands.
Note: To process the products of a small size (diameter) put the pusher (21) into the lid chute (20), and use the small pusher (22) for feeding products.
- After you finish using the unit, take the plug out of the socket.
- To remove the motor unit (2) press the clamp button (19) and turn the motor unit (2) counterclockwise.
- Remove the geared lid (16) by pressing the fixing buttons (18).
Note: It is impossible to remove the geared lid (16) without removing the motor unit (2).
- Remove the lid (15).
ENGLISH
- Carefully remove the disk knives (13 or 14) from the bowl (9) by taking the top of the driving shaft (10).
- Take the chopped products out of the chopper bowl (9).
- Clean, wash and dry all the details used for products processing right after the end of operation..
CLEANING
ATTENTION! The blades of blender attachment (1), chopping knives (11, 12) and disc knives (13, 14) are very sharp and dangerous. Handle these attachments very carefully!
- Unplug the unit before cleaning.
- Remove all the attachments.
- Use a slightly damp cloth to clean the motor unit (2) and reduction gears (6, 16).
- After processing of salty and sour products it is better to rinse the attachments with water.
- While possessing products with strong dyeing properties (for instance carrot or beet-root) the bowls or attachments can get colored, wipe the attachments or bowls with a cloth, dampened in vegetable oil, then rinse.
- Wash the attachments (1, 7, 11-14), container (8), bowl (9), driving shaft (10), lid (15), push-
ers (21, 22) with warm water and a neutral detergent, then rinse and dry.
DO NOT IMMERSE THE MOTOR UNIT (2) AND THE GEARS (6, 16) INTO ANY LIQUIDS, DO NOT WASH THEM UNDER WATER JET OR IN A DISH WASHING MACHINE.
Cooking examples
Mayonnaise
Use the blender attachment (1) to make mayonnaise.
200-250 ml vegetable oil
1 egg (yolk and white)
1 tbs. of lemon juice or vinegar
Salt and pepper
Put all the ingredients into the measuring beaker (8) according to the order mentioned above. Immerse the blender attachment (1) into the beaker (till the bottom). Switch on the blender at the maximal rotation speed by pressing and holding the (3) «TURBO» button, and wait till vegetable oil becomes an emulsion.
Then, without switching off the unit, slowly move the blender attachment (1) upwards and downwards, until you get mayonnaise of the desired consistency.
Products processing duration
| Product type Weight Attachment type | Approximate processing time | ||
| Meat (without fat streaks) | 400 g | Chopping knife | 10 sec. |
| Onion | 500 g | Chopping knife | 6 sec. |
| Nuts | 300 g | Chopping knife | 10 sec. |
| Fruits | 700 g | Chopping knife | 10 sec. |
| Carrots | 400 g | Chopping knifeDisc knife | 10 sec. |
| Raw potatoes | 400 g | Disc knife | 10 sec. |
| Cucumbers | 800 g | Disc knife | 10 sec. |
Storage
- Clean the unit before taking it away for storage.
- Do not wind the power cord around the motor unit.
- Keep the blender set away from children in a dry cool place.
Delivery set
Motor unit - 1 pc.
Blender attachment - 1pc.
Whisks gear - 1pc.
Whisk-2 pcs.
Measuring beaker - 1pc.
Bowl - 1 pc.
Chopping knife - 2 pcs.
Disc knife - 2 pcs.
Bowl lid - 1 pc.
Geared lid - 1 pc.
Pusher - 1 pc.
Small pusher - 1pc.
ENGLISH
SPECIFICATIONS
Power supply: 230 V \~ 50 Hz
Power consumption: 700 W
The manufacturer preserves the right to change the specifications of the unit without a preliminary notification.
Service life of the unit is 3 years.
Guarantee
Details regarding guarantee conditions can be obtained from the dealer from whom the appliance was purchased. The bill of sale or receipt must be produced when making any claim under the terms of this guarantee.

This product conforms to the EMC-Requirements as laid down by the Council Directive 89/336/EEC and to the Low Voltage Regulation (73/23 EEC)
DEUTSCH
KÜCHENMASCHINE STABMIXER-SET
BESCHREIBUNG
A production date of the item is indicated in the serial number on the technical data plate. A serial number is an eleven-unit number, with the first four figures indicating the production date. For example, serial number 0606xxxxxx means that the item was manufactured in June (the sixth month) 2006.
DE
- ENGLISH
- BLENDER SET WITH FOOD PROCESSOR
- DESCRIPTION
- SAFETY MEASURES
- Before using the unit
- Selection of attachment rotation speed
- Using the blender
- WARNING: before assembling make sure that the power plug is not inserted into the socket.
- Attention!
- USING WHISKS
- USING THE CHOPPING KNIVES
- Before you start chopping:
- Be careful: the knives are very sharp! Always hold the knives by the upper plastic shank.
- The maximal allowable continuous operation time should not exceed 30 seconds with subsequent 2 minute break.
- USING THE DISK KNIVES
- Attention! During the operation use only the pushers (21, 22) supplied with the unit; do not use any other objects, do not push the products with your hands.
- CLEANING
- DO NOT IMMERSE THE MOTOR UNIT (2) AND THE GEARS (6, 16) INTO ANY LIQUIDS, DO NOT WASH THEM UNDER WATER JET OR IN A DISH WASHING MACHINE.
- Cooking examples
- Mayonnaise
- Storage
- Delivery set
- SPECIFICATIONS
- Service life of the unit is 3 years.
- Guarantee
- DEUTSCH
- KÜCHENMASCHINE STABMIXER-SET
- BESCHREIBUNG
- DE
Brand : Vitek
Model : VT-1477
Category : Blender