
VP BS6120 Animal - Vacuum Cleaner ECG - Free user manual and instructions
Find the device manual for free VP BS6120 Animal ECG in PDF.


| Product Type | Bagless Floor Vacuum Cleaner |
| Brand | ECG |
| Model | VP BS6120 Animal |
| Power Cord Length | 5 m |
| Dust Container Capacity | 2.5 L |
| Voltage | 220–240 V~, 50/60 Hz |
| Nominal Input Power | 800 W |
| Noise Level | < 80 dB |
| Motor Filter | HEPA class 10 (square) |
| Output Filter | HEPA class 7 (rectangular) |
| Accessories Included | Telescopic tube, combination brush (hard floors/carpets), upholstery brush for hair and pet fur, crevice nozzle, dusting brush, upholstery attachment |
| Suction Power Control | Variable electronic control (min, med, max) and manual air flow regulator |
| Automatic Cord Rewind | Yes |
| Thermal Motor Fuse | Yes (overheat protection) |
| Vertical Parking | Yes |
| Maintenance | Empty dust container after each use; clean or replace HEPA filters regularly |
| Safety Features | Auto shut-off on overheat, no operation without filters, do not use wet |
Frequently Asked Questions - VP BS6120 Animal ECG
User questions about VP BS6120 Animal ECG
0 question about this device. Answer the ones you know or ask your own.
Ask a new question about this device
Download the instructions for your Vacuum Cleaner in PDF format for free! Find your manual VP BS6120 Animal - ECG and take your electronic device back in hand. On this page are published all the documents necessary for the use of your device. VP BS6120 Animal by ECG.
USER MANUAL VP BS6120 Animal ECG
natural_image
Black and white photo of a ECG vacuum cleaner device with visible branding and control buttons (no text or symbols on body)VP BS6120 Animal VP BS6115 Independent
FLOOR VACUUM CLEANER INSTRUCTION MANUAL
Read carefully and save for future use!
Warning: The safety measures and instructions, contained in this manual, do not include all conditions and situations possible. The user must understand that common sense, caution and care are factors that cannot be integrated into any product. Therefore, these factors shall be ensured by the user/s using and operating this appliance. We are not liable for damages caused during shipping, by incorrect use, voltage fluctuation or the modification or adjustment of any part of the appliance.
To protect against a risk of fire or electric shock, basic precautions shall be taken while using electrical appliances, including the following:
- Read all instructions before using the appliance.
- Make sure the voltage in your outlet corresponds to the voltage provided on the appliance label and that the socket is properly grounded. The outlet must be installed according to valid safety instructions.
- Do not use the vacuum cleaner if the power cord is damaged. All repairs, including cord replacements, must be carried out at a professional service centre! Do not remove the protective covers from the appliance; there is a risk of electric shock!
- Protect the vacuum cleaner from direct contact with water and other liquids, do not place on it containers with liquids to prevent electric shock.
- Do not use the vacuum cleaner in upright position. Never use the vacuum cleaner without the motor filter and output filter inserted.
- Do not leave the plugged in vacuum cleaner unattended. Disconnect the cord from the electrical outlet prior to any maintenance. When unplugging the appliance, hold the power cord by the plug. Do not pull the cable.
- Do not use the vacuum cleaner outdoors or in a damp environment. Risk of electric shock.
- Do not allow children to play with the vacuum cleaner. A vacuum cleaner is not a toy. Be more attentive if you are using the vacuum cleaner near children.
- Use only attachments and accessories approved by the manufacturer.
- If the vacuum cleaner does not work properly, if it fell (e.g. into water), if it is damaged or if it was forgotten outdoors, have it inspected professionally at an authorized service centre.
- Do not hold the vacuum cleaner by the power cord when moving it. Make sure that the power cord is not broken or bent over sharp objects and edges. When working with the vacuum cleaner, do not drive over the power cord. Keep the power cord away from heat sources.
- Do not touch the power cord or the vacuum cleaner with wet hands.
- Do not insert any objects into the vacuum cleaner openings. Do not use the vacuum cleaner if the openings are blocked in any way. Make sure that the vacuum cleaner is clean, without dirt and any debris, which can reduce the suction power of the vacuum cleaner.
- Keep hair, loose clothing, hands and other parts of the body away from openings or moving parts of the vacuum cleaner.
- Do not use the vacuum cleaner on the following objects, which could result in damaging the device or injury:
- sharp objects like glass, screws, coins, nails, etc.
- hot or smouldering objects like embers, cigarettes or flammable and volatile liquids
- wet surfaces, water and other liquids.
- Use extra care when cleaning stairs.
- Use the vacuum cleaner only in accordance with the instructions in this manual. This vacuum cleaner is designed for home use only. The manufacturer is not liable for any damage caused by the improper use of this appliance.
- This appliance can be used by children aged 8 years and older and people with lower physical or mental abilities or lack of experience and knowledge, if they are supervised or have been instructed to use the product in a safe manner and understand the potential dangers. Children shall not play with the appliance. Cleaning and maintenance performed by the user should not be done by children unless they are older
than 8 years and under supervision. Children under 8 years old must keep away from the appliance and its power supply.
DESCRIPTION OF THE VACUUM CLEANER
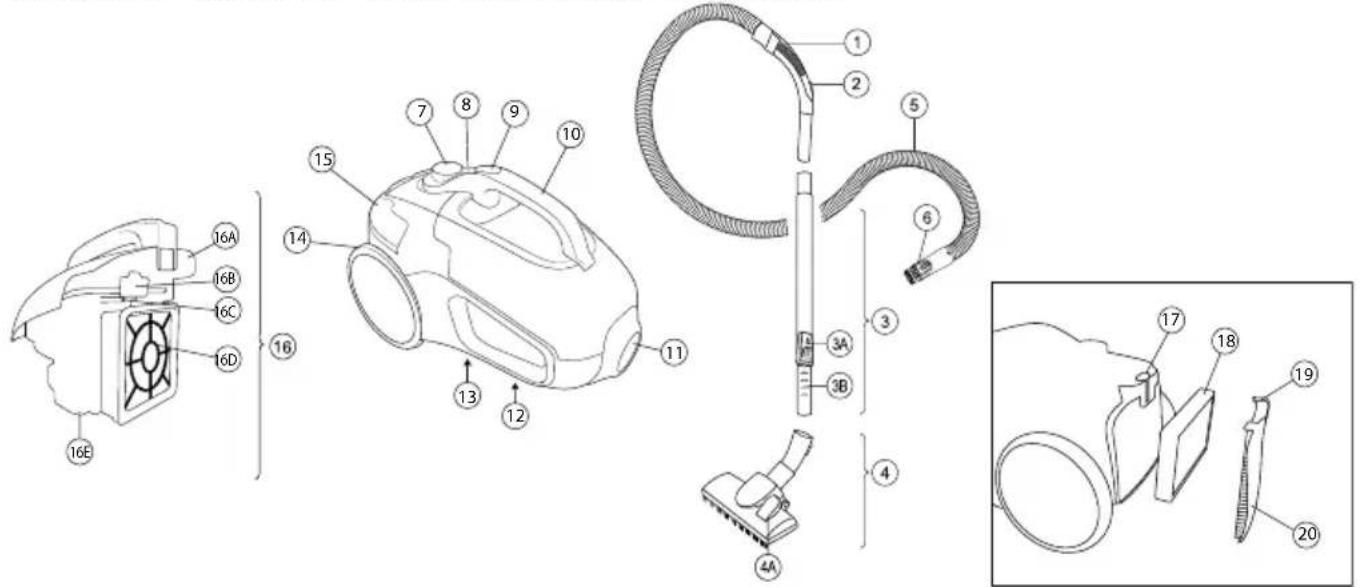
List of parts
- Hose handle
- Air flow regulator
- Telescopic tube with safety catch (A) and stop (B)
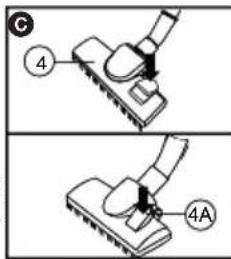
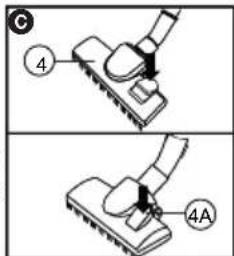
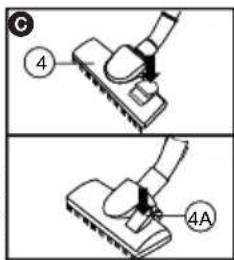
- Nozzle / attachment for vacuum cleaner (see description of accessories)
- Hose
- Hose end with lock
- Variable electronic suction power
- On/Off switch
- Dust collection system release button
- Vacuum cleaner handle
- Hose connection opening
- Handle for vertical parking position
- Technical specifications
- Power cord
- Cable rewind button
- Dust collection system
16A: Top cover
16B: Top cover lock button
16C: Safety lock
16D: HEPA motor filter
16E: Dust container - Handle for vertical parking position
- Output filter
- Output filter grille
- Output filter lock
Description of accessories
(type of available accessories depends on the model of the vacuum cleaner)
- Telescopic tube with chrome finish
• Brush for hard floors and carpets
• Upholstery brush especially for hair and pets' fur - Nozzle for narrow spaces
- Nozzle for vacuuming dust from furniture and solid surfaces
- Attachment for vacuuming upholstered furniture
Overview of symbols
| 1 | On/Off switch Automatic power cord rewind | ||
| Prohibition symbol Hard floors | |||
 | Carpets ATTENTION | ||
 | Dust collection system release button | ||
USING THE VACUUM CLEANER
Assembly
The vacuum cleaner must be switched off and disconnected from power before you start to assemble it!
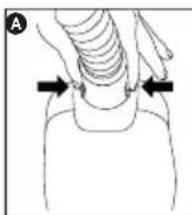
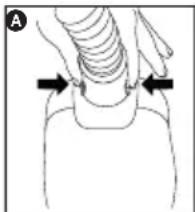
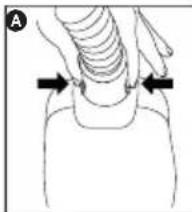
- Insert the vacuum cleaner hose (5) into the opening on the vacuum cleaner (11) so that the catches on the hose end snap into the opening of the vacuum cleaner [Fig. ⑧].
- Connect the telescopic tube (3) to the hose handle (1).
- If you want to adjust the length of the telescopic tube, press the loc (3A) and adjust the length of the tube (Fig. ⑧).
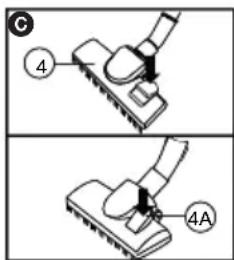
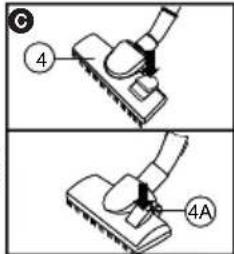
- Insert a brush or a nozzle suitable for the surface you want to vacuum on the other end of the tube (3).
Vacuuming
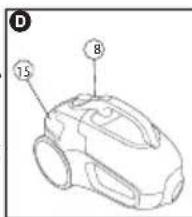
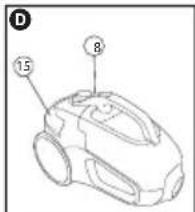
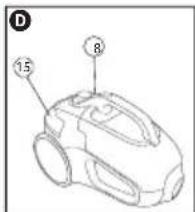
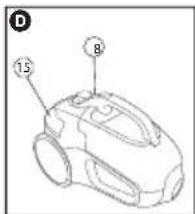
- Pulling out the cable: The cord has a yellow and red mark at the end. Grasp the plug and pull the cord up to the yellow marker. Never pull the cord past the red mark, it could be damaged! If you want to rewind the cord, press the retractor button (15), the power cord will wind back into the vacuum cleaner.
- Starting the vacuum cleaner: Insert the plug into an electrical outlet, whose parameters correspond to the data on the type plate of the vacuum cleaner and start the vacuum cleaner by pressing the on / off button (8). You can regulate the power using the control (7).
- After vacuuming: Press the on / off button (8), slide it to off and unplug the power cord (14). Press the retractor button (15) to rewind the cord into the vacuum cleaner. While winding the cable, hold the plug of the power cord to avoid damaging it [Fig. ⑭].
Power regulation
Minimal: drapes, thin and fine fabrics.
Medium: cleaning standard surfaces, sofas, armchairs, upholstered chairs, carpets.
Maximum: vacuuming hard floors.
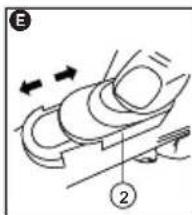
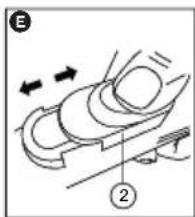
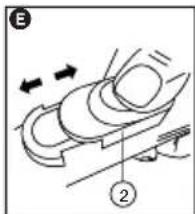
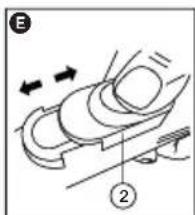
• Note: You can also adjust the suction power using the manual air flow regulator (2) located on the hose handle (1) [Fig. ⑤]. Open the regulator to reduce the suction power.
Issues
Do not use an appliance showing any signs of damage. A damaged power cord has to be replaced in an authorized service centre. Only this way can you prevent safety risks.
See the troubleshooting guide if your vacuum cleaner does not operate correctly. Refer to an authorized service centre if you are not able to resolve an issue yourself. The vacuum cleaner is equipped with a thermal motor fuse, activated in case of overheating (caused by clogging of the suction opening, filters, etc.). In this case, switch off the appliance by pressing the on / off button and let it cool down completely for a few hours. Before using it again check for clogged filters or suction opening.
After use
Switch off the vacuum cleaner and unplug it from the electrical outlet. Before attaching any accessories or before cleaning the appliance, always switch off the vacuum cleaner and unplug the power cord from the outlet.
natural_image
Illustration of a human torso with arrows pointing to the neck area (no text or symbols present)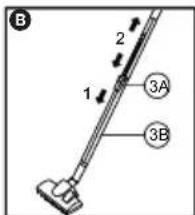
CLEANING AND MAINTENANCE
Warning:
• Always unplug the power cord from the outlet before any maintenance and cleaning.
• Empty the dust container (16E) after each use and clean the HEPA motor filter, see the following instructions.
- Do not use water or any other liquids when cleaning the vacuum cleaner's filters!
Cleaning the dust container (16E)
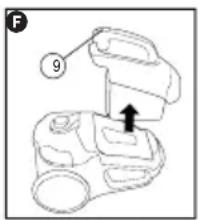
- Press the dust collection system button 📋 and remove the whole dust collection system (16) from the vacuum cleaner [Fig. ⑤].
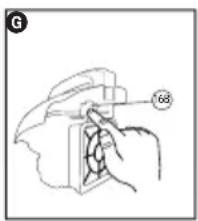
- Press the top cover lock button (16B) and open the top cover (16A) [Fig. G].
- Empty the container.
- Replace the top cover so that the locks together with the top cover lock button fit perfectly into place.
- Insert the dust collection system back into the vacuum cleaner and make sure it snaps into its place.
Cleaning or replacement of the HEPA motor filter
- Press the dust collection system button 📄 and remove the whole dust collection system (16) from the vacuum cleaner [Fig. ⑤].
- Remove from the dust collection system (16) the HEPA motor filter (16D) [Fig. ⑧].
- If the HEPA motor filter is clogged with dust, clean it. Be careful not to damage it.
- If the filter is especially dirty, replace it with a new one.
- Replace the HEPA motor filter by pushing on the frame so that the upper tab snaps in behind the safety catch (16C).
- Insert the dust collection system back into the vacuum cleaner and make sure it snaps into its place.
Cleaning and replacement of the output filter
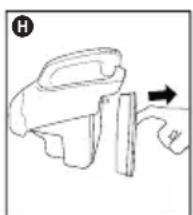
- Press the lock of the output filter (20) and remove the grille of the output filter (19).
- Remove the output filter (18) [Fig. ①].
- If the output filter is clogged by dust, clean it carefully so that you do not damage it.
- Replace an especially dirty or damaged output filter for a new one.
- Insert the cleaned or new output filter back into the vacuum cleaner.
- Replace the grille of the output filter so that the lock (20) snaps into place.
natural_image
Line drawing of a hand holding a tool with a numbered label (68) on the handle, no text or symbols present.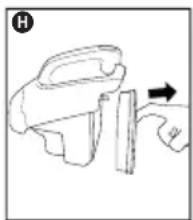
natural_image
Line drawing of a hand holding a device with an arrow indicating direction (no text or symbols)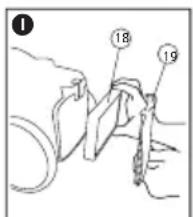
Cleaning the surface of the appliance
- Use a soft, slightly damp cloth with a few drops of detergent for cleaning. Never use solvents or other abrasive cleaners. Never immerse the vacuum cleaner in w3ater or any other liquid and do not rinse it under running water.
Vacuum cleaner storage
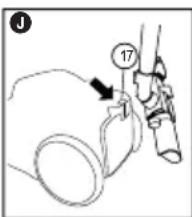
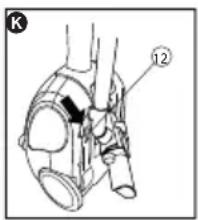
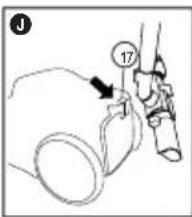
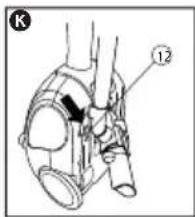
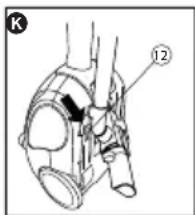
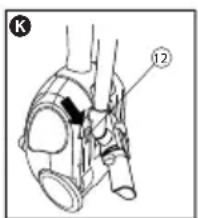
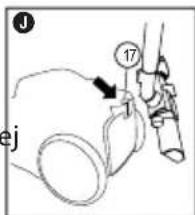
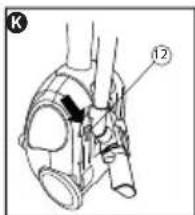
You can remove the hose before storing the vacuum cleaner. Press the locks at the end of the hose and pull it out of the opening of the vacuum cleaner. You can attach the telescopic tube with the combined nozzle to the vacuum cleaner using special holders (12) and (17) in horizontal ⏻ and also in vertical Ⓚ position.
TROUBLESHOOTING
Before contacting the service, check the following list of common problems and possible remedies.
| Problem Solution | |
| The motor will not start. Check the power cord and the electrical outlet. If the device still does not work, contact an authorized service centre. | |
| The vacuum cleaner turned off during use and cannot be turned on again. | The vacuum cleaner is equipped with a motor thermal fuse, which is activated in the event of overheating (caused by clogging of the suction opening, filters, etc.).If the thermal fuse is activated, switch off the appliance by pressing the on / off button, unplug the power cord and let it cool down completely for a few hours.Before using it again check for clogged filters or suction opening. |
| Poor suction power | The power regulator is set to minimum, raise the power.Dust container is full. Empty it.Clogged filter. Clean or replace filters. |
| The dust collection system is not properly closed. | The safety lock (16C) does not allow to insert the dust collection system without the HEPA motor filter.Make sure that the HEPA motor filter is in place and correctly fitted. |
| The vacuum cleaner emits an odor for the first few minutes. | This odor is normal with a new appliance and will disappear after a short time.It is not a malfunction. |
| The brush stays too close to the floor when vacuuming. | Use the electronic power regulator (7) or the air flow regulator (2) to reduce the suction power of the vacuum cleaner. |
TECHNICAL DATA
The length of the power cord: 5 m
Dust container capacity: 2.5 l
Nominal voltage: 220–240 V\~ 50/60 Hz
Nominal input power: 800 W
Noise level: < 80 dB
Filters: output filter (HEPA class 7) rectangular, motor
filter (HEPA class 10) square
USE AND DISPOSAL OF WASTE
Wrapping paper and corrugated paperboard – deliver to scrapyard. Packing foil, PE bags, plastic elements – throw into plastic recycling containers.
DISPOSAL OF THE PRODUCT AT THE END OF LIFE
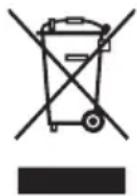
Disposal of electric and electronic equipment (valid in EU member countries and other European countries with an implemented recycling system)
The represented symbol on the product or package means the product shall not be treated as domestic waste. Hand over the product to the specified location for recycling electric and electronic equipment. Prevent negative impacts on human health and the environment by properly recycling your product. Recycling contributes to preserving natural resources. For more information on the recycling of this product, refer to your local authority, domestic waste processing organization or store, where you purchased the product.
This product complies with EU directives on electromagnetic compatibility and electrical safety.
The operating manual is available on internet at www.ecg-electro.eu.
Changes of text and technical parameters reserved.
08/05

SICHERHEITSHINWEISE
Stückliste
natural_image
Anatomical illustration of a human torso with arrows indicating specific areas (no text or labels present)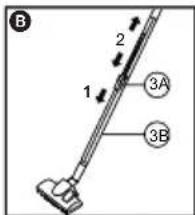
natural_image
Mechanical diagram showing a rotating component with arrows indicating motion (no text or symbols)Störungen
natural_image
Line drawing of a hand using a tool to adjust or install a component (no text or symbols present)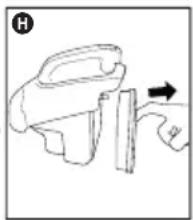
natural_image
Line drawing of a hand holding a device with an arrow indicating motion (no text or symbols)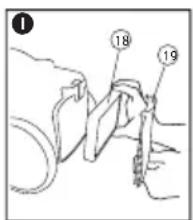
Čeština
Seznam součástí
natural_image
Illustration of a human torso with arrows indicating anatomical or procedural points (no text or symbols present)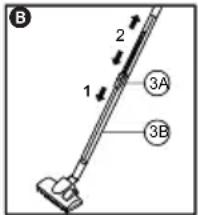
Vysávání
natural_image
Diagram of a mechanical component with labeled parts and directional arrows (no readable text or symbols)V případě závady
natural_image
Illustration of a hand using a tool to adjust or install a mechanical component (no text or symbols visible)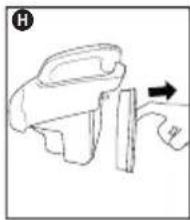
natural_image
Line drawing of a hand holding a device with an arrow indicating direction (no text or symbols)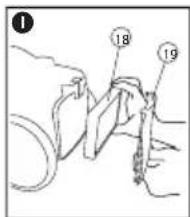
ODSTRAŇOVÁNÍ PROBLÉMŮ
Osade loetelu
natural_image
Illustration of a human neck with arrows pointing to the anatomical structure (no text or symbols present)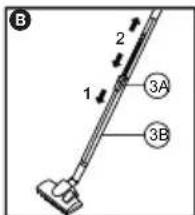
Tolmu imemine
natural_image
Diagram of a mechanical component with arrows indicating motion, no text or symbols presentPärast kasutamist
natural_image
Line drawing of a hand using a tool to adjust or install a component (no text or symbols present)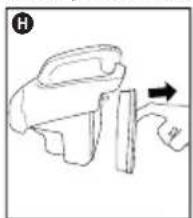
natural_image
Line drawing of a hand holding a device with an arrow indicating direction (no text or symbols)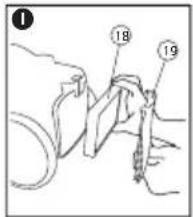
Popis dijelova
- Ručka crijeva
- Regulator protoka zraka
- Teleskopska cijev sa osiguračem (A) i prihvatom (B)
- Četka / nastavak za usisivač (vidi opis dodatne opreme)
- Crijevo
- Završetak crijeva s osiguračem
- Elektronička regulacija snage usisa
- Prekidač
- Gumb za otpuštanje dijela za sakupljanje prašine
- Ručka usisivača
- Grlo za priključak crijeva
-
Ručka za odlaganje u okomitom položaju
-
Tehnički podaci
- Kabel za napajanje
- Tipka za namatanje kabela
- Sustav za sakupljanje prašine
16A: Gornji poklopac
16B: Gumb za zaključavanje gornjeg poklopca
16C: Osigurač
16D: HEPA filtar motora
16E: Spremnik za prašinu - Ručka za odlaganje u horizontalnom položaju
- Izlaznifiltar
- Mrežica izlaznog filtera
- Osigurač izlaznog filtera
Opis pribora
(vrsta dostupnog pribora ovisi o modelu usisivača)
- Teleskopska cijev s kromiranom površinom
- Četka za tvrde podove i tepihe
- Četka posebno za kosu i krzno kućnih ljubimaca
• Nastavak za uske prostore - Nastavak za usisavanje prašine s namještaja i čvrstih površina
• Nastavak za usisavanje tapeciranog namještaja
Pregled simbola
| [GSN] | Prekidač Automatsko namotavanje kabela |  | |
 | Simbol zabrane Tvrdi podovi |  | |
 | Tepisi POZOR |  |

Gumb za otpuštanje dijela za sakupljanje prašine
KORIŠTENJE USISIVAČA
Sastav
Prije sastavljanja, usisivač mora biti isključen i odvojen od izvora električne struje!
- Gurnite crijevo usisivača (5) u grlo na usisivaču (11) tako da se brave na kraju crijeva zaključaju u vratu usisivača [Sl. Ⓐ].
- Spojite teleskopsku cijev (3) na ručku crijeva (1).
- Da biste prilagodili duljinu teleskopske cijevi, pritisnite bravu (3A) i prilagodite duljinu cijevi [Sl. ⑧].
- Na drugi kraj cijevi (3) pričvrstite četku ili nastavak koji odgovara površini koju želite usisati.
Usisavanje
- Izvlačenje kabela: Kabel na kraju ima žutu i crvenu oznaku. Uzmite utikač i izvucite ga i izvlačite dok ne vidite žutu oznaku. Nikada ne povlačite kabel za crvenu oznaku, mogao bi se oštetiti! Ako želite kabel namotati, pritisnite tipku za uvlačenje(15), i kabel će se namotati unutar usisivača.
natural_image
Anatomical illustration of a human torso with arrows indicating specific anatomical or pathological features (no text or labels present)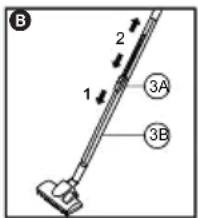
- Pokretanje usisivača: Uključite mrežni utikač u električnu utičnicu čiji parametri odgovaraju podacima na tipskoj pločici usisivača i pokrenite usisivač pritiskom na tipku (8) za uključivanje / isključivanje. Snagu možete regulirati gumbom (7).
- Nakon usisavanja: Pritisnite prekidač (8) da biste isključili usisivač i izvukli kabel za napajanje (14) iz utičnice. Pritisnite gumb za navijanje (15) da namotate kabel u usisivač. Dok namotavate kabel, držite utikač kabela napajanja kako se ne bi oštetio [Sl. ⑭].
Regulacija snage
natural_image
Mechanical diagram showing a gear or cam mechanism with labeled parts (no text or symbols present)natural_image
Hand holding a tool with a numbered label (68) on the handle, no visible text or symbols beyond the number.natural_image
Line drawing of a hand holding a small object with an arrow indicating direction (no text or symbols)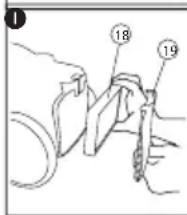
UKLANJANJE POTEŠKOĆA
Dalu saraksts
The image is too blurry to recognize any text content.
natural_image
Anatomical illustration of a human torso with arrows indicating specific anatomical or pathological features (no text or labels present)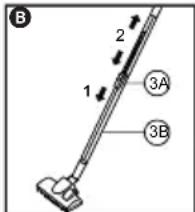
Tirišana
natural_image
Mechanical diagram showing a gear or cam mechanism with directional arrows and labeled parts (no text or symbols present)Bojājumi
natural_image
Hand holding a tool with a circular indicator showing '68' (no text or symbols on the diagram itself)natural_image
Line drawing of a hand holding a device with an arrow indicating motion (no text or symbols)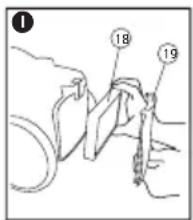
Dalių sąrašas
natural_image
Anatomical illustration of a human torso with arrows indicating specific anatomical or pathological features (no text or labels present)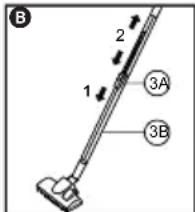
Dulkių siurbimas
natural_image
Mechanical diagram showing a gear or cam mechanism with labeled parts (no text or symbols present)Problemiški momentai
natural_image
Line drawing of a hand using a tool to adjust or install a component, no text or symbols presentnatural_image
Line drawing of a mechanical device with an arrow indicating direction (no text or symbols)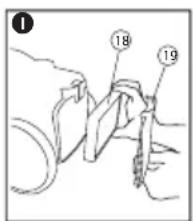
TRIKČIŲ DIAGNOSTIKA IR ŠALINIMAS
natural_image
Illustration of a human torso with a shoulder and arm, showing anatomical positioning (no text or symbols)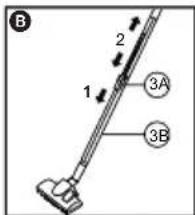
Porszívás
Meghibásodás esetén
natural_image
Line drawing of a mechanical device with an arrow indicating direction (no text or symbols)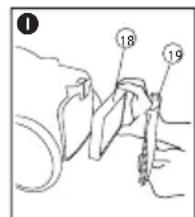
Lista elementów
natural_image
Anatomical illustration of a human torso with arrows indicating specific areas (no text or labels present)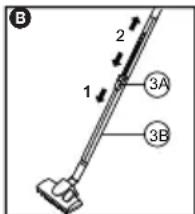
Odkurzanie
natural_image
Diagram of a mechanical component with directional arrows indicating motion (no text or symbols)W wypadku awarii
natural_image
Line drawing of a hand using a tool to adjust or install a component, no text or symbols present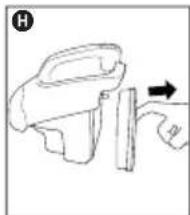
natural_image
Line drawing of a hand holding a device with an arrow indicating direction (no text or symbols)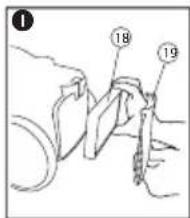
Listă de componente
natural_image
Anatomical illustration of a human torso with arrows pointing to specific areas (no text or labels present)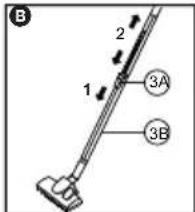
natural_image
Mechanical diagram showing a curved component with directional arrows and labeled parts (no readable text or symbols)Probleme
natural_image
Hand holding a tool with a circular indicator showing '68' (no text or symbols on the diagram itself)natural_image
Line drawing of a hand holding a device with an arrow indicating motion (no text or symbols)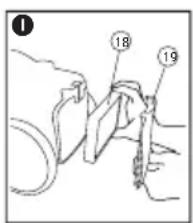
Zoznam súčastí
natural_image
Anatomical illustration of a human torso with arrows indicating specific anatomical points (no text or labels present)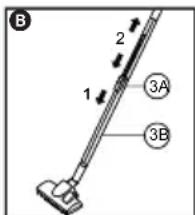
Vysávanie
natural_image
Diagram of a mechanical component with arrows indicating motion, no text or symbols presentV prípade poruchy
natural_image
Illustration of a hand using a tool to adjust or install a component, no text or symbols present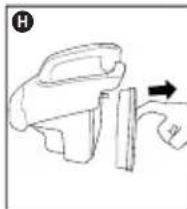
natural_image
Line drawing of a hand holding a device with an arrow indicating direction (no text or symbols)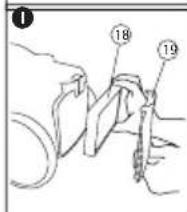
ODSTRAŇOVANIE PROBLÉMOV
The image is too blurry to recognize any text content.
natural_image
Illustration of a human torso with arrows indicating anatomical or procedural points (no text or symbols present)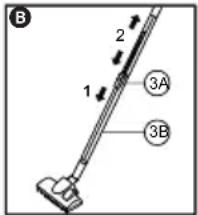
Sesanje
natural_image
Diagram of a mechanical component with arrows indicating motion, no text or symbols presentV primeru okvare
natural_image
Line drawing of a hand holding a tool, no text or symbols present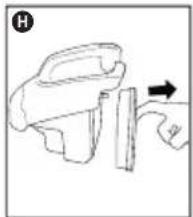
natural_image
Line drawing of a hand holding a device with an arrow indicating motion (no text or symbols)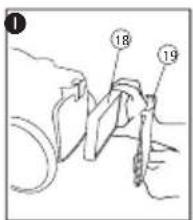
Čiščenje površine aparata
BEZBEDNOSNA UPUTSTVA
Lista delova
- Ručka creva
- Regulator protoka vazduha
- Teleskopska cev sa osiguračem (A) i prihvatom (B)
- Četka / nastavak za usisivač (vidi opis dodatne opreme)
- Crevo
- Završetak creva sa osiguračem
- Elektronska regulacija snage usisavanja
- Prekidač
- Taster za otpuštanje dela za sakupljanje prašine
- Ručka usisivača
- Grlo za priključak creva
-
Ručka za odlaganje u okomitom položaju
-
Tehnički podaci
- Kabl za napajanje
- Dugme za namotavanje kabla
-
Sistem za sakupljanje prašine
16A: Gornji poklopac
16B: Taster za zaključavanje gornjeg poklopca
16C: Osigurač
16D: HEPA filtar motora
16E: Posuda za prašinu -
Ručka za odlaganje u horizontalnom položaju
-
Izlaznifiltar
-
Mrežica izlaznog filtra
-
Osigurač izlaznog filtra
Opis pribora
(vrsta dostupnog pribora ovisi o modelu usisivača)
- Teleskopska cev sa hromiranom površinom
- Četka za tvrde podove i tepihe
- Četka posebno za kosu i krzno kućnih ljubimaca
• Nastavak za uske prostore
• Nastavak za usisavanje prašine sa nameštaja i čvrstih površina
• Nastavak za usisavanje tapeciranog nameštaja
Pregled simbola
| [47Z6] | Prekidač Automatsko namotavanje kabla |  | |
 | Simbol zabrane Tvrdi podovi |  | |
| Tepisi PAŽNJA | |||
| Taster za otpuštanje dela za sakupljanje prašine | |||
KORIŠĆENJE USISIVAČA
Sastav
Pre sastavljanja, usisivač mora biti isključen i odvojen od izvora električne struje!
- Gurnite crevo usisivača (5) u grlo na usisivaču (11) tako da se brave na kraju creva zaključaju u vratu usisivača [Sl. Ⓐ].
- Spojite teleskopsku cev (3) na ručku creva (1).
- Da biste prilagodili duljinu teleskopske cevi, pritisnite bravu (3A) i prilagodite duljinu cevi [Sl. ⑧].
- Na drugi kraj cevi (3) pričvrstite četku ili nastavak koji odgovara površini koju želite usisati.
natural_image
Illustration of a human torso with arrows pointing to the neck area (no text or symbols present)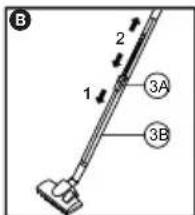
Usisavanje
- Izvlačenje kabla: Kabl na kraju ima žutu i crvenu oznaku. Kabl povucite za utikač i izvucite ga do žute oznake. Nikada ne povlačite kabl za crvenu oznaku, mogao bi se oštetiti! Ako želite da namotate kabl, pritisnite taster za uvlačenje(15), i kabl će se namotati unutar usisivača.
- Pokretanje usisivača: Uključite mrežni utikač u električnu utičnicu čiji parametri odgovaraju podacima na tipskoj pločici usisivača i pokrenite usisivač pritiskom na taster (8) za uključivanje / isključivanje. Snagu možete da regulirate tasterom (7).
- Posle usisavanja: Pritisnite prekidač (8) da biste isključili usisivač i izvukli kabl za napajanje (14) iz utičnice. Pritisnite taster za navijanje (15) da namotate kabl u usisivač. Dok namotavate kabl, držite utikač kabla napajanja kako se ne bi oštetio [Sl. ⑭].
Regulacija snage
Minimalna: zavese, tanke i nežne tkanine.
Srednja: čišćenje standardnih površina, sofe, fotelja, tapeciranih stolica, tepiha.
Maksimalna: usisavanje tvrdih podova.
- Napomena: Snagu usisavanja možete da prilagodite i pomoću ručnog regulatora protoka vazduha (2) na ručki creva (1) [Sl. ⑧]. Otvorite regulator da biste smanjili snagu usisavanja.
natural_image
Diagram of a mechanical component with arrows indicating motion, no text or symbols presentU slučaju problema
natural_image
Hand holding a tool with a circular indicator (no text or symbols)Čišćenje ili zamena HEPA izlaznog filtra
- Pritisnite osigurač izlaznog filtra (20) i zamenite mrežicu izlaznog filtra (19).
- Zamenite izlazni filtar (18) [Sl. ①].
- Ako je izlazni filtar začepljen prašinom, pažljivo ga očistite kako ga ne biste oštetili.
- Zamenite posebno prljavi ili oštećeni izlazni filtar novim.
- Očišćeni ili novi izlazni filtar vratite nazad u usisivač.
- Vratite natrag mrežicu izlaznog filtra tako da brava (20) klikne na svoje mesto.
natural_image
Line drawing of a hand holding a device with an arrow indicating motion (no text or symbols)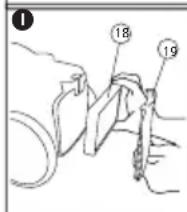
Λίστα εξαρτημάτων
natural_image
Anatomical illustration of a human torso with arrows indicating specific areas (no text or labels present)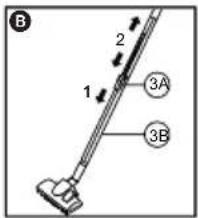
Προβλήματα
natural_image
Hand holding a tool with a circular indicator showing '60' (no text or symbols on the diagram itself)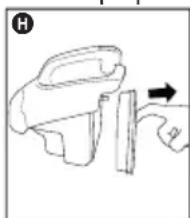
natural_image
Line drawing of a hand holding a device with an arrow indicating motion (no text or symbols)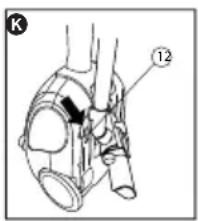
Перелік частин
natural_image
Anatomical illustration of a human torso with arrows indicating specific areas (no text or labels present)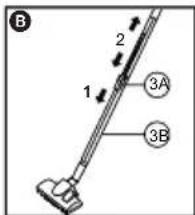
Прибирання
natural_image
Mechanical diagram showing a gear or cam mechanism with directional arrows and labeled parts (no text or symbols present)Обмеження
natural_image
Line drawing of a hand using a chisel to adjust or install a component (no text or symbols present)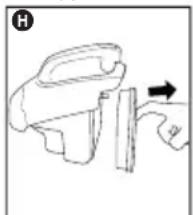
natural_image
Line drawing of a hand holding a small object with an arrow indicating direction (no text or symbols)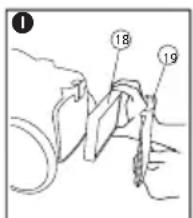
250 69 Klíčany, Czech Rep. e-post: ECG@kbexpert.cz
Hrvatski
K+B Progres, a.s.
U Expertu 91 tel.: +420 272 122 111
250 69 Klíčany, Czech Rep. e-mail: informacije@kbprogres.cz
Bosanski
K+B Progres, a.s.
U Expertu 91 tel.: +420 272 122 111
250 69 Kličany, Czech Rep. e-mail: informacije@kbprogres.cz
Latviešu valoda
K+B Progres, a.s.
U Expertu 91 tel.: +420 272 122 111
250 69 Klíčany, Czech Rep. e-pasts: ECG@kbexpert.cz
Lietuvių kalba
K+B Progres, a.s.
U Expertu 91 tel.: +420 272 122 111
250 69 Klíčany, Czech Rep. el. paštas: ECG@kbexpert.cz
Magyar
K+B Progres, a.s.
U Expertu 91 tel.: +420 272 122 111
250 69 Klíčany, Czech Rep. e-mail: ECG@kbexpert.cz
Polski
K+B Progres, a.s.
U Expertu 91 tel.: +420 272 122 111
250 69 Kličany, Czech Rep. e-mail: ECG@kbexpert.cz
Română
K+B Progres, a.s.
U Expertu 91 tel.: +420 272 122 111
250 69 Klíčany, Czech Rep. e-mail: ECG@kbexpert.cz
Slovenčina

- VP BS6120 Animal VP BS6115 Independent
- Read carefully and save for future use!
- DESCRIPTION OF THE VACUUM CLEANER
- List of parts
- Description of accessories
- Overview of symbols
- USING THE VACUUM CLEANER
- Assembly
- Vacuuming
- Power regulation
- Issues
- After use
- CLEANING AND MAINTENANCE
- Warning:
- Cleaning the dust container (16E)
- Cleaning or replacement of the HEPA motor filter
- Cleaning and replacement of the output filter
- Cleaning the surface of the appliance
- Vacuum cleaner storage
- TROUBLESHOOTING
- TECHNICAL DATA
- USE AND DISPOSAL OF WASTE
- DISPOSAL OF THE PRODUCT AT THE END OF LIFE
- SICHERHEITSHINWEISE
- Stückliste
- Störungen
- Seznam součástí
- Vysávání
- V případě závady
- ODSTRAŇOVÁNÍ PROBLÉMŮ
- Osade loetelu
- Tolmu imemine
- Pärast kasutamist
- Popis dijelova
- Opis pribora
- Pregled simbola
- KORIŠTENJE USISIVAČA
- Sastav
- Usisavanje
- Regulacija snage
- UKLANJANJE POTEŠKOĆA
- Dalu saraksts
- The image is too blurry to recognize any text content.
- Tirišana
- Bojājumi
- Dalių sąrašas
- Dulkių siurbimas
- Problemiški momentai
- TRIKČIŲ DIAGNOSTIKA IR ŠALINIMAS
- Porszívás
- Meghibásodás esetén
- Lista elementów
- Odkurzanie
- W wypadku awarii
- Listă de componente
- Probleme
- Zoznam súčastí
- Vysávanie
- V prípade poruchy
- ODSTRAŇOVANIE PROBLÉMOV
- Sesanje
- V primeru okvare
- Čiščenje površine aparata
- BEZBEDNOSNA UPUTSTVA
- Lista delova
- KORIŠĆENJE USISIVAČA
- U slučaju problema
- Čišćenje ili zamena HEPA izlaznog filtra
- Λίστα εξαρτημάτων
- Προβλήματα
- Перелік частин
- Прибирання
- Обмеження
- Hrvatski
- Bosanski
- Latviešu valoda
- Lietuvių kalba
- Magyar
- Polski
- Română
- Slovenčina
Brand : ECG
Model : VP BS6120 Animal
Category : Vacuum Cleaner