
Andris Lux ECO - Kettle Ariston Thermo - Free user manual and instructions
Find the device manual for free Andris Lux ECO Ariston Thermo in PDF.


| Product Type | Electric storage water heater |
| Brand | Ariston Thermo |
| Model | Andris Lux ECO |
| Capacity (L) | 10, 15 or 30 depending on variant |
| Empty weight (kg) | 6.6 (10 L), 7.41 (15 L), 2.8 (30 L ?) – refer to the label |
| Power supply | Single-phase 230 V ~ 50 Hz |
| Power consumption (W) | According to model, refer to the rating plate |
| Protection rating | IPX4 (protection against water splashes) |
| Set temperature | 40°C to 80°C, adjustable by the user |
| Anti-legionella function | Yes, cycle at 60°C for 1 hour, enabled by default |
| ECO EVO function | Automatic learning of consumption habits to save energy |
| Installation type | Vertical, over sink or under sink |
| Hydraulic connection | Cold water inlet (blue collar) with safety group compliant with EN 1487 |
| Magnesium anode | Replacement recommended every 2 years |
| Maintenance | Descaling of the heating element every 2 years, draining if risk of frost |
| Repairability index | Spare parts available via authorized service centers |
| Safety | Safety valve, overpressure protection, mandatory bipolar disconnection |
| Tank material | Enameled steel |
| Standards | CE, compliance with LVD, EMC, RoHS, ErP directives |
Frequently Asked Questions - Andris Lux ECO Ariston Thermo
User questions about Andris Lux ECO Ariston Thermo
0 question about this device. Answer the ones you know or ask your own.
Ask a new question about this device
Download the instructions for your Kettle in PDF format for free! Find your manual Andris Lux ECO - Ariston Thermo and take your electronic device back in hand. On this page are published all the documents necessary for the use of your device. Andris Lux ECO by Ariston Thermo.
USER MANUAL Andris Lux ECO Ariston Thermo
natural_image
Line drawing of a device casing with a central shield and mounting feet (no text or symbols)
ARISTON
Scaldacqua elettrico Electric water heater Chauffe-eau électrique Elektrische waterverwarmer Elektrischer Warmwasserspeicher Calentadores eléctricos Termoacumulador eléctrico Podgrzewacze elektryczne Elektromos vízmelegítók Elektrický ohřívač vody Электрический водонагреватель Elektrinis vandens šildytuvas Elektriskais ūdens sildītājs Elektriline veesoojendaja Boilere electrice
- ErP Energy related Products: EN 50440.
natural_image
Close-up of a metallic pressure regulator with flanged inlet and valve (no text or symbols visible)GENERAL SAFETY INSTRUCTIONS
- Read the instructions and warning in this manual carefully, they contain important information regarding safe installation, use and maintenance.
This manual is an integral part of the product. Hand it on to the next user/owner in case of change of property.
-
The manufacturer shall not liable for any injury to people, animals or damage to property caused by improper, incorrect or unreasonable use or failure to follow the instructions reported in this publication.
-
Installation and maintenance must be performed by professionally qualified personnel as specified in the relative paragraphs. Only use original spare parts. Failure to observe the above instructions can compromise the safety of the appliance and relieves the manufacturer of any liability for the consequences.
-
DO NOT leave the packaging materials (staples, plastic bags, expanded polystyrene, etc.) within the reach of children - they can cause serious injury.
-
The appliance may not be used by persons under 8 years of age, with reduced physical, sensory or mental capacity, or lacking the requisite experience and familiarity, unless under supervision or following instruction in the safe use of the appliance and the hazards attendant on such use. DO NOT permit children to play with the appliance. User cleaning and maintenance may not be done by unsupervised children.
-
DO NOT touch the appliance when barefoot or if any part of your body is wet.
-
Before using the device and after routine or extraordinary maintenance, we recommend filling the appliance's tank with water and draining it completely to remove any residual impurities.
-
If the appliance is equipped with a power cord, the latter may only be replaced by an authorised service centre or professional technician.
-
It is mandatory to screw on the water inlet pipe of the unit a safety valve in accordance with national regulations. In countries which have enacted EN 1487, the safety group must be calibrated to a maximum pressure of 1487 MPa (0,7 bar) and include at least a cock, check valve and control, safety valve and hydraulic load cutout.
-
Do not tamper with the overpressure safety device (valve or
EN
safety group), if supplied together with the appliance; trip it from time to time to ensure that it is not jammed and to remove any scale deposits.
- It is normal that water drips from the overpressure safety device when the appliance is heating. For this reason, the drain must be connected, always left open to the atmosphere, with a drainage pipe installed in a continuous downward slope and in a place free of ice.
- Make sure you drain the appliance and disconnect it from the power grid when it is out of service in an area subject to subzero temperatures.
- Water heated to over 50 °C can cause immediate serious burns if delivered directly to the taps. Children, disabled persons and the aged are particularly at risk. We recommend installing a thermostatic mixer valve on the water delivery line, marked with a red collar.
- Do not leave flammable materials in contact with or in the vicinity of the appliance.
- Do not place anything under the water heater which may be damaged by a leak.
LEGIONELLA BACTERIA FUNCTION
Legionella are small rod shaped bacteria which are a natural constituent of all fresh waters. Legionaries' disease is a pneumonia infection caused by inhaling of Legionella species. Long periods of water stagnation should be avoided; it means the water heater should be used or flushed at least weekly.
The European standard CEN/TR 16355 gives recommendations for good practice concerning the prevention of Legionella growth in drinking water installations but existing national regulations remain in force.
This electro-mechanical storage water heater is sold with a thermostat set at a temperature higher than 60^ C; it means it is enabled to carry out a “thermal disinfection cycle” to restrict the Legionella growth inside the tank.
Warning: when this software has been carrying out the thermal disinfection treatment, water temperature can cause burns. Feel water before bathing or showering.
TECHNICAL CHARACTERISTICS
For the technical specifications, refer to the nameplate (the nameplate is located next to the water intake/outlet pipes).
| Product Information | |||||
| Product range 10 | 530 | ||||
| Weight (kg) 6,67,4 | 12,8 | ||||
| Installation Oversink Undersink Oversink | ink Undersink Oversink | ||||
| Model Refer to the nameplate | |||||
| Qelec (kWh) 2,548 | 3,131 2,634 3,130 2 | 842 | |||
| Qelec, week, smart (kWh) | 9,930 11,272 | 10,199 | 11,486 | 12,106 | |
| Qelec, week (kWh) | 11,436 14,999 | 11,878 | 15,829 | 15,979 | |
| Load profile | XXS | S | |||
| L_wa | 15 dB | ||||
| _wh | 38,4% | 36,6% | 37,8% | 37,6% | 39,2% |
| Capacity (L) | 10 15 30 | ||||
The power consumption data in the table and the other information given in the Product Fiche (Annex A to this manual) are defined in relation to EU Directives 812/2013 and 814/2013.
Products which do not have the label and Product Fiche required for boiler/solar power configurations pursuant to regulation 812/2013 may not be used in such installations.
The appliance is equipped with a Smart function that allows you to adjust consumption to user profiles.
If used properly, the appliance has a daily consumption of “Qelec * (Qelec, week, smart/Qelec, week)” less than that of an equivalent product with no smart function.
The products are sold with the thermostat blocked at the operating temperature that ensures the best energy performance, as shown in Table 3 and on the Product Sheet.
This appliance is conforming with the international electrical safety standards IEC 60335-1 and IEC 60335-2-21. The CE marking of the appliances attests its conformity to the following EC Directives, of which it satisfies the essential requisites:
- LVD Low Voltage Directive: EN 60335-1, EN 60335-2-21, EN 60529, EN 62233, EN 50106.
- EMC Electro-Magnetic Compatibility: EN 55014-1, EN 55014-2, EN 61000-3-2, EN 61000-3-3.
- RoHS2 Risk of Hazardous Substances: EN 50581.
- ErP Energy related Products: EN 50440.
This product is in conformity with REACH regulations.
INSTALLING NORMS (for the installer)
This product must be installed vertically to operate correctly. Once installation is complete, and before any water is added or the power supply is connected, use a measuring instrument (i.e. a spirit level) to check that the device has been installed perfectly vertical.
The appliance heats water to a temperature below boiling point. It must be linked up to a mains water supply according to the appliance performance levels and capacity. Before connecting the appliance, it is first necessary to:
- Check whether the characteristics (please refer to the data plate) meet the customer's requirements.
- Make sure the installation conforms to the IP degree (of protection against the penetration of liquids) of the appliance according to the applicable norms in force.
- Read the instructions provided on the packaging label and on the appliance data plate.
This appliance was designed to be installed only inside buildings in compliance with the applicable norms in force. Furthermore, installers are requested to keep to the following advice in the presence of:
- Damp: do not install the appliance in closed (unventilated) and damp rooms.
- Frost: do not install the appliance in areas where the temperature may drop critically and there may be a risk that ice may form.
- Sunlight: do not expose the appliance to direct sunrays, even in the presence of windows.
- Dust/vapours/gas: do not install the appliance in the presence of particularly dangerous substances such as acidic vapours, dust or those saturated with gas.
- Electrical discharges: do not install the appliance directly on electrical supplies that aren't protected against sudden voltage jumps.
In the case of walls made of bricks or perforated blocks, partition walls featuring limited static, or masonry different in some way from those stated, you first need to carry out a preliminary static check of the supporting system.
The wall-mounting fastening hooks must be designed to support a weight that is three times higher than the weight of the water heater filled with water. We recommend installing the appliance as close as possible to the delivery points to minimise heat loss along the pipes. Local regulations may provide for restrictions on installation in bathrooms; observe any regulatory minimum distances. To facilitate maintenance, make sure there is a clearance of at least 50 cm inside the enclosure for access to the electrical equipment.
Hydraulic connection
Connect the water heater's inlet and outlet with pipes or fittings that are able to withstand temperature in exceeds of 90^ C at a pressure exceeding that of the working pressure. Therefore, we advise against the use of any materials which cannot resist such high temperatures.
The appliance must not be supplied with water of hardness less than 12^ F, nor with especially hard water (greater than 25^ F); we recommend installing a water softener, properly calibrated and controlled - do not allow the residual hardness to fall below 15^ F.
Screw a "T" piece union to the water inlet pipe with the blue collar. On one side of the "T" piece union, screw a tap for draining the appliance that can only be opened with the use of a tool (B Fig. 1). On the other side of the "T" piece union screw the safety valve supplied (A Fig. 1).
Safety group complies with the European standard EN 1487
Some countries may require the use of hydraulic special safety devices; the installer must check the suitability of the safety device he tends to use.
Do not install any shut-off device (valve, cock, etc.) between the safety unit and the heater itself.
The appliance's drain outlet must be connected to a drain pipe of diameter at least equal to the of the outlet itself, with a funnel to permit an air gap of at least 20 mm for visual inspection. Use a hose to connect the safety group to the mains cold water supply; fit a cock if necessary (D fig. 1). In addition, a water discharge tube on the outlet C Fig. 1 is necessary if the emptying tap is opened.
When installing the safety device, do not tighten it fully down, and do not tamper with its settings.
It is necessary to connect the drain, which must always be left exposed to the atmosphere, with a drainage pipe that is installed sloping downwards in a place with no ice. If the network pressure is closed to the calibrated valve pressure, it will be necessary to apply a pressure reducer far away from the appliance. To avoid any possible damage to the mixer units (taps or shower) it is necessary to drain any impurities from the pipes.
"Gravity drain" connection
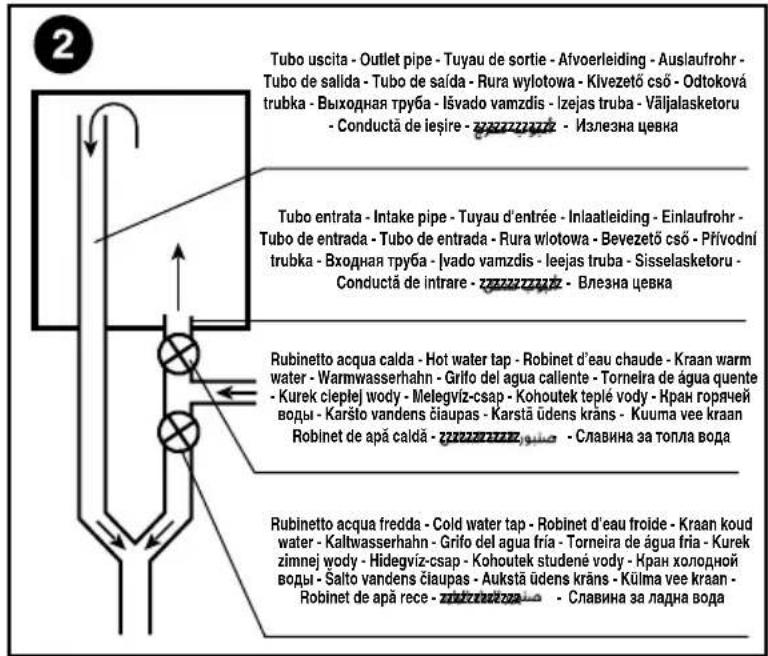
Specific taps must be used for this type of installation and the connection must be implemented as shown in the diagram in Fig. 2. With this solution, the water heater can work at any mains pressure and no type of tap must be connected on the outlet pipe, which acts as a vent.
Electrical connection
It is mandatory, before installing the appliance, to perform an accurate control of the electrical system by verifying
compliance with current safety standards, which is adequate for the maximum power absorbed by the water heater (refer to the data plate) and that the section of the cables for the electrical connection is suitable and complies with local regulations. The manufacturer is not liable for damage caused by lack of grounding or anomalous power supply. Before starting up the appliance, check that the power rating matches that given on the nameplate. The use of multiplugs, extensions or adaptors is strictly prohibited.
It is strictly forbidden to use the piping from the plumbing, heating and gas systems for the appliance earthing connection. If the appliance is supplied with a power supply cable, should the latter need replacing, use a cable featuring the same characteristics (type H05VV-F 3x1.5 mm², 8.5 mm in diameter. The power cord (type H05VV-F 3x1.5 mm² dim. 8.5 mm) must be routed into the hole (F Fig. 3) in the back of the appliance and connected to the thermostat terminals (M Fig. 6)
Use a two-pole switch conforming with national laws in force (contact gap of at least 3 mm, preferably equipped with fuses) to disconnect the appliance's power supply.
The appliance must be grounded with a cable (yellow/green and longer than the phase cable) connected to the terminals marked ⊕ (G Fig. 6).
Before starting up the appliance, check that the power rating matches that given on the nameplate. If the appliance is not supplied with a power supply cable, choose one of the following installation modes:
- connection to mains with a rigid pipe (if the appliance has no cable clamp); use a cable with a minimum 3x1.5 mm² section;
- with a flexible cable (type H05VV-F 3x1.5 mm², 8.5 mm in diameter) if the appliance is supplied with a cable clamp.
Testing and ignition of the device
Before powering up the appliance, fill the heater with mains water.
To do so, open the mains cock and the hot water tap until all the air has been vented from the boiler. Check for leaks from the flanges, tighten down the fittings (not too much!) if necessary.
Turn on the appliance with the switch.
MAINTENANCE REGULATIONS (for qualified personnel)
Before calling your Technical Servicing Centre, check that the fault is not due to lack of water or power failure.
Caution: disconnect the appliance from the mains before conducting any maintenance work.
Emptying the appliance
The appliance must be emptied if it is to be left unused for a long period and/or in premises subject to frost.
To drain the appliance, proceed as follows:
- close the tap, if installed (D Fig. 1), otherwise the central tap domestic power supply;
- turn on the hot water tap (wash basin or bathtub);
- open the drain valve B (Fig. 1).
Replacing parts
Remove the cover to access the electrical parts.
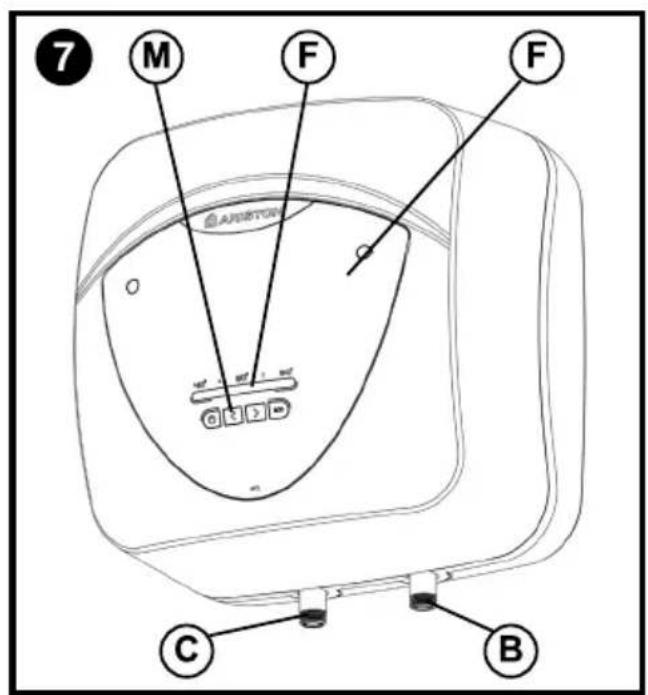
Access the electronic thermostat (T Fig. 6) by disconnecting the power cable (C Fig. 6) and the cable (Y Fig. 6) on the control panel. Then remove it from its seat while taking care not to bend the sensor holder rod excessively (K Fig. 6).
Access the control panel (W Fig. 6) by disconnecting the cable (Y Fig. 6) and unscrewing the screws.
When reassembling, make sure the components are put back in their original positions.
Before handling the heating element and anode, empty the appliance.
Undo the 4 bolts (A fig. 4) and remove the flange. The heating element and anode are attached to the flange. During reassembly, make sure that the flange gasket, the thermostat and the heating element are put back in their original positions. We recommend replacing the flange gasket (Z Fig. 5) every time it is disassembled.
Use only original parts from authorized service centres authorized by the manufacturer.
Periodical maintenance
The heating element (R fig. 5) should be descaled every two years (the frequency must be increased, if water is very hard) to ensure it works properly. If you do not wish to use a liquid descaler (in this case please read the safety data sheets of descaling), you can simply break off the deposit, taking care not to damage the heating element's cladding. The magnesium anode (N fig. 5) must be replaced every two years, otherwise the decay of the warranty. In the presence of aggressive or waters rich in chloride it is recommended to check the status of the anode annually.
To remove this, disassemble the heating element and unscrew from the support bracket.
EN
USER INSTRUCTIONS
Reset/Diagnostics
When any of the faults described below occurs, the device goes into fault status and all the LEDs on the control panel flash simultaneously.
Reset: reset the appliance by switching it off and on from the key (A fig.6). If the cause of the fault disappears when reset, the appliance resumes its regular operation. Otherwise, all the LEDs start to flash again and Technical Assistance must be requested to intervene.
Diagnostics: activate the diagnostics by pressing the key (A fig.6) for 5 seconds.
The indication of the type of fault is provided via 5 led (1→5 fig.6) according to the following diagram:
LED ref. 1 – Fault inside the board;
LED ref. 2 - Fault at the anode (in models with an active anode);
LED ref. 3 - Faulty NTC 1/NTC 2 temperature sensors (open or short circuited);
LED ref. 5 - Water over temperature detected by a single sensor;
LED ref. 4 and 5 - General over temperature (board failure);
LED ref. 3 and 5 - Probe differential error;
Exit the diagnostics by pressing the key (A fig.6) or wait 25 s.
Error reset: reset the appliance by switching it off and on with the ON/OFF button (A Fig. 6). If the cause of the malfunction disappears immediately after the appliance has been reset, it will resume normal operation. On the contrary, if the error code continues to appear on the display, contact the Service Centre.
"Thermal disinfection function" (anti-Legionella)
The anti-Legionella function is activated by default. It consists of a water heating/60°C temperature maintenance cycle for 1 hour which has a thermal disinfection action on the relative bacteria.
The cycle starts when the product is started up and when it is restarted after a power outage. If the product always functions at temperatures lower than 55^ C, the cycle is repeated after 30 days. When the product is switched off, the anti-Legionella function is deactivated. If the equipment is switched off during the anti-Legionella cycle, the product switches off and the function is deactivated. At the end of the cycle, the use temperature returns to the temperature previously set by the user.
Activation of the anti-Legionella cycle is displayed as a normal 60°C temperature setting.
To deactivate the anti-Legionella function permanently, press and hold down the “ECO” and “+” keys simultaneously for 4 sec.; the led 40^ C flashes rapidly for 4 sec. to confirm deactivation.
To reactivate the anti-Legionella function, repeat the operation described above; the led 60^ C flashes rapidly for 4 sec. to confirm reactivation.
"Thermal disinfection function" (anti-Legionella)
Switch the device on by pressing the key (A fig.6). Set the desired temperature by selecting a level between 40^ C and 80^ C using the "+" and "-" buttons. During the heating phase, the LEDs (1→5 fig.6) related to the temperature reached by the water remain on; the subsequent ones until the temperature is set, flash progressively. If the temperature drops, for example due to water being drawn, the heating is automatically reactivated and the LEDs between the last one on (steady) and that related to the set temperature start to flash progressively again. When first switched on, the product is set to 70^ C.
In case of a power failure or if the product is switched off using the button (A fig.6), the last temperature set remains saved.
Slight noise may occur during the heating phase due to the water being heated.
ECO EVO function
The "ECO EVO" function consists of self-learning software of the user consumption, which allows heat loss to be minimised and energy savings to be maximised. This function is active by default.
The "ECO EVO" software consists of an initial learning period of a week when the product begins to operate at the temperature indicated in the product data sheet (Attachment A) and logs the user energy demand. From the second week onwards the learning process continues so as to learn the user requirements in more detail and changes the temperature every hour to adapt it to the actual demand in order to improve energy savings. The "ECO EVO" software activates the heating of the water within the time and amounts determined automatically by the product itself according to user consumption. During the day, when no water is drawn, the product still guarantees a reserve of hot water.
Activate the "ECO" function by pressing the relevant key that lights up green.
Two operating modes are possible:
1) Manual adjustment of the temperature (see the "Adjusting the temperature and activating the functions of the device" paragraph): the manual mode is accessed with the ECO button off. In this mode, the product continues to note the user's energy demand without adjusting the temperature selected by the user. Press the "ECO" key for it to light up and the "ECO EVO" function to start, which is immediately effective in this case as the "learning process" has already been implemented;
2) ECO EVO:
- After the first week of continuous learning, the water heater always prepares the amount of hot water according to a statistical prediction of demand which is supplied in time: to do so, the temperature will be automatically determined which will always be between a Tminimum=40°C and a maximum temperature that is set by the user (by default, the maximum temperature is equal to the value shown in the data sheet [Attachment A])
- Press the ECO key for long for the eco LED to flash for about 4 s and the learning process restarts (from the first week). This is used to delete the user demand from the memory and restart (hard reset).
- Caution: when the ECO key is on and the "+/-" keys (Fig.6) or the knob (Fig.6) or the "ECO" key itself are pressed, the Eco soft mode described above is accessed (the ECO key goes off)
In order to guarantee proper ECO operation, it is recommended not to disconnect the product from the mains.
USEFUL INFORMATION (for the user)
Before any operation of cleaning the device make sure to turn off the product by bringing the external switch to the OFF position.
Do not use insecticides, solvents or aggressive detergents that may damage the painted parts or plastic material.
If the water delivery is cold, have the following checked:
- that the device is connected to the power supply and the external switch is in the ON position;
- That at least the 40^ C LED (1→5 fig.6) is on.
If there is presence of steam output from the taps:
Remove power from the electrical appliance and contact technical support.
If the hot water delivery is insufficient, have the following checked:
- the pressure of the water mains;
- eventual obstruction of the inlet and outlet pipes (deformation or sediment).
Water trickling from the pressure safety device
During the heating phase, some water may trickle from the tap. This is normal. To prevent the water trickling, a suitable expansion vessel must be installed on the flow system. If the trickling continues even after the heating phase, have the following checked:
- device calibration;
- the pressure of the water mains.
Caution: Never obstruct the appliance outlet!
IF THE PROBLEM PERSISTS, NEVER ATTEMPT TO REPAIR THE APPLIANCE YOURSELF - ALWAYS HAVE THIS DONE BY A QUALIFIED TECHNICIAN.
The indicated data and specifications are not binding; the manufacturer reserves the right to modify them at his own discretion notification or replacement.

Pursuant to Art. 26 of Italian Legislative Decree 14 march 2014, n. 49 "Enactment of Directive 2012/19/EU governing electrical and electronic waste (WEEE)"
The barred bin symbol on the appliance and its packaging indicates that the product must be scrapped separately from other waste at the end of its service life. The user must therefore hand the equipment over to a sorted waste disposal facility for electro-technical and electronic equipment at the end of its service life. Alternatively, he may return the equipment to the retailer at the time of purchase of a new equivalent type of appliance. Electronic equipment of size less than 25 cm can be handed over to any electronics equipment retailer whose sales area is at least 400 m² for disposal free of charge and without any obligation to purchase new product. Sorted waste collection for recycling, treatment and environmentally compatible scrapping contributes to the prevention of damage to the environment and promotes reuse/recycling.
CONSIGNES GÉNÉRALES DE SÉCURITÉ
Led ref. 1 – Storing in kaart;
- RoHS2 Risk of Hazardous Substances: EN 50581.
- ErP Energy related Products: EN 50440.
- RoHS2 Risk of Hazardous Substances: EN 50581.
- ErP Energy related Products: EN 50440.
natural_image
Illustration of a device with arrows indicating movement or force, no text or symbols present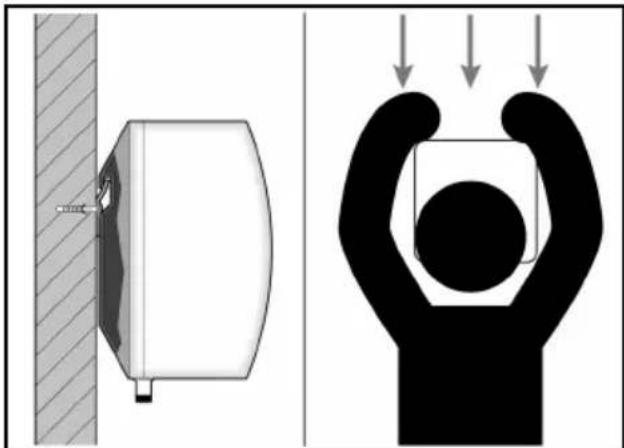
natural_image
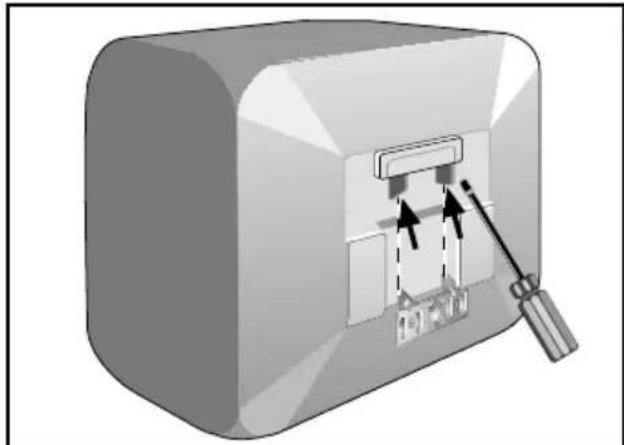
Diagram showing a wall-mounted device and a hand holding a square, with arrows indicating force or movement (no text or symbols)Schema installazione - Installation scheme - Schéma d'installation - Installatieschema - Installationsschema - Esquema de instalación - Esquema de instalação - Schemat instalacji - Beszerelési rajz - Instalační schéma - Схема установки - Montavimo schema - Instalácijas shēma - Paigaldamise juhend - Schema de instalare - соссососесос - Монтажна схема
Sopralavello - Oversink - Sur évier - Boven spoelbak - Überbecken - Sobre lavabo - Em cima da pia - Nadumywalkowa - Mosdókagyló fölött - Nad umyvadlo - Над раковиной - Virš prausyklės - Virs izlietnes - Valamu kohal - Deasupra chiuvetei - ۰۶۸۷۵۸۸۸۸۸- Горен дел од мијалник
natural_image
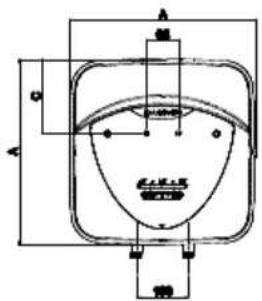
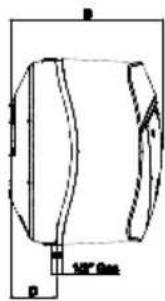
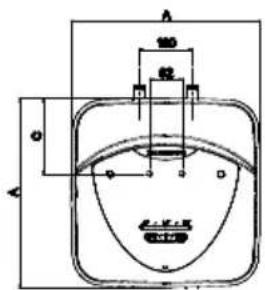
Technical line drawing of a cylindrical mechanical component with mounting holes and dimension annotations (no readable text or symbols)| MOD. | 10 15 30 | |
| A 36 | 0 360 446 | |
| B 29 | 4 342 406 | |
| C 14 | 4 144 165 | |
| D 92 | 78 115 |
Sottolavello - Undersink - Sous évier - Onder spoelbak - Unterbecken - Bajo lavabo - Em baixo da pia - Podumywalkowa - Mosdó kagyló alatt - Pod umyvadlo - Под раковиной - Po prausykle - Zem izlietnes - Valamu all - Sub chiuvetá - ृृृृृृृृृृृृृृृृृृृृृृृृृृृृृृृृृृृृृृृृृृृ
flowchart
graph TD
    A[" "] --> B[" "]
    B --> C[" "]
    C --> D[" "]
    D --> E[" "]
    style A fill:#fff,stroke:#000
    style B fill:#fff,stroke:#000
    style C fill:#fff,stroke:#000
    style D fill:#fff,stroke:#000
    style E fill:#fff,stroke:#000
natural_image
Close-up of a car's front panel with 'ARISTON' branding and directional arrows indicating components (no readable text beyond logo)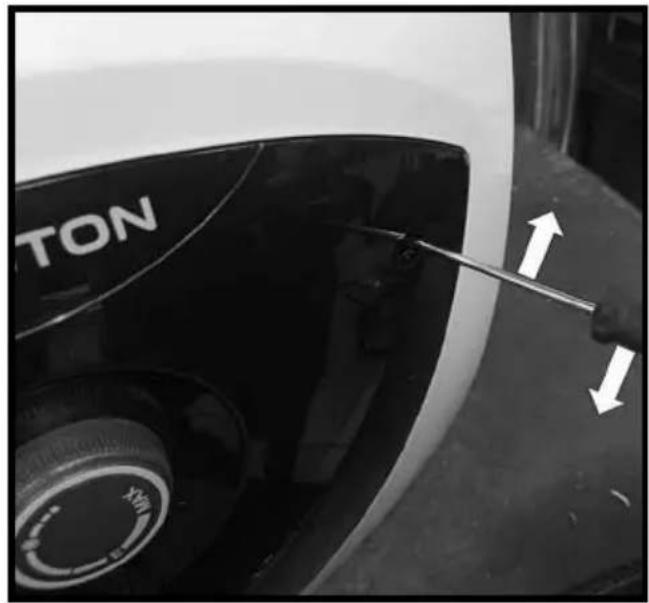
natural_image
Close-up of a car's front wheel with a tool inserted, showing the number 'TON' and directional arrows (no text or symbols on the car itself)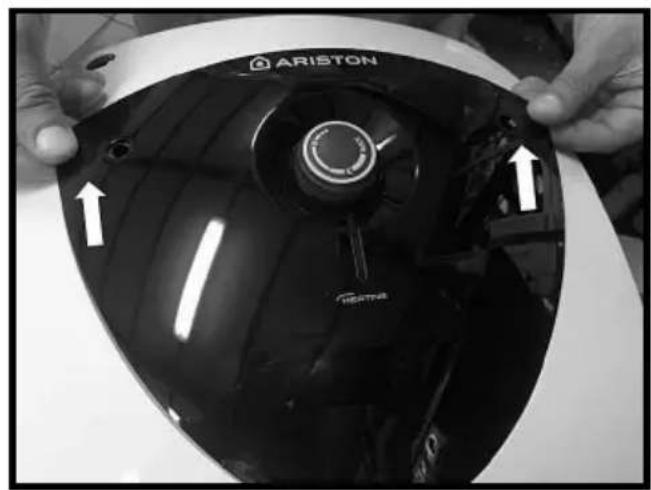
natural_image
Close-up of hands holding a car hood with visible branding and mechanical components (no readable text or symbols)
natural_image
Abstract black-and-white circular diagram with three curved arrows forming a cycle around a stylized flower or clover shape (no text or symbols)WE MAKE USE OF RECYCLED PAPER
Produced by:

Ariston S.p.A.
Viale Aristide Merloni, 45
60044 Fabriano (AN) - ITALY
ariston.com

- ARISTON
- GENERAL SAFETY INSTRUCTIONS
- EN
- LEGIONELLA BACTERIA FUNCTION
- TECHNICAL CHARACTERISTICS
- INSTALLING NORMS (for the installer)
- Hydraulic connection
- Safety group complies with the European standard EN 1487
- "Gravity drain" connection
- Electrical connection
- Testing and ignition of the device
- MAINTENANCE REGULATIONS (for qualified personnel)
- Emptying the appliance
- Replacing parts
- Periodical maintenance
- USER INSTRUCTIONS
- Reset/Diagnostics
- "Thermal disinfection function" (anti-Legionella)
- ECO EVO function
- 2) ECO EVO:
- USEFUL INFORMATION (for the user)
- If the water delivery is cold, have the following checked:
- If there is presence of steam output from the taps:
- If the hot water delivery is insufficient, have the following checked:
- Water trickling from the pressure safety device
- IF THE PROBLEM PERSISTS, NEVER ATTEMPT TO REPAIR THE APPLIANCE YOURSELF - ALWAYS HAVE THIS DONE BY A QUALIFIED TECHNICIAN.
- Pursuant to Art. 26 of Italian Legislative Decree 14 march 2014, n. 49 "Enactment of Directive 2012/19/EU governing electrical and electronic waste (WEEE)"
- CONSIGNES GÉNÉRALES DE SÉCURITÉ
Brand : Ariston Thermo
Model : Andris Lux ECO
Category : Kettle