Piccolo - Kettle Ariston Thermo - Free user manual and instructions
Find the device manual for free Piccolo Ariston Thermo in PDF.


| Product type | Electric storage water heater, free flow |
| Capacity | 5 liters |
| Weight | 2.6 kg |
| Dimensions (approx.) | Height 36 cm, width 30 cm, depth 30 cm |
| Power supply | 230 V ~ 50 Hz |
| Power consumption | 2000 W (estimated from Qelec) |
| Daily energy consumption | 2.182 kWh/24h (XXS load profile) |
| Temperature adjustment range | 40 °C to 80 °C |
| Recommended temperature | 60 °C to limit scale and bacterial growth |
| Frost protection | Yes, * position on the thermostat |
| Safety | Bipolar safety thermostat (Reset), temperature limiter |
| Installation type | On sink or under sink, vertical, wall mounting |
| Hydraulic connection | Blue inlet (cold water), red outlet (hot water), hoses supplied |
| Operating pressure | Free flow (pressureless), max 0.7 MPa with safety unit |
| Recommended max flow rate | 5 l/min (limited by valve) |
| Noise | 15 dB(A) |
| Periodic maintenance | Annual descaling, inspection of anode (if present), replacement of heating element gasket |
| External cleaning | Soft cloth with soapy water, do not use solvents |
| Spare parts and repairability | Heating element, thermostat, indicator lamp replaceable by professional |
| Protection rating | IP24 (estimated for installation in wet room) |
Frequently Asked Questions - Piccolo Ariston Thermo
User questions about Piccolo Ariston Thermo
0 question about this device. Answer the ones you know or ask your own.
Ask a new question about this device
Download the instructions for your Kettle in PDF format for free! Find your manual Piccolo - Ariston Thermo and take your electronic device back in hand. On this page are published all the documents necessary for the use of your device. Piccolo by Ariston Thermo.
USER MANUAL Piccolo Ariston Thermo
natural_image
3D rendering of a white rectangular electronic device with two ports and a central knob (no text or symbols visible)GB Open outlet water heater
Open outlet water heater.
The outlet acts as a vent, use mixing taps suitable for open outlet water heaters only.
Before switching on the appliance make sure it is full of water open the hot water tap (to the left) and wait until water flows through.
ATTENTION!
GB Instructions for installation, use, and maintenance pag. 22
GENERAL SAFETY INSTRUCTIONS
CAUTION!
- This manual is an integral part of the product. Keep it with care with the appliance, and hand it on to the next user/owner in case of change of property.
- Read the instructions and warning in this manual carefully, they contain important information regarding safe installation, use and maintenance.
- The appliance must be installed and commissioned by a qualified technician in accordance with local legislation and health and safety regulations. All power circuits must be shut off before you open the terminal block.
- DO NOT use the appliance for any other than its specified use. The manufacturer is not liable for damage resulting from improper or incorrect use or failure to observe the instructions given in this manual.
- Incorrect installation can result in damage to property and injury to persons and animals; the manufacturer is not liable for the consequences.
- DO NOT leave the packaging materials (staples, plastic bags, expanded polystyrene, etc.) within the reach of children - they can cause serious injury.
- The appliance may not be used by persons under 8 years of age, with reduced physical, sensory or mental capacity, or lacking the requisite experience and familiarity, unless under supervision or following instruction in the safe use of the appliance and the hazards attendant on such use. DO NOT permit children to play with the appliance. User cleaning and maintenance may not be done by unsupervised children.
- DO NOT touch the appliance when barefoot or if any part of your body is wet.
- Any repairs, maintenance, plumbing and electrical hookup must be done by qualified technicians using original spare parts only. Failure to observe the above instructions can compromise the safety of the appliance and relieves the manufacturer of any liability for the consequences.
- The hot water temperature is regulated by a thermostat which also acts as a re-armable safety device to prevent dangerous overheating.
- The electrical hookup must be done as indicated in this manual.
-
If the appliance is equipped with a power cord, the latter may only be replaced by an authorised service centre or professional technician.
-
Do not tamper with the overpressure safety device, if supplied together with the appliance; trip it from time to time to ensure that it is not jammed and to remove any scale deposits. In countries which have enacted EN 1487, the appliance's intake pipe must be equipped with a safety device compliant with the said standard, calibrated to a maximum pressure of 0.7 MPa, including at least a cock, check valve, safety valve and hydraulic load cutout.
- It is normal that water drip from the overpressure safety device and EN 1487 safety unit when the appliance is heating. For this reason one must install a drain, open to the air, with a continuously downwards sloping pipe, in an area not subject to subzero temperatures. Make sure to drain the appliance when it is out of service or in an area subject to subzero temperatures.
- Make sure to drain the appliance when it is out of service or in an area subject to subzero temperatures.
- Water heated to over 50^ C can cause immediate serious burns if delivered directly to the taps. Children, disabled persons and the aged are particularly at risk. We recommend installing a thermostatic mixer valve on the water delivery line, marked with a red collar.
- Do not leave flammable materials in contact with or in the vicinity of the appliance.
Symbols:
| Symbol | Meaning |
| Failure to observe this warning can result in injury, which may even be fatal in certain circumstances | |
| Failure to observe this warning can result in damage or injury, even serious in certain circumstances, to property, plants and animals | |
| Observe the product's general and specific safety instructions. |
GENERAL SAFETY STANDARDS
| Ref. | Warning Risk | Symbol | |
| 1 | Do not open the appliance or remove from its installation | Electrocution hazard due to the presence of live electrical equipment Personal injury - burns caused by overheated components and wounds caused by sharp edges | |
| 2 | Do not start or stop the appliance by inserting/pulling the power plug | Electrocution hazard due to damage to the power cord, its plug or the socket | |
| 3 | Do not damage the power cord | Electrocution hazard due to bare live wires | |
| 4 | Do not leave objects on the appliance | Personal injury due to objects falling off the appliance as a result of vibration | |
| Damage to the appliance or other property due to objects falling off the appliance as a result of vibration | |||
| 5 | Do not climb onto the appliance | Personal injury due to falling off the appliance | |
| Damage to the appliance or other property due to the appliance itself detaching from its mounting | |||
| 6 | Do not clean the appliance without having first switched it off, pulled its power plug or shut off its power switch | Electrocution hazard due to the presence of live electrical equipment | |
| 7 | Install the appliance to a solid wall which is not subject to vibration | Danger of the appliance falling off the wall due to structural collapse, or noisy operation | |
| 8 | Make the electrical hookup with cables of adequate cross-section | Danger of fire due to overheating of undersized electrical wires | |
| 9 | Restore all safety and control functions after working on the appliance and check that they are operational before returning it to service | Damage or blocking of the appliance due to improper control | |
| 10 | Drain all components containing hot water, using the bleed cocks, before handling them | Danger of burns | |
| 11 | Descale the system as given in the product's "safety sheet"; when doing so, ventilate the room, wear safety clothing, make sure not to mix products, and protect the appliance itself and any adjacent objects | Personal injury due to contact of the skin and eyes with acid, inhalation or ingestion of noxious chemicals | |
| Damage to the appliance and adjacent objects due to corrosion by acid | |||
| 12 | Do not use insecticides, solvents or aggressive detergents to clean the appliance | Damage to plastic and painted parts and assemblies |
Anti-legionella recommendations (European standard CEN/TR 16355)
Information
Legionella is a small bacterium, of stick-like form, and is found naturally in fresh water.
Legionnaire's disease is a serious pulmonary infection caused by inhalation of the Legionella pneumophilia bacterium and other species of Legionella. The bacterium is frequently to be found in the plumbing of houses, hotels and water used in A/C and air cooling systems. The most effective measure against infection is to prevent the bacterium proliferating in water circuits.
European standard CEN/TR 16355 provides guidelines for preventing the proliferation of Legionella in drinking water systems, without substituting applicable local legislation.
General recommendations
"Conditions favourable to the proliferation of Legionella". The following conditions are favourable to the proliferation of Legionella:
- Water temperature in the range 25 - 50 °C. To reduce the proliferation of Legionella, the water temperature be kept with these limits to prevent them growing or reduce their growth to a minimum. If this is not possible, the drinking water system must be sanitised thermally;
- Stagnant water. To prevent water stagnating for a long time, the drinking water system must be flushed or made to run abundantly at least once a week;
- Nutrients, biofilms and sediment in the circuit, including boilers, etc. Sediment may promote the proliferation of Legionella and should be regularly eliminated from water storage devices, boilers and expansion/holding tanks (for instance, once a year).
As regards storage heater like the present, if:
1) the appliance is switched off for several months at a time or
2) the water temperature is kept constant in the range 25 - 50°C,
the Legionella bacterium may grow inside the tank. If such circumstances, to reduce the proliferation of the bacterium, one must run a thermal sanitisation cycle.
Electromechanical storage heaters are sold with a thermostat set to a temperature higher than 60^ C, which permits a thermal sanitisation cycle to be run to reduce the proliferation of Legionella in the tank.
This cycle is suited to use in domestic hot water systems and complies with the guidelines for the prevention of Legionella given in Table 2 of standard CEN/TR 16355 (see below).
Table 2 - Types of hot water system
| Separate hot and cold water | Mixed hot and cold water | |||||||||
| No storage | Storage | No storage upline of the mixer valves | Storage upline of the mixer valves | No storage upline of the mixer valves | ||||||
| No circulation of hot water | Circulation of hot water | No circulation of mixed water | Circulation of mixed water | No circulation of mixed water | Circulation of mixed water | No circulation of mixed water | Circulation of mixed water | No circulation of mixed water | Circulation of mixed water | |
| Ref. in Enclosure C | C.1 | C.2 C.4 | C.3 | C.4 C.5 | C.5 | C.6 | C.7 | C.8 | C.9 | C.10 |
| Temperature | - | ≥ 50 ^ e | in storage heater ^a | ≥ 50 ^ e | thermal disinfection ^d | thermal disinfection ^d | in storage heater ^a | ≥ 50 ^ e thermal disinfection ^d | thermal disinfection ^d | thermal disinfection ^d |
| Stagnation | - | ≤ 3 I b | - | ≤ 3 I b | - | ≤ 3 I b | - | ≤ 3 I b | - | ≤ 3 I b |
| Sediment | - | - | remove ^c | remove ^c | - | - | remove ^c | remove ^c | - | - |
| a Temperature ≥ 55^ all day or at least 1h a day ≥ 60^ .b Volume of water contained in the pipes between the circulation system and the most distant tap.c Remove the sediment from the storage heater as required by local conditions, but no less frequently than once a year.d Thermal disinfection for 20 minutes at 60^ , for 10 minutes at 65^ or 5 minutes at 70^ at all delivery points at least once a week.e The water temperature in the circulation circuit may not fall below 50^ .- Not required | ||||||||||
However, the thermal disinfection cycle does not kill all Legionella bacteria in the storage tank. It follows that if the water temperature setting is less than 55^ C, the Legionella bacterium infection may reoccur.
Caution: the water temperature in the tank can cause immediate serious burns. Children, disabled persons and the aged are particularly at risk of burns. Check the water temperature before taking a bath or shower.
However, the thermal disinfection cycle does not kill all Legionella bacteria in the storage tank. It follows that if the water temperature setting is less than 55^ C, the Legionella bacterium infection may reoccur.
Caution: the water temperature in the tank can cause immediate serious burns. Children, disabled persons and the aged are particularly at risk of burns. Check the water temperature before taking a bath or shower.
DESCRIPTION OF THE WATER HEATER (see fig. 4)
A. Pilot lamp
B. Control knob
C. Front cover
TECHNICAL CHARACTERISTICS
For the technical specifications, refer to the nameplate (the nameplate is located next to the water intake/outlet pipes).
| Product information | ||
| Product range | 5 | |
| Weight | 2,6 Kg | |
| Installation | Oversink | Undersink |
| Model | Refer to the nameplate | |
| Qelec (kWh) | 2,182 | 2,366 |
| Load profile | XXS | |
| Lwa | 15 dB | |
| _wh | 38,8% | 36,4% |
| Capacity (L) | 5 | |
The power consumption data in the table and the other information given in the Product Data Sheet (Enclosure A to this manual) are defined in relation to EU Directives 812/2013 and 814/2013.
The products without the label and the data sheet for water heaters and solar devices, stipulated in regulation 812/2013, are not intended to be used in such assemblies.
Products equipped with a regulator knob have the thermostat positioned in the
This appliance is conforming with the international electrical safety standards IEC 60335-1 and IEC 60335-2-21. The CE marking of the appliances attests its conformity to the following EC Directives, of which it satisfies the essential requisites:
- LVD Low Voltage Directive: EN 60335-1, EN 60335-2-21, EN 60529, EN 62233, EN 50106.
- EMC Electro-Magnetic Compatibility: EN 55014-1, EN 55014-2, EN 61000-3-2, EN 61000-3-3.
- RoHS2 Risk of Hazardous Substances: EN 50581.
- ErP Energy related Products: EN 50440.
INSTALLATION NORMS (for the installer)

WARNING! Follow the general warnings and the safety norms listed at the beginning of the text and keep to all the instructions given under all circumstances.
The installation and set-up of the water heater must be carried out by a competent person in conformity with the applicable norms in force and with any provisions set forth by local authorities and public health bodies.
Warning: this is an open outlet appliance (no pressure) and can be installed in one point of use only. The electrical and plumbing connections must be made in compliance with the applicable norms in force.
The appliance heats water to a temperature below boiling point. It must be linked up to a mains water supply according to the appliance performance levels and capacity.
Before connecting the appliance, it is first necessary to:
- Check whether the characteristics (please refer to the data plate) meet the customer's requirements.
- Make sure the installation conforms to the IP degree (of protection against the penetration of liquids) of the appliance according to the applicable norms in force.
- Read the instructions provided on the packaging label and on the appliance data plate.
Installing the appliance
This appliance was designed to be installed only inside buildings in compliance with the applicable norms in force. Furthermore, installers are requested to keep to the following advice in the presence of:
- Damp: do not install the appliance in closed (unventilated) and damp rooms.
- Frost: do not install the appliance in areas where the temperature may drop critically and there may be a risk that ice may form.
- Sunlight: do not expose the appliance to direct sunrays, even in the presence of windows.
- Dust/vapours/gas: do not install the appliance in the presence of particularly aggressive atmospheres such as acidic vapours, dust or those saturated with gas.
- Electrical discharges: do not install the appliance directly on electrical supplies that aren't protected against sudden voltage jumps.
! See warning no. 26
See warning no. 9 - In the case of walls made of bricks or perforated blocks, partition walls featuring limited static, or masonry different in some way from those stated, you first need to carry out a preliminary static check of the supporting system.
Install the appliance using the special bracket provided in the box, fastening it using 2 screws/Rawlplugs measuring 6 mm in diameter.
See warning no. 10
Local norms could set forth restrictions regarding the installation in a bathroom environment. Therefore keep to the minimum distances foreseen by the applicable norms in force.
The appliance should be installed as close as possible to the point of use to limit heat dispersion along the piping.
! See warning no. 20
Plumbing connection
Before making the plumbing connection, you must arrange for the system to be cleaned thoroughly to eliminate any residue or dirt that could compromise the proper operation of the water heater.
Connect the water heater inlet and outlet to resistant pipes or pipefittings, as well as to the operating pressure, the temperature of the hot water that could at times reach well over 80^ C. We advise against the use of materials that cannot withstand such high temperatures.
We recommend you use dielectric joints for the electrical insulation of the appliance from the water mains.
Connect the inlet pipe (marked with a blue rubber washer) and the outlet pipe (red rubber washer) to the corresponding pipes of the system. Tighten couplings E using a pair of spanners as illustrated in fig. 4
In the event of low mains pressure values, install the appliance at no more than one metre above the tap (fig. 3) and no more than 2 metres form the side of the latter.
Should these distances be greater than the recommended values, you must include an air valve on the hot water pipe. Fill the appliance up and let the water flow out of the tap for a few seconds.
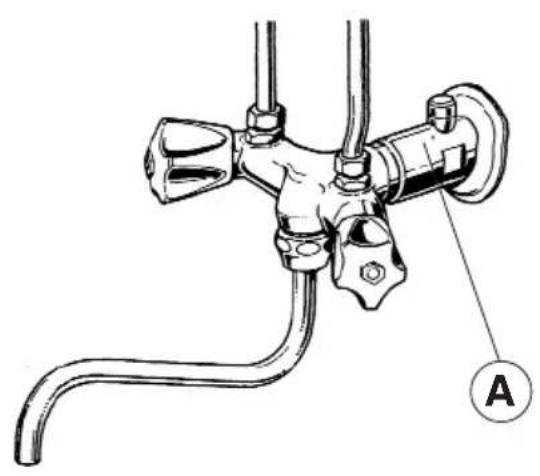
The water flow rate, with the tap turned on fully, should not be more than 5 l/min; for this reason, in accordance with DIN 44531 norm, you should adjust the small valve (fig. 5) to limit the water flow.
In the presence of particularly hard waters, there will be a considerable and rapid formation of limescale inside the appliance, with a consequent loss in efficiency and damage to the electric heating element.
Electrical connection
For greater safety, have qualified personnel carry out a careful inspection of the electrical system, ensuring it complies with the applicable norms in force, because the appliance manufacturer will not be held responsible for any damage caused by the lack of earthing of the system or for faults in the electricity supply.
See warning no. 24 - Check that the system is suitable for the maximum power absorbed by the water heater (please refer to the data plate) and that the cross-section of the electrical connection cables is suitable, and no less than 1.5 mm ^2 .
The power supply cable (type H05 W-F 3x1.5, 8.5 mm in diameter) should be inserted in the corresponding hole (X fig. 6) situated in the vicinity of the control knob and feed it until it reaches the thermostat slots (T fig. 6). The electrical connection should be made directly on the terminals (D fig. 6) of the thermostat (respect the L-N polarity).
The appliance is fitted with a cable and plug. For installations without a plug, use a bipolar switch in conformity with the applicable norms in force (fused with a minimum contact opening of 3 mm).
The appliance must be earthed and the earth wire (yellow-green colour) should be fastened to the special faston on the heating element and marked with the ⏻ (PE fig. 6). Secure the power supply cable in place using the special cable clamp provided with the appliance
! See warning no. 11
GB
The use of multiplugs, extensions or adaptors is strictly prohibited.
It is strictly forbidden to use the piping from the plumbing, heating and gas systems for the appliance earthing connection.
The appliance is not protected against the effects caused by lightning.
Before turning the appliance on, make sure the supply voltage complies with the value stated on the appliance data plate and that the appliance itself is filled with water.
If the appliance is not supplied with a power supply cable, make a fixed connection to the mains using a rigid pipe or cable for permanent installation.
Starting and testing the appliance
Before powering the appliance, fill the tank up with mains water.
Set the knob (F fig. 6) to the desired position, plug the appliance into the socket or switch the main switch to "ON". Check the appliance operation until the end of the first heating cycle, indicated by the relative pilot lamp turning off. During the heating phase, the water expansion could cause some trickling from the tap: this is completely normal and does not mean the tap is faulty. Do not screw the taps too tightly to prevent damaging their seals. In the event of a malfunction, read the paragraph regarding the MAINTENANCE REGULATIONS.
Adjusting the operating temperature
The temperature of the water can be selected on the knob (F fig. 6) and can be adjusted from 40 to 80°C approximately. We recommend you set the temperature of the water heater to 60°C to:
- reduce the formation of limescale;
- reduce heat dispersion;
- avoid the risk of bacteria proliferation.
Anti-freeze function
If the temperatures in the room where the appliance is installed can reach particularly low values, set the knob (F fig. 6) to setting *.
The pilot lamp (A fig. 4) stays on during the heating phase.
MAINTENANCE REGULATIONS (for competent persons)

WARNING! Follow the general warnings and the safety norms listed at the beginning of the text and keep to all the instructions given under all circumstances.
All maintenance operations and service visits should be performed by a competent person (who have the skills required by the applicable norms in force).
Before performing any maintenance operations and/or replacing any components, disconnect the appliance from the electricity mains using the external switch; empty out the water heater if necessary.

See warning nos. 20 - 26 - 28
Replacing parts, when necessary
To access the electrical parts (heating element, thermostat, pilot lamp), remove the cover C by unscrewing screws D (fig. 4).
In the event of an intervention on the thermostat, disconnect the latter from the electricity mains and slide it out of its seat on the heating element. In the event of an intervention on the heating element, unscrew the bolts (A fig. 6) using a 10 mm spanner.
When remounting the components, make sure you put the flange seal, the thermostat, the heating element and all pipes back in their original position.
We recommend you replace the seal each time you dismount the flange.
Once the aforementioned operations are complete, make sure you fill the appliance with water before powering it.
Periodic maintenance
The following operations should be performed annually:
- empty the appliance and dismount the heating element;
- carefully remove all limescale from the heating element parts; if you prefer not to use acids designed especially for this purpose, use non-metallic objects to break off the limescale crust that has formed, taking care not to damage the heating element's armour.
- We recommend you replace the seal each time you dismount the heating element.
To remount the heating element, the tightening torque of the bolts (A fig. 6) should be between 7 and 10 N/m. You must respect the “criss-cross” type of tightening.
Once the aforementioned operations are complete, make sure you fill the appliance with water before powering it.
Resetting the bipolar safety
In the event of an abnormal overheating of the water, a thermal safety switch in compliance with CEI-EN norms cuts off the electrical circuit on both the power supply phases of the heating element.
To reset the operation of the appliance, proceed as follows:
- leave it to cool;
- set the knob (F fig. 6) to the maximum temperature position;
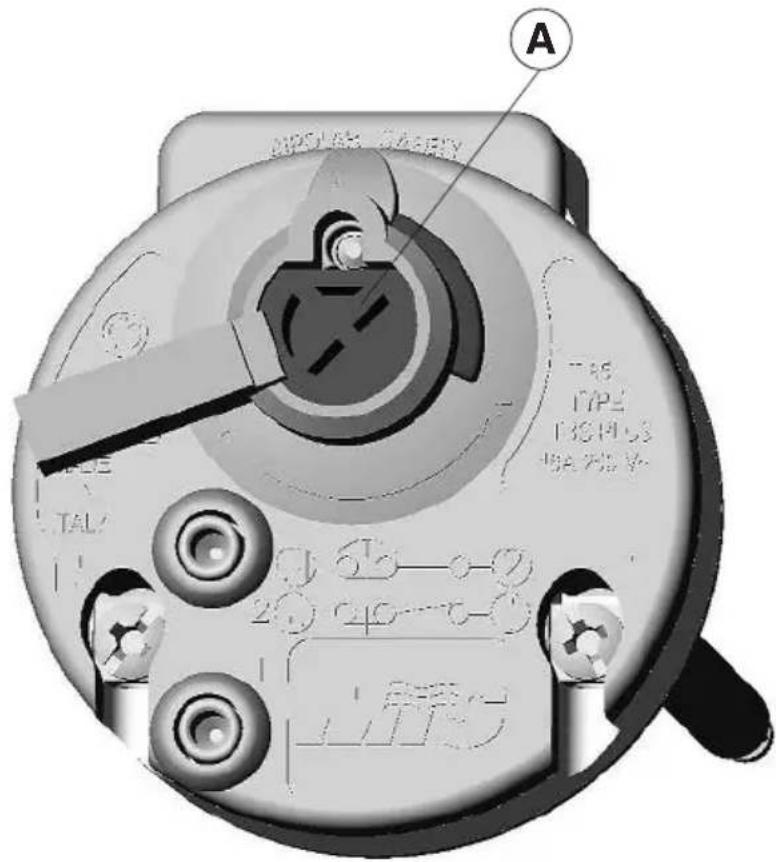
- remove the cover C by unscrewing screws D (fig. 4);
- disconnect the thermostat (T fig. 6) from the electricity mains;
- using a cross-head screwdriver, press on point A fig. 9 until you hear it click.
Remount everything in the reverse order, paying particular attention to repositioning the components correctly.
Once the aforementioned operations are complete, make sure you fill the appliance with water before powering it.
USER INSTRUCTIONS

WARNING! Follow the general warnings and the safety norms listed at the beginning of the text and keep to all the instructions given under all circumstances.
Advice for user
- Avoid positioning any objects and/or appliances that could be damaged by water leaks beneath the water heater.
- Should you not use any water for an extended period of time, you should:
disconnect the appliance from the electrical supply by switching the external switch to "OFF"; turn off the plumbing circuit taps.
- Hot water at above 50^ C flowing out of the taps at the point of use could cause serious scalds or even death from burns. Children, the disabled and the elderly are more exposed to the risk of burns.
- It is strictly forbidden for the user to perform any routine or extraordinary maintenance.
- Before calling the after-sales service centre for assistance in the event of a suspected malfunction, check first whether this is due to other causes, such as for example a temporary power failure or water shortage.
!
See warning nos. 1 - 2 - 3
!
See warning no. 4 – Contact a competent person for the replacement of the power supply cable.
!
See warning nos. 5 - 6 - 8
!
See warning no. 21 - To clean the outer parts of the appliance, use a damp cloth soaked in soapy water.
!
See warning no. 21 - To clean the outer parts of the appliance, use a damp cloth soaked in soapy water.
!
See warning nos. 22 - 23
Operation
To turn the water heater on, insert the plug into the wall socket or switch on the bipolar switch.
The pilot lamp (A fig. 4) only stays on during the heating cycle; during this time, the expanding water could cause some water to trickle from the tap: this is completely normal and does not mean the tap is faulty. Do not screw the taps too tightly to prevent damaging their seals.
The thermostat will automatically disable the heating element as soon as the selected water temperature is reached. During the final stage of heating, it is normal for a few cycles of thermostat starting and stopping to take place.
During normal operation, the electric heating element may make a little noise inside the appliance, which is due to the heat exchange; the plumbing connections may also become hot to the touch.
Adjusting the operating temperature
The temperature of the water can be selected on the knob (F fig. 6) and can be adjusted from 40 to 80°C approximately. We recommend you set the temperature of the water heater to 60°C to:
- reduce the formation of limescale;
- reduce heat dispersion;
- avoid the risk of bacteria proliferation.
GB
Anti-freeze function
If the temperatures in the room where the appliance is installed can reach particularly low values, set the knob (F fig. 6) to setting *.
The pilot lamp (A fig. 4) stays on during the heating phase.
Anti-freeze function
If the temperatures in the room where the appliance is installed can reach particularly low values, set the knob (F fig. 6) to setting *.
The pilot lamp (A fig. 4) stays on during the heating phase.
Resetting the bipolar safety
In the event of an abnormal overheating of the water, a thermal safety switch in compliance with CEI-EN norms cuts off the electrical circuit on both the power supply phases of the heating element; in this case, call the After-sales service centre for assistance.
USEFUL INFORMATION
If the water comes out cold
Have the following checked:
- that the thermostat terminals are powered;
- the thermostat thermal safety;
- the heating parts of the heating element.
If the water comes out boiling hot (steam in the taps)
Disconnect the appliance from the electricity supply and have the following checked:
- the setting and correct operation of the thermostat;
- the amount of limescale build-up in the tank and on the components.
Insufficient hot water supply
Have the following checked:
- the pressure of the water mains;
- he condition of the hot water inlet pipe;
- the electrical components.
DO NOT TRY TO REPAIR THE APPLIANCE UNDER ANY CIRCUMSTANCES: ALWAYS CONTACT PROFESSIONAL STAFF.
Ariston Thermo UK Ltd.
Artisan Building, Suite 2,
Hillbottom Road,
High Wycombe,
HP12 4HJ

This product confi rms to EU Directive 2002/96/EC.
The symbol of the crossed waste paper basket on the appliance indicates that at the end of its working life the product should be disposed of separately from normal domestic household rubbish, it must be disposed of at a waste disposal centre with dedicated facilities for electric and electronic appliances or returned to the retailer when a new replacement product is purchased. The user is responsible for the disposal of the product at the end of its life at an appropriate waste disposal centre. The waste disposal centre (using special treatment and recycling processes effectively dismantles and disposes of the appliance) helps to protect the environment by recycling the material from which the product is made.
For further information about waste disposal systems visit your local waste disposal centre or the retailer from which the product was purchased.
CONSIGNES GÉNÉRALES DE SÉCURITÉ
ATTENTION!
Raccordement hydraulique
(GB) Warning: To use mixing-tap for above sink water heater.
R = Acqua calda (rosso) Warmwasser (rot) Hot water (red) Eau chaude (rouge) Warmwater (rood) Melegvíz (piros) Teplá voda (červená) Woda gorąca (czerwony) Topla voda (crveno)
B = Acqua fredda (blu) Kaltwasser (blau) Cold water (blue) Eau froide (bleu) Koudwater (blauw) Hidegvíz (kék) Studená voda (modrá) Woda zimna (niebieski) Hladna voda (plavo)
Fig. 3
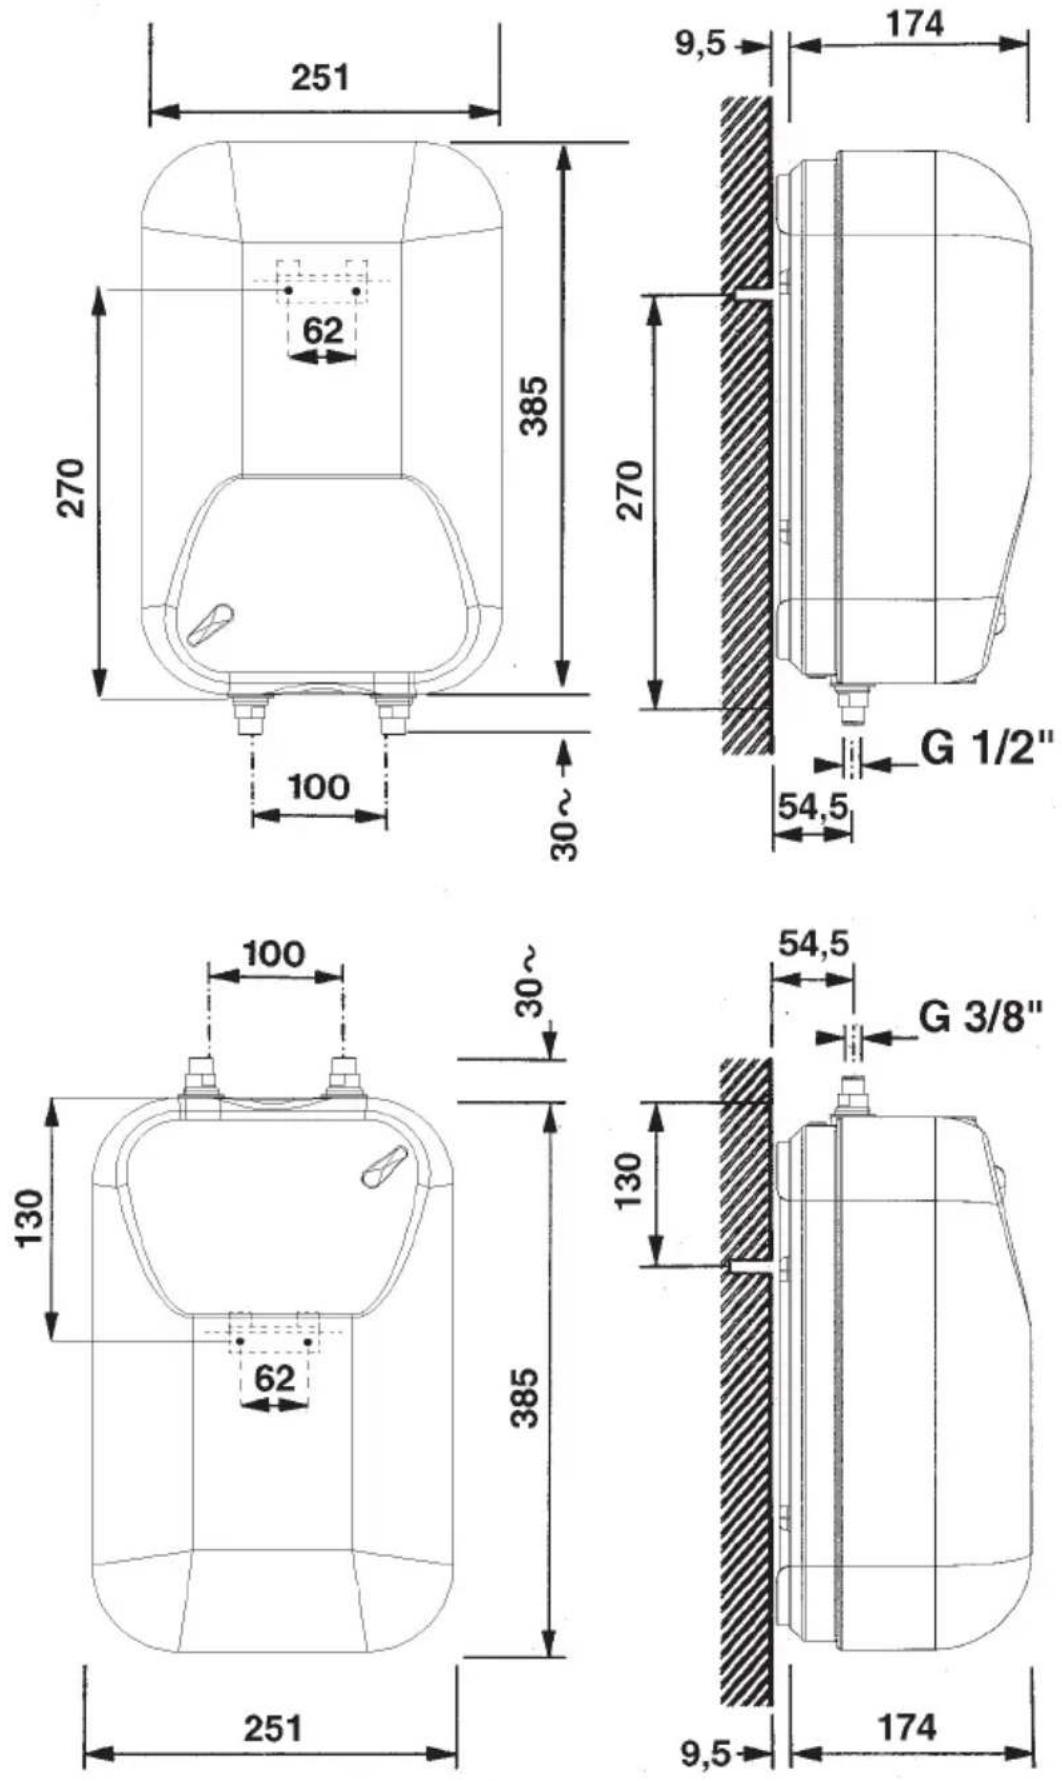
Fig. 4
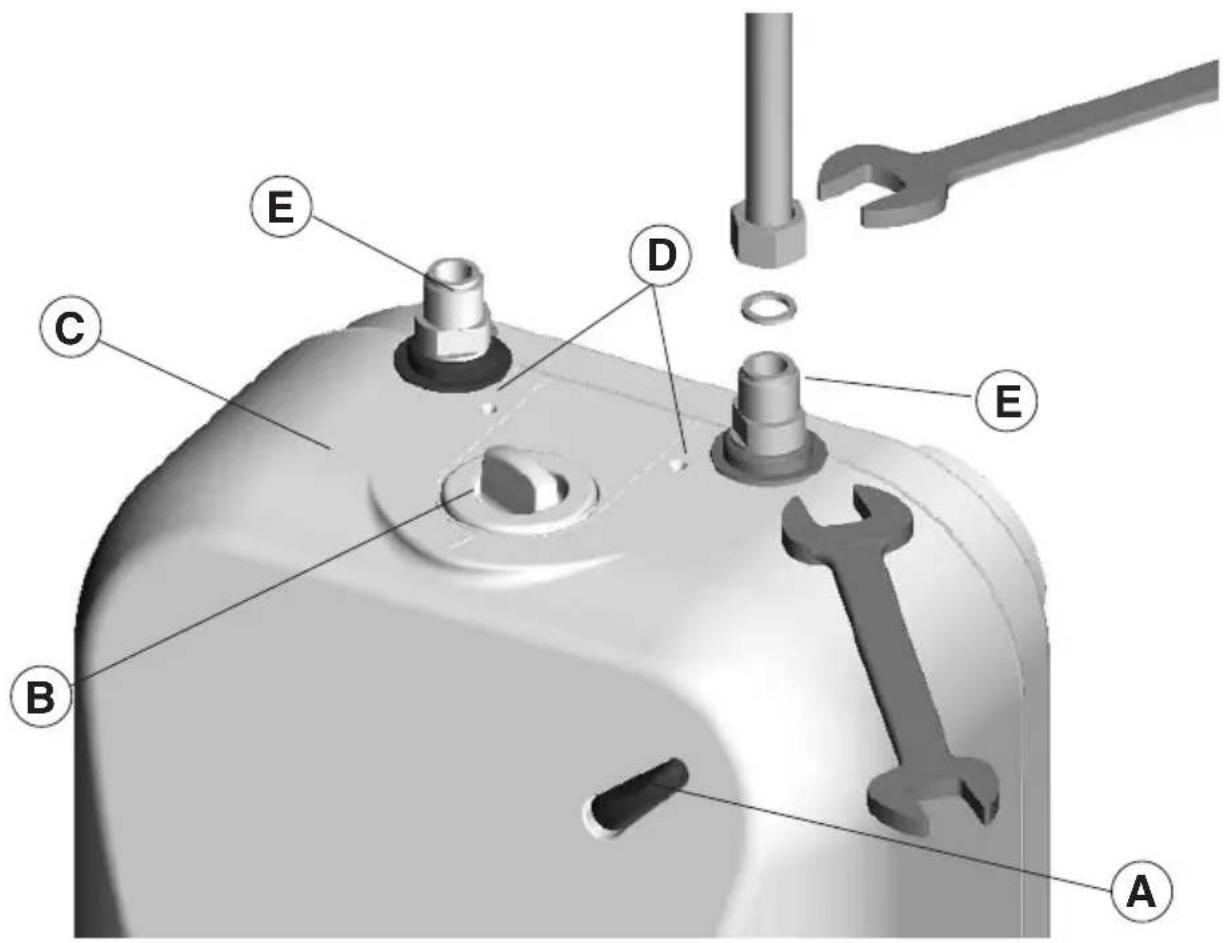
Fig. 5
natural_image
Technical line drawing of a mechanical valve assembly with a labeled component (A), no text or symbols present.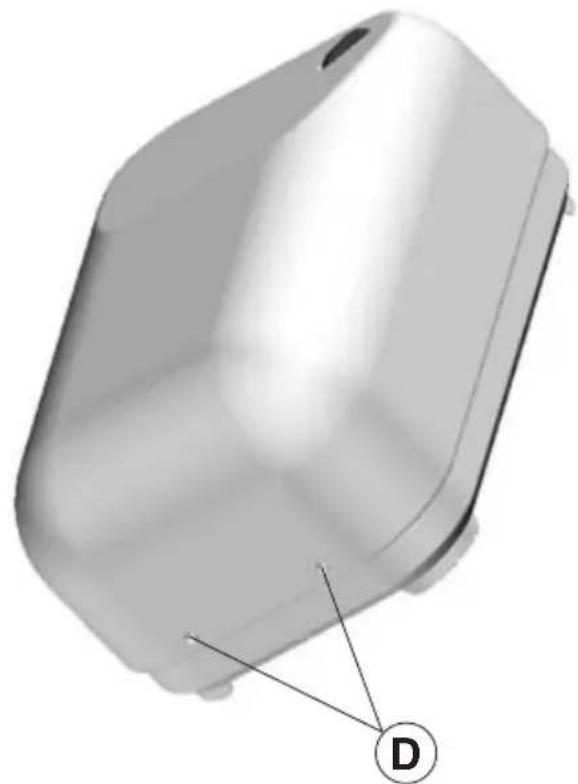
natural_image
3D rendered model of a rectangular electronic device with a labeled point D (no text or symbols on the object itself)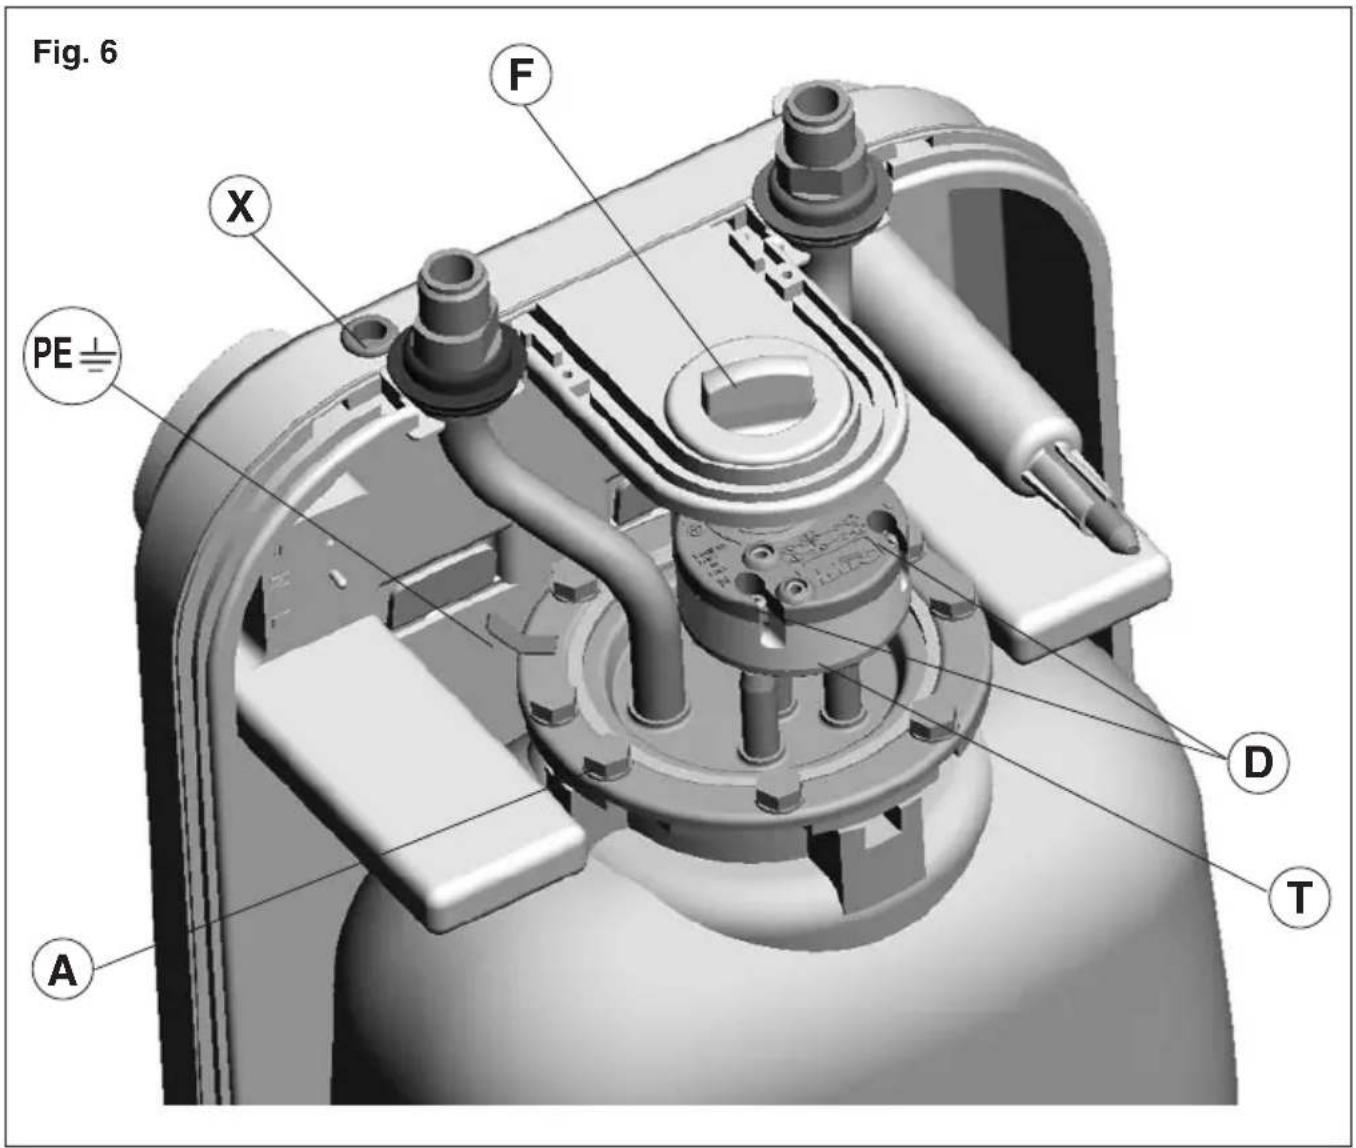
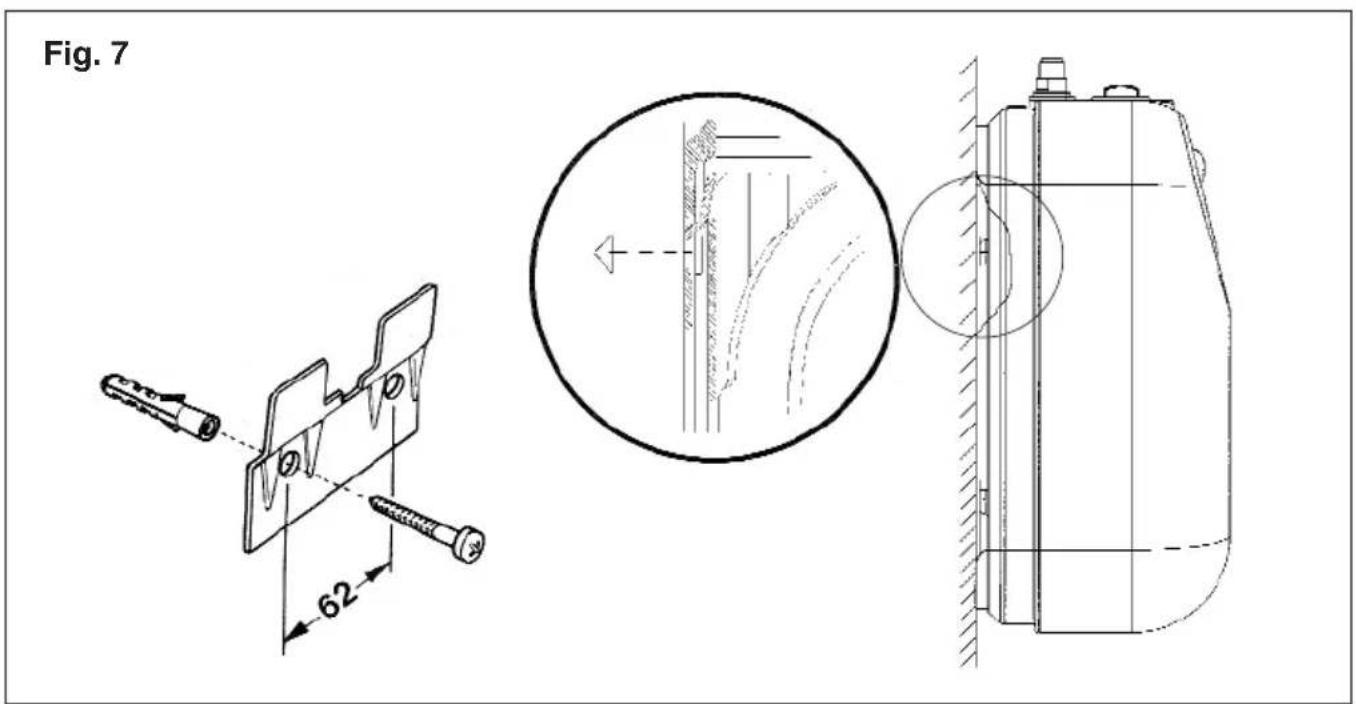
Fig. 8
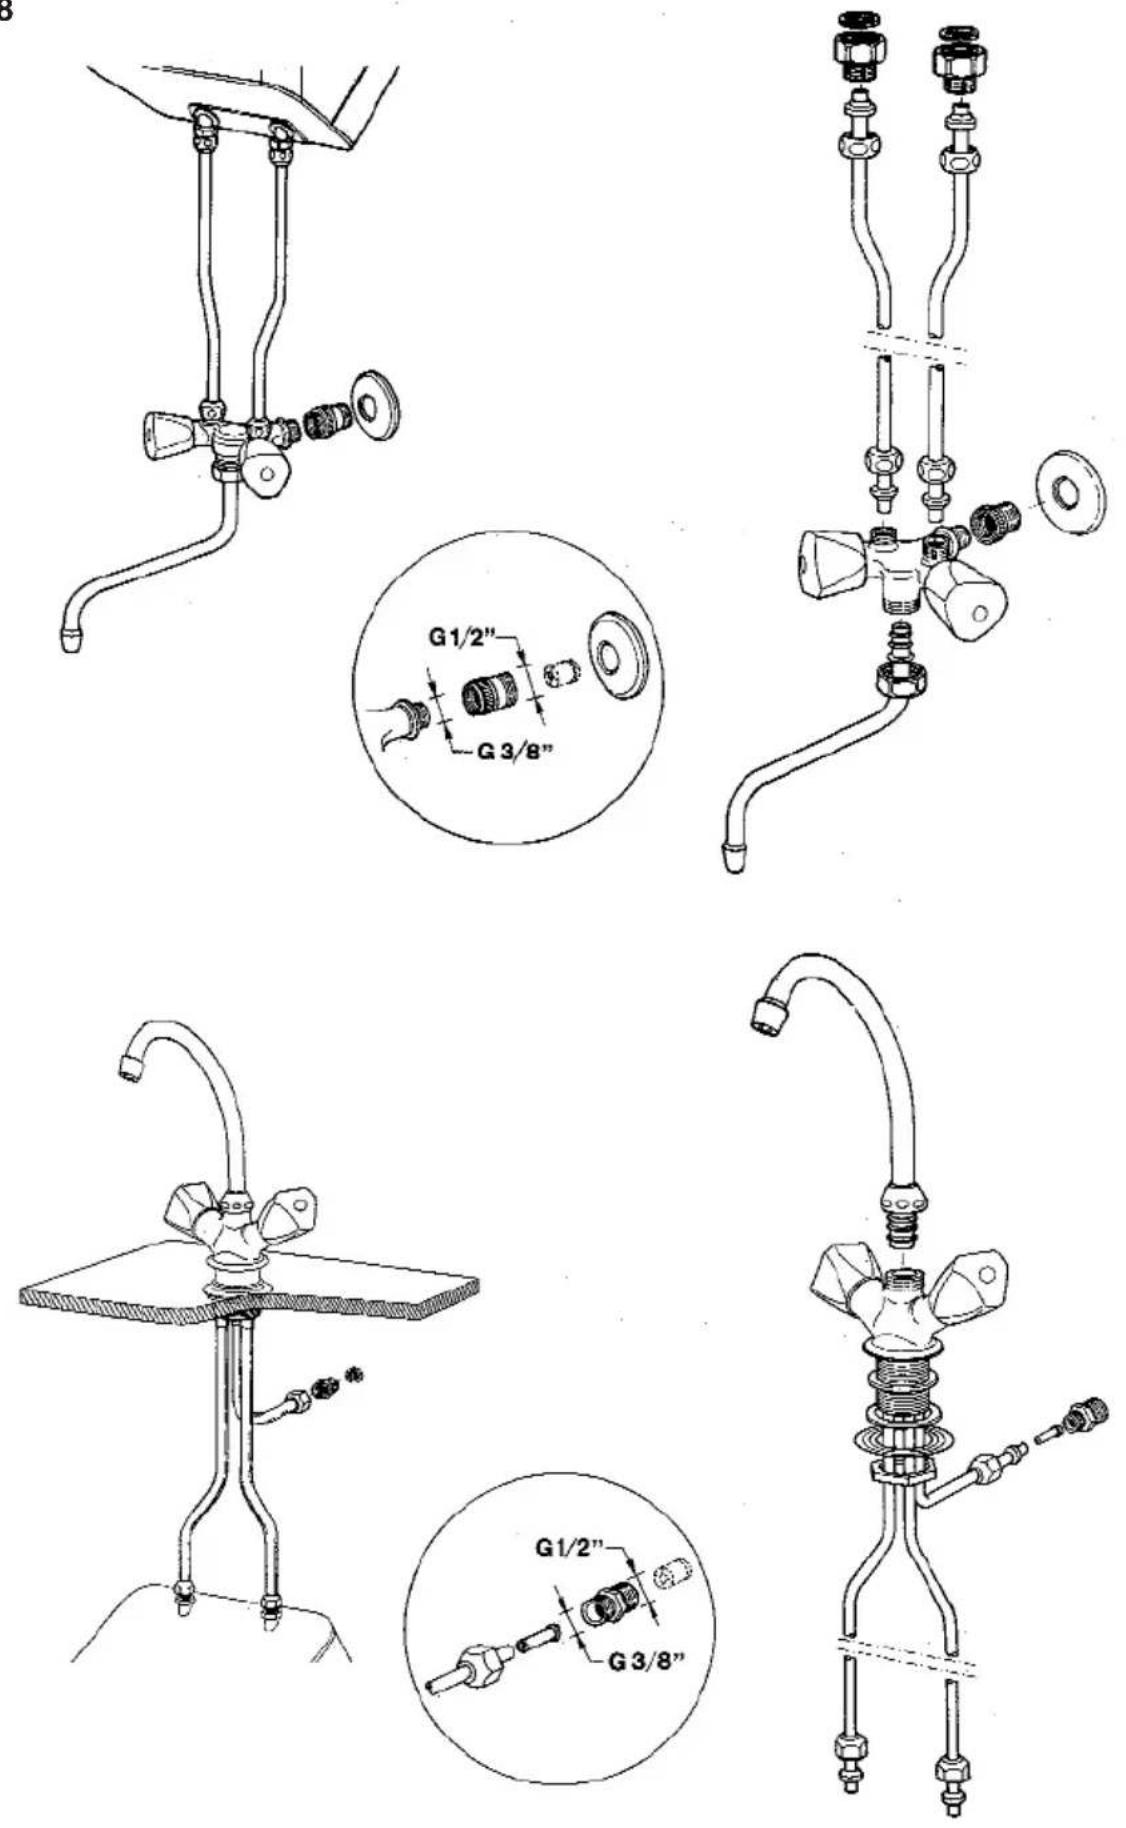
Fig. 9
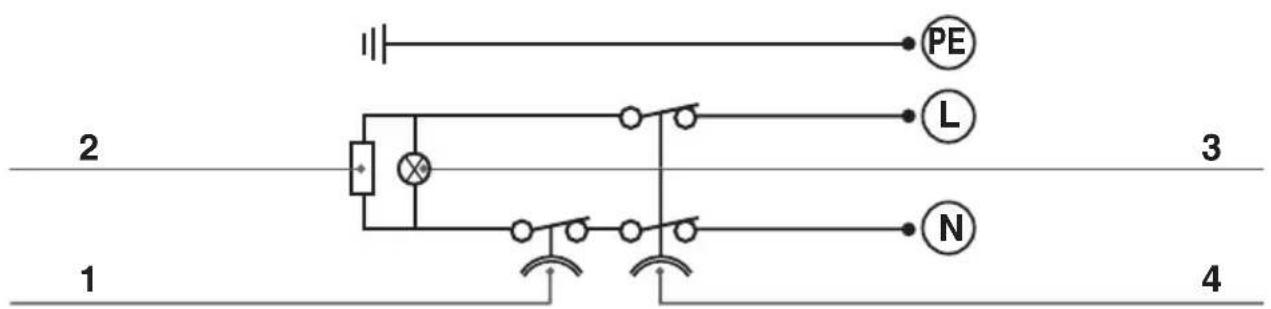
1 - Temperature regulator
2 - Heating element
3 - Indicator lamp
4 - Temperature limiter (RESET SYSTEM)


- ATTENTION!
- GENERAL SAFETY INSTRUCTIONS
- CAUTION!
- Anti-legionella recommendations (European standard CEN/TR 16355)
- Information
- General recommendations
- DESCRIPTION OF THE WATER HEATER (see fig. 4)
- TECHNICAL CHARACTERISTICS
- INSTALLATION NORMS (for the installer)
- Installing the appliance
- Plumbing connection
- Electrical connection
- GB
- Starting and testing the appliance
- Adjusting the operating temperature
- Anti-freeze function
- MAINTENANCE REGULATIONS (for competent persons)
- Replacing parts, when necessary
- Periodic maintenance
- Resetting the bipolar safety
- USER INSTRUCTIONS
- Advice for user
- Operation
- USEFUL INFORMATION
- If the water comes out cold
- If the water comes out boiling hot (steam in the taps)
- Insufficient hot water supply
- DO NOT TRY TO REPAIR THE APPLIANCE UNDER ANY CIRCUMSTANCES: ALWAYS CONTACT PROFESSIONAL STAFF.
- Ariston Thermo UK Ltd.
- This product confi rms to EU Directive 2002/96/EC.
- CONSIGNES GÉNÉRALES DE SÉCURITÉ
- Raccordement hydraulique
Brand : Ariston Thermo
Model : Piccolo
Category : Kettle