
G5 ME - Laptop GIGABYTE - Free user manual and instructions
Find the device manual for free G5 ME GIGABYTE in PDF.

| Brand | GIGABYTE |
| Model | G5 ME |
| Product type | Gaming laptop |
| Adapter input voltage | 100-240 Vac |
| Adapter input frequency | 50-60 Hz |
| Adapter output rated voltage | 20 V, 7.5 A |
| USB ports | 2x USB 3.2 Type-C, 2x USB 3.2 Type-A, 1x USB 2.0 Type-A |
| Video output | 1x HDMI, 1x Mini DisplayPort 1.4 |
| Ethernet port | 1x RJ-45 (LAN) |
| Audio | Combo audio jack (microphone/headphone), built-in speakers, built-in microphone |
| Card reader | Micro SD card reader |
| Webcam | Built-in HD webcam with indicator light |
| Battery | Lithium-ion, not user-replaceable – contact support for replacement |
| Keyboard | Backlit keyboard with LED keys and function keys (Fn) |
| Touchpad | Multi-touch touchpad with enable/disable via Fn+F1 |
| Special functions | Airplane mode, sleep, display switch, brightness and volume control, webcam enable/disable, auto/full-speed fan mode, Flexikey® |
| System recovery | Hidden partition with factory image, restore via F9 at startup, Reset this PC or Smart Recovery option |
| Recovery disk creation | Via Smart USB Backup application, requires a USB drive of at least 32 GB |
| Maximum storage temperature | 45 °C |
| Electrical compatibility | Power adapter with mandatory grounding |
Frequently Asked Questions - G5 ME GIGABYTE
User questions about G5 ME GIGABYTE
0 question about this device. Answer the ones you know or ask your own.
Ask a new question about this device
Download the instructions for your Laptop in PDF format for free! Find your manual G5 ME - GIGABYTE and take your electronic device back in hand. On this page are published all the documents necessary for the use of your device. G5 ME by GIGABYTE.
USER MANUAL G5 ME GIGABYTE
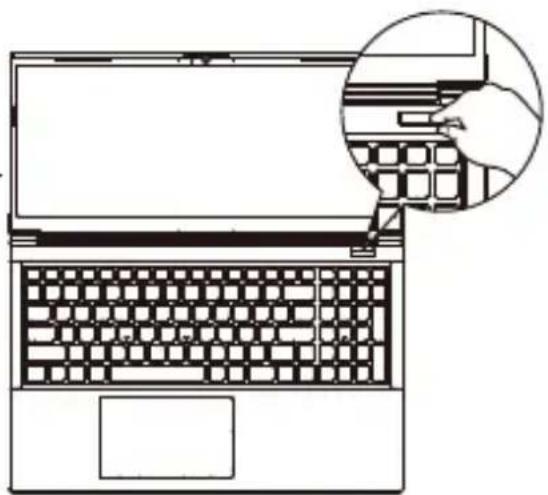
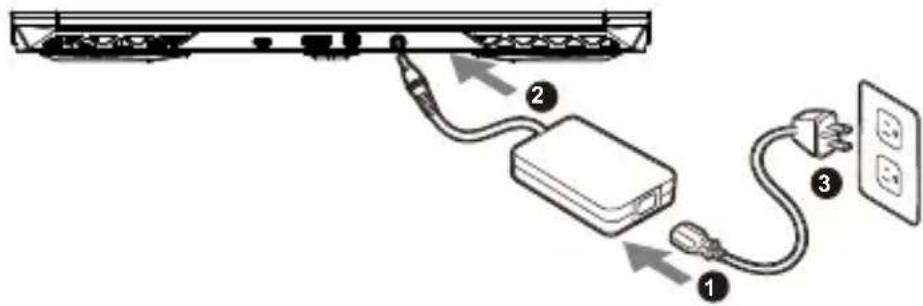
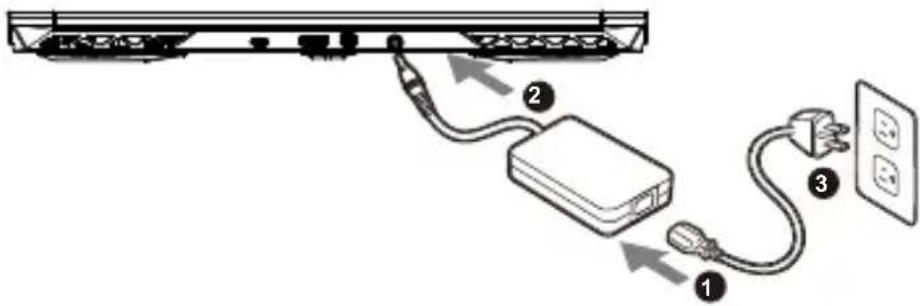
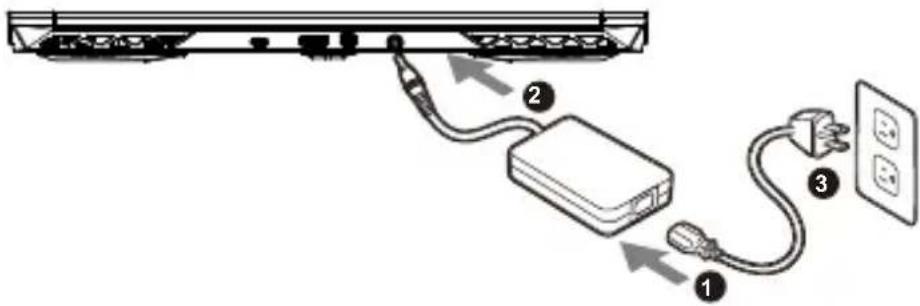
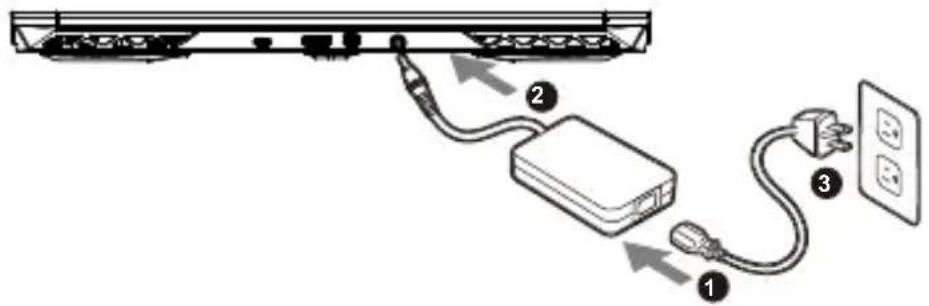
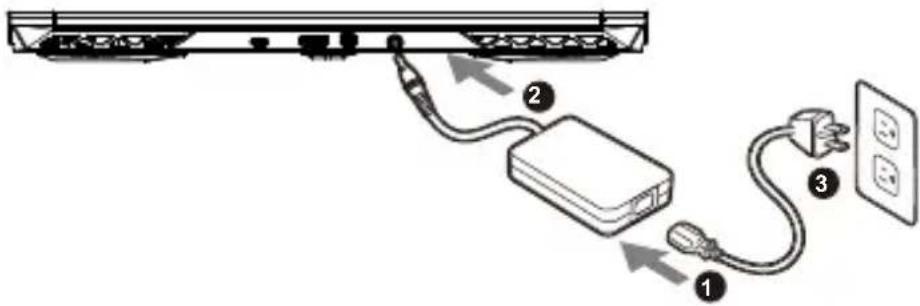
1 Connect the power cord to the AC adapter.
2 Connect the adapter to the Power (DC) Input Port on the notebook.
3 Connect the power cord to the power outlet.
Switching on the Power
After you turn on the notebook for the very first time, do not turn it off until the operating system has been configured. Please note that the volume for the audio will not function until Windows® Setup has completed.
natural_image
Line drawing of a laptop keyboard with an inset showing a hand typing on the keyboard (no text or symbols present)
IMPORTANT:
- Ensure that your Notebook PC is connected to a grounded power adapter before turning it on for the first time.
- When using your Notebook PC on power adapter mode, the socket outlet must be near to the unit and easily accessible.
- Locate the input/output mark on your Notebook PC and ensure that it matches the input/output rating information on your power adapter. Some Notebook PC models may have multiple rating output currents based on the available SKU.
• Power adapter information: - Input voltage: 100-240Vac
- Input frequency: 50-60Hz
- Rating output voltag: 20V, 7.5A
* Product specifications and product appearance may differ from country to country. We recommend that you check with your local dealers for the specifications and appearance of the products available in your country.
* Although we endeavor to present the most accurate and comprehensive information at the time of publication, we reserve the right to make changes without prior notice.
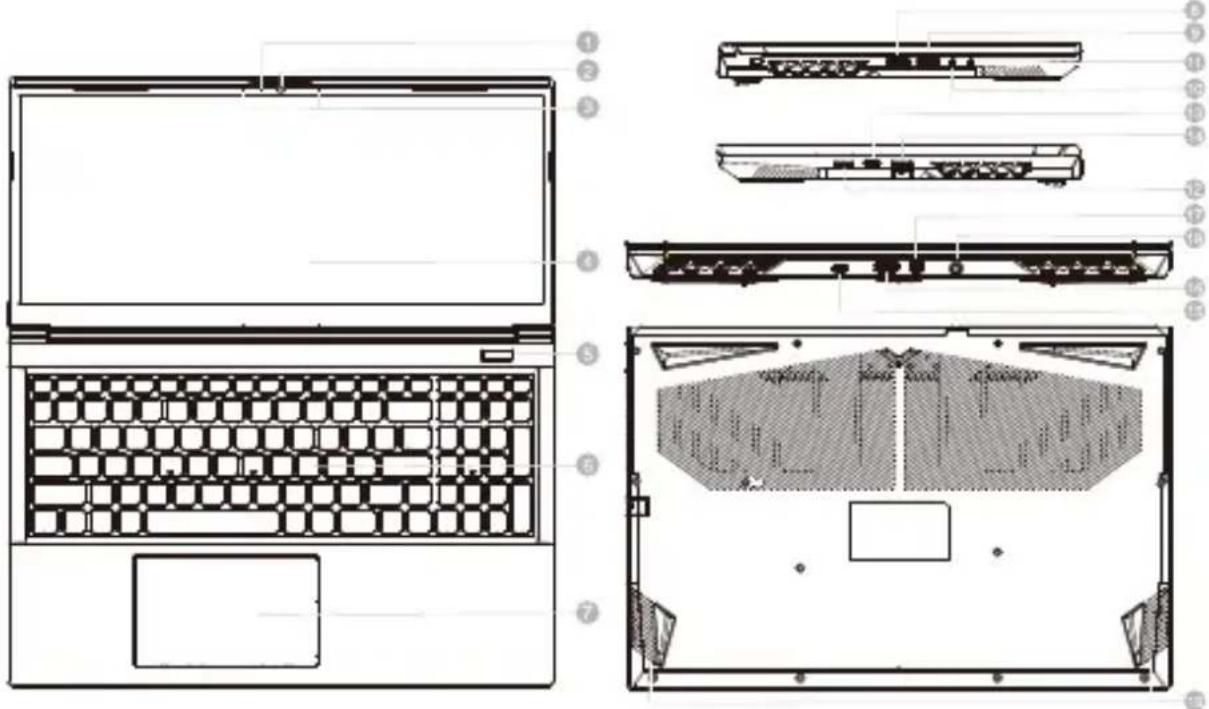
1 Webcam Indicator
2 Webcam
3 Microphone USB 3.2 Port (USB type-C)
4 Display Panel Ethernet Port (LAN)
5 Power Button USB 3.2 Port (USB type-C)
6 Keyboard HDMI Port
7 Touchpad Mini DisplayPort 1.4
8 USB 3.2 Port (USB type-A) Power Input (DC)
9 USB 2.0 Port (USB type-A) Speakers
10 Microphone-In Jack
11 Audio Combo Jack
MicroSD Card Reader


IMPORTANT:
- Do not remove the built-in lithium battery. For any service needs, please contact your local GIGABYTE Authorized Service Center.
- Do not install the Notebook PC on a slant or a place prone to vibrations, or avoid using the Notebook PC in that location for a long time. This increases the risk that a malfunction or damage to the product will occur.
- Do not store and use Notebook PC in direct sunlight or the location where temperatures exceed 112°F (45°C) such as inside a vehicle. There is a danger of Lithium-ion battery expansion and aging.
- Do not use the Notebook PC in a badly ventilated location such as on bedding, on a pillow or cushion, etc, and do not use it in a location such as room with floor heating as it may cause the computer to overheat. Take care that the Notebook PC vents (on the side or the bottom) are not blocked especially in these environments. If the vents are blocked, it may be dangerous and cause the Notebook PC to overheat.
Hotkeys
The computer employs hotkeys or key combinations to access most of the computer's controls like screen brightness and volume output. To activate hotkeys, press and hold the
Hotkey Description
| Fn +~ Play / Pause(in Audio/Video Programs) | ||
| Fn + F1 Touchpad Toggle | ||
| Fn + F2 | Turn LCD Backlight OFF(Press a key to or use Tochpad to turn on) | |
| Fn + F3 Mute Toggle | ||
| Fn + F5/F6 Volume Decrease/Increases | ||
| Fn + F7 Display Toggle | ||
| Fn + F8/F9 Brightness Decreases/Increases | ||
| Fn + F10 PC Camera Power on and off | ||
| Fn + F11 Airplane Mode Toggle | ||
| Fn + F12 Sleep Toggle | ||
| NumLK Number Lock Toggle | ||
| Fn+ ScrLK Scroll Lock Toggle | ||
| Caps Lock Caps Lock Toggle | ||
| Fn+ Esc Control Center Toggle | ||
| Fn+ ! Fan Automatic Control / Full Power | ||
| Fn + Backspace Disable/Enable Flexikey® | ||
Fn +  | Power Modes Toggle | |
Fn +  | Launch the LED Keyboard Application | |
Fn +  | Toggle the Keyboard LED On/Off | |
Fn +  | Keyboard LED Illumination Decrease | |
Fn +  | Keyboard LED Illumination Increase | |

WARNING
- You can backup original recovery image through this application in case of losing by device damage.
- You can backup original recovery image to USB Flash Drive and restore the system if any storage system replacement with the recovery USB Flash Drive.
- Before you restore the system through the recovery USB Flash Drive, please make sure that you have already made the backup of your data.
- Please DO NOT shut down or un-plug the system when performing backup through recovery USB Flash Drive.
1

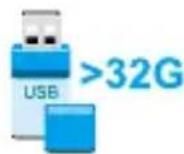
- Please plug in the USB Flash Drive which is at least 32GB in capacity to make the original image (backup the data in USB first. All data will be eliminated during the creation of recovery USB Flash disk)
2

- Insert the driver disk to your optical drive and run the install of "Smart USB Backup" (for none-ODD model, please use USB ODD device or download from http://www.gigabyte.com
3

- Run the "Smart USB Backup" after finishing the install.
4
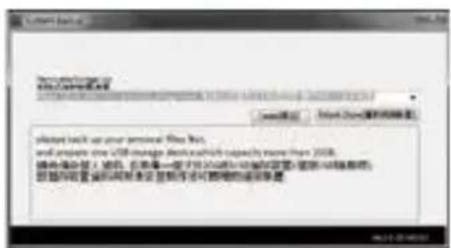
- Select your USB Flash disk from the drop-down list and start to create the recovery USB disk.
5
- The window will pop out when the creation of recovery disk is done.
- Please press F12 on starting the system when you need to restore the system. Select"boot from recovery USB disk" and the system will be restored.
- The time needed for restore will be around 30 mins(time needed may vary by USB disk model).
System Recovery (Restore your laptop operating system)
When something is going wrong with the laptop operating system, the storage of the laptop has a hidden partition containing a full back up image of the operating system that can be used to restore the system to factory default settings.

Note
- If the storage has been switched or the partition deleted, the recovery option will no longer be available and a recovery service will be needed.
- The recovery function is only available on devices with O/S preinstalled. Devices with EFI SHELL do not have the recovery function.
Launch System Recovery
The system recovery feature is preinstalled before the laptop is shipped from the factory. The option menu allows you to launch the Windows recovery tool to reinstall the operating system to factory default.
The brief introduction below will show you how to start the recovery tool and restore your system.

All ready to go
Make sure your PC is plugged in. This will take a few minutes.
Recovery Guide
1 Turn off and restart the laptop.
2

During the laptop turn on process, press and hold F9 key to launch the tool.
3

Choose "Troubleshoot" to enter the recovery settings.
(Also you can choose "Continue" to exit recovery system and continue to System for files or data backup.)

There are two options for system recovery
- Reset this PC
You can choose to keep or remove your files and then reinstalls Windows without losing your files. - Smart Recovery
Your PC settings will be restored to factory default settings.
Caution: All personal data and files will be lost.
4

Smart Recovery
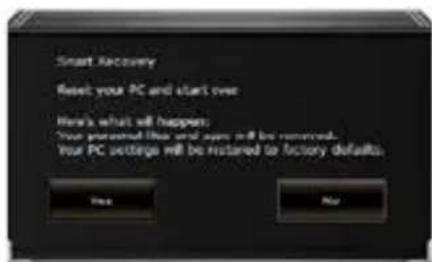
The recovery will be activated and you will see the option buttons on the window. Click on "Yes" to start it.

Caution
- Once the "Recovery" is selected, your personal data and files will be deleted after the laptop starts restoring, and the operating system will be reset to factory default settings.
- A progress indicator bar will show on the window when the recovery process is running. Please make sure the AC-adapter is plugged in and do not turn off the laptop.
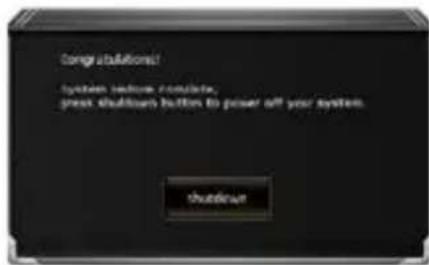
After the system recovery is completed, you will see the option button on the window, please click on "Shutdown".
5

Advanced options

System Restore
Use a restore point recorded on your PC to restore Windows.
System Image Recovery
Recover Windows using a specific system image file.

Startup Repair
Fix problems that keep Windows from loading.

Command Prompt
Use the Command Prompt for advanced trobleshooting.

UEFI Firmware Settings
Change settings in your PC's UEFI firmware.

Startup Settings
Change Windows Startup behavior.
Appendix
■ Warranty & Service :
Warranty and service and related information please refer to the warranty card or GIGABYTE service website as the below link:
https://www.gigabyte.com/Support/Laptop
■ FAQ :
FAQ(Frequent Asked Questions) please refer to the below link:
https://www.gigabyte.com/Support/Faq
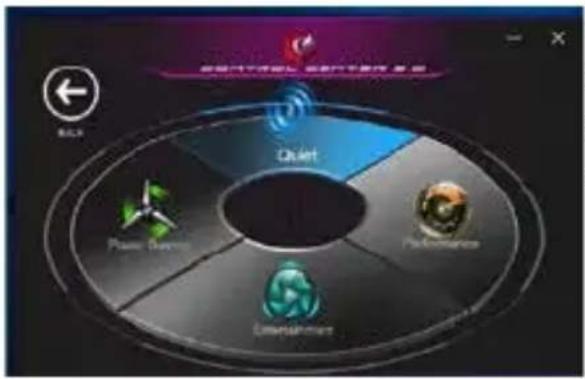
Control Center Application
The Control Center application is a quick computer configuration application, which allows you to change power mode, set keyboard backlight and assign a single key to launch multiple key combinations.

Control Center Overview
- Power Modes
- LED Keyboard
- Flexikey
- FAN speed control
1 Power Modes
To set different power mode.
flowchart
graph TD
    A["Quhart"] --> B["Power Division"]
    A --> C["Performance"]
    A --> D["Detection Hardware"]
    style A fill:#f9f,stroke:#333
    style B fill:#ccf,stroke:#333
    style C fill:#cfc,stroke:#333
    style D fill:#fcc,stroke:#333
- Quiet
- Performance
- Entertainment
- Power Saving
2 LED Keyboard
To set keyboard backlight.

- Keyboard Backlit: The buttons surrounding the swatch allow you to alter the keyboard backlit.
- Keyboard Sleep timer : enter the value to set backlit sleep timer.
- Brightness : to set the brightness of keyboard backlight.
3
Flexikey®
The Flexikey® application is a quick hotkey configuration application. It allows you to assign a single key to launch multiple key combinations, programs and applications. You also can create text macros and disable certain keys. The application can also be used to configure the mouse buttons and create hotkeys for gaming.
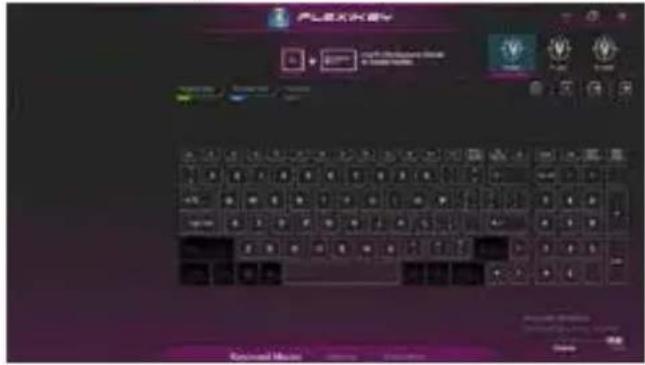
Flexikey® Overview
- Profile
- Keyboard Macro
- Statistics
- Mouse Macro
- Disable/Enable
Keyboard Macro
You can set macro on every keycap except the black key here. Just click the key you want to set macro and it will pop out the macro assign page.
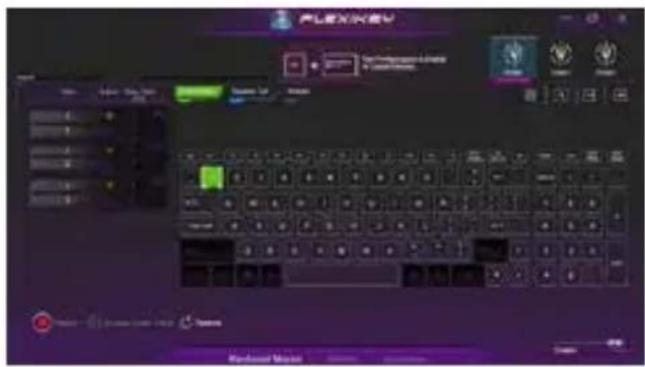
- Name:naming the macro profile
- Action Type
- Start Record
- Enable Delay Time
- Restore
Setting Steps :
a.Choose an action key "each key", the name can be edited by "1"
b.Choose an action type by "2"
c.Choose "EXPRESS KEY" as an action type if you want to set a macro key. Then click "3" to start record and press again to stop it.
Statistics
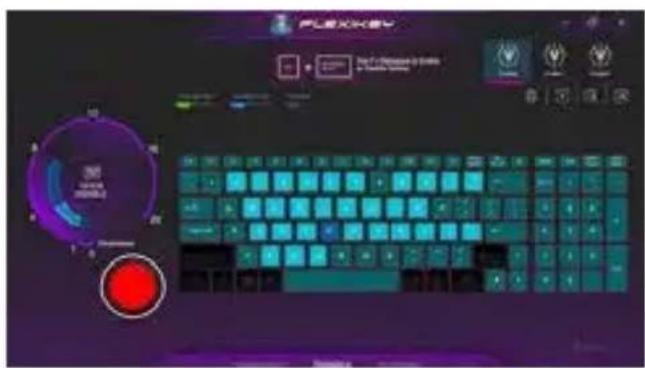
1. Start Record
Click to start recording the frequency of key presses.
Different colors will represent the frequency of key presses, purple is the most frequent through to green is the less frequent.
2. Quick Disable
The color bar at left side of the screen, displays the color code against the number of key presses. click to disable the color which corresponds to the keys you wish to disable, all disabled keys will then change to gray.
Mouse Macro
You can set macro on every mouse key cap here. Just click the key you want to set macro and it will pop out the macro assign page.
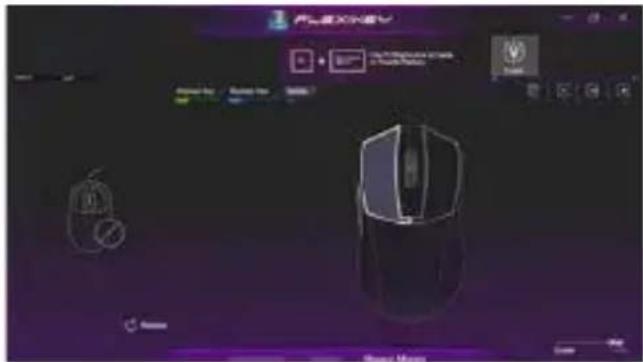
- Name: naming the macro profile
- Action Type
- Start Record
- Enable Delay Time
- Restore
Setting Steps :
a. Choose an action key "each key", the name can be edited by "1"
b. Choose an action type by "2"
c. Choose "EXPRESS KEY" as an action type if you want to set a macro key. Then click "3" to start record and press again to stop it.
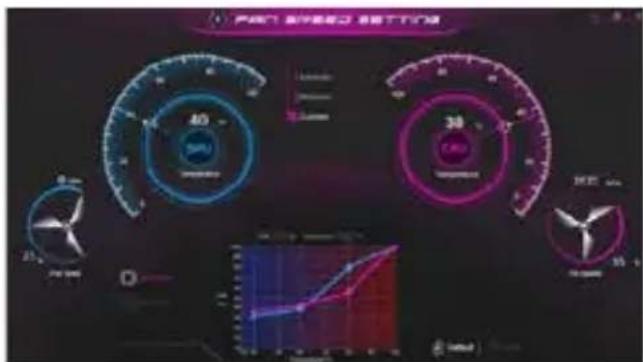
FAN speed control
You can set fan speed on here.
natural_image
Line drawing of a laptop keyboard with a hand inserting a key (no text or symbols)تشغيل الطاقة
https://www.gigabyte.com/Support/Laptop
الأستلة الشائعة:
https://www.gigabyte.com/Support/Faq

natural_image
Line drawing of a laptop keyboard with a hand inserting a key (no text or symbols)
ВАЖНО
1Индикатор на уеб камерата Комбиниран аудиопорт
2Уеб камерата
Четец на карти MicroSD
3Микрофон USB 3.2 порт (USB type-C)
4 Панел на дисплея Ethernet порт (LAN)
5 Бутон за включване и изключване
15 USB 3.2 порт (USB type-C)
6Клавиатура HDMI порт
7Тъчпад Mini Display порт 1.4
8USB 3.2 порт (USB type-A) Вход за захранване (DC)
9USB 2.0 порт (USB type-A) Високоговорител
10Вход за микрофон


ВАЖНО
https://www.gigabyte.com/Support/Laptop
https://www.gigabyte.com/Support/Faq
natural_image
Line drawing of a laptop keyboard with an inset showing a hand inserting a key (no text or symbols present)
DŮLEŽITÉ
https://www.gigabyte.com/Support/Laptop
■ Časté otázky:
https://www.gigabyte.com/Support/Faq

natural_image
Line drawing of a laptop keyboard with a hand inserting a key (no text or symbols)
WICHTIG
- The window will pop out when the creation of recovery disk is done.
- Please press F12 on starting the system when you need to restore the system. Select "boot from recovery USB Flash Drive" and the system will be restored."
- The time needed for restore will be around 30 mins (time needed may vary by USB disk model).
natural_image
Line drawing of a laptop keyboard with a hand inserting a component (no text or symbols)
ΣΗΜΑΝΤΙΚΟ
https://www.gigabyte.com/Support/Laptop
https://www.gigabyte.com/Support/Faq
natural_image
Line drawing of a laptop keyboard with a hand inserting a key (no text or symbols)
IMPORTANTE
https://www.gigabyte.com/Support/Laptop
natural_image
Line drawing of a laptop keyboard with a hand inserting a key (no text or symbols)
TÄHTIS
1 Veebikaamera märgutuli Audio ühendpesa
2 Veebikaamera
3 Mikrofon USB 3.2 port (USB type-C)
4 Kuvaripaneel Etherneti port (LAN)
5 Toitenupp USB 3.2 port (USB type-C)
6 Klaviatuur HDMI port
7 Puuteplaat Mini Display port 1.4
8 USB 3.2 port (USB type-A) Toite sisendpesa (DC)
9 USB 2.0 port (USB type-A) Kõlar
10 Mikrofoni sisenpesa


TÄHTIS
https://www.gigabyte.com/Support/Laptop
■ KKK
https://www.gigabyte.com/Support/Faq
natural_image
Line drawing of a laptop keyboard with a hand inserting a small component (no text or symbols)
IMPORTANT
System Image Recovery
■ Foire Aux Questions:
natural_image
Line drawing of a laptop keyboard with a hand inserting a key (no text or symbols)בַרְשָׁה בַרְשָׁה

: כְרָה

GIGABYTE
| Fn +~ | (###/###) ###/### | |
| Fn + F1 | ###/###/### | |
| Fn + F2 | LCD-### ####### ####### (### ####### ####### #######) | |
| Fn + F3 | ###/###/###/### | |
| Fn + F5/F6 | ###/###/###/### | |
| Fn + F7 | ###/###/###/### | |
| Fn + F8/F9 | ###/###/###/### | |
| Fn + F10 | ###/###/###/### | |
| Fn + F11 | ###/###/###/### | |
| Fn + F12 | ###/###/###/### | |
| NumLK | ###/###/###/### | |
| Fn+ ScrLK | ###/###/###/### | |
| Caps Lock | ###/###/###/### | |
| Fn+ Esc | ###/###/###/### | |
| Fn+ ! | ###/###/###/###/### | |
| Fn + Backspace | Flexikey® ###/######/###### | |
| Fn + |  | ###/######/###### |
| Fn + |  | LED ###/######/###### |
| Fn + |  | ###/######/######/###### |
| Fn + |  | ###/######/######/###### |
| Fn + |  | ###/######/######/###### |

תְרָה
https://www.gigabyte.com/Support/Laptop
: כְרָה לַלְא
: אַרְשָׁוֹתִי, אַרְשָׁוֹתִי, אַרְשָׁוֹתִי, אַרְשָׁוֹתִי,
https://www.gigabyte.com/Support/Faq

natural_image
Line drawing of a laptop keyboard with an inset showing a hand interacting with the keyboard (no text or symbols present)
FONTOS
11 Audió kombinált jack-aljzat
MicroSD kártyaolvasó
The Ground Truth image displays a single, solid horizontal line. According to Rule 2 (UNDERSCORE & LINE RULES), this is a stylistic or background line, not a placeholder underscore. Therefore, the OCR result must ignore it and output nothing or only meaningful text. The provided OCR content is "____", which consists of four underscores. This is an incorrect interpretation of the line as a placeholder, violating the rule that stylistic lines must be ignored. The OCR has hallucinated placeholder underscores where none exist in the GT, violating the rule to ignore such lines. Hence, the OCR result is inconsistent with the Ground Truth.
SB „C” típusú)
HDMI
18 Tápfeszültség bemeneti aljzat (DC)

FONTOS
https://www.gigabyte.com/Support/Laptop
■ GYIK:
https://www.gigabyte.com/Support/Faq
natural_image
Line drawing of a laptop keyboard with a hand inserting a key (no text or symbols)
重要
https://www.gigabyte.com/jp/Support/Laptop
■よくある質問
natural_image
Line drawing of a laptop keyboard with a hand inserting a key (no text or symbols)
중요
https://www.gigabyte.com/kr/Support
■자주 묻는 질문
https://www.gigabyte.com/kr/Support/Faq
natural_image
Line drawing of a laptop keyboard with a hand inserting a key (no text or symbols)
SVARBU!
https://www.gigabyte.com/Support/Laptop
■ DUK:
https://www.gigabyte.com/Support/Faq
natural_image
Line drawing of a laptop keyboard with an inset showing a hand inserting a key (no text or symbols present)
SVARİGI
https://www.gigabyte.com/Support/Laptop
■ BUJ:
https://www.gigabyte.com/Support/Faq

natural_image
Line drawing of a laptop keyboard with an inset showing a hand typing on the keyboard (no text or symbols present)
BELANGRIJKE INFORMATIE
https://www.gigabyte.com/Support/Laptop
https://www.gigabyte.com/Support/Faq

natural_image
Line drawing of a laptop keyboard with an inset showing a hand interacting with the keyboard (no text or symbols present)
WAŻNE
11 Gniazdo audio combo
Czytnik kart microSD
The Ground Truth image displays a single, solid horizontal line. According to Rule 2 (UNDERSCORE & LINE RULES), this is a stylistic or background line, not a placeholder underscore. Therefore, the OCR result must ignore it and output nothing or only meaningful text. The provided OCR content is "____", which consists of four underscores. This is an incorrect interpretation of the line as a placeholder, violating the rule that stylistic lines must be ignored. The OCR has hallucinated placeholder underscores where none should exist in the GT. Hence, the OCR result is inconsistent with the Ground Truth.
HDMI
The Ground Truth image displays a single, solid horizontal line. According to Rule 2 (UNDERSCORE & LINE RULES), this is a stylistic or background line, not a placeholder underscore. Therefore, the OCR result must ignore it and output nothing or only meaningful text. The provided OCR content is "____", which consists of four underscores. This is an incorrect interpretation of the line as a placeholder, violating the rule that stylistic lines must be ignored. The OCR has hallucinated placeholder underscores where none should exist in the GT. Hence, the OCR result is inconsistent with the Ground Truth.
18 Gniazdo wejścia zasilania (Prąd stały)

WAŻNE
https://www.gigabyte.com/Support/Laptop
■ FAQ:
natural_image
Line drawing of a laptop keyboard with a hand inserting a key (no text or symbols)
IMPORTANTE
1 Indicador da câmara web
2 Câmara web
3 Microfone Porta USB 3.2 (USB tipo
4 Monitor Porta Ethernet (LAN)
5 Botão de energia Porta USB 3.2 (USB tipo C)
6 Teclado Porta HDMI
7 Touchpad Porta Mini Display 1.4
8 Porta USB 3.2 (USB tipo A)
9 Porta USB 2.0 (USB tipo A) Altifalante
10 Tomada de entrada para microfone
11 Tomada de áudio combinada
natural_image
Line drawing of a laptop keyboard with an inset showing a hand interacting with the keyboard (no text or symbols present)
IMPORTANT
https://www.gigabyte.com/Support/Laptop
■ ÎNTREBĂRI FRECVENTE:
https://www.gigabyte.com/Support/Faq

natural_image
Line drawing of a laptop keyboard with an inset showing a hand typing on the keyboard (no text or symbols present)
ВНИМАНИЕ
natural_image
Line drawing of a laptop keyboard with a hand inserting a key (no text or symbols)
重要
natural_image
Line drawing of a laptop keyboard with a hand inserting a key (no text or symbols)
VAŽNO
- Uverite se da je vaš notebook računar povezan sa uzemljenim adapterom za napajanje pre nego što ga prvi put uključite.
- Kada koristite notebook računar u režimu adaptera za napajanje, strujna utičnica mora biti blizu uređaja i lako dostupna.
- Pronađite oznaku sa ulaznom/izlaznom specifikacijom na notebook računaru i uverite se da se slaže sa informacijama o ulaznoj/izlaznoj specifikaciji na adapteru za napajanje. Neki modeli notebook računara možda imaju više specifikacija izlazne struje, na osnovu dostupnog SKU-a.
• Informacije o adapteru za napajanje: - Ulazni napon : 100-240 Vac
- Ulazna frekvencija : 50-60 Hz
- Specifikacija izlaznog napona : 20V, 7.5A
1 Indikator veb-kamere
2Veb-kamera
3Mikrofon USB 3.2 port (USB tip C)
4Ekran Mrežni port(LAN)
5Dugme za napajanje USB 3.2 port (USB tip C)
6Tastatura HDMI port
7Tačped Mini DisplayPort 1.4
8USB 3.2 port (USB tip A)
9USB 2.0 port (USB tip A) Zvučnik
10Ulazni priključak za mikrofon
11 Kombinovani audio priključak
Nakon završetka oporavka sistema, u prozoru ćete videti dugme opcije, kliknite na „lsključivanje“.
5

Napredne opcije

Oporavak sistema
Koristite tačku vraćanja snimljenu na računaru za oporavak operativnog sistema Windows.

Oporavak pomoću slike sistema
https://www.gigabyte.com/Support/Faq
natural_image
Line drawing of a laptop keyboard with a hand inserting a key (no text or symbols)
重要
Control Center 應用程式概觀
natural_image
Line drawing of a laptop keyboard with an inset showing a hand typing on the keyboard (no text or symbols present)
ÖNEMLİ
1 Web Kamerası Göstergesi
2 Web kamerasi
natural_image
Line drawing of a laptop keyboard with a hand inserting a key (no text or symbols)
ВАЖЛИВО
1 Індикатор веб-камери
2Веб-камера
3Мікрофон Порт USB 3.2 (USB type-C)
4 Панель дисплея Порт Ethernet (LAN)
5Кнопка живлення Порт USB 3.2 (USB type-C)
6Клавіатура Порт HDMI
7 Сенсорна панель Порт Mini Display 1.4
8 Порт USB 3.2 (USB type-A)
9 Порт USB 2.0 (USB type-A)
10Контакт входу мікрофону
C)
J)
B type-C)
m = 311
m = 311
m = 311
m = 311
m = 311
m = 311
m = 311
m = 311
m = 311
m = 311
m = 311
m = 311
m = 311
m = 311
m = 311
m = 311
m = 311
m = 311
https://www.gigabyte.com/Support/Laptop
■ ЧаПи:
https://www.gigabyte.com/Support/Faq