P37W v4 - Laptop GIGABYTE - Free user manual and instructions
Find the device manual for free P37W v4 GIGABYTE in PDF.

User questions about P37W v4 GIGABYTE
0 question about this device. Answer the ones you know or ask your own.
Ask a new question about this device
Download the instructions for your Laptop in PDF format for free! Find your manual P37W v4 - GIGABYTE and take your electronic device back in hand. On this page are published all the documents necessary for the use of your device. P37W v4 by GIGABYTE.
USER MANUAL P37W v4 GIGABYTE
Congratulations on your purchase of the GIGABYTE Notebook.
This manual will help you to get started with setting up your notebook. The final product configuration depends on the model at the point of your purchase. GIGABYTE reserves the right to amend without prior notice. For more detailed information, please visit our website at www.gigabyte.com
Using GIGABYTE Notebook for the First Time
text_image
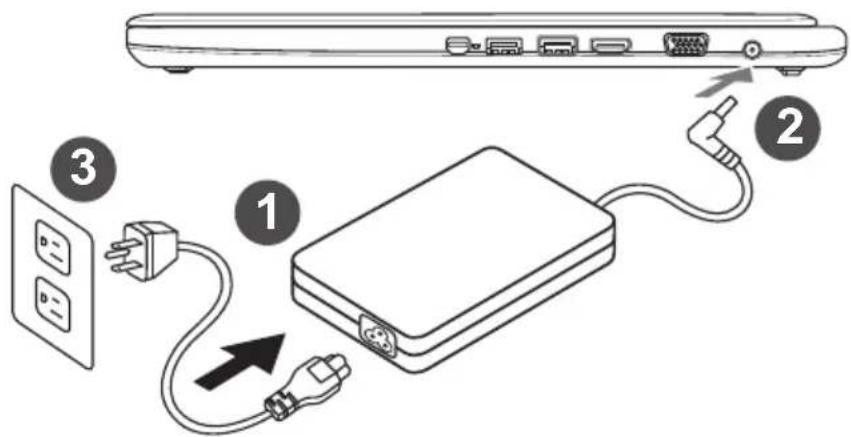
Diagram showing cable connection to a device with labeled components and power outlets1 Connect the power cord to the AC adapter.
2 Connect the AC adapter to the DC-in jack on the right side of the notebook.
3 Connect the power cord to the power outlet.
IMPORTANT!
- Ensure that your Notebook PC is connected to a grounded power adapter before turning it on for the first time.
- When using your Notebook PC on power adapter mode, the socket outlet must be near to the unit and easily accessible.
- Locate the input/output rating label on your Notebook PC and ensure that it matches the input/output rating information on your power adapter. Some Notebook PC models may have multiple rating output currents based on the available SKU.
● Power adapter information:
- Input voltage: 100-240Vac - Input frequency: 50-60Hz - Rating output voltage: 19V or 19.5V

natural_image
Line drawing of a laptop with a hand inserting a card into the screen (no text or symbols)Switching on the Power
After you turn on the Notebook for the very first time, do not turn it off until the operating system has been configured. Please note that the volume for the audio will not function until Windows® Setup has completed.
Booting Up the Notebook for the First Time
Depending on your configuration, the Microsoft ^® Windows ^® Boot Screen will be the first screen that you will see as the notebook starts up. Follow the on-screen prompts and instructions and enter your personal information to complete the setup of the Windows ^® Operating System.
Your GIGABYTE Notebook Tour
Top View & Front View
text_image
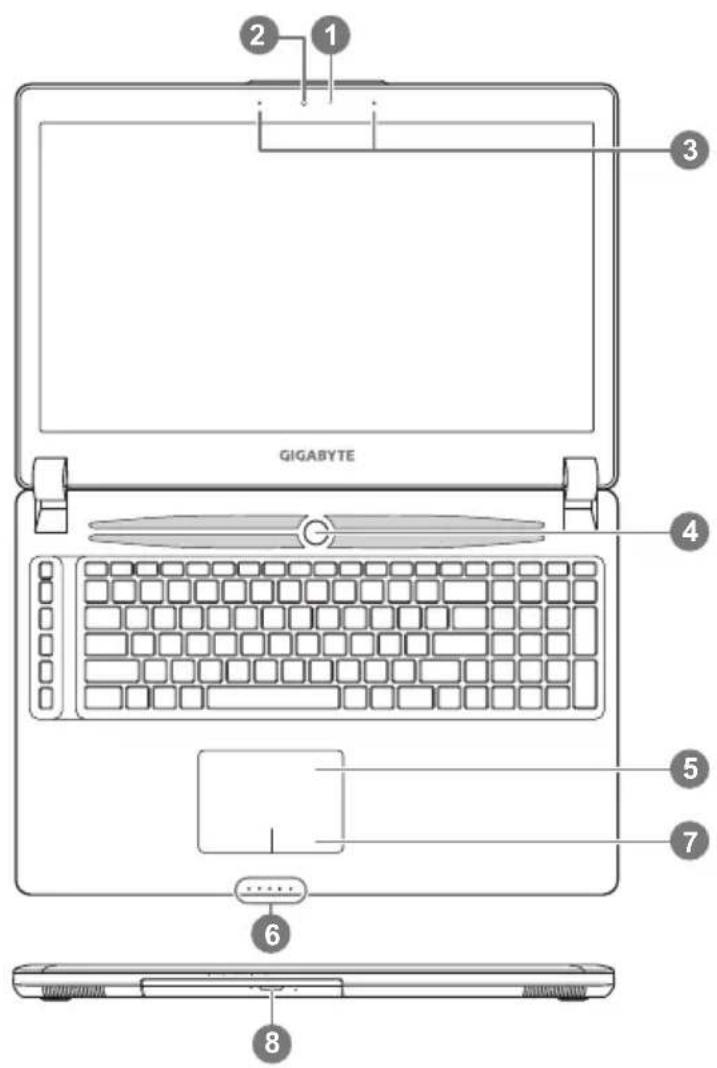
GIGABYTE 1 2 3 4 5 7 6 81 Light sensor
2 Webcam
3 Microphone
4 Power Button
5 TouchPad
6 LED Indicators ①
7 Battery Indicator Button ②
8 Swappable Storage Bay
① Bluetooth Status LED
Wireless Lan Status LED
HDD Status LED
Battery Status LED
Power Status LED
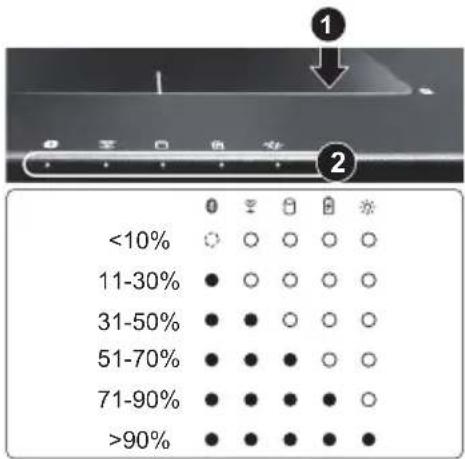
② Press the right button of touchpad to check the remaining battery power. Right click to show the remaining power percentage. As shown below, the battery life indicator is available when the laptop is shut down, in stand-by or hibernation.(Battery mode)
text_image
<10% 11-30% 31-50% 51-70% 71-90% >90%Left View

text_image
1 2 3 4 5 61 Kensington Lock Slot
2 Ethernet Port
3 USB 2.0 Port
4 SD Card Reader
5 Headphone Jack
6 Microphone Jack
Right View

text_image
2 3 141 Mini Display Port
2 USB 3.0 Port
3 USB 3.0 Port (USB Charge)
4 HDMI Port
5 External Display (VGA) Port
6 DC-in Jack
Base View

text_image
Laptop front panel diagram with labeled components and internal slot patterns1 Memory Compartment
2 Speakers

Warning:
DO NOT remove the built-in lithium battery. For any service needs, please contact your local GIGABYTE Authorized Service Center.
Hotkeys
The computer employs hotkeys or key combinations to access most of the computer's controls like screen brightness and volume output. To activate hotkeys, press and hold the
| Hotkey | Function Description | |
| Fn+ESC Elect ODD Eject ODD | ||
| Fn+F1 | Sleep Put the computer in Sleep mode. | |
| Fn+F2 電 | Wireless LAN Enables/disable the Wireless LAN function. | |
| Fn+F3 * | Brightness Down Decrease the screen brightness. | |
| Fn+F4 * | Brightness Up Increase the screen brightness. | |
| Fn+F5 LCD/ 回 | Display Toggle | Switch display output between the display screen, external monitor (if connected) and both. |
| Fn+F6 回 | Touchpad Toggle Turn the internal touchpad on and off. | |
| Fn+F7 回 | Speaker Toggle Turn the speaker on and off. | |
| Fn+F8 回 | Volume Down Decrease the sound volume. | |
| Fn+F9 回 | Volume Up Increase the sound volume. | |
| Fn+F10 | Screen Display Toggle Turn the screen display on and off. | |
| Fn+F11 /8 | Bluetooth Enable/disable the Bluetooth function. | |
| Fn+F12 回 | Webcam | Turn the internal webcam on and off. |
| Fn+Space 回 | Keyboard Backlight Toggle | Turn the keyboard backlight on and off. |
Macro key
Macro keys can be set via Macro Hub, setting combination keys for complicated and/or general operation.
| Macro key | Macro key | Description |
| G | G | Macro group switch, press around 3 seconds as hardware switch on/off. |
| G1 | G1 | User Programmable Macro key |
| G2 | G2 | User Programmable Macro key |
| G3 | G3 | User Programmable Macro key |
| G4 | G4 | User Programmable Macro key |
| G5 | G5 | User Programmable Macro key |

text_image
Diagram showing a device component with labeled parts, including a highlighted section and numbered annotations.1 Unlock swappable bay locker.
2 Draw the swappable bay out.

text_image
9.5mm/7mm HDD/SSD onlyConnect the HDD or SSD pin by sliding it into the connector.
natural_image
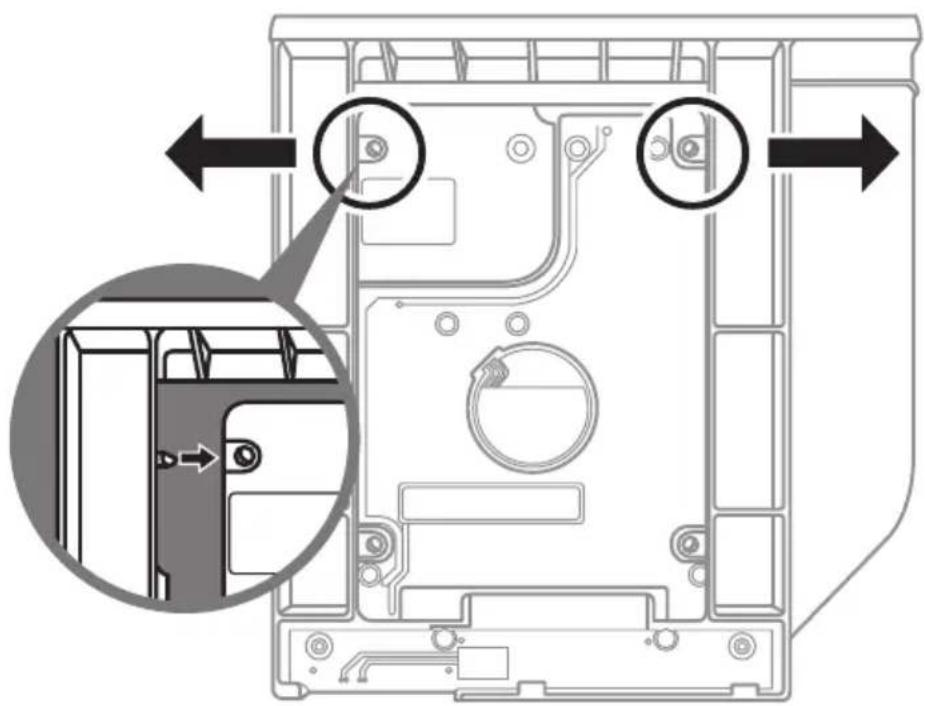
Technical diagram of a mechanical device showing internal components and directional arrows (no text or symbols)Gently push the plastic frame outwards. Slide in the HDD or SSD until it locks into place. There will be a slight click.

text_image
Diagram of a computer RAM module with labeled components and directional arrows indicating assembly steps1 Pull swappable bay back to slot.
2 Lock swappable bay locker.
Macro Hub Instruction
Welcome to use Macro Hub ! Macro Hub makes it much easier for you to control your Macro Key on P37. You can deal with complex key stroke combination by just one press on macro key, which brings you benefits both in work and game. Before using Macro Hub, please read following guide, thanks.
1 Launch Macro Hub

You can find the shortcut of Macro Hub on desktop. Just double click it.
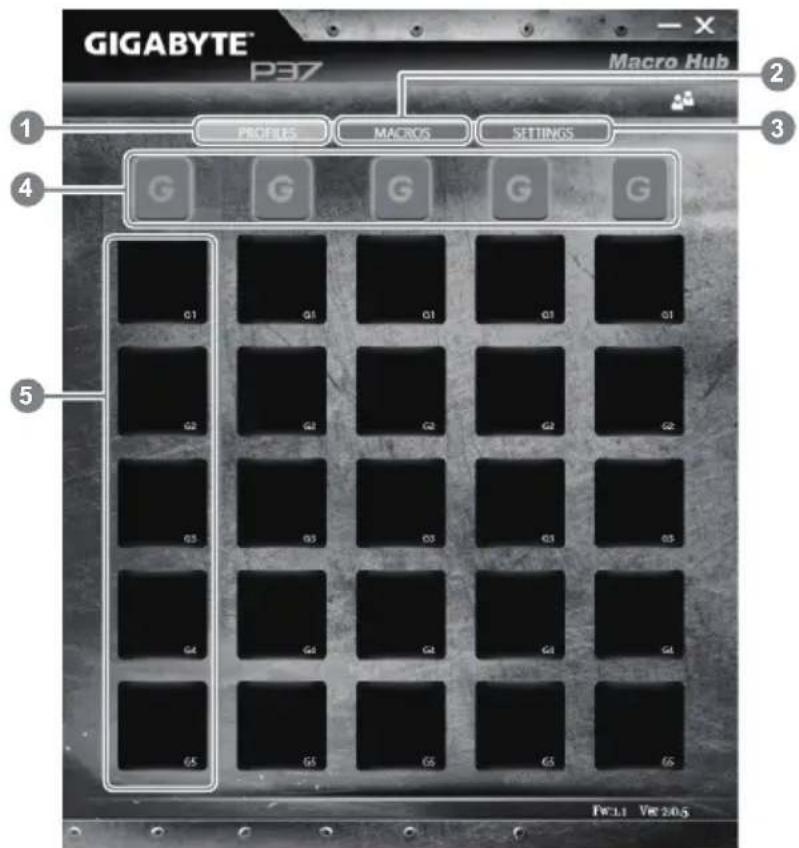
2 The overview of Macro Hub
text_image
GIGABYTE® P37 Macro Hub 1 2 3 4 PROFILES MACROS SETTINGS G G G G G G Q1 Q1 Q1 Q1 Q1 Q2 Q2 Q2 Q2 Q3 Q3 Q3 Q3 Q3 Q3 Q4 Q4 Q4 Q4 Q4 Q4 Q5 Q5 Q5 Q5 Q5 Q5 PwLLi Vcc 20.51 Profiles: View your current macro command settings.
2 Macros: Edit macro command funtions anf settings.
3 Settings: Update Macro Hub version or renew macro hub settings.
4 Macro Key Group Indicators: Indicate the activated Macro Key Group (the atcivated group indicator will light up)
5 Macro Key Function: Show the programmed Macro functions under the Macro Key Group, from G1 to G5.
3 Using Macro Hub
1 Set Macro Key to basic function

text_image
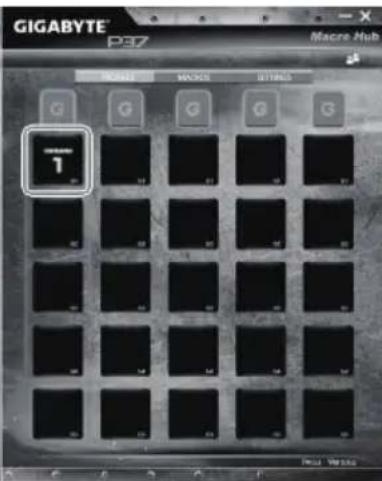
G ESC F1 F2 ~ - 1 @ 2 Tab Q 友 手 Caps Lock Aa. Click the G button on the left-top of the keyboard to switch to the Macro Key group you would like to use
text_image
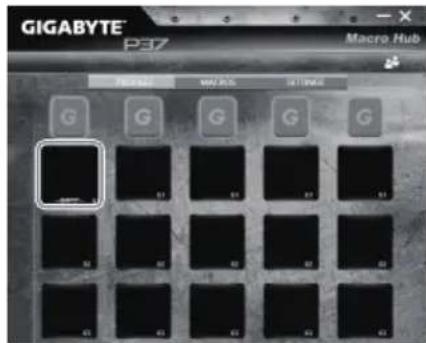
GIGABYTE® P37 Macro Hub F90254 MAY-INS S11-VI45 G G G G G G G G G G G G G G G G G G G G G G G G G G G G G G G G G G G G G G G G G G G G G G G G G G 61 61 61 61 61 61 61 61 61 61 61 61 61 61b. Click the Macro Key function brick
text_image
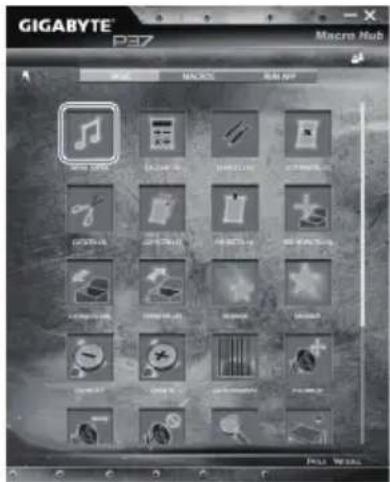
GIGABYTE PEZ Macrom Hub MACRO BIPK GICAGO MACRO BIPK GICAGO MACRO GICAGO MACRO GICAGO MACRO GICAGO MACRO GICAGO MACRO GICAGO MACRO GICAGO MACRO GICAGO MACRO GICAGO MACRO GICAGO MACRO GICAGO MACRO GICAGO MACRO GICAGO MACRO GICAGO MACRO GICAGO MACRO FOSA 10.0000000000000000000000000000000000000000000000000000000000000000000000000000000000000000000000000000c. Double-click the function you would like to use(ex. Media Player) in the Basic or Macros function area.

text_image
GIGABYTE p37 Macrom Hub 1 2 3 4 5 6 7 8 9 10 11 12 13 14 15 16 17 18 19 20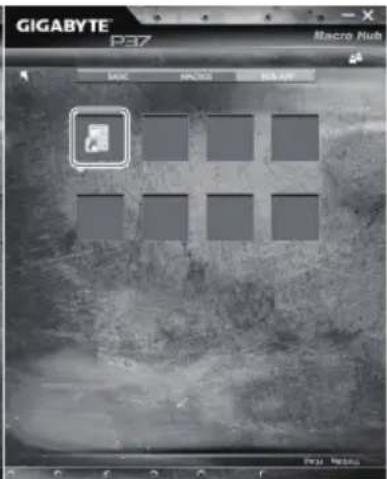
text_image
GIGABYTE P37 Macro Hub DOC INFOX INFO ART
text_image
GIGABYTE P37 Macro Hub G G G G G G G G G G G G G G G G G G G G G G G G G G G G G G G G G G G G G G G G G G G G G G G G G G M10 M11 M12 M13 M14 M15 M16 M17 M18 M19 M20 M21 M22 M23 M24 M25 M26 M27 M28 M29 M30 M31 M32 M33 M34 M35 M36 M37 M38 M39 M40 M41 M42 M43 M44 M45 M46 M47 M48 M49 M50 M51 M52 M53 M54 M55 M56 M57 M58 M59 M60 M61 M62 M63 M64 M65 M66 M67 M68 M69 M70 M71 M72 M73 M74 M75 M76 M77 M78 M79 M80 M81 M82 M83 M84 M85 M86 M87 M88 M89 M90 M91 M92 M93 M94 M95 M96 M97 M98 M99 M100d. Complete the setting
text_image
GIGABYTE P37 Macre Hub MACRE MACR BITBLOG 1 2
text_image
GIGABYTE P37 Macro Hub Micro Micro Settings G G G G P P37 Micro2 Edit macro command funtions anf settings.
text_image
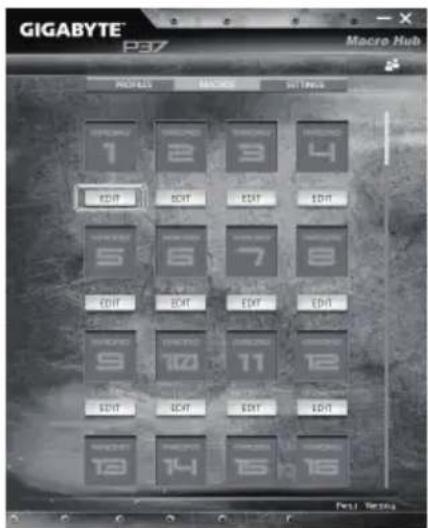
GIGABYTE® P37 Macro Hub MODULAR MODULAR BITTING EDIT EDIT EDIT EDIT EDIT EDIT EDIT EDIT EDIT EDIT EDIT EDIT EDIT EDIT EDIT EDIT EDIT EDIT EDIT EDIT EDIT EDIT EDIT EDIT EDIT EDIT EDIT EDIT EDIT EDIT EDIT EDIT EDIT EDIT EDIT EDIT EDIT EDIT EDIT EDIT EDITa. Click "Macros" (you can set up to 100 sets of macro)
text_image
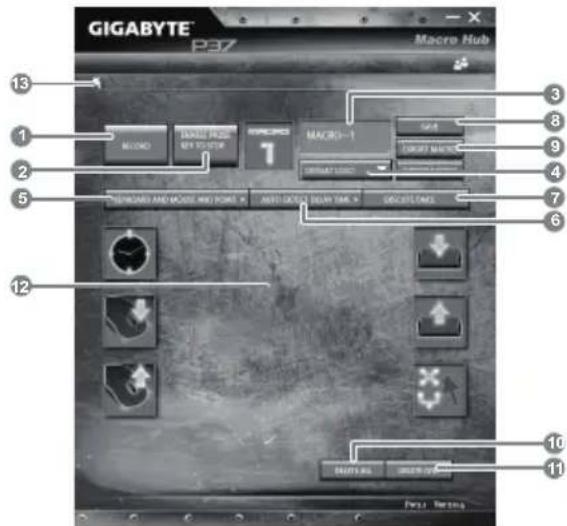
GIGABYTE P37 Macro Hub 13 1 2 5 12 3 8 9 4 7 6 10 11 BUCKING BUCKING MACRS-1 BUCKING BUCKING BUCKING BUCKING BUCKING BUCKING BUCKING BUCKING BUCKING BUCKINGb. Overview of macro record panel (you can record your own macro here)
- Start recording: Click when you're about to record the macro
- Pause key Switch: Enable/Disable Pause key to stop recording.
- Macro Name: Set the name of this macro
- Import icon: Set icon for this macro. You can use default icon or upload your own icon
- Record type: You can choose to record only mouse(or keyboard) movement, or record both. You can also decide to or not to record mouse position.
- Record interval: You can decide to or not to record the interval of each movement (or You can set fixed interval time between every movement)
- Execution way: You can set the macro execution way (execution once, repeat execution or repeat execution with deep press)
- Export macro: Export your macro
- Import macro: Import the macro
-
Delete all: Delete all movement in this macro
-
Delete selected: Delete selected movement
- Movement list: it shows all movement you record
- Exit: The system will inquire you if to save the recorded macro
text_image
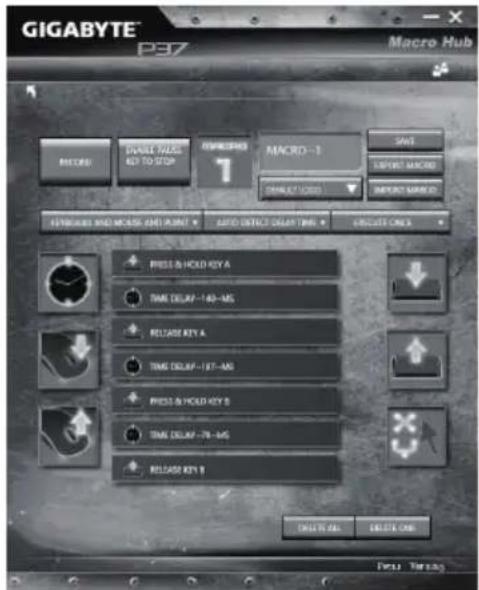
GIGABYTE® P37 Macro Hub RECORD CREATE NAME KEY TO STOP ENGLISH MACRO -1 SAVE SELECT MACRO SELECT NAME ATTENUO AND MOUNT AND PRINT AUTO SELECT COLD KEY CIRCUIT ONLY PRESS & HOLD KEY A TIME DELAY - 140 - MG RELEASE KEY A TIME DELAY - 157 - MG PRESS & HOLD KEY B TIME DELAY - 78 - MG RELEASE KEY B SELECT NULL Cancel Cancel Menu Optionsc. Start to record macro: When you click start button, the macro engine will start to record macro. All movement you made(mouse/keyboard) will be shown in the movement list. You can decide to use "pause" key or mouse click on stop button to stop recording based on your record range. Finishing recording: When you have done all movement, click exit button. The Macro Engine will inquire you if you want to save the macro. Click Yes then you can finish the record of your own macro.

text_image
GIGABYTE Macro Hub PROGRESS MACROS SITIMENS 1 MASSO EDIT 2 3 4 5 6 7 8 9 10 11 12 EDIT EDIT EDIT EDIT 13 14 15 16d. Complete the setting.
3 Edit "Settings" of Macro Hub

text_image
GIGABYTE P37 Macro Hub 1 PROCES MACROS SETBACK 2 SOFTWARE UPDATE CLEAN REACHY TRIMMABLE UPGRADE 3 FULL TREADS- Software update: Update latest version of GIGABYTE Macro Hub
- Clean memory: Erase current Macro Hub settings
- Firmware Upgrade: Upgrade Macro Key firmware
Setup Your System for RAID 0/1

WARNING
- Please backup your data before you build and run RAID 0/1 on your system.
● RAID 1 needs two storage drives of the same specification and capacity in your laptop.
● RAID 0 needs two storage drives of the same specification in your laptop. Different capacity is acceptable.
1

text_image
SSD SSD HDD HDD- Please install the HDDs/SSDs you would like to build your RAID 0 configuration in the system, then turn on the system.
2
text_image
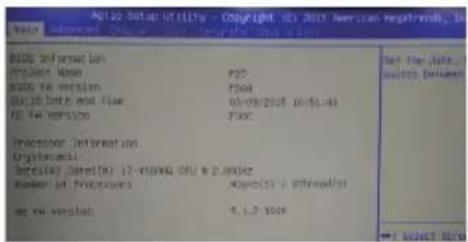
AS120 Data Utility - Copyright 03.2017 American Right-Worth Water SOS: Forward Line Project Name: SOS TO version: SOS TO date and time: SOS TO version: Processor Information Digital mini Distribut Direktur 12- trailing CPU & 2.00GHz Number of processors: 4000x2 / 1000bit set via version: 9.1.2.1008 Set the data... switch between- Press F2 right after turning on and enter the BIOS.
3
text_image
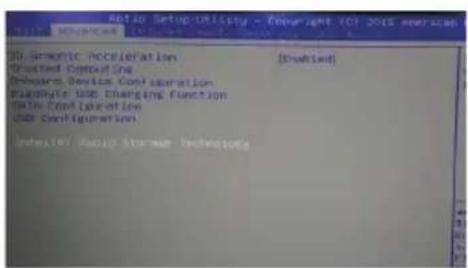
SIN. Diagnostic Acceleration [Disabled] Posted Consulting Hardware Device Configuration Absolute USE Charging Function Active Configuration Use Configuration Details: Repair Storage Technologies- Press right click and enter [Advanced] menu and choose [Intel Rapid Storage Technology]
4
text_image
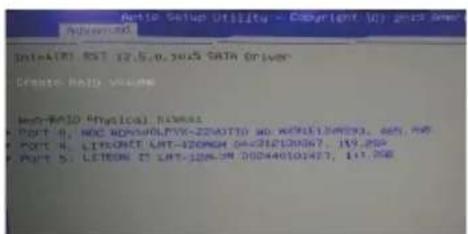
Auto Setup Utility - Copyright (by) 2015 Author: MD IntraAIRE, RST 17.6.0.3015 DATA DRIVER Create Audio Volume Auto-RAD Physical License: - POST 8, WDC NOVAOLYK-22VOTIO NO. WDC13493, 405, 406 - POST 9, LITONATE LRT-420N04 04-03/12/20067, 199.200 - POST 5, LETION IT LRT-3206.0M 0502440101407, 141.200- Select [Create RAID Volume]
5
text_image
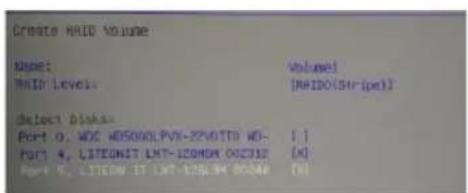
Create RAID Volume Diaset: HOLD Level: Volume1 [HAIDO(Strips)] Select Disk Port 0, WDC HDS5000LPVN-22VOTTR HD- Port 4, LISTENUT LNT-120NOM OOC32E [+] (M) PORT 5, LISTENUT LNT-120NOM OOC32E (M)- Select the HDD/SSDs you would like to build RAID 0 with [X]. In this example, the RAID 0 is composed with 2 SSD. After the selection, choose Create Volume
6

text_image
Ratio Setup Utility - Copyright 45.2015 American Mail: New York, New Jersey, New York, New York, New York, New York, New York, New York, New York, New York, New York, New York, New York, New York, New York, New York, New York, New York, New York, New York, New York, New York, New York, New York, New York, New York, New York, New York, New York, New York, New York, New York, New York, New York, New York, New York- The Creation of RAID 0 is finished now and please remember to save it in Save & Exit page and reboot the system. Then you can start to install the OS in your new disk volume
Smart USB Backup Guide (Original: Recovery Image USB)

WARNING
● You can backup original recovery image through this application in case of losing by device damage.
- You can backup original recovery image to USB disk and restore the system if any storage system replacement with the recovery USB disk.
Before you restore the system through the recovery USB disk, please make sure that you have already made the backup of your data.
- Please DO NOT shut down or un-plug the system when performing backup through recovery USB disk.
1
text_image
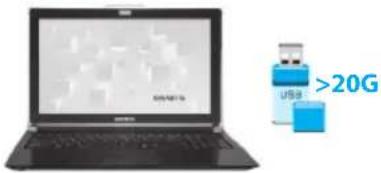
USB >20G- Please plug in the USB disk which is at least 20GB in capacity to make the original image (backup the data in USB first. All data will be eliminated during the creation of recovery USB disk)
2

- Insert the driver disk to your optical drive and run the install of "Smart USB Backup" (for none-ODD model, please use USB ODD device or download from http://www.gigabyte.com
3

- Run the "Smart USB Backup" after finishing the install.
4

text_image
Microsoft USB Package Please back up your personal file first, and prepare one USB storage device which capacity more than 2008 请先提供个人资料,并準備一重大於2008的USB磁存装置(即原USB磁存器). 請留存位置資料將被保留及製作後可轉換的電子算體 GIOBYTE COPYRIGHT http://12351799- Select your USB disk from the dropdown list and start to create the recovery USB disk.
5
- The window will pop out when the creation of recovery disk is done.
- Please press F12 on starting the system when you need to restore the system. Select "boot from recovery USB disk" and the system will be restored.
- The time needed for restore will be around 30 mins(time needed may vary by USB disk model).
Recovery Guide
System Recovery (Restore your laptop operating system)
When something is going wrong with the laptop operating system, the storage of the laptop has a hidden partition containing a full back up image of the operating system that can be used to restore the system to factory default settings.

Note
- If the storage has been switched or the partition deleted, the recovery option will no longer be available and a recovery service will be needed.
- The recovery function is only available on devices with O/S preinstalled. Devices with DOS do not have the recovery function.
Launch System Recovery
The system recovery feature is preinstalled before the laptop is shipped from the factory. The option menu allows you to launch the Windows recovery tool to reinstall the operating system to factory default.
The brief introduction below will show you how to start the recovery tool and restore your system.

All ready to go
Make sure your PC is plugged in. This will take a few minutes.
Windows 7 Recovery Guide
1
Turn off and restart the laptop.
2

text_image
GIGABYTE™ PressDuring the laptop turn on process, press and hold F9 key to launch the tool.
3
text_image
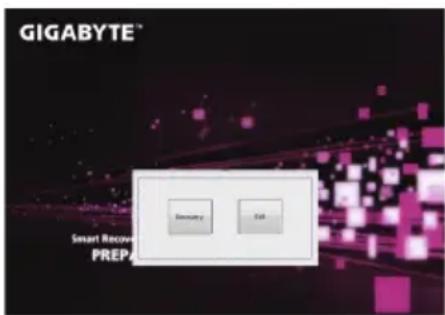
GIGABYTE® Smart Recovery PREP Default ExitThe recovery will be activated and you will see the option buttons on the window. Click on "Recovery" to start it.

Caution
Once the "Recovery" is selected, your personal data and files will be deleted after the laptop starts restoring, and the operating system will be reset to factory default settings.
4

text_image
GIGABYTE® Smart Restore Now Place with reportA progress indicator bar will show on the window when the recovery process is running. Please make sure the AC-adapter is plugged in and do not turn off the laptop.
5

text_image
GIGABYTE® Smart Recovery RESTORE FINISHReboot the laptop after the system recovery is complete.
Windows 8.1 Recovery Guide
1
Turn off and restart the laptop.
2

text_image
GIGABYTE™ Press <13> For Excel SETUP Press <12> For BBS FIOSUP Menu Press <90> For System RecoveryDuring the laptop turn on process, press and hold F9 key to launch the tool.
3

Choose "Troubleshoot" to enter the recovery settings. (Also you can choose "Continue" to exit recovery system and continue to Windows 8.1 for files or data backup.)

There are two options for system recovery
- Refresh your PC
You can refresh your laptop to improve the system stability without losing your files. - Reset your PC
If you want to remove all of your files, you can reset your PC completely.
Caution: All personal data and files will be lost.
4

- Choose "Refresh your PC"
Choose an account to continue.

Here are what will happen
- Your files and personalization settings won't be changed.
- Your PC settings will be restored to factory default settings.
- Apps from Windows Store will be kept.
- Apps you installed from discs or websites will be removed.
- A list of removed apps will be saved on your desktop.

■ choose "Reset your PC"
▶ Just remove my files
Only personal data and files will be removed, but computer settings will be kept.
▶ Fully clean the drive
The drive will be completely restored to factory default settings. It takes more time. > [Click on "Reset" to execute recovery function.]

Here are what will happen
- All of your personal files and apps will be removed.
- Your PC settings will be restored to factory default settings.

■ Advanced options

System Restore
Use a restore point recorded on your PC to restore Windows.

System Image Recovery
Recover Windows using a specific system image file.

Automatic Repair
Fix problems that keep Windows from loading.

Command Prompt
Use the Command Prompt for advanced trobleshooting.

UEFI Firmware Settings
Change settings in your PC's UEFI firmware.

Startup Settings
Change Windows Startup behavior.
Appendix
■ Warranty & Service:
Warranty and service and related information please refer to the warranty card or GIGABYTE service website as the below link:
http://www.gigabyte.com/support-downloads/technical-support.aspx
■ FAQ:
FAQ (Frequent Asked Questions) please refer to the below link: http://www.gigabyte.com/support-downloads/faq.aspx