U2442N - Laptop GIGABYTE - Free user manual and instructions
Find the device manual for free U2442N GIGABYTE in PDF.

| Brand | Gigabyte |
| Model | U2442N |
| Product Type | Laptop |
| Screen Size | 14 inches |
| Processor | Intel Core i5-3337U (1.8 GHz, turbo up to 2.7 GHz) |
| RAM | 4 GB DDR3 (expandable to 8 GB) |
| Storage | 500 GB HDD (SATA) |
| Graphics | NVIDIA GeForce GT 730M (2 GB VRAM) |
| Operating System | Windows 8 (64-bit) |
| Dimensions (W x D x H) | 33.8 x 23.8 x 2.1 cm (13.3 x 9.4 x 0.8 inches) |
| Weight | 1.8 kg (4.0 lbs) |
| Power Supply | Lithium-ion 4-cell, 4700 mAh, 65 W AC adapter |
| Battery Life | Up to 4 hours |
| Connectivity | Wi-Fi 802.11 b/g/n, Bluetooth 4.0, Ethernet, USB 3.0 x 2, USB 2.0 x 1, HDMI, VGA, headphone/mic combo |
| Optical Drive | None |
| Webcam | HD webcam (1.3 MP) |
| Keyboard | Full-size backlit keyboard with numeric pad |
| Touchpad | Multi-touch gesture support |
| Security | Kensington lock slot, TPM (Trusted Platform Module) 1.2 |
| Warranty | 1 year limited |
| Reparability | User-accessible RAM and hard drive; service manual available online |
Frequently Asked Questions - U2442N GIGABYTE
User questions about U2442N GIGABYTE
0 question about this device. Answer the ones you know or ask your own.
Ask a new question about this device
Download the instructions for your Laptop in PDF format for free! Find your manual U2442N - GIGABYTE and take your electronic device back in hand. On this page are published all the documents necessary for the use of your device. U2442N by GIGABYTE.
USER MANUAL U2442N GIGABYTE
Congratulations on your purchase of the GIGABYTE Notebook.
This manual will help you to get started with setting up your notebook. The final product configuration depends on the model at the point of your purchase. GIGABYTE reserves the right to amend without prior notice. For more detailed information, please visit our website at www.gigabyte.com

Using GIGABYTE Notebook for the First Time

text_image
Diagram showing cable connection to a device with labeled components and wiring paths1 Connect the power cord to the AC adapter.
2 Connect the AC adapter to the DC-in jack on the right side of the notebook.
3 Connect the power cord to the power outlet.
natural_image
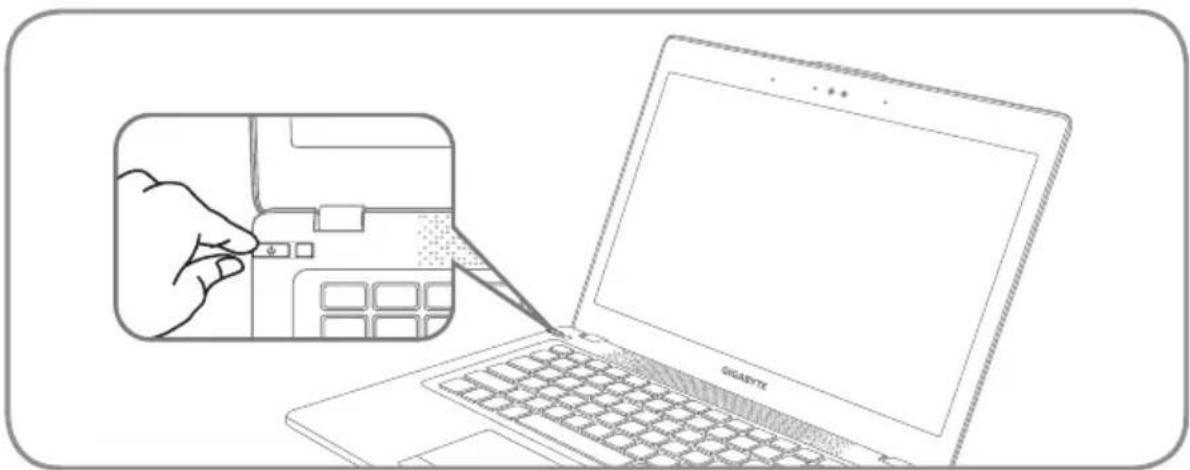
Line drawing of a hand inserting a component into a laptop keyboard, with no text or symbols present.Switching on the Power
After you turn on the U2442 for the very first time, do not turn it off until the operating system has been configured. Please note that the volume for the audio will not function until Windows® Setup has completed.
Booting Up the U2442 for the First Time
Depending on your configuration, the Microsoft ^ Windows ^ Boot Screen will be the first screen that you will see as the notebook starts up. Follow the on-screen prompts and instructions and enter your personal information to complete the setup of the Windows ^ Operating System.
2 Your GIGABYTE Notebook Tour
Top View
text_image
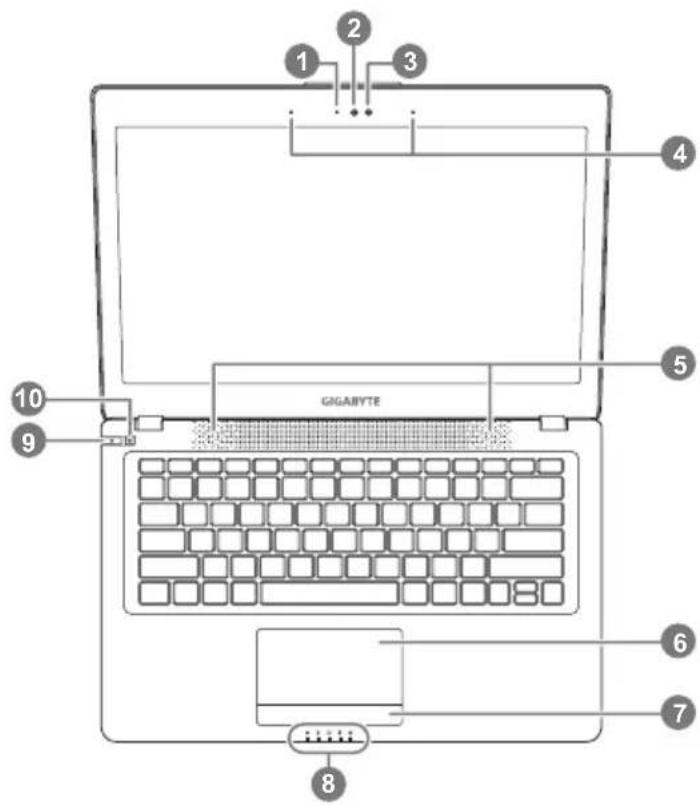
1 2 3 4 5 GIGABYTE 6 7 8 9 101 Webcam Status LED Indicator
2 Webcam
3 Light sensor
4 Microphone x 2
5 Speakers
6 TouchPad
7 Battery Indicator Button ①
8 LED Indicators ②
9 Power Button
10 Smart + Button ③
① Press the right button of touchpad to check the remaining battery power.
② Bluetooth Status LED
Wireless Lan Status LED
HDD Status LED
Battery Status LED
Power Status LED
③ To call out smart manager function.
- Smart Setup :
Under off condition, Push 🔊" to enter "Smart Setup" menu in off mode. You can choose BIOS Setup Utility, Smart Recovery in the setup menu.
- Smart Manager :
In Windows® Mode Press "⚙" button to initiate "Smart Manager".
Left View

text_image
Diagram of a device rear panel with labeled ports and connectors1 Ethernet Port
2 D-sub (VGA) Port
3 USB Port x 2
4 Microphone Jack
5 Headphone Jack
6 Kensington Lock Slot
Right View

text_image
1k1 SD Card Reader
2 USB Port x 2
3 HDMI Port
4 DC-in Jack
Base View

natural_image
Top-down view of a rectangular electronic device with internal circuitry and mounting holes (no text or symbols)1 Memory Compartment

Hotkeys
The computer employs hotkeys or key combinations to access most of the computer's controls like screen brightness and volume output. To activate hotkeys, press and hold the
| Hotkey Function Description | ||
| Fn+F1 | Sleep Put the computer in Sleep mode. | |
| Fn+F2 | Wireless LAN | Enables/disable the Wireless LAN function. |
| Fn+F3 | Brightness Down | Decrease the screen brightness. |
| Fn+F4 | Brightness Up Increase the screen brightness. | |
| Fn+F5 | Display Toggle | Switch display output between the display screen, external monitor (if connected) and both. |
| Fn+F6 | Screen Display Toggle Turn the screen display on and off. | |
| Fn+F7 | Speaker Toggle | Turn the speaker on and off. |
| Fn+F8 | Volume Down Decrease the sound volume. | |
| Fn+F9 | Volume Up Increase the sound volume. | |
| Fn+F10 | Touchpad Toggle Turn the internal touchpad on and off. | |
| Fn+F11 | Bluetooth Enable/disable the Bluetooth function. | |
| Fn+F12 | Webcam Turn the internal webcam on and off. | |
| Fn+Space | Keyboard Backlight Toggle | Turn the keyboard backlight on and off. |

GIGABYTE Software Application
• GIGABYTE Smart Manager
You can activate GIGABYTE Smart Manager by double clicking on the shortcut icon on the desktop if the machine you purchased has the operation system built-in. GIGABYTE Smart Manager is an icon-based control interface, enabling users to intuitively access common system setup as well as GIGABYTE exclusive utilities. Please be noted that the GIGABYTE Smart Manager interface, icons, utilities and software versions may vary based on the purchased models. Please operate GIGABYTE Smart Manager according to the actual version built-in.
• GIGABYTE Smart Recovery
- If the machine you purchase already has operating system built-in, you can restore the system back to factory default by using GIGABYTE Smart Recovery. Please be noted that the GIGABYTE Smart Recovery interface, icons, utilities and software versions may vary based on the purchased models. Please operate GIGABYTE Smart Recovery according to the default built-in version.
- Please be noted that personal data will be lost after recovery, do remember to backup any data before operating this function.
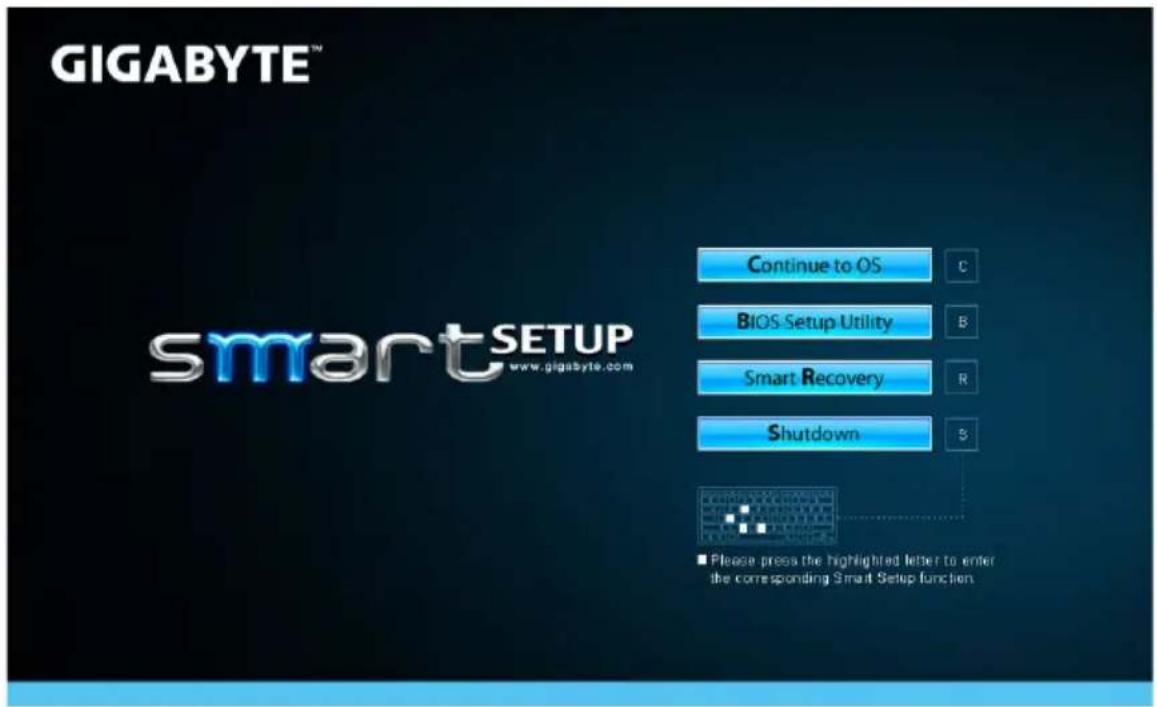
• GIGABYTE Smart Setup
During the off mode, press Smart ^+ Button to enter "Smart Setup" menu. You can choose BIOS Setup Utility, Smart Recovery, and other functions in this setup menu.
text_image
GIGABYTE™ smartSETUP www.gigabyte.com Continue to OS C BIOS Setup Utility B Smart Recovery R Shutdown 5 ■ Please press the highlighted letter to enter the corresponding Smart Setup function.Press"Continue to OS" button to enter operating system.
Continue to OS
Press"BIOS Setup Utility" button to enter BIOS setup utility.
BIOS Setup Utility
Press"Smart Recovery" button to enter GIGABYTE Smart Recovery.
Smart Recovery
Press"Shutdown" button to shutdown the system.
Shutdown
5 Appendix
■ Warranty & Service:
Warranty and service and related information please refer to the warranty card or GIGABYTE service website as the below link:
http://www.gigabyte.com/support-downloads/technical-support.aspx
■ FAQ:
FAQ (Frequent Asked Questions) please refer to the below link:
http://www.gigabyte.com/support-downloads/faq.aspx