C-APS700-X - Paint spray SCHEPPACH - Free user manual and instructions
Find the device manual for free C-APS700-X SCHEPPACH in PDF.

| Product type | Cordless paint sprayer (paint spray) |
| Brand | Scheppach |
| Model | C-APS700-X |
| Power supply | Lithium-ion battery 20 V (IXES series, battery not included) |
| Tank capacity | 1000 ml |
| Maximum flow rate | 700 ml/min |
| Maximum viscosity | 55 DIN/s |
| Weight (without battery) | 1.35 kg |
| Included nozzles | 1.5 mm, 2.0 mm, 2.5 mm, 3.0 mm (4 nozzles) |
| Sprayable materials | Solvent-based or water-thinnable paints, glazes, primers, varnishes, stains, wood preservatives |
| Unsuitable materials | Alkaline products, acidic products, products containing particles, latex, anti-splash |
| Sound pressure level (LpA) | 77.3 dB (K=3 dB) |
| Sound power level (LwA) | 85.3 dB (K=3 dB) |
| Vibration (ah) | ≤2.5 m/s² (K=1.5 m/s²) |
| Flow adjustment | Adjustment wheel on the trigger (+/-) |
| Spray pattern adjustment | Vertical, horizontal flat jet or round jet by rotating the nozzle head |
| Cleaning | Disassembly of the spray unit, rinsing with water, cleaning the air filter |
| Safety | Mandatory removal of battery before maintenance; wear hearing protection, safety glasses, mask |
| Available spare parts | Batteries (SBP2.0, SBP4.0), chargers (SBC2.4A, SBC4.5A, SDBC2.4A, SDBC4.5A), nozzles |
| Warranty | 5 years (12 months for the battery), extension to 10 years possible under conditions |
Frequently Asked Questions - C-APS700-X SCHEPPACH
User questions about C-APS700-X SCHEPPACH
0 question about this device. Answer the ones you know or ask your own.
Ask a new question about this device
Download the instructions for your Paint spray in PDF format for free! Find your manual C-APS700-X - SCHEPPACH and take your electronic device back in hand. On this page are published all the documents necessary for the use of your device. C-APS700-X by SCHEPPACH.
USER MANUAL C-APS700-X SCHEPPACH
natural_image
Line drawing of a handheld industrial spray gun with a cylindrical base and control panel (no text or symbols)
Made in P.R.C.
C-APS700-X
GB Cordless paint spraying system | Translation of the original operating instructions 17
Inhaltsverzeichnis
Günzburger Straße 69
D-89335 Ichenhausen
Hinweis:
Günzburger Straße 69
D-89335 Ichenhausen
Division Manager Product Center

Andreas Pecher
Head of Project Management
18 Garantiebedingungen – Scheppach 20V IXES Serie
Revisionsdatum 25.04.2024
https://shop.scheppach.com/contact
1 Introduction ...... 17
2 Proper use.... 17
3 Product description (Fig. 1-11).... 18
4 Scope of delivery (Fig. 1, 2) ...... 18
5 Unpacking 18
6 Technical data.... 18
7 Safety instructions.... 19
8 Assembly.... 21
9 Before commissioning.... 21
10 Operation 22
11 Working instructions.... 23
12 Cleaning and maintenance 23
13 Storage and transport 23
14 Repair and ordering spare parts 24
15 Disposal and recycling 24
16 Troubleshooting 25
17 EU Declaration of Conformity.... 25
18 Warranty conditions - Scheppach 20V IXES series 25
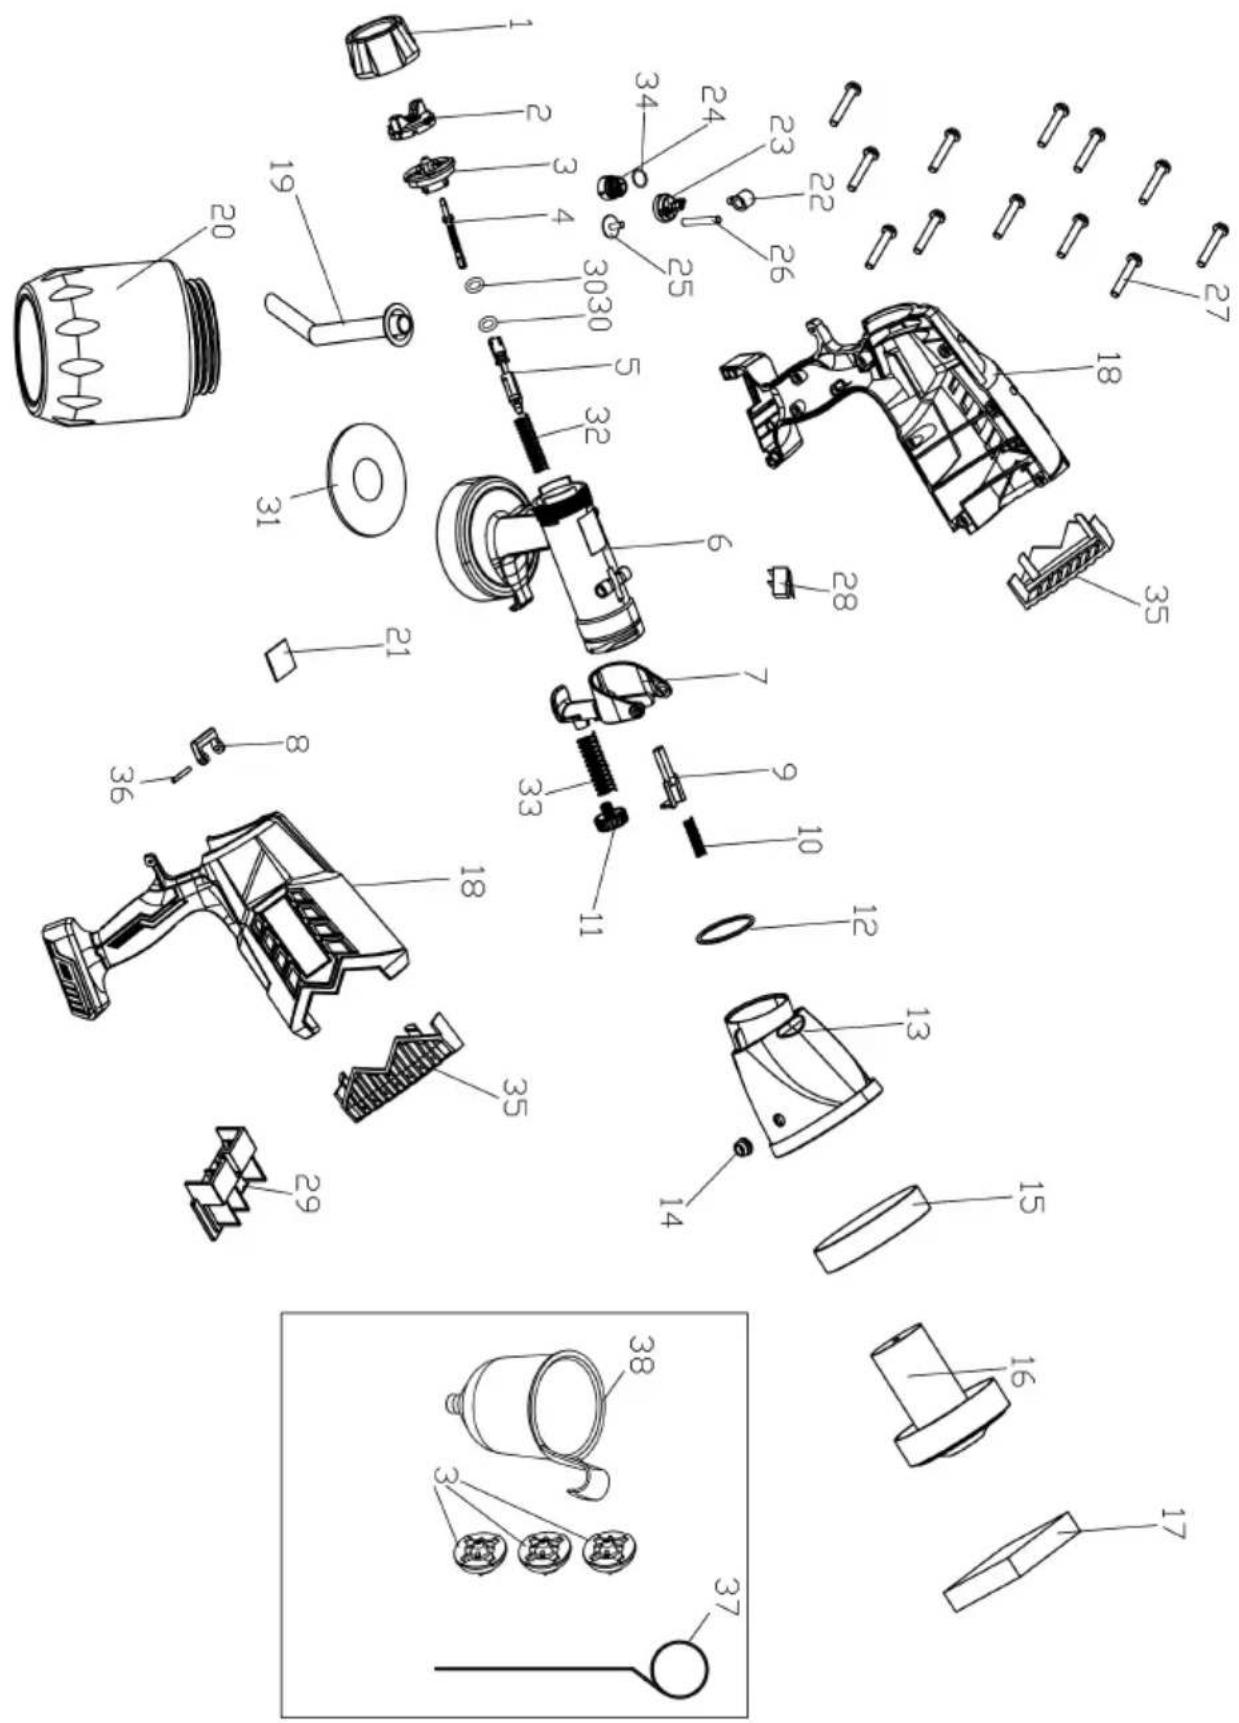
19 Exploded view.... 284
Explanation of the symbols on the product
Symbols are used in this manual to draw your attention to potential hazards. The safety symbols and the accompanying explanations must be fully understood. The warnings themselves will not rectify a hazard and cannot replace proper accident prevention measures.
 | Before commissioning, read and observe the operating manual and safety instructions! |
 | Wear hearing protection. |
 | Wear safety goggles. |
 | If dust builds up, wear respiratory protection! |
 | Lithium-ion battery |
 | The product complies with the applicable European directives. |
 | The product complies with the applicable Serbian directives. |
Explanation of the signal words in the operating manual
DANGER
Signal word to indicate an imminently hazardous situation which, if not avoided, will result in death or serious injury.
WARNING
Signal word to indicate a potentially hazardous situation which, if not avoided, could result in death or serious injury.
CAUTION
Signal word to indicate a potentially hazardous situation which, if not avoided, could result in minor or moderate injury.
ATTENTION
Signal word to indicate a potentially hazardous situation which, if not avoided, could result in product or property damage.
1 Introduction
Manufacturer:
Scheppach GmbH
Günzburger Straße 69
D-89335 Ichenhausen
Note:
In accordance with the applicable product liability laws, the manufacturer of this product assumes no liability for damage to the product or caused by the product arising from:
- Improper handling
• Non-compliance with the operating manual
• Repairs carried out by third parties, unauthorised specialists
• Installing and replacing non-original spare parts - Improper use
Note:
The operating manual is part of the product and contain important information for safe, proper and economical operation. Please also observe the applicable national regulations. Read all operating and safety instructions carefully before use and only use the product as described. Keep the manual and pass it on when you give the product to someone else.
2 Proper use
The product is suitable for spraying solvent-based and water-thinnable paints, glazes, primers, clear coats, automotive top coats, stains and wood preservatives. Alkaline and acidic substances, spray substances containing particles, latex paints, and paints with spray/drip retardants must not be sprayed.
The product may only be used in the intended manner. Any use beyond this is improper. The user, not the manufacturer, is responsible for damages or injuries of any type resulting from this.
An element of the intended use is also the observance of the safety instructions, as well as the assembly instructions and operating information in the operating manual.
Persons who operate and maintain the product must be familiar with the manual and must be informed about potential dangers.
The liability of the manufacturer and resulting damages are excluded in the event of modifications of the product.
The product may only be operated with original parts and original accessories from the manufacturer.
The safety, operating and maintenance specifications of the manufacturer, as well as the dimensions specified in the technical data, must be observed.
Please note that our products were not designed with the intention of use for commercial or industrial purposes. We assume no guarantee if the product is used in commercial or industrial applications, or for equivalent work.
3 Product description (Fig. 1-11)
- Spraying unit
1a. Union nut
1b. Nozzle head
1c. 1.5 mm nozzle
1d. 2.0 mm nozzle
1e. 2.5 mm nozzle
1f. 3.0 mm nozzle
- Trigger lever
2a. Adjustment wheel spray volume
-
Engine unit
-
Air filter cover
4a. Air filter
- Handle
5a. Locking mechanism
- Battery mount
6a. Battery*
- Paint container
7a. Riser pipe
-
Ventilation hose
-
Viscosity measuring beaker
-
Cleaning needle
-
Cleaning brush
* = may not be included in the scope of delivery!
4 Scope of delivery (Fig. 1, 2)
Item Quantity Designation
1d. 1 x 2.0 mm nozzle
1e. 1 x 2.5 mm nozzle
1f. 1 x 3.0 mm nozzle
-
1 x Viscosity measuring beaker
-
1 x Cleaning needle
-
1 x Cleaning brush
1 x Cordless paint spraying system
1 x Operating manual
5 Unpacking

WARNING
The product and the packaging material are not children's toys!
Do not let children play with plastic bags, films or small parts! There is a danger of choking or suffocating!
- Open the packaging and carefully remove the product.
- Remove the packaging material, as well as the packaging and transport safety devices (if present).
- Check whether the scope of delivery is complete.
- Check the product and accessory parts for transport damage. Immediately report any damage to the transport company that delivered the Product. Later claims will not be recognised.
- If possible, keep the packaging until the expiry of the warranty period.
- Familiarise yourself with the product by means of the operating manual before using for the first time.
- With accessories as well as wearing parts and replacement parts use only original parts. Spare parts can be obtained from your specialist dealer.
- When ordering please provide our article number as well as type and year of manufacture for the product.
6 Technical data
| Rated voltage | 20V |
| Paint container capacity | 1000 ml |
| Max. flow rate | 700 ml/min |
| Max. viscosity | 55 DIN/sec |
| Weight (without battery) | 1.35 kg |
Subject to technical changes!
Noise and vibration

WARNING
Noise can have serious effects on your health. If the machine noise exceeds 85 dB, please wear suitable hearing protection for you and persons in the vicinity.
The noise and vibration values have been determined in accordance with EN 60745-1.
Noise data
| Sound pressure level L_pA | 77.3 dB |
| Measurement uncertainty K_pA | 3 dB |
| Sound power level L_wA | 85.3 dB |
| Measurement uncertainty K_wA | 3 dB |
Vibration parameters (hand/arm vibration)
| Vibration an | ≤2.5 m/s2 |
| Measurement uncertainty K | 1.5 m/s2 |
The total vibration emission values specified and the device emissions values specified have been measured in accordance with a standardised test procedure and can be used for comparison of one electric tool with another.
The total noise emission values specified and the total vibration emission values specified can also be used for an initial estimation of the load.

WARNING
The noise emission values and vibration emission value can vary from the specified values during the actual use of the power tool, depending on the type and the manner in which the electric tool is used, and in particular the type of workpiece being processed.
Try to keep the stress as low as possible. For example: Limit working time. In doing so, all parts of the operating cycle must be taken into account (such as times in which the power tool is switched off or times in which it is switched on, but is not running under a load).
7 Safety instructions

WARNING
Read all safety warnings, instructions, illustrations and specifications provided with this power tool.
Failure to follow all instructions listed below may result in electric shock, fire and/or serious injury.
Save all warnings and instructions for future reference.
The term "power tool" in the warnings refers to your mains-operated (corded) power tool or battery-operated (cordless) power tool.
1) Work area safety
a) Keep your work area clean and well-lit. Cluttered or dark areas invite accidents.
b) Do not operate power tools in explosive atmospheres, such as in the presence of flammable liquids, gases or dust. Power tools create sparks which may ignite the dust or fumes.
c) Keep children and bystanders away while operating a power tool. Distractions can cause you to lose control.
2) Electrical safety
a) The connection plug of the electric tool must fit into the socket. Never modify the plug in any way. Do not use any adapter plugs with earthed (grounded) power tools. Unmodified plugs and matching outlets will reduce risk of electric shock.
b) Avoid body contact with earthed or grounded surfaces, such as pipes, radiators, ranges and refrigerators. There is an increased risk of electric shock if your body is earthed or grounded.
c) Do not expose power tools to rain or wet conditions. Water entering a power tool will increase the risk of electric shock.
d) Do not abuse the cord. Never use the cord for carrying, pulling or unplugging the power tool. Keep cord away from heat, oil, sharp edges or moving parts. Damaged or entangled cords increase the risk of electric shock.
e) When operating a power tool outdoors, use an extension cord suitable for outdoor use. Use of a cord suitable for outdoor use reduces the risk of electric shock.
f) If operating a power tool in a damp location is unavoidable, use a residual current device (RCD) protected supply. Use of an RCD reduces the risk of electric shock.
3) Personal safety
a) Stay alert, watch what you are doing and use common sense when operating a power tool. Do not use a power tool while you are tired or under the influence of drugs, alcohol or medication. A moment of inattention while operating power tools may result in serious personal injury.
b) Wear personal protective equipment and always safety goggles. Protective equipment such as a dust mask, non-skid safety shoes, safety helmet or hearing protection used for appropriate conditions will reduce personal injuries.
c) Prevent unintentional starting. Ensure the switch is in the off-position before connecting to power source and/or rechargeable battery, picking up or carrying the tool. Carrying power tools with your finger on the switch or energising power tools that have the switch on invites accidents.
d) Remove any adjusting tools or spanners/keys before turning the power tool on. A wrench or a key left attached to a rotating part of the power tool may result in personal injury.
e) Avoid abnormal postures. Keep proper footing and balance at all times. This enables better control of the power tool in unexpected situations.
f) Dress properly. Do not wear loose clothing or jewellery. Keep your hair and clothing away from moving parts. Loose clothes, jewellery or long hair can be caught in moving parts.
g) If devices are provided for the connection of dust extraction and collection facilities, ensure these are connected and properly used. Use of dust extraction can reduce dust-related hazards.
h) Do not let familiarity gained from frequent use of tools allow you to become complacent and ignore tool safety principles. A careless action can cause severe injury within a fraction of a second.
a) Do not force the power tool. Use the correct power tool for your application. The correct power tool will do the job better and safer at the rate for which it was designed.
b) Do not use the power tool if the switch does not turn it on and off. Any power tool that cannot be controlled with the switch is dangerous and must be repaired.
4) Power tool use and care
c) Disconnect the plug from the power source and/or remove the battery pack, if detachable, from the power tool before making any adjustments, changing accessories, or storing power tools. Such precautionary measures reduce the risk of starting the power tool accidentally.
d) Store idle power tools out of the reach of children and do not allow persons unfamiliar with the power tool or these instructions to operate the power tool. Power tools are dangerous in the hands of untrained users.
e) Maintain power tools and attachments. Check for misalignment or binding of moving parts, breakage of parts and any other condition that may affect the power tool's operation. If damaged, have the power tool repaired before use. Many accidents are caused by poorly maintained power tools.
f) Keep cutting tools sharp and clean. Properly maintained cutting tools with sharp cutting edges are less likely to bind and are easier to control.
g) Use electric tools, insertion tools, etc. according to these instructions. Take into account the working conditions and the work to be performed. Use of the power tool for operations different from those intended could result in a hazardous situation.
h) Keep handles and grasping surfaces dry, clean and free from oil and grease. Slippery handles and grasping surfaces do not allow for safe handling and control of the tool in unexpected situations.
5) Battery tool use and care
a) Recharge only with the charger specified by the manufacturer. A charger that is suitable for one type of battery pack may create a risk of fire when used with another battery pack.
b) Use power tools only with specifically designated battery packs. Use of any other battery packs may create a risk of injury and fire.
c) When battery pack is not in use, keep it away from other metal objects, like paper clips, coins, keys, nails, screws or other small metal objects, that can make a connection from one terminal to another. Shorting the battery terminals together may cause burns or a fire.
d) Under abusive conditions, liquid may be ejected from the battery; avoid contact. If contact accidentally occurs, flush with water. If liquid contacts eyes, additionally seek medical help. Liquid ejected from the battery may cause irritation or burns.
e) Do not use a battery pack or tool that is damaged or modified. Damaged or modified batteries may exhibit unpredictable behaviour resulting in fire, explosion or risk of injury.
f) Do not expose a battery pack or tool to fire or excessive temperature. Exposure to fire or temperature above 130 °C may cause explosion.
g) Follow all charging instructions and do not charge the battery pack or tool outside the temperature range specified in the instructions. Charging improperly or at temperatures outside the specified range may damage the battery and increase the risk of fire.
6) Service
a) Only have your power tool repaired by qualified specialists and only with original spare parts. This will ensure that the safety of the power tool is maintained.
b) Never service damaged battery packs. Service of battery packs should only be performed by the manufacturer or authorized service providers.
7.1 Safety instructions for paint spray guns
- Keep your work area clean, well lit and free from paint or solvent containers, cloths and other flammable materials. Possible danger of spontaneous combustion. Keep functional fire extinguishers / extinguishing equipment available at all times.
- Ensure good ventilation in the spraying area and sufficient fresh air in the entire room. Evaporating flammable solvents create an explosive environment.
- Do not spray or clean with materials whose flash point is below 21°C. Use materials based on water, low-volatility hydrocarbons or similar materials. Volatile evaporating solvents create an explosive environment.
- Do not spray in the vicinity of ignition sources such as static electricity sparks, naked flames, pilot lights, hot objects, motors, cigarettes and sparks from plugging in and unplugging power cables or operating switches. Such spark sources can cause ignition of the surrounding area.
- Do not spray materials that are not known to be hazardous. Unknown materials can create hazardous conditions.
- Wear additional personal protective equipment such as appropriate protective gloves and protective or respiratory mask when spraying or handling chemicals. Wearing protective equipment for appropriate conditions reduces exposure to hazardous substances.
- Be aware of any hazards arising from the material being sprayed. Observe the markings on the container or the manufacturer's information for the spray, including instructions to use personal protective equipment. Follow the manufacturer's instructions to reduce the risk of fire and injuries caused by toxins, carcinogens, etc.
- The product must not be used for spraying flammable substances. The product must not be cleaned with flammable solvents.
Residual risks
The product has been built according to state-of-the-art and the recognised technical safety rules. However, individual residual risks can arise during operation.
- Damage to hearing if the stipulated hearing protection is not worn.
-
Residual risks can be minimised if the "Safety Instructions" and the "Intended Use" together with the operating manual as a whole are observed.
-
Use the product in the way that is recommended in this operating manual. This is how to ensure that your product provides optimum performance.
• Furthermore, despite all precautions having been met, some non-obvious residual risks may still remain.

WARNING
This power tool generates an electromagnetic field during operation. This field can impair active or passive medical implants under certain circumstances. In order to prevent the risk of serious or deadly injuries, we recommend that persons with medical implants consult with their physician and the manufacturer of the medical implant prior to operating the power tool.

WARNING
In case of extended working periods, the operating personnel may suffer circulatory disturbances in their hands (vibration white finger) due to vibrations.
Raynaud's syndrome is a vascular disease that causes the small blood vessels on the fingers and toes to cramp in spasms. The affected areas are no longer supplied with sufficient blood and therefore appear extremely pale. The frequent use of vibrating products can cause nerve damage in people whose circulation is impaired (e.g. smokers, diabetics).
If you notice unusual adverse effects, stop working immediately and seek medical advice.
ATTENTION
The product is part of the 20V IXES series and may only be operated with batteries of this series. Batteries may only be charged with battery chargers of this series. Observe the manufacturer's instructions.

WARNING
Follow the safety and charging instructions and correct usage given in the instruction manual of your 20V IXES Series battery and charger. A detailed description of the charging process and further information are provided in this separate manual.
8 Assembly

WARNING
Danger of injury!
Remove the battery before all maintenance, cleaning or adjustment work.
ATTENTION
Always make sure the product is fully assembled before commissioning!
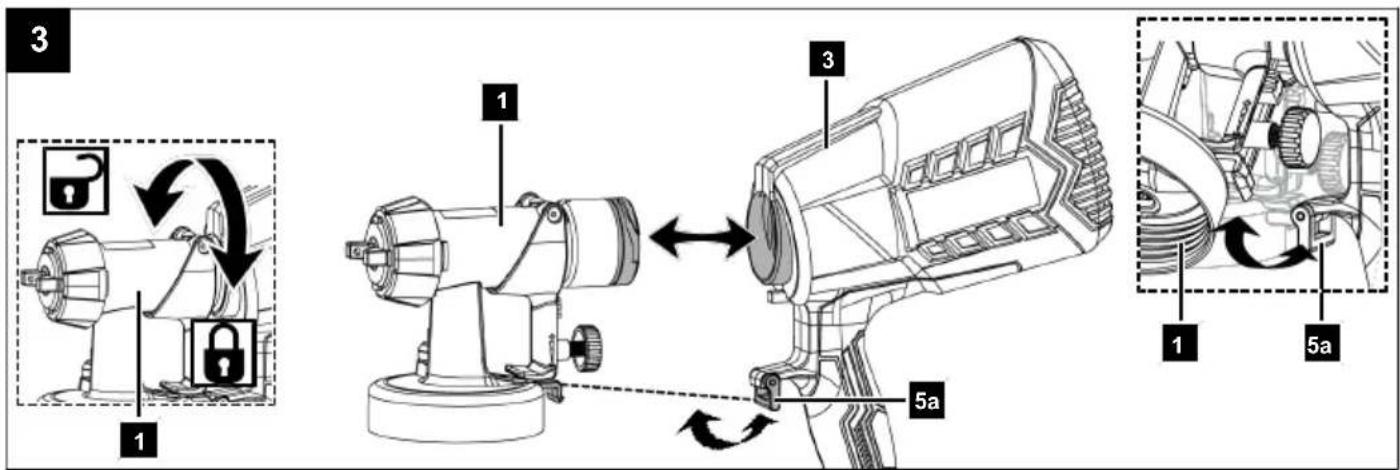
8.1 Assembling/removing the spray unit (1) (Fig. 3)
Assembling the spray unit (1):
-
Insert the motor unit (3) over the bayonet lock of the spray unit (1).
-
Turn the motor unit (3) clockwise until it audibly clicks into place.
- Close the lock (5a).
Dismantling the spray unit (1):
- Open the lock (5a).
- Turn the motor unit (3) anti-clockwise.
- Pull the spray unit (1) out of the motor unit (3).
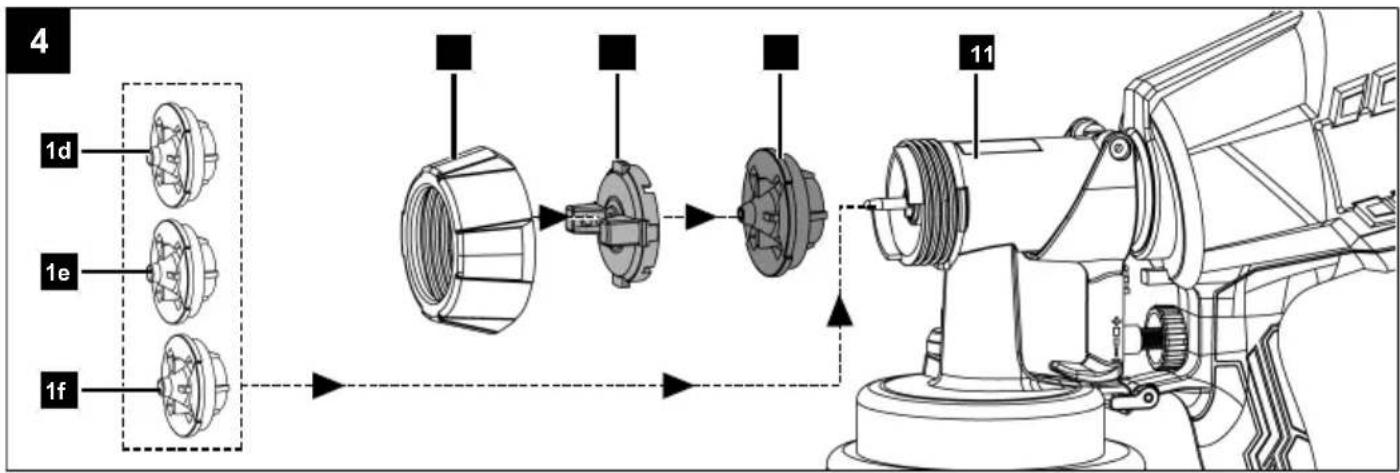
8.2 Fitting/replacing the nozzle (Fig. 4)
- Hold the product with the nozzle head (1b) facing upwards.
- Turn the union nut (1a) counter-clockwise.
-
Remove the union nut (1a) together with the nozzle head (1b) from the spray unit (1).
-
If a nozzle is already fitted:
-
Remove the nozzle from the spray unit (1).
-
If necessary, carefully lever out the nozzle.
-
Place the desired nozzle on the spray unit (1).
-
Place the nozzle head (1b) onto the inserted nozzle.
-
Secure everything by placing the union nut (1a) on top and turning it clockwise.
8.2.1 Selecting nozzles
Item Nozzle opening use
| 1c. | 1.5 mm | Low viscosity |
| 1d. | 2.0 mm | Water-based paints |
| 1e. | 2.5 mm | High viscosity |
| 1f. | 3.0 mm | Oil based paints |
The diameter of the nozzle opening is printed on the inside of the nozzles.
9 Before commissioning

WARNING
Danger of injury!
Remove the battery from the power tool before carrying out any work on the power tool (e.g. maintenance, tool change, etc.) and when transporting and storing it. There is a risk of injury if the on/off switch is operated unintentionally.
9.1 Preparing the spray surface
- Thoroughly cover a generous area around the area to be sprayed. Any uncovered areas may otherwise become contaminated.
- Roughen smooth surfaces slightly and then remove the sanding dust.
- Make sure that the spray surface is clean, dry and free of grease.
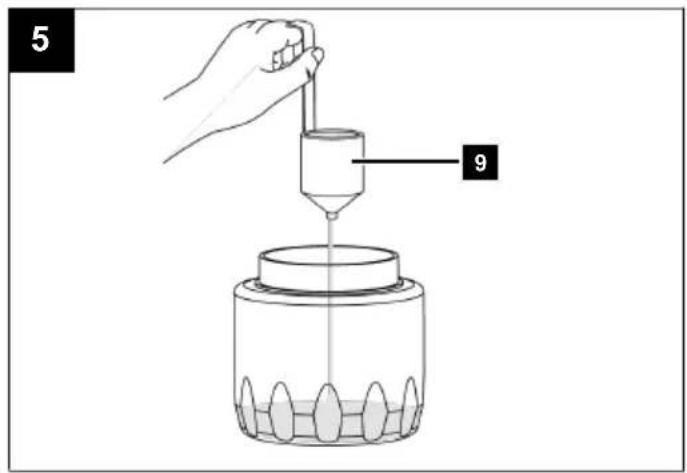
9.2 Preparing the spray material (Fig. 5)
The product allows you to process spray material up to a maximum of 55 DIN/sec. (viscosity). The viscosity is determined in a simplified measuring procedure with the enclosed viscosity measuring beaker (9).
- Using the viscosity measuring cup (9), scoop out enough spray material to fill it completely.
- Lift the viscosity measuring cup (9) out of the spray material and allow the liquid to drain out through the lower opening.
-
Measure the flow time in seconds until the flow of liquid stops and the liquid has completely passed through. This time is called "DIN seconds (DIN/sec.)".
-
If the value is too high (>55 DIN/sec.), add a diluent suitable for the sprayed material in small quantities gradually and mix.
-
Measure again and repeat the process until you have achieved a viscosity of less than 55 DIN/sec.
-
Rinse the viscosity measuring cup (9) thoroughly after each use to avoid falsified measurement results in future measurements.
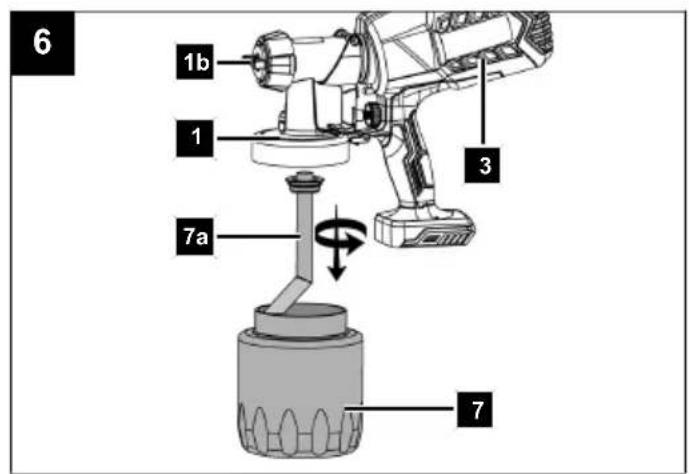
9.2.1 Filling with spray material (Fig. 6)
- Unscrew the paint container (7) from the spray unit (1) by turning it anti-clockwise.
- When working on low-lying objects, turn the riser pipe (7a) on the underside of the spray unit (1) forwards towards the nozzle head (1b). When working on higher objects, place the riser pipe (7a) towards the rear, in the direction of the motor unit (3).
- Fill the prepared spray material into the paint container (7) and screw it onto the spray unit (1).
Note:
Filling the paint container with the spray material using a paper funnel prevents clumping of the spray material and thus blockages in the product.
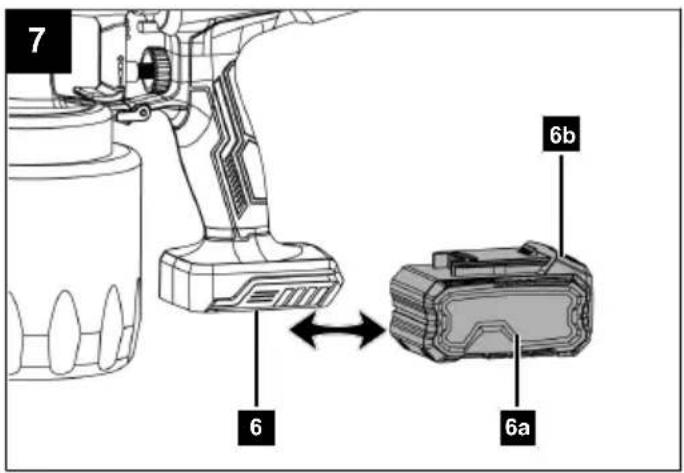
9.3 Inserting/removing the battery (6a) (Fig. 7)

CAUTION
Danger of injury!
Do not insert the battery until the product is ready for use.
Inserting the battery
- Push the battery (6a) into the battery mount (6). The battery (6a) clicks into place audibly.
Removing the battery
- Press the unlocking button (6b) of the battery (6a) and remove the battery (6a) from the battery mount (6).
10 Operation

WARNING
Danger of injury!
Remove the battery from the power tool before carrying out any work on the power tool (e.g. maintenance, tool change, etc.) and when transporting and storing it. There is a risk of injury if the on/off switch is operated unintentionally.

WARNING
Danger of injury!
Never point the product at yourself, other people or animals. There is a danger of injury.
ATTENTION
Make sure that the ambient temperature does not exceed 40^ C and does not fall below 4^ C during work and during the charging process.
ATTENTION
The product is part of the 20V IXES series and may only be operated with batteries of this series. Batteries may only be charged with battery chargers of this series. Observe the manufacturer's instructions.
Note:
Before each use, carry out a spray test on a piece of cardboard or similar material. This allows you to determine the appropriate settings before you begin your work.
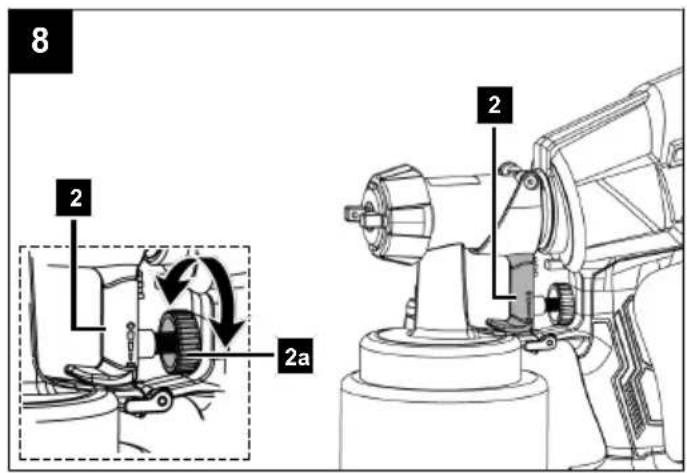
10.1 Switching the product on/off (Fig. 8)
Switching on
- Press the trigger (2) and hold it down.
Switching off
- Release the trigger lever (2).
10.2 Setting spray volume (Fig. 8)
The spray volume can be adjusted by turning the spray volume adjustment wheel (2a) on the trigger lever (2).
-
Turn the spray volume adjustment wheel (2a) in the "+" direction to increase the spray volume.
-
Turn the spray volume adjustment wheel (2a) in the “-” direction to reduce the spray volume.
We recommend that you determine the appropriate spray quantity through practical tests.
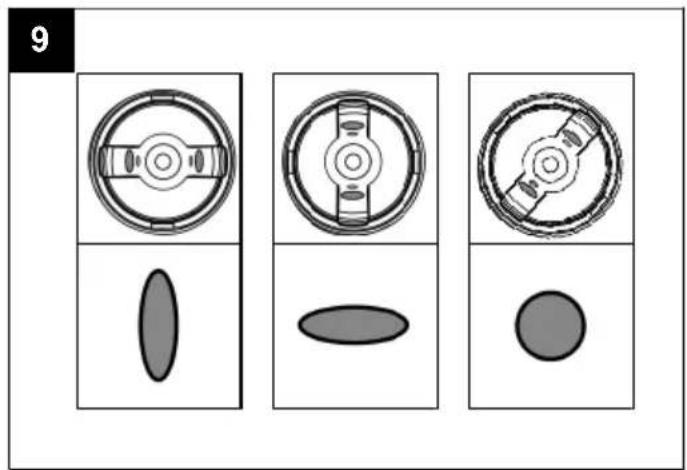
10.3 Adjusting the spray pattern (Fig. 9)
The spray pattern can be changed by turning the nozzle head (1b).
Vertical flat jet
- Turn the nozzle head (1b) so that the two raised sections are horizontal.
Horizontal flat jet
- Turn the nozzle head (1b) so that the two raised sections are vertical.
Round jet
- Turn the nozzle head (1b) so that the two raised sections are positioned diagonally.
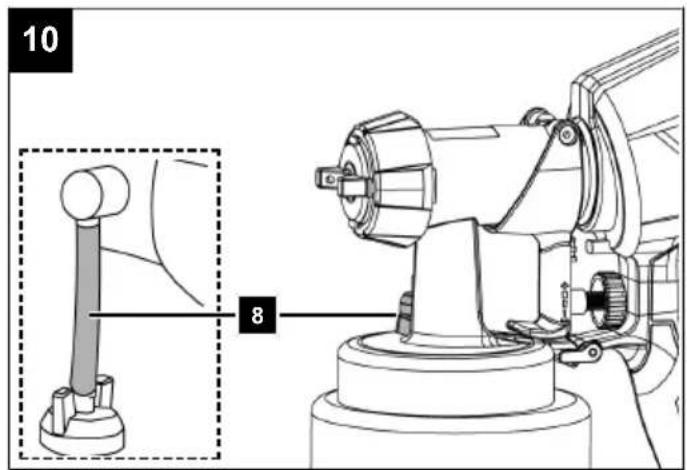
10.4 Ventilation hose (8) (Fig. 10)
Always pay attention to the ventilation hose (8) while working. If paint enters the ventilation hose (8) during operation, this indicates that the product is heavily contaminated or clogged. In this case, stop work immediately and thoroughly clean the product as described in 12.1.
10.5 After use (Fig. 7)
-
Switch off the product and remove the battery (6a).
-
Check and clean the product thoroughly after each use.
11 Working instructions
Note:
The spraying result depends crucially on the correct spraying technique.
- Always start at the edge of the spray area. - First make the spraying motion and only then press the trigger.
- Avoid interruptions within the spray area.
- Do not let the spraying motion come from your wrist, but from your arm. This ensures that the distance between the airless paint spray gun and the surface remains constant during the spraying process.
• Find the best distance to the surface by conducting practical tests.
- Smooth spray gun guidance results in a uniform surface quality.
- Wipe the nozzle and nozzle head regularly during use to prevent the nozzle from becoming clogged.
- Allow each strip to overlap by approximately 30%. This creates an even coating.
- Apply only one coat at a time. Always allow one coat to dry completely before applying another coat.
12 Cleaning and maintenance

WARNING
Have maintenance and repair tasks that are not described in this operating manual, carried out by a specialist workshop. Use only original spare parts.

WARNING
Improper maintenance or cleaning work can cause injuries!

WARNING
The product may start unexpectedly and cause injuries and burns during cleaning, repair and maintenance work.
- Switch the product off.
- Remove the battery.
- Allow the product to cool.
12.1 Cleaning
-
Keep protective devices, air vents and the motor housing as free of dust and dirt as possible. Rub the product clean with a clean cloth or blow it off with compressed air at low pressure. We recommend that you clean the product directly after every use.
-
Ventilation openings must always be free.
-
Do not use any cleaning products or solvents; they could attack the plastic parts of the product. Make sure that no water can penetrate the product interior.
12.1.1 Cleaning the spray unit (1) (Fig. 3, 4, 6, 10)
- Remove the paint container (7) and rinse it thoroughly with water.
- Fill the paint container (7) with water and screw it back onto the spray unit (1).
- Let the all of the water run through the product by actuating the trigger lever (2).
- Remove the mounted nozzle, the paint container (7) and, if necessary, the ventilation hose (8) from the spray unit (1). Clean all individual parts with the cleaning needle (10) and the cleaning brush (11).
- Thoroughly rinse the riser pipe (7a) and the paint container (7). Pass the cleaning brush (11) through the riser pipe (7a) to remove all deposits
- Allow all parts to dry thoroughly before reassembling the spray unit (1).
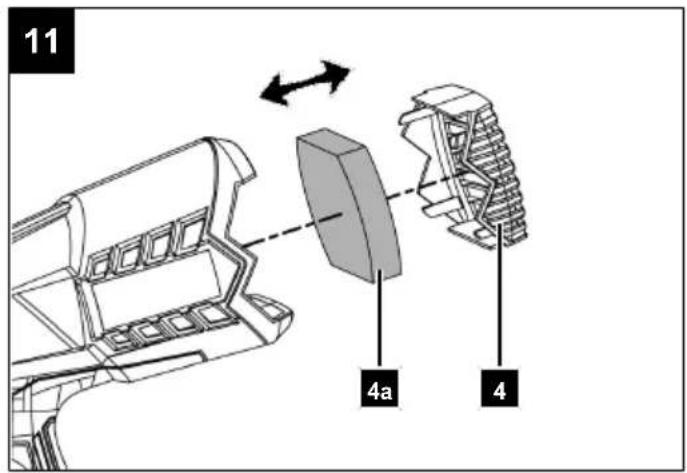
12.1.2 Cleaning the air filter (4a) (Fig. 11)
- Pull the air filter cover (4) backwards away from the product.
- Remove the air filter (4a) and check it for damage. Replace any damaged elements if necessary.
- Wash the air filter (4a) thoroughly under running water.
-
Allow the air filter (4a) to dry completely.
-
Insert the air filter (4a) and replace the air filter cover (4) on the product.
12.2 Maintenance
- Check the product for obvious defects such as loose, worn or damaged parts before each use.
- For safety reasons, replace any damaged or cracked tool attachments.
- Check the covers and protective devices for damage and correct seating. Replace them if necessary.
13 Storage and transport

WARNING
Danger of injury and burning!
The product can start unexpectedly and cause injuries.
- Switch off the engine before carrying out any cleaning or maintenance work.
- Allow the engine to cool down.
- Remove the battery.
13.1 Storage
Preparation for storage
- Remove the battery from the product before prolonged storage (e.g. winter storage).
- Clean and check the product for damage.
-
Store the battery in a partially charged state.
-
When stored, check the battery charge level every three months.
Store the product and its accessories in a dark, dry and frost-free place that is inaccessible to children.
The optimum storage temperature is between 5°C and 30°C.
Store the product in its original packaging.
Cover the product to protect it from dust or moisture. Store the operating manual with the product.
13.2 Transport
- Allow the product to cool.
- Protect the product from impacts, shocks and severe vibrations, e.g. during vehicular transport.
- Secure the product to prevent it slipping and toppling.
14 Repair and ordering spare parts
With this product, it is necessary to note that the following parts are subject to natural or usage-related wear, or that the following parts are required as consumables.
ATTENTION
According to the German Product Liability Act, no liability is accepted for damage caused by improper repairs or by not using original spare parts.
Such work should be performed by a customer service centre or an authorised specialists. The same applies to accessory parts.
Spare parts and accessories can be obtained from our Service Centre. To do this, scan the QR code on the front page.
14.1 Ordering spare parts
Please provide the following information when ordering spare parts:
- Model designation
- Item number
- Type plate data
Spare parts / accessories
| Battery pack SBP2.0 - Article no.: 7909201708 |
| Battery pack SBP4.0 - Article no.: 7909201709 |
| Battery charger SBC2.4A - Article no.: 7909201710 |
| Battery charger SBC4.5A - Article no.: 7909201711 |
| Battery charger SDBC2.4A - Article no.: 7909201712 |
| Battery charger SDBC4.5A - Article no.: 7909201713 |
| StarterKit SBSK2.0 - Article no.: 7909201720 |
| StarterKit SBSK4.0 - Article no.: 7909201721 |
15 Disposal and recycling
Notes for packaging


The packaging materials are recyclable. Please dispose of packaging in an environmentally friendly manner.
Notes on the disposal of electrical and electronic equipment

Waste electrical and electronic equipment does not belong in household waste, but must be collected and disposed of separately!
• Used batteries that are not installed permanently in the old device must be removed non-destructively before disposal! Their disposal is regulated by the battery act.
- Owners or users of electrical and electronic devices are legally obliged to return them after use.
- The end user is responsible for deleting their personal data from the old device being disposed of!
- The symbol of the crossed-out dustbin means that waste electrical and electronic equipment must not be disposed of with household waste.
- Waste electrical and electronic equipment can be handed in free of charge at the following places:
– Public disposal or collection points (e.g. municipal works yards)
- Points of sale of electrical appliances (stationary and online), provided that dealers are obliged to take them back or offer to do so voluntarily.
- Up to three waste electrical devices per type of device, with an edge length of no more than 25 centimetres, can be returned free of charge to the manufacturer without prior purchase of a new device from the manufacturer or taken to another authorised collection point in your vicinity.
- Further supplementary take-back conditions of the manufacturers and distributors can be obtained from the respective customer service.
- If the manufacturer delivers a new electrical appliance to a private household, the manufacturer can arrange for the free collection of the old electrical appliance upon request from the end user. Please contact the manufacturer's customer service for this.
• These statements only apply to devices installed and sold in the countries of the European Union and which are subject to the European Directive 2012/19/EU. In countries outside the European Union, different regulations may apply to the disposal of waste electrical and electronic equipment.
Notes on lithium-ion batteries

Remove the battery before disposing of the device!
- Do not dispose of batteries in household waste, in a fire (risk of explosion) or in water. Damaged batteries can harm the environment and your health if toxic vapours or liquids escape.
- Defective or used batteries must be recycled in accordance with Regulation (EU) 2023/1542.
- Hand in the battery and the battery charger at a recycling centre. The plastic and metal parts used can be separated by type and thus recycled.
- Dispose of batteries when discharged. We recommend covering the poles with an adhesive strip to protect against a short circuit. Do not open the battery.
- Dispose of batteries in accordance with local regulations. Return batteries to a used battery collection point where they can be recycled in an environmentally friendly manner. Ask your local waste disposal company about this.
16 Troubleshooting
The following table shows fault symptoms and describes remedial measures in the event of your product failing to work properly. If you cannot localise and rectify the problem with this, please contact your service workshop.
| Fault Possible cause Remedy | ||
| Product does not start On/off switch | ch damaged Contact the service | centre |
| Battery flat or incorrectly inserted | Check the battery | |
| Product stops during operation | product overloaded by spraying material being too viscous | Empty the product and clean it thoroughly. |
| Battery power too low Charge | the battery | |
17 EU Declaration of Conformity
Translation of the original Declaration of Conformity
Manufacturer:
Scheppach GmbH
Günzburger Straße 69
D-89335 Ichenhausen
We declare under our sole responsibility that the product described here complies with the applicable directives and standards.
Brand: SCHEPPACH
Art. designation: Cordless paint spraying system - C-APS700-X
Art. no. 5906006900
EU directives:
2014/30/EU, 2006/42/EG, 2011/65/EU*,
* The object of the declaration described above fulfils the regulations of the directive 2011/65/EU of the European Parliament and Council from 8th June 2011, on the restriction of the use of certain hazardous substances in electrical and electronic equipment.
Applied standards:
EN 60745-1:2009/A11:2010;
EN 50580:2012/A1:2013;
EN IEC 55014-1:2021;
EN IEC 55014-2:2021
Documentation authorised representative:
Georg Kohler
Günzburger Str. 69
D-89335 Ichenhausen
Division Manager Product Center

Andreas Pecher
Head of Project Management
18 Warranty conditions - Scheppach 20V IXES series
Revision date 25/04/2024
Dear customer,
our products are subject to strict quality checks. However, if a product does not function perfectly, we deeply regret this and ask that you contact our customer service at the address specified below. We will also be glad to assist you by telephone via the service number. The following information is intended to help you to process and settle your claim without any problems.
For the assertion of warranty claims, the following applies:
-
The warranty conditions govern our additional manufacturer warranty services for purchasers (private end consumers) of new products. The statutory warranty claims are not affected by this warranty. This is the responsibility of the dealer who you purchased the product from.
-
The manufacturer's warranty only covers defects in a new product purchased by you that are due to a material or manufacturing defect. If material or manufacturing defects occur during the warranty period, the manufacturer as guarantor shall provide one of the following services of its choice under this warranty:
– Free repair of the goods
- Free replacement of the goods with an item of equal value (if necessary also replacement with a successor model if the original goods are no longer available).
Replaced products or parts shall become our property. Please note that our products were not designed for commercial, trade or professional use. A warranty claim is therefore not valid if the product has been used in commercial, trade or industrial operations within the warranty period or has been subjected to equivalent stress.
3. The following are excluded from our warranty services:
- Damage to the product which was caused by non-observance of the assembly instructions, improper installation, non-observance of the operating instructions (e.g. connection to an incorrect mains
voltage or type of current) or the maintenance and safety regulations or use of the product in unsuitable environmental conditions as well as by insufficient care and maintenance.
- Damage to the product caused by misuse or improper application (such as overloading the product or using non-approved tools and accessories), penetration of foreign bodies into the product (such as sand, stones or dust), transport damage, use of force or external influences (such as damage caused if dropped).
- Damage to the product or parts of the product which is due to intentional, normal (operational) or other natural wear as well as damage and/or wearing of wear parts.
- Defects in the product which have been caused by the use of accessories, expansions or spare parts that are not original parts or are not used as intended.
– Products on which changes or modifications have been made.
– Minor deviations from the target characteristics which are irrelevant for the value and usability of the product.
– Products on which unauthorised repairs have been carried out, in particular by an unauthorised third party. - If the marking on the product or the identification information of the product (machine label) is missing or illegible.
-
Products that are very dirty and are therefore refused by the service personnel.
– Claims for damages and consequential damages are generally excluded from this warranty. -
The warranty period is usually 5 years (12 months for batteries/rechargeable batteries) and starts from the date of purchase of the product. The date on the original purchase receipt is decisive. Warranty claims must be made immediately after becoming aware of them. The assertion of warranty claims after expiry of the warranty period is excluded. The repair or replacement of the product does not result in an extension of the warranty period, nor does this service initiate a new warranty period for the product or for any installed spare parts. This also applies when using an on-site service. A prerequisite for a claim under the warranty is that the manufacturer, as the guarantor, is enabled to examine the warranty claim by sending in the goods at the manufacturer's request. Care must be taken to avoid damage during transport by using appropriate packaging. The product concerned is to be cleaned and returned to the service centre together with a copy of the purchase receipt, which must include the date of purchase and the product designation. If a product is sent in incomplete without the complete scope of delivery, the missing accessories will be charged / deducted in value if the product is exchanged or in the event of a refund. Partially or completely dismantled products cannot be accepted as a warranty claim. In the event of an unjustified complaint or if outside the warranty period, the purchaser shall generally bear the transport costs and the transport risk. Please report a warranty claim in advance to the service centre (see below). It is generally agreed upon that the defective product will be returned to the service address given below with a brief description of the fault by organised return or, in the case of repair outside the warranty period, with sufficient postage, taking the appropriate packaging and shipping guidelines into account. Please note that your product (depending on the model) will be free of all operating materials when returned for safety reasons. The product sent to our service centre must be packaged in such a way that damage to the product under complaint is avoided during transport. After successful repair / replacement, we will send the product back to you free of charge. If products cannot be repaired or replaced, a sum up to the purchase price of the defective product may be refunded at our own discretion, taking into account any deduction for wear and tear. These warranties are only for the benefit of the original private purchaser and cannot be assigned or transferred.
-
Extension of the warranty period to 10 years: Scheppach offers an additional warranty extension of 5 years on products of the Scheppach 20V series. Thus, the warranty period for these products totals 10 years. Batteries / rechargeable batteries, battery chargers and accessories are excluded from this. You can claim this warranty extension by registering your Scheppach product from this range at https://garantie.scheppach.com no later than 30 days from the date of purchase. After registering online successfully, you will receive confirmation for the item-related warranty extension.
-
In order to submit your warranty claim, please contact our service centre.
Preferably, please use our form on our homepage: https://shop.scheppach.com/contact
Please do not send us any products without first contacting and registering with our service centre.
Contacting our service centre first is mandatory to claim these warranty promises. Warranty claims must be made before expiry of the warranty period within 14 days of discovery of the defect. For this purpose, the original purchase receipt and, if necessary, confirmation of the item-related warranty extension are required.
-
Processing time - We normally process complaint consignments within 14 days of receipt at our service centre. If, in exceptional cases, the processing time mentioned is exceeded, you will be informed in good time.
-
Wear parts are generally excluded from the warranty! - Wear parts are: a) supplied, attached and/or installed batteries / rechargeable batteries as well as b) all model-dependent wear parts (i.e. belts, saw blades, tool attachments, grinding discs, filters, carbon brushes etc., see operating manual). The warranty does not cover batteries or rechargeable batteries that are deeply discharged or those with damaged housing or battery terminals.
-
Cost estimate - Products that are not covered or no longer covered by the warranty will be repaired at extra cost. Upon request to our service centre, you can send in the defective products for a cost estimate and, if necessary, give the service centre approval for the repair in writing (by post, e-mail). No further processing will take place without approval for the repair.
The warranty conditions only apply in the current version at the time of the complaint and, if necessary, can be found on our homepage (www.scheppach.com).
In case of translations, the German version is decisive.
89335 Ichenhausen (Germany)
Tel: +800 4002 4002 ·
E-Mail: customerservice.GB@scheppach.com
Internet: https://www.scheppach.com
We reserve the right to make changes to the warranty conditions at any time without prior notice.
Sommaire
Günzburger Straße 69
D-89335 Ichenhausen
Remarque :
Günzburger Straße 69
D-89335 Ichenhausen
Division Manager Product Center

Head of Project Management
18 Conditions de garantie - série IXES 20 V de Scheppach
https://shop.scheppach.com/contact
Günzburger Straße 69
D-89335 Ichenhausen, Germania
Nota:
1f. 1 x Ugello 3,0 mm
Günzburger Straße 69
D-89335 Ichenhausen
Division Manager Product Center

Andreas Pecher
Head of Project Management
https://shop.scheppach.com/contact
Günzburger Straße 69
D-89335 Ichenhausen
Aanwijzing:
Günzburger Straße 69
D-89335 Ichenhausen
Division Manager Product Center

Andreas Pecher
Head of Project Management
https://shop.scheppach.com/contact
Günzburger Straße 69
1d. 1 Boquilla 2,0 mm
1e. 1 Boquilla 2,5 mm
1f. 1 Boquilla 3,0 mm
Günzburger Straße 69
D-89335 Ichenhausen
Division Manager Product Center

Andreas Pecher
Head of Project Management
https://shop.scheppach.com/contact
customerservice.ES@scheppach.com –
Internet: https://www.scheppach.com
Günzburger Straße 69
Günzburger Straße 69
D-89335 Ichenhausen
Division Manager Product Center

Head of Project Management
https://shop.scheppach.com/contact
Günzburger Straße 69
D-89335 Ichenhausen
Upozornění:
Günzburger Straße 69
D-89335 Ichenhausen
Division Manager Product Center

Andreas Pecher
Head of Project Management
https://shop.scheppach.com/contact
Günzburger Straße 69
D-89335 Ichenhausen
Upozornenie:
Günzburger Straße 69
D-89335 Ichenhausen
Division Manager Product Center

Head of Project Management
https://shop.scheppach.com/contact
Günzburger Straße 69
D-89335 Ichenhausen
Megjegyzés:
Günzburger Straße 69
D-89335 Ichenhausen
Division Manager Product Center

Andreas Pecher
Head of Project Management
Günzburger Straße 69
D-89335 Ichenhausen
Wskazówka:
1d. 1 x Dysza 2,0 mm
1e. 1 x Dysza 2,5 mm
1f. 1 x Dysza 3,0 mm
Günzburger Straße 69
D-89335 Ichenhausen
Division Manager Product Center

Head of Project Management
https://shop.scheppach.com/contact
Günzburger Straße 69
D-89335 Ichenhausen
Napomena:
Prema važećem njemačkom Zakonu o odgovornosti za proizvode, proizvođač ovog proizvoda ne odgovara za štete koje nastanu na ovom proizvodu ili koje ovaj proizvod uzrokuje u slučaju:
1d. 1 x Sapnica 2,0 mm
1e. 1 x Sapnica 2,5 mm
1f. 1 x Sapnica 3,0 mm
-
1 x Posudica za mjerenje viskoznosti
-
1 x lgla za čišćenje
-
1 x Četka za čišćenje
1 x Akumulatorski sustav za prskanje boje
1 x Priručnik za uporabu
5 Raspakiravanje

UPOZORENJE
Günzburger Straße 69
D-89335 Ichenhausen
Division Manager Product Center

Andreas Pecher
Head of Project Management
https://shop.scheppach.com/contact
Ne šaljite nam proizvode bez prethodnog stupanja u kontakt i prijave našem servisnom centru.
Günzburger Straße 69
D-89335 Ichenhausen
Napotek:
Proizvajalec tega izdelka skladno z veljavnim zakonom o odgovornosti za izdelke ne jamči za poškodbe na tem izdelku ali poškodbe s tem izdelkom, do katerih pride pri:
Günzburger Straße 69
D-89335 Ichenhausen
Division Manager Product Center

Head of Project Management
18 Garancijski pogoji – serija Scheppach 20V IXES
Datum revizije 25.04.2024
Spoštovana stranka,
https://shop.scheppach.com/contact
Prosimo, da nam ne pošiljate nobenih izdelkov, ne da bi nas prej kontaktirali in se registrirali pri našem servisnem centru.
Za uveljavljanje te garancije morate obvezno najprej stopiti v stik z našim servisnim centrom.
Günzburger Straße 69
D-89335 Ichenhausen
Juhis:
Günzburger Straße 69
D-89335 Ichenhausen
Division Manager Product Center

Andreas Pecher
Head of Project Management
18 Garantiitingimused – Scheppach 20V IXES seeria
https://shop.scheppach.com/contact
E-post: customerservice.EE@scheppach.com
Internet: https://www.scheppach.com
Günzburger Straße 69
D-89335 Ichenhausen
Nuoroda:
Günzburger Straße 69
D-89335 Ichenhausen
Division Manager Product Center

Andreas Pecher
Head of Project Management
Günzburger Straße 69
Günzburger Straße 69
D-89335 Ichenhausen
Division Manager Product Center

Andreas Pecher
Head of Project Management
https://shop.scheppach.com/contact
E-pasts: customerservice.LV@scheppach.com
Internets: https://www.scheppach.com
Günzburger Straße 69
D-89335 Ichenhausen
Anvisning:
Günzburger Straße 69
Division Manager Product Center

Head of Project Management
18 Garantivillkor – Scheppach 20V IXES Serie
Revisionsdatum 2024-04-25
Ärade kund,
https://shop.scheppach.com/contact
Günzburger Straße 69
D-89335 Ichenhausen
Huomautus:
Günzburger Straße 69
D-89335 Ichenhausen
Division Manager Product Center

Head of Project Management
https://shop.scheppach.com/contact
Günzburger Straße 69
D-89335 Ichenhausen, Tyskland
Bemærk:
Günzburger Straße 69
D-89335 Ichenhausen, Tyskland
Division Manager Product Center

Andreas Pecher
Head of Project Management
18 Garantivilkår – Scheppach 20V IXES-serie
Revisionsdato 25-04-2024
Kære kunde,
https://shop.scheppach.com/contact
Günzburger Straße 69
D-89335 Ichenhausen
Merknad:
10.2 Stille inn spraymengden (fig. 8)
Forberedelse for lagring
Günzburger Straße 69
D-89335 Ichenhausen
Division Manager Product Center

Head of Project Management
18 Garantibetingelser – Scheppach 20V IXES serie
https://shop.scheppach.com/contact
E-post: customerservice.NO@scheppach.com
Internett: https://www.scheppach.com
Günzburger Straße 69
D-89335 Ichenhausen, Германия
Указание:
Günzburger Straße 69
D-89335 Ichenhausen
Division Manager Product Center
J. J. J. J.
Andreas Pecher
Head of Project Management
https://shop.scheppach.com/contact
Günzburger Straße 69
D-89335 Ichenhausen
Υπόδειξη:
Günzburger Straße 69
D-89335 Ichenhausen
Division Manager Product Center

Andreas Pecher
Head of Project Management
https://shop.scheppach.com/contact
89335 Ichenhausen (Germany)
Tηλ: +800 4002 4002
E-mail: customerservice.GR@scheppach.com ·
Internet: https://www.scheppach.com
Günzburger Straße 69
D-89335 Ichenhausen
Indicatie:
Günzburger Straße 69
D-89335 Ichenhausen
Division Manager Product Center

Head of Project Management
https://shop.scheppach.com/contact
Günzburger Straße 69
D-89335 Ichenhausen
Napomena:
1d. 1 x Mlaznica 2,0 mm
1e. 1 x Mlaznica 2,5 mm
1f. 1 x Mlaznica 3,0 mm
-
1 x Posuda za merenje viskoznosti
-
1 x Igla za čišćenje
-
1 x Četka za čišćenje
- Uklonite akumulator.
Günzburger Straße 69
D-89335 Ichenhausen
Division Manager Product Center

Andreas Pecher
Head of Project Management
18 Uslovi garancije - Scheppach 20V IXES serija
Datum revizije 25.04.2024.
Poštovani kupci,
naši proizvodi podležu strogim kontrolama kvaliteta. Uko- liko ovaj uređaj i pored toga ne bude radio besprekorno, žao nam je zbog toga i molimo Vas da se obratite našoj servisnoj službi na adresi koja je navedena u nastavku. Sa zadovoljstvom Vam stojimo na raspolaganju i putem telefona preko servisnog broja. Napomene u nastavku treba da vam posluže za obradu i regulaciju bez problema i slučaju štete.
https://shop.scheppach.com/contact
Nemojte nam slati proizvode a da nas prethodno niste kontaktirali i prijavili kod našeg servisnog centra.
Ta dobijanje ovih usluga po osnovu garancije obavezno je da prvo kontaktirate naš servisni centar.
Zahtevi po osnovu garancije moraju da se podnesu pre isteka garantnog roka u roku od 14 dana posle utvrđivanja nedostatka. Za to je potreban originalni račun i po potrebi potvrda produženja garancije za određeni proizvod.
-
Trajanje obrade - u redovnim slučajevima obrađuje- mo reklamacione pošiljke u roku od 14 dana posle do- stave u naš servisni centar. Ako se navedeno trajanje obrade u izuzetnim slučajevima prekorači, pravoreme- no ćemo vas obavestiti.
-
Potrošni delovi - potrošni delovi su: a) isporučene, priključene i/ili ugrađene baterije / akumulatori kao i b) svi od modela zavisni potrošni delovi (između ostalog kaiševi, listovi testere, alati za intervenciju, brusni diskovi, filteri, ugljene četkice, itd., vidi uputstvo za upotrebu). Izuzeti od garancije su potpuno ispražnjene ili na polovima oštećene baterije odn. akumulatori.
-
Obračun troškova - proizvode koji nisu ili nisu više pokriveni garancijom popravljamo uz naknadu. Na upit kod našeg servisnog centra neispravne uređaje možete poslati da bi se napravio obračun troškova i po potrebi servisno centru poslati pismeno (poštom, e-poštom) odobrenje za popravku. Bez odobrenja popravke neće se vršiti dalja obrada.
Günzburger Straße 69
D-89335 Ichenhausen
İthalatçı:
Günzburger Straße 69
D-89335 Ichenhausen
Division Manager Product Center

Head of Project Management
Notizen
CE
SCHEPPACH GMBH
Günzburger Str. 69
D-89335 Ichenhausen

Stand der Informationen · Status of the information · Version des informations · Versione delle informazioni · Stand van de informatie · Información disponible · Versão das informações · Stav informaci · Stav informácií · Az információk kelte · Stan informacji · Verzija informacija · Stanje informacij · Informatsiooni seis · Informacijos data · Informácijas stāvoklis · Informationens status · Tietojen tila · Informationsstatus · Status for informasjon · Последна редакция на информацията · Έκδοση των πληροφοριών · Stadiul informațiilor · Izdanje informacija · Bilgilerin güncelliği Update: 01/2026 · Ident.-No.: 5906006900