Breeze - Electric bike Urban Arrow - Free user manual and instructions
Find the device manual for free Breeze Urban Arrow in PDF.


User questions about Breeze Urban Arrow
0 question about this device. Answer the ones you know or ask your own.
Ask a new question about this device
Download the instructions for your Electric bike in PDF format for free! Find your manual Breeze - Urban Arrow and take your electronic device back in hand. On this page are published all the documents necessary for the use of your device. Breeze by Urban Arrow.
USER MANUAL Breeze Urban Arrow
Breeze Longtail e-bike
Original operating instruction
natural_image
Line drawing of a modern bicycle with front wheel, suspension frame, and rear wheels (no text or symbols)EPAC: Electrically Power Assisted Cycle
CE UK CA
We hope you'll enjoy your new Urban Arrow electric longtail bike!
Please read the most important information about using the Breeze in this user manual, so that you can enjoy many pleasant and safe journeys. Read the instructions thoroughly and carefully before taking your first ride. Various warning signs and signal words are used to reflect the potential situations. Pay close attention to these.
This manual has been compiled with great care. Nevertheless, errors may occur. Printing and typesetting errors reserved. No rights can be derived from the contents of this manual.

WARNING
Serious injury and/or damage to the Breeze due to not following these instructions.
- Please read these instructions carefully before using the Breeze for the first time.
- Familiarise yourself with the concept and meaning of the safety instructions.
• → 2. Warnings, safety instructions and notes - The manufacturer is not liable for any injury or damage resulting from failure to comply with safety regulations and instructions. 33. Warranty provisions

INFORMATION
The Breeze is also referred to below as an electric longtail or bike.
Your Breeze is an electrically powered bike (EPAC: Electrically Power Assisted Cycle) for transporting cargo and passengers. It supports you with an auxiliary drive when the support mode is activated and as long as you pedal. You can control how much support you want. The support level can be set in different support modes. The pedal assistance depends on your pedalling force, cadence and riding speed. The assistance is switched off as soon as you stop pedalling, when manually switch off the assistance, the battery is empty or if you reach a speed of more than 25 km/h,
Content
The Breeze - structure and markings 6
- Stickers, labels and engraved numbers 8
1.1 Label with user information 8
1.2 Barcode sticker 9
1.3 Engraved number 9
1.4 Urban Arrow Connected 9
-
Warnings, safety instructions and notices 9
-
This manual and other help 10
-
General safety instructions 11
-
Intended use 12
5.1 Operating regulations 13
5.2 Rules of conduct 14
-
Legal requirements for participation in road traffic 14
-
Bike weight 14
-
Maximum permissible total weight 15
-
Maximum permissible load weight for each loading point 16
-
Racks 16
10.1 MIK Click-system 17
- Passenger transport 19
11.1 Transporting children in child seats 20
11.2 Transporting children in the protection bar 22
11.3 Seat cushions 24
11.4 Footrests 24
11.5 Transporting passengers on the rack 25
11.6 Examples of passenger transport 26
- Bringing luggage 28
12.1 Recommended bike bags 29
12.2 Bike trailers 30
-
Tightening torques for screw connections 30
-
Before the first ride 31
14.1 Adjusting 31
14.2 Familiarise yourself with the lighting 32
14.3 Practising driving and braking 32
-
Before every ride 32
-
Bike frame 34
-
Saddle height 34
17.1 Adjusting the saddle height 35 - Adjusting the position and angle of the saddle 36
- Adjusting the handlebars and stem 38
19.1 Adjusting the position of the rudder 38
19.2 Adjusting the handlebar height 39
19.3 Aligning the handlebar 40 - Bike handles 40
- Suspension front fork 41
21.1 Changing front fork spring preload 42
21.2 Lock out 42 - Brakes 42
22.1 Brake levers 44 - Gears 45
- Belts 45
24.1 Measuring belt tension 46
24.2 Adjusting the belt tension 46 - Rims 48
- Outer and inner tubes 48
- Transporting your bike 49
27.1 Transport by car or camper van 49
27.2 Transporting your bike by bus, train or plane 49 - Parking your bike 49
- Storing your bike 50
- Protection against theft, vandalism and loss 50
30.1 Urban Arrow Connected 51
30.2 Frame and battery lock: order additional keys 51
30.3 Key rings 51 - Cleaning the bike and its parts 52
- Disposal 52
- Warranty provisions 53
- Maintenance intervals 53
- Declaration of conformity 54
The Breeze – structure and markings
text_image
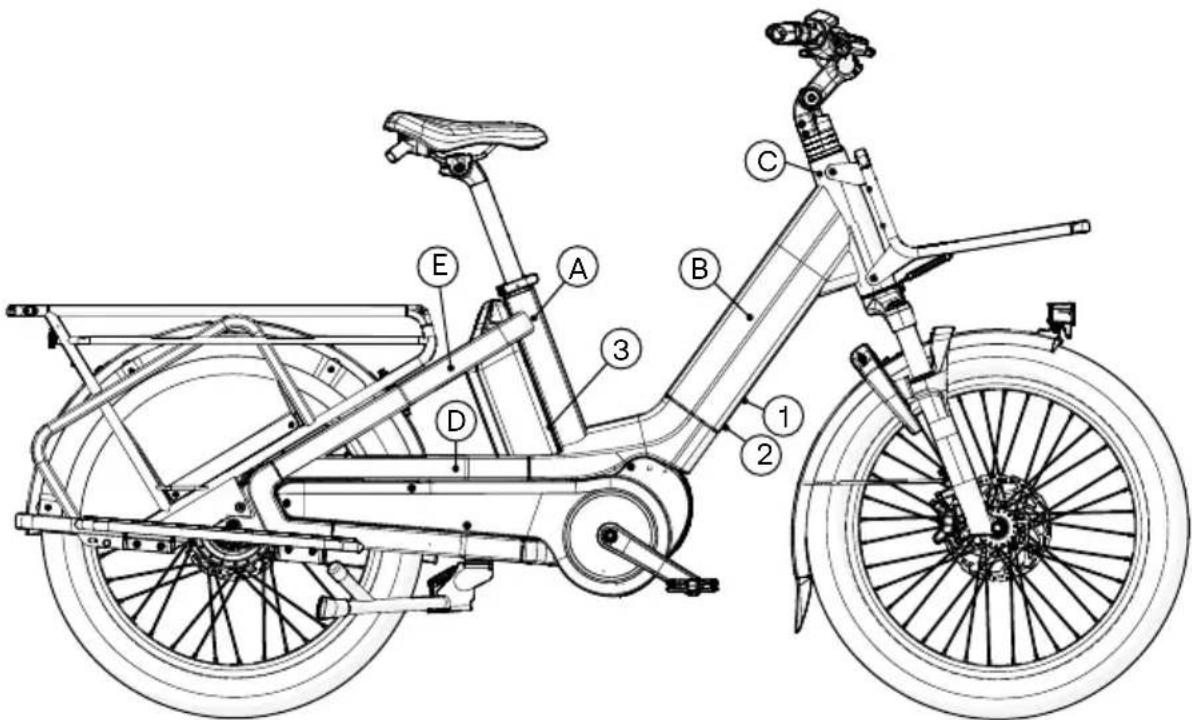
Technical diagram of a bicycle with labeled parts including front wheel, rear wheel, and side seatsFig. 1. The Breeze including scope of delivery
Frame Parts Markings Included
| a. Seat tube | Seat post clamp | 1. Label with user information | Charger |
| b. Down tube | Seat post Saddle | Charging cable | |
| c. Head tube | Handlebar stem | 2. Barcode sticker | Pedals |
| d. Rear stays | Bike handles | 3. Frame number | Display Instructions: |
| e.Rear dropouts | Bell | • Bosch | |
| Brake levers | • Gates | ||
| Shifter levers | • Suntour | ||
| Display and holder | • Safety information | ||
| Front rack | • Quick Start Guide | ||
| Headset bearings | |||
| Front light, including reflectors (front and rear) | |||
| Ring lock | |||
| Mudguards (front and rear) | |||
| Suspension fork | |||
| Tyres, including reflector Rim | |||
| Spokes | |||
| Spoke magnet | |||
| Speed sensor | |||
| Front brake | |||
| Brake disc | |||
| Valve | |||
| Thru axle | |||
| Motor | |||
| Pedal | |||
| Crank | |||
| Belt guard | |||
| Belt | |||
| Bike stand | |||
| Luggage rack | |||
| Gear hub | |||
| Rear light | |||
| Charger Battery |
EN
NL
DE
FR
DA
SE
- Stickers, labels and engraved numbers
1.1 Label with user information
text_image
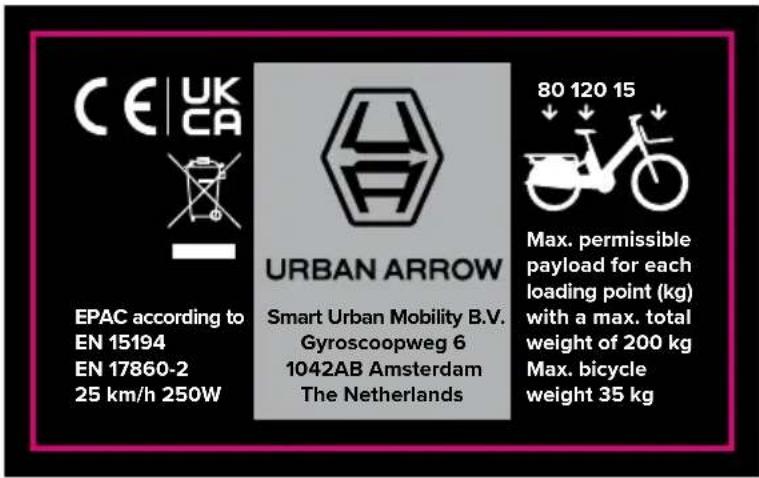
CE UK CA URBAN ARROW EPAC according to EN 15194 EN 17860-2 25 km/h 250W Smart Urban Mobility B.V. Gyrosoopweg 6 1042AB Amsterdam The Netherlands 80 120 15 Max. permissible payload for each loading point (kg) with a max. total weight of 200 kg Max. bicycle weight 35 kgFig. 2. Label with user information
- CE marking: the e-bike complies with the applicable European CE directives.
- UKCA mark: the Pedelec complies with British regulations.
- Crossed-out wheelie bin: Do not dispose of the Pedelec and its components with household waste.
- EPAC: Electrically Power Assisted Cycle
- Standards met:
a. EN 15194 Bikes – Electrically powered assist bikes – EPAC
b. EN 17860-2 Cargo bikes – Part 2: Lightweight single-track cargo bikes – Mechanical aspects
- Maximum pedal assistance: 25 km/h
- Maximum nominal continuous power: 250 W
- Maximum permissible load weight for each charging point:
a. The rear rack can carry a maximum load of 80 kg.
b. The driver's weight may not exceed 120 kg.
c. The front rack can carry a maximum load of 15 kg.
-
Maximum total weight: the maximum permitted total weight is 200 kg.
-
Maximum bike weight: the weight of the longtail, without accessories but with battery (Bosch PowerPack 400), is approximately 35 kg.
1.2 Barcode sticker
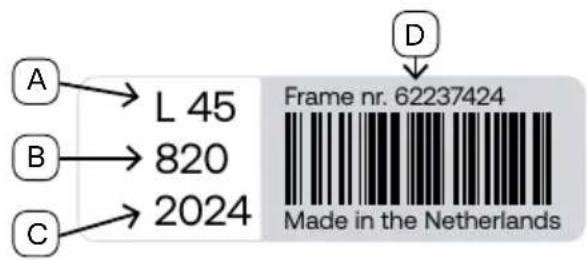
The barcode sticker contains the frame number (D) of the bike as a series of digits and as a barcode. You will also find information about the frame size (A), frame colour (B) and year of manufacture (C) of your bike.
text_image
A → L 45 B → 820 C → 2024 Frame nr. 62237424 Made in the NetherlandsFig. 3. Barcode stickers
1.3 Engraved number
There is a unique number engraved on the seat tube, behind the battery. Write down the number.
1.4 Urban Arrow Connected
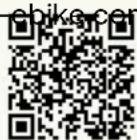
For the best anti-theft protection, have Urban Arrow Connected installed at your Urban Arrow dealer. Scan the QR code for detailed information about Urban Arrow Connected.
Urban Arrow Connected. Outsmart the thief and stay connected to your Urban Arrow bike.
www.urbanarrow.com/connected
2. Warnings, safety instructions and notices
The warnings, safety instructions and information are structured as follows:
WARNING SIGN AND SIGNAL WORD
Possible consequences and cause of the hazard.
Measures must be taken to prevent this hazard.

WARNING
Indicates a potentially hazardous situation. If not avoided, it could result in serious injury.

CAUTION
Indicates a potentially hazardous situation. If the situation is not avoided, it could result in minor injury.
A NOTIFICATION
Indicates a potentially harmful situation. If the situation is not avoided, the product or something around it may be damaged.

INFORMATION
This symbol indicates user instructions, particularly useful or important information about the product or its additional benefits. This is not a symbol of a dangerous or harmful situation.
3. This manual and other help
This original user manual General I Electric Longtail describes the operation, care and maintenance of your Breeze. It helps you to use your Breeze safely and as intended.
If you have any doubts or questions about your Breeze, please contact your Urban Arrow dealer, our customer service desk or check out the frequently asked questions. You can also get technical support for your battery, motor, display or charger directly from Bosch.
Specialised dealer
For a quick and professional answer to your question, you can also contact an Urban Arrow dealer at any time: www.urbanarrow.com/dealers/
If you cannot find answers to your questions in the instructions, at your Urban Arrow dealer or in the frequently asked questions, or if you need more technical information, please contact our customer service department.
Customer service
https://servicecenter.urbanarrow.com/en
Bosch www.bosch-ebike.com/en/service/contact
4. General safety instructions

WARNINGS
Serious accidents, accidents and/or fines resulting from non-compliance with the respective national traffic rules and standards.
- Before using your bike abroad, you must be aware of the applicable legislation there.
- Your bike must comply with the requirements of the respective national usage regulations and applicable standards. If you make technical modifications, please take these requirements into account.
Criminal and serious insurance violations caused by tuning.
Do not make any changes to the drive system of the e-bike. If the maximum speed exceeds 25 km/h and/or the speed of the walking aid exceeds 6 km/h, registration and insurance are required for an e-bike. In addition, the warranty will be void if the motor has been modified or has been modified in the past. Changing the gear size(s) and/or tyre sizes is also considered modification and will invalidate the warranty.
Serious accidents due to lack of control over the bike.
- Ask your Urban Arrow dealer to demonstrate how the bike and its components work and which special features they have. Pay attention to the instructions for the components.
- Adjust the bike to your height.
- We recommend that only people aged 14 or older ride an e-bike, or the minimum age prescribed by local law.
- Always keep your hands on the handlebars. Failure to do so could result in a serious fall and, in some countries, a criminal offence.
- Pay attention to traffic. Do not be distracted by the display or your smartphone. We recommend that you do not listen to music through headphones while cycling.
Serious accidents caused by parts coming loose or breaking
- When replacing parts and wear parts, only use original spare parts. In addition to original spare parts, compatible parts that have been explicitly approved by us may also be used.
- Have damaged or bent parts replaced before using the bike again. Otherwise, parts that are important for the bike's functioning may become defective.
- Have all assembly and adjustment work carried out in a specialised workshop. If you have to tighten something yourself, use a suitable torque wrench and adhere to the specified tightening torques. Loose screws/nuts can come loose, tear off or break. Screws/nuts that are tightened too much can damage the parts. You will find the tightening torques on the parts and in the instructions.

INFORMATION
The A-weighted sound pressure level at the driver's ears is less than 70 dB(A). This means that the noise emitted by the Pedelec during use does not exceed 70 dB(A).
5. Intended use
Use the longtail for trips and commuting that require moderate effort. Ride on normal, paved surfaces where the tyres maintain contact with the ground at average speeds (15 to 25 km/h).
The electric longtail is designed for transporting cargo or carrying additional passengers. You may transport a maximum of two children with the Breeze. Children may only be transported in the designated areas and with the recommended accessories and approved seats.
Please note the provisions of your national legislation → 6. Legal requirements for participation in road traffic, → 8. Maximum permissible total weight of 200 kg, → 9. Maximum permissible load weight for each load point and the chapter on → 11. Passenger transport.
The Breeze is intended for use in the following countries: Belgium, Denmark, Germany, France, Great Britain, the Netherlands and the United States.
Manufacturers and dealers are not liable for any use outside this scope (e.g. use of the electric longtail for competitions) or for failure to comply with the safety instructions in the user manual and for any resulting damage (e.g. broken racks due to overloading).
Intended use also includes compliance with the operating, maintenance and repair conditions → 34. Maintenance intervals.
5.1 Operating regulations
If you want to ride on public roads, your Breeze must have at least the following components:
- Brakes
- Bell
• Lighting (reflectors and lights)
In addition, there are other requirements covered by national laws on usage regulations. If components that are legally required in your country are not fitted to your bike, you must fit them before riding on public roads.
| Denmark The Tra | ||
 | www.retsinformation.dk/eli/lta/2023/421 | |
| Germany |  | Regulations governing road traffic permits (StVZO) www.gesetze-im-internet.de/stvzo_2012/ BJNR067910012.html |
| France |  | Traffic legislation www.legifrance.gouv.fr/codes/texte_lc/LEGITEXT000006074228/ |
| Grear Britain |  | Traffic rules, road safety and vehicle regulationswww.gov.uk/browse/driving/highway-code-road-safety |
| The Netherlands | 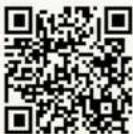 | Road Traffic Act 1994 https://wetten.overheid.nl/BWBR0006622/2024-01-01 |
5.2 Rules of conduct
If you use your electric bike on public roads, you must comply with the regulations. In addition to specific national regulations, these are usually:
- Be considerate of other road users.
- Do not ride under the influence of alcohol or drugs.
- Do not ride with your hands off the handlebars.
- Do not ride through red lights.
- Use cycle paths.
6. Legal requirements for participation in road traffic
In Europe, electric bikes are legally treated as bikes in road traffic as long as the motor has a nominal continuous power output of no more than 250 watts, provides assistance when pedalling up to approximately 25 km/h and switches off at speeds above that.
This means you do not need a driving licence or motor vehicle liability insurance. In some countries, bike helmets are required by law.

WARNING
Serious head injury due to lack of head protection.
Wear a well-fitting bike helmet. Also make sure that your passengers wear bike helmets.
7. Bike weight
The weight of your Breeze including the battery (Bosch PowerPack 400) is approximately 35 kg.

INFORMATION
Adding extra parts changes the weight of the bike. If you want to know the exact weight of your bike, we recommend having it weighed at a specialised workshop. Most bike shops have professional and accurate bike scales.
8. Maximum permissible total weight

WARNING
Serious accidents caused by defective parts.
Do not exceed the permitted total weight of the bike. Otherwise, parts relevant to safety may break or malfunction. In addition, the braking system is only designed for the permitted total weight of the bike.
The maximum permissible weight of the Breeze is 200 kg. This weight must not be exceeded. Please also note the weight that each individual charging point can carry.
You can calculate the maximum permissible total weight as follows: Bike weight + rider weight + weight of all passengers + weight of luggage + weight of accessories
Example:
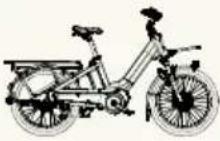 | 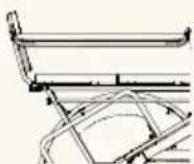 |  | 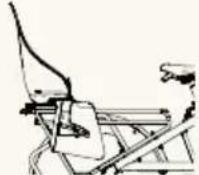 | |
| Breeze and battery of 545 Wh | Protection Bar Footrests Children's seat | and seat cushion | ||
| 33,3 kg3,25 kg +36,55 kg | 2 kg 0,6 kg | 2 x1,2 kg | 3 kg0,5 kg +3,5 kg | [GBGZ] |
 | 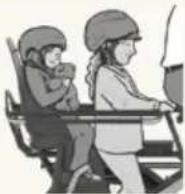 | 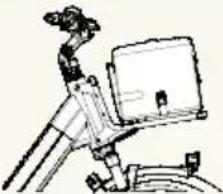 | 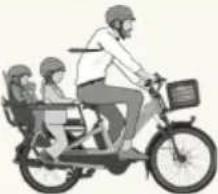 | |
| Driver Passengers | Luggage on front | rack | Total | |
| 83 kg | 18 kg27 kg +45 kg | 5,5 kg 176,75 kg |  | |

INFORMATION
More information about accessories can be found in chapters 11. Passenger transport and 12. Carrying luggage.
- Maximum permissible load weight for each loading point
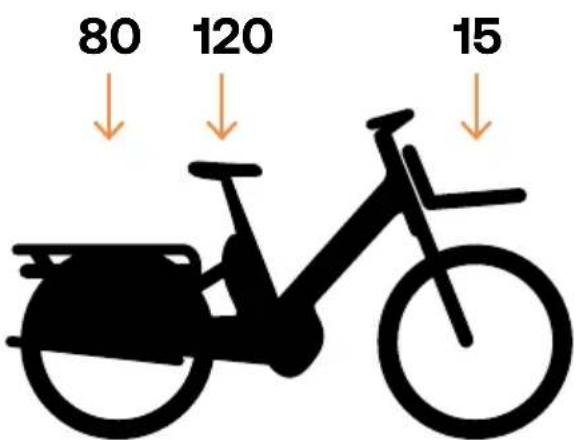
text_image
80 120 15Fig. 4. Maximum permissible load weight for each loading point
- The rear rack can carry a maximum load of 80 kg.
- The rider's weight must not exceed 120 kg.
- The front rack can carry a maximum load of 15 kg.

WARNING
Serious accidents caused by defective parts.
Even if, in theory, you could load the bike with 215 kg, you must not exceed the maximum permitted weight of 200 kg.
10. Racks

WARNINGS
Serious accidents caused by defective parts.
- Do not exceed the load capacity of the rack. The maximum load capacity is engraved on the racks.
- Don't make any changes to the racks.
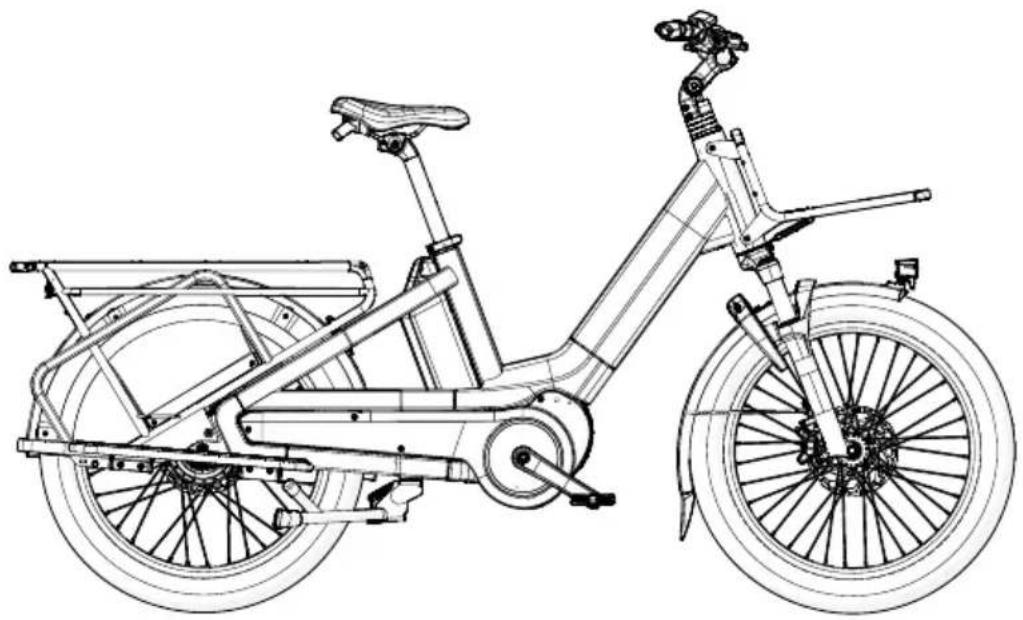
The rear rack is attached to the rear of the Breeze. It can carry a maximum load of 80 kg. The front rack is attached to the head tube.
It is designed for lighter loads. You can load it with a maximum of 15 kg. The tubes of the rack have a diameter of 18 mm.
natural_image
Line drawing of a bicycle with extended front wheel and rear suspension (no text or symbols)Fig. 5. Rear and front racks
10.1 MIK Click-system
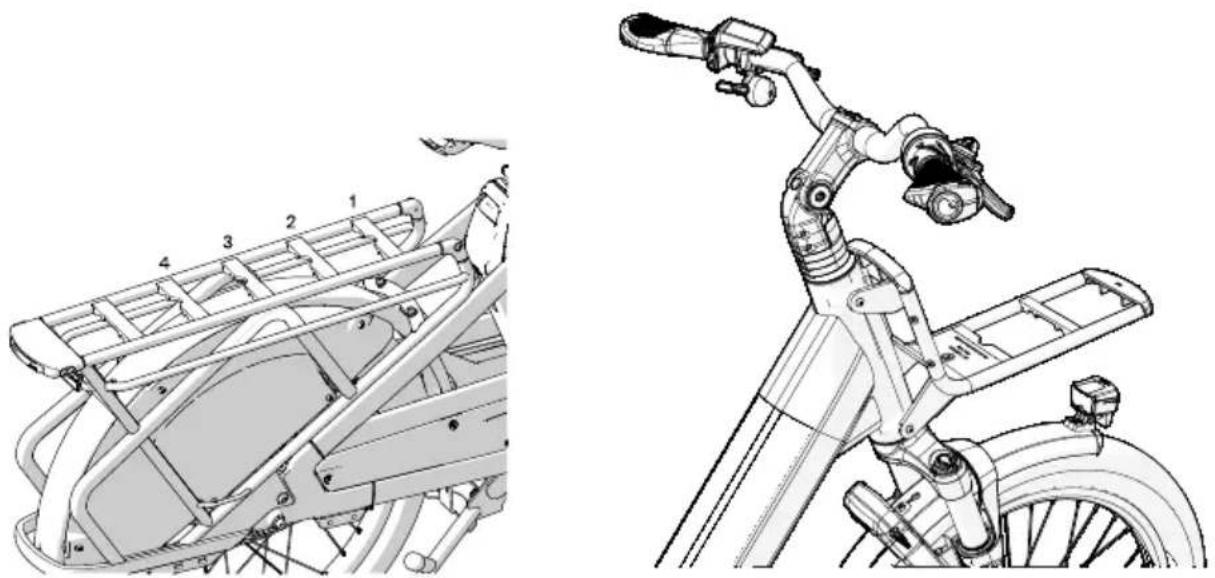
The racks on your bike have integrated MIK profiles. You can also recognise this by the MIK logo on the front rack and the MIK HD logo on the rear rack. With MIK HD (Heavy Duty), the rear rack is suitable for bike seats.
natural_image
Technical line drawing of a bicycle frame assembly, showing front and side views (no text or symbols)Fig. 6. 4x MIK HD positions on the rear rack Fig. 7. MIK profile on the front rack
| Component | Interface type | Usability | Max. | Information |
| Rear rack 4 MIK | HD profiles and 18 mm tube | Maximum of 2 accessories at a time | 80 kg | Passenger transport permitted. Please refer to chapter → 11. Passenger transport |
| Front rack 1 MIK | profile Maximum of 1 | accessory at a time | 15 kg | No passengers allowed. The maximum permitted height of accessories is 250 mm and must not extend beyond the bottom of the front rack |
The MIK adapter plate is integrated into the bike accessories or you can attach it to the accessories later.

WARNINGS
Serious accidents as a result of incorrect operation.
• Always ensure that the handlebars can move freely! If you are using large accessories, you may need to adjust the angle of the stem. See chapter 19 in this manual for instructions.
- Follow the manufacturer's instructions for the accessories.
- If in doubt, please contact your Urban Arrow dealer.
Installation works as follows: place the accessory on the rack and press down until you hear a click or it locks into place. Removal is different for MIK and MIK HD accessories: you can remove the MIK accessories by placing the MIK stick in the adapter plate holder until it comes loose. MIK HD accessories can be removed by pressing the button towards the rack (1.) and then towards the children's seat (2.).
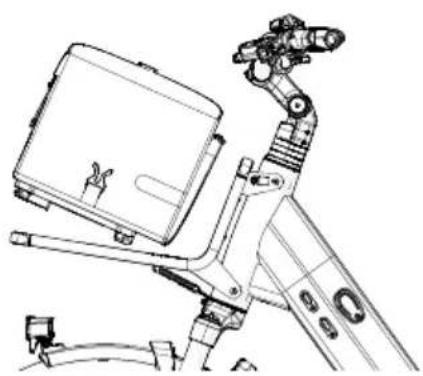
natural_image
Technical line drawing of a mechanical device with a rectangular housing and articulated arm (no text or symbols)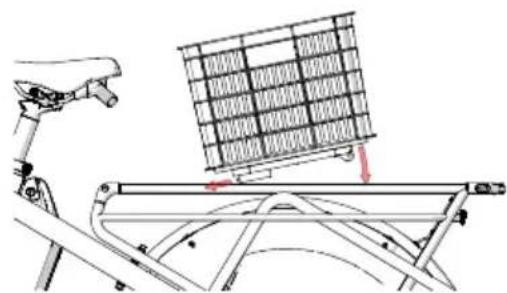
natural_image
Diagram of a bicycle frame with a grid array and directional arrows indicating motion (no text or symbols)Fig. 8. Attaching bike accessories with integrated MIK adapter plate
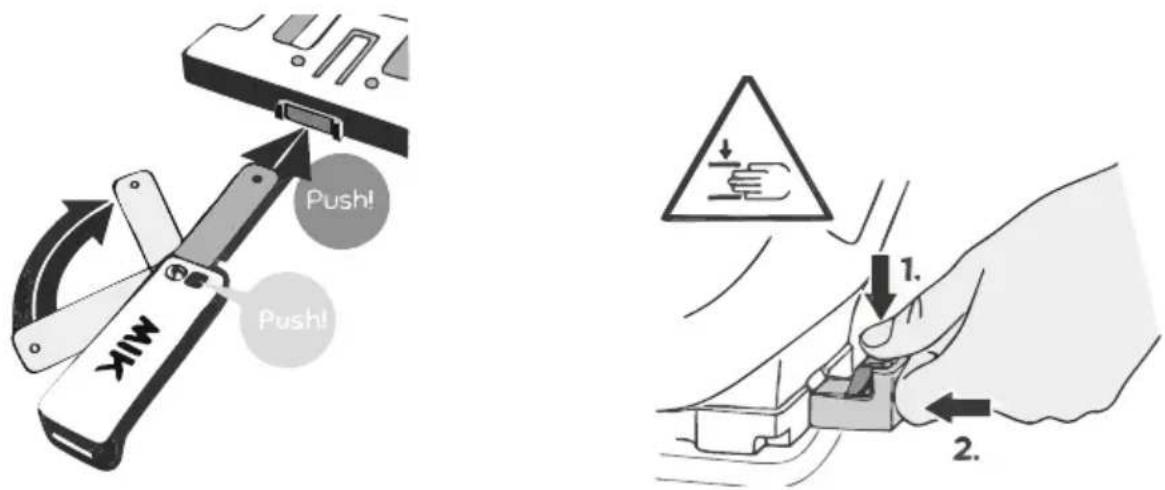
Fig. 9. Removing MIK accessories Fig. 10. Removing MIK HD accessories
11. Passenger transport

WARNINGS
Serious injury caused by crushed or torn limbs.
- Only transport people if the spoke guard is present and in good condition.
- Depending on age and weight, each person being transported must be secured with the appropriate system (e.g. children's seat with safety belt, footrest, protection bar).
- Ensure that no body parts (hands, feet, etc.) can come into contact with rotating parts (wheels, cranks, etc.) while riding.
Serious injury caused by the bike overturning.
- Children must always be lifted into the children's seat or protection bar by an adult. An adult must also remove children from the children's seat and protection bar.
- Lift children out of the children's seat and protection bar as soon as you park the bike, even if you are only parking it for a short time.
Serious accidents due to lack of control over the bike.
- Carrying passengers affects the handling characteristics of the vehicle. Steering response is slower and braking distances are longer. Brake earlier. Avoid emergency braking and drive with foresight.
- Carry a maximum of two children on the rear rack of the Breeze.
- Passengers must be transported in a seated position.
- Place the heaviest load (person or luggage) closest to the saddle. Place lighter loads at the rear. Adding a small load to the front rack makes the bike more stable and prevents the front wheel from lifting off the ground.
- Ensure that no straps can get caught in moving parts (wheels, cranks, etc.) while riding. Ensure that no large key rings or long objects are hanging from the ring lock on the front wheel.
- Do not attach key rings and/or extra keys to the ring lock on the front wheel that could get caught in the moving parts.
Serious injury resulting from an emergency stop while transporting persons and heavy loads.
A very heavy load (e.g. a crate of drinks) must not be transported with a person on the rear rack, even if it is lighter than the person.
Serious head injury due to lack of head protection.
Wear a well-fitting bike helmet. Make sure your passengers also wear bike helmets.
Serious accidents caused by defective parts and unsuitable additional parts.
Do not make any changes to the accessories (e.g. the protection bar, etc.).

PLEASE NOTE
Fingers bruised by exposed coil springs on the saddle.
If you replace the saddle with one that has coil springs, these must be covered when transporting children. Otherwise, fingers could get caught.

INFORMATION
Before use, please also check the national regulations for transporting children.
Germany: If you wish to transport children on your Breeze or in a bike trailer, you must be at least 16 years old.
Denmark: Children under the age of 7 must be transported in a children's seat with a belt system.
11.1 Transporting children in child seats
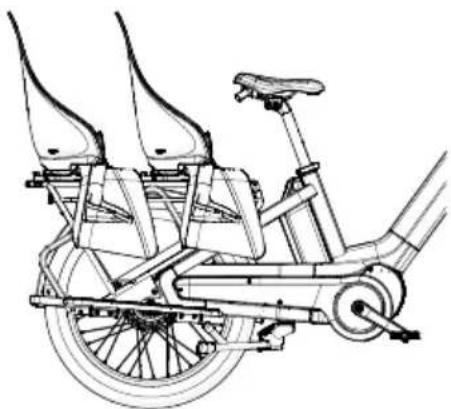
natural_image
Line drawing of a bicycle with suspension frame and wheel (no text or symbols)Fig. 11. Children's seats

WARNINGS
Serious accidents due to lack of control over the bike.
- First practise driving off, braking, turning corners and riding downhill without other people or luggage on your bike. Adapt your riding style to the conditions.
- When transporting two children in children's seats, the heavier child should sit closer to the saddle.
Serious accidents caused by defective parts.
- Only use children's seats that comply with EN 14344.
- Follow the instructions provided by the children's seat manufacturer. Secure children's seats in accordance with the manufacturer's instructions and only in the permitted locations. It is not permitted to attach a children's seat to the front rack, seat tube, handlebars or handles.
- Check regularly that the children's seat is correctly installed.
People travelling in children's seats must be properly secured. Instructions can be found in the children's seat manual.
Children may only be transported in children's seats on the rear rack if the following points apply:
• They can sit upright independently.
• They weigh between 9 and 22 kg.
• They are no taller than 110 cm when standing.
The average age of children who can be transported in children's seats is 1 to 5 years. The transport of newborns (0 - 12 months) is not permitted.

INFORMATION
We recommend installing the protection bar, even when children are being transported in children's seats. The protection bar provides extra protection if the bike falls over.
11.1.1 Recommended children's seats (Status 30-06-2024)
On the next page, you will find a list of recommended children's seats. We are not responsible for any changes made to the children's seat by the manufacturer after 30 June 2024. If in doubt, please contact your Urban Arrow dealer.
| Brand | Model children's seat | Mounting | Single mount | Double mount* | Compatibility protection bar |
| Bobike Go® Maxi MIK-HD | via the integrated MIK HD profile on the rear rack | ||||
| Polisport Bubbly Maxi Plus MIK-HD | via the integrated MIK HD profile on the rear rack | ||||
| Thule Yepp 2 MIK-HD via the integrated MIK HD profile on the rear rack | |||||
| Urban Iki Ta-Ke MIK-HD via the integrated MIK HD profile on the rear rack | |||||
| Qibbel Air MIK-HD via the integrated MIK HD profile on the rear rack | |||||
*the mounting of two children's seats
11.2 Transporting children in the protection bar
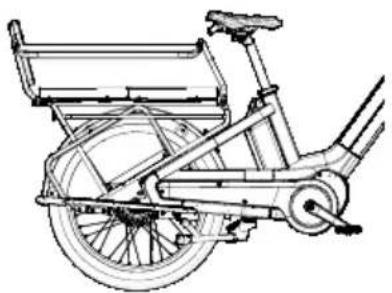
Please contact your Urban Arrow dealer if you need a protection bar for your Breeze. The dealer can install the protection bar for you, and installation instructions are included with the accessory.
natural_image
Line drawing of a bicycle with wheels and seat (no text or symbols)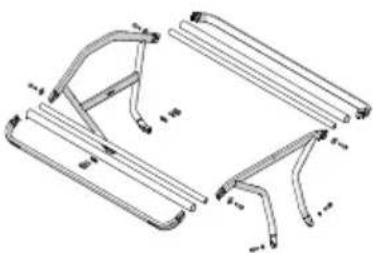
natural_image
Technical line drawing of a mechanical bracket assembly (no text or symbols)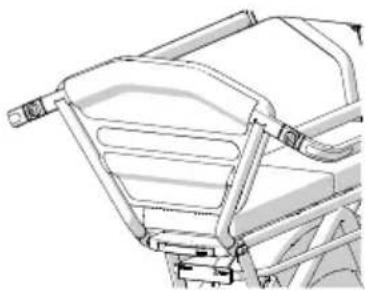
natural_image
Technical line drawing of a vehicle chassis frame with no visible text or symbolsFig. 12. Protection bar Fig. 13. Drawing of protection bar Fig. 14. Backrest

WARNING
Bruised limbs.
- When used without a children's seat, the footrest, padded backrest and seat cushion must always be correctly installed.
- Children being transported must remain calm during the ride, hold on to the foam of the inner handrails and place their feet on the footrests.
- Ensure that the distance between the saddle and the protection bar is more than 20 mm to prevent fingers from getting trapped. If necessary, adjust the position of the saddle to prevent entrapment.
Serious accidents due to lack of control over the bike.
- When transporting two children, the heavier child must sit in the position closest to the bike saddle.
- When transporting a child in a children's seat and a child on a seat cushion, it is recommended that the child on the seat cushion is placed in the position closest to the saddle, even if they are lighter than the child in the children's seat.
Serious accidents caused by defective parts.
- No luggage may be attached to the protection bar. This could cause the protection bar to bend and no longer provide adequate protection for the passengers.
• Regularly check that the bolts are tight. - Have the protection bar installed by your Urban Arrow dealer.
- The protection bar must be replaced after a fall or accident.
Serious accidents due to poor visibility.
Rear lights and reflectors must not be covered.

INFORMATION
If a child is a passenger in the protection bar, it is important that they are aware of and understand the dangers. The child must not stick their arms or legs out of the longtail bike unexpectedly and must not make any sudden movements.
Children may only be transported in the protection bar without a children's seat if the following points apply:
- The child can sit independently and safely in the protection bar for the expected duration of the journey.
• The child uses a seat cushion → 11.3 Seat cushion.
• The backrest is secured.
• The child weighs at least 22 kg and no more than 36 kg.
• They are no taller than 140 cm when standing.
• The footrests are fitted → 11.4 Footrests.
• The spoke protection is present and intact.

INFORMATION
If another child is being transported in the children's seat with children's seat on the rear rack, no backrest needs to be attached.
11.3 Seat cushions
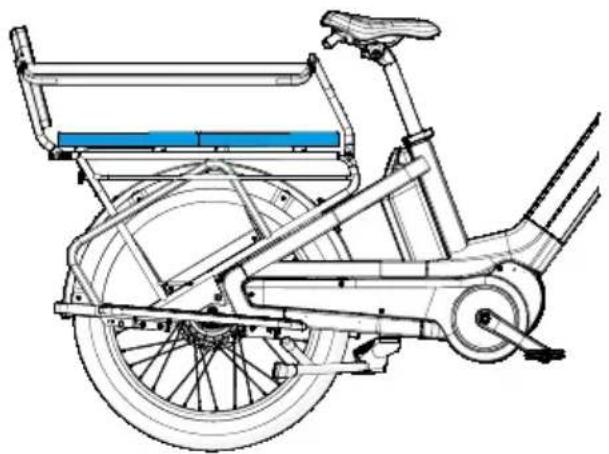
Only use the original Urban Arrow Breeze seat cushions. The seat cushions are attached to the rear rack using the MIK Click system 10.1 MIK Click system.
natural_image
Technical line drawing of a bicycle chassis with wheels and suspension components (no text or symbols)Fig. 15. Seat cushion
Always check the temperature of the seat and backrest before placing children on the bike.
11.3.1 Recommended seat cushion
We have developed the following seat cushion. You can purchase it from your Urban Arrow dealer.
| Brand | Item no. | Weight | Mounting | Weight clearance |
| Urban Arrow | 653006800 | 0,5 kg | → 10.1 MIK Click-system | 22 - 36 kg |
11.4 Footrests
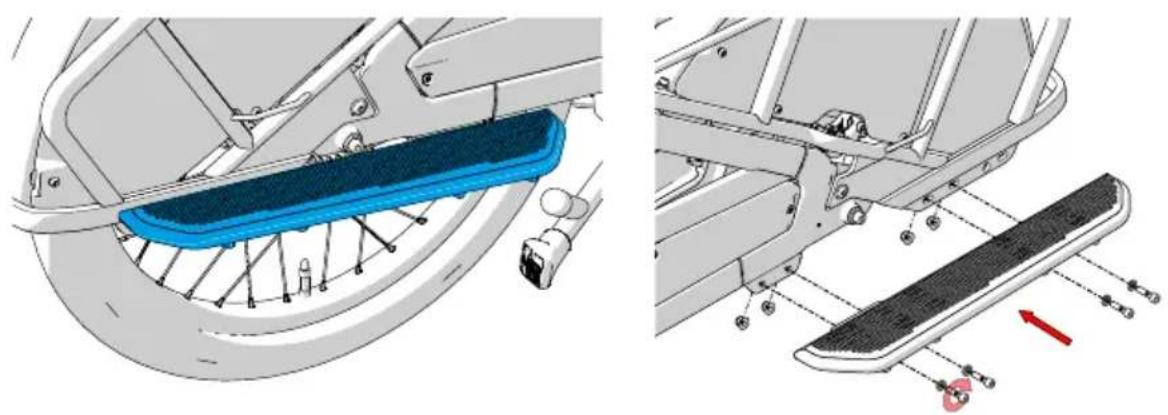
Please contact your Urban Arrow dealer if you need footrests for your Breeze. The dealer can install the footrests for you and installation instructions are included with the footrests. The weight of the footrests is 1.2 kg.
natural_image
Mechanical assembly diagram showing a blue brake pad inserted into a car wheel, with a close-up view of the component being installed (no text or symbols present)Fig. 16. Footrest Fig. 17. Footrest

WARNING
Bruised limbs.
The footrests must always be fitted when transporting people. The people being transported must place their feet on the footrests while the vehicle is in motion.
A NOTIFICATION
Deformed footrests.
Do not place more than 40 kg on the footrests. For example, a person weighing 80 kg should not stand with their entire weight on a footrest.
11.5 Transporting passengers on the rack
Passengers may only travel without a children's seat, protection bar and seat cushion if the following points apply:
- The person can sit independently and safely for the expected duration of the journey.
- The person weighs at least 36 kg and no more than 80 kg.
• The footrests are fitted → 11.4 Footrests.
• The spoke protection is present and intact.
11.6 Examples of passenger transport
√
natural_image
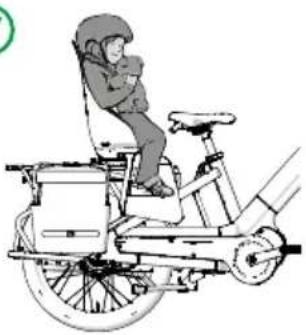
Illustration of a person riding a bicycle with a seatbelt (no text or symbols)No footrests, no protection bar, no backrest, no seat cushion, 1 children's seat, luggage
- Permitted weight for rear carrier: max. 80 kg
- Child: approx. 1 - 5 years old, 9 - 22 kg, max. 110 cm tall
- Place the heaviest load in the position closest to the saddle.
• Additional luggage transport on the rear rack: permitted
√
natural_image
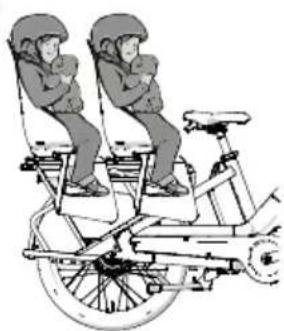
Illustration of two children riding a stationary bike (no text or symbols)No footrests, no protection bar, no backrest, no seat cushion, 2 children's seats, no luggage
- Permitted weight for rear rack: max. 80 kg
- Children: approx. 1 - 5 years old, 9 - 22 kg each, max. 110 cm tall
- Place the heaviest child in the position closest to the saddle
- Extra luggage transport on the rear rack: not permitted
×
natural_image
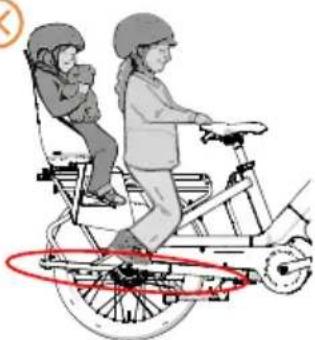
Illustration of two children riding a bicycle, one holding a child, with no visible text or symbolsNo footrests, no protection bar, no backrest, no seat cushion, 1 children's seat, no luggage, passenger in front position
The transport of passengers on the rack without footrests is not permitted
√
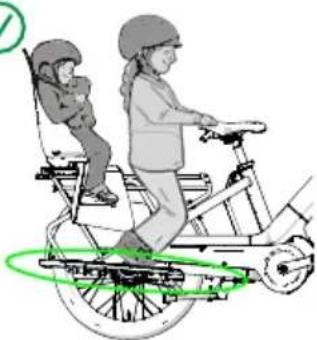
natural_image
Illustration of a child riding a bicycle with a green circular motion indicator (no text or symbols)Footrests, no protection bar, no backrest, no seat cushion, 1 children's seat, no luggage, passenger in front position
- Permitted Weight for rear rack: max. 80 kg
- Child in children's seat: approx. 1 - 5 years old, 9 - 22 kg, max. 110 cm tall
• Person on the rack: from 8 years old, weighing 36 - X kg - Place the child in the rear children's seat.
• Additional luggage transport on the rear rack: not permitted - Seat cushion recommended

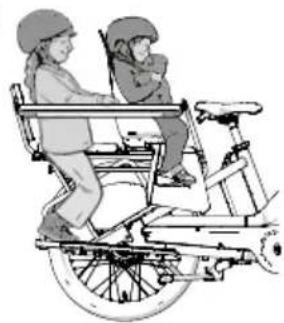
natural_image
Illustration of two children riding a bicycle (no text or symbols)It is recommended to place the heaviest child in the position closest to the saddle for better weight distribution. This results in better steering and braking performance.

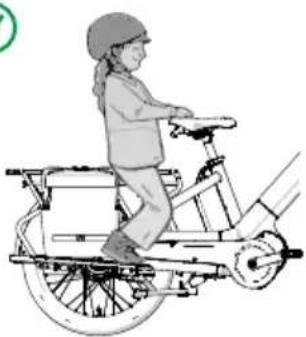
natural_image
Illustration of a child riding a bicycle with a helmet and wheels (no text or symbols)Footrests, no protection bar, no backrest, no seat cushion, no children's seat, luggage
Permitted weight for rear carrier: max. 80 kg
- Person on the rack: from 8 years old, weighing 36 - X kg
- Place the heaviest load in the position closest to the saddle.
• Additional luggage transport on the rear rack: permitted - Seat cushion recommended

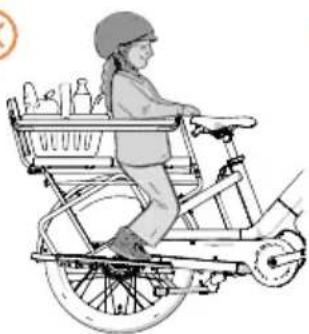
natural_image
Illustration of a child riding a bicycle loaded with goods (no text or symbols)
natural_image
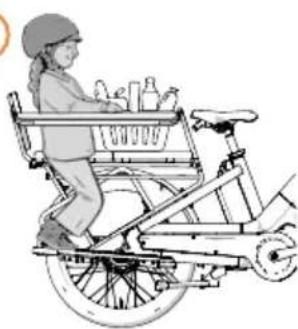
Illustration of a child riding a bicycle with shopping carts and bottles (no text or symbols)Footrests, protection bar, backrest, seat cushion, no children's seat, crate (e.g. drinks crate)
Heavy boxes or crates must not be transported with persons on the rear rack, as loose objects can cause injury.

natural_image
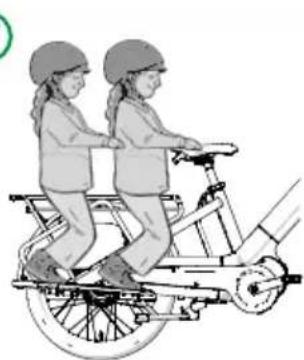
Illustration of two children riding an electric bicycle (no text or symbols)Footrests, no protection bar, no seat cushion, no luggage, 2 passengers
- Permitted weight for rear rack: max. 80 kg
- 2 passengers on the rack, from 8 years of age, weighing 36 - X kg
- Extra luggage transport on the rear rack: not permitted
- Place the heaviest person in the position closest to the saddle
- Seat cushions recommended
natural_image
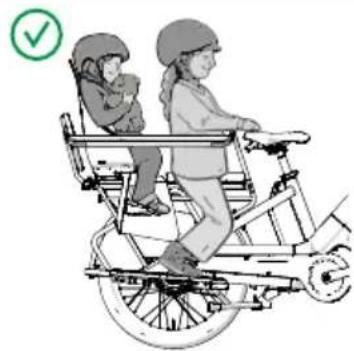
Illustration of two children riding a bicycle, one with a green checkmark (no text or symbols)Footrests, protection bar, no backrest, 1 seat cushion, 1 children's seat, no luggage
Permitted weight for rear rack: max. 80 kg
- Child in children's seat: approx. 1 - 5 years old, 9 - 22 kg, max. 110 cm tall
- Child in the protection bar: approx. 5 - 8 years old, 22 - 36 kg, max. 140 cm tall
- Place the heaviest child in the position closest to the saddle
• Extra luggage on the rear rack: not permitted
natural_image
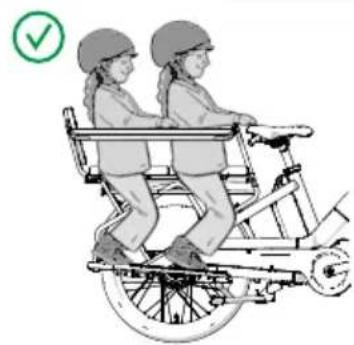
Illustration of two people riding a bicycle with a green checkmark (no text or symbols)Footrests, protection bar backrest, 2 seat cushions, no children's seat, no luggage
- Permitted weight for rear rack: max. 80 kg
- 2 children in the protection bar: approx. 5 - 8 years old, 22 - 36 kg each, max. 140 cm tall
- Place the heaviest child in the position closest to the saddle
• Additional luggage transport on the rear rack: not permitted
natural_image
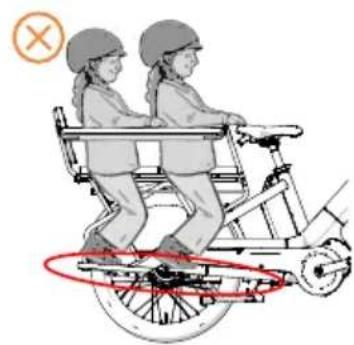
Illustration of two people riding a bicycle with a red circular motion path (no text or symbols)No footrests, protection bar, backrest, 2 seat cushions, no children's seat, no luggage
Transport is not permitted without footrest
12. Bringing luggage

WARNINGS
Serious accidents due to lack of control over the bicycle.
- Transporting luggage affects the handling characteristics of your bike. Steering becomes slower and braking distances are longer. Therefore, brake earlier. Avoid emergency braking and ride with foresight.
- Secure your luggage properly. Use straps or quick-release fasteners to secure loose items and ensure that they do not slide forward or fall off the bike during transport. When placing or removing luggage or children, make sure that the bike is parked on a flat and stable surface.
-
Distribute the luggage evenly. Make sure that the weight of your load is balanced on the bicycle. Avoid placing all heavy objects on one side of the wheel. Place heavier objects at the bottom of panniers, baskets and crates.
-
Place the heaviest load (person or luggage) behind the saddle. Place lighter loads at the rear. Adding a small load to the front rack makes the bike more stable and prevents the front wheel from lifting off the ground.
- Make sure that no straps can get caught in moving parts (wheels, cranks, etc.) while riding. Try to avoid buckles and cords on bags. When placing luggage on the front rack, make sure that the handlebars can move freely and that the luggage cannot come into contact with the cables, handlebars or brake levers.
- Luggage transported on the front luggage rack must not protrude too high, as described in → chapter 10.1. Luggage must not be higher than 250 mm and must not protrude lower than the bottom of the luggage rack of the front wheel.
- Do not wear loose clothing, as it may become caught in moving parts.
Serious injury resulting from an emergency stop while transporting passengers and heavy loads.
A very heavy load (e.g. a crate of drinks) must not be transported with a person on the rear rack, even if it is lighter than the person.
A NOTIFICATION
Damage caused by attached luggage
Protect the luggage racks from abrasion at all contact points. Use protective film or wear protection, for example.

INFORMATION
When transporting passengers on the rear racks, separate panniers can be mounted on the side racks, but these may restrict legroom.
12.1 Recommended bike bags
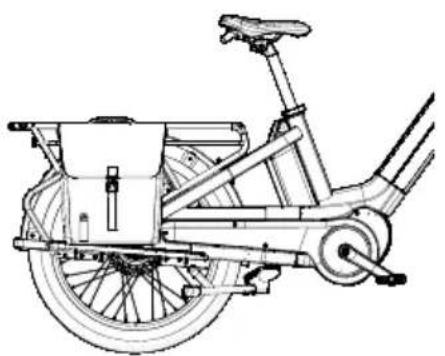
We have developed the following bags especially for the Breeze. You can purchase them from your Urban Arrow dealer.
natural_image
Line drawing of a bicycle with front wheel, rear seat, and side-mounted wheels (no text or symbols)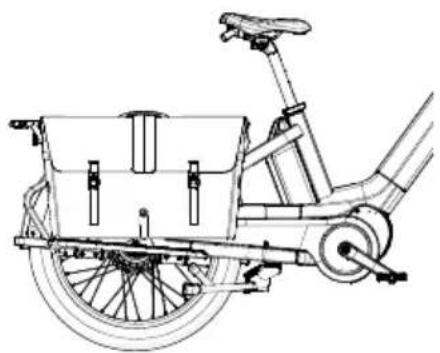
natural_image
Line drawing of a bicycle with front wheel, rear wheels, and cargo basket (no text or symbols)Fig. 18. Single bike bag Fig. 19. Cargo bike bag

INFORMATION
Attaching and removing double bike bags can be tricky if protection bars are fitted. Your dealer can show you how to install them.
12.2 Bike trailers

WARNINGS
Serious accidents caused by defective parts.
- Only use bike trailers that comply with the relevant national legislation. Bike trailers must be designed and tested in accordance with EN 15918. Bike trailers must also be equipped with lights. Ask your Urban Arrow dealer for advice.
- Follow the instructions provided by the bike trailer manufacturer. Secure bike trailers in accordance with the manufacturer's instructions and only in the permitted locations. Check regularly that they are securely fastened.
- Do not exceed the maximum total weight of 200 kg (weight of the entire combination).
Serious accidents due to lack of control over the bike.
- Bike trailers affect handling. The braking distance is longer. Therefore, brake earlier. Steering also becomes slower. First practise driving off, braking, cornering and riding downhill with an empty bike trailer. Adjust your riding style.
- Avoid overloading bike trailers. The heavier the load, the more difficult it is to brake.
Serious head injury caused by riding a bike without a helmet.
Make sure your child wears a well-fitting bike helmet.
13. Tightening torques for screw connections

WARNING
Serious accidents caused by defective parts.
Have all assembly and adjustment work carried out by an Urban Arrow dealer. If you want to tighten something yourself, use the correct torque wrench and adhere to the specified tightening torques. Screws/nuts that are too loose can come loose, tear off or break. Screws/nuts that are too tight can damage the parts. You will find the tightening torques on the parts and in the part instructions. The tightening torques specified by the part manufacturers take precedence over the tightening torques in these instructions.

INFORMATION
- Screws and nuts are tightened by turning them clockwise. By turning them counterclockwise, you can loosen the screws or nuts.
- Adjusting screws can be turned both clockwise and counterclockwise.
Screw connection Interface Tightening torque
| Handlebar Allen key 4 5-6 Nm | ||
| Handlebar stem on front fork clamp | Allen key 5 11 - 12 Nm | |
| Brake lever Allen key 5 6 - 8 Nm | ||
| Front rack Allen key 5 10 Nm | ||
| Rear rack Allen key 5 15 Nm | ||
| Rear rack Allen key 5 12 Nm | ||
| Front lock + plate Allen key 4 4 Nm | ||
| Saddle post Allen key 5 1 x 10 Nm, 1 x 16 Nm max. | ||
| Saddle clamp Allen key 6 6 - 8 Nm | ||
| Adapter plate for bike stand Allen key 6 25 Nm | ||
| Cranks Allen key 8 45 Nm | ||
| Pedals Allen key 6 35 - 55 Nm | ||
| Engine | Torx 40 | 30 Nm |
| Front axle | Allen key 6 10 Nm | |
| Rear axle | Allen key 6 15 - 20 Nm | |
| Belt and motor cover | Torx 25 | 1 - 3 Nm |
| Coat protector | Torx 25 | 1 Nm |
14. Before the first ride
14.1 Adjusting
Before riding the bike for the first time, you or your Urban Arrow dealer must adjust it to your height.
- Adjust the saddle height
- Adjust the position and angle of the saddle
- Change the position and height of the handlebars
-
Change the position of the hand grips
-
Change the position of the brake levers
- Change the position of the adjuster/shifter
- Adjust the front fork spring preload
14.2 Familiarise yourself with the lighting
The front and rear lights on your Breeze are powered by the battery. As soon as you switch on the system, the front and rear lights will also switch on. You can switch the lights on and off using the controls on the display.
Even if you no longer have motor assistance, there is still some residual power for the lights. Make sure you don't suddenly find yourself without lights in the dark, e.g. by always carrying a spare battery with you or planning your trips so that you can recharge the battery en route. You can check the available range while on the road to see if you have enough power.

WARNING
Serious accidents due to lack of lighting.
Faulty lighting can lead to serious accidents when riding in the dark or in poor visibility.
Have the lights replaced by your Urban Arrow dealer before continuing to ride.

INFORMATION
LED bulbs cannot be replaced.
14.3 Practising driving and braking
Practise riding and braking in a safe place before riding in traffic. Practise with a loaded rack in particular. Practise until you feel confident enough. The load on the front and rear racks affects the maximum braking power.
15. Before every ride

WARNING
Serious accidents due to lack of control over the bike.
Don't ride the Breeze if it is not in perfect technical condition. If you are unsure, have the Breeze checked by your Urban Arrow dealer if necessary. Have defective and damaged parts replaced.
Once your bike has been adjusted to suit you, check that it is ready for use.
Check your bike before every ride, after every journey and every time you leave it unattended. Below is a checklist that you can use as a guide:
Parts Test
| Frame/front fork Check the frame and front fork for any visible deformations, cracks and damage. | |
| Spring elements Check the operation, settings and fastenings. | |
| Handlebar/stem Check the correct position and that it is securely fastened. | |
| Check that the bell is working properly and is securely attached. | |
| Check that the handlebar can move freely in both directions. | |
| Saddle/seat post | Check that the quick-release seat post clamp is tight and that the seat post cannot be easily twisted. The clamp must be closed. |
| Check the correct position and that it is securely fastened. | |
| Wheels | Check the condition of the tyres (damage, foreign objects, tread depth), concentricity and tyre pressure. |
| Check that the valves are securely in place. | |
| Visually inspect the spokes and rims for damage and wear. | |
| Check that the drive shaft is correctly and securely in place. | |
| Belt | Check belt and gears for wear and damage. |
| Brakes | Brake system including brake lever. Check that it works properly and is correctly attached. |
| Visual inspection of the brake discs and whether the brakes are worn. | |
| Check that the pipes and connections are secure. | |
| Brake, gear and electrical cables/wires | Check that all cables and lines are intact and not bent. |
| Lighting | Check the operation and settings of the lighting. |
| Screw connections | Visually check that no screws/bolts are missing or loose. |
| Parts Test | |
| Passenger transport | Check that all passengers being transported are secured in accordance with the requirements. |
| Luggage | Check that your luggage is securely fastened.Distribute the luggage so that the weight is evenly distributed.This ensures safer driving behaviour.Check that luggage cannot come into contact with moving parts, such as the handlebars or wheels. |
| General Please pay attention to the maximum load weight and total weight. | |
16. Bike frame

WARNINGS
Serious accidents caused by broken parts.
- Never ride with a bent or cracked frame.
- After an accident or fall, have your bike checked by a qualified bike mechanic before riding it again. Undetected defects can cause accidents.
The Breeze has an aluminium frame with a low-step design, making it easier to get on and off. The raised head tube also contributes to an upright, neck-friendly position and ensures a stable riding experience.
17. Saddle height

WARNING
Serious accidents resulting from incorrect settings.
We recommend that all assembly and adjustment work be carried out by an Urban Arrow dealer. If you wish to assemble something yourself, please ensure that you observe the following → 13. Tightening moments for screw connections.
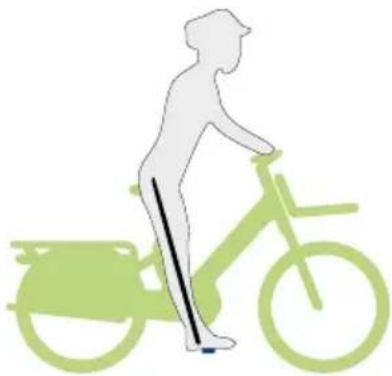
Determining the optimal seat height for your height:
-
Sit on the saddle and lean against a wall.
-
Turn the pedal to its lowest point on the side facing away from the wall.
-
Place your heel on the pedal. It is recommended to keep your knee slightly bent so that you can easily reach the ground for stability when you stop. This is especially important when there is a heavy load at the rear.
-
Raise the saddle if your leg is not straight with your heel on the pedal. Lower the saddle if you cannot reach the pedals.
natural_image
Silhouette of a person riding a green bicycle with a speedometer, no text or symbols presentFig. 20 Push your leg straight
17.1 Adjusting the saddle height
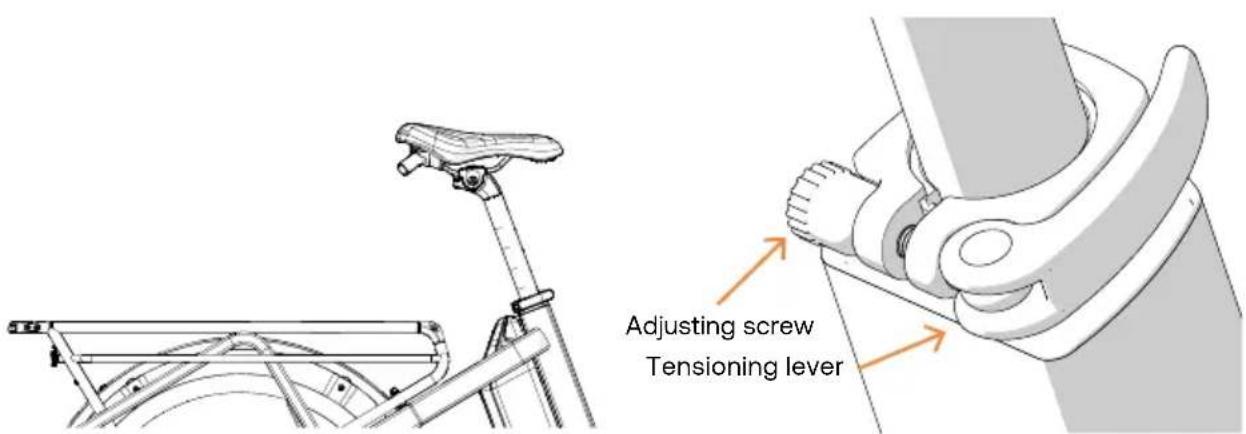
You can adjust the saddle height by sliding the seat post in or out. The seat post is located in the seat tube of the bike and is secured with an external seat post clamp. The seat post clamp is secured by a quick-release lever. The clamping force of the quick-release clamp can be adjusted with an Allen key. Lock the quick-release clamp and tighten the nut to 8 Nm. The clamping force of the quick-release clamp is set to the correct tension.

WARNING
Serious accidents caused by a bent or broken seat post.
The quick-release fastener with tension lever must be securely closed before you start cycling.
text_image
Adjusting screw Tensioning leverFig. 21. Minimum insertion depth Fig. 22. Seat post clamp with adjusting screw and tensioning lever
- Open the tension lever by folding it open 90°.
- Set the seat post to the desired position.
- Close the tension lever by folding it down 90^ . The lever should be difficult to move at the end of the closing movement.
a If the quick-release clamp closes too easily, the preload must be increased. To do this, set the seat post to the desired position and close the seat post clamp. Tighten the adjustment screw using a 6 mm Allen key to a torque of 8 Nm. Check that the correct preload has been achieved by opening and closing the seat post clamp.
b If the seat post clamp is too difficult to close, lubricate the rotating part, otherwise the preload must be reduced. The adjustment screw must be loosened using a 6 mm Allen key. Check again that the correct preload has been achieved by opening and closing the seat post clamp.
-
Close the tension lever. The lever of the seat post clamp must be positioned so that it cannot be opened accidentally.
-
Check that the saddle is securely fastened by ensuring that the seat post cannot be easily turned.
18. Adjusting the position and angle of the saddle

WARNINGS
Serious accidents resulting from incorrect settings.
We recommend that all assembly and adjustment work be carried out by an Urban Arrow dealer. If you wish to assemble something yourself, please ensure that you observe the following → 13. Tightening torques for screw connections.
Serious accidents caused by broken saddle rails.
Never clamp the saddle at the arches of the saddle frame, but always at a straight point. Only move the saddle within the straight area and within the markings.
Serious accidents because the tensioning screws have torn out of the nuts.
Screw the clamping screws straight and fully into the nuts.
text_image
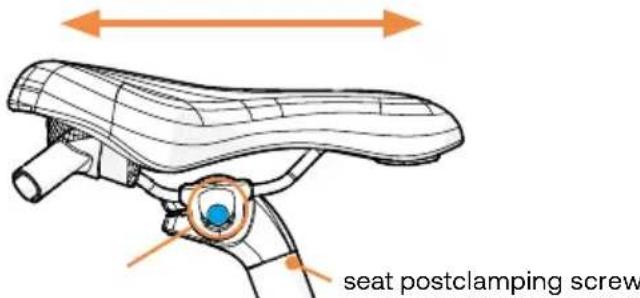
seat postclamping screwFig. 23. Moving the saddle forwards/backwards
-
Moving the saddle forwards/backwards: Loosen the clamping screw under the seat by turning it counterclockwise. Do not loosen the clamping screw more than two to three turns, otherwise the entire mechanism may fall apart.
-
Move the saddle horizontally. Stay within the markings.
-
Tighten the clamp bolt clockwise. Tightening torque 10 Nm.

PLEASE NOTE
When using the protection bar, the distance between the saddle and the protection bar must be at least 20 mm.
natural_image
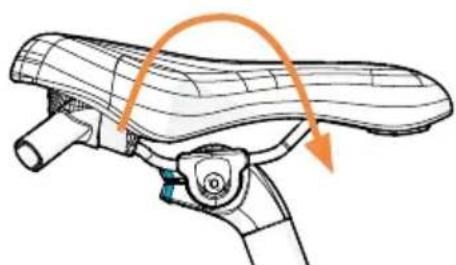
Diagram of a bicycle steering wheel with orange motion arrows indicating rotation (no text or symbols)Fig. 24 Tilting the saddle
- Tilting the saddle: Most cyclists are most comfortable on a horizontally aligned saddle. However, if you want to tilt the saddle slightly, loosen the rear clamp screw two to three turns counterclockwise.
- Rotate the saddle to the desired position.
- Tighten the clamp screw clockwise. Tightening torque 16 Nm.
The bolt tightening torques must be checked during every prescribed service interval.
19. Adjusting the handlebars and stem
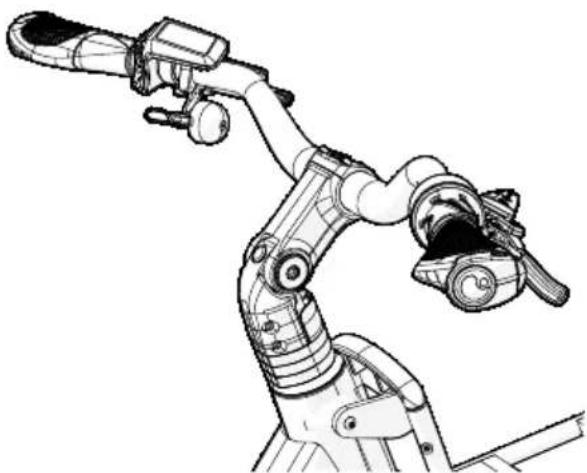
The stem connects the handlebars to the front fork. The Breeze has an angle-adjustable stem at the front.
19.1 Adjusting the position of the rudder
To prevent your wrists from extending too far when holding the handlebars, your arms should be slightly bent. Make adjustments if necessary if you notice after a while that the position of the handlebars does not suit your riding style.
natural_image
Line drawing of a robotic arm with articulated joints and control valves (no text or symbols)Fig. 25. Handlebar stem
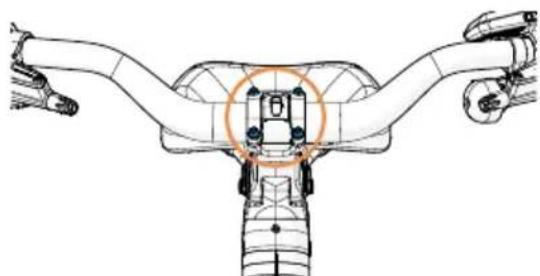
- Loosen the four handlebar clamp screws by turning them counterclockwise with a 4 mm Allen key. Do not loosen the screws completely, but only two to three turns.
natural_image
Technical line drawing of a mechanical device with no visible text or symbolsFig. 26 Handlebar clamp screws
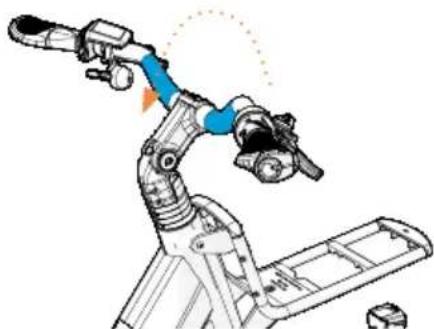
- Now you can set the handlebars to the desired position. Make sure that the handlebars are clamped exactly in the centre of the stem. Tighten the four handlebar clamp screws.
Tightening torque: 5-6 Nm
natural_image
Illustration of a robotic arm with articulated joints and a blue pointer indicating motion (no text or symbols)Fig. 27 Set the handlebars to the desired position

WARNING
Reduced performance due to damaged and/or jammed cables.
Adjusting the steering position may result in damage and jamming of the cable. Adjust all cables and pipes to the new steering position.
19.2 Adjusting the handlebar height
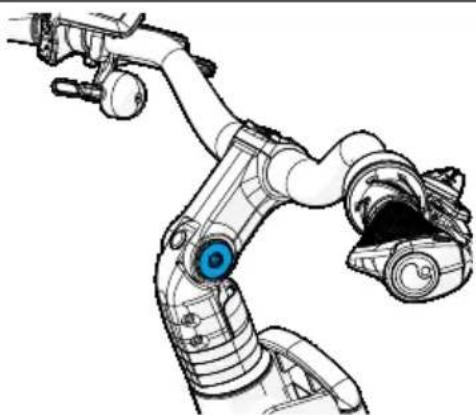
- Loosen the stem screw by turning it counterclockwise with a 6 mm Allen key. Do not loosen it completely.
natural_image
Technical line drawing of a robotic arm with a blue circular component on the branch (no text or symbols)Fig. 28. Handlebar stem screw
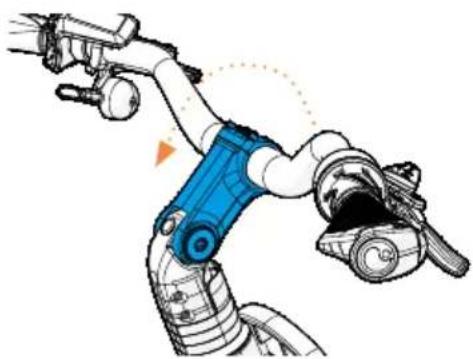
- Now rotate the handlebar and stem to the desired position.
natural_image
Illustration of a robotic arm with blue and white components, no text or symbols presentFig. 29 Rotate handlebar stem
- Tighten the stem screw by turning the Allen key clockwise. Tightening torque: 15-18 Nm

WARNING
- Reduced performance due to damaged and/or jammed cables.
-
Adjusting the steering position may result in damage and jamming of the cable.
-
Adjust the display, levers, cables and pipes to the new handlebar position. Tighten the bolts clockwise with a torque wrench.
Display: Allen key 3, tightening torque 0.5 Nm,
Levers: Allen key 5, tightening torque: 6-8 Nm.
19.3 Aligning the handlebar
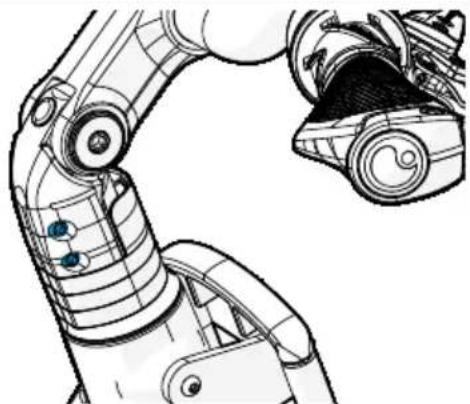
- Now loosen the two handlebar stem screws using a 5 mm Allen key. However, do not unscrew them completely.
natural_image
Technical line drawing of a robotic arm with visible joints and components (no text or symbols)Fig. 30. Loosen the handlebar stem screws
- Now hold the front wheel in place with your feet and move the handlebar slightly to the left or right. Align the stem with the front wheel so that they form a straight line. Then perform the above steps in reverse order with the specified tightening torque.
SAFETY WARNING
Do not remove the stem from the head tube. The stem must remain securely in the head tube.
3 Once the handlebar is aligned, the two adjustment screws (loosened in step 1) can be tightened clockwise again.
Tightening torque: 10 - 12 Nm
20. Bike handles
The bike handles are located at the ends of the handlebar. They affect riding comfort and your health. If your hands or wrists hurt after long rides, it may be useful to adjust the position of the bike handles.
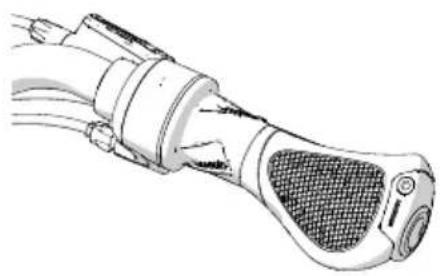
- Loosen the tension screws on the handles by turning them one or two turns counterclockwise with an Allen key 4.
natural_image
Technical illustration of a mechanical device with mesh and curved components (no text or symbols)Fig. 31. Bike handle
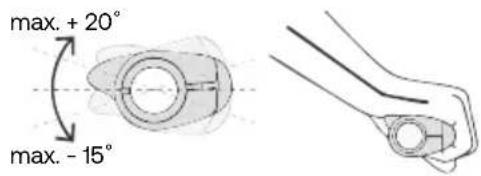
- Now you can adjust the bike handle to the desired position. Change the angle in small increments. Turn the support surface of the handle so that the palm of your hand is in full contact. Avoid bending your wrist too much.
text_image
max. + 20° max. - 15°Fig. 32. Ergonomic hand position

WARNINGS
Serious accidents caused by loose bike handles.
- Push the handles all the way to the end of the handlebar.
-
Tighten the handles to the required torque.
-
Then tighten the screws with a torque wrench (4 Nm). After tightening, check that the handles cannot be turned easily. The handles must not be able to be turned after tightening.
21. Suspension front fork
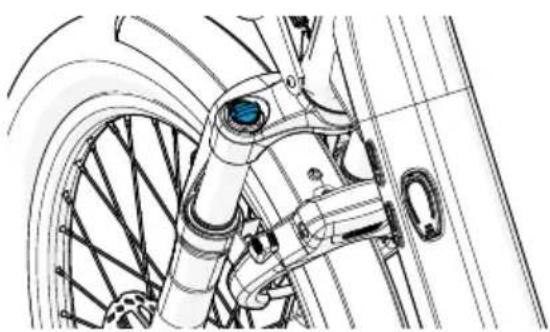
The front wheel is held in place by the front fork. This consists of two fork legs, the bridge and the steering tube. The front fork of your Breeze is suspended. You can adjust the compression and rebound damping to improve riding comfort.
natural_image
Technical line drawing of a bicycle wheel assembly with visible components and no text or symbols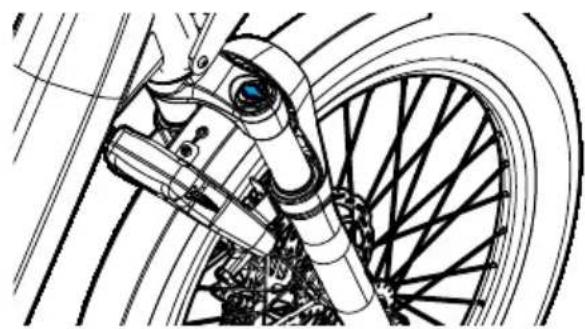
natural_image
Technical line drawing of a bicycle wheel assembly (no text or symbols)Fig. 33. Changing the front fork spring preload Fig. 34. Front fork lockout function
21.1 Changing front fork spring preload
The operation of the front fork depends on the spring preload. Depending on preference and load, you can choose a higher preload by turning the adjustment screw on the left side of the front fork clockwise (heavier load) or a lower preload by turning it counterclockwise (lighter load).
21.2 Lock out
If suspension is not required (e.g. when riding on flat roads), the suspension function of the front fork can be deactivated by turning it counterclockwise until it stops. The suspension can be reactivated by turning the lockout button clockwise until it stops.
22. Brakes

WARNINGS
Serious accidents due to lack of control over the bike.
- With a new disc brake, you will not have full braking power available at first! As you brake more, the braking power will increase until the brake pads are fully worn into the brake disc. Braking harder will speed up the process.
- Keep the brake pads and surfaces free of oil or grease. Otherwise, the brakes may not work properly. Have any parts that have come into contact with oil or grease replaced by your Urban Arrow dealer.
- Only ride your bike if you can safely reach the brake levers. Your dealer can adjust the position of the brake levers, the angle and the width of the brake levers.
- Familiarise yourself with the correct braking technique. Practise braking in a safe place before riding in traffic. Practise until you feel confident. Get off of the bike if a situation seems unsafe.
- When the roads are wet, the tyres have less grip on the road. Adapt your riding style to the conditions. The available braking power depends on the condition of the road surface, such as moisture, gravel, road markings or black ice. Take this into account when braking.
- Luggage affects the handling characteristics. The braking distance is longer. Therefore, brake earlier. The steering response is also slower. Adjust your riding style.
Serious accidents caused by defective brakes.
- Have all work on the brakes carried out at a specialist workshop.
-
Do not use the bike if the brake discs are cracked or deformed and contact your Urban Arrow dealer. The brake disc must be replaced.
-
Don't use the bike if you notice that the braking power is too high or too low and contact your Urban Arrow dealer.
- Do not use the bike if fluid is leaking from the brake system and contact your Urban Arrow dealer
Serious accidents due to reduced braking power.
Do not apply the brakes continuously. The brake discs may overheat, causing them to become less effective and permanently damaged. Brake intermittently.
Burns caused by contact with the brake discs.
Do not touch the brake discs for at least 30 minutes after riding. They can become very hot and cause burns.
Injuries caused by contact with rotating brake discs.
HKeep your fingers away from rotating brake discs. The discs are sharp. You could seriously injure your fingers.
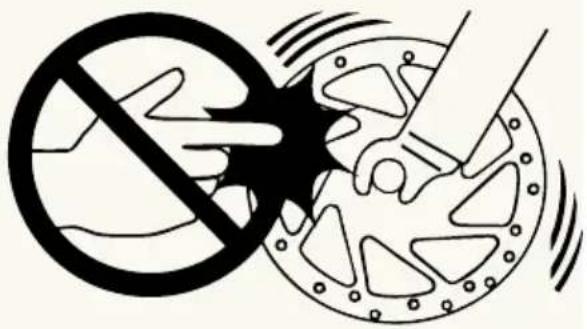
text_image
Safety warning symbol showing no hazard and a hand holding a device, indicating hazardous or hazardous material.Fig. 35. Do not touch the brake discs.

INFORMATION
Your Breeze doesn't have an emergency stop button. To stop quickly in a dangerous situation, you must use the brakes. The maximum braking force is stronger than the possible propulsion. This means that you can stop at any time by braking.
Please note that the drive system is not automatically switched off after braking.
Switch the drive system to standstill when you stop cycling.
The brakes on your bike are hydraulic disc brakes. The braking force is transferred using mineral oil.
With a new disc brake, you will not have full braking power at first! As you brake more, the braking power will increase until the brake pads are completely worn into the brake disc.
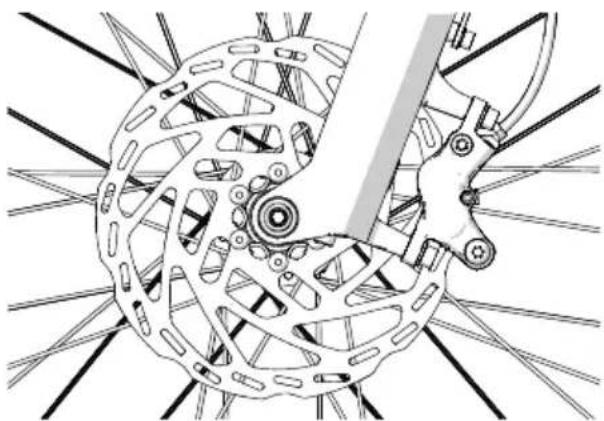
natural_image
Technical line drawing of a bicycle wheel assembly with no visible text or symbolsFig. 36. Hydraulic disc brake at the front
22.1 Brake levers
There are two brake levers on your bike. By squeezing the brake levers, you can slow down or stop your bike. The front wheel brake is operated with the left brake lever and the rear wheel brake with the right brake lever. In Great Britain, it is the other way around: the front brake lever is on the right side and the rear brake lever is on the left side.
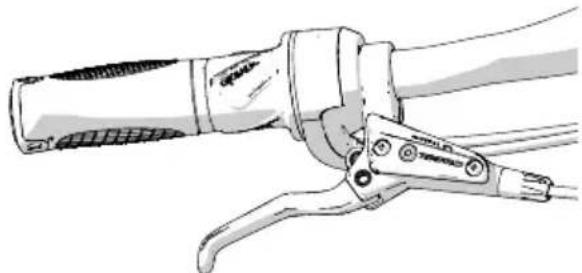
natural_image
Line drawing of a hand gripping a bicycle brake lever (no text or symbols)Fig. 37. Brake lever

WARNINGS
Serious accidents due to lack of control over the bike.
• Always use both brake levers when braking hard. If you only squeeze the left brake lever (front wheel), only the front wheel will come to a standstill and you could slide over the handlebar.
- Only ride your bike if you can safely reach the brake levers. Your Urban Arrow dealer can adjust the position, the angle and the width of the brake levers.

INFORMATION
Before your first ride, check which brake lever controls which brake. If you are used to something different, have the brake levers adjusted by a specialist bicycle mechanic before your first ride.
22.1.1 Changing the position of the brake levers
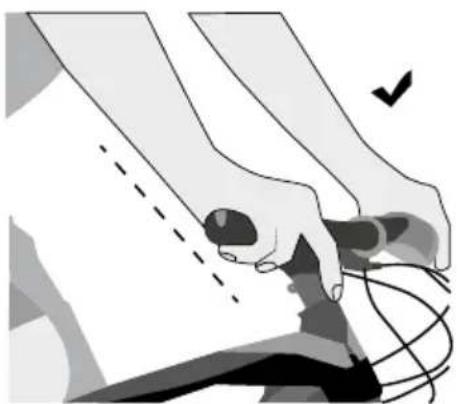
natural_image
Illustration of a hand pressing down on paper with a checkmark and magnified detail (no text or symbols)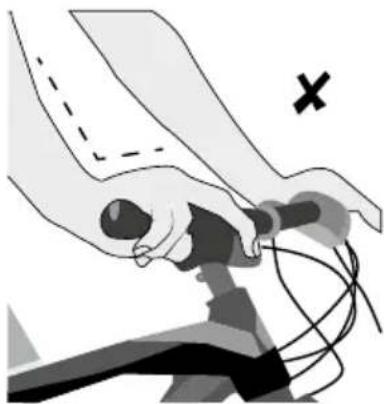
natural_image
Illustration of a hand holding a tool with a cross mark indicating a specific point (no text or symbols present)Fig. 38. Correct position of the brake levers Fig. 39. Incorrect position of the brake levers
To change the position of the brake levers on the handlebar, proceed as follows:
-
Open the mounting screw by turning it one or two turns counterclockwise.
-
To move the brake lever, move it to the left or right to the desired position. It may be necessary to move the gear lever slightly inwards.
-
To adjust the angle of the brake lever, place one or two fingers on the brake lever. Now turn the handle downwards until your fingers, wrist and forearm form a straight line.
-
Then tighten the mounting screw clockwise with a torque wrench and the specified torque. After tightening, check that the brake lever cannot be easily turned around the handlebar.
23. Gears
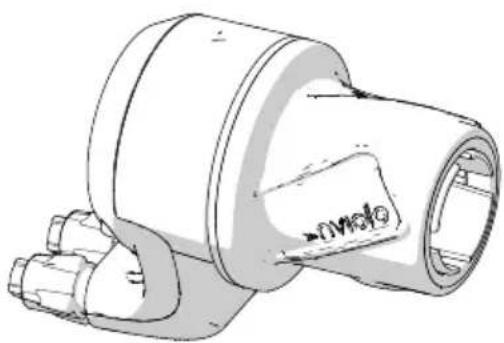
With a hub gear, shifting takes place in the rear wheel hub according to the principle of the planetary gear mechanism. The Enviolo hub gear is continuously variable and works without predefined gears. It is operated using the twist grip on the handlebar. Turn until the gear is comfortable for you.
natural_image
Technical line drawing of a mechanical component with no visible text or symbolsFig. 40. Enviolo twist grip (gear shift)
24. Belts

WARNINGS
Serious bruising due to accidental pressing of the power button.
Remove the battery before performing any measurements, adjustments or cleaning of the Breeze.
Serious injury due to worn or damaged straps.
Check the strap for signs of wear before each ride. A worn or damaged strap can break.
NOTIFICATION
Damaged strap due to improper use.
Do not kink, twist or bend the strap, and do not tie knots in it.
24.1 Measuring belt tension
There are several methods for measuring belt tension. One of these methods is to use the Carbon Drive app. This measures the belt tension based on the natural frequency (Hz) of the belt length. You can download the app at www.gatescar-bondrive.com/products/tools.

INFORMATION
The Carbon Drive app works best in a quiet environment.
- Remove the battery.
- Download the app on your smartphone.
- Open the app.
- Select the voltage icon.
- Turn on the microphone, tap Measure and hold the smartphone above the middle of the belt. Make sure the microphone is pointing towards the belt.
- Pull the belt so that it vibrates like a guitar string. The app converts the sound into the natural frequency of the belt.
- Turn the crank a quarter turn and repeat the measurement.
- Compare the frequency of the belt with the specifications to see if the belt tension needs to be adjusted.
Voltage Small, light rider Large, strong
Hub gears 50 Hz 60 Hz
24.2 Adjusting the belt tension
- Remove the battery.
- Remove the crank on the right side of the bike using the crank removal tool.
- Remove the chain guard on the right side of the bike by turning the Torx 25 screws counterclockwise until they are completely loose.
-
Loosen the belt tensioner screw by turning it counterclockwise with a 5 mm Allen key. However, do not loosen it completely.
-
Increase or decrease the belt tension by turning the mounting bracket on the adjustment screw:
a. To decrease tension: turn counterclockwise.
b. To increase tension: turn clockwise.
The tension can be checked using the Gates Carbon Drive Mobile or Gates Toothbelt Tension Gauge.
- Tighten the belt tensioner screw by turning it clockwise. (Tightening torque: 12-14 Nm) While tightening, hold the belt tensioner adjustment screw in position with Allen key 5.
- Install the crank. Use Allen key 8, tightening torque: 45 Nm.

WARNING
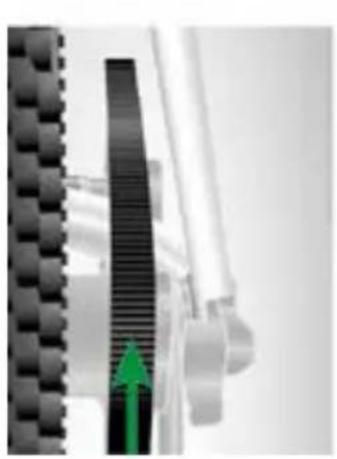
When adjusting the tension, the belt must be correctly aligned. Otherwise, noise may occur and/or the belt or sprocket may wear prematurely and the belt may come loose.
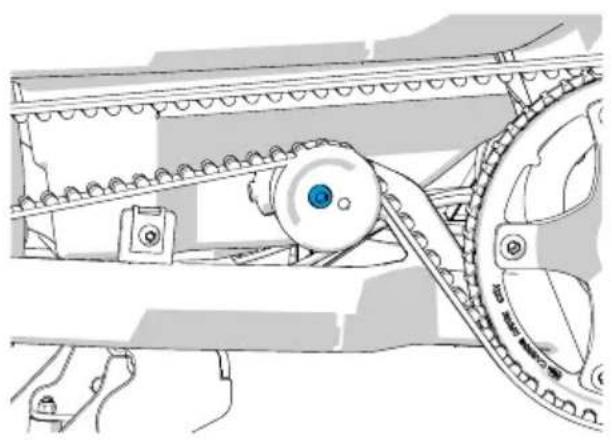
natural_image
Technical line drawing of a mechanical assembly with gears and chains (no text or symbols)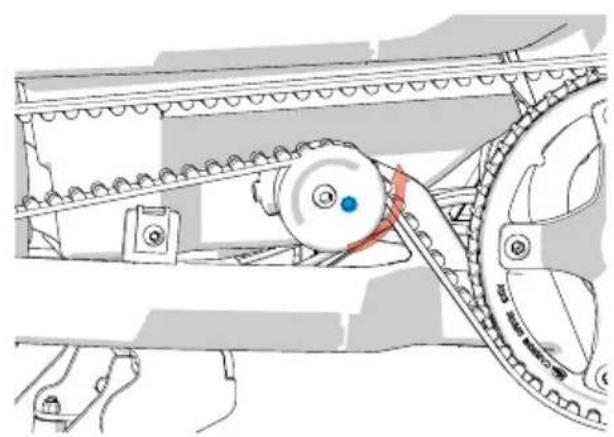
natural_image
Mechanical assembly diagram showing a pulley system with conveyor belt and gear mechanism (no text or labels)Fig. 41. Belt tensioner screw Fig. 42. Belt tensioner adjustment screw
natural_image
Close-up of a mechanical component with a green arrow indicating direction (no visible text or symbols)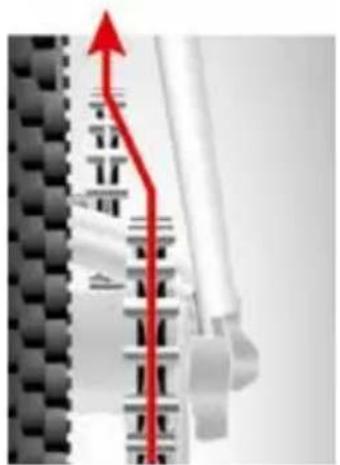
natural_image
Mechanical assembly diagram showing a red arrow indicating upward motion, with no visible text or symbols.Fig. 43. Correct alignment @Gates Fig. 44. Gears are not correctly aligned
25. Rims

WARNINGS
Serious accidents caused by broken rims.
- Stop riding your bike if the rims are cracked or severely deformed. Have the rims replaced by a specialist bike repairer.
- Mechanical shocks can deform the rims (especially in combination with insufficient tyre pressure). Safe tyre mounting is no longer guaranteed. We strongly advise against repairing the rim yourself. In this case, please contact your Urban Arrow dealer.
The rim is the load-bearing ring-shaped metal profile of a wheel that holds the outer tyre, inner tube and rim tape in place. The rim is connected to the hub of the bike by spokes.
26. Outer and inner tubes

WARNINGS
Serious accidents due to lack of control over the bike. Tyres that are overinflated can burst or come off the rim. This can cause the tyre to burst, causing the rider to lose control of the handlebars immediately. If the tyre pressure is too low, the outer tyre can come off the rim.
- Tyres are wearing parts. Regularly check the tread depth, tyre pressure and condition of the sidewalls. Replace worn tyres before using the bike again.
- The air pressure in the tyre must not be too high or too low. The permitted tyre pressure is indicated on the sidewall of the tyre in bar or PSI. For the Breeze, it is 2.0 - 4.5 bar or 30 - 65 PSI

INFORMATION
Use an air pump with an integrated pressure gauge. This means you can check or adjust the tyre pressure at any time.
Some valves require adapter nozzles. You can buy these together with the pump at your specialist bike shop.
27. Transporting your bike
Follow these instructions if you want to transport the bike.
27.1 Transport by car or camper van

WARNINGS
Serious accidents caused by loose/falling bike carriers.
- The bike carrier must be designed for the higher weight of the bike. Ask the bike carrier manufacturer for advice.
- The Breeze is longer than a normal bike. Check the width when mounting it on a car.
Serious accidents caused by loose accessories.
Before transport, remove the battery, panniers, baskets, etc.
NOTIFICATION
Damage to the electronics caused by water ingress.
Protect the motor and charging station in particular from water ingress. Use a suitable rain cover for this purpose.
27.2 Transporting your bike by bus, train or plane
Check with the transport companies you plan to use well in advance to find out whether you can take your bike with you and, if so, under what conditions.
28. Parking your bike

WARNING
Bruised limbs.
- When operating the bike stand, ensure that no body parts such as fingers or toes come into contact with the stand. This could cause injury.
- Don't use the bike stand with bare feet.
NOTIFICATION
Damage caused by the bike falling over.
• Always park your bike on a hard, flat surface. The bike may tip over on soft surfaces.
• Each time you park your bike, check that the bike stand is properly locked.
Folding the bike stand:
- First, check that the bike is unlocked.
- Stand to the left of the Breeze in the direction of travel and hold the bike with your left hand on the handlebar and your right hand on the saddle.
- Place your right foot in front of the bike stand.
- Now push the bike forward.
Parking your bike:
- Stand to the left of the Breeze in the direction of travel and hold the bike with your left hand on the handlebar and your right hand on the saddle.
- Press down on the bike stand with your right foot and push the bike backwards at the same time.
- Check that the bike is stable by moving it back and forth.
29. Storing your bike
In winter, store the bike in a dry, not too cold place. Remove the battery and store it separately in a warmer place.
30. Protection against theft, vandalism and loss

WARNING
Serious accidents resulting from unauthorised access by third parties.
Protect your bike against unauthorised access. Check your bike before every ride, after every transport and every time you leave it unattended. If your bike is damaged, don't use it again until the damage has been repaired.
The following measures can help you protect your bike against theft and vandalism and make it easier to get your bike back if you lose it:
- In addition to the frame lock, use a high-quality bike lock.
- Secure the bike to an object (e.g. tree, lamppost, fence). This will prevent the bike from being taken away.
- Park your bike in secure, private or municipal bike racks or lockers.
- Make a note of your bike's important features (frame number (behind the battery) and Urban Arrow identification number). This will make it easier to describe and identify your bike if you lose it.
30.1 Urban Arrow Connected
For the best anti-theft protection, have Urban Arrow Connected installed at your Urban Arrow dealer. Scan the QR code for detailed information about Urban Arrow Connected.
Urban Arrow Connected. Outsmart the thief. And stay connected to your Urban Arrow bike.
www.urbanarrow.com/connected
30.2 Frame and battery lock: order additional keys
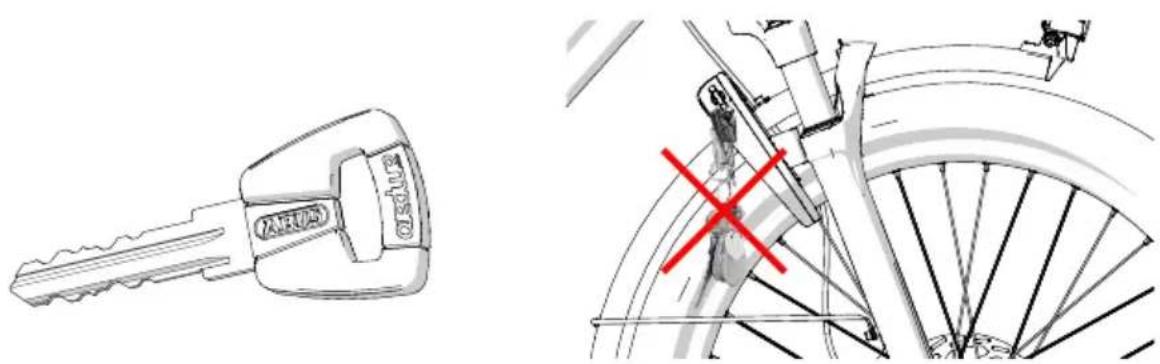
Your bike is equipped with an Abus frame lock. You can use this to open and close both the bike lock and the battery lock. The key is marked with a number and the key type. Keep the spare key in a safe place.
30.3 Key rings
To prevent accidents or injuries, avoid hanging too many or too long objects on the key, as they may get caught between the front wheel and the mudguard or lock.
natural_image
Technical line drawing of a key and bicycle wheel with no visible text or symbolsFig. 45. Identification of the key Fig. 46. Example of an incorrect key ring
31. Cleaning the bike and its parts

WARNING
Serious injury due to accidental pressing of the power button.
Remove the battery from the Breeze before cleaning it.
TIPS
Damage to the electronics caused by water ingress.
Do not immerse the bike or any of its parts in water, do not spray the bike with water and do not clean the bike with a high-pressure cleaner. Even if the parts are sealed, the bike may be damaged. Clean the bike with a slightly damp, soft cloth.
Scratches and dull spots caused by abrasive cleaning agents and sponges.
Don't use cleaning products based on solvents or abrasives for cleaning. Don't use rough sponges or brushes either. Clean the bike and its parts with a slightly damp, soft cloth or a soft brush.
Clean your bike regularly, especially after riding in the rain. You can have paint damage and rust spots repaired by a specialist bike repairer. Your Urban Arrow dealer will also recommend which grease to apply to parts and how to do so.
32. Disposal
Please comply with national regulations for waste disposal. This is the only way to ensure that pollutants are disposed of correctly and raw materials are recycled.
| Material/component Disposal | |
| Cardboard, paper Waste paper | |
| Plastic Household waste | |
| Bike frame | • Recycling centre• Bulk waste |
| Parts (electronic) Recycling centre | |
| Pedelec batteries | • Specialised retailers• Recycling centre |
Material/component Disposal
Button cells
• Specialised retailers
- Recycling centre
Outer tyres, inner tubes Recycling centre
33. Warranty provisions
We offer a five-year warranty against material and construction defects on the frame under normal handling, use and maintenance. We offer a five-year warranty against rusting of the frame and paintwork on the frame. We offer a two-year warranty on suspension forks.
34. Maintenance intervals
Because the spokes settle during the first few kilometres of riding, the brake and gear cables lengthen and the bearings run in, the first inspection should be carried out after approximately 100 kilometres or six weeks from the date of sale.
After that, visit your Urban Arrow dealer once or twice a year or every 2,000 kilo-metres. Have your specialist dealer carry out the following checks:
• Visual and functional tests
- Cable
- Screw connections
- Spring elements
- Frame/front fork
- Handlebar/handlebar stem
- Saddle/seat post
- Tyres
- Bottom bracket
- Gear hub
- Belt
- Brakes
- Lighting
- E-system
- Installation check accessories
- Front and rear rack
- Software-update
- Test drive
Record all maintenance work in your maintenance logbook.

INFORMATION
- We recommend taking your Urban Arrow to a specialist bike repair shop for a thorough check before the winter starts, so that it is ready for the dark, wet season.
- If you store the Urban Arrow during the winter, we recommend servicing it at the start of the cycling season in spring to ensure that the bike is ready to ride again after the long break.
35. Declaration of conformity
The declaration of conformity can be found at: https://urbanarrow.com/documents
1.4 Urban Arrow Connected 7
text_image
Technical diagram of a bicycle with labeled parts including front wheel, rear wheel, and side seatstext_image
CE UK CA URBAN ARROW 80 120 15 Max. permissible payload for each loading point (kg) with a max. total weight of 200 kg Max. bicycle weight 35 kg EPAC according to EN 15194 EN 17860-2 25 km/h 250W Smart Urban Mobility B.V. Gyroscoopweg 6 1042AB Amsterdam The Netherlands1.4 Urban Arrow Connected
www.urbanarrow.com/nl/connected
WAARSCHUWINGSTEKEN EN SIGNAALWOORD
Bosch www.bosch-ebike.com/nl/service/contact
natural_image
Line drawing of a modern bicycle with extended front wheel and side suspension (no text or symbols)natural_image
Technical line drawing of a bicycle frame assembly, showing front and side views (no text or symbols)natural_image
Technical line drawing of a mechanical device with a box and articulated arm (no text or symbols)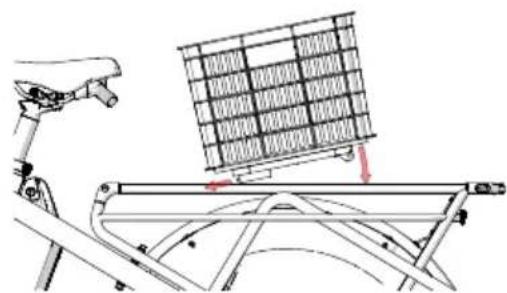
natural_image
Diagram of a bicycle frame with a grid array and directional arrows indicating motion (no text or symbols)natural_image
Line drawing of a bicycle with suspension and wheel assembly (no text or symbols)natural_image
Line drawing of a bicycle with wheels and seat (no text or symbols)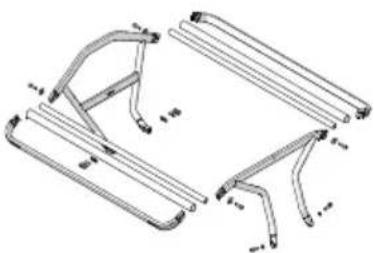
natural_image
Technical line drawing of a mechanical bracket assembly (no text or symbols)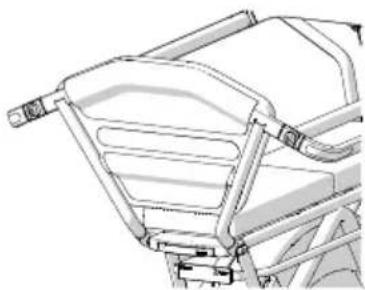
natural_image
Technical line drawing of a vehicle front bumper with no visible text or symbolsAfb. 12. Protection bar Afb. 13. Tekening van
Protection bar
Afb. 14. Rugleuning

WAARSCHUWING
Gekneusde ledematen.
natural_image
Technical line drawing of a bicycle chassis with wheel, frame, and suspension components (no text or symbols)Afb. 15. Zitkussen
natural_image
Mechanical assembly diagram showing a blue brake pad mounted on a car wheel, with a close-up view of the component being inserted (no text or symbols present)Afb. 16. Voetsteun Afb. 17. Voetsteun

WAARSCHUWING
Gekneusde ledematen.
natural_image
Illustration of a person riding a bicycle with a seatbelt (no text or symbols)natural_image
Illustration of two children riding a bicycle with wheels and seatbelt (no text or symbols)natural_image
Illustration of two children riding a bicycle with a red circular motion path overlay (no text or symbols)natural_image
Illustration of a child riding a bicycle with a green circular symbol indicating motion (no text or symbols present)natural_image
Illustration of two children riding a bicycle (no text or symbols)natural_image
Illustration of a child riding a bicycle with a helmet and wheels (no text or symbols)natural_image
Illustration of a person riding a bicycle with a basket and wheels (no text or symbols)
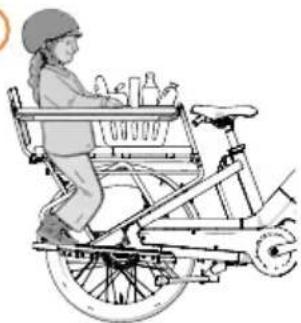
natural_image
Illustration of a child riding a bicycle with shopping carts and bottles (no text or symbols)natural_image
Illustration of two children riding a bicycle with wheels (no text or symbols)natural_image
Illustration of two children riding a bicycle with a green checkmark (no text or symbols)natural_image
Illustration of two children riding a bicycle with a green checkmark (no text or symbols)natural_image
Illustration of two children riding a bicycle with a red circular motion path (no text or symbols)natural_image
Line drawing of a bicycle with front wheel, rear wheel, and side-mounted platform (no text or symbols)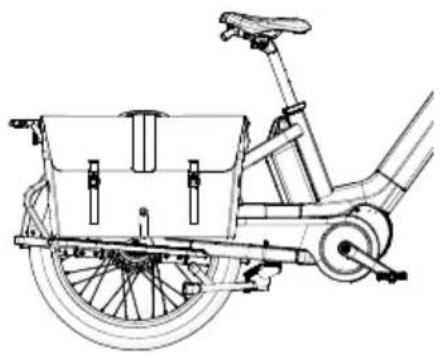
natural_image
Line drawing of a bicycle with front wheel, rear wheels, and rear seat (no text or symbols)natural_image
Silhouette of a person riding a bicycle with a basket nearby (no text or symbols)Afb. 20 Duw je been recht
natural_image
Technical line drawing of a bicycle frame with a wheel and suspension bracket (no text or symbols)Afb. 21. Mminimale insteekdiepte
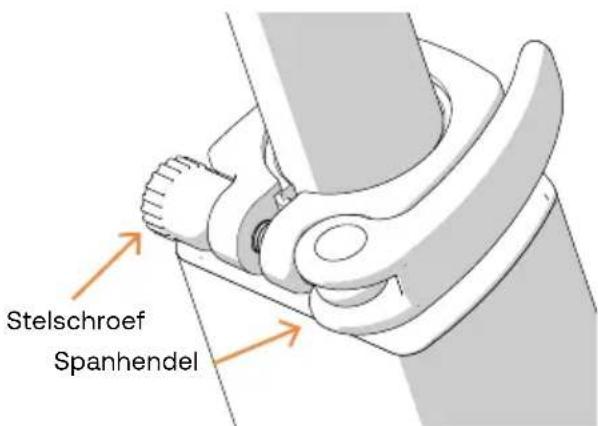
text_image
Stelschroef SpanhendelAfb. 22. Zadelpenklem met spanhendel
natural_image
Diagram of a bicycle steering wheel with orange motion arrows indicating rotation (no text or symbols)natural_image
Line drawing of a robotic arm with articulated joints and control valves (no text or symbols)Afb. 25. Stuurpen
natural_image
Technical line drawing of a bicycle head assembly with no visible text or symbolsnatural_image
Illustration of a robotic arm with articulated joints and a blue pointer, no text or symbols presentnatural_image
Technical line drawing of a robotic arm with a blue circular component on the branch (no text or symbols)natural_image
Illustration of a robotic arm with a blue sensor or sensor device, showing joint movement (no text or symbols)natural_image
Technical line drawing of a robotic arm with visible joints and blue components (no text or symbols)VEILIGHEIDSWAARSCHUWING
natural_image
Technical illustration of a mechanical device with mesh and curved components (no text or symbols)natural_image
Technical line drawing of a bicycle wheel assembly with visible components and no text or symbols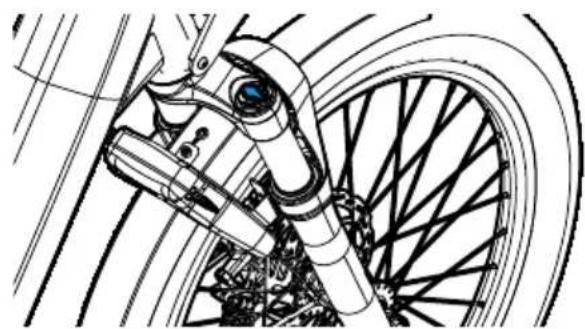
natural_image
Technical line drawing of a bicycle wheel assembly (no text or symbols)text_image
Safety warning symbol showing no hazard and accident with a hand holding a device, indicating no hazard or accident.natural_image
Technical line drawing of a bicycle brake caliper assembly (no text or symbols)natural_image
Line drawing of a hand gripping a bicycle brake lever (no text or symbols)Afb. 37. Remgreep

WAARSCHUWINGEN
natural_image
Illustration of a hand holding a document with a checkmark and abstract lines (no text or symbols)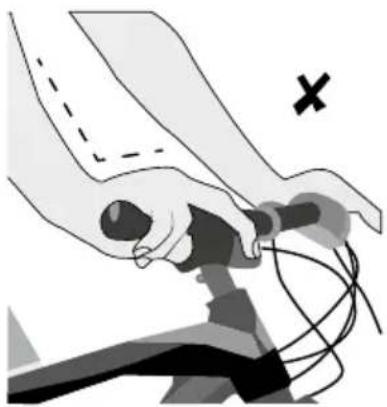
natural_image
Illustration of a hand holding a small object with a cross mark and arrow indicating motion (no text or symbols)natural_image
Technical line drawing of a mechanical component with no visible text or symbolsAfb. 40. Enviolo twist grip (schakelbediening)
24. Riemen

WAARSCHUWINGEN
natural_image
Technical line drawing of a mechanical assembly with gears and chains (no text or symbols)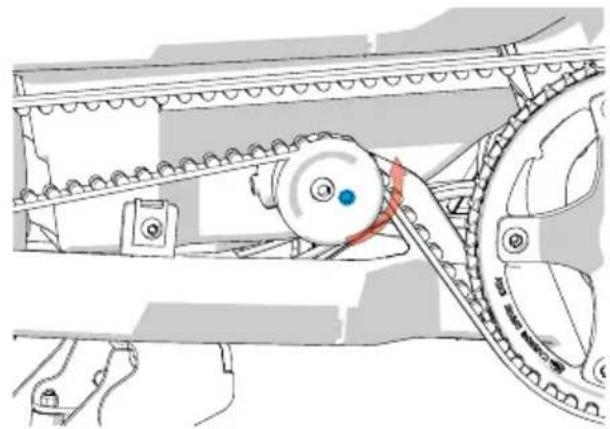
natural_image
Mechanical assembly diagram showing a belt drive system with pulleys and gears (no text or labels)Afb. 41. Riemspanner schroef Afb. 42. Riemspanner stelschroef
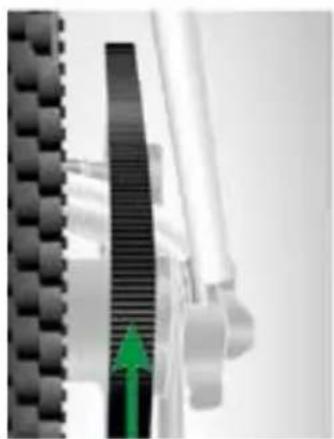
natural_image
Close-up of a mechanical component with a green arrow indicating direction (no visible text or symbols)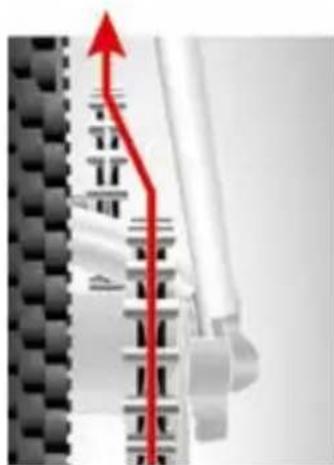
natural_image
Mechanical assembly diagram showing a red upward arrow and gear-like components (no text or symbols)30.1 Urban Arrow Connected
www.urbanarrow.com/nl/connected
natural_image
Technical illustration of a key and bicycle wheel with a red cross mark (no text or symbols)1.4 Urban Arrow Connected 113
text_image
Technical diagram of a bicycle with labeled parts including front wheel, rear wheel, and side seatstext_image
CE UK CA URBAN ARROW EPAC according to EN 15194 EN 17860-2 25 km/h 250W Smart Urban Mobility B.V. Gyrocoopweg 6 1042AB Amsterdam The Netherlands 80 120 15 Max. permissible payload for each loading point (kg) with a max. total weight of 200 kg Max. bicycle weight 35 kg1.4 Urban Arrow Connected
https://urbanarrow.com/de/connected
natural_image
Line drawing of a modern bicycle with visible suspension components and wheel rim (no text or symbols)natural_image
Technical line drawing of a bicycle frame assembly, showing front and side views (no text or symbols)text_image
Diagram showing hand pressing a component with warning symbol and numbered arrows indicating steps 1 and 2natural_image
Line drawing of a bicycle with wheel, suspension, and support structure (no text or symbols)natural_image
Line drawing of a bicycle with wheels and suspension components (no text or symbols)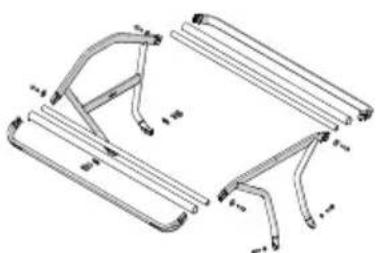
natural_image
Technical line drawing of a mechanical bracket assembly (no text or symbols)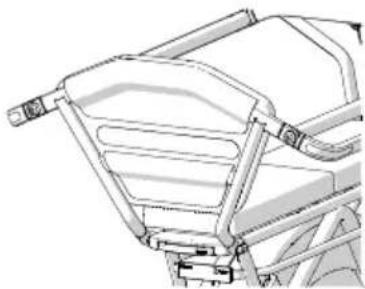
natural_image
Technical line drawing of a vehicle chassis frame with no visible text or symbolsnatural_image
Technical line drawing of a bicycle chassis with wheel rim and suspension frame (no text or symbols)Abb. 15. Sitzkissen
natural_image
Mechanical assembly diagram showing a blue brake component inserted into a car wheel, with a close-up of the brake mechanism and a red directional arrow indicating motion (no text or symbols present)natural_image
Illustration of a person riding a bicycle with a seatbelt (no text or symbols)natural_image
Illustration of two children riding a bicycle with wheels and seatbelt (no text or symbols)natural_image
Illustration of two children riding a bicycle with a red circular motion path overlay (no text or symbols)natural_image
Illustration of a child riding a bicycle with a green circular motion indicator (no text or symbols)natural_image
Illustration of two children riding a bicycle (no text or symbols)natural_image
Illustration of a child riding a bicycle with a helmet and wheels (no text or symbols)natural_image
Illustration of a child riding a bicycle with a basket and wheels (no text or symbols)
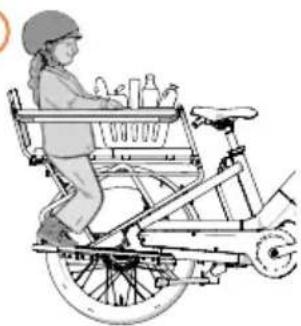
natural_image
Illustration of a child riding a bicycle with a basket and wheels (no text or symbols)natural_image
Illustration of two children riding a bicycle with wheels (no text or symbols)natural_image
Illustration of two children riding a bicycle, one with a green checkmark (no text or symbols)natural_image
Illustration of two children riding a bicycle with a green checkmark (no text or symbols on the diagram itself)natural_image
Illustration of two children riding a bicycle with a red circular motion indicator (no text or symbols)natural_image
Line drawing of a bicycle with front wheel, rear wheel, and side-mounted platform (no text or symbols)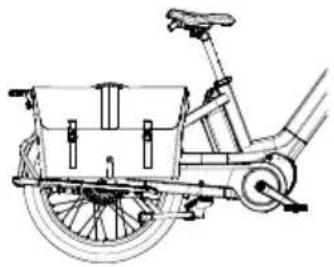
natural_image
Line drawing of a bicycle with front wheel, rear basket, and side-mounted platform (no text or symbols)natural_image
Silhouette of a person riding a green bicycle with a horizontal line indicating the bike lane (no text or symbols)natural_image
Diagram of a bicycle steering wheel with orange motion arrows indicating rotation (no text or symbols)natural_image
Line drawing of a robotic arm with articulated joints and control valves (no text or symbols)Abb. 25. Vorbau
natural_image
Technical line drawing of a mechanical device with no visible text or symbolsnatural_image
Mechanical robotic arm with articulated joints and a blue pointer indicating force direction (no text or symbols)natural_image
Technical line drawing of a robotic arm with a blue circular component on the branch (no text or symbols)natural_image
Illustration of a robotic arm with blue and white components, no text or symbols presentnatural_image
Technical line drawing of a robotic arm with visible joints and blue components (no text or symbols)natural_image
Technical illustration of a Lenkergriff tool (no text or symbols on the diagram itself)natural_image
Technical line drawing of a bicycle wheel assembly with visible components and no text or symbols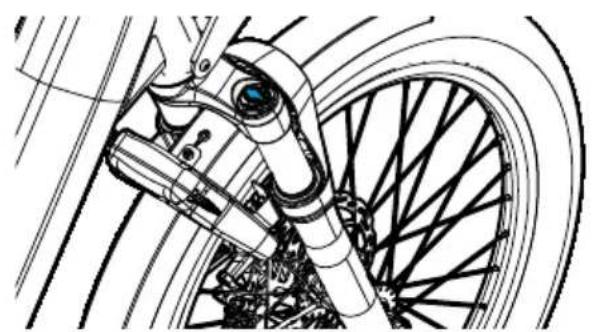
natural_image
Technical line drawing of a bicycle wheel assembly (no text or symbols)text_image
Safety warning symbol showing no protection with a hand holding a device, indicating hazard or hazard.natural_image
Technical line drawing of a bicycle wheel assembly with rotating components (no text or symbols)natural_image
Line drawing of a hand gripping a bicycle brake lever (no text or symbols)Abb. 37. Bremshebel

WARNUNGEN
natural_image
Illustration of a hand pressing down on paper with a checkmark and a checkmark symbol (no text or symbols present)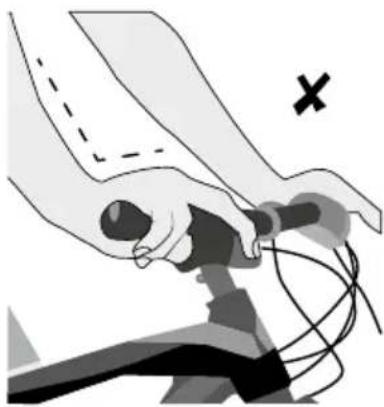
natural_image
Illustration of a hand holding a tool with a cross mark and a plus sign, no text or symbols presentnatural_image
Technical line drawing of a mechanical component with no visible text or symbolsnatural_image
Technical line drawing of a mechanical assembly with gears and chains (no text or symbols)
natural_image
Mechanical assembly diagram showing a belt drive mechanism with pulleys and gears (no text or labels)natural_image
Close-up of a mechanical gear mechanism with a green arrow indicating motion direction (no text or symbols)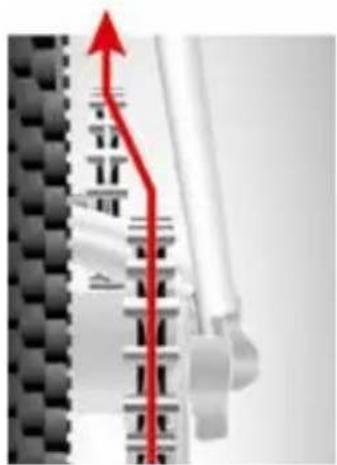
natural_image
Close-up of a mechanical component with a red upward arrow indicating motion or force (no text or symbols visible)30.1 Urban Arrow Connected
https://urbanarrow.com/de/connected
text_image
Technical sketch showing a key and bicycle wheel with a red cross mark indicating a safety or hazard symbol.text_image
Technical diagram of a bicycle with labeled parts including front wheel, rear wheel, and side seatstext_image
CE | UK CA URBAN ARROW EPAC according to EN 15194 EN 17860-2 25 km/h 250W Smart Urban Mobility B.V. Gyrocoopweg 6 1042AB Amsterdam The Netherlands 80 120 15 Max. permissible payload for each loading point (kg) with a max. total weight of 200 kg Max. bicycle weight 35 kg1.4 Urban Arrow Connected
natural_image
Line drawing of a modern bicycle with extended frame and wheels (no text or symbols)natural_image
Technical line drawing of a bicycle chassis with labeled components (no text or symbols present)natural_image
Technical line drawing of a mechanical device with a rectangular component and articulated arms (no text or symbols)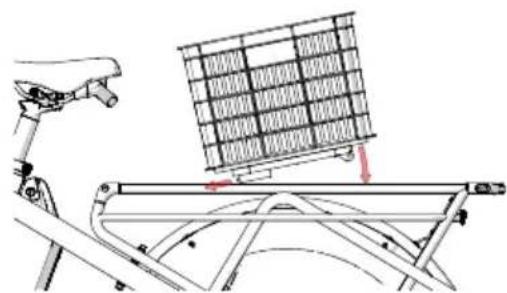
natural_image
Diagram of a bicycle frame with a grid array and directional arrows indicating motion (no text or symbols)natural_image
Line drawing of a bicycle with suspension legs and wheel (no text or symbols)natural_image
Line drawing of a bicycle with wheels and suspension (no text or symbols)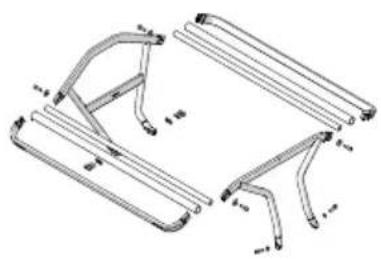
natural_image
Technical line drawing of a mechanical bracket assembly (no text or symbols)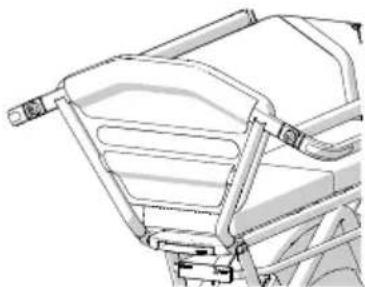
natural_image
Technical line drawing of a mechanical device with no visible text or symbolsFig. 14. Dossier
Fig. 12. Barre de protection Fig. 13. Composants de la barre de protection

VERTISSEMENT
Blessures
natural_image
Line drawing of a bicycle chassis with wheels and seat (no text or symbols)natural_image
Mechanical assembly diagram showing a blue component inserted into a car wheel (no text or symbols visible)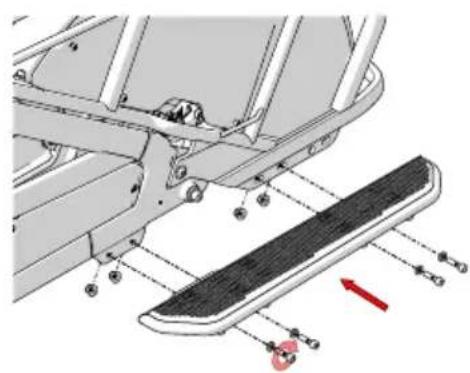
natural_image
Mechanical assembly diagram showing a vehicle's side panel and foot, with no visible text or symbolsFig. 16. Repose-pieds Fig. 17. Repose-pieds

AVERTISSEMENT
Blessures
natural_image
Illustration of a person riding a bicycle with a seatbelt (no text or symbols)natural_image
Illustration of two children riding a bicycle (no text or symbols)natural_image
Illustration of a child riding a bicycle with a red hand icon overlay (no text or symbols)natural_image
Illustration of a child riding a bicycle with a green circular motion indicator (no text or symbols)natural_image
Illustration of two children riding a bicycle (no text or symbols)natural_image
Illustration of a child riding a bicycle with a helmet and wheels (no text or symbols)natural_image
Illustration of a child riding a bicycle with a basket and wheels (no text or symbols)
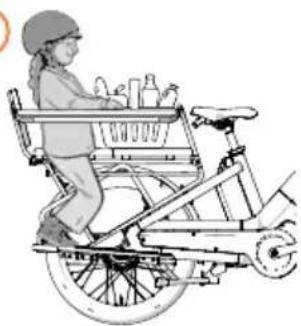
natural_image
Illustration of a child riding a bicycle with buckets and wheels (no text or symbols)natural_image
Illustration of two people riding a bicycle with wheels (no text or symbols)natural_image
Illustration of two children riding a bicycle, one with a green checkmark (no text or symbols)natural_image
Illustration of two people riding a tricycle with a checkmark icon (no text or symbols on the diagram itself)natural_image
Illustration of two children riding a bicycle with a red circular motion path (no text or symbols)natural_image
Silhouette of a person riding a bicycle with a horizontal line indicating the bike lane (no text or symbols)natural_image
Diagram of a bicycle steering wheel with orange motion arrows indicating rotation (no text or symbols)natural_image
Technical line drawing of a robotic arm with articulated joints and actuators (no text or symbols)Fig. 25. Potence
natural_image
Technical line drawing of a bicycle head assembly with no visible text or symbolsnatural_image
Mechanical robotic arm with articulated joints and a blue pointer, no visible text or symbolsnatural_image
Technical line drawing of a robotic arm with a blue circular component on the branch (no text or symbols)Fig. 28. Vis de la potence
natural_image
Illustration of a robotic arm with blue and white components, no text or symbols presentFig. 29 Rotation de la potence
natural_image
Technical line drawing of a robotic arm with visible joints and components (no text or symbols)natural_image
Medical illustration of a foot with mesh mesh and attached medical device (no text or labels)natural_image
Technical line drawing of a bicycle wheel assembly with a blue eye (no text or symbols)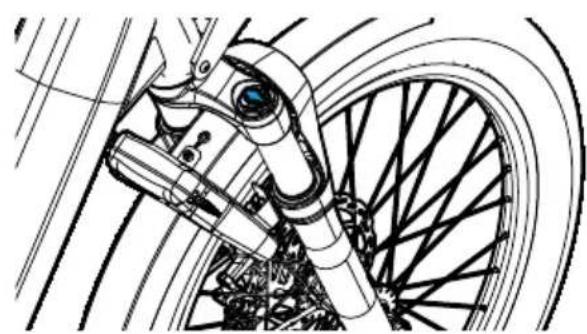
natural_image
Technical line drawing of a bicycle wheel assembly with visible components and no text or symbolstext_image
Safety warning symbol showing no protection with a circular hazard zone and a hand holding a tool, indicating hazardous safety.natural_image
Technical line drawing of a bicycle brake system with no visible text or symbolsnatural_image
Line drawing of a hand gripping a bicycle brake lever (no text or symbols)natural_image
Illustration of a hand holding a pen, with a checkmark and abstract lines (no text or symbols)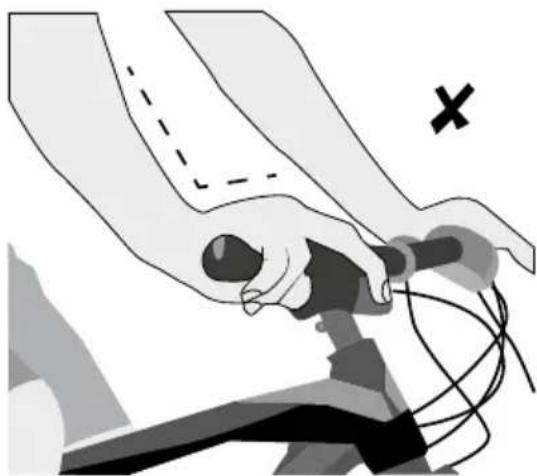
natural_image
Illustration of a robotic hand holding a small object with a cross mark indicating motion (no text or symbols)natural_image
Technical line drawing of a mechanical component with flanged ends and a central cylindrical shaft (no text or symbols)natural_image
Technical line drawing of a mechanical assembly with gears and chains (no text or symbols)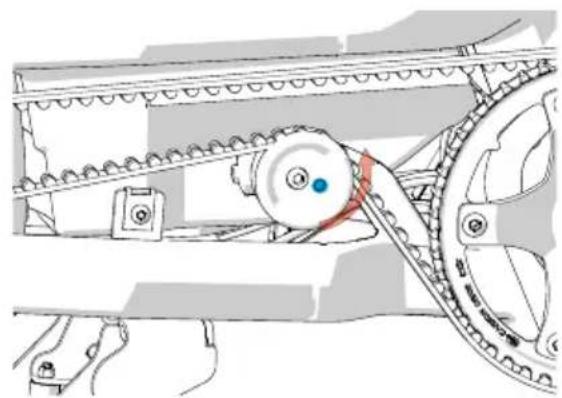
natural_image
Mechanical assembly diagram showing a pulley system with gears and chains (no text or labels)natural_image
Close-up of a mechanical component with a green arrow indicating direction (no visible text or symbols)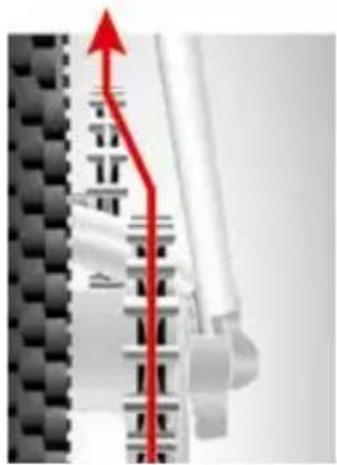
natural_image
Mechanical assembly diagram showing a red arrow indicating upward motion, with no visible text or symbols.30.1 Urban Arrow Connected
natural_image
Technical sketch of a key and bicycle wheel assembly (no text or symbols)1.4 Urban Arrow Connected 221
30.1 Urban Arrow Connected 262
text_image
Technical diagram of a bicycle with labeled parts including front wheel, rear wheel, and side seatsFig. 1. Breeze, inklusive levering
text_image
CE UK CA URBAN ARROW EPAC according to EN 15194 EN 17860-2 25 km/h 250W Smart Urban Mobility B.V. Gyrocoopweg 6 1042AB Amsterdam The Netherlands 80 120 15 Max. permissible payload for each loading point (kg) with a max. total weight of 200 kg Max. bicycle weight 35 kg1.4 Urban Arrow Connected
For den bedste tyverisikring bør du få installeret Urban Arrow Connected hos din Urban Arrow-forhandler. Scan QR-koden for mere information om Urban Arrow Connected.
www.urbanarrow.com/da-dk/connected
Bosch www.bosch-chike.com/dk/service/kontakt
natural_image
Line drawing of a modern bicycle with extended front wheel and side-mounted wheels (no text or symbols)natural_image
Technical line drawing of a bicycle frame assembly, showing front and side views (no text or symbols)Fig. 6. 4x HD-systemer på baghjulets bagagebærer Fig. 7. MIK-profil på frontladet
natural_image
Technical line drawing of a mechanical device with a box and articulated arm (no text or symbols)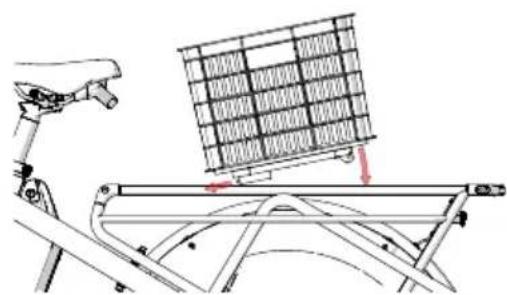
natural_image
Diagram of a bicycle frame with a grid array and directional arrows indicating motion (no text or symbols)natural_image
Line drawing of a bicycle with wheel, suspension, and support structure (no text or symbols)Fig. 11. Barnestol

ADVARSLER
natural_image
Technical line drawing of a bicycle chassis with wheel, frame, and suspension components (no text or symbols)Fig. 15. Sædehynde
natural_image
Mechanical assembly diagram showing a blue brake pad inserted into a car wheel, with a close-up view of the component being installed (no text or symbols present)natural_image
Illustration of a child riding a tricycle with a seatbelt (no text or symbols)natural_image
Illustration of two children riding a stationary bike (no text or symbols)natural_image
Illustration of two children riding a bicycle with a red circular motion indicator (no text or symbols)natural_image
Illustration of two children riding a bicycle with a green motion path overlay (no text or symbols)natural_image
Illustration of two children riding a bicycle (no text or symbols)natural_image
Illustration of a child riding a bicycle with a helmet and wheels (no text or symbols)natural_image
Illustration of a person riding a bicycle loaded with bottles (no text or symbols)
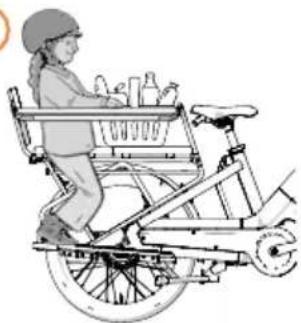
natural_image
Illustration of a child riding a bicycle with shopping carts and bottles (no text or symbols)natural_image
Illustration of two children riding a bicycle with wheels (no text or symbols)natural_image
Illustration of two children riding a bicycle with a green checkmark indicating approval (no text or symbols on the diagram itself)natural_image
Illustration of two people riding a bicycle with a green checkmark indicating approval (no text or symbols present)natural_image
Illustration of two people riding a bicycle with a red circular motion indicator (no text or symbols)natural_image
Silhouette of a person riding a bicycle with a green outline and a blue dot at the base (no text or symbols)natural_image
Diagram of a bicycle steering wheel with orange motion arrows indicating rotation (no text or symbols)natural_image
Technical line drawing of a robotic arm with articulated joints and control valves (no text or symbols)Fig. 25. Frempind
natural_image
Technical line drawing of a mechanical device with no visible text or symbolsFig 26 Styrklemskruer
natural_image
Illustration of a robotic arm with articulated joints and a blue pointer, no text or symbols presentnatural_image
Technical line drawing of a robotic arm with a blue circular component on the branch (no text or symbols)natural_image
Illustration of a robotic arm with blue and white components, no text or symbols presentFig 29 Rotér frempind
natural_image
Technical line drawing of a robotic arm with visible joints and blue components (no text or symbols)natural_image
Technical illustration of a mechanical device with mesh and curved components (no text or symbols)natural_image
Technical line drawing of a bicycle wheel assembly with visible components and no text or symbols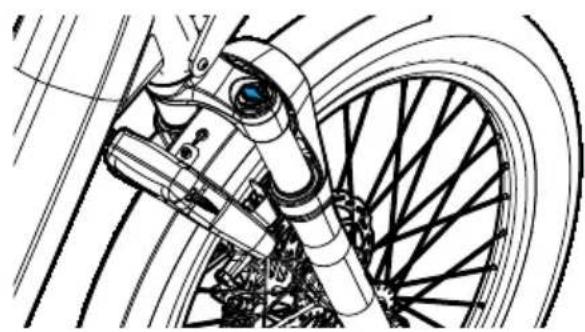
natural_image
Technical line drawing of a bicycle wheel assembly (no text or symbols)text_image
Safety warning symbol showing no hazard and a hand holding a device, indicating no hazard or no hazard.natural_image
Technical line drawing of a bicycle wheel assembly with mounting brackets and suspension components (no text or symbols)Fig. 36. Hydraulisk skivebremse foran
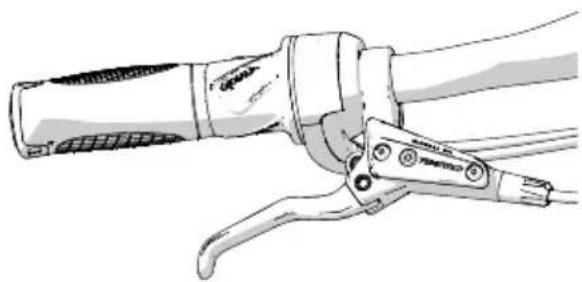
natural_image
Line drawing of a bicycle brake lever with handle and grip (no text or symbols)natural_image
Illustration of a hand holding a document with a checkmark and abstract lines (no text or symbols)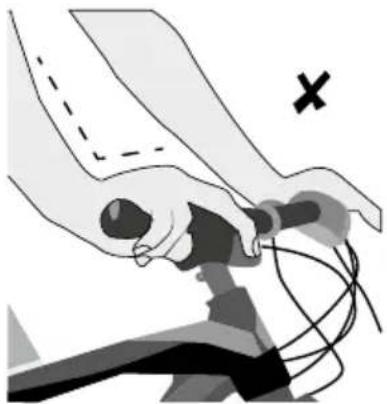
natural_image
Illustration of a hand holding a small object with a cross mark indicating a specific point (no text or symbols present)natural_image
Technical line drawing of a mechanical component with no visible text or symbolsFig. 40. Enviolo twist grip (gearbetjening)
24. Stropper

ADVARSLER
natural_image
Technical line drawings of mechanical components, showing two views of a conveyor belt system (no text or symbols)30.1 Urban Arrow Connected
For den bedste tyverisikring bør du få Urban Arrow Connected installeret hos din Urban Arrow-forhandler. Scan QR-koden for detaljerede oplysninger om Urban Arrow Connected.
www.urbanarrow.com/connected
1.4 Urban Arrow Connected 273
text_image
Technical diagram of a bicycle with labeled parts including front wheel, rear wheel, and side seatsBild 1. Breeze
text_image
CE | UK CA URBAN ARROW EPAC according to EN 15194 EN 17860-2 25 km/h 250W Smart Urban Mobility B.V. Gyrocoopweg 6 1042AB Amsterdam The Netherlands 80 120 15 Max. permissible payload for each loading point (kg) with a max. total weight of 200 kg Max. bicycle weight 35 kg1.4 Urban Arrow Connected
www.urbanarrow.com/connected
natural_image
Line drawing of a modern bicycle with visible suspension components and wheel rim (no text or symbols)natural_image
Technical line drawing of a bicycle frame assembly, showing front and side views (no text or symbols)natural_image
Technical line drawing of a mechanical device with a rectangular housing and articulated arm (no text or symbols)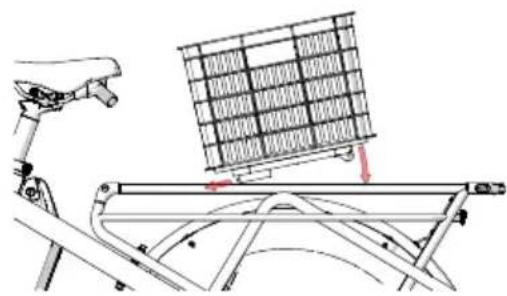
natural_image
Diagram of a bicycle frame with a grid array and directional arrows indicating motion (no text or symbols)natural_image
Technical line drawing of a bicycle with suspension frame and wheel (no text or symbols)Bild 11. Barnstolar

VARNINGAR
natural_image
Line drawing of a bicycle with wheels and seat (no text or symbols)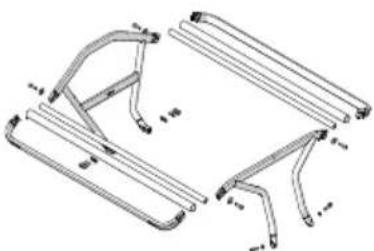
natural_image
Technical line drawing of a mechanical bracket assembly (no text or symbols)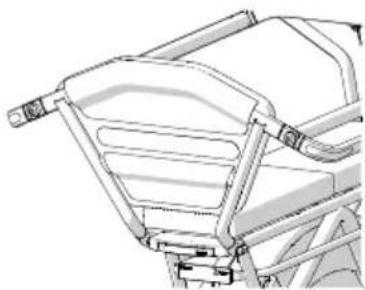
natural_image
Technical line drawing of a vehicle chassis frame with no visible text or symbolsnatural_image
Technical line drawing of a bicycle chassis with wheel, frame, and suspension components (no text or symbols)Bild 15. Sittdyna
natural_image
Mechanical assembly diagram showing a blue brake pad inserted into a car wheel, with a close-up view of the component being installed (no text or symbols present)natural_image
Illustration of a person riding a bicycle with a seatbelt (no text or symbols)natural_image
Illustration of two children riding a bicycle with wheels and seatbelt (no text or symbols)natural_image
Illustration of two children riding a bicycle with a red circular motion path overlay (no text or symbols)natural_image
Illustration of a child riding a bicycle with a green circular motion indicator (no text or symbols)natural_image
Illustration of two children riding a bicycle (no text or symbols)natural_image
Illustration of a child riding a bicycle with a helmet and wheels (no text or symbols)Fotstöd, ingen Protection bar, inget ryggstöd, ingen sittdyna, ingen barnstol, last
natural_image
Illustration of a person riding a bicycle loaded with plastic bottles (no text or symbols)
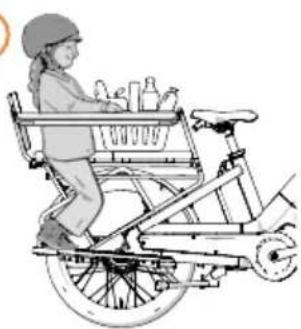
natural_image
Illustration of a child riding a bicycle loaded with bottles and a basket (no text or symbols)natural_image
Illustration of two children riding a stationary bicycle (no text or symbols)natural_image
Illustration of two children riding a tricycle, one seated and one standing, with a green checkmark indicating approval (no text or symbols on the diagram itself)Fotstöd, Protection bar, inget ryggstöd, en sittdyna, en barnstol, ingen last
natural_image
Illustration of two children riding a bicycle with a green checkmark (no text or symbols on the diagram itself)natural_image
Illustration of two children riding a bicycle with a red circular motion indicator (no text or symbols)natural_image
Line drawing of a bicycle with front wheel, rear wheels, and side-mounted platform (no text or symbols)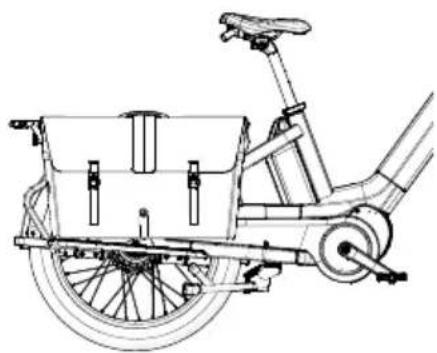
natural_image
Line drawing of a bicycle with a front basket and wheels (no text or symbols)natural_image
Silhouette of a person riding a bicycle with a horizontal line indicating the bike lane (no text or symbols)natural_image
Diagram of a bicycle steering wheel with orange motion arrows indicating rotation (no text or symbols)natural_image
Line drawing of a robotic arm with articulated joints and control valves (no text or symbols)Bild 25. Styrstam
natural_image
Technical line drawing of a bicycle head assembly with no visible text or symbolsnatural_image
Mechanical robotic arm with articulated joints and a blue pointer indicating motion (no text or symbols)natural_image
Technical line drawing of a robotic arm with a blue circular component on the branch (no text or symbols)natural_image
Illustration of a robotic arm with a blue and orange component, no text or symbols presentnatural_image
Technical line drawing of a robotic arm with visible joints and blue circular features (no text or symbols)natural_image
Technical line drawing of a mechanical component with mesh texture and connectors (no text or symbols)natural_image
Technical line drawing of a bicycle wheel assembly with visible components and no text or symbols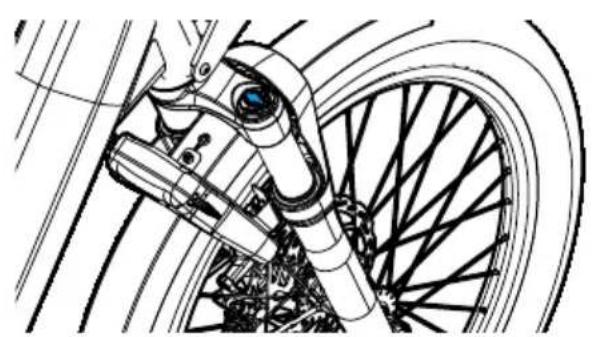
natural_image
Technical line drawing of a bicycle wheel assembly with visible mechanical components (no text or symbols)text_image
Safety warning symbol showing no hazard and a hand using a tool to stop disc hazardnatural_image
Technical line drawing of a bicycle brake caliper assembly (no text or symbols)natural_image
Line drawing of a hand gripping a bicycle brake lever (no text or symbols)Bild 37. Bromsspak

WARNING
natural_image
Illustration of a hand holding a document with a checkmark and abstract lines (no text or symbols)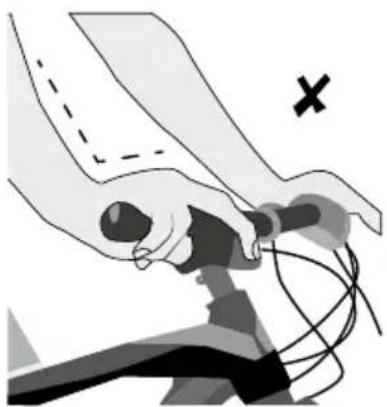
natural_image
Illustration of a hand holding a device with a cross mark and a plus sign, no text or symbols presentnatural_image
Technical line drawing of a mechanical component with no visible text or symbolsBild 40. Enviolo-vridreglage
24. Remmar

VARNINGAR
natural_image
Technical line drawing of a mechanical assembly with gears and chains (no text or symbols)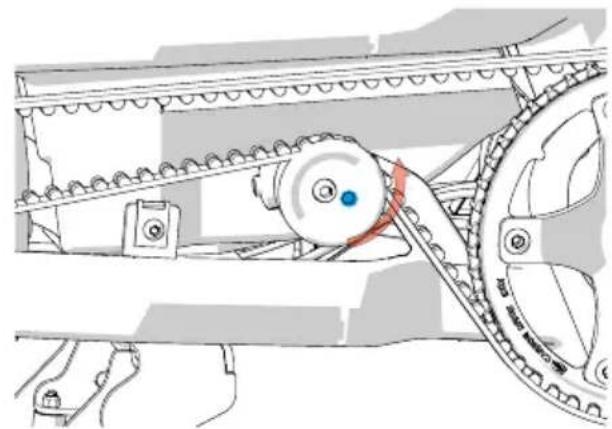
natural_image
Mechanical assembly diagram showing a pulley system with conveyor belt and chain (no text or labels)natural_image
Close-up of a mechanical component with a green arrow pointing to a textured black bar (no visible text or symbols)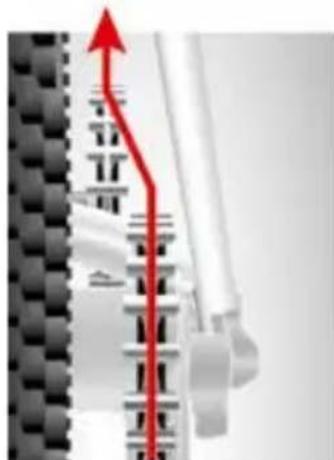
natural_image
Mechanical assembly diagram showing a red upward arrow and gear-like components (no text or symbols)30.1 Urban Arrow Connected
www.urbanarrow.com/connected