
Shorty Raincover - Electric bike Urban Arrow - Free user manual and instructions
Find the device manual for free Shorty Raincover Urban Arrow in PDF.


User questions about Shorty Raincover Urban Arrow
0 question about this device. Answer the ones you know or ask your own.
Ask a new question about this device
Download the instructions for your Electric bike in PDF format for free! Find your manual Shorty Raincover - Urban Arrow and take your electronic device back in hand. On this page are published all the documents necessary for the use of your device. Shorty Raincover by Urban Arrow.
USER MANUAL Shorty Raincover Urban Arrow
Installation and User Instruction
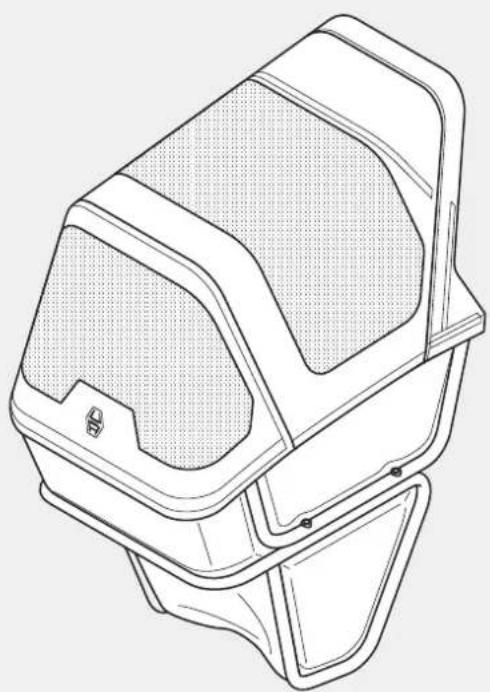
natural_image
Line drawing of a mechanical device with mesh casing and mounting bracket (no text or symbols)EN Installation and User Instruction 14
NL Installatie- en gebruikersinstructie 20
DE Installations- und Benutzeranleitung 26
FR Installation et instructions d'utilisation 32
1
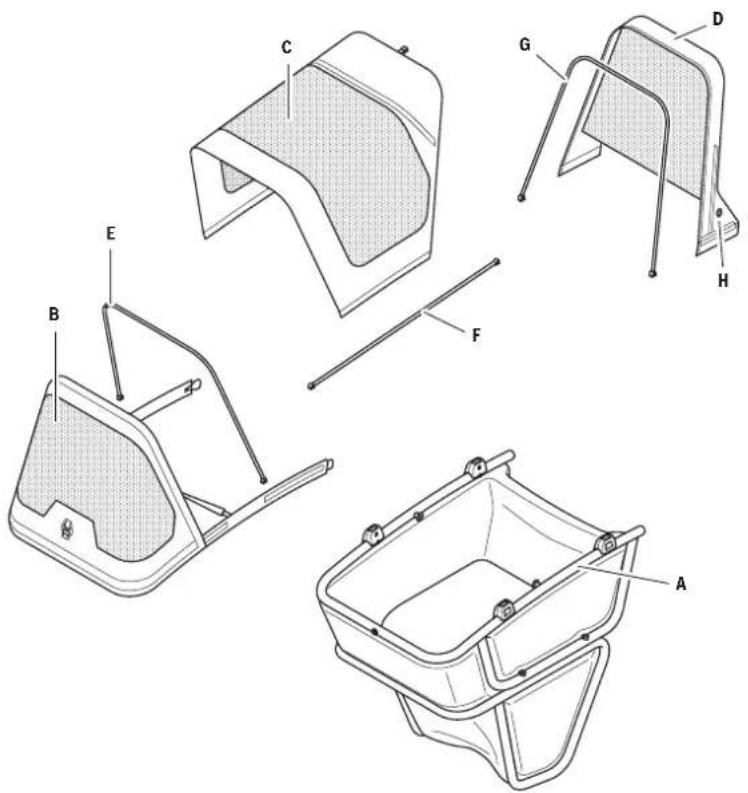
text_image
Technical diagram of a mechanical device with labeled parts A through H, showing exploded and assembled views.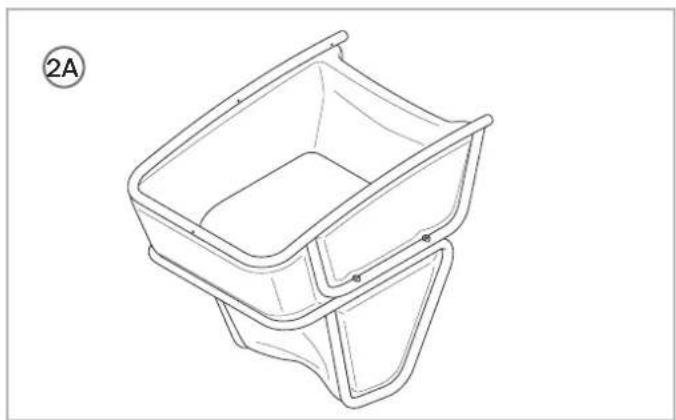
natural_image
Line drawing of a plastic container with side supports and a handle, labeled '2A' in the top-left corner (no other text or symbols)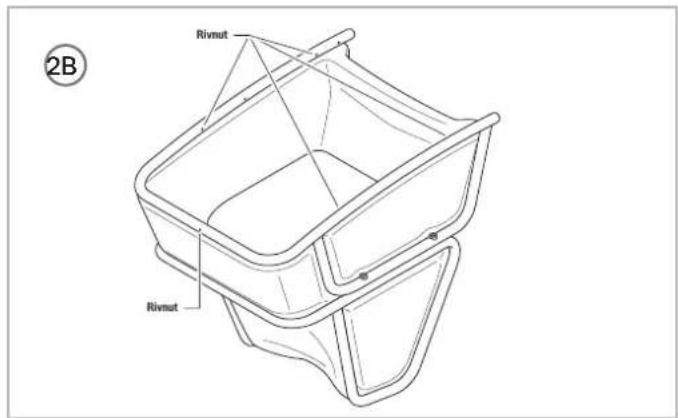
text_image
Rivnut 2B Rivnut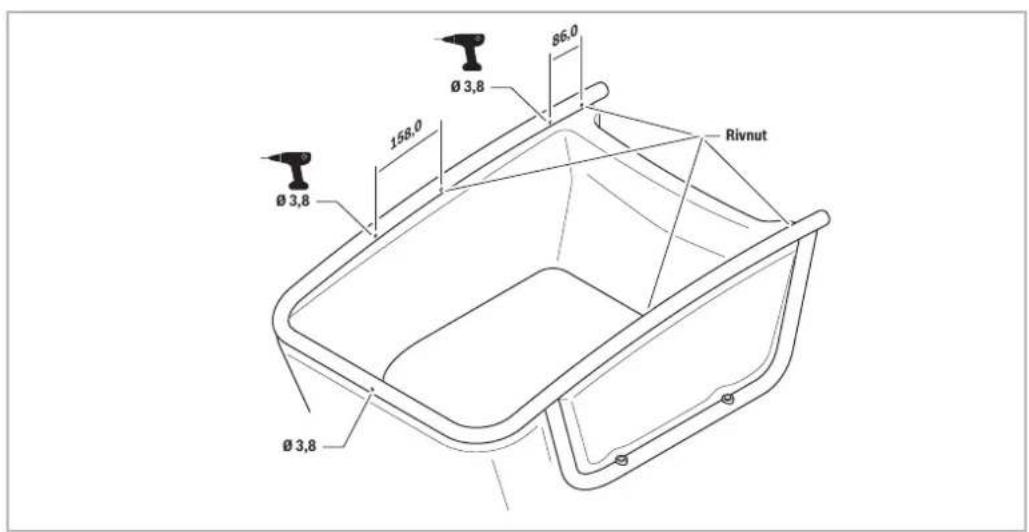
text_image
Ø 3,8 158,0 Ø 3,8 S6,0 Rivnut Ø 3,8 Ø 3,8Urban Arrow Shorty Raincover4
3
text_image
Diagram showing three-step installation of a tool: tool, drill, and component with labeled parts.EN
4
text_image
Technical diagram showing a mechanical assembly with labeled parts and directional arrows indicating motion or assembly steps.5
natural_image
Line drawing of a container with a handle and arrow indicating direction (no text or symbols)EN
6
natural_image
Technical line drawing of a mechanical component with a meshed plate and curved base (no text or symbols)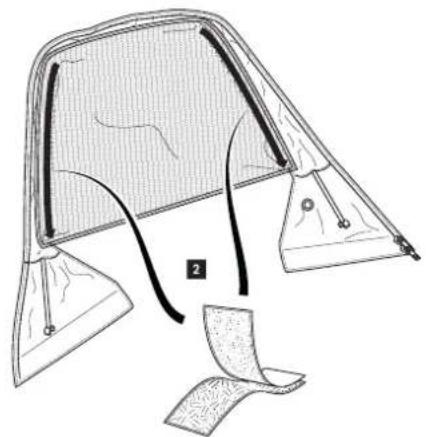
natural_image
Line drawing of a fabric net with straps and clamps, no text or symbols present7
text_image
Diagram showing a car interior with labeled parts and directional arrows indicating assembly or repair steps.User Manual 9
EN
natural_image
Line drawing of a car interior frame with a cable and hook attachment (no text or symbols)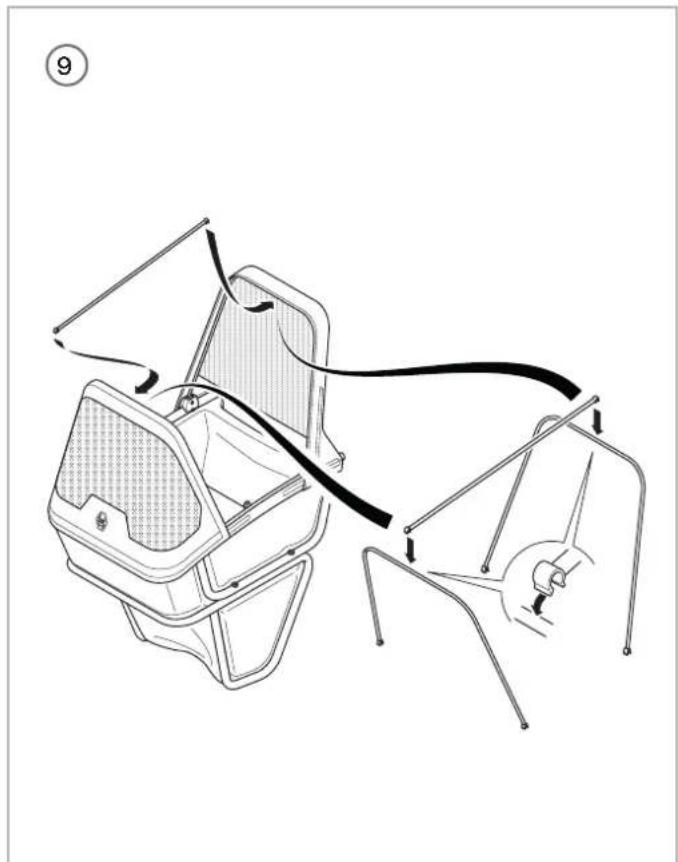
natural_image
Line drawing of a bicycle seat assembly with handlebars and guide rails (no text or symbols)Urban Arrow Shorty Raincover10
text_image
Technical diagram of a car seat assembly with labeled parts and directional arrows indicating assembly steps.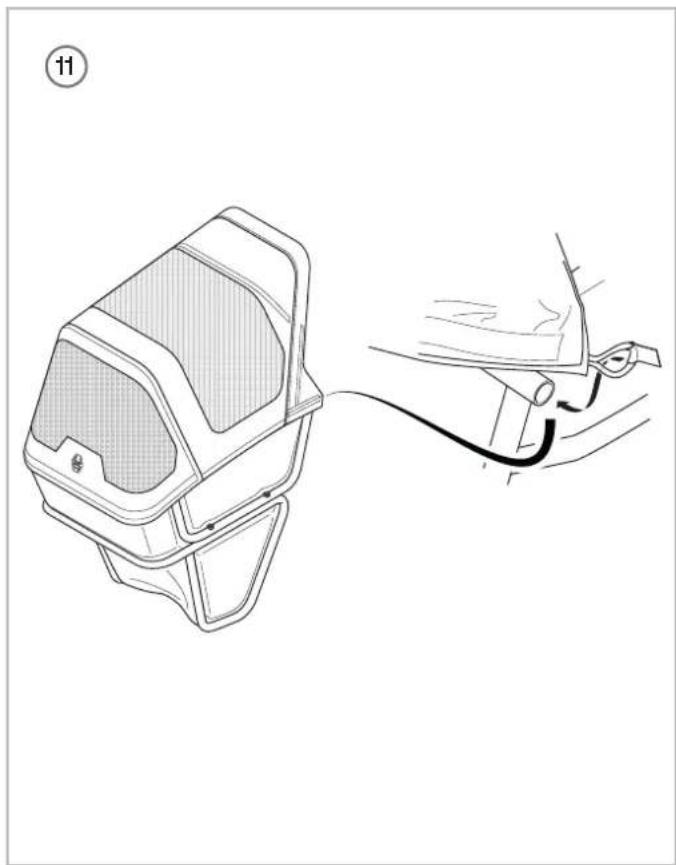
natural_image
Line drawing of a car interior with a cable and connector, no text or symbols present
12
text_image
Technical diagram showing a device with labeled parts and a close-up view of the cable being inserted into a socket.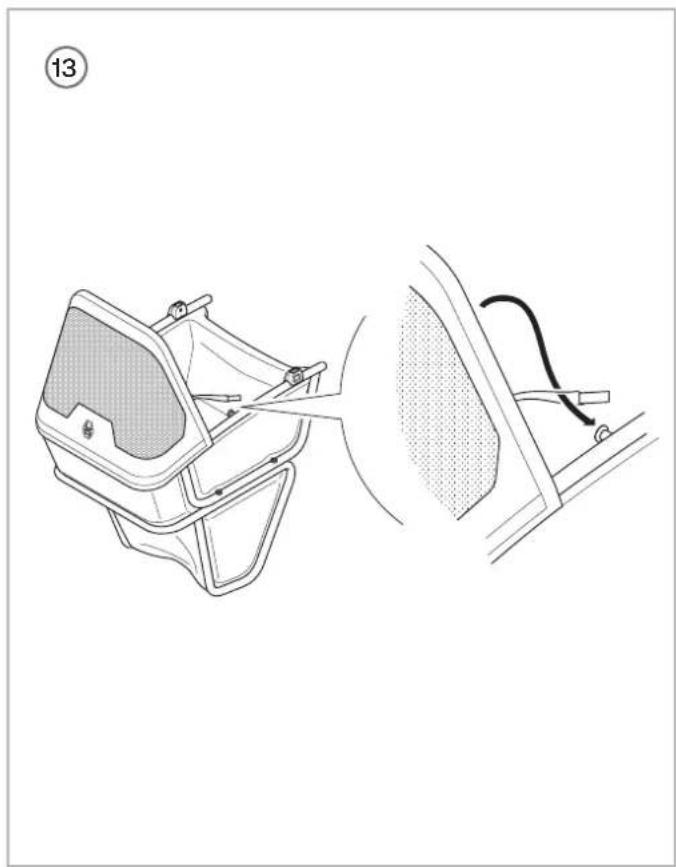
natural_image
Technical line drawing of a bicycle seat assembly and steering wheel (no text or symbols)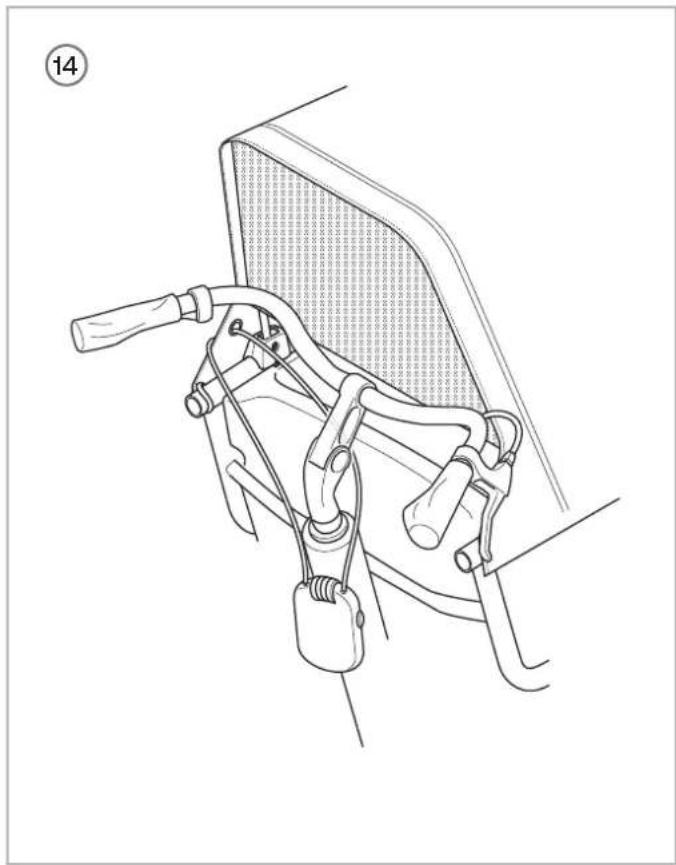
natural_image
Line drawing of a climbing gear assembly with attached bracket and handle (no text or symbols)1. Product Parts ①
| Part Letter | |
| Protection tube* A | |
| Windscreen B | |
| Doors C | |
| Rear D | |
| Front frame E | |
| Top frame F | |
| Rear frame G | |
| Eyelet H | |
*Bicycle part
Technical data
| Subject Data | |
| Material covers | Polyamide (pvc coated)Polyester (pvc coated) |
| Material windows Polypropylene | |
2. Safety instructions
Please read these instructions carefully before installing and using the Urban Arrow Shorty Raincover.
- This product is only suitable for use on the 'Urban Arrow Shorty' bikes of Urban Arrow. The connections of the Shorty Raincover shall be checked every time the bike is used.
- Never leave children unattended under the Shorty Raincover. Make sure that they are always supervised by a person responsible for their safety.
• Strong crosswinds can have an effect on the riding behavior of the bike. Adjust your speed if necessary.
• If the Shorty Raincover or any of its important parts are bent or broken, replace all the parts.
• Make sure that the Shorty Raincover is free during storage and is not placed under heavy equipment. - In the event of a defect, such as a crack or hole in the hood, we recommend that you contact your dealer. Do not continue driving if the hood is defective.
- Modifications to the Shorty Raincover or its components are not permitted. This will void the warranty.
- Keep the bike and Shorty Raincover away from fire.
3. Installation
Check if the packaging contains the following components:
- Windscreen
- Doors
- Rear
- Front frame
- Top frame
- Rear frame
- Storage bag
• Installation and user manual - Bag with installation parts:
| Part Letter | |
| Male snap fastener (1) I | |
| Brackets (4) J | |
| Loop fixation (2) K | |
| 4.2x13mm self tapping screw (6) L | |
| 3.5x9.5mm self tapping screw (1) M | |
| M5x16mm button head hex screw (6) N | |
| Special M5 screw with flat head (1) O | |
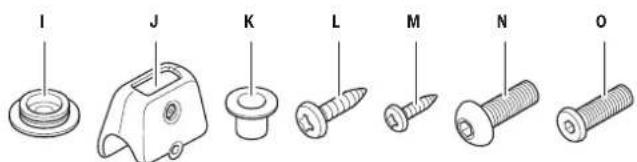
text_image
I J K L M N ORecommended tools:
Electric drill
• 3.0 mm metal drill bit
• 3.8 mm metal drill bit
• 3mm Allen key
- Measuring tape
- Pencil
- Center punch
- Hammer
To install the Shorty Raincover:
- Install the brackets Ⓙ:
NOTICE Depending on the model of your Shorty, follow procedure A or B. If your model has no rivnut on the outside of the front of the protection tube, follow procedure A. If your model does have a rivnut on the outside of the protection tube, follow procedure B.
Procedure A ②A
- Mark the middle of the front side of the protection tube Ⓐ with a centre punch and a hammer.
- Drill a 3mm hole at the marking in the middle of the front side of the protection tube Ⓐ.
- Drill the 3.8 mm holes on the inside of the protection tube at the indicated positions. TIP Place the brackets on the protection tube to determine the correct height of the drilling holes.
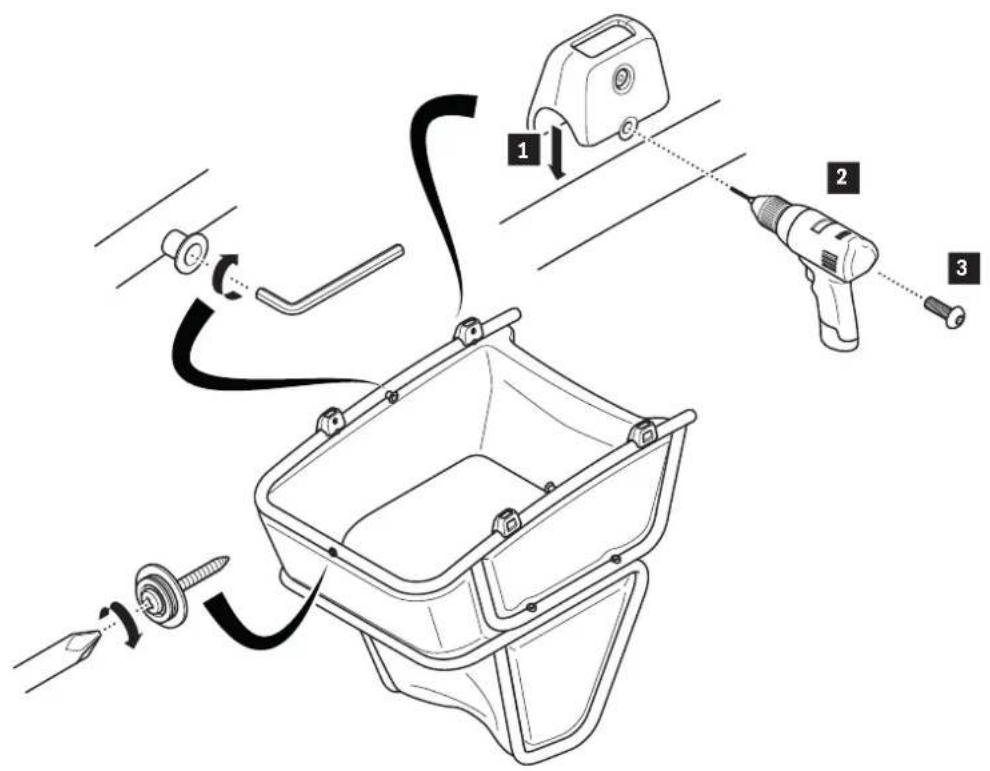
- Attach the male snap fastener ① to the front side of the protection tube A by using the 3.5x9.5mm screw M. ③
- Attach the brackets ① onto the protection tube ② by clicking them into place and fastening them with the 4.2x13mm screws ③.
- Use the Allen key to attach the loop fixations Ⓚ to the existing centre rivnuts on the inside of each side of the protection tube Ⓐ.
Procedure B ②B
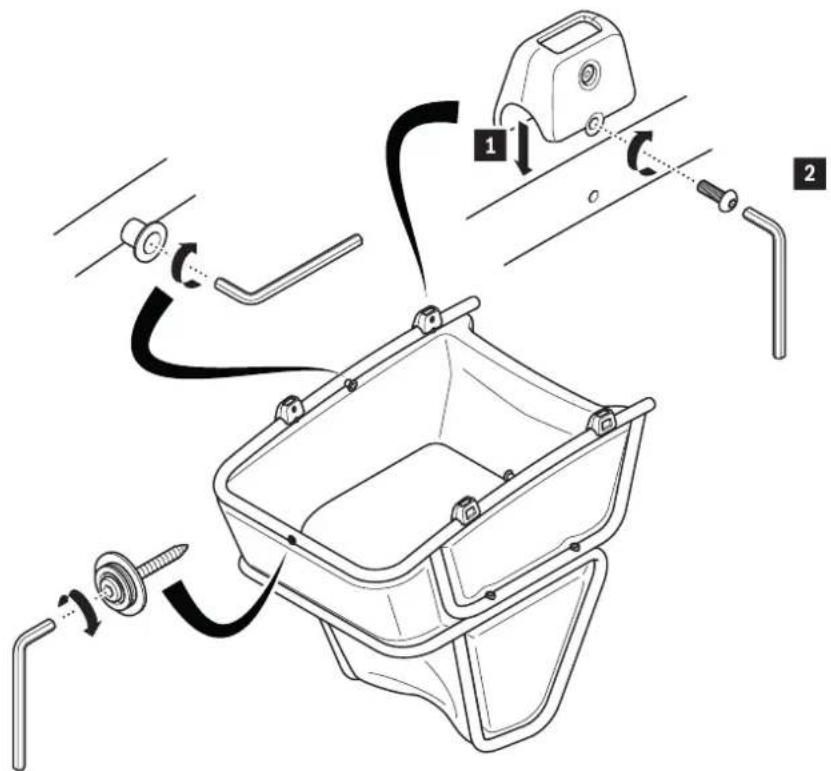
- Attach the male snap fastener ① to the rivnut on the front side of protection tube Ⓐ by using the special M5x16 screw ⑨. ④
- Put the brackets ① onto the protection tube ⑧ by placing them over the existing rivnuts at the indicated positions.
Urban Arrow Shorty Raincover16
- Use an Allen key to attach the brackets Ⓙ to the protection tube Ⓐ with the M5x16 screws Ⓝ.
- Use the Allen key to attach the loop fixations Ⓚ to the centre rivnuts on the inside of each side of the protection tube Ⓐ.
Installation (continued)
- Place the windscreen ⑥ on a horizontal and clean surface. NOTICE Please make sure that the inside of the windscreen is facing upwards.
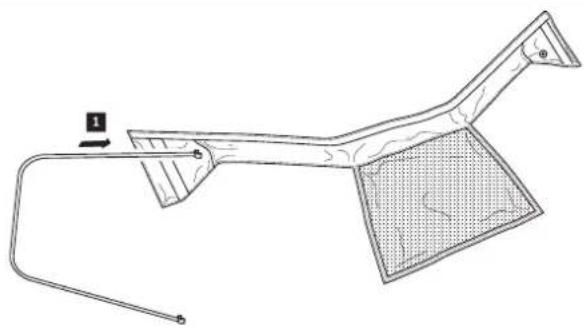
- Carefully put the front frame ⑥ into the funnel of the windscreen ⑧ by sliding it into place until an equal length protrudes on both sides. ⑤
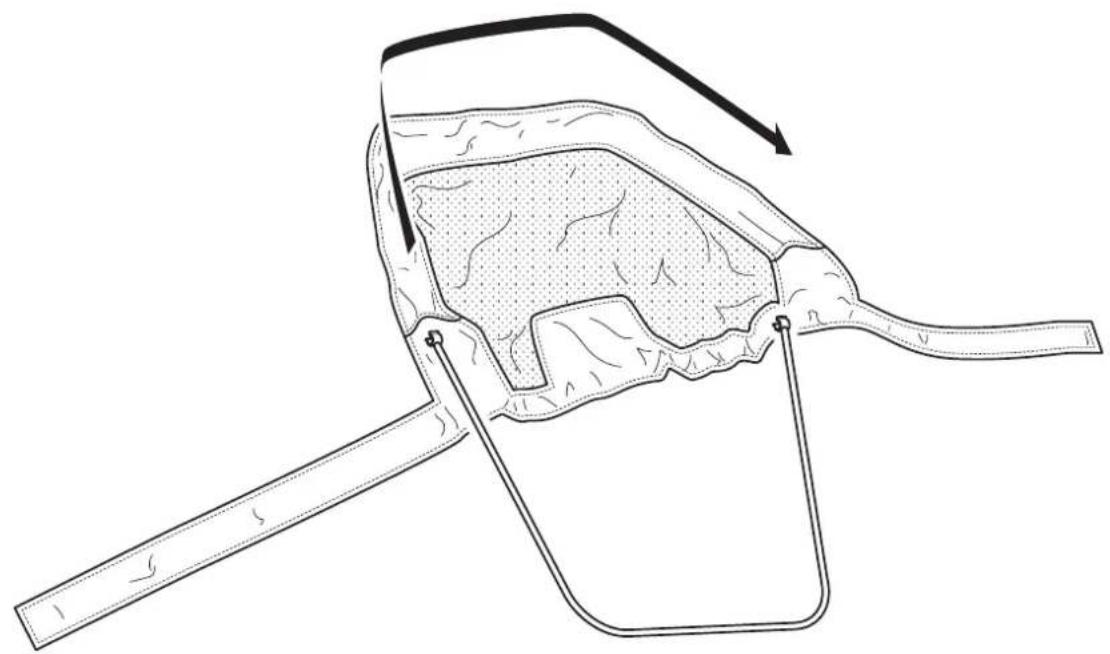
- Place the rear ① on a horizontal and clean surface. NOTICE Please make sure that the inside of the rear is facing upwards, and the mesh is not attached to the funnel.
- Carefully put the rear frame ⑥ into the funnel of the rear ① by sliding it into place until an equal length protrudes on both sides. ⑥
- Fold the sides of the rear Ⓞ inwards and attach to the mesh with the velcro strip. Fasten the rear frame Ⓡ with the velcro loops.
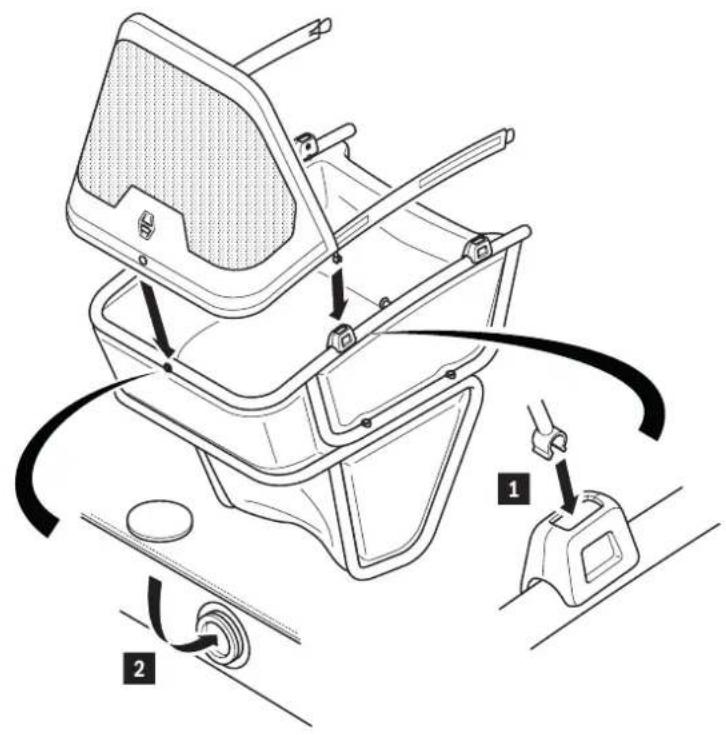
- Place the windscreen Ⓑ onto the brackets on the front side of the protection tube Ⓐ. When done correctly, you hear a clicking sound. ⑦
- Pull the bottom edge of the windscreen Ⓑ over the front side of the protection tube Ⓒ, and attach with to the male snap fastener ⏱.
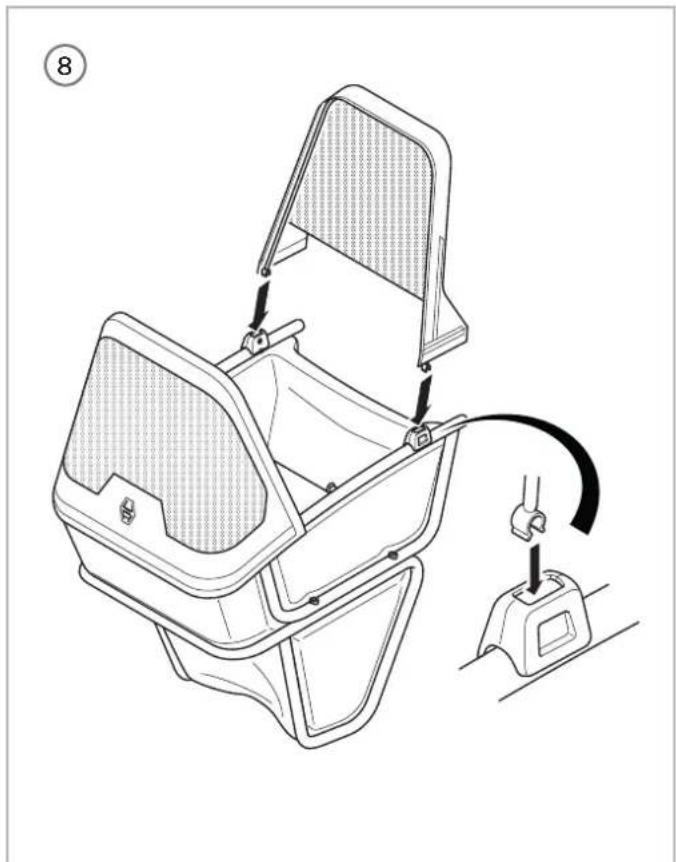
- Place the rear ① onto the brackets on the rear side of the protection tube A. When done correctly, you hear a clicking sound. ⑧
-
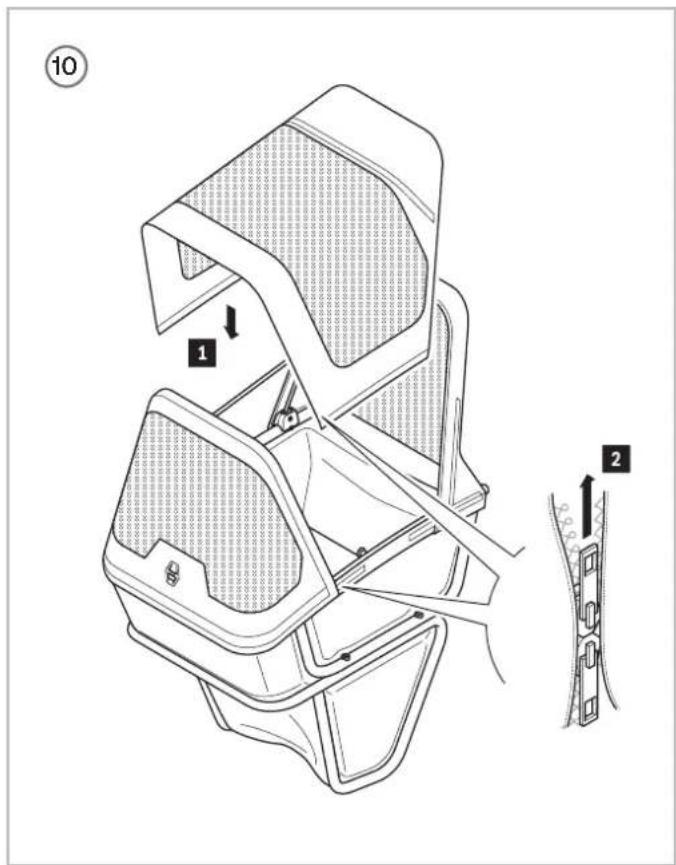
Attach the top frame Ⓔ to the front frame Ⓔ and rear frame Ⓗ with the C-shaped clips on both ends. When done correctly, you hear a clicking sound. Ⓞ
-
Place the doors © over the top frame Ⓔ, and attach to the windscreen ® and rear ® with the zippers. ⑩ NOTICE Make sure the small hook on top of the doors is positioned on the rear side.
- Fasten the Shorty Raincover onto the protection tube Ⓐ by connecting the velcro patches on the bottom of the doors Ⓒ and rear Ⓓ.
- Pull the red loops on each side of rear ① backwards, and put the attached elastic straps over the back ends of the protection tube ④. ⑪
4. Usage
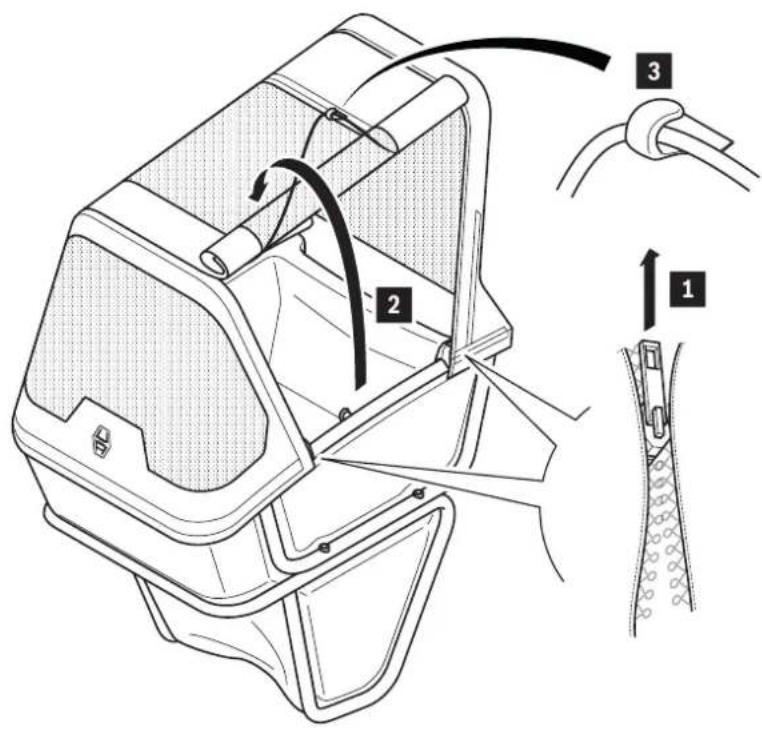
Open doors ⑫
- Unzip both sides of the doors ©.
- To keep the doors © open, roll up and use the velcro patches on top to put in place.
- Pull the elastic band on the inside of the doors ©, guide it around the rolled-up doors, and attach it to the small hook on the top of the doors ©.
Windscreen only ⑬
- Uninstall the doors © and rear © by following steps 4-13, and their instructions, in reversed order.
- Loosen the elastics loops attached to the inside of the windscreen Ⓑ.
- Place the elastic loops around the loop fixations Ⓚ on the inside of the protection tube Ⓐ.
5. Uninstalling 6. Securing
• Follow steps 6-13, and their instructions, in reversed order.
- Do not remove the frames from the windscreen Ⓑ and rear Ⓓ.
• Make sure the Shorty Raincover is clean and completely dry before storage.
• To store the Shorty Raincover correctly:
- Place the windscreen Ⓐ, doors Ⓐ, and rear Ⓓ on a horizontal and clean surface. NOTICE Make sure that the inside of each cover is facing upwards.
- Fold up the straps on the windscreen Ⓗ. NOTICE Carefully smooth out all creases before folding.
- Put the windscreen Ⓑ on top of the rear Ⓓ.
- Fold the doors © and put on top of the windscreen Ⓗ. NOTICE Carefully smooth out all creases before folding.
- Put the top frame Ⓔ on top of the doors Ⓒ.
- Carefully put covers and frames into the storage bag.
Use the eyelet Ⓗ to secure the Shorty Raincover with an optional lock.
⑭
7. Cleaning 8. Warranty
EN
Clean the Shorty Raincover when necessary. If your Shorty Raincover is not used for an extended period of time, uninstall it correctly, clean the cover as described in these instructions and store it in a cool, dry place away from direct sunlight. Make sure the Shorty Raincover is completely dry before storage.
To clean the Shorty Raincover:
- Use a damp cloth to wipe the entire surface of the Shorty Raincover.
- If necessary, rinse with lukewarm water and cloth. NOTICE Do not use detergents or other solvents to clean the appliance.
- Put the Shorty Raincover at a place where it can dry.
Contact your Urban Arrow partner before returning the product. The warranty covers 24 months from the date of purchase. The defective product must be sent to the manufacturer within 2 weeks. The warranty will be void in the following cases:
- External force
- Improper maintenance
- Failure to comply with operating instructions
• Discoloration caused by UV-radiation - Wrinkles, scratches and indentations in the window material even caused by normal usage
Modifications to the Shorty Raincover or its components are not permitted. This will void the warranty.