
VersaTip 2000-6 - Electric soldering iron DREMEL - Free user manual and instructions
Find the device manual for free VersaTip 2000-6 DREMEL in PDF.

| Brand | Dremel |
| Model | VersaTip 2000-6 |
| Product type | Butane gas soldering iron |
| Energy source | Refined butane gas |
| Tank capacity | ± 17 ml (≈ 9 g) |
| Runtime | ≈ 75 min (high setting) / ≈ 90 min (low setting) |
| Heating time | Instantaneous (open flame) / ≈ 25 seconds (tips) |
| Maximum temperature (open flame) | 1200 °C |
| Temperature (hot air) | 680 °C |
| Temperature (tips) | 550 °C |
| Weight (tool empty) | 135 g |
| Nominal heat flow | 12 g/h |
| Child safety | Yes, two-step mechanism |
| Refilling | Via refill valve, refined butane gas |
| Included accessories | Soldering tip, hot cut knife, shaping knife, hot air tip, wide flame head, deflector, wrenches (7 and 8 mm) |
| Uses | Soldering, cutting, shaping, hot air, open flame |
| Maintenance and cleaning | Clean exterior with a damp cloth and mild detergent; soldering tip cleaned on a damp sponge |
| Repairability | Replaceable nozzle; repair by Dremel technical center |
| Warranty | Compliant with legal regulations; normal wear, overload, improper use excluded |
| Disposal | Selective sorting for recycling according to WEEE directive 2012/19/EU |
Frequently Asked Questions - VersaTip 2000-6 DREMEL
User questions about VersaTip 2000-6 DREMEL
0 question about this device. Answer the ones you know or ask your own.
Ask a new question about this device
Download the instructions for your Electric soldering iron in PDF format for free! Find your manual VersaTip 2000-6 - DREMEL and take your electronic device back in hand. On this page are published all the documents necessary for the use of your device. VersaTip 2000-6 by DREMEL.
USER MANUAL VersaTip 2000-6 DREMEL
natural_image
Line drawing of a soldering iron with no visible text or symbols| GB | Original instructions 3 | |
| DE | Übersetzung der originalbedienungsanleitung 5 | |
| FR | Traduction de la notice originale 7 | |
| IT | Traduzione delle istruzioni originali 10 | |
| NL | Vertaling van de originele gebruiksaanwijzing 12 | |
| DA | Oversættelse af betjeningsvejledning 15 | |
| SV | Översättning av originalinstruktioner 17 | |
| NO | Oversettelse av originalinstruksjonene 19 | |
| FI | Kăännös alkuperäisistä ohjeista 21 | |
| ES | Traducción de las instrucciones originales 23 | |
| PT | Tradução das instruções originais 26 | |
| EL | Μεταφραση των πρωτοτυπων οδηγιων 28 | |
| TR | Orijinal yönergerėin čevin'si | 31 |
| CS | Překlad originálnich pokynů 33 | |
| PL | Tłumaczenie oryginalnej instrukcji 36 | |
| BG | Превод на оригиналните инструкции 38 | |
| HU | Az eredeti előírások fordítása | 41 |
| RO | Traducere a instructiunilor originale | 43 |
| ET | Algsete juhiste tõlge | 46 |
| LT | Originalių instrukciju vertimas | 48 |
| SL | Prevod originalnih navodil | 50 |
| LV | Originālas lietošanas instrukcijas tulkojums | 52 |
| HR | Prijevod originalnih uputa | 55 |
| SR | Превод оригиналног упутства | 57 |
| MK | Употребени символи | 59 |
| SK | Preklad pôvodných pokynov | 62 |
| AR | 65 |
EU
GB
USED SYMBOLS
① READ THESE INSTRUCTIONS
SAFETY WARNINGS
WARNING
READ ALL
SAFETY
WARNINGS AND ALL INSTRUCTIONS
Failure to follow the warnings and instructions may result in fire and/or serious injury. Save all warnings and instructions for future reference. Before using the tool, make sure you read and understand this manual completely.
WORK AREA SAFETY
a. Keep work area clean and well lit. Cluttered or dark areas invite accidents.
b. Do not keep combustible materials near the tool.
c. Keep children and bystanders away while operating a power tool. Distractions can cause you to lose control.
d. Only use the tool outdoors or in well-ventilated rooms.
PERSONAL SAFETY
a. Stay alert, watch what you are doing and use common sense when operating the tool. Do not use the tool while you are tired or under the influence of drugs, alcohol or medication. A moment of inattention while operating tools may result in serious personal injury.
b. Use personal protective equipment. Always wear eye protection. Protective equipment such as dust mask, non-skid safety shoes, hard hat, or hearing protection used for appropriate conditions will reduce personal injuries.
c. Do not overreach. Keep proper footing and balance at all times. This enables better control of the tool in unexpected situations.
d. Dress properly. There is a danger of burning yourself with the flame or with liquid soldering tin. Wear protective clothing to protect yourself against burns. Keep your hair, clothing and gloves away from the flame. Loose clothes or long hair can catch fire.
e. Secure the workpiece. Use a clamping device to hold the workpiece. This allows you to use both hands to operate the tool.
f. Do not use the appliance when it is leaking (gas smell), shows any sign of damage or is malfunctioning.
g. If the appliance is leaking (gas smell) immediately take it outside and check the leak-tightness without a flame. Always use soapsuds.
h. (Ref)filling the gas tank must be done in a well-ventilated place far away from any possible sources of ignition, open flames, pilot lights, electrical cookware and away from other persons. Be sure to observe the safety instructions and warning notices on the refill container.
i. Do not make any modifications to the tool.
TOOL USE AND CARE
a. Store the tool in an appropriate place with an ambient temperature between 10°C and 50°C. Allow your tool to fully cool down before storing. Unused tools should be stored away
from children in a dry location. Switch off all unused tools.
b. Always allow the tool to fully cool down before removing/ replacing tips and/or installing/ replacing the nozzle.
c. Extremely flammable gas under pressure.
d. Do not use near sparks or an open flame.
e. Do not puncture or incinerate the gas tank or store at a temperature above 50°C.
f. Keep out of reach of children.
g. Do not try to disassemble this unit.
SERVICE
a. Have the tool serviced by a qualified repair person using only identical replacement parts. This will ensure that the safety of the tool is maintained.
SPECIFICATIONS
Model number 2000
Power source Refined butane gas
Gas tank capacity ± 17 ml / ± 9 grams
Run time ± 45 minutes (highest setting) ± 90 minutes (lowest setting)
Heat-up time Instantly (open flame) ± 25 seconds (tips)
Nominal heat input 12 g/h
Cool-down time 17 min (<25°C) (lips) 15 min (<25°C) (flame guard)
Temperature 1200°C (open flame) 680°C (hot air) 550°C (tips)
Weight 135 grams (empty tool)
GENERAL
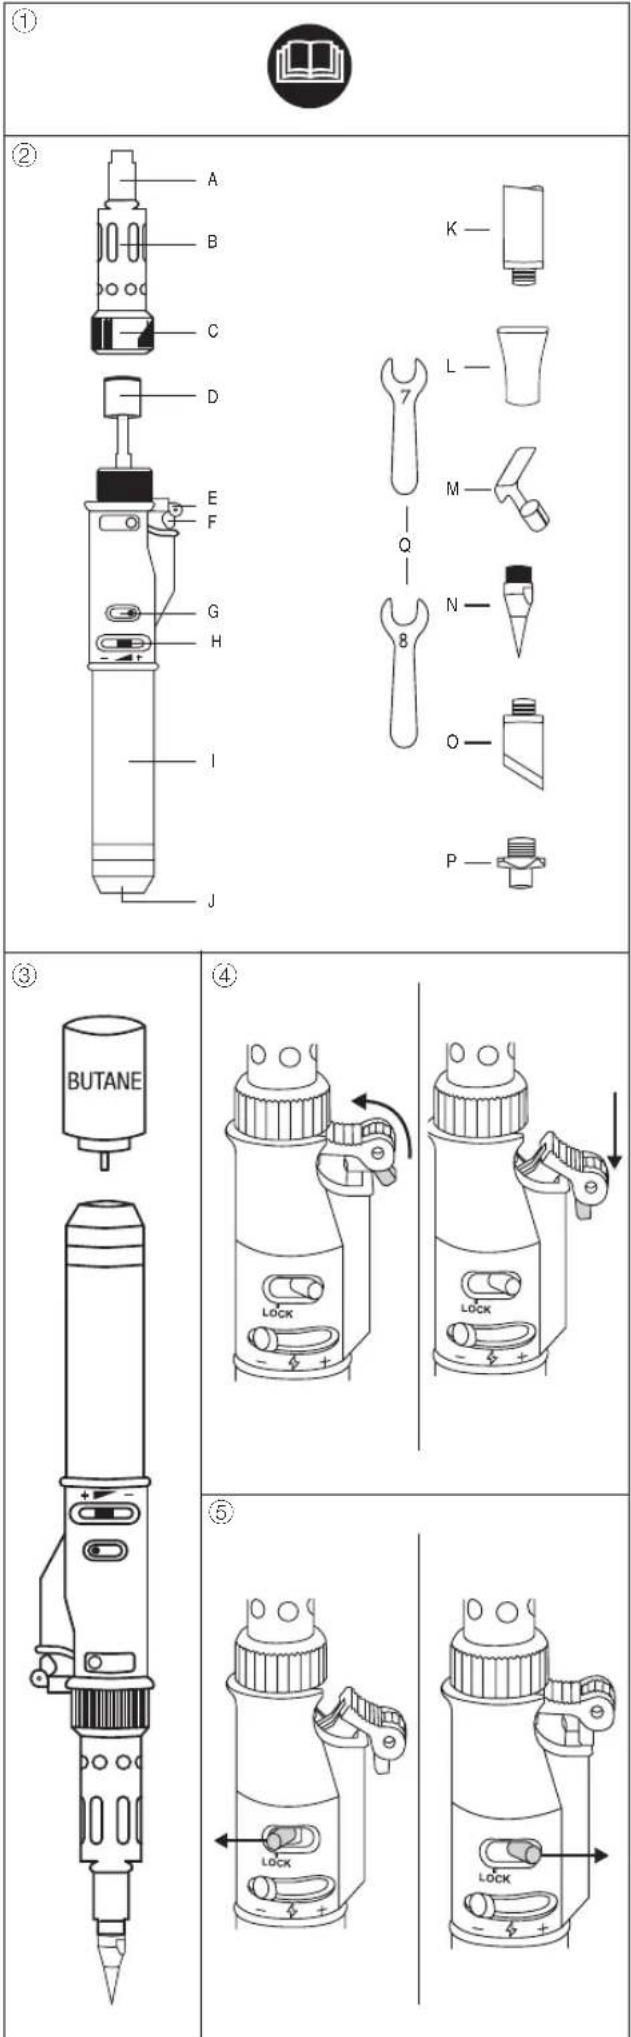
A. Catalyst
B. Flame guard
C. Flame guard nut
D. Ceramic insulator
E. Ignition switch
F. Child safety lock
G. Lock button
H. Flame control lever
1. Gas tank
J. Filling valve
K. Shaping knife
L. Wide flame head
M. Deflector
N. Soldering tip
O. Cutting knife
P. Hot air tip
Q. Wrenches (7 & 8 mm)
(RE)FILLING THE GAS TANK ③
The tool may only be filled and operated with liquid butane gas. Make sure the gas you are using is refined butane gas that can also be used for lighters.
-
Hold the tool and the gas refill container as shown in ③.
-
Fill the gas tank with liquid butane gas observing the instructions on the refill container. The gas tank is full when liquid butane gas escapes through the filling valve. In that case, there is no more air present in the gas tank.

DO NOT OVERFILL THE GAS TANK. OVERFILLING
OCCURS WHEN NO AIR ESCAPES FROM THE TANK WHILE FILLING IT. IN THIS CASE PLEASE USE A DIFFERENT TIP ON THE GAS TANK WITH WHICH YOU ARE FILLING, TO ALLOW AIR TO ESCAPE FROM THE TANK.
USE
GETTING STARTED
Familiarize yourself with the tool components, the different tips and the kit content before use (2). Remove the carton cover from the ignition switch before using the tool. The tool is equipped with a child-safety mechanism which requires a two-step operation to protect against accidental ignition.
ON/OFF
To switch on and operate the tool ①:
-
Ignite the tool as illustrated.
-
The ceramic insulator will start to glow shortly after ignition. When this is no the case, repeat steps 1 and 2.
-
To switch off the tool, release the ignition switch. This will automatically shut off the flow of butane gas, causing the tool to stop and slowly cool down.
To operate the tool continuously ⑤:
-
Ignite the tool as described above.
-
Slide the lock button to the left.
-
To switch off the tool, release the ignition switch and slide the lock button to the right. This will immediately stop the flow of butane gas.
USING WITH AN OPEN FLAME
To use the Dremel Versatip with an open flame, unscrew the flame guard, remove the catalyst (and tip if attached) and screw flame guard back onto the tool and securely tighten the flame guard nut.
FLAME LENGTH AND TEMPERATURE ADJUSTMENT
After ignition, make sure the tool is on by checking that the catalyst starts to glow.
Then move the flame control lever to the right to increase flame length and temperature, or to the left to decrease flame length and temperature. When using the open flame or hot air the tool is at the correct temperature immediately after ignition.
Please allow 25 seconds of heat-up time for tips.
ACCESSORIES

ALWAYS SWITCH OFF THE TOOL AND ALLOW IT TO
FULLY COOL DOWN BEFOR ATTACHING OR REMOVING ACCESSORIES
- Soldering tip: regular soldering activities, using soldering tin
- Hot cutting knife: cutting of nylon rope to prevent 'feathering'
- Shaping knife: cutting to size of sheets of plastic and other heat-sensitive materials
- Wide flame head: preparing for detailed paint removal
• Hot air tip: melting of plastics and other heat-sensitive materials - Deflector: shrinking of heat-sensitive insulation around electrical wiring
INSTALLING / REPLACING TIPS

ALWAYS ALLOW THE TOOL TO COOL FULLY
BEFORE INSTALLING OR REPLACING TIPS
Make sure to use the right tip for the job you want to do.
Only use tips that fit onto the tool perfectly.
Loose fitting tips might result in an uncontrolled and unsafe flame.
The use of tips requires the catalyst to be installed.
- Unscrew the flame guard nut and remove the flame guard.
- Slide in the catalyst into the flame guard with the narrow part facing outward.
- Place the flame guard and catalyst back on to the tool and securely tighten the flame guard nut.
- The soldering tip, cutting knife tip, shaping knife tip and hot blower tip can be screwed onto the catalyst. Secure the bits tightly using the 7 mm wrench.
- To remove a tip, simply use the 7 mm wrench to unscrew the tip. Use the 8 mm wrench to hold the catalyst in place if required.
- The wide flame head tip and the deflector tip can be slid over the end of the catalyst. To remove them slide off the catalyst.
MAINTENANCE AND CLEANING

ALWAYS ALLOW THE
TOOL TO COOL FULLY
BEFORE INSTALLING OR REPLACING A NOZZLE
INSTALLING / REPLACING A NOZZLE
The nozzle can get clogged, due to butane gas impurities. To prolong the life of the tool, the nozzle is replaceable (a replacement nozzle can be ordered through your dealer). Should the nozzle be clogged, follow these steps to replace the nozzle:
- Unscrew the flame guard nut.
- Remove flame guard (and catalyst and tip if applicable).
- Unscrew the ceramic insulator.
- Remove the nozzle (small copper part) by hand by gently turning and pulling it.
- Install new nozzle with little opening facing outward.
- Put the ceramic insulator back and securely tighten it.
- Replace flame guard (and catalyst and tip if applicable).
- Securely tighten flame guard nut.

ALWAYS SWITCH OFF THE
TOOL AND ALLOW IT TO
Clean the exterior of the tool with a clean cloth. If necessary, use a damp cloth with a small amount of neutral detergent.
To clean the soldering tip, soak the soldering sponge in some water.
After soldering or in case of excess solder on the tip, wipe it on the sponge when it is still hot.
SERVICE AND WARRANTY
We recommend that all tool service be performed by a Dremel Service Centre.
This Dremel product is guaranteed in accordance with statutory/country-specific regulations; damage due to normal wear and tear, overload or improper handling are excluded from the warranty.
In case of a complaint, send the undismantled tool and/or charger and proof of purchase to your dealer.
CONTACT DREMEL
For more information on service and warranty, the Dremel product range, support and hotline, go to www.dremel.com.
DISPOSAL
The tool, accessories and packaging should be sorted for environmental-friendly recycling.
ONLY FOR EC COUNTRIES
According to the European Directive 2012/19/EU on Waste Electrical and Electronic Equipment and its implementation into national law, power tools that are no longer usable must be collected separately and disposed of in an environmentally friendly manner. If disposed incorrectly, waste electrical and electronic equipment may have harmful effects on the environment and human health, due to the potential presence of hazardous substances.
ONLY FOR UNITED KINGDOM
According to The Waste Electrical and Electronic Equipment Regulations 2013 (SI 2013/3113) (as amended), products that are no longer usable must be collected separately and disposed of in an environmentally friendly manner.
DE
VERWENDETE SYMBOLE

LESEN SIE DIESE ANWEISUNGEN
SICHERHEITSHINWEISE
WARNING
LESEN SIE ALLE WARNHINWEISE
L. Tête de flamme large
M. Déflecteur
EMBÔUT DIFFÉRENT SUR LE
RÉSERVOIR DE GAZ AV
LEQUEL VOUS FAITES LE
REMLISSAGE, POUR
INSTALLATION / REMPLACEMENT DES EMBOUTS
LAISSEZ TOUJOURS L'OUTIL REFROIDIR COMPLÈTEMENT AVANT D'INSTALLER OU DE REEMPLACER LES EMBOUTS
INSTALLATION / REMPLACEMENT D'UNE BUSE
SOLO PER I PAESI DELLA CE
VEILIGHEIDS-WAARSCHUWINGEN
LET OP
LEES ALLE
VEILIGHEIDS-
WAARSCHUWINGEN EN ALLE INSTRUCTIES
(GEN)OPFYLDNING AF GASBEHOLDEREN ③
UNDGÅ AT OVERFYLDE GASBEHOLDEREN.
OVERFYLDNING SKER, Når DER IKKE KOMMER LUFT UD AF BEHOLDEREN, MENS DEN FYLDES. I DETTE TILFÆLDE SKAL DER BRUGES EN ANDEN SPIDS PÅ GASBEHOLDEREN, DER FYLDES MED, FOR AT TILLADE LUFT SLIPPE UD AF BEHOLDEREN.
BRUG
INTRODUKTION
INSTALLATION / UDSKIFTNING AF EN DYSE
DET SVALNA HELT INNAN RENGÖRING
SIKKERHET I ARBEIDSOMRÅDET
(PÅ)FYLLING AV GASSTANKEN
③
(RE)CARREGAR A BOTIJA ③
NASTAVENÍ DÉLKY A TEPLOTY PLAMENE
HEGYET, HOGY A TARTÁLYBÓL
TAVOZHASSON A LEVEGO.
HASZNÁLAT
AZ ELSŐ LÉPÉSEK
ON/OFF (PORNIRE/OPRIRE)
(OPÄTOVNE) NAPLNENIE NADOBY NA PLYN ③
natural_image
Simple horizontal lines with no text or symbols, one above the other (pure graphical elements)
Bosch Power Tools B.V.
Konijnenberg 60
4825 BD Breda
The Netherlands
GB Importer
Robert Bosch Ltd.
Broadwater Park,
Uxbridge UB9 5HJ
04/2024

2610Z10254 11:2023 AI Rights Reserved
www.dremel.com

- EU
- GB
- USED SYMBOLS
- SAFETY WARNINGS
- WARNING
- READ ALL
- SAFETY
- WARNINGS AND ALL INSTRUCTIONS
- WORK AREA SAFETY
- PERSONAL SAFETY
- TOOL USE AND CARE
- SERVICE
- SPECIFICATIONS
- Model number 2000
- GENERAL
- (RE)FILLING THE GAS TANK ③
- DO NOT OVERFILL THE GAS TANK. OVERFILLING
- USE
- GETTING STARTED
- ON/OFF
- USING WITH AN OPEN FLAME
- FLAME LENGTH AND TEMPERATURE ADJUSTMENT
- ACCESSORIES
- ALWAYS SWITCH OFF THE TOOL AND ALLOW IT TO
- FULLY COOL DOWN BEFOR ATTACHING OR REMOVING ACCESSORIES
- INSTALLING / REPLACING TIPS
- ALWAYS ALLOW THE TOOL TO COOL FULLY
- BEFORE INSTALLING OR REPLACING TIPS
- MAINTENANCE AND CLEANING
- ALWAYS ALLOW THE
- TOOL TO COOL FULLY
- BEFORE INSTALLING OR REPLACING A NOZZLE
- INSTALLING / REPLACING A NOZZLE
- ALWAYS SWITCH OFF THE
- TOOL AND ALLOW IT TO
- SERVICE AND WARRANTY
- CONTACT DREMEL
- DISPOSAL
- ONLY FOR EC COUNTRIES
- ONLY FOR UNITED KINGDOM
- DE
- VERWENDETE SYMBOLE
- SICHERHEITSHINWEISE
- INSTALLATION / REMPLACEMENT DES EMBOUTS
- LAISSEZ TOUJOURS L'OUTIL REFROIDIR COMPLÈTEMENT AVANT D'INSTALLER OU DE REEMPLACER LES EMBOUTS
- INSTALLATION / REMPLACEMENT D'UNE BUSE
- SOLO PER I PAESI DELLA CE
- VEILIGHEIDS-WAARSCHUWINGEN
- LET OP
- LEES ALLE
- VEILIGHEIDS-
- WAARSCHUWINGEN EN ALLE INSTRUCTIES
- (GEN)OPFYLDNING AF GASBEHOLDEREN ③
- UNDGÅ AT OVERFYLDE GASBEHOLDEREN.
- BRUG
- INTRODUKTION
- INSTALLATION / UDSKIFTNING AF EN DYSE
- DET SVALNA HELT INNAN RENGÖRING
- SIKKERHET I ARBEIDSOMRÅDET
- (PÅ)FYLLING AV GASSTANKEN
- (RE)CARREGAR A BOTIJA ③
- NASTAVENÍ DÉLKY A TEPLOTY PLAMENE
- HASZNÁLAT
- AZ ELSŐ LÉPÉSEK
- ON/OFF (PORNIRE/OPRIRE)
- (OPÄTOVNE) NAPLNENIE NADOBY NA PLYN ③
Brand : DREMEL
Model : VersaTip 2000-6
Category : Electric soldering iron