
PEWH 2800 A1 - Garden shredder PARKSIDE - Free user manual and instructions
Find the device manual for free PEWH 2800 A1 PARKSIDE in PDF.

| Product type | Electric rotor garden shredder |
| Brand | Parkside |
| Model | PEWH 2800 A1 |
| Rated power | 2800 W (P40) |
| Rated voltage | 220–240 V ~, 50 Hz |
| Protection class | II (double insulation) |
| Protection type | IPX4 |
| Max. branch thickness | ≤ 42 mm (depending on wood species and texture) |
| Number of roller teeth | 8 |
| Weight | Approx. 20.5 kg |
| Sound pressure level (L_pA) | 83.2 dB; K_pA=3 dB |
| Guaranteed sound power level | 98 dB |
| Cutting system | Roller with automatic feed |
| Collection bin | Yes, with safety switch |
| Functions | On/Off, rotation direction switch (feed, stop, reverse), overload protection, anti-restart lock, LED status indicator |
| Safety | Safety switch on bin, emergency stop, eye and ear protection required, protective gloves |
| Maintenance | Cleaning with brush or cloth, empty bin, readjust pressure plate, replace cutting roller |
| Warranty | 3 years (private use) |
| Article number (IAN) | 495946_2504 |
Frequently Asked Questions - PEWH 2800 A1 PARKSIDE
User questions about PEWH 2800 A1 PARKSIDE
0 question about this device. Answer the ones you know or ask your own.
Ask a new question about this device
Download the instructions for your Garden shredder in PDF format for free! Find your manual PEWH 2800 A1 - PARKSIDE and take your electronic device back in hand. On this page are published all the documents necessary for the use of your device. PEWH 2800 A1 by PARKSIDE.
USER MANUAL PEWH 2800 A1 PARKSIDE
natural_image
Exterior view of a Parkside electric vehicle charging station (no signage or text visible on the device itself)Translation of the original instructions
NL BE
Elektrische hakselaar
Before reading, unfold the page containing the illustrations and familiarise yourself with all functions of the device.
FR BE
Inhaltsverzeichnis
Einleitung.... 4
Service-Center....21
Importeur.... 21
Scope of delivery/accessories......23
Overview.... 24
Description of functions....24
Technical data....24
Safety information....25
Meaning of the safety information...... 25
Pictograms and symbols...... 25
General safety instructions.... 26
Residual risks....32
Control elements....33
Overload switch.... 33
Direction of rotation switch....33
LED status indicator....33
On/Off switch....33
Safety switch.... 33
Grip screw....33
Assembly....33
Assembling the chassis and wheels.....33
Inserting the collection container......33
Operation.... 33
Working instructions.... 33
Switching on and off....34
Overload protection.... 34
Restart lock....34
Cleaning, maintenance and storage..... 34
General cleaning and maintenance..... 34
Emptying the collection container...... 35
Removing blockages.... 35
Adjusting the pressure plate.... 35
Replace the cutting drum and pressure plate.... 35
Storage.... 36
Troubleshooting.... 36
Disposal/environmental protection......37
Service.... 37
Guarantee.... 37
Repair service.... 38
Service Centre.... 39
Importer.... 39
Spare parts and accessories.... 39
Translation of the original EU declaration of conformity.... 40
Exploded view.... 211
Introduction
Congratulations on purchasing your new drum shredder (hereafter referred to as device or power tool).
You have chosen a high-quality device. This device was quality-tested and subjected to a final inspection during production, therefore ensuring proper functioning of your device.

The instruction manual forms part of this device. It contains important information on safety, use and disposal. Read the instruction manual carefully. Familiarise yourself with the controls and how to use the device correctly. Use the device only as described and for the stated fields of application. Store the instruction manual carefully and ensure that all documents are handed over in the event that the device is passed on to another user.
Proper use
This device is only intended for the following use:
- Shredding of tree cuttings, bushes and shrubs with branch thicknesses ≤ 42 mm
- Shredding fibrous or woody garden waste The machine is not suitable for shredding household, garden and flower waste.
The shredder must not become filled with stones, glass, metal, bones, plastics or fabric waste.
Any other use that is not expressly permitted in this instruction manual may pose a serious hazard to the user and result in damage to the device. The operator or user of the machine is responsible for any accidents or personal injury and/or material damage to third parties or their property. The machine is intended to be used by do-it-yourselfers. It was not designed for heavy commercial use. The warranty is void in the case of commercial use. The manufacturer is not liable for damage caused by improper use or incorrect operation.
Scope of delivery/accessories
Unpack the device and check that everything is present.
Dispose of the packaging material properly.
- Garden Shredder
- Chassis (3-piece)
- 2× Wheel + Wheel cover
• Assembly materials Wheels: - 2× Bushing
- 2× Washer
- 2× Hexagon socket screw
- Combination-Tool spanner
- Pushing element
• Collection container
- Instructions
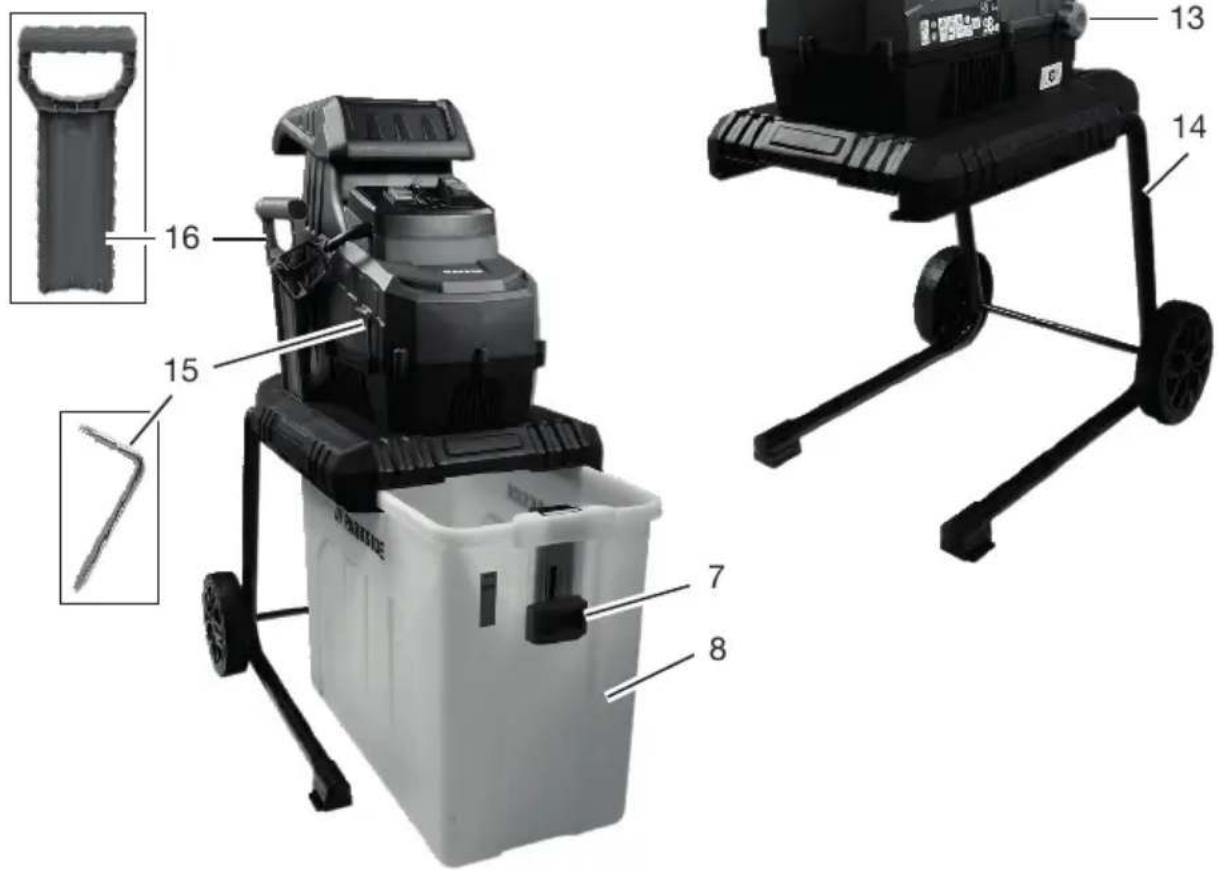
Overview
The illustrations for the device can be found on the front and back fold-out page.
Fig. A
1 Hopper
2 Overload switch
3 Direction of rotation switch
4 LED status indicator
5 On switch
6 Off switch
7 Safety switch
8 Collection container
9 Cable-Strain relief
10 Power cord
11 Handle
12 Cover (Gearbox)
13 Grip screw
14 Chassis
15 Combination-Tool spanner
16 Pushing element
Fig. B
17 Wheel cover (2×)
18 Hexagon socket screw (2×)
19 Washer (2×)
20 Wheel (2×)
21 Bushing (2×)
22 Axle
23 Hole
Fig. D
24 Hexagon socket screw (4×)
25 Pressure plate
26 Cutting drum
27 Motor shaft
28 Feather key
Description of functions
The drum shredder is equipped with a powerful electric motor with overload protection and restart lock. A roller drum system serves as the cutting system, which automatically pulls in the shredded material.
Please refer to the descriptions below for information on how the operating elements work.
Technical data
Garden Shredder ...... PEWH 2800 A1
Rated voltage U .... 220–240 V \~, 50 Hz
Rated input power P .... 2800 W (P40) ^*
Protection class ...... □ II
Protection type ......IPX4
Branch thickness .... ≤ 42 mm **
Volume (Collection container) .... ≈ 56 l
Number Teeth Cutting drum 8
Weight ≈ 20.5 kg
Sound pressure level ( L_pA ) 83.2 dB; K_pA=3 dB
Sound power level ( L_WA )
- Measured ....93.5 dB; K_WA=2.56 dB
– Guaranteed ....98 dB
Sound values were determined according to noise measurement method EN 50434:2014.
Noise values were determined in accordance with the standards and regulations specified in the Declaration of Conformity.
* Continuous operation with intermittent load:
40 sec. Load
60 sec. Idle
** The maximum branch thickness that can be shredded depends on the type of wood and the nature of the shredded material.
The maximum branch thickness that can be shredded is lower for hardwood such as oak or beech than for softwood such as pine or spruce.
The shredding thickness is also reduced for dry or gnarled wood.
Safety information

CAUTION! The following basic safety precautions must be observed while using electrical devices to protect against electric shock, injury and risk of fire.
Meaning of the safety information
▲ DANGER! If you do not observe this safety instruction, an accident will occur. The result of which is severe bodily injury or death.
▲ WARNING! If you do not observe this safety instruction, an accident may occur. The result of which is likely severe bodily injury or death.
▲ CAUTION! If you do not observe this safety instruction, an accident will occur. The result of which is likely minor or moderate bodily injury.
NOTICE! If you do not observe this safety instruction, an accident will occur. The result of which is possible damage to property.
Pictograms and symbols Symbols on the device

Attention!

Read the instruction manual carefully. Familiarise yourself with the controls and how to use the device correctly.

Use eye protection and hearing protection Use protective gloves

Risk of injury! Switch off the machine, pull out the mains plug and wait for the blade to come to a stop.

Rotating cutting blades

Injury hazard caused by rotating tool! Keep hands away.

Risk of injury due to ejected parts!

Maintain a distance from hopper and ejection zone.

Keep persons in the vicinity away from the device

Use of the device in the rain or a damp environment is prohibited.

Ensure that you do not touch any of the dangerous moving parts before you have unplugged the machine from the mains supply, and that the dangerous moving parts have come to a complete standstill.

Do not use as a step!

Direction of rotation switch

Hopper

Protection class II (double insulation)

Waste electrical and electronic equipment (WEEE) must not be disposed of with domestic waste.

Direction of rotation Cutting drum

Guaranteed sound power level L_WA in dB.

Safety switch ON / OFF

Adjusting the pressure plate

Attention! Setting/adjusting the pressure plate can result in metal cuttings! Shredded material with metal cuttings is considered special waste and must NOT be composited. Dispose of metal cuttings/special waste properly.
Symbols used in the instruction manual
Attention!
General safety instructions General Information
- Read the instruction manual carefully. Familiarise yourself with the controls and how to use the device correctly.
- In the case of an accident or malfunction during operation, the machine must be switched off immediately and disconnect the mains plug. Injuries must be properly treated or medical assistance sought. For possible causes of a malfunction: Troubleshooting, p. 36 or contact our service centre.
- Children, individuals with limited physical, sensory or mental capabilities, as well as those who have insufficient experience or knowledge or are not familiar with the instructions must never be permitted to use the machine. Local regulations may specify a restricted age limit for the user.
- If the power cord of this device is damaged, it must be replaced by the manufacturer or their representative to avoid safety hazards. contact the service centre.
• Cleaning and user maintenance must not be carried out by children.
- The machine must not be used at altitudes over 2000 m.
• Note that the user is responsible for any accidents or risks to others and their property.
- Observe noise protection rules and other local regulations.
Preparation
- Wear hearing protection and safety goggles. Wear these at all times while operating the machine. There is a risk of hearing damage and eye injuries.
• Always wear sturdy shoes and full-length trousers during operation of the machine. Do not operate the machine in bare feet or with open sandals. Avoid wearing clothing that hangs loose or with hanging cords or ties. These could get caught in the hopper and lead to serious injuries.
- Never operate the machine if there are people,
particularly children or animals, nearby.
- Only use the machine out in the open (i.e. not against a wall or other rigid object) and only while standing on a solid, level surface.
- Do not use the machine on a paved, gravelled surface where ejected material could cause injury.
- Before putting into operation, always visually inspect the machine, the cutting tools, the screws of the cutting tools and other fastening materials to ensure they are secure, and that the housing is undamaged and the safety equipment and protective guards are in place. Damaged or worn parts are to be replaced as a set to ensure the machine remains balanced. Damaged or illegible stickers must be replaced.
- Prior to use, always check the power cord and extension cord for signs of damage or wear
and tear. If the cord is damaged during use, it must be disconnected from the supply network immediately. DO NOT TOUCH THE CABLE BEFORE IT HAS BEEN DISCONNECTED FROM THE POWER SUPPLY. Do not use the device if the cord is damaged or worn.
Operation
- Pay attention, be aware of what you are doing and take the utmost care when working with the device. Do not use the device if you are tired or you are under the influence of drugs, alcohol or medication.
- Make sure that the hopper is empty before switching on the machine.
- Keep your head and body away from the feed opening.
- Do not allow hands or other body parts or clothing to enter the hopper or ejection chute. Keep them away from moving parts.
- Ensure you are standing securely and do not lose your balance. Avoid an abnormal body posture. Do not lean forward. When material is being fed in, never stand on a higher level than the base of the machine.
- Ensure secure footing on slopes.
- Operate the device at walking speed.
• Always stand outside the ejection zone while operating the machine.
- Do not use the product in bad weather, especially when there is a risk of lightning.
- Only work in daylight or with good artificial lighting.
- When feeding in material, pay special attention to ensure it does not contain any metal, stones, bottles, cans or other foreign bodies.
• Make sure that no processed material accumulates in the ejection zone; this could prevent the material from being ejected correctly and lead
to kickback of the material through the feed opening.
- If the machine becomes clogged, turn off the power supply and disconnect the machine from the power supply before starting to clean it out. Ensure the motor is free of waste and other deposits to protect the motor from damage or the potential for fire.
- Do not operate the machine with damaged or defective safety equipment or protective guards, of if the safety equipment, e.g. the collection bag, are not in place.
- Do not operate the machine with a damaged or worn out cord. Ensure that you do not connect a damaged cord to the power supply or touch a damaged cord before it has been disconnected from the power supply since damaged cords pose the risk of coming into contact with live parts.
- Keep the extension cord away from dangerous moving parts to prevent damage to the cord that can lead to contact with live parts.
- Keep the ventilation holes free of waste and other deposits to protect the motor from damage or fire.
- Do not overload your machine. Only work within the power range indicated. Observe the maximum indicated branch thickness. Do not use your machine for purposes for which it is not intended.
- Only turn off the machine once the hopper is fully emptied otherwise the machine may become clogged and, under some circumstances, may not start again.
- Do not use the machine if the switch cannot be turned on and off. Damaged switches must be replaced by our service centre.
- Use only approved extension cables of type
H07RN-F that are not more than 75 m long and are designed for outdoor use. The wire cross section of the extension cable must be at least 2x 1.5 mm ^4 . Always roll out the cable drum completely before use. Check the extension cable for damage.
- Do not tilt the machine while the motor is running.
- Never transport the device while the drive is running.
- Never use the power cord to pull the plug out of the outlet or to pull the device. Protect the power cord from heat, oil and sharp edges.
- Switch off the device and disconnect the plug from the power outlet. Make sure that all moving parts have come to a complete stop
- when leaving the device,
- if the power cord or extension cord is damaged or entangled,
- before removing obstructions or loosening blockages,
- before checking the device, cleaning it or performing maintenance work on it.
- If foreign bodies enter the cutting tools, or if the machine generates unusual noises or vibrates unusually, immediately turn off the power supply and allow the machine to come to a standstill. Disconnect the machine from the mains supply and perform the following steps before switching the machine on again and operating it:
- search for signs of damage,
- replace damaged parts,
- Check for loose parts and tighten them if necessary.
Cleaning, maintenance and storage
- Allow the motor to cool down before storing the device for a longer period.
- Replace worn or damaged parts in the in-
terests of safety. Use only original spare parts and accessories. Using externally produced parts results in the immediate loss of any warranty claim.
- Switch the drive off, disconnect the device from the power supply and allow the device to cool off if you want to clean, adjust, store the device or to exchange an accessory part.
- Handle the device with care and keep it clean.
- Store the device out of reach of children.
- When maintaining the shredding unit, be aware that it can always still move even if the power supply is switched off by the locking function or protective equipment.
- Never try to circumvent the locking function of the protective equipment.
- Do not try to repair the device by yourself unless you have professional training. All work not mentioned in this instruction manu-
al may only be per- formed by our service centre. Many accidents are caused by poorly maintained appliances.
- Warning! Risk of injury by dangerous moving parts!
- Ensure that you do not touch any of the dangerous moving parts before you have unplugged the machine from the mains supply, and that the dangerous moving parts have come to a complete standstill.
- If the power cord of this device is damaged, it must be replaced by the manufacturer, their customer service or by a similarly qualified person in order to avoid hazards. contact the service centre.
Additional safety instruction for machines with a collection container
- Switch off the machine before attaching or removing the collection container.
Residual risks
There will always be residual risks even if you operate this device according to the instructions. The following hazards may occur in connection with the type and design of this device:
- Eye damage if no suitable eye protection is worn.
• Hearing damage if suitable ear protection is not worn. - Injuries and property damage caused by loose parts of the running power tool that are unexpectedly ejected from the power tool due to sudden damage, wear or incorrect insertion.
- Injuries caused by moving parts or hot surfaces.
▲ WARNING! Danger due to electromagnetic field generated while the tool is in operation. Under certain circumstances, this field may negatively affect active or passive medical implants. In order to reduce the danger of serious or fatal injuries, we recommend that individuals who wear medical implants should consult their doctor and the manufacturer of
the implant before operating the tool.
Control elements
Familiarise yourself with the operating elements before using the device for the first time.
Overload switch
The overload switch (2) automatically switches off the machine in the event of overuse.
Direction of rotation switch
The direction of rotation switch (3) can be set to the following positions:
- Feed –: Machine running in continuous operation, material being fed in
- Stop O : Machine stops
- Reverse = : Machine running backwards, jammed material is released
LED status indicator
The LED status indicator (4) lights up as soon as the machine is connected to the power supply.
On/Off switch
- On switch (5) I press: Device starts
- Off switch (6) O press: Machine stops
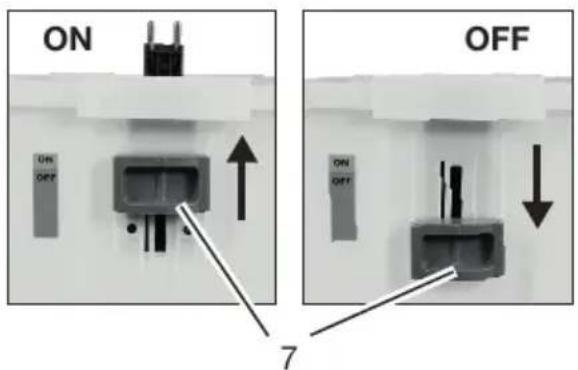
Safety switch
Safety switch (7) in position
• ON : Collection container locked
• OFF : Collection container unlocked
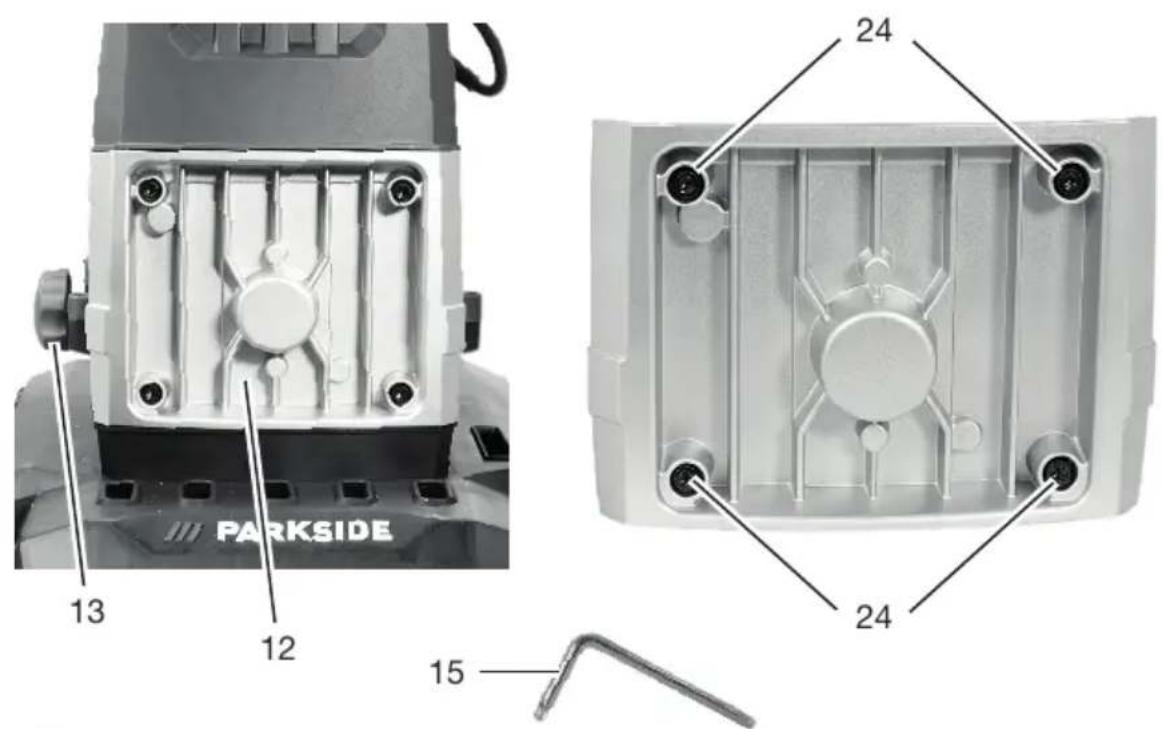
Grip screw
The pressure plate inside the machine can be adjusted using the handle screw (13).
Assembly
Assembling the chassis and wheels
Tools and aids required
- Chassis (14)
- Axle (22)
- 2× Wheel cover (17)
- 2× Wheel (20)
• Assembly materials Wheels: - 2× Hexagon socket screw (18)
- 2× Washer (19)
- 2× Hexagon socket screw (18)
- 2× Washer (19)
- 2× Bushing (21)
• Combination-Tool spanner (15)
- Screwdriver (not included)
Procedure (Fig. B)
- Place the shredder on the hopper (1).
- Turn the chassis (14) upwards.
- Insert the axle (22) through the tubes of the chassis.
- Slide one sleeve (21) onto each side of the axle.
- Place the wheels (20) without wheel covers on the sleeves on the right and left.
- Secure the axle using a screwdriver. To do this, insert the screwdriver through the hole (23) in the axle.
- Secure each wheel to the axle using a washer (19) and screw (18).
- Clip the wheel covers (17) onto the wheels.
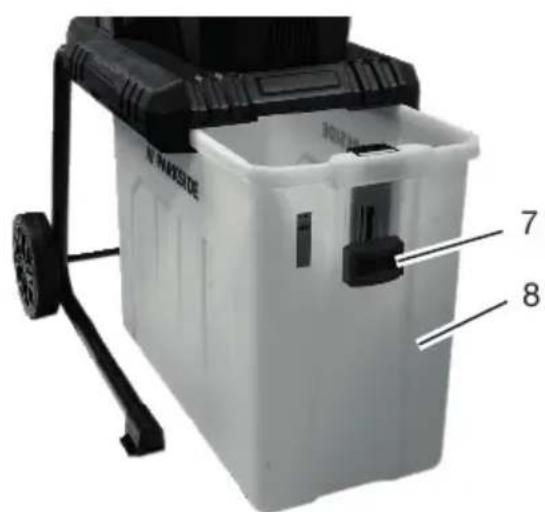
Inserting the collection container
Requirements
- The hopper must be empty.
Procedure (Fig. C)
- Set the safety switch (7) on the collection container (8) to the lower position OFF.
- Push the collection container along the guide rails into the base frame. The container can only be pushed in one direction.
- Press the safety switch to the upper position ON to lock it.
NOTICE! For safety reasons, the machine will not operate without a correctly positioned collection container.
Operation
Working instructions
⚠ WARNING! Risk of injury! Long
branches can rebound when fed in. Keep a sufficient distance from the machine.
- Use eye protection and hearing protection
- Use protective gloves
- Fill the hopper with the material to be shredded. When feeding branches into the machine, hold them until they feed in automatically.
-
Be sure to keep to the infeed speed of the shredder and do not overload the machine.
-
Shred wilted garden waste that has been stored for several days and thin twigs alternately with branches to prevent clogging.
- Remove soil and stones from roots before shredding.
- Do not shred soft, damp material such as kitchen waste. Compost it instead.
- Allow the shredder to completely shred the material before adding new material.
- Do not use your hands to push the shredding material forward. Only use the pushing element (16) or other shredding material for this purpose.
- Pick up a few dry branches at the end and use them to help clean the machine.
- Only switch off the machine when all shredded material has passed through the shredding unit. Otherwise, the cutting tool may become blocked when restarting.
Switching on and off
Tools and aids required
- Extension cord for outdoor use
Information on the power supply
- Ensure that the mains voltage and mains frequency match the specifications on the rating plate.
- Connect the device only to a power outlet with a residual current device (RCD) of rated residual current no more than 30 mA.
- Only use extension cords that are suitable for outdoors.
Switching on
- Make a loop from the end of the extension cable and attach this to the cable strain relief (9).
- Connect the machine to the power supply.
- The LED status indicator (4) lights up.
- Set the direction of rotation switch (3) to Feed -.
- Press the on switch (5).
- The machine is now in continuous operation.
Switching off
⚠ WARNING! Risk of injury due to rotating blades! The blades continue to run after switching off. Wait until the blades have come to a standstill.
- Press the off switch (6).
- Set the direction of rotation switch (3) to Stop O.
- Pull the device plug out of the wall outlet if you are leaving the device unattended or if you have finished working.
- The LED status indicator (4) goes out.
Overload protection
If the machine is overloaded e.g. by branches that are too thick, it will switch off automatically.
To restart the machine, allow it to cool down and then switch it on again.
Restart lock
If the power supply is interrupted during operation, the machine will not start automatically after the power supply is restored.
Restarting
- Set the direction of rotation switch (3) to Stop O.
- Press the overload switch (2).
- Switch the machine on again (see Switching on and off, p. 34).
Cleaning, maintenance and storage
WARNING! Electric shock! Risk of injury due to unintentional start-up. Protect yourself when performing maintenance or cleaning work. Switch off the device and disconnect the mains plug from the socket.
You should have any repair and maintenance work that is not described in these instructions carried out by our Service Centre. Only use original replacement parts.
General cleaning and maintenance
NOTICE! Risk of damage! Improper cleaning can damage the device. Never spray down the device with water. Do not clean the device under running water. Do not use any abrasive cleaning agents or solvents.
• Always keep the machine, wheels and ventilation holes clean.
- Use a brush or cloth for cleaning, but do not use any cleaning agents or solvents.
- Check the machine, especially the protective equipment, before each use for damage such as loose, worn or damaged parts.
- Ensure that all nuts, bolts and screws are firmly in place.
- Check the covers and protective devices for damage and correct fit. Replace these if necessary.
Emptying the collection container
Notes
- Empty the collection container in good time. Be aware that the collection container fills unevenly under the ejection chute.
- Risk of injury! Switch off the machine, pull out the mains plug and wait for the blade to come to a stop.
Procedure (Fig. C)
- Switch off the machine (see Switching on and off, p. 34).
- Set the safety switch (7) on the collection container (8) to the lower position OFF.
- Pull out the collection container and empty it.
- Make sure that the area around the safety switch is free of wood chips before inserting the collection container again.
- Push the collection container along the guide rail into the base frame.
- Press the safety switch to the upper position ON to lock it.
Removing blockages
- Change the direction of rotation of the cutting drum to reverse to remove any jammed shredded material.
- Switch off the machine (see Switching on and off, p. 34).
- Set the direction of rotation switch (3) to Reverse =.
- Press the on switch (5).
- The cutting drum runs backwards as long as the direction of rotation switch is set to Reverse =. Jammed shredded material is released.
- Change the direction of rotation again to continue shredding (see Switching on and off, p. 34).
Adjusting the pressure plate
Notes
• CAUTION! The pressure plate may only be adjusted during operation.
- The pressure plate is preadjusted at the factory. However, running-in a new machine can sometimes require the pressure plate to be adjusted at shorter intervals at the beginning.
- You can tell that it is the right time to re-adjust the pressure plate when the shredded material is only slightly crushed and is still joined together in chains.
- ⚡AUTION! Setting/adjusting the pressure plate can result in metal cuttings! Shredded material with metal cuttings is considered special waste and must NOT be composted. Dispose of metal cuttings/special waste properly.
Procedure
- Empty the collection container (8) and start up the drum shredder.
- Slowly turn the handle screw (13) clockwise ∪ until you hear a slight grinding noise and small metal chips fall out of the ejection chute.
Turning the handle screw clockwise by half a turn brings the cutting drum approx. 0.50 mm closer to the pressure plate. - The pressure plate is adjusted as soon as you no longer hear any grinding noises.
- NOTICE! Avoid unnecessary wear on the pressure plate and only adjust it as far as necessary.
- Empty and clean the collection container immediately after adjusting the pressure plate. Dispose of metal cuttings/special waste properly.
Replace the cutting drum and pressure plate
Requirements
- Use protective gloves
• Combination-Tool spanner (15)
Tools and aids required
Procedure (Fig. D.1)
- Switch off the machine and pull the plug out of the power outlet.
-
Turn the handle screw (13) approximately 2 turns anticlockwise ⭕.
-
Loosen the four screws (24) using the tool key provided (15) and remove the gearbox cover (12) from the machine.
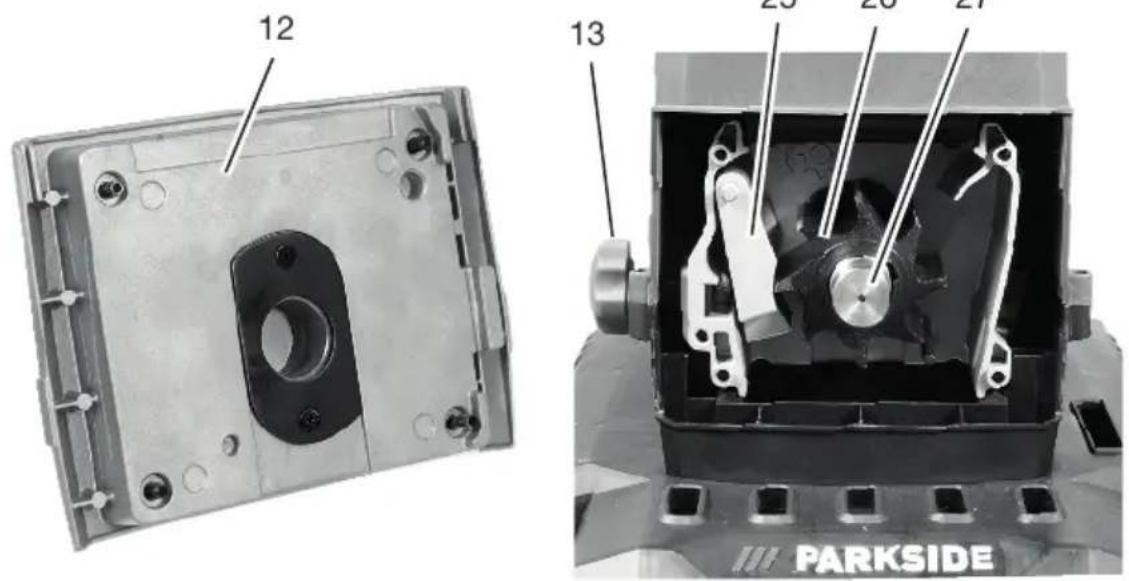
- Carefully pull the cutting drum (26) off the motor shaft (27).
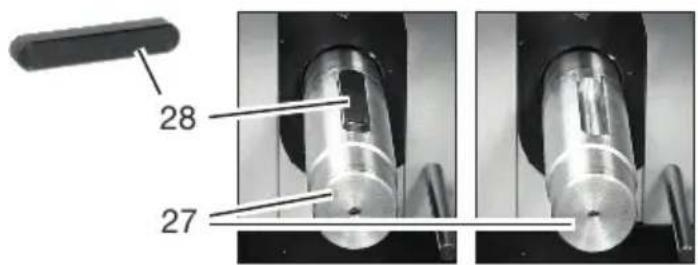
- NOTICE! This may cause the feather key (28) to come loose and fall off the motor shaft. Turn the motor shaft so that the groove faces upwards and reinsert the feather key into the groove (see Fig. D.2).
- Remove the pressure plate (25).
- Remove any dirt from the motor shaft and lubricate it lightly.
- Place the new cutting drum in the same position on the motor shaft. Ensure that the cutting drum is correctly aligned (note the curvature of the blade teeth).
- Reinsert the pressure plate.
- Insert the gearbox cover and tighten the screws.
NOTICE! The machine has a safety feature and will not start if the screw at the bottom right is not tightened properly. It must be tightened until a clicking sound is heard.
- Adjust the pressure plate, see Adjusting the pressure plate, p. 35.
Storage
Always store the device and accessories:
- clean
- dry
- protected against dust
- protected against frost
• out of the reach of children - Give the motor time to cool off before you store the device in an enclosed space.
- Do not wrap the device in plastic bags as moisture and mildew may form.
Troubleshooting
The following table will assist you in fixing faults:
| Problem Possible cause Error correction | ||
| Machine does not start | No mains power supply | Check the socket, mains connection cable, plug and fuse and have them repaired by a qualified electrician if necessary. |
| Collection container not inserted correctly | Inserting the collection container, p. 33 | |
| Safety switch on collection container not engaged | ||
| Overload protection activated | Overload protection, p. 34 Restart lock, p. 34 | |
| Defective motor Contact the service centre. | ||
| Garden waste is not drawn in | Shredding material too soft | Push through using a pushing element (16) or wood or shred dry branches |
| Cutting drum in reverse | Changing the direction of rotation (see Switching on and off, p. 34) | |
| Cutting drum blockedRemoving blockages, p. 35 | ||
| Shredding material in ejection chute | Switching off the machineNetzstecker ziehenWait for blades to stopRemove shredded material from the ejection chute | |
| Shredded material hangs together in chains | Pressure plate not adjusted correctly | Adjusting the pressure plate, p. 35 |
| Machine does not shred satisfactorily | Cutting drum or pressure plate worn out | Check the cutting drum and pressure plate, replace if necessary (seeReplace the cutting drum and pressure plate, p. 35) |
Disposal/environmental protection
The device, accessories and packaging should be properly recycled.
Waste electrical and electronic equipment (WEEE) must not be disposed of with domestic waste.
The symbol of the crossed-out wheeled bin means that this product must not be disposed of as unsorted municipal waste at the end of its useful life.
Directive 2012/19/EU on waste electrical and electronic equipment:
Consumers are legally obliged to recycle electrical and electronic equipment in an environmentally sound manner at the end of its life. In this way, environmentally friendly and resource-saving recycling is ensured.
Depending on the implementation in national law, you may have the following options:
- Return to a shop,
- Hand over to an official collection point,
- Return to the manufacturer/distributor.
This does not affect accessories enclosed with the old devices or tools without any electrical components.
Service
Guarantee
Dear Customer,
This product is provided with a 3 year guarantee from the date of purchase. In case of defects, you have statutory rights against the seller of the product. These statutory rights are not restricted by our guarantee presented below.
Terms of Guarantee
The guarantee period begins on the date of purchase. Please retain the original receipt. This document is required as proof of purchase. If a material or manufacturing defect occurs within three years of the date of purchase of this product, we will repair or replace – at our choice – the product for you free of charge. This guarantee requires the defective product and proof of purchase to be presented within the three-year period with a brief written description of what constitutes the defect and when it occurred. If the defect is covered by our guarantee, you will receive either the repaired product or a new product. No new guarantee period begins on repair or replacement of the product.
Guarantee Period and Statutory Claims for Defects
The guarantee period is not extended by the guarantee service. This also applies for replaced or repaired parts. Any damages and defects already present at the time of pur-
chase must be reported immediately after unpacking. Repairs arising after expiry of the guarantee period are chargeable.
Guarantee Cover
The product has been carefully produced in accordance with strict quality guidelines and conscientiously checked prior to delivery.
The guarantee applies for all material and manufacturing defects. This guarantee does not extend to cover product parts that are subject to normal wear and may therefore be considered as wearing parts (e.g. Blade) or to cover damage to breakable parts.
This guarantee shall be invalid if the product has been damaged, used incorrectly or not maintained. Precise adherence to all of the instructions specified in the operating manual is required for proper use of the product. Intended uses and actions against which the operating manual advises or warns must be categorically avoided.
The product is designed only for private and not commercial use. The guarantee will be invalidated in case of misuse or improper handling, use of force, or interventions not undertaken by our authorised service branch.
Processing in Case of Guarantee
To ensure efficient handling of your query, please follow the directions below:
- Please have the receipt and product number (IAN 495946_2504) ready as proof of purchase for all enquiries.
- Please refer for the product number to the type plate on the product, an engraving on the product, the title page of the operating instructions (bottom left) or the sticker on the back or underside of the product.
- Should functional errors or other defects occur, please initially contact the service centre specified below by telephone or use the contact form available on parkside-diy.com in the category Service.
- After consultation with our customer service, a product recorded as defective can be sent postage paid to the service address communicated to you, with the proof of purchase (receipt) and specification of what constitutes the defect and when it occurred. In order to avoid acceptance problems and additional costs, please be sure to use only the address communicated to you. Ensure that the
consignment is not sent carriage forward or by bulky goods, express or other special freight. Please send the appliance inc. all accessories supplied at the time of purchase and ensure adequate, safe transport packaging.

You can view and download these and many other manuals on parkside-diy.com. This QR code will take you directly to parkside-diy.com. Select your country and search for the operating instructions via the search mask. You can open your operating instructions by entering the article number (IAN) 495946_2504.
Repair service
For repairs that are not covered by warranty, contact the service centre. They will gladly create a cost estimate for you.
- We can only work on devices which are sent in properly packed and with postage paid.
Note: Please send your device cleaned and with an indication of the defect to the address named for the service centre.
- The following are not accepted: devices sent in without prepaid postage, sent as bulky goods, sent as an Express shipment, or devices sent as any other form of special freight.
- We will dispose of defective devices you ship to us free of charge.
Service Centre

Service Great Britain
Tel.: 0800 051 8970
Contact form on
parkside-diy.com
IAN 495946_2504

Service Malta
Tel.: 800 65168
Contact form on
parkside-diy.com
IAN 495946_2504
Importer
Please note that the address below is not a service address. Contact the service centre named above first.
Spare parts and accessories
You can get spare parts and accessories from www.grizzlytools.shop. If you have any problems with your order, contact us via our online shop. If you have any other questions, contact: Service Centre, p. 39
| Pos. nr. Name Order No. | ||
| 8 Collection container 91103602 | ||
| 13 Grip screw (+ Nut) 91103600 | ||
| 16 Pushing element 91103595 | ||
| 17-20 | Wheel set (2×):Wheel cover, Wheel, Washer, Hexagon socket screw | 91103604 |
| 25 Pressure plate 91103599 | ||
| 26 Cutting drum 91103598 | ||
Translation of the original EU declaration of conformity
Product: Garden Shredder
Model: PEWH 2800 A1
Serial number: 000001 - 030000
The object of the declaration described above is in conformity with the relevant Union harmonisation legislation:
2006/42/EC • 2014/30/EU • 2000/14/EC & 2005/88/EC • 2011/65/EU & (EU) 2015/863
The object of the declaration described above is in conformity with Directive 2011/65/EU of the European Parliament and of the Council of 8 June 2011 on the restriction of the use of certain hazardous substances in electrical and electronic equipment.
To ensure conformity, the following harmonised standards and national standards and regulations have been applied:
EN 60335-1:2012/A15:2021 • EN 50434:2014
EN IEC 55014-1:2021 • EN IEC 55014-2:2021
EN IEC 61000-3-2:2019/A2:2024
EN 61000-3-3:2013/A2:2021 • EN ISO 3744:2010
EN IEC 63000:2018
In accordance with the Directive 2000/14/EC relating to noise emission, the following is confirmed: Sound power level ( L_WA )
- Measured: 93.5 dB;
- Guaranteed: 98 dB
Followed conformity assessment procedure according to 2000/14/EC, Annex V.
This declaration of conformity is issued under the sole responsibility of the manufacturer:


Authorised representative of documentation
Sommaire
Introduction...... 41
Garantie (France)....58
Service-Center....60
Importateur.... 60
Overbelastingbeveiliging....74
Opstartvergrendeling.... 74
Service-Center....78
Importeur.... 78
Service-Center....96
Importador.... 96
Service-Center....115
Importatore.... 115
Ricambi e accessori.... 115
- 2× Boccola
- 2× Rosetta
- 2× Vite torx
Service-Center....132
Dovozce....132
Service-Center....149
Importér.... 149
Service-Center....205
Importør...... 206
C
D
①
②
Explosionszeichnung • Exploded view • Vue éclatée • Vista esplosa • Vista explosionada • Explosietekening • Eksploderet tegning • Robbantott ábra • Widok rozłożony • Rozložený pohled • Rozložený pohlád
PEWH 2800 A1
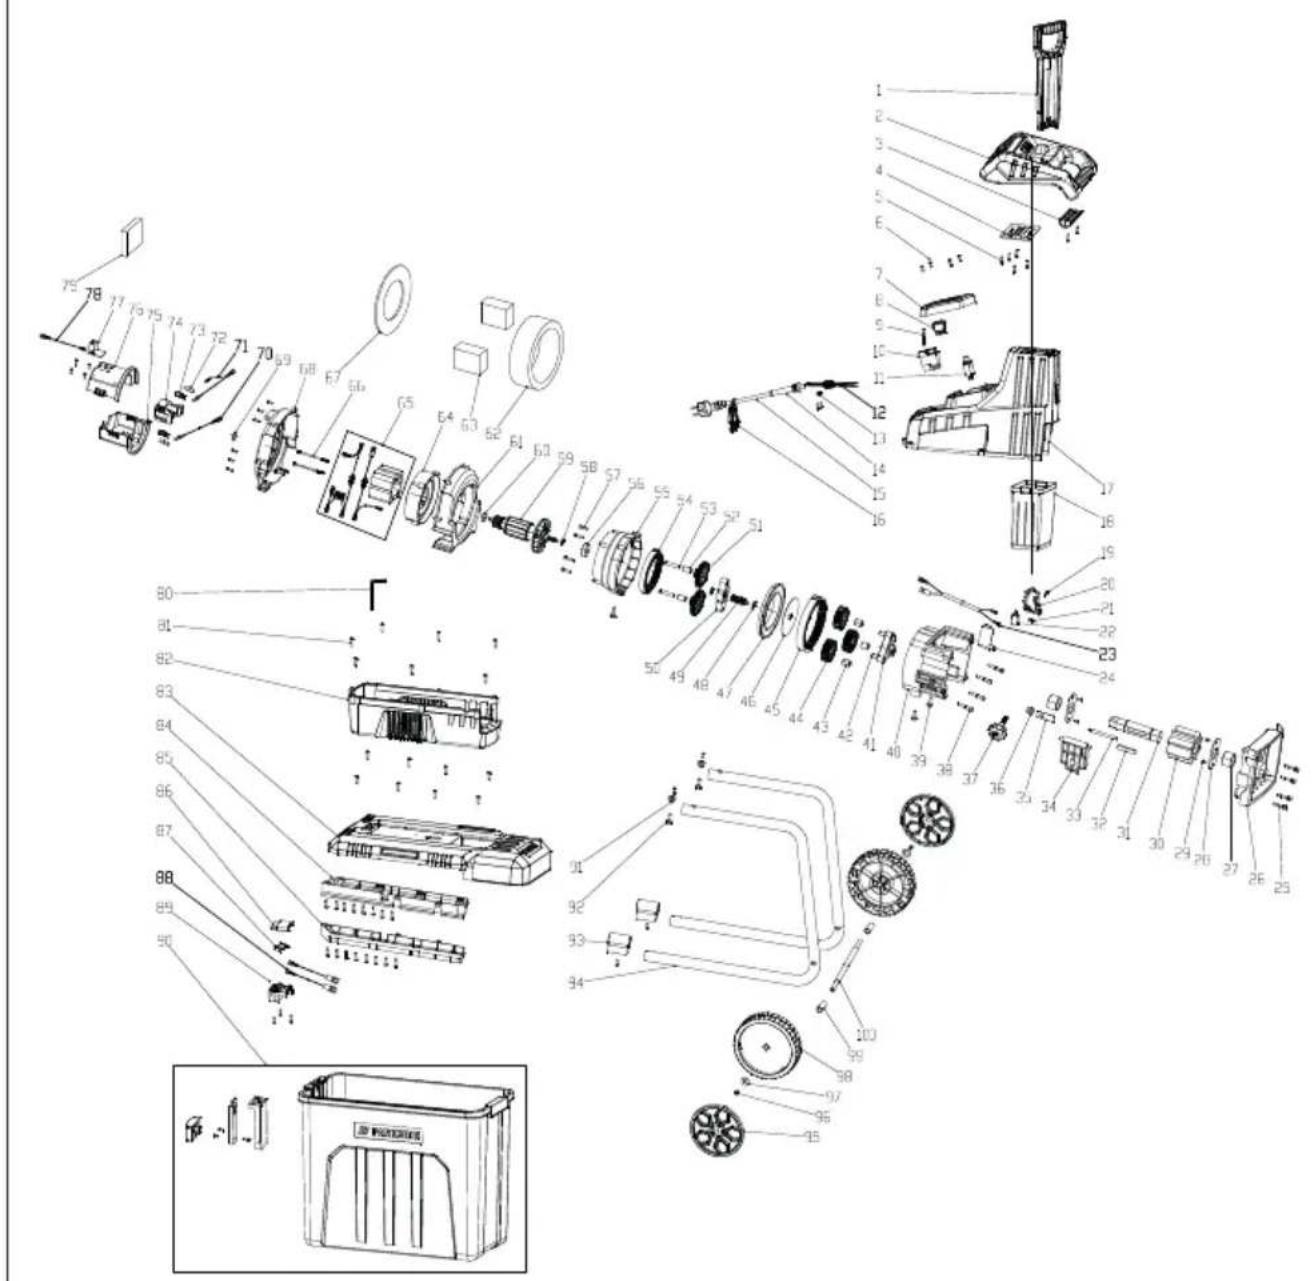
informativ • informative • informatif • informatief • informativo • informatív • informacyjny • informační • informatívny
IAN 495946_2504
8=


- Inhaltsverzeichnis
- Introduction
- Proper use
- The shredder must not become filled with stones, glass, metal, bones, plastics or fabric waste.
- Scope of delivery/accessories
- Overview
- Fig. A
- Fig. B
- Fig. D
- Description of functions
- Technical data
- Safety information
- Meaning of the safety information
- Pictograms and symbols Symbols on the device
- Safety switch ON / OFF
- Symbols used in the instruction manual
- Attention!
- General safety instructions General Information
- Preparation
- Operation
- Cleaning, maintenance and storage
- Additional safety instruction for machines with a collection container
- Residual risks
- the implant before operating the tool.
- Control elements
- Overload switch
- Direction of rotation switch
- LED status indicator
- On/Off switch
- Safety switch
- Grip screw
- Assembly
- Assembling the chassis and wheels
- Tools and aids required
- Procedure (Fig. B)
- Inserting the collection container
- Requirements
- Procedure (Fig. C)
- Working instructions
- ⚠ WARNING! Risk of injury! Long
- Switching on and off
- Information on the power supply
- Switching on
- Switching off
- Overload protection
- Restart lock
- Restarting
- General cleaning and maintenance
- Emptying the collection container
- Notes
- Removing blockages
- Adjusting the pressure plate
- Procedure
- Replace the cutting drum and pressure plate
- Procedure (Fig. D.1)
- Storage
- Troubleshooting
- Disposal/environmental protection
- Directive 2012/19/EU on waste electrical and electronic equipment:
- Service
- Guarantee
- Terms of Guarantee
- Guarantee Period and Statutory Claims for Defects
- Guarantee Cover
- Processing in Case of Guarantee
- Repair service
- Service Centre
- Service Great Britain
- Service Malta
- Importer
- Spare parts and accessories
- Translation of the original EU declaration of conformity
- Sommaire
- Introduction...... 41
Brand : PARKSIDE
Model : PEWH 2800 A1
Category : Garden shredder