ERCVDE190-65mii1 - Fridge Essentiel B - Free user manual and instructions
Find the device manual for free ERCVDE190-65mii1 Essentiel B in PDF.

| Brand | Essentiel B |
| Model | ERCVDE190-65mii1 |
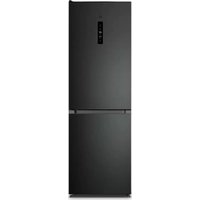
| Product type | Combined refrigerator-freezer |
| Climate class | SN/N/ST (+10°C to +38°C) |
| Dimensions (W × H × D) | 595 × 1880 × 630 mm |
| Number of refrigerator shelves | 4 removable shelves |
| Number of freezer drawers | 3 drawers |
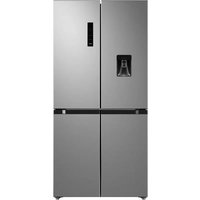
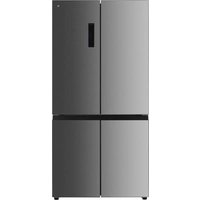
| Water dispenser | Yes, integrated in door, capacity 3 L |
| Interior lighting | LED, energy efficiency class F |
| Defrosting | Automatic (fan-assisted cooling) |
| Temperature setting | Electronic, 6 positions + Fast Cool mode |
| Temperature indicator | Yes, with OK display |
| Coldest zone | At bottom of refrigerator, above the vegetable drawer |
| Ice cube production | Ice cube tray provided |
| Power supply | 220-240 V ~ 50 Hz (standard) |
| Door opening direction reversibility | Possible |
| Cleaning | Warm water and white vinegar; no soap or detergent |
| Safety | Do not use electrical appliances inside; do not freeze carbonated beverages |
| Spare parts | Available for 10 years |
| Warranty | From date of purchase (see terms) |
Frequently Asked Questions - ERCVDE190-65mii1 Essentiel B
User questions about ERCVDE190-65mii1 Essentiel B
0 question about this device. Answer the ones you know or ask your own.
Ask a new question about this device
Download the instructions for your Fridge in PDF format for free! Find your manual ERCVDE190-65mii1 - Essentiel B and take your electronic device back in hand. On this page are published all the documents necessary for the use of your device. ERCVDE190-65mii1 by Essentiel B.
USER MANUAL ERCVDE190-65mii1 Essentiel B
natural_image
Exterior view of a modern stainless steel refrigerator with a single water dispenser (no visible text or symbols)Notice d'utilisation / User guide / Bedienungsanleitung / Gebruiksaanwijzing
Compartiment congélateur
Freezer compartment
Gefrierabteils
diepvriescompartiment
FR EN DE NL
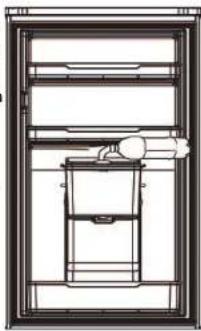
| 1 | Panneau decontrôle Control panel Bodienfeld | Bedieningspaneel | |
| 2 | Clayettes en verre Glass shelves Glasablagen | Legplanken in glas | |
| 3 | Bac à fruits et légumes | Fruit and vegetable bin | Obst- und Gemüsefach |
| 4 | Tiroir de congélation (x 3) avec 1 bac à glaçons fourni | Freezer drawer (x 3) with 1 ice cube tray included | Gefrierschubladen (x 3), 1 mitgelieferte Eiswürfelschale |
| 5 | Pieds avant réglables en hauteur | Adjustable foot at the front | Höhenverstellbare Füße vorn |
| 6 | Balconnets de porte Door shelves Türablager | Doumokken | |
| 7 | Distributeur d'eau Water dispenser Wasserspender Waterverdeler | ||
| 8 | Balconnet porto-boutelles | Bottle-holder door shelf | Tür-Flaschenhalterung |
déballage
natural_image
Illustration of hands holding a rectangular object with arrows indicating movement or force (no text or symbols)natural_image
Illustration of a hand pressing down on a flat surface with upward arrows, no text or symbols presentnatural_image
Architectural line drawing of a double door with a ladder and support structure (no text or symbols)natural_image
Line drawing of a door panel with a handle and label 'Pousser' (no other text or symbols)natural_image
Technical line drawing of a mechanical assembly with no visible text or symbolsnatural_image
Diagram of a portable water heater with a downward arrow indicating flow or movement (no text or symbols)natural_image
Technical line drawing of a mechanical assembly with an inset showing a detail view (no text or symbols)
natural_image
Pure mechanical assembly diagram without any text, numbers, or symbolsNettoyage
natural_image
Technical line drawing of a mechanical assembly with a 45-degree angle标注 (no text or symbols beyond the angle label)flowchart
graph TD
    A["LED"] --> B["Robot Icon"]
    B --> C["LED"]
    style A fill:#fff,stroke:#000
    style B fill:#fff,stroke:#000
    style C fill:#fff,stroke:#000
https://boulanger.scene7.com/is/content/Boulanger/3497674192112_a_0
- Remove the shipping box.
- Check that the appliance has not been damaged during transport. Do not plug in a damaged appliance under any circumstances! If the appliance is damaged, please contact your retailer.
- Remove all adhesive tape and packaging materials on the inside and outside of the appliance.
Before fi rst use
- Clean the inside of the appliance with a little white wine vinegar diluted in warm water. Do not use soap or detergent as the odour may linger. After cleaning, thoroughly dry the appliance. Wipe electrical parts with a soft cloth only.
- You can use white spirit to remove any remaining adhesive from the outside of the appliance.
- To clean the appliance, always unplug it, or remove the fuses or turn off the circuit breaker.
installation
Installation location
- This refrigeration appliance is not intended to be used as a built-in appliance. Place your refrigerator on a stable, level surface. Your appliance will be heavy when loaded with food: it must therefore be placed on a solid, resistant floor. The appliance must be installed in a dry, well-ventilated room at room temperature. Refer to the table in the next section 'Climate class'.
- Never place an appliance that emits heat (microwaves, toasters, etc.) on top of the refrigerator.)
• The appliance must not be exposed to direct sunlight.
• The appliance must not be exposed to rain. - The appliance must not be installed next to a radiator, a stove or any other heat source.
- The appliance's energy consumption and efficient operation are affected by the room temperature.
- The appliance must be installed so that the power outlet is accessible. The appliance can be installed on its own, next to a piece of furniture or in front of a wall. Make sure that there is enough free space around the appliance so that the door and drawers can be opened conveniently.
- Make sure that it is not resting on its power cable after installation.
- Before plugging the appliance into the mains socket for the first time, allow it to stand for two hours if it was transported in a vertical position or 24 hours if transported in a horizontal position. This is to allow the refrigerant gas to flow back into the compressor. Failure to comply with this waiting period may damage the compressor.
Suffi cient ventilation
- To improve the efficiency of the cooling system and save energy, you must leave enough ventilation space around the appliance. For this reason, you must make sure you leave enough space around the refrigerator.
- We recommend you leave 50 to 70mm between the back of the appliance and the wall, at least 100mm above and between the sides and the wall, as well as space in front of the appliance, so that the doors can open 135^ . Refer to the diagrams below:
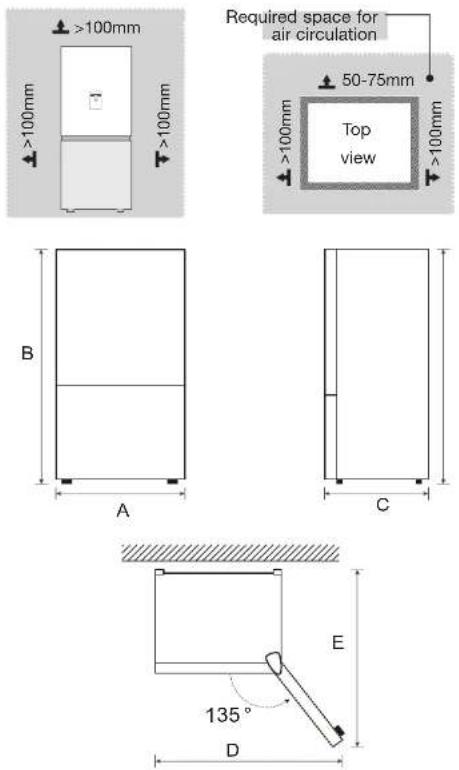
| Width Overall height Depth | Width doors open 135° | Depth doors open 135° | |
| A B C D E | |||
| 595 mm 1880 mm 630 mm 988 mm 1074 mm | |||
Climate classes
- Only install the appliance in a location where the room temperature matches the climate class for which it was designed (see table below). The climate class is indicated on the rating plate located on the outside of the appliance.
- The table below shows the correct room temperature for each climate class:
Climate class Room temperature
| SN +10 to +32°C | |
| N +16 to +32°C | |
| ST +16 to +38°C | |
| T | +16 to +43°C |
Your refrigerator has a climate class of "SN/N/ST". If the room temperature is below or above the indicated room temperature, the performance of your refrigerator may be affected, and your food may spoil.
Levelling
- The appliance must be levelled to compensate for the uneven floor or for vibration-free operation. To do this, adjust the height of the front feet to ensure the appliance is properly balanced.
• The front should be slightly higher than the rear to aid in door closing. - Leveling screws can be turned easily by tipping the cabinet slightly.
- Turn the leveling screws counterclockwise to raise the unit or clockwise to lower it.
use
Getting started
- Before plugging into the electrical outlet for the first time, leave the appliance in place for two hours to allow the refrigerant gas to settle in the compressor. Not respecting this waiting period may damage the compressor.
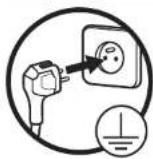
• Always plug your appliance into an earthed and easily accessible power socket. When power-on the refrigerator, the display screen (including the key light) will light up for 3 seconds. Then, the default setting is +4°C.
- The interior lighting in the refrigerator compartment comes on when the door is opened.
Description of the control panel
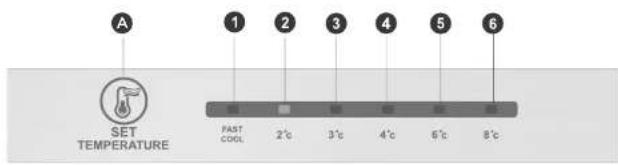
| Display Button | |||
| 1 | temperature setting 1 | A | Temperature setting button |
| 2 temperature setting 2 | |||
| 3 temperature setting 3 | |||
| 4 temperature setting 4 | |||
| 5 temperature setting 5 | |||
| 6 temperature setting 6 | |||
- When powering on the refrigerator, the display screen will shine constantly for 3 sec. The refrigerator then runs according to temperature setting 4.
• Normal operation display. - When there is a failure, the corresponding LED light will display a combined failure code (in recycling display).
- Where there is no failure, the LED light will display the current temperature setting.
Operating instructions
Gear setting
- The temperature setting will be changed once every time you press the SET key. The refrigerator will then run under the new setting value after 15 sec.

Fast cool mode
- Enter: Circulating modulation Fast cool mode.
- Operate: Fast cool indicator lights up, the refrigerator will automatically exit Fast cool mode after 40 hours of continuous operation at low temperatures.
- Press the button to switch to the other gear. This cancels Fast cool mode. When placing a large amount of food in the freezer compartment at one time, it is recommended to open the fast cool mode 12 hours in advance, so as to quickly freeze food and avoid food deterioration.
Error code
- The following warnings appearing on the display indicate corresponding faults of the refrigerator.
- Though the refrigerator may still have cooling and freezing function with the following faults, the user should contact a maintenance specialist, so as to ensure normal use of the refrigerator.
Fault Code Fault Description
| LED 1 and LED 2 lit Refrigerating temperature sensor fault |
| LED 1 and LED 3 lit Freezer defrost sensor fault |
| LED 1 and LED 4 lit Ambient temperature sensor fault |
Setting the temperature (freezer compartment)
The freezer compartment temperature control system, located in the refrigeration section, has 3 settings:
FREEZER-TEMP
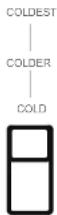
COLD Default position.
COLDER Ambient temperature above 35°C. This setting is most useful in summer.
COLDEST Ambient temperature below 10°C. This setting is more useful in winter.
The freezer will still operate to give a temperature of around -18^ . It is therefore necessary to regulate the operating intensity according to the outside ambient air.
The coldest zone in the refrigerator
- The symbol indicates the location of the coldest zone of your refrigerator, whose temperature is less than or equal to 4°C. The latter is located at the bottom of the refrigerator compartment, just above the crisper drawer.
- Since the shelves are removable, always ensure that the shelves demarcating the cold zone are positioned by the sticker in order to guarantee the temperature in this zone.
Temperature indicator

Incorrect setting
- Make sure that "OK" appears in the temperature indicator to ensure that food is preserved properly in your refrigerator, particularly in the coldest zone. If "OK" does not appear, the average temperature in the zone is too high. Set the thermostat to a higher position.

Correct setting
- After each change, wait for the temperature inside the appliance to stabilise before making any further adjustments, if necessary. Only change the position of the thermostat gradually and wait at least 12 hours before checking again and making any necessary changes.
- It is normal that the word "OK" does not appear in the temperature indicator after the appliance has been filled with fresh food or after the door has been opened repeatedly (or left open for a prolonged period); wait at least 12 hours before deciding whether or not to adjust the temperature.
Food storage tips
Stored food should always be spaced out and not touch the walls so that cold air can circulate freely between items.
| Refrigerator compartment | Food type |
| Door shelves | Food items with natural preservatives such as jams, juices, butter, drinks, condiments.Do not store perishable food in it. |
| Vegetable crisper | The fruit, herbs and vegetables should be placed separately in this bin.Bananas, potatoes, onions and garlic should not be stored in the refrigerator. |
| Lower shelf Raw meat, poultry, fl sh (for short-term preservation) | |
| Intermediate shelves | Dairy products, eggs, cheese. |
| Upper shelf | Food that does not require cooking such as ready meals, cooked meats, leftovers. |
| Freezer drawers | Food to be kept for a long timeLower drawer for raw meat, poultry, fl sh.Intermediate drawer for frozen vegetables, chips,Upper drawer for ice cream, frozen fruit, frozen meals. |
- In order to avoid the appearance of odours, food should be stored covered or in closed containers.
- Only store fresh foods, which have been cleaned and wrapped in appropriate food packaging or containers. Meat and washed fish should be wrapped in plastic or cling film and preferably eaten within two days.
- Fruit and vegetables can be stored directly in the vegetable compartment. It is not necessary to pack them separately.
- To ensure that air can circulate properly, never cover the shelves with paper or plastic sheets.
- Allow hot food and hot drinks to cool to room temperature before placing them in the appliance.
- Limit the number of door openings and, in any case, do not leave the door open too long to avoid a rise in temperature of the refrigerator.
- Setting high temperatures can easily lead to food waste.
| Food Storage life | |
| Eggs, marinades, smoked meat Up to 10 days | |
| Cheese Up to 10 days | |
| Root vegetables Up to 8 days | |
| Fresh butter Up to 7 days | |
| Desserts, fruit, ready meals, fresh minced meat Up to 2 days | |
| Fish, fresh minced meat, seafood 1 day |
Energy-saving tips
Follow the guidelines below in order to save energy:
- Limit how often the doors are opened and avoid leaving the doors open for too long to prevent the temperature from increasing.
- Make sure that the appliance is located away from any heat source (direct sunlight, electric heating, hobs etc.).
- Do not set the temperature to a colder temperature than necessary.
- Do not store hot food or liquids that will evaporate inside the appliance. Allow hot food and hot drinks to cool to room temperature before placing them in the appliance.
• In the event of a power failure, do not open the appliance doors. - Place the appliance in a well-ventilated room free of moisture. Please refer to the chapter on installing the appliance.
- Follow the recommendations in the diagram below showing the correct placement of the shelves and other compartments in the appliance. These are the best positions for saving energy.
Making ice cubes
- To make ice cubes, fill an ice cube tray three-quarters full with cold water and place it in the freezer compartment for more than two hours. To remove the ice cubes, bend the tray slightly or place it under running water for a few seconds.
- You can select the "COLDEST" mode to reduce the time it takes to make ice cubes.
Storage of frozen food in the freezer compartment
- Your appliance is labelled "4 stars" ✦ which means that it is suitable for storing frozen food, freezing fresh products and making ice cubes.
- When starting the appliance, it is advisable to wait two hours before placing fresh products in the freezer compartment. If the appliance is already running, this waiting period is not necessary.
- Do not place hot dishes in the freezer until they have cooled down, as food that is already frozen may rot.
- Place fresh food to be frozen in the top drawer and use the 2 lower drawers to store products which are already frozen. Do not mix products which are already frozen with fresh products.
- If you are planning to freeze foods (meat, minced meat, fi sh, etc.), consider dividing items into portions so that they can be eaten all at once. Leave a space of at least 3 cm between the food to be frozen and the top wall inside the drawers. Use an airlight, sealed package which is easy-to-open to freeze your food (freezer bags, storage boxes, etc.) Do not refreeze food that has thawed. This presents a risk to your health from food poisoning.
- When you buy frozen foods, make sure they have been frozen in good condition and that the packaging is not torn.
- When storing frozen food, observe the storage conditions indicated on the packaging. If there are no instructions, the food should be consumed as soon as possible.
- Food must be transported in appropriate packaging to maintain its quality and must be returned to the freezer as soon as possible. If the packaging of a frozen food is damp and smells unpleasant, the food may have been stored in poor conditions before. Do not store this food!
- The shelf life of frozen food changes with room temperature, repeated opening and closing of the door, temperature setting, type of food and the time between when the food was purchased and when it was placed in the freezer. Always follow the instructions on the packaging and never exceed the shelf life.
-
WARNING: Bottles and cans should not be placed in the freezer compartment. They can burst when the contents freeze, and sodas can even explode! Never store soda, juice, beer, sparkling wine, etc. in the freezer compartment.
-
WARNING: Do not put ice cream or ice in your mouth immediately after taking them out of the freezer compartment. Very cold ice can freeze on your lips or tongue and cause physical damage.
- WARNING: Do not touch frozen foods with wet hands. The ice could stick your hands to the food.
- WARNING: Do not use electrical appliances (for example electric ice cream makers, blenders, etc.) inside the refrigerator and/or the freezer.
| Food Shelf life | |
| Fruit, beef Between 10 and 12 months | |
| Vegetables, veal, poultry Between 8 and 10 months | |
| Game Between 6 and 8 months | |
| Pork Between 4 and 6 months | |
| Minced or diced meat 4 months | |
| Bread, cakes, ready meals, lean fi sh 3 months | |
| Tripe 2 months | |
| Smoked sausage, oily fi sh 1 months |
use of accessories
Your appliance comes with several accessories, and this section describes the best way to use them.
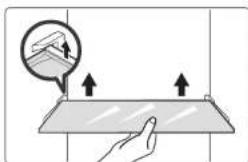
Door shelves
You can remove the door shelves to clean them. To extract a door shelf, press on either side of the shelf in the direction indicated by the arrows, then lift it gradually until it comes free. After cleaning, reposition it in the opposite direction.
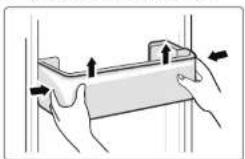
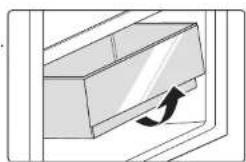
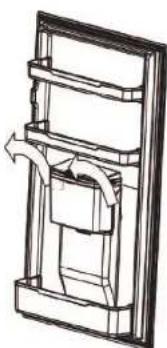
Refrigerator compartment shelves
- The refrigerator compartment is fitted with four shelves that can be removed for cleaning. There is a security on the back of the shelf as shown in the diagram below. You must first lift the shelves upwards to be able to remove them.
natural_image
Illustration of a hand pressing down on a flat surface with upward arrows, no text or symbols presentCrisper drawer
- It is intended for preserving fruits and vegetables. - To clean it, fi rst remove the contents of the tray Grasp the tray by its handle and pull it towards you, then lift it completely to extract it from its housing.
Freezer drawers
• They are used to store food that needs to be frozen, including meat, fi sh, ice cream, etc.
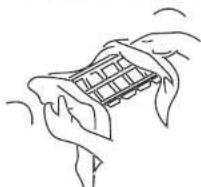
Ice cube tray
- It is used to make ice cubes. To make ice cubes, fill the tray with water. The water level must not exceed the top line (ideally 80% of the tray's volume). Place the ice cube tray in the freezer drawer and wait at least two hours for the ice cubes to form. Once the ice cubes have formed, gently twist the tray to release the ice cubes.
Water dispenser
- The water dispenser, located in the refrigerator door, is designed to store drinking water. With this device, you can easily get cool water without opening the refrigerator. Please read the following recommendations.
General recommendations
- Use the water dispenser only with cold water (tap water or pure, unfl avoured bottled water). Hot water, carbonated drinks containing carbon dioxide such as cola, fruit juice, etc. should not be used with the water dispenser.
- The water injection by taking down the water box from the door is not allowed.
- The maximum amount of water dispensed must be less than the maximum capacity indicated on the tank.
- In the event of a water distribution failure, please check that the tank is correctly positioned in its housing.
- Please empty the water tank before moving the device.
• The tank head components are not detachable. - If the water dispenser is used for the first time or left unused for a long time, it should be disassembled and cleaned before you serve and drink the water.
- If the water in the water tank is not used for a long time, it is suggested to empty the water in the tank and add fresh drinking water.
-
It is recommended to clean the water distribution system once every 3-6 months.
-
When using a detergent product to clean the water dispenser and replacing the dispenser in its housing, please do not drink the equivalent of the first 5 to 6 glasses of water as they may still contain product residue.
- When opening/closing the door, do not apply excessive force to prevent water from overfl owing from the tank inside the refrigerator.
Parts description

Filling the water tank
Before pouring water into the tank, make sure that the tank is stable and in the correct position. The maximum capacity of the tank is 3 litres. Warning! Do not exceed the maximum capacity or water may overflow when you close the lid.
Remove the cap from the cover and directly fill the water in.
natural_image
Technical line drawing of a refrigerator interior with no visible text or symbolsCollecting the water
natural_image
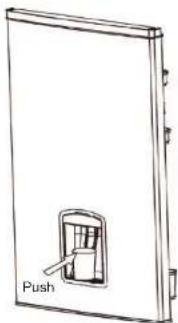
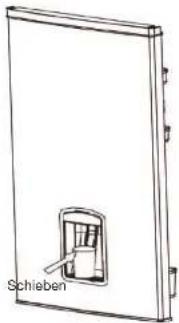
Simple line drawing of a door with a push button and label 'Push' (no other text or symbols)- Push the lever forward while pressing down with a glass or cup.
- Water flows when you push the lever forward and the flow stops when the lever returns to its original position.
- Warning! Do not push the dispenser lever forward if there is no container underneath it, as water will pour out of the dispenser.
- If you have used the water dispenser a lot, water may drip from the drip tray and wet the floor. Please check and empty the drip tray regularly, if necessary, with a dry cloth before it overflows.
Disassembly
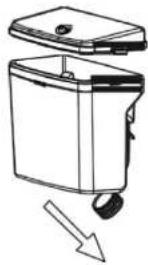
- Remove the water tank
- Grasp the tank on both sides then lift it up.
natural_image
Technical line drawing of a mechanical assembly with no visible text or symbols- Remove the head and the tank seal
natural_image
Diagram of a portable appliance with a lid and wheels, showing a downward arrow indicating flow or change (no text or symbols present)- Separate the seal from the tank head
- Use a fl at screwdriver to pry up and remove the tank head.
natural_image
Technical line drawing of a mechanical assembly with an inset showing a detail view (no text or symbols)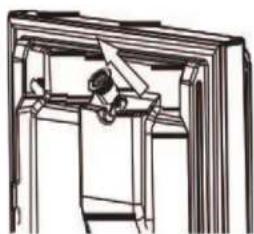
natural_image
Technical line drawing of a mechanical assembly or frame structure (no text or symbols)Cleaning
Disassemble the water tank, water tank cover, seal and head.
Use cold or lukewarm water to clean each part with a soft sponge.
Wipe with a dry cloth.
- When using a detergent product to clean the water dispenser and replacing the dispenser in its housing, please do not drink the equivalent of the first 5 to 6 glasses of water as they may still contain product residue.
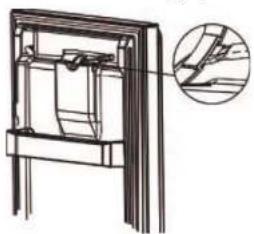
- When reinstalling the seal on the bottom of the water tank, make sure it is installed correctly (not at an angle or incorrectly positioned).
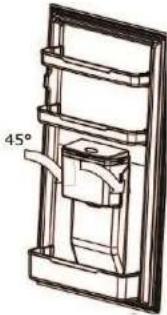
- When replacing the water tank, be sure to align the notches on the tank with those on the housing (inside the door). Check that the head has been inserted into the opening fl rst. Insert the tank at 45° downwards.
natural_image
Technical line drawing of a mechanical assembly with a 45-degree angle标注 (no text or symbols beyond the angle indicator)cleaning and maintenance
Unplug the appliance before performing any cleaning or maintenance work.
Regularly clean and disinfect the appliance.
- Remove frozen foods and fresh foods from the refrigerator.
- Wrap frozen foods in several layers of newspaper, cover them and store them in a cool place.
- Clean the refrigerator and freezer compartments with a sponge soaked in baking soda and warm water.
- Clean the accessories with a soft sponge and warm soapy water.
- After cleaning, rinse with clean water and dry the parts thoroughly.
- Once everything is dry, the appliance can be used again.
- Never use abrasive or caustic products, or sponges with scouring pads to clean the inside or outside of your appliance.
• Take care not to run water into the lamp housing and other electrical components.
- Inspect the door seals regularly to make sure they are clean and do not harbour any food particles. Door seals must be kept clean at all times. Clean them with hot water and thoroughly dry them.
- Do not clean glass shelves with hot water when they are cold. The glass could break due to sudden changes in temperature and cause personal injury or property damage.
- IMPORTANT: Do not put oil or oily dishes in the refrigerator in unsealed containers, as grease can damage the refrigerator's plastic surfaces. If you spill or splash oil onto the plastic surfaces, immediately clean the soiled parts with hot water.
Defrosting
Your ventilated cold appliance will automatically defrost.
troubleshooting guide
If you have a problem with your appliance or suspect that it is not working properly, perform the checks listed below before calling the after-sales service for service.
Problems Possible causes and solutions
| The appliance is not working properly | Make sure the power cord is properly plugged into the socket. |
| Check the fuse or your electrical supply circuit and replace it if necessary. | |
| In order to protect the compressor, it is normal for the freezer not to run during the defrost cycle, or not to start immediately after turning on the unit. | |
| Bad odours in the compartments | Maybe the inside needs to be cleaned. |
| Odours can come from certain foods, containers or packaging. | |
| The appliance is making noise | The noises below are quite normal:Noise from the compressor running.Noise from the small fan motor in the freezer compartment or other compartments.A gurgling sound similar to the sound of boiling water.Crackling during automatic defrost.A click before the compressor starts up. |
| Other unusual noises are caused by the reasons listed below. In this case, you should carry out checks and take the necessary actions:The appliance is not level.The back of the appliance is touching the wall.Bottles or containers have fallen or are moving. | |
| The motor runs continuously. | It is normal to hear frequent motor noise. It will need to work harder in the following situations:The temperature is set to a lower setting than required.A large amount of food that is still hot has recently been placed inside the appliance.The temperature outside the appliance is too high.The doors are opened too often and for too long.The appliance was recently installed or has been switched off for a long period of time. |
| The internal temperature is too high | You may have left the doors open too long or opened them too often; or the closing of the doors is obstructed; or the appliance does not have enough space on the sides, behind it and above it. |
| The internal temperature is too low | Increase the temperature by following the instructions in the "Description of the control panel" section. |
| The doors do not close easily | Check that the top of the refrigerator is tilted backwards by about 10-15 mm to allow the doors to close by themselves, and that there is nothing inside stopping the doors from closing. |
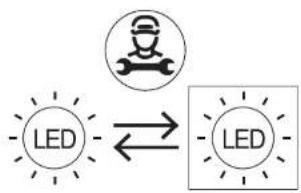
| The light is not working | ·Your appliance has LED lighting. This type of lighting is designed to work longer than a conventional light bulb. Contact your retailer's after-sales service if the lighting is defective.·The control system deactivated the lights because the door stayed open too long. Close and reopen the door to reactivate the light. |
If the information above does not help you resolve your problem, do not attempt to repair the appliance yourself; contact your retailer's after-sale service.
Refrigerator repairs should only be carried out by qualified service technicians. Poor repairs can lead to hazards for users and are not covered by the warranty.
Sounds during the operation of the appliance
The following sounds are normal when the appliance is in operation:
• Crackling (ice crackling):
This sound can be heard during the automatic defrosting process.
It may also be heard when the refrigerator is cooling or heating (expansion of the appliance materials).
- Clicking:
This noise is heard when the compressor starts or stops.
- Compressor noise:
This is the normal noise of the motor. This noise indicates that the compressor is operating normally. When the compressor starts, the noise may increase slightly for a short time.
• Bubbling and gurgling sound:
This sound can be heard when the refrigerant flows through the coils inside the system.
• Sound of flowing water:
This is the normal sound of water flowing into the evaporator collector during the defrosting process. This sound can be heard inside the appliance during the defrosting process.
In case of absence or prolonged periods without use
You should empty and unplug the appliance if you are not going to use it for a long period of time.
In case of power failure
- If the power failure does not last very long, there is no risk of your food spoiling. However, do not open the doors. The operating range of your appliance is indicated in the "PRODUCT INFORMATION SHEET". This duration is significantly shortened depending on the load of the appliance.
- If the power failure is prolonged, transfer frozen products to another freezer.
• As soon as you notice that thawing has started, eat the food as quickly as possible. - Warning! Any food that has thawed should not be refrozen.
- To avoid damage to the appliance in the event of sudden power cuts and restarts, the appliance will not start immediately if the power outage lasts less than 5 minutes.
Interior lighting
Your appliance is fitted with LED lighting. This type of lighting is designed to work longer than a conventional light bulb. Contact your retailer's after-sales service if the lighting is defective.
This product contains a light source of energy efficiency class 'F'. Light source in this product is replaceable only by qualified engineers.
flowchart
graph LR
    A["LED"] <--> B["LED"]
Reversing the door's opening direction
The procedure used to change the opening direction of the refrigerator door can be consulted here:
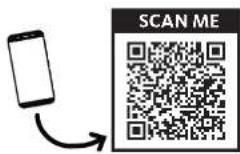
https://boulanger.scene7.com/is/content/Boulanger/3497674192112 a 0

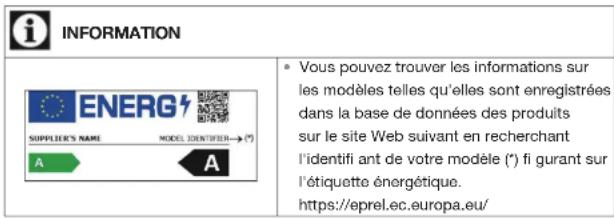
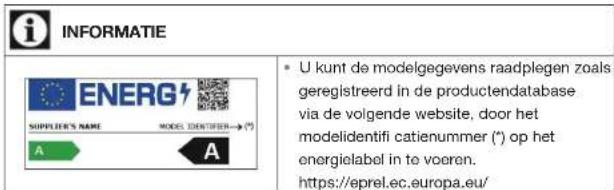
INFORMATION
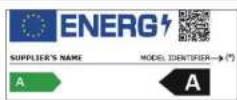
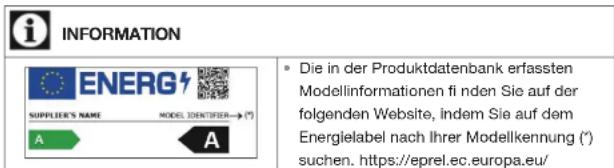
- You can find the model information which is stored in the product database on the following website by searching for your model ID (*) provided on the energy label. https://eprel.ec.europa.eu/
The availability period for your appliance's spare parts is 10 years.
Internet link to the manufacturer's website where the information referred to in point 4(a) of the Annex to Commission Regulation (EU) 2019/2019 can be found: https://www.boulanger.com/info/assistance/
Auspacken
natural_image
Illustration of hands holding a rectangular object with arrows indicating movement or force (no text or symbols)natural_image
Illustration of a hand pressing down on a flat surface with upward arrows indicating force or movement (no text or symbols)natural_image
Diagram of a mechanical component with an arrow indicating rotational motion (no text or symbols)natural_image
Technical line drawing of a mechanical assembly or lifting device inside a frame (no text or symbols)Wasserausgabe
natural_image
Line drawing of a door with a switch and label 'Schieben' (no other text or symbols)natural_image
Technical line drawing of a mechanical assembly with internal components and directional arrows (no text or symbols)natural_image
Diagram of a portable water heater with a downward arrow indicating flow or movement (no text or symbols)natural_image
Technical line drawing of a mechanical assembly with an inset showing a close-up of a component (no text or symbols present)Reinigung
natural_image
Technical line drawing of a mechanical assembly with a 45-degree angle标注 (no text or symbols beyond the angle marker)https://boulanger.scene7.com/is/content/Boulanger/3497674192112_a_0
natural_image
Illustration of hands holding a rectangular object with arrows indicating movement or force (no text or symbols)natural_image
Illustration of a hand pressing down on a flat surface with arrows indicating upward motion (no text or symbols)natural_image
Technical line drawing of a mechanical assembly or lifting device inside a frame (no text or symbols)natural_image
Line drawing of a door with a handle and label 'Duwen' (no other text or symbols)natural_image
Technical line drawing of a mechanical assembly with no visible text or symbolsnatural_image
Diagram of a portable water heater with a downward arrow indicating flow or movement (no text or symbols)natural_image
Technical line drawing of a mechanical assembly with an inset magnified detail (no text or symbols)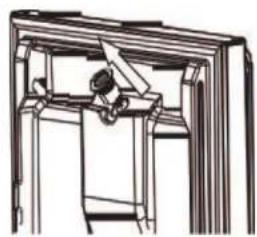
natural_image
Line drawing of a person sitting inside a wooden frame, viewed from above (no text or symbols)Reiniging
natural_image
Technical line drawing of a mechanical assembly with a 45-degree angle标注 (no text or symbols beyond the angle marker)flowchart
graph TD
    A["LED"] --> B["Robot Icon"]
    B --> C["LED"]
https://boulanger.scene7.com/is/content/Boulanger/3497674192112 a 0
All information, designs, drawings and pictures in this document are the property of SOURCING & CREATION. SOURCING & CREATION reserves all rights to its brands, designs and information. Any copy and reproduction through any means shall be deemed and considered as counterfeiting.
Protection of the environment
This symbol attached to the product means that it is an appliance whose disposal is subject to the directive on waste from electrical and electronic equipment (WEEE). This appliance may not in any way be treated as household waste and must be subject to a specific type of removal for this type of waste. Recycling and recovery systems are available in your area (waste removal) and by distributors.
By taking your appliance at its end of life to a recycling facility, you will contribute to environmental conservation and prevent any harm to your health.

Umweltschutz
\* Tested in our laboratories
Warranty valid from the date of purchase (receipt as proof of purchase). This warranty does not cover defects or damage caused by improper set up, incorrect use, or normal wear and tear of this product.
\* In unseren Labors getestet
Ref. ERCVDE190-65mii1
SERVICE RELATION CLIENTS / Customer Relations Department / Kundenservice / Klantenafdeling
Avenue de la Motte CS 80137 59811 Lesquin cedex
FABRIQUÉ EN R.P.C. / Made in China / Hergestellt in VR China / Gefabriceerd in VRC.
SOURCING & CREATION
Avenue de la Motte 59810 Lesquin - FRANCE contact@sc-ub.com