ERMVE180-85miv1 - Fridge Essentiel B - Free user manual and instructions
Find the device manual for free ERMVE180-85miv1 Essentiel B in PDF.

| Brand | Essentiel B |
| Model | ERMVE180-85miv1 |
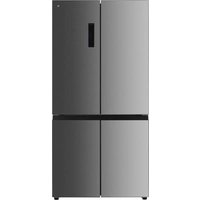
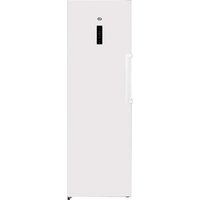
| Product type | Multi-door refrigerator-freezer (cabinet) |
| Dimensions (W x H x D) without door | 833 x 1775 x 653 mm |
| Width with doors open at 135° | 1400 mm |
| Depth with doors open at 135° | 570 mm |
| Climate class | SN/N/ST/T (10 °C to 43 °C) |
| Refrigerator temperature range | 2 °C to 8 °C |
| Freezer temperature range | -24 °C to -16 °C |
| Variable temperature zone | Fruits/Vegetables, Beverages, Meats |
| Special modes | Super Cool and Super Freeze |
| Control panel | Digital screen with lock/unlock |
| Open door alarm | Yes, adjustable |
| Interior lighting | LED (class G) |
| Defrost | Automatic |
| Cleaning | Warm water and vinegar, no abrasive products |
| Leveling | Adjustable feet |
| Installation | Clearance >100 mm around, flat and stable surface |
| Spare parts | Available for 10 years |
| Number of doors | 2 doors |
Frequently Asked Questions - ERMVE180-85miv1 Essentiel B
User questions about ERMVE180-85miv1 Essentiel B
0 question about this device. Answer the ones you know or ask your own.
Ask a new question about this device
Download the instructions for your Fridge in PDF format for free! Find your manual ERMVE180-85miv1 - Essentiel B and take your electronic device back in hand. On this page are published all the documents necessary for the use of your device. ERMVE180-85miv1 by Essentiel B.
USER MANUAL ERMVE180-85miv1 Essentiel B
natural_image
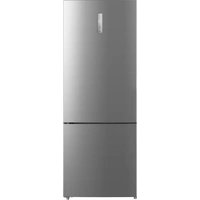
Exterior view of a modern stainless steel double refrigerator with front door and side panels (no visible text or symbols)Notice d'utilisation / User guide / Bedienungsanleitung / Gebruiksaanwijzing

natural_image
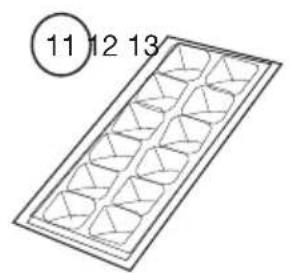
Diagram of a rectangular panel with internal grid patterns and numbered labels (11, 12, 13) on the top left corner.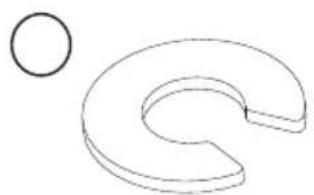
natural_image
Simple line drawing of a curved shape with a separate circle nearby (no text or symbols)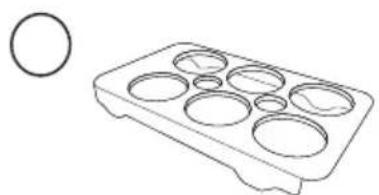
natural_image
Line drawing of a tray with multiple circular cavities and a separate circle on the left (no text or symbols)| FR EN DE NL | ||||
| 1 | Éclairage LED LED lighting LED-Leuchte | Ledverlichting | ||
| 2 | Porte-bouteilles Wine rack Weinregal Wijnrek | |||
| 3 | Distributeur d’eau Water dispenser Wasserspender Waterdispenser | |||
| 4 | Balconnets de porte (5) | Door trays (5) Türablagen (5) Deurvakken (5) | ||
| 5 | Zone à température variable | Variable temperature zone | Variable Temperaturzone | Variabele-temperatuurzone |
| 6 | Bacs coulissants du haut du congélateur (2) | Freezer upper sliding trays (2) | Obere herausziehbare Ablagen für den Gefrierschrank (2) | Bovenste schuifladen vriezer (2) |
| 7 | Bacs coulissants du milieu du congélateur (2) | Freezer middle sliding trays (2) | Mittlere herausziehbare Ablagen für den Gefrierschrank (2) | Middelste schuifladen vriezer (2) |
| 8 | Bacs coulissants du bas du congélateur (2) | Freezer lower sliding trays (2) | Untere herausziehbare Ablagen für den Gefrierschrank (2) | Onderste schuifladen vriezer (2) |
| 9 | Clayettes en verre amovibles (3) | Removable glass shelves (3) | Herausnehmbare Glasböden (3) | Verwijderbare glazen legplanken (3) |
| 10 | Zone Fruits/ Légumes | Fruit / vegetables zone | Obst/Gemüse-Zone | Fruit/groenten-zone |
| 11 | Bac à glaçons | Ice cube tray | Eiswürfelschale IJsblokjesvorm | |
| 12 | Rondelle de type C (2) | C type washer (2) | Unterlegscheibe Typ C (2) | C-type ring (2) |
| 13 | Bac à œufs | Egg tray | Eierhalter | Eierrekje |
natural_image
Simple line drawing of an electrical outlet with a plug and socket, no text or symbols present.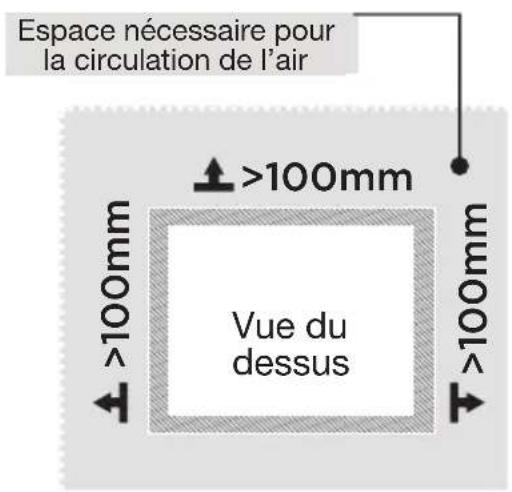
natural_image
Technical line drawing of a double door with labeled dimensions A and B (no text or symbols beyond labels)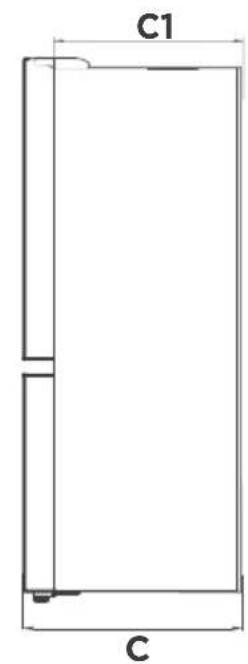
natural_image
Illustration of a hand pressing down on a flat surface with upward arrows indicating movement or force (no text or symbols present)Balconnets de porte
natural_image
Illustration of two hands holding a rectangular object with arrows indicating direction (no text or symbols)Bac à légumes
natural_image
Diagram of a mechanical component with an arrow indicating direction (no text or symbols)natural_image
Illustration of two hands holding a rectangular object with upward arrows indicating motion or force (no text or symbols)natural_image
Illustration of a hand pressing down on a flat surface with arrows indicating upward motion (no text or symbols)Nettoyage des bacs
natural_image
Diagram of a door handle with an arrow indicating clockwise motion (no text or symbols)Guide de dépannage
Codes d'erreur
https://eprel.ec.europa.eu/
Thank you for purchasing an Essentiel b branded product. We pay particular attention to the RELIABILITY, EASE OF USE and DESIGN of our products and we hope you will be completely satisfied with your new upright multi-door fridge freezer.
Unpacking
- Remove the shipping box.
- Check that the appliance has not been damaged during transport. Do not plug in a damaged appliance under any circumstances! If the appliance is damaged, please contact your retailer.
- Remove all tapes and packaging materials on the inside and outside of the appliance, including the handle parts that are stored inside the refrigerator boxes.
Before first use
- Clean the inside of the appliance with lukewarm water with a little white wine vinegar added to it. Do not use soap or detergent as the odour may linger. After cleaning, completely dry the appliance.
- You can use white spirit to remove any remaining adhesive from the outside of the appliance.
- To clean the appliance, always turn it off and unplug it, or remove the fuses or flip the circuit breaker to the off position.
Installation
Installation location
WARNING: To avoid any risk due to the instability of the appliance, it must be secured as per the instructions.
- Place your refrigerator on a stable, level surface. Your appliance will be heavy when loaded with food: it must, therefore, be placed on a strong, solid floor.
- The appliance must be installed in a dry, well-ventilated room at room temperature (10°C minimum and 43°C maximum).
- The appliance should not be exposed to direct sunlight.
- The appliance must not be exposed to rain.
-
The appliance must not be installed next to a radiator, a stove or any other heat source.
-
The appliance's energy consumption and efficient operation are affected by the room temperature.
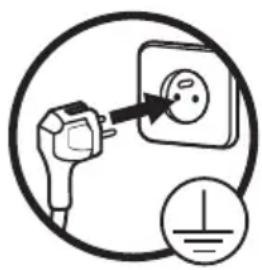
- The appliance must be installed in such a way that the power point is accessible.
• After installing it, make sure that it is not resting on its power cord.
natural_image
Simple line drawing of an electrical outlet with a plug and a power symbol (no text or labels)Before plugging the appliance into the mains socket for the first time, please let the appliance rest for two hours if the appliance was transported in an upright position, or 24 hours if the appliance was transported in the horizontal position. This is to allow the refrigerant gas to go back down into the compressor. Failure to comply with this waiting period may damage the compressor.
Climate class
Only install the appliance in a location where the room temperature matches the climate class for which it was designed (see table below).
The climate class is on the rating plate located inside the appliance.
The table below shows the correct room temperature for each climate class:
| Climate class Room temperature |
| SN from +10 to +32°C |
| N from +16 to +32°C |
| ST from +16 to +38°C |
| T from +16 to +43°C |
Your refrigerator ERMVE180-85miv1 is rated "SN/N/ST/T". If the room temperature is below or above the rated room temperature, the performance of your refrigerator may be affected, and your food may spoil.
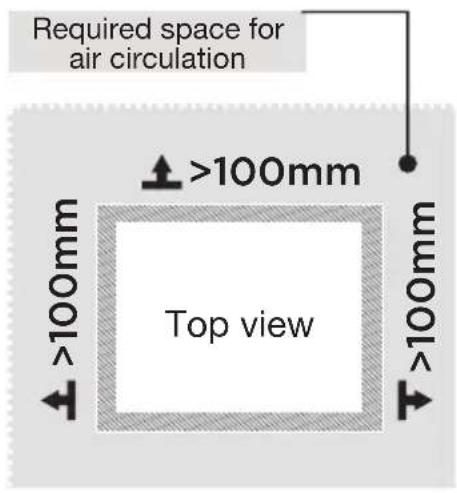
Sufficient ventilation
- The refrigerator is not intended to be used as a built-in appliance and ideally it should not be positioned directly under a cabinet.
- Make sure that air can circulate freely around the appliance to ensure that it can work properly (see figure below).
- The space above the refrigerator and to the rear should be more than 100 mm and at least 100 mm on both sides to facilitate heat dissipation.
• Make sure you leave enough space for the door to open. - If your appliance is to be installed next to another refrigerator or freezer, make sure the appliances are not touching each other. This is to prevent condensation from forming on the outside.

natural_image
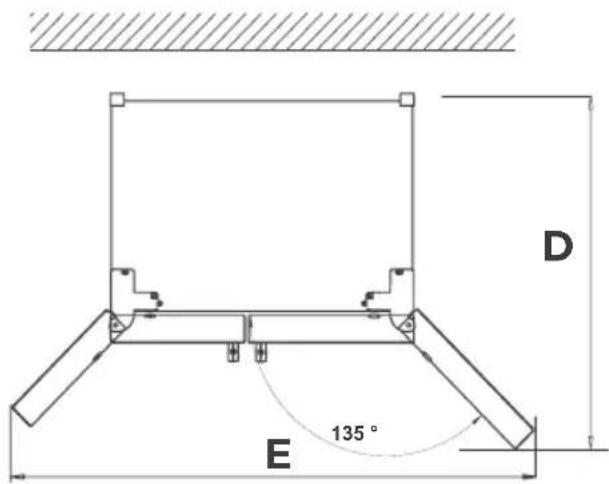
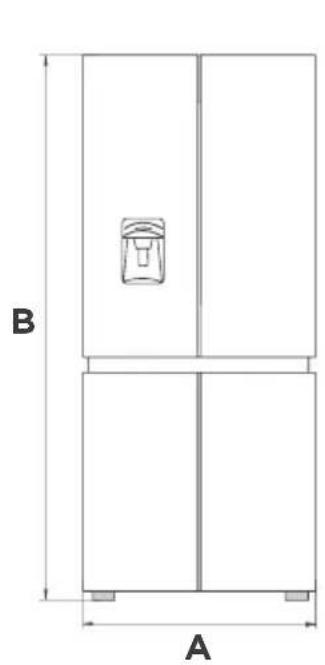
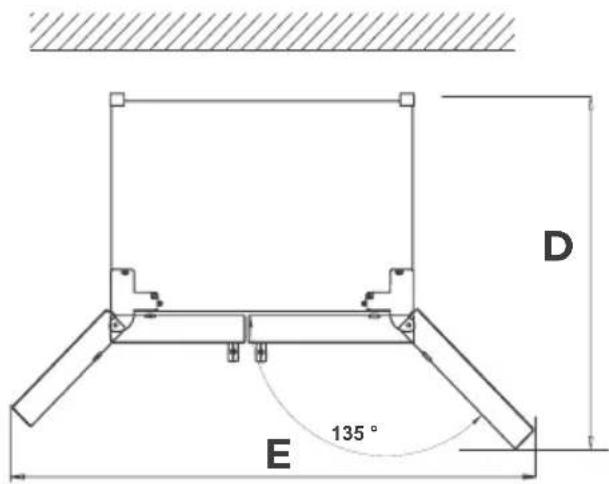
Technical line drawing of a two-panel refrigerator with labeled dimensions A and B (no text or symbols beyond labels)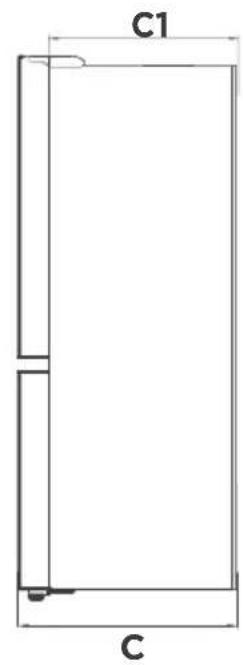

| Width | Overall Height | Depth | Without door | Depth doors open 135° | Width doors open 135° |
| A B C C | 1 D E | ||||
| 833 1775 | 653 570 1000 | 1400 |
Levelling feet
• To avoid vibration, the unit must be levelled.
- If required, adjust the levelling screws to compensate for the uneven floor.
- The front of the unit should be slightly higher than the rear to aid in door closing.
- The levelling screws can be turned easily by tipping the unit slightly.
- Turn the levelling screws counterclockwise to raise the unit; or clockwise to lower it.

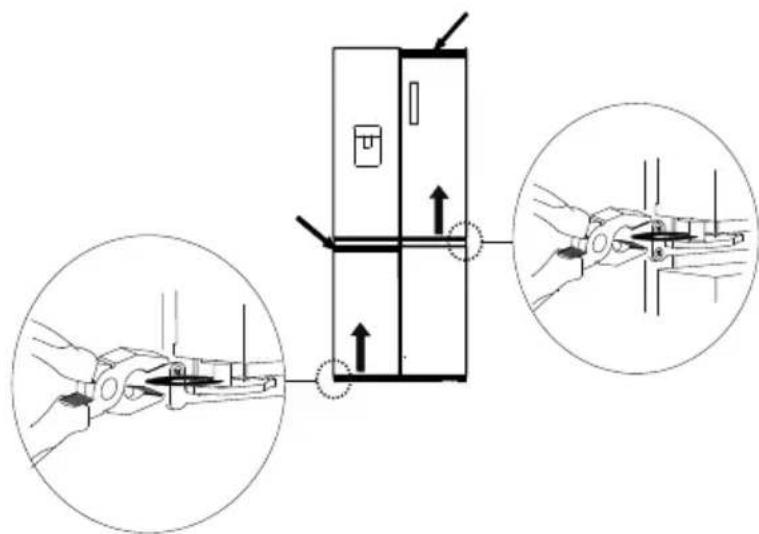
Levelling doors
After transportation or door shelves are loaded with food or beverage, the upper two doors may not be aligned. There are 2 C type washers which are used to adjust the doors. Follow below process to level the doors.
- Before levelling the doors, check alignment of the doors to make sure the appliance is levelled on a flat surface.
- If the top of the upper two doors do not look levelled, slightly lift the lower door and insert a C type washer, using a clamp, between the bottom of the door and the middle hinge.
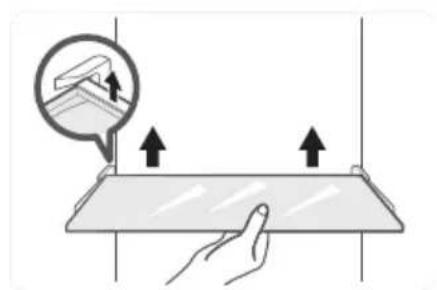
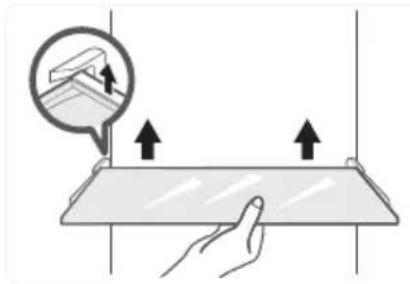
Removable glass shelves
The walls of the refrigerator are equipped with a series of runners allowing you to position the shelves according to your needs. You can remove the shelves for easy cleaning.
natural_image
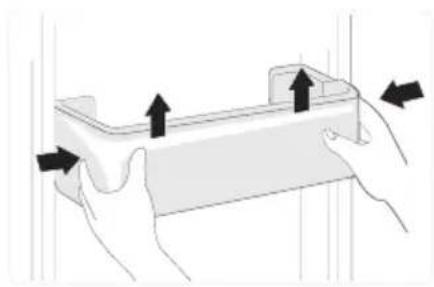
Illustration of a hand holding a flat surface with arrows indicating upward movement, and an inset showing a magnified view of a device (no text or symbols present)Door trays
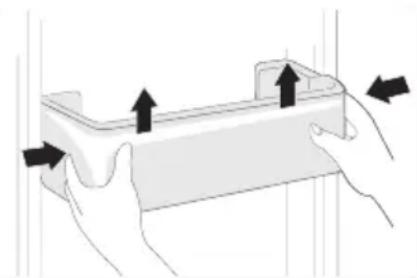
The fridge compartment has door trays. They are intended for the storage of eggs, condiments, canned drinks, etc. Do not place too many heavy objects in the door trays.
You can remove the door trays for cleaning. Use both hands to squeeze the tray, and then push it upward to take it out. After cleaning, reposition it as required.
natural_image
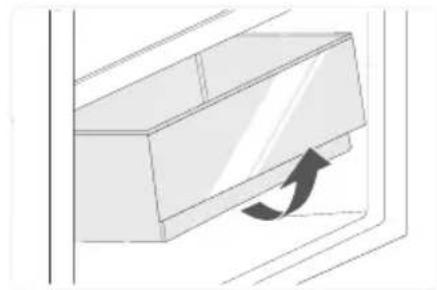
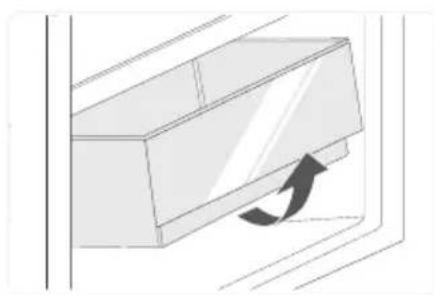
Illustration of two hands holding a rectangular object with upward arrows indicating motion or force (no text or symbols)Vegatable drawer
To remove the drawer, hold the handle of the drawer and pull it out completely until it stops. Lift the drawer up and remove it by pulling it out.
natural_image
Diagram of a door handle with an arrow indicating direction (no text or symbols)Moving the appliance
- Remove all food from inside the appliance.
- Pull the power plug out, insert and fix it into the power plug hook at the rear or on top of the appliance.
- Tape parts such as shelves and the door handle to prevent from falling off while moving the appliance.
- Move the appliance with more than two people carefully. When transporting the appliance over a long distance, keep the appliance upright.
- After installing the appliance, connect the power plug into a mains socket to power on the appliance.
Use
Getting started
- Before plugging the appliance into the mains socket for the first time, please let the appliance to rest for two hours if it was transported in an upright position, or 24 hours if it was transported in a horizontal position. This is to allow the refrigerant gas to go back down into the compressor. Failure to comply with this waiting period may damage the compressor.
- Plug the appliance into a mains socket.
- Wait at least two hours before placing food in the appliance to ensure that the correct temperature has been reached inside the refrigerator.
Description and use of the control panel
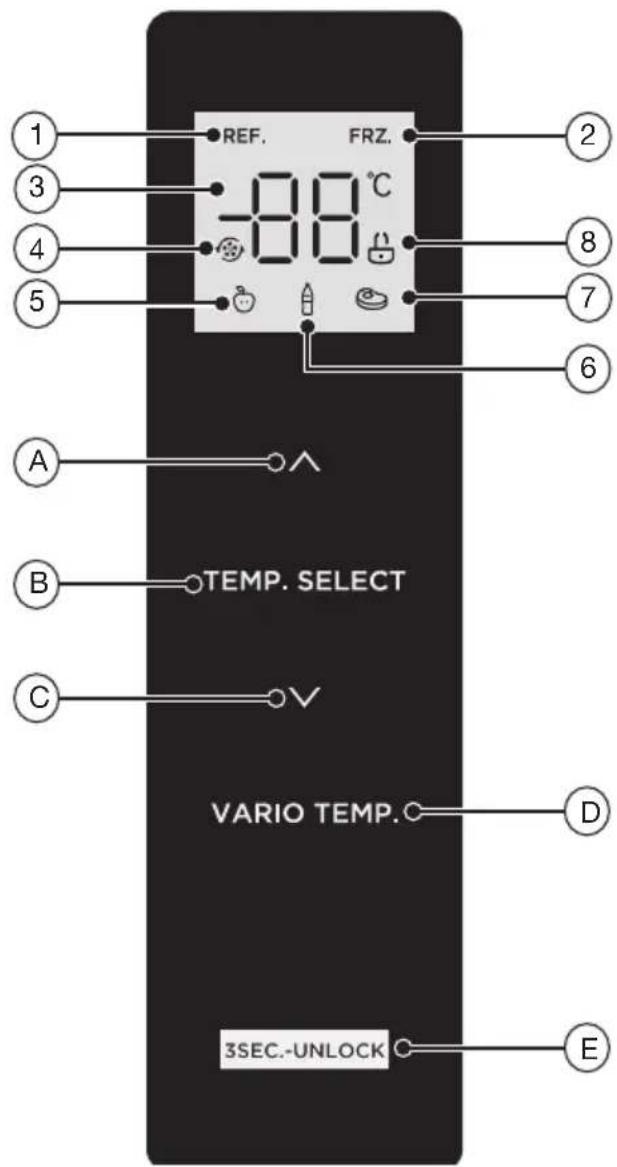
-
Refrigerator icon
-
Freezer icon
-
Temperature display
-
Super cool icon
-
Fruit / vegetable icon
-
Drink icon
-
Meat icon
-
Unlock icon
A. Temperature up button
B. Temperature zone selection button
C. Temperature down button
D. Variable temperature selection button
E. Lock / unlock button
The arrangement of the drawers, bins and shelves presented in the description of the appliance is designed to ensure that energy is used as efficiently as possible.
1- Display on the control panel
- When you plug in the refrigerator, the display and icons on the control panel will light up for 3 seconds and there will be a starting up alert sound.
- For the first connection, the default temperature is set to 5^ for the fridge, -20^ for the freezer. Thereafter, each time you restart the refrigerator, it will operate according to the temperature set before the last power off.
- When error occurs, the display shows the error code (see “Troubleshooting guide” section). During normal running, the display shows the set temperature of the fridge compartment or freezer compartment.
2- Lock / unlock the control panel
- The control panel will be automatically locked in 30 seconds if there is no operation on the control panel or no door opening. The unlock icon ( ) will then go off, indicating the control panel is locked.
- Long press the lock/unlock button (E) for 3 seconds to toggle locking or unlocking the control panel. When the control panel is locked. The unlock icon (☐) does off and there is an alert sound. When the control panel is unlocked. The unlock icon (☐) lights up and there is an alert sound.
3- Temperature control - Fridge
Set temperature for the fridge compartment:
- Press the temperature zone selection button (B) on the control panel until the refrigerator icon (REF) plays, and then press the temperature up button (A) or temperature down button (C) to adjust the desired temperature. The setting range for the refrigerating compartment is between 2°C and 8°C.
- We recommend setting the temperature to 5^ for the fridge compartment.
4- Temperature control - Freezer
Set temperature for the freezer compartment:
- Press the temperature zone selection button (B) on the control panel until the freezer icon (F8Zplays, and then press the temperature up button (A) or temperature down button (C) to adjust the desired temperature. The setting range for the freezer compartment is between -24°C and -16°C.
- We recommend setting the temperature to -20^ for the freezer compartment.
NOTE: The optimal temperature setting of each compartment depends on the ambient temperature. Above recommended temperatures are based on the ambient temperature of 25^ C.
5- Temperature control - Variable temperature / fruit & vegetable zone
Set temperature for the variable zone and fruit & vegetable zone:
- Press the variable temperature selection button (D) on the control panel to toggle among fruit/ vegetable, drink and meat until the desired icon ( 🍎 or 🌘 displays, and then press the temperature up button (A) or temperature down button (C) to adjust the desired temperature.
NOTE: Fruit/vegetable: suitable for storing all kinds of fruits and vegetables; drink: suitable for storing dry goods and drinks; meat: suitable for a small amount of meat stored for 1-2 days.
6- Super cool mode ()
Set super cool mode:
- Set the temperature of the fridge compartment to the lowest 2°C, and then press the temperature down button (C) to enter the super cool mode. When in super cool mode, the refrigerator icon (RARD) is displayed and the temperature of the fridge compartment will be fixed at 2°C at all times.
Exit super cool mode:
- Press the temperature up button (A) to exit super cool mode.
- The appliance will automatically exit super cool mode after super cool mode has been operated for 6 hours.
- After exiting super cool mode, the temperature of the fridge compartment will automatically return to the temperature set before the super cool mode.
7- Super freeze mode ()
Set super freeze mode:
- Set the temperature of the freezer compartment to the lowest -24^ , and then press the temperature down button (C) to enter the super freeze mode. When in super freeze mode, the freezer icon (F) and the super cool icon ( ) will be displayed and the temperature of the fridge compartment will be fixed at -24^ at all times.
Exit super freeze mode:
- Press the temperature up button (A) to exit super freeze mode.
- The appliance will automatically exit super freeze mode after super freeze mode has been operated for 43 hours.
- After exiting super freeze mode, the temperature of the freezer compartment will automatically return to the temperature set before the super freeze mode.
NOTE: The super freeze mode is designed to maintain the nutritional value of the food in the freezer. It can freeze the food in the shortest time. If a large amount of food is frozen at one time, we recommend you turn on the super freeze mode and put the food in. At this time, the freezing speed of the freezer compartment is increased, which can quickly freeze the food, effectively lock the nutrition of the food, and facilitate storage.
8- Door open alert
- Press the temperature up button (A) and the temperature down button (C) simultaneously for 3 seconds to toggle between disabling and enabling the alert sound plays when the door opens.
- When the alert sound is enabled and one of the fridge doors is opened, the fridge will beep three times after 2 minutes, then four times after another 1 minute, five times after yet another 1 minute, and so on, until it sounds thirty times continuously within every minute.
Practical tips for use
Daily use
Store different types of food in different compartments according to the below table.
| Fridge/freezer compartments Type of food | |
| Door shelves of fridge compartment | ·Food with natural preservatives, such as jams, juices, drinks, condiments.·Do not store perishable foods. |
| Wine · Red wine, white wine, sparkling wine, etc. | |
| Fruit & vegetables zone (salad drawer) | ·Fruits, herbs and vegetables should be stored separately in the crisper bin.·Do not store bananas, onions, potatoes, garlic in the refrigerator. |
| Fridge shelf | ·Dairy products, eggs, cakes, pasta, pizza.·Food that do not need cooking, such as ready-to-eat foods, deli meats, leftovers. |
| Variable zone compartment | ·20°C~5°C, wide range variable temperature.·3°C~5°C: fresh fruit, vegetables.·0°C~2°C: drinks, beer, red wine.·-7°C~-1°C: chilling foods for short-term storage, such as raw meat, fish, seafood, dumplings.·-20°C~-8°C: chilling foods for long-term storage, such as raw meat, fish, seafood, dumplings. |
| Freezer compartment | ·Foods for long-term storage.·Seafood, fish, meat, dumplings, frozen baked goods. |
Storage and energy saving tips
- Do not put hot food or evaporating liquids inside the refrigerator. Wait for anything cooked to cool completely before storing it (for example: soup).
• Always pack products to prevent different foods from contaminating each other. - Store only fresh foods, cleaned and wrapped in appropriate food packaging or containers.
- Never cover the shelves with paper or plastic sheets. Arrange food so that air can circulate freely around it.
- Make sure that the food does not touch the walls of the appliance, especially the back wall.
- Do not leave the door open for a long time because hot air will enter the refrigerator and the cold air inside will escape, thereby wasting energy.
- In the event of a power cut, do not open the door.
- Make sure there are no obstructions preventing the door from closing properly.
- Do not set the temperature to a colder temperature than necessary.
- Setting high temperatures can easily lead to food waste.
Cleaning and maintenance
Unplug the appliance before you clean it.
We recommend that you regularly clean and disinfect your appliance.
- Remove the fresh food from the refrigerator. Wrap it up and store it in a cool place.
- Clean the appliance and accessories inside with a soft (non-abrasive) sponge dipped in a solution of bicarbonate of soda and warm water or soapy, lukewarm water. Remove the door shelves by lifting them upwards. Do not forget to clean the door seals.
- After cleaning, rinse with clean water and dry the parts thoroughly with a soft cloth.
-
Once everything is dry, reassemble the refrigerator. Put the door shelves back by sliding them in from the top.
-
Never clean the appliance with a steam cleaner. The moisture generate can accumulate on the electrical components and could expose users to the risk of an electric shock! Hot steam can also damage parts made with plastic.
- Never use abrasive or caustic products, or sponges with scouring pads to clean the inside or outside of your appliance.
- Do not use hot water to clean the glass shelves if they are cold. There is a risk that the glass will shatter because of the sudden change in temperature which could cause injury and serious damage.
- IMPORTANT: Never put oil or oily dishes in the refrigerator in open containers as the fatty substances can damage the plastic surfaces of the refrigerator. If you spill or splash oil on the plastic surfaces, clean it up and immediately wash the affected parts with hot water.
Defrosting
- The refrigerator is made based on the air-cooling principle and thus has automatic defrosting function. Frost formed due to change of season or temperature may also be manually removed by disconnection of the appliance from power supply or by wiping with a dry towel.
Cleaning the door trays
- According to the direction arrow in the figure below, use both hands to squeeze the tray, and push it upward, then you can take it out to clean.
natural_image
Illustration of two hands holding a rectangular object with upward arrows indicating movement or force (no text or symbols)Cleaning the glass shelves
- As the innermost part of the refrigerator liner where contacting the shelf has a backstop, you shall raise the shelf upward, then you can take it out and clean it.
natural_image
Illustration of a hand pressing down on a flat surface with upward arrows indicating pressure or force (no text or symbols)Cleaning the drawers
- Remove the contents of the drawer. Hold the handle of the drawer and pull it out completely until it stops. Then, lift the drawer up and remove it by pulling it out.
natural_image
Diagram of a door handle with an arrow indicating clockwise motion (no text or symbols)Troubleshooting guide
Error codes
The following warnings appearing on the display indicate corresponding faults of the refrigerator. Though the refrigerator may still have cold storage function with the following faults, we recommend you contact the after-sales service centre, so as to ensure optimized operation of the appliance.
| Error code Description | |
| E1 Temperature sensor failure of the fridge compartment. | |
| E2 Temperature sensor failure of the freezer compartment. | |
| E3 Temperature sensor failure of the variable zone compartment. | |
| E4 Failure of defrosting sensor in fridge compartment. | |
| E5 Freezing defrost sensor detection circuit error. | |
| E6 Communication error. | |
| E7 Circulation of temperature detection circuit error. | |
| EH Moisture sensor error. | |
Malfunctions
If the appliance malfunctions, it may be due to a minor problem that you can rectify by following the instructions below. Before you call in a technician, you should carry out the following checks:
| Problems Check | |
| Your refrigerator is not working. • The appliance is plugged in.Your main circuit breaker has not tripped.The appliance is plugged into a suitable socket.To check, plug a different appliance into the socket in question. | |
| Your refrigerator is not working effectively. | You have not overfilled it.The door has been shut properly.The condenser is not covered in dust.The temperature is not too high and adjust as necessary to a cooler setting.The appliance is not near a heat source.Ensure the appliance is well-ventilated, for example, the gaps at the back and around the sides are large enough. |
| Your appliance is too cold. • The refrigerator is in super cool mode.The temperature is too low and adjust as necessary to a warmer setting. | |
| Door cannot be properly closed. | The door is stuck by food packages or too much food is placed.The refrigerator is tilted. |
| Your appliance is noisy. The cooling gas that circulates in the refrigerationsystem can sometimes make small noises, even when the compressor is not operating. Do not be concerned, this is completely normal. If you hear a different noise, check:The appliance is levelled.Nothing is touching the rear of the appliance.The contents of the appliance are not vibrating. | |
| Water overflows. • There is too much food in the chamber or foodstored contains too much water, resulting in heavy defrosting.The doors are not closed properly, resulting in frosting due to entry of air and increased water due to defrosting. | |
| The housing is hot. • Heat dissipation of the | built-in condenser viathe housing, which is normal when housingbecomes hot due to high ambient temperature,storing too much food or the compressor isshut down. This provides sound ventilation tofacilitate heat dissipation. |
| There is surface condensation. | • Condensation on the exterior surface and doorseals of the refrigerator is normal when theambient humidity is too high. Wipe the exteriorsurface and door seals with a clean towel. |
If this does not solve your specific problem, please contact your retail store service desk and do not attempt to make repairs yourself.
Your refrigerator should only be repaired by qualified maintenance technicians. Poorly done repairs can be dangerous for the user and are not covered by the warranty.
Noises in operation
The appliance may make the following noises when operating normally:
- Crackling: Noise produced during automatic defrosting. It may also be produced when the refrigerator is in the cooling or warming phase and is due to expansion of the appliance materials.
- Clicking: Noise produced when the thermostat switches the compressor on or off.
- Compressor noise, humming: Normal motor noise. This noise indicates that the compressor is working normally. When the compressor cuts in, the noise can rise slightly for a brief moment.
- Bubbling or gurgling: Noise produced when the refrigerant fluid flows through the coils inside the system.
- Running water: Normal noise produced when the water flows out of the evaporation container during defrosting. This noise may also be audible inside the appliance during defrosting.
If you are going to be away or the appliance is not going to be used for a long period
- Unplug, empty and clean the appliance.
- Keep the door ajar when the appliance is unplugged and unused.
Interior light
Your appliance has LED lighting. This type of lighting is designed to last much longer than conventional light bulbs. Contact your retail store service desk if your refrigerator lighting develops a fault.
This product contains a light source of energy efficiency class ‘G’. The light bulb in this product is replaceable only by qualified engineers.
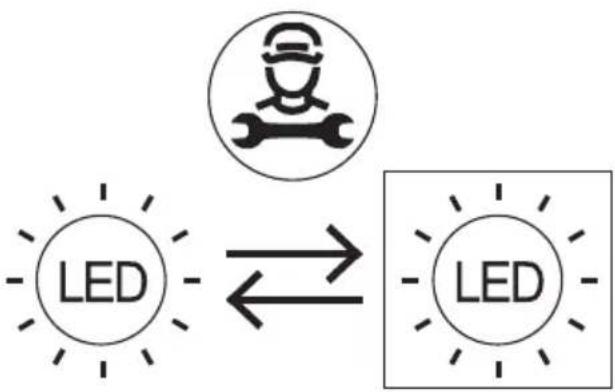
flowchart
graph LR
    A["LED"] <--> B["LED"]
    style A fill:#fff,stroke:#000
    style B fill:#fff,stroke:#000
INFORMATION
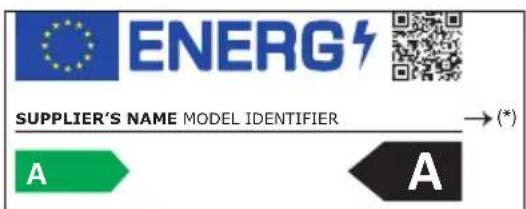
You can find information about the models, as registered in the product database, on the following website by searching for your model ID (*), shown on the rating plate: https://eprel.ec.europa.eu/
The availability period for spare parts for your device is 10 years.
Link to the manufacturer's website where the information referred to in point 4 a) of the appendix to the Commission Regulation (EU) 2019/2019 can be found: https://www.boulanger.com/info/assistance/
natural_image
Simple line drawing of an electrical outlet with a plug and socket, no text or symbols present.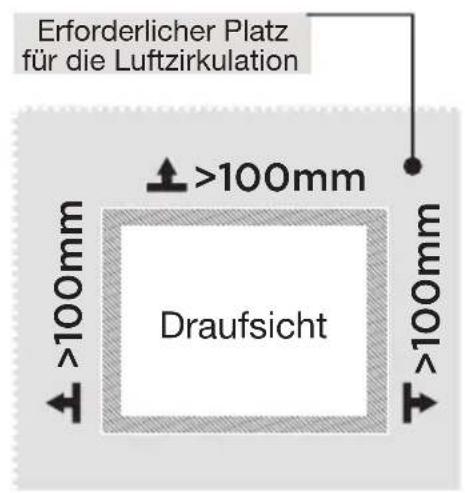
natural_image
Technical line drawing of a double door with labeled dimensions A and B (no text or symbols beyond labels)

natural_image
Illustration of a hand holding a flat surface with arrows indicating upward motion, no text or symbols present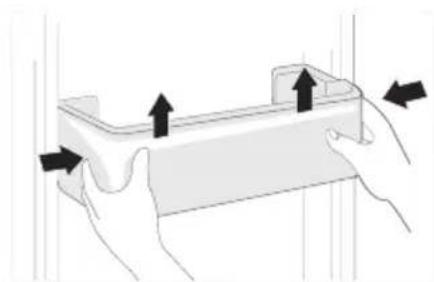
natural_image
Illustration of two hands holding a rectangular object with arrows indicating upward movement (no text or symbols)Gemüsefach
natural_image
Diagram of a mechanical component with an arrow indicating direction (no text or symbols)natural_image
Illustration of two hands holding a rectangular object with upward arrows indicating motion or force (no text or symbols)natural_image
Illustration of a hand pressing down on a flat surface with arrows indicating upward movement (no text or symbols)natural_image
Diagram of a door handle with an arrow indicating clockwise motion (no text or symbols)Fehlersuche
Fehlercodes
natural_image
Simple line drawing of an electrical outlet with a plug and socket, no text or symbols present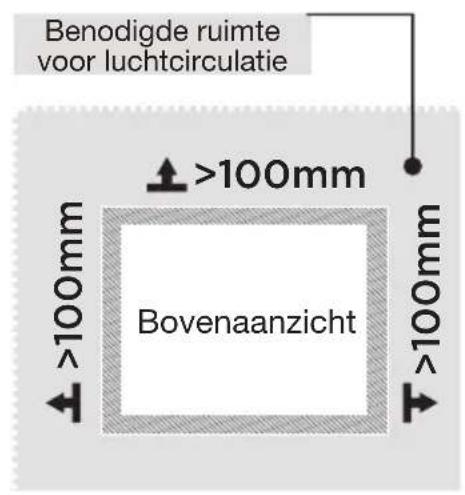
natural_image
Technical line drawing of a double door with labeled dimensions A and B (no text or symbols beyond labels)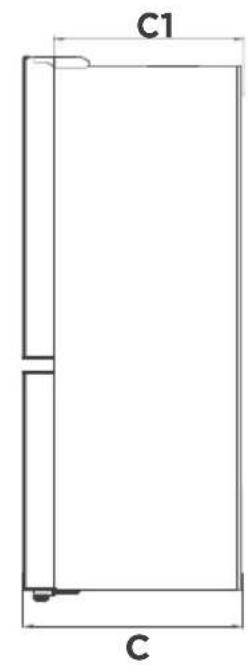
natural_image
Illustration of a hand pressing down on a flat surface with upward arrows indicating movement or force (no text or symbols)Deurvakken
natural_image
Illustration of two hands holding a rectangular object with arrows indicating upward movement (no text or symbols)Groentelade
natural_image
Diagram of a mechanical component with an arrow indicating direction (no text or symbols)natural_image
Illustration of two hands holding a rectangular object with upward arrows indicating motion or force (no text or symbols)De glazen legplanken reinigen
natural_image
Illustration of a hand holding a flat surface with upward arrows indicating movement or force, and an inset showing a hand holding a wall-mounted device (no text or symbols present)De laden reinigen
natural_image
Diagram of a door handle with an arrow indicating clockwise motion (no text or symbols)https://eprel.ec.europa.eu/
All information, designs, drawings and pictures in this document are the property of SOURCING & CREATION. SOURCING & CREATION reserves all rights to its brands, designs and information. Any copy and reproduction through any means shall be deemed and considered as counterfeiting.
Protection of the environment
This symbol attached to the product means that it is an appliance whose disposal is subject to the directive on waste from electrical and electronic equipment (WEEE). This appliance may not in any way be treated as household waste and must be subject to a specific type of removal for this type of waste. Recycling and recovery systems are available in your area (waste removal) and by distributors.
By taking your appliance at its end of life to a recycling facility, you will contribute to environmental conservation and prevent any harm to your health.

Umweltschutz
\* Tested in our laboratories
Warranty valid from the date of purchase (receipt as proof of purchase). This warranty does not cover defects or damage caused by improper set up, incorrect use, or normal wear and tear of this product.
\* In unseren Labors getestet
Ref. ERMVE180-85miv1
SERVICE RELATION CLIENTS / Customer Relations Department / Kundenservice / Klantenafdeling
Avenue de la Motte CS 80137 59811 Lesquin cedex
FABRIQUÉ EN R.P.C. / Made in China / Hergestellt in VR China / Gefabriceerd in VRC.
SOURCING & CREATION Avenue de la Motte 59810 Lesquin - FRANCE contact@sc-ub.com