USER MANUAL Power+ RM1500E EGO
natural_image
Line drawing of a grasshopper robotic vacuum cleaner (no text or symbols)
RMR1500E/RMR3000E/RMR6000E
ROBOTIC MOWER
EN Robotic mower 12
DE Mähroboter 31
FR Robot tondeuse 52
natural_image
Simple line drawing of a rectangular tray with horizontal dotted lines and small car icons at the bottom (no text or symbols)
flowchart
graph TD
    A["User"] -->|Correction data LoRa| B["EGO"]
    B --> C["Satellite"]
    C --> D["Connect"]
    D -->|Wireless Signal| B
    B -->|Wireless Signal| E["Powertrain"]

H1
H2


natural_image
Simple line drawing of a tree with a cross symbol and a small object below (no text or labels)

natural_image
Simple line drawing of a tree with a cloud and a small tree on the ground (no text or symbols)
H3
natural_image
Diagram of a computer monitor with an open lid and directional arrow indicating motion (no text or symbols)
natural_image
Technical line drawing of a mechanical device with a labeled component and directional arrow (no text or symbols)
natural_image
Diagram showing a computer monitor with a device emitting particles, no text or symbols present
J

1
natural_image
Line drawing of a robotic car with visible wheels and mounting bracket (no text or symbols)
2
2
Follow App
natural_image
Diagram showing a black circle above a water surface with two vertical posts and a downward arrow indicating flow or movement (no text or symbols)
natural_image
Diagram showing a robotic car approaching a water surface with a black circle and cross symbol (no text or labels)
natural_image
Diagram showing a person standing on a rectangular platform with three circular motion paths and a small car, no text or symbols present.
natural_image
Technical line drawings of a robotic arm and a person holding a digital camera (no text or symbols)
EGO Europe GmbH
The Anchorage, 34 Bridge Street Reading, RG1 2LU, United Kingdom
EN
NOTE: The following format is used in the Operator's manual to make it easier to use:
■ Text written in italics is a text that is in the EGO Connect™ app or is a reference to another section in the Operator's manual.
■ Text written in bold is one of the buttons on the product.
OVERVIEW
Introduction
Product description (Fig. A)
The robotic mower is powered by a rechargeable lithium-ion battery pack. Using the EGO Connect™ app on your smartphone, you can define the boundaries of a mowing zone. The mower will then automatically cut the grass within the boundaries. The mowing routes are calculated by the algorithm according to the shape of the work area to achieve the highest mowing efficiency. If the battery runs low before finishing a mowing task, it will automatically go back to its charging station to recharge.
The frequent cutting technique improves the grass quality and decreases the use of fertilizers. Collection of grass is not necessary.
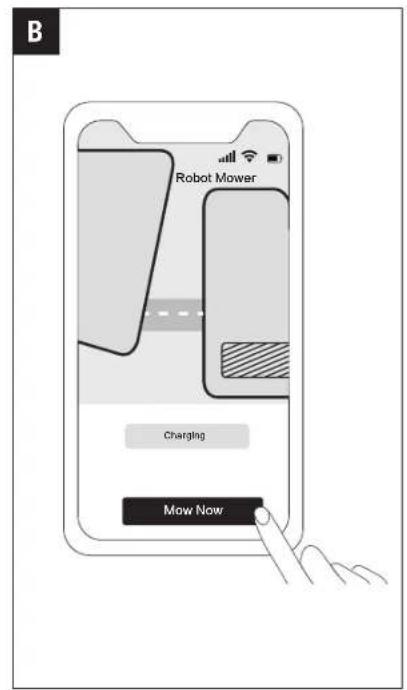
EGO Connect™ App (Fig. B)
The EGO Connect™ app is an important part of the system. You can follow the interactive guidance shown in the app to complete the system installation and set up the mowing zone. You can also use the app to adjust the settings of the mower, customize the mowing zone, view the work status of the mower, control the mower remotely, etc.
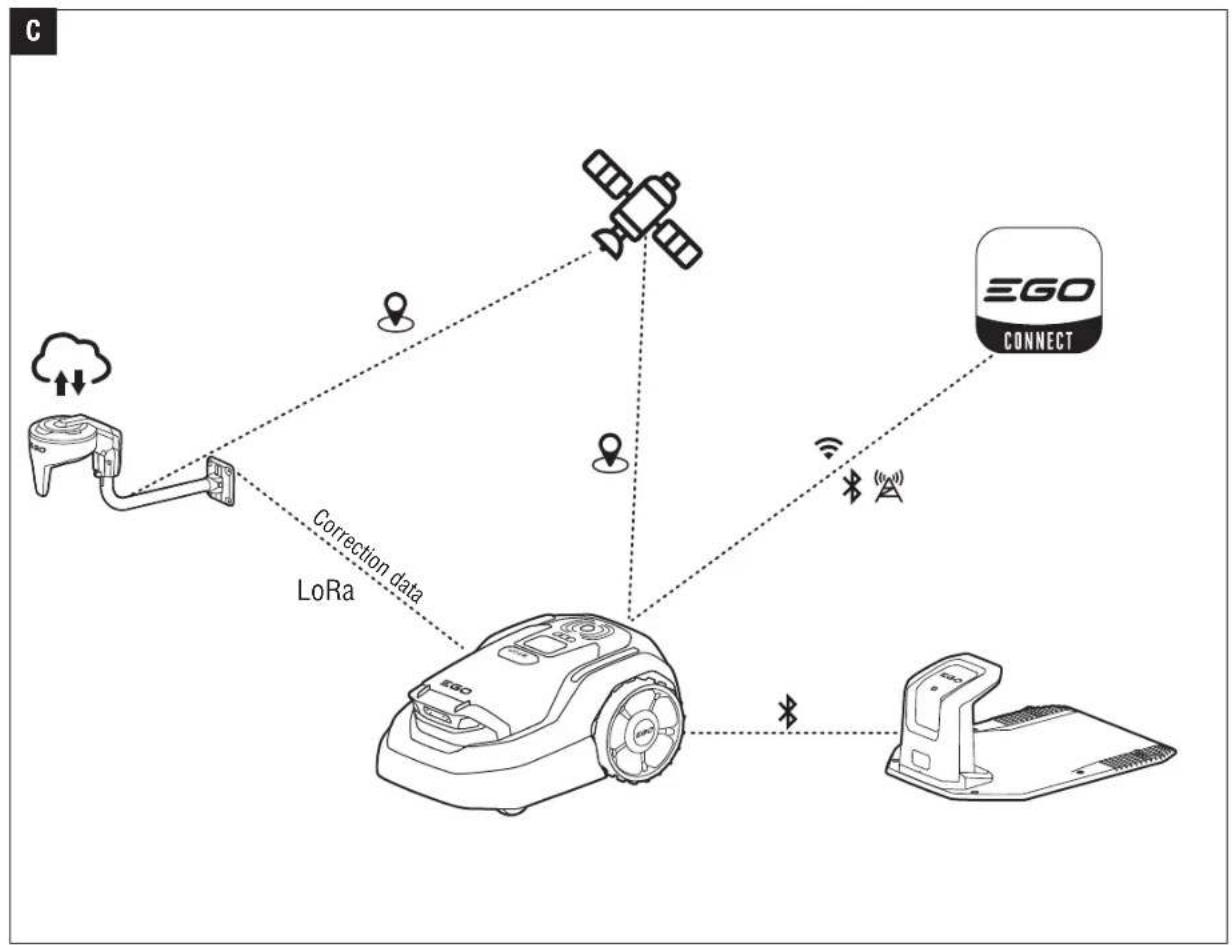
How PATH IQ™ Works (Fig. C)
EGO AURA-R2 robotic mower achieves unparalleled navigation accuracy through an advanced fusion of RTK (Real-Time Kinematic), VIO (Visual-Inertial Odometry), and vSLAM (Visual Simultaneous Localization and Mapping) technologies, also known as PATH IQ ^M .
RTK positioning delivers centimeter-level accuracy by combining satellite signals with a fixed reference data from either RTK antenna or network RTK, ensuring the robot pinpoints its exact location even across expansive lawns. VIO technology enhances reliability in GPS-challenged areas—such as under tree canopies or near structures—by integrating camera data and inertial sensors to track movement direction and speed in real time. Meanwhile, vSLAM empowers the robot to dynamically map its surroundings using onboard cameras, enabling it to recognize obstacles, adapt to terrain changes, and optimize mowing routes autonomously.
With intelligent PATH-IQ™ system, AURA-R2 eliminates dependency on physical boundaries while maintaining seamless operation in complex environments. Whether navigating slopes, avoiding garden features, or recovering from disruptions, this triple-layered localization ensures the robot stays on course, delivering consistent performance with surgical precision.
Safety Instructions
READ CAREFULLY BEFORE USE.
KEEP FOR FUTURE REFERENCE.
This product is not intended for use by children or persons with reduced physical, sensory or mental capabilities, or lack of experience and knowledge, unless they have been given supervision or instruction concerning use of the appliance by a person responsible for their safety. Children should not play with the appliance. Cleaning and user maintenance shall not be done by children without supervision.
■ The product must only be used with the equipment recommended by manufacturer. All other types of use are incorrect.
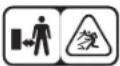
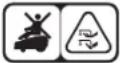
■ Do not use the product when people, especially children, or animals are in the work area.
■ Warning signs must be put around the work area of the product if it operates in public areas. The signs must have the text that follows: Warning! Automatic lawn mower! Keep away from the machine! Supervise children!
■ To prevent damage to the product and accidents to vehicles and people, do not map out work areas and paths across public pathways.
- Keep a safe distance from the product when operating.
■ Do not ride on the product.
■ Do not touch moving hazardous parts, such as the blade disc, before it has come to a complete stop.
■ Always stop and switch off the product, remove the plug from the power outlet:
- before clearing a blockage on the machine;
- before checking, cleaning or working on the machine or charging station;
- after striking a foreign object to inspect the machine for damage;
- if the machine starts to vibrate abnormally, and to check for damage before restarting;
■ If an injury or accident occur, seek medical assistance.
- Do not put power supply cable and low-voltage cable in the work area, which can cause damage to the cables.
-
Do not connect a damaged cable or plug, or touch a damaged cable, before it is disconnected from the power outlet. Disconnect the plug from the power outlet if the cable becomes damaged while in operation. A worn or damaged cable increases the risk of electrical shock. A damaged cable must be replaced by service personnel.
■ Never operate the product with a defective cover on charging station.
■ When you connect the power supply to the power outlet, use a residual-current device (RCD) with a tripping current of maximum 30 mA.
■ Only charge the product in the included charging station. Incorrect use may result in electric shock, overheating or leaking of corrosive liquid from the battery. In the event of leakage of electrolyte, flush with water/neutralizing agent. Get medical aid if corrosive liquid comes in your eyes.
■ Use only original EGO batteries. Product safety cannot be guaranteed with other than original batteries. Do not use non-rechargeable batteries.
-
If there is a risk of thunderstorm, we recommend that the power supply to the charging station and RTK station are disconnected. Connect the power cable again if there is no longer a risk of thunderstorm.
■ The owner is responsible for accidents or dangers that occur to other people or property.
■ The product must only be operated, maintained and repaired by people that are fully conversant with its special characteristics and safety regulations.
■ It is not permitted to change the initial design of the product.
■ Obey national regulations about electrical safety.
- Do not install the charging station, including any accessory, at a location that is below, or within 60 cm from any combustible material. In case of malfunction, heating of the charging station and the power supply may occur and create a potential risk of fire.
- Do not put the power supply at a height where there is a risk it can be submerged in water. Do not put the power supply on the ground. Do not encapsulate the power supply. Condensed water can harm the power supply and increase the risk of electrical shock.
- Keep your hands and feet away from the rotating blades. Do not put your hands or feet near or below the product when it is operating.
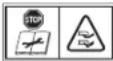
■ STOP the product when people, especially children or animals are in the work area.
■ We recommend to set the schedule to operate when the work area has no activity. The product can cause injury to animals at night in work area.
■ Make sure that there are no objects such as stones, branches, tools or toys on the lawn. The blades can be damaged if it hits an object.
- Do not run when you operate the product manually with the App. Always walk, be sure of footing on slopes and make sure to have balance at all times. Always wear substantial footwear and long trousers when you operate the product with the App.
■ Do not lift the product or move it when it is operating.
- Do not let the product collide with people or animals. If a person or animal comes in the way of the product, stop the product immediately.
■ Do not put objects on top of the product or the charging station.
■ Do not use the product if the STOP button does not work.
■ Do not use solvents to clean the product.
■ Disconnect the plug from the charging station before you clean or do maintenance of the charging station.
- Lithium-ion batteries can explode or cause fire if disassembled, short-circuited, exposed to water, fire, or high temperatures. Handle carefully, do not dismantle, open the battery or use any type of electrical/mechanical abuse. Avoid storage in direct sunlight.
■ Even if you use this robotic mower in accordance with instructions, certain residual risks cannot be ruled out.
■ For the purposes of recharging the battery, only use the detachable supply unit provided with this appliance.
SAFETY SYMBOLS
EN
 | Safety Alert |
 | WARNING – Read user instructions before operating the machine. |
 | WARNING – Operate the disabling device before working on or lifting the machine. |
 | Do not touch rotating blade. |
 | WARNING – Keep a safe distance from the machine when operating. |
 | WARNING – Do not ride on the machine. |
 | This product is in accordance with applicable EC directives |
 | This product is in accordance with applicable UK legislation. |
 | Waste electrical products should not be disposed of with household waste. Take to an authorized recycler. |
| [44V8] | Bluetooth ^ |
 | Direct current (DC) |
| [2ATA] | Alternating current |
| [6×3] | Class II Construction |
 | Designed to be supplied from a separated extra-low voltage (SELV) power source |
 | Cutting width |
 | SMPS (Switch mode power supply unit) |
 | SMPS incorporating a short-circuit-proof safety isolating transformer (inherently or non-inherently) |
| [S3D] | Use this device indoors only |
| [Y42Y] | Alternating current |
| Min Minutes | |
| IP66 | Protected from total dust ingress and from high-pressure water jets from any direction |
| V Voltage | |
EN
| W Watt | |
| Ah Ampere-hours |
| kg Kilogram | |
| m Meter | |
| cm Centimeter |
| mm Millimeter |
| °C Celsius | |
NOTE: The Bluetooth® word mark and logos are registered trademarks owned by Bluetooth SIG, inc. and any use of such marks by EGO is under license.
SPECIFICATIONS
| RMR1500E | RMR3000E | RMR6000E |
| Power supply model number | CHR0750E | CHR0750E | CHR1500E |
| Power supply input 100-240V~ 50-60Hz 2A max |
| Power supply output | 2.4A 28V d.c.67.2W | 2.4A 28V d.c.67.2W | 4.8A 28V d.c.134.4W |
| Low-voltage cable length | 10 m |
| Battery | Lithium-Ion21.78 V /4.6 Ah | Lithium-Ion21.78 V /4.6 Ah | Lithium-Ion21.78 V /9.5 Ah |
| Mean energy consumption | 16.7 kwh/month@1500 m^2 | 17.2 kwh/month@3000 m^2 | 19.5 kwh/month@6000 m^2 |
| Power consumption during cutting | 40W ± 20% |
| Working capacity 1500 m^2 3000 m^2 6000 m^2 | |
| Average mowing time 110 min 110 min | 220 min | |
| Average charging time 90 min | 90 min | 90 min |
| Area capacity per hour | 180 m^2 | 180 m^2 | 180 m^2 |
| Cutting width | 24 cm |
| Cutting system 3 pivoted cutting blades |
| Blade and screw kit model number | AB1009R |
| Maximum blade speed | 2400 /min |
| GNSS working mode | Wifi, BLE, LTE |
| Cutting height adjustment range | 20 – 90 mm |
| Cutting height adjustment increment | 5 mm/15 positions |
| Max. Incline inside mowing zone | 50% (26.6°) |
| Max. incline at boundary | 15% (8.5°) |
| Minimum transport path width | 1 m |
| Sound power level | L_WA : 58 dB(A), K: 2.54 dB(A) |
| Sound pressure level | L_PA : 50 dB(A), K: 2.54 dB(A) |
| IP-classifi-cation | Robotic mower | IP66 |
| Charging station | IP66 |
| Power supply | IP66 |
| Recommended operating temperature | 0°C - 40°C |
| Recommended charging temperature | 5°C - 40°C |
| Recommended storage temperature | -40°C - 70°C |
| Mower weight (w/o charging station) | 15 kg | 15 kg | 15.5 kg |
| Bluetooth® | Frequency Band(s) | 2.402-2.480 GHz |
| Max. RF Power | 10 dBm |
| 2.4G WLAN | Frequency Band(s) | 2400-2484 MHz |
| Max. RF Power | 18 dBm |
| GSM900 | Frequency Band(s) | 824~849 MHz / 869~894 MHz |
| Max. RF Power | 33 dBm |
| DCS1800 | Frequency Band(s) | 710~1785 MHz / 1805~1880 MHz |
| Max. RF Power | 30 dBm |
| UMTS Band 1 | Frequency Band(s) | 880~915 MHz / 925~960 MHz |
| Max. RF Power | 23 dBm |
| UMTS Band 8 | Frequency Band(s) | 1710~1785 MHz / 1805~1880 MHz |
| Max. RF Power | 23 dBm |
| LTE Band 1 | Frequency Band(s) | 1920~1980 MHz / 2110~2170 MHz |
| Max. RF Power | 23 dBm |
| LTE Band 3 | Frequency Band(s) | 1710~1785 MHz / 1805~1880 MHz |
| Max. RF Power | 23 dBm |
| LTE Band 7 | Frequency Band(s) | 2500~2570 MHz / 2620~2690 MHz |
| Max. RF Power | 23 dBm |
| LTE Band 8 | Frequency Band(s) | 880~915 MHz / 925~960 MHz |
| Max. RF Power | 23 dBm |
| LTE Band 20 | Frequency Band(s) | 832~862 MHz / 791~821 MHz |
| Max. RF Power | 23 dBm |
| LTE Band 28A | Frequency Band(s) | 703~733 MHz / 758~788 MHz |
| Max. RF Power | 23 dBm |
| LTE Band 38 | Frequency Band(s) | 2570~2620 MHz / 2570~2620 MHz |
| Max. RF Power | 23 dBm |
| LTE Band 40 | Frequency Band(s) 23 | 00~2400 MHz / 2300~2400 MHz |
| Max. RF Power 23 dBm |
| LTE Band 41 | Frequency Band(s) 25 | 55~2655 MHz / 2555~2655 MHz |
| Max. RF Power 23 dBm |
| Lora | Frequency Band(s) | 863-870 MHz (Europe, Middle East, Africa) |
| Frequency Band(s) 91 | 7-920 MHz (Israel) |
| Max. RF Power 22 dBm (Conducted Rated) |
| GNSS Specification | GNSS Signal Designations | Frequency band(MHz) |
| GPS | L1 1559-1610 MHz | |
| L2 1215-1300 MHz | |
| L5 1164-1215 MHz | |
| Galileo | E1 1559-1610 MHz | |
| E5b 1164-1215 MHz | |
| E5a 1164-1215 MHz | |
| E6 1215-1300 MHz | |
| BDS | B1I 1559-1563 MHz | |
| B2I 1205-1209 MHz | |
| B3I 1258-1278 MHz | |
| B1C 1559-1591 MHz | |
| B2a 1166-1186 MHz | |
| GLONASS | G1 1559-1610 MHz | |
| G2 1215-1300 MHz | |
| SBAS L1 1559-1610 MHz | |
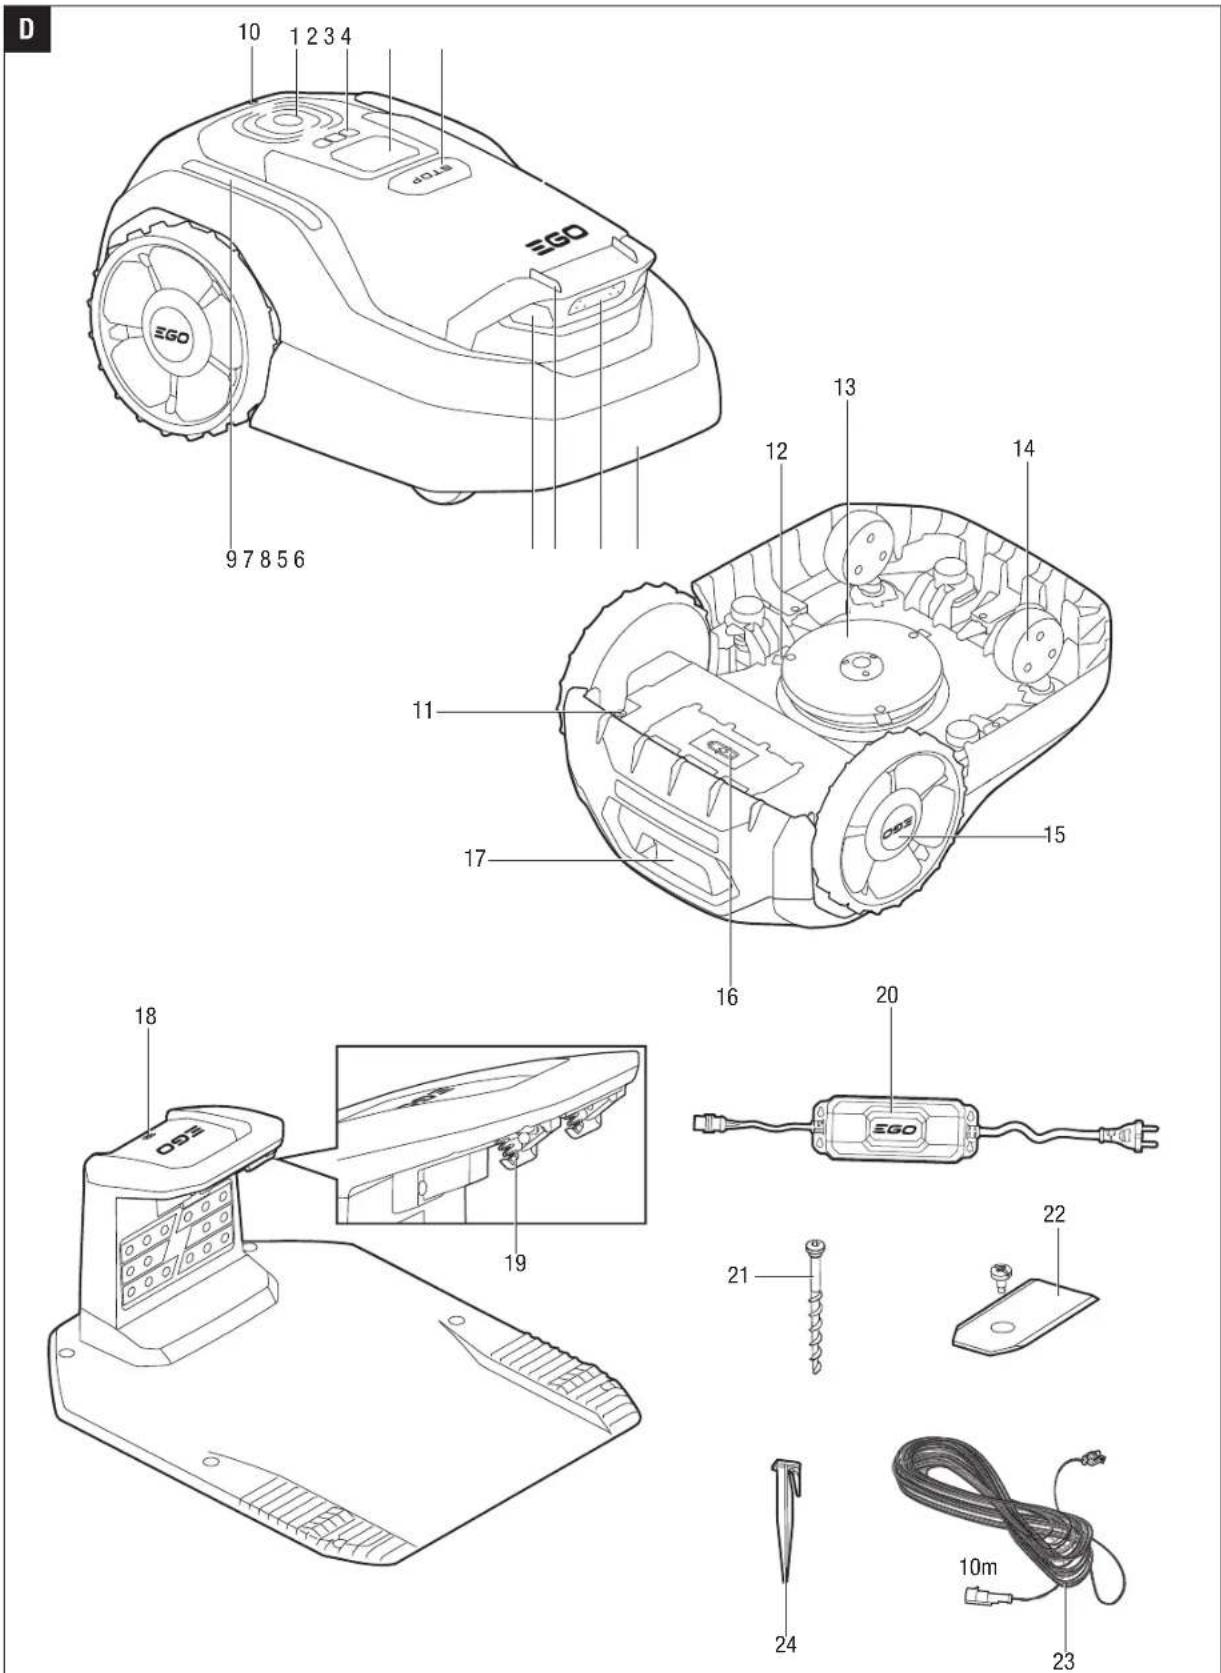
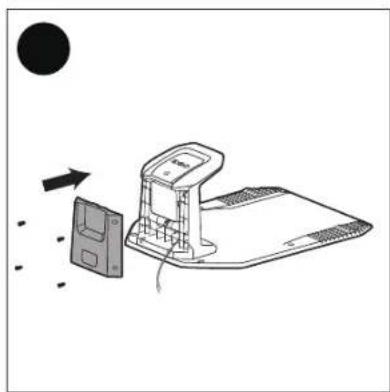
PACKAGE (FIG. D)
- Mower Antenna
- Control Panel
- Display Screen
- STOP Button
- Camera Array
- Bumper
- Headlight
- Charging Contact
- Mood Light
- Rain Sensor
- Diagnostic Port (After-sale service only)
- Blade
- Skid Plate
- Front Wheel
- Rear Wheel
- Battery-compartment Cover
- Carrying Handle
- Charging Status Indicator
- Charging Contact
- Power Supply
-
Screw to Attaching the Charging Station (6)
-
Blade and Screw (9)
- Low-voltage Cable
- Stake to Fix the Low-voltage Cable (10)
NOTE:
The mower appearance can be different for different model number.
The appearance of power supply can be different for different markets.
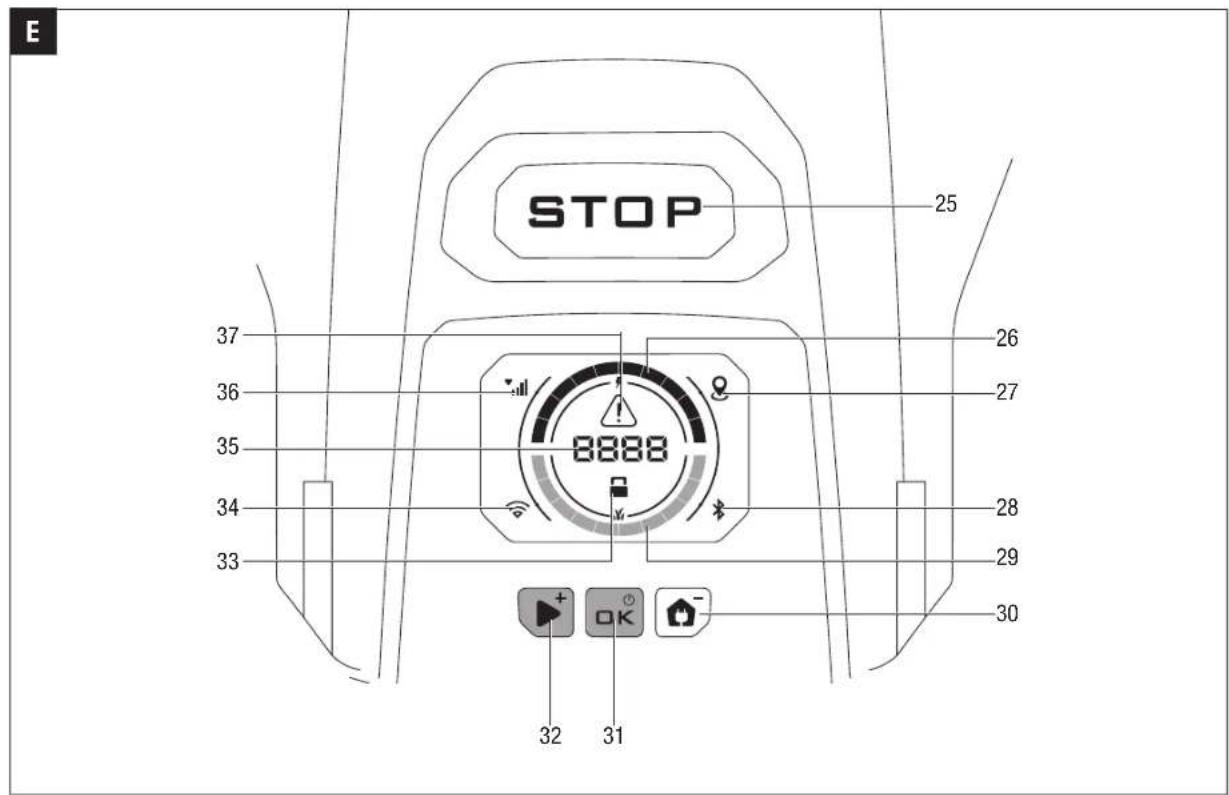
Display Screen and Control Panel (Fig. E)
- STOP Button
- Battery Charge Status
- Positioning Signal Icon
- Bluetooth ^® Icon
- Mowing Progress
- PARK Button
- OK Button
- START Button
- PIN Lock Icon
- Wifi Signal Icon
- PIN Code/Error Code/PARK
- LTE Signal Icon
- Error Icon
Accessories (sold separately)
| NAME MODEL NUMBER | |
| RTK antenna kit ARA2000 | |
| RTK antenna pole & fixing base kit A | PB2000 |
| PATH IQ Solar & Battery kit | SP1401 |
| 75W Power supply | CHR0750E |
| Low-voltage cable | ACE1000 |
| Blade and screw kit | AB1009R |
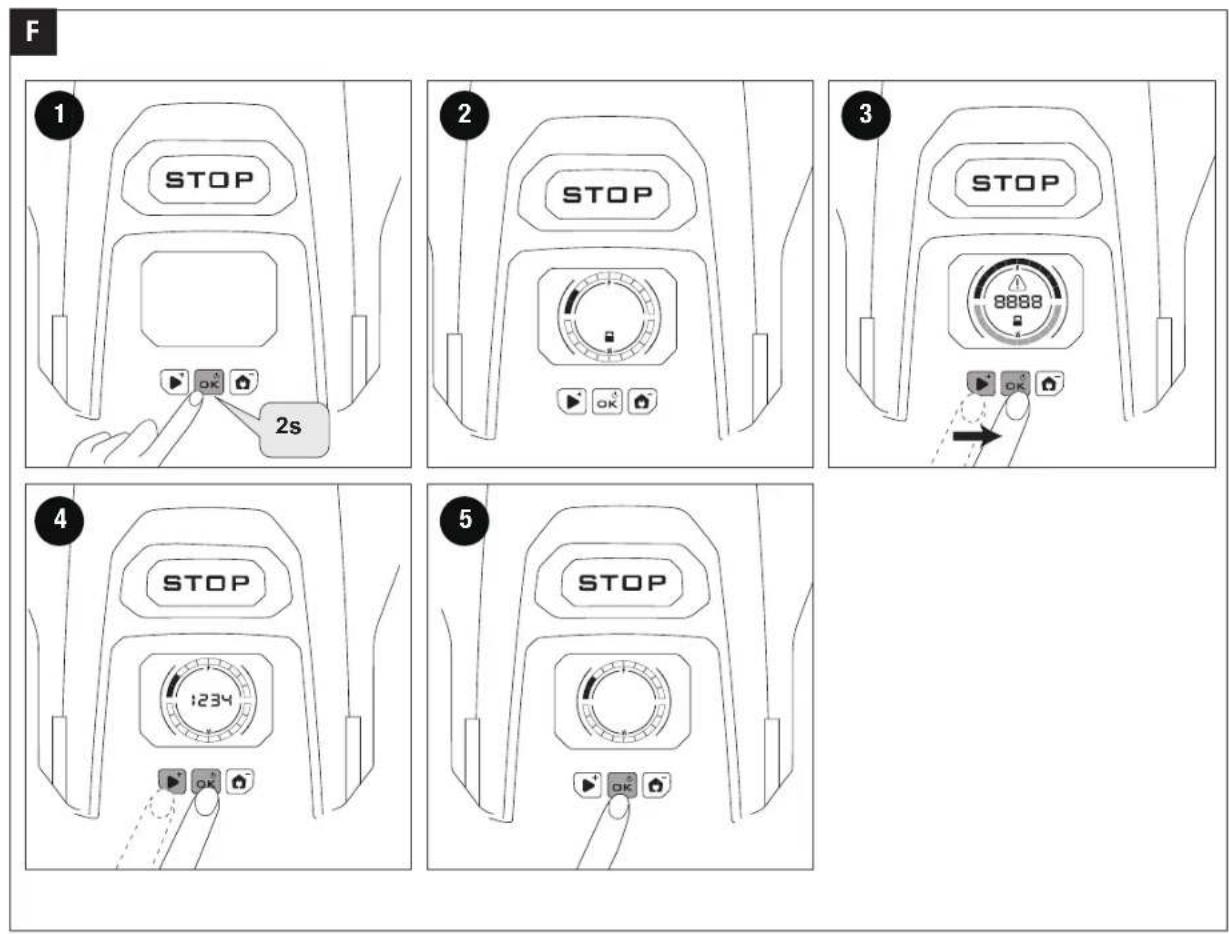
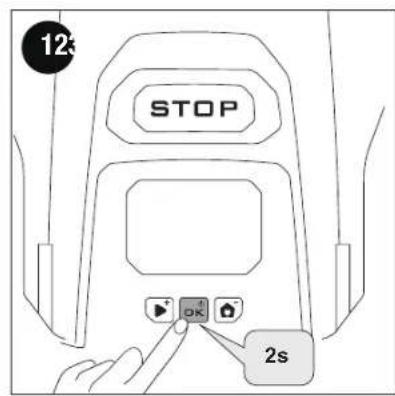
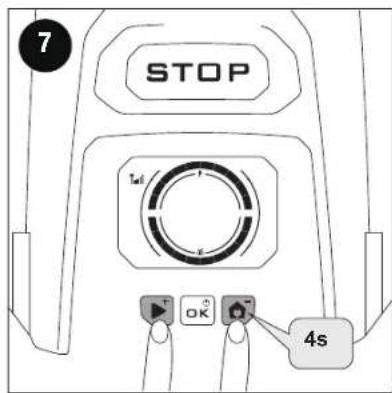
Power On/Off (Fig. F)
Press the OK button and hold for 2 seconds to switch on the mower.
Wait for loading sequence, the machine will announce when ready to start (unless voice turned off).
Enter the PIN code before operating the mower. Press the START or PARK button to change the number and press the OK button to confirm the code.
NOTE: The default PIN code is 0000.
The mower screen will switch off after 30 seconds of inactivity. Press any button on the mower to illuminate the screen.
Press the OK button and hold for 4 seconds and enter the PIN code to switch off the mower.
EN
EN INSTALLATION AND MAPPING
Before You Start
Prepare the app
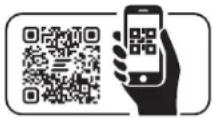
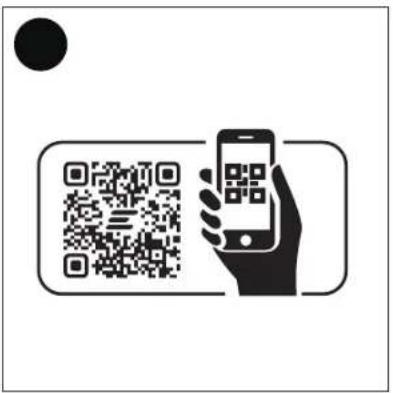
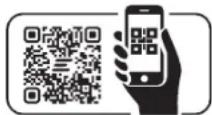
To ensure a successful setup, please scan the QR code to download the EGO Connect™ app. Alternatively, go to the Google Play Store (Android) or the Apple App Store (iOS) and search EGO Connect™ app. After installing the app, register and log in. For a more detailed explanation refer to the section "EGO Connect™ App".
NOTE: During use, the app will ask you for Bluetooth®, GPS positioning, and Wi-Fi networking permissions when necessary. To ensure normal use, it is recommended that you enable the above permissions.
Clear the lawn
Remove debris, piles of leaves, toys, wires, stones, and other obstacles. Make sure children and pets are off the lawn. Please cut your lawn to a maximum height of 10 cm. Fill in holes in the lawn to make it level.
CAUTION: Holes with water in the lawn can cause damage to the product.
Charge the mower for the first time
When the product is new or has been stored for a long period, the battery can be empty and needs to be charged before starting.
WARNING: Only charge the product using a charging station and a power supply which is intended for it. Incorrect use may result in electric shock, overheating or leakage of corrosive liquid from the battery. In the event of leakage of electrolyte flush with water and seek medical help if it comes in contact with the eyes etc.
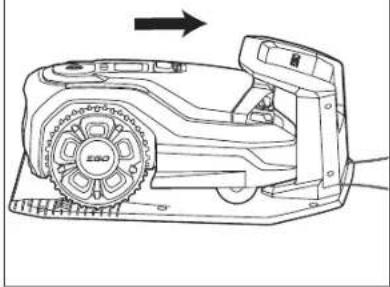
- Place the product in the charging station.
- Slide the product in as far as possible to ensure proper contact between the product and the charging station.
- The flashing GREEN indicator on the charging station indicates that charging is in progress.
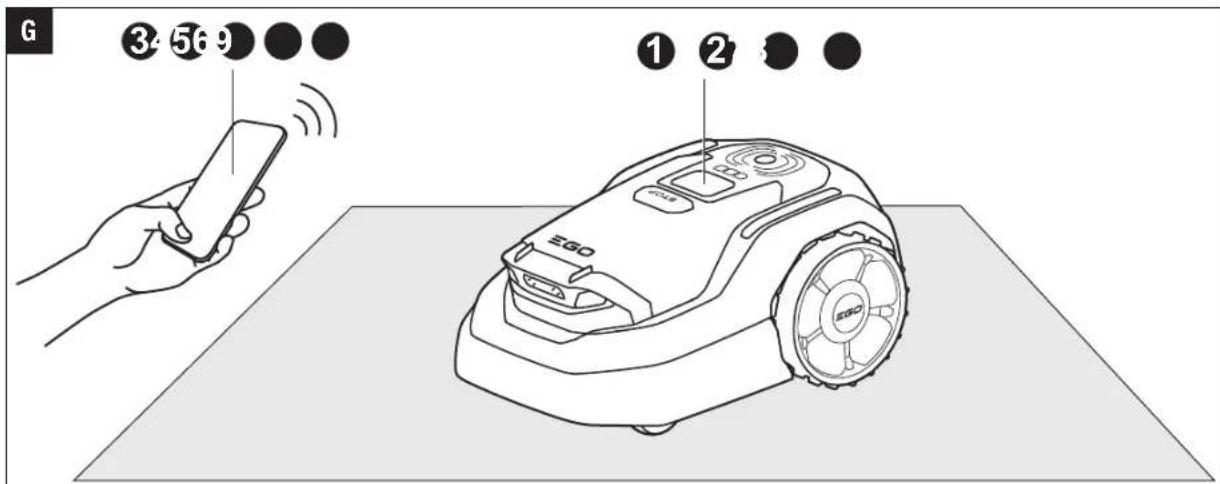
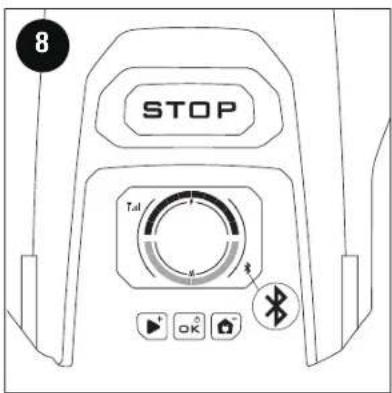
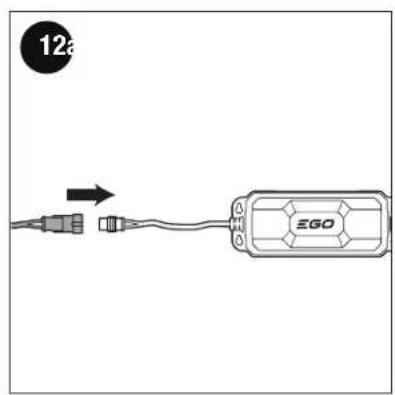
Pair EGO Connect™ with the Mower (Fig. G)
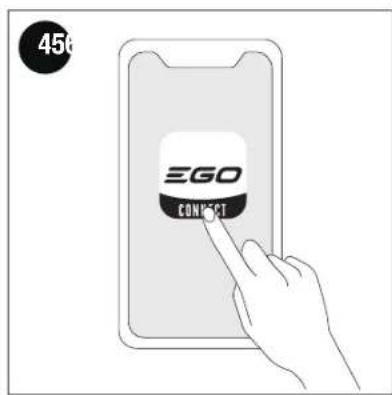
Press and hold the OK button for 2 seconds to switch on the mower. With EGO Connect™ App open and logged in follow on screen prompts to pair with your mower, if machine is not detected automatically, press +Add button on the app homescreen. Follow on screen prompts to pair your mower with a smartphone via Bluetooth®. You will need to press and hold the START and PARK buttons for 4 seconds when prompted to put mower into pairing mode. Your device must be connected to a 4G network or Wi-Fi network, and Bluetooth® permissions must be enabled for EGO connect. Follow the instructions via the app for other settings.
Activating Positioning Service Function
If you purchase the RTK antenna kit ARA2000, refer to the instructions in the operator's manual of ARA2000.
If you choose network RTK service, follow the guidance via app.
NOTE: All regions are not available through the network RTK. Please contact after-sales service.
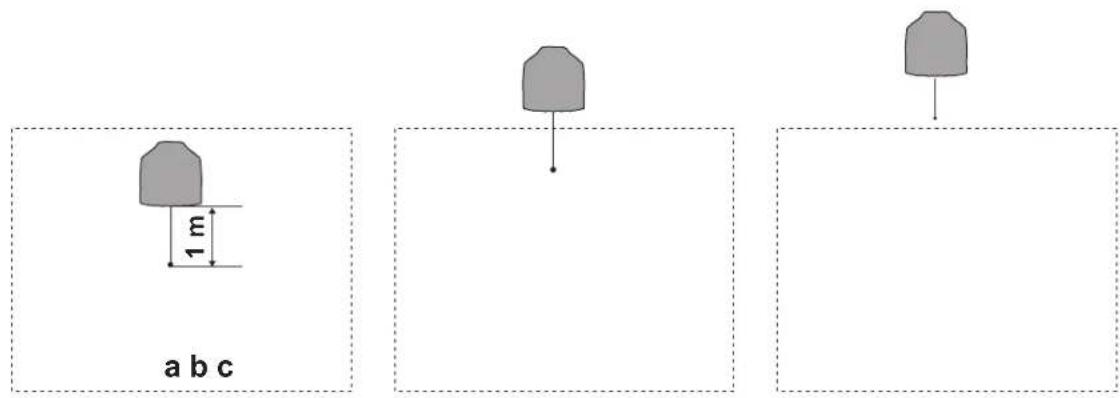
Examine Where to Put the Charging Station (Fig. H1, H2, H3)
You can put the charging station inside or outside the mowing zone. No transport path is necessary if the charging station docking point is in the mowing zone (a or b) (Fig. H1). The charging station docking point is where the product stops after reversing from the charging station, the reversing distance is 1 m by default, check your app map for the exact position of docking point after the first work area is created. If the docking point is not in the mowing zone, you must create a transport path (c) (Fig. H1).
The installation process on the app will help guide you in selecting appropriate location.
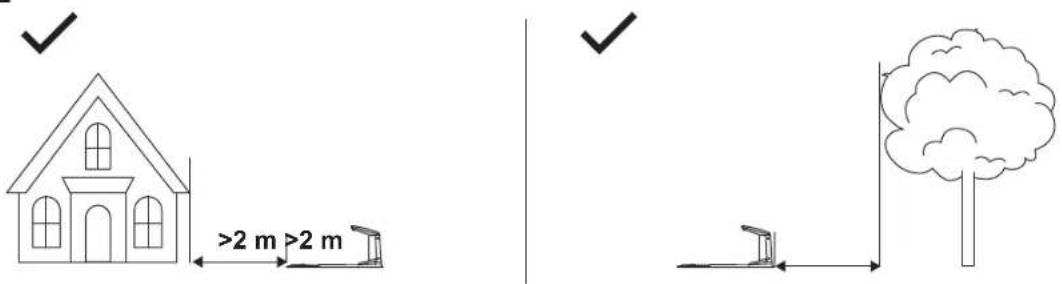
Where possible put the charging station where the docking point has an unimpeded sky view (Fig. H2).
■ Put the charging station near a power outlet.
■ Put the charging station on a level surface (Fig. H3).
■ The baseplate of the charging station must not be bent (Fig. H3).
■ Do not cover the charging station.
■ If the mowing zone has 2 parts separated with a steep slope, we recommend putting the charging station in the lower section.
NOTE: Do not fix the charging station in place until prompted by the app following site selection process.
⚠️ CAUTION: Do not install the charging station where there are metal objects in the ground. Metal objects can cause interference with the charging station signal.
⚠️ CAUTION: Do not put your feet on the baseplate of the charging station.
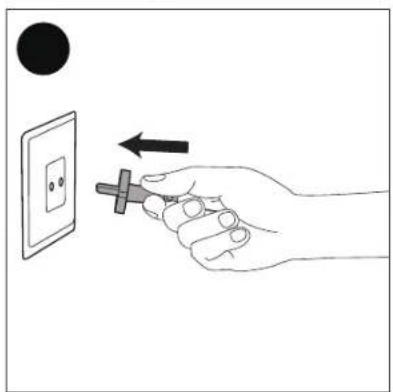
Examine Where to Put the Power Supply
⚠ WARNING: Do not cut or extend the low-voltage cable. There is a risk of electrical shock.
⚠ WARNING: The power supply cable and low-voltage cable must be outside the mowing zone to avoid damage to the cables.
⚠ WARNING: Make sure that the plugs of the low-voltage cable and the power supply are clean and dry before you connect them.
NOTICE: Maximum two low-voltage cables can be used, and using more cables will affect product charging efficiency.
⚠️ CAUTION: Make sure that the blades on the product do not cut the low-voltage cable.
⚠️ CAUTION: Do not coil up the low-voltage cable. The coil causes interference with the signal from the charging station.
- Put the power supply in an area with a roof and protection from the sun and rain.
■ Put the power supply in an area with good airflow.
■ Put the power supply at a minimum height of 30 cm from the ground.
■ Use a residual-current device (RCD) with a tripping current of maximum 30 mA when you connect the power supply to the power outlet.
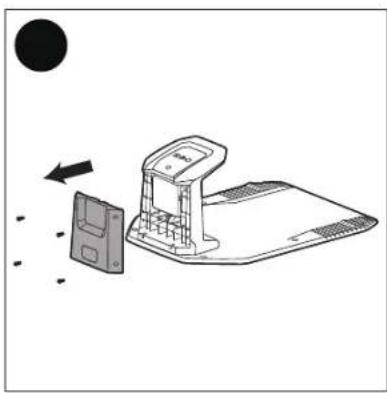
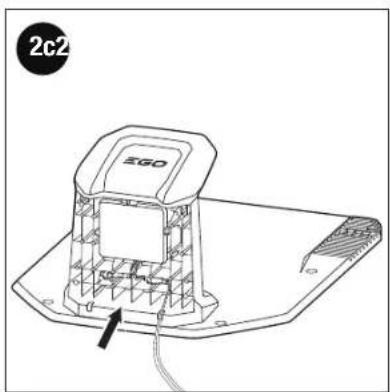
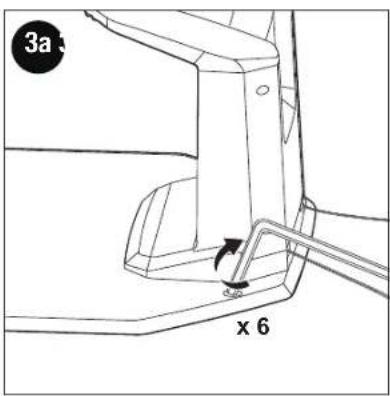
Assemble the Charging Station (Fig. I)
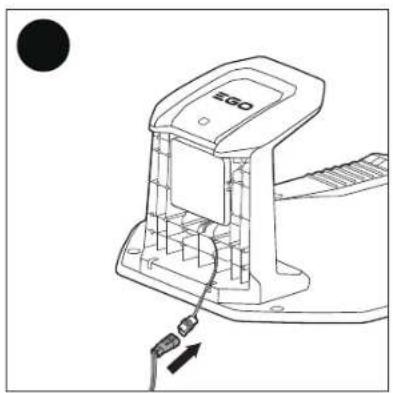
Check GNSS Signal and Secure Charging Station Location (Fig. J)
- Make sure the mower in the charging station, the charging status indicator will flash GREEN or glow solid GREEN.
- Follow the guidance in the app. Tap Start > Next
- If the auto-check is successful, you can go ahead and attach the charging station to the ground with the supplied 6 screws. If not, you need to relocate the charging station and try again. Follow the guidance in the app.
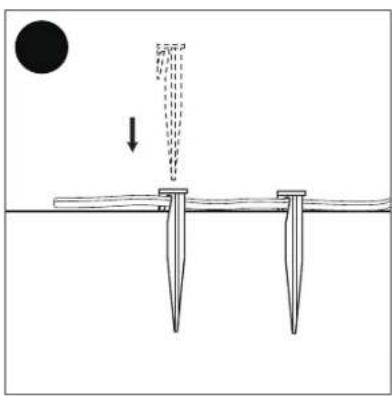
- Fix the low-voltage cable on the ground with stakes.
⚠ WARNING: Make sure the low-voltage cables are not placed on the lawn or anywhere the mower may pass over. Otherwise the cables may get damaged.
Update to the Latest Firmware
EGO AURA-R2 uses Over-The-Air (OTA) to update the firmware. To fully experience EGO AURA-R2, prior to use, please update to the latest firmware in the app.
Tap: (Device Details) > Firmware update
It is recommended to turn on the 'Allow auto updates' to ensure the robotic mower always up-to-date, to deliver the optimal performance.
The mower will complete the update when the following preconditions are met:
■ Make sure the mower is switched ON and has paired with the antenna if you purchase ARA2000.
■ The mower is in the charging station, make sure proper contacts between the mower and the charging station.
■ The battery level of the mower is above 30%.
■ The mower has stable network connection.
Follow the instructions in the app, and wait for 10-30 min to automatically complete the firmware update depending on the network conditions. During this process, please do not switch off or perform other operations. You can start using it after the app prompts that the update is successful.
Preparation Before Mapping
Follow the guidance in the app.
Map out the Mowing Zone
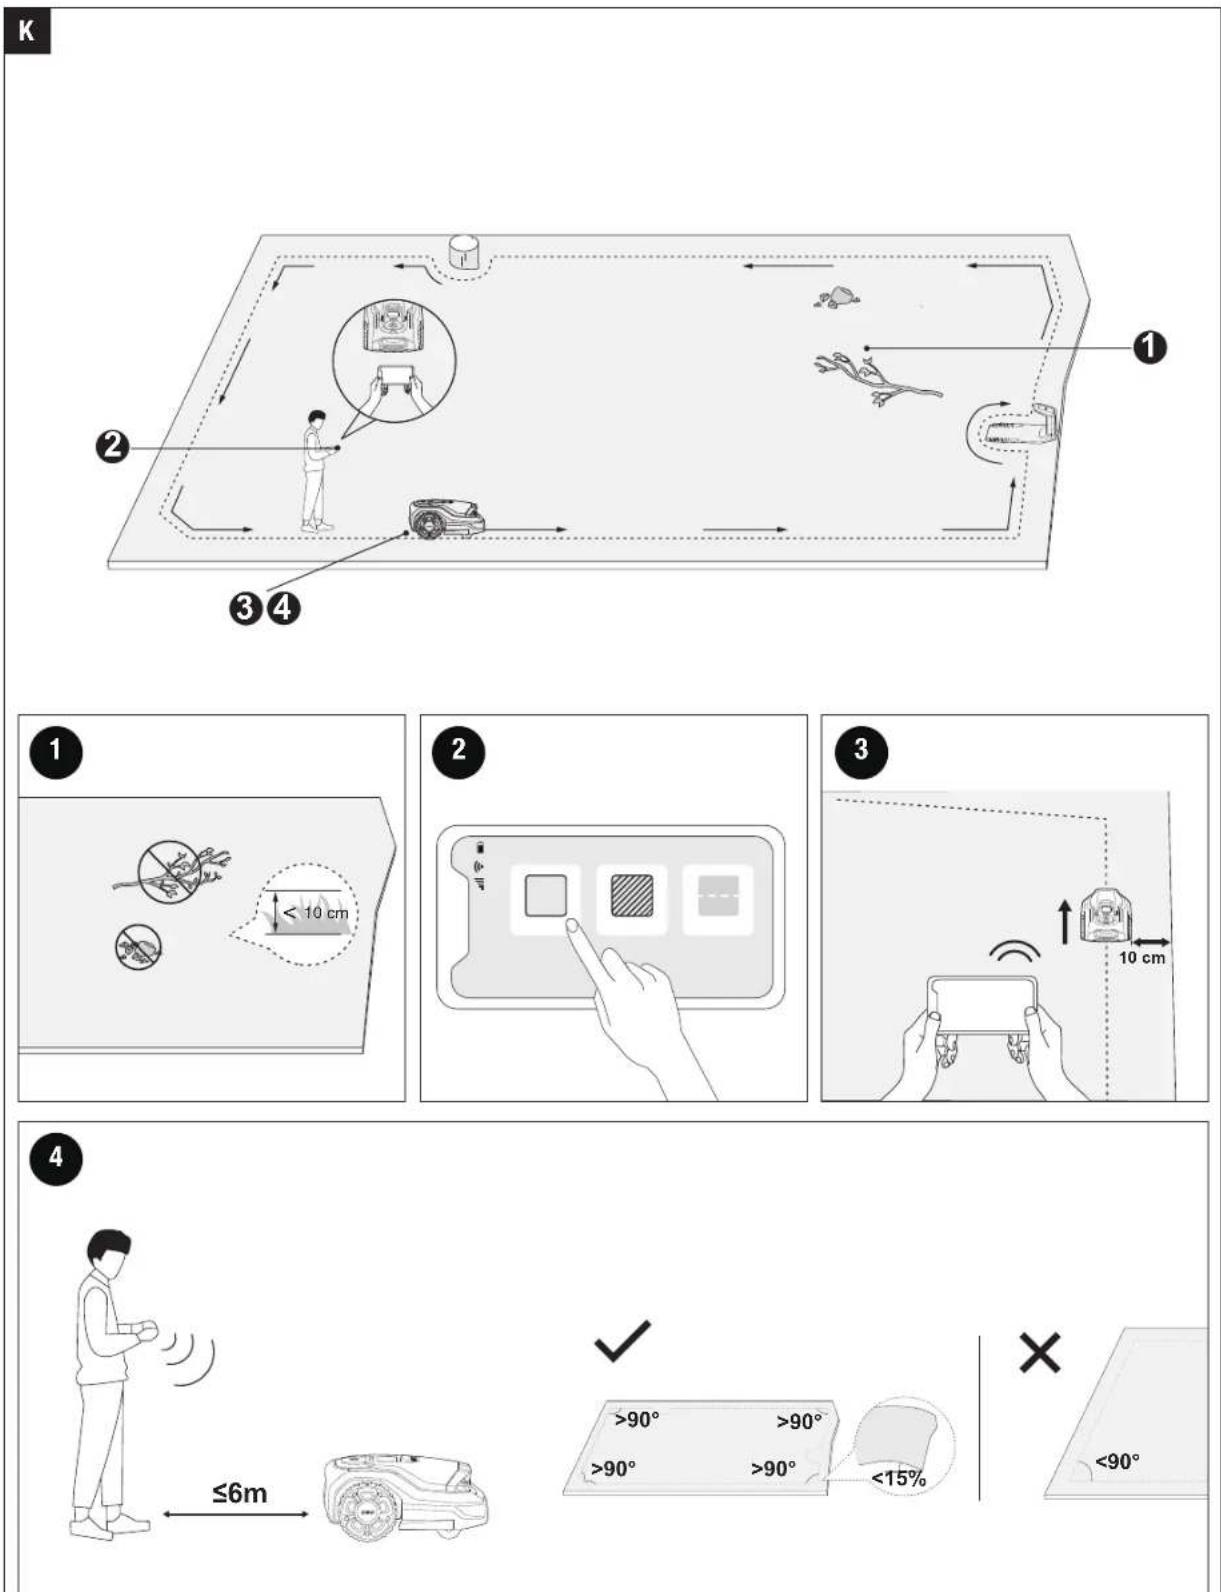
Map out the boundary (Fig. K)
A boundary is a virtual line created to define the mower's mowing zone.
If you have more than one lawn or a large lawn that needs to be divided into several parts, create multiple zones and connect them with transport paths.
For RMR1500E/RMR3000E, maximum 20 mowing zones can be created on a map.
For RMR6000E, maximum 40 mowing zones can be created on a map.
- Make sure the mower is switched ON. With Bluetooth ^® connection, your smartphone will connect to the mower automatically.
NOTE: If the mower status is locked, you must enter the PIN code before operating the mower.
- Tap Start mapping > Add elements > Boundary.
- App will calibrate the mower to ensure accurate positioning. Once complete follow instructions on the app screen to complete the following steps.
- Find a proper starting point along the edge of your lawn and use the app to drive mower to that location. Keep within 6 m of the mower during the mapping process.
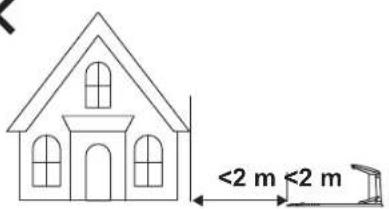
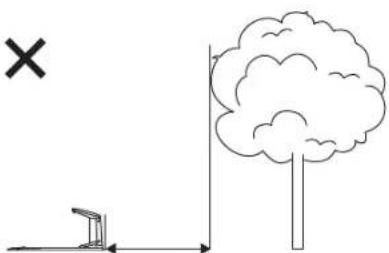
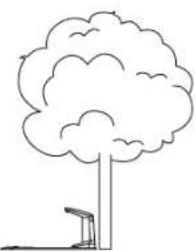
- Keep a minimum 10 cm from wall/fences and other obstacles (like trees).
- Drive the mower around the boundary using the app control along the edge.
- Follow the app prompts to save the work area, or create more map elements. Be sure to save when final map element is created.
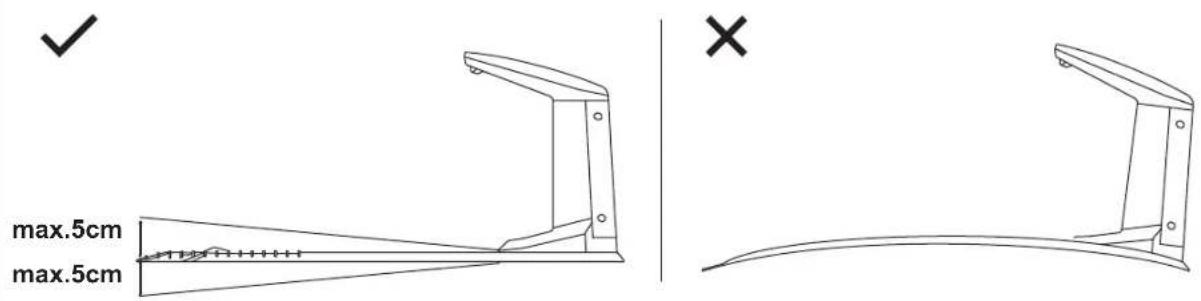
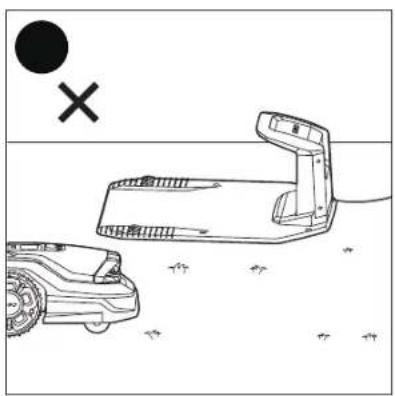
⚠️ CAUTION: Do not let the product operate on gravel.
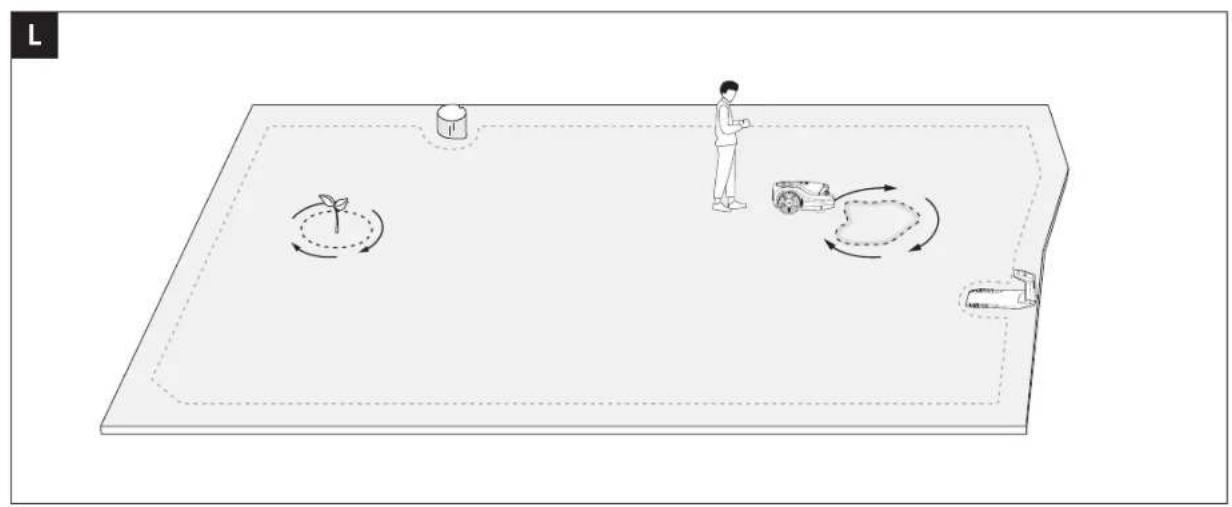
Create a No-go Zone (Fig. L)
The no-go zone is an area created within the boundary to restrict the mower's mowing zone.
To protect both your mower and objects on the lawn, you can set borders for objects or areas that you don't want the mower to enter. For example, a flowerbed, a ditch, a hole, lawn decorations, a pond, a pool, sprinkler heads, or emerged roots. If you have recently installed a trampoline or grill on the lawn, you can also set it as a no-go zone to protect it.
Follow the guidance in the app. When you need to cancel the area (like when you remove the trampoline from the lawn), just delete it via the app.
A no-go zone can also be used to define a rewilding zone. You can set up rewilding zones for places where the grass is left to grow naturally, creating a home for wildlife like bees, butterflies, and hedgehogs.
Tap 📋 > Start mapping > Add elements > No-go zone
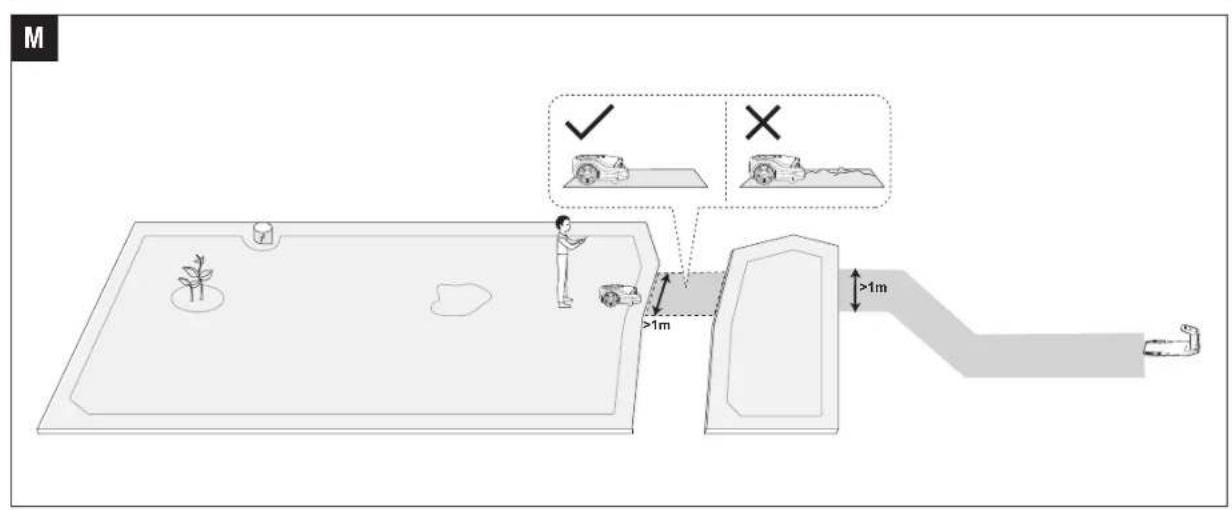
Create a Transport Path (Fig. M)
A transport path is the passage between two mowing zones, or between mowing zones and back to the charging station. The mower can operate automatically in this path, but does not cut grass.
Tap Start mapping > Add elements > Path
NOTE: Path creation must start within a mowing zone and end within a separate mowing zone or the docking point. Create boundaries for both zones before creating the transport path to link them.
NOTE: If the charging station docking point is not in the mowing zone, create a transport path between the mowing zone and the charging station, refer to the section "Examine where to put the charging station".
DAILY USE
Mow
How does EGO AURA-R2 mow (Fig. A)
Inside the mowing zone, the mower will mow the lawn along a planned
EN
path calculated by an algorithm for maximum efficiency. The mower can change its mowing direction according to your choices within the EGO Connect™ app. This avoids repetitive mowing tracks. To customize mowing directions for each mowing zone, see the section “Manage Multiple Zones”.
Manage multiple zones
You can create multiple zones for your map, each zone with its own unique name and a customized mowing direction, cut height and mowing schedule.
For manual mowing, you can select to mow all zones or only some of them. For scheduled mowing, you can set up schedules for all or selected zones.
A zone is automatically created after the boundaries of a mowing zone is mapped out. You can continue to create multiple zones and connect them with paths, for instructions, see the section above "Create a Transport Path".
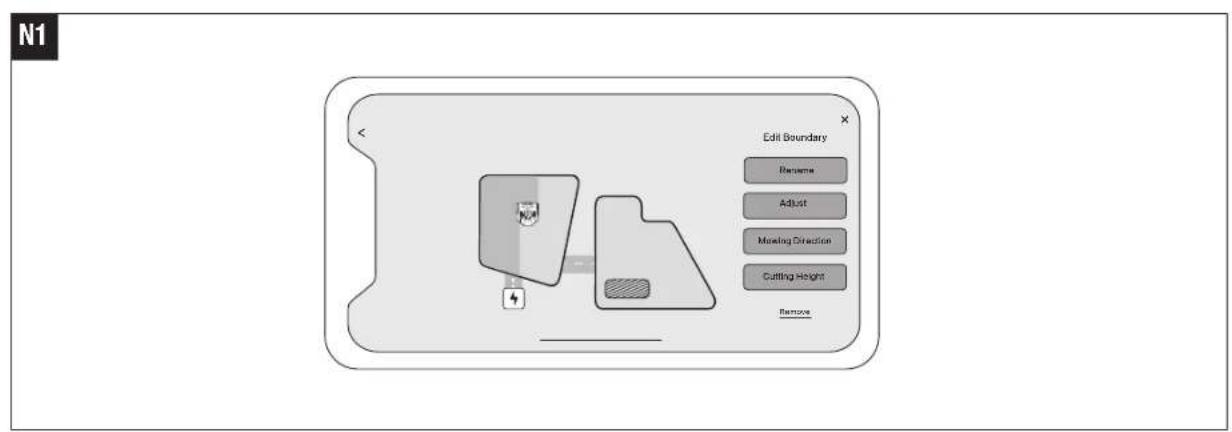
To rename the zones (Fig. N1)
- Tap: (Device Details) > map management
- Tap to select a zone
- Tap Edit > Rename to set a name for the zone
To customize mowing direction
The mower can automatically change its mowing direction according to your choices. You can choose one or more directions so that mower changes the mowing direction every time it finishes a round of mowing.
- Tap : (Device Details) > map management
- Tap to select a zone
- Tap Edit > Mowing direction
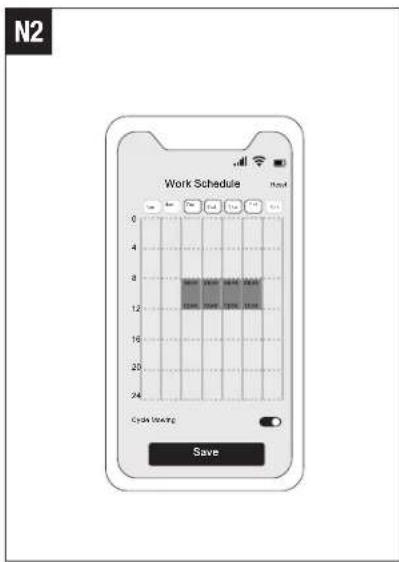
To create or modify work schedules (Fig. N2)
- Tap (Device Details) > work schedule
- Select a day to set up a schedule.
- Set the start time and end time of the schedule.
- Select which zone(s) to apply the schedule.
- Tap 'Save' to save the settings.
To enable or disable work schedules (Fig. N3)
You can disable the work schedules if you don't want the mower to follow the schedule.
Enable or disable mowing cycle (Fig. N3)
When disabled, if the mowing progress in the selected zones reaches 100%, the mower will stop mowing and return to the charging station even if the scheduled end time has not yet arrived. The mower will restart when the next week mowing period arrives.
When enabled, if the mowing progress in the selected zones reaches 100%, the mower will start a new round of mowing and keep mowing until the scheduled end time arrives.
EGO Connect™ App
Introduction
The app is an important part of robotic mower, you can use the app to:
- Bind and activate the mower.
- Create a map (mowing zone) with multiple mowing zones.
- Check the status and work progress of the mower, remotely control the mower to start, stop, or return to the charging station, etc.
- View and change mower work settings (map management, mowing schedules, etc.).
- View and change mower security/function settings (Headlight, Reset PIN code, Anti-theft, etc.).
- Update firmware, and change network connection.
- Unbind and retain or clear user data.
Download, register, log in
- Download EGO Connect ^TM app on your mobile device or scan QR Code below.
- Create a new account in EGO Connect™ app. If you already have an account, skip to step 4.
- An e-mail will be sent to the registered e-mail address. Follow the instructions in the e-mail to validate your account.
- Log in to your EGO account in EGO Connect ™ app.
Update EGO connect™ app and firmware
To experience the latest features and updates, always keep your EGO connect™ app up-to-date. You will receive a notification to remind you when there is a new version of the app.
To manually check firmware updates, tap (Device Details) > Firmware update to show the current version and latest version.
To update the firmware, see the section "Update to the Latest Firmware".
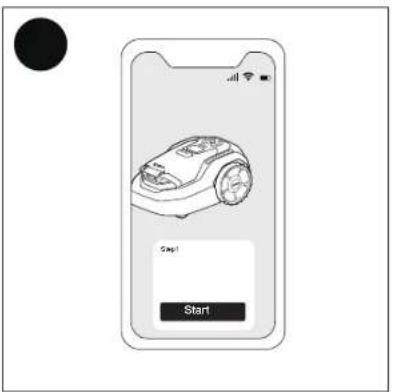
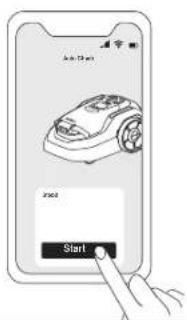
App homescreen (Fig. 0)
The homescreen shows the status of the mower and work progress. You can choose to view the mowing zone of all zones or selected zones, start or pause mowing tasks, and send the mower home.
- Battery level
- Cellular signal strength
- Bluetooth ^®
- Wi-Fi
- Positioning signal
- Tap to view device details
- Tap to enter PIN code
- Tap to enter work schedule
-
Mower Status
-
Tap to enter map management
? Unknown status
Passed
Standby
Manually mowing
← Returning to charging station
Charging
Setting
Remote control
↑ firmware Update
Error code
Mapping
Ready to turn off
-
Mowed area
-
Tap to let mower return to the charging station
-
Tap to mow
-
Mowing progress
-
Charging station
-
Mowing zone
-
Path
-
No-go zone
App settings (Fig. P)
Tap (Device Details) to browse and adjust the related settings in the EGO Connect™ app.
Work settings
■ Work Schedule
You can set the mowing schedule according to your lawn area at any time.
■ Global Cutting Mode
There is two cutting modes for your choice.
Standard cut: faster mowing speed to mow efficiently
Fine cut: lower mowing speed to focus on the quality of the cut
Global Height
The cutting height can be varied from 20-90 mm of 1-15 positions.
■ Map Management
You can edit or delete the map you created.
Rain Sensor
When enabled, the robotic mower returns to the charging station when rain is detected and restarts until the rain sensor is dry and delay time is over. You can set the delay time of 0-180 minutes. The default delay time is 90 minutes.
■ Voice Prompt
When enabled, the robotic mower will make specific sounds during operation and when in error.
Headlight
EN
When enabled, it helps mowers continue to perceive their surroundings at night and complete operations such as obstacle avoidance. You can also customize the headlight to be turned on in selected time period.
■ Mood light
When enabled, you can customize the color of the light by picking the color from the ring in app. Specific lighting effects remind you to pay attention to the status of the mower.
Control
You can remotely control the mower from your app.
Safety settings
■ Reset PIN Code
You can reset the PIN code of your mower.
Anti-theft
This feature can precisely locate your mower and prevent incidents such as mower theft. You can choose to enable the alarm when the mower is being lifted and when the mower crosses over the virtual boundary.
Others
■ Time Zone and Country
You can manually select your local time zone and country or region so that the mowing schedules can follow your local time.
4G Network
You can check the expiration time of the free cellular data package.
■ Wi-Fi Network
The mower can be configured with a Wi-Fi network to reduce cellular data consumption.
■ Firmware Update
You can update the mower to the latest firmware.
■ Relocate Antenna
You can follow the guidance to relocate the RTK antenna.
■ Relocate Charging Station
You can follow the guidance to relocate the charging station.
General settings
■ Device Name
View the name of your mower.
Registration
Register the purchase information of your mower.
■ Device Notification
View the device notification
■ Usage Statistics
View the usage statistics of your mower.
■ Accessories
View the accessory maintenance status of your mower.
Share Device
Share your mower with others who have registered on the EGO Connect™ app.
■ Device Log
EN
View the operation log of your mower.
About
View the basic device information of your mower.
Delete Device
Delete this device from your account.
■ Factory Reset
Restore factory settings for this device.
MAINTENANCE
⚠ WARNING: To avoid serious personal injury, always switch off the mower, and ensure that all moving parts have come to a complete standstill, before cleaning, performing any maintenance or transporting the mower.
WARNING: When servicing, use only identical replacement parts. Use of any other parts may create a hazard or cause product damage. To ensure safety and reliability, all repairs should be performed by a qualified service technician.
⚠ WARNING: Always wear long trousers, work shoes, and protective gloves when performing any maintenance on the product blades.
For better operation and longer service life, make sure to clean the product regularly and replace worn parts.
We recommend the blades are regularly inspected and replacement time should be once every 6-8 weeks, according to the mowing schedules and grass types.
It is important that the blades rotate easily. The edges of the blades should not be damaged. The lifetime of the blades varies immensely and depends on for instance:
■ Operating time and size of the mowing zone.
■ Type of grass and seasonal growth.
■ Soil, sand and use of fertilizers.
■ The presence of objects such as cones, windfalls, toys, tools, stones, roots and the like.
NOTE: Working with blunt blades gives a poorer mowing result. The grass is not cut cleanly and more energy is needed resulting in the product not mowing such a large area.
Clean the product
⚠ WARNING: Never use solvents for cleaning. Before cleaning, make sure the product is switched off.
Chassis and blades
Inspect the blades once a week.
- Press the OK button for 4 seconds to switch off the product.
- Lift the product onto its side.
- Clean the blades and chassis using a brush. At the same time, check that the blades are intact and rotate freely.
Wheels
The product does not operate satisfactorily on slopes if the wheels are blocked with grass.
■ Use a soft brush to clean the wheels
Body of the product
■ Use a moist cloth and a weak soap solution to clean the body of the product.
Camera array
■ Check and clean the camera array regularly. A stained camera lens may affect the performance of the mower.
Check if there is corrosion or dirt on the charging contacts, and clean them in time. Otherwise, the mower cannot be charged due to poor contact.
Charging station
⚠ WARNING: Disconnect the power supply from the power outlet before maintenance.
NOTE: The product cannot enter the charging station if there are objects in the charging station. Clean the charging station regularly.
Remove grass, twigs and other objects from the charging station.
Replace the Blades
⚠ WARNING: You must replace the screws when you replace the blades. The used screws can wear quickly and allow the blades to loosen, this can cause serious injury.
Replace worn or damaged blades for a safe operation. Replace the blades regularly for a satisfactory cut result and a reduced energy use. All 3 blades and screws must be replaced at the same time to get a balanced cutting system.
To replace the blades (Fig. Q)
- Push the STOP button.
- Press the OK button for 4 seconds to switch off the product.
- Turn the product upside down. Put the product on a soft and clean surface to avoid scratching the product.
- Rotate the skid plate so that its holes align with the screws for the blade.
- Remove the 3 screws with a flat-head or Philips screwdriver (not included).
- Remove the 3 blades.
- Attach 3 new blades and screws.
- Make sure that the blades can pivot freely.
Battery
CAUTION: Charge the battery fully before you put the product into storage. If the battery is not fully charged it can cause damage to the battery. If the operating time of the product is shorter than usual between charges, this means that the battery is at the end of its life cycle. Replace the battery to extend the operating time.
NOTE: The battery life is related to the length of the season and how many hours a day the product operates. A long season or many hours of operation a day means that the battery must be replaced more regularly. Take your product to your EGO center service for battery replacement.
Transportation
⚠ WARNING: The product must be switched off before lifting, moving, or transporting it. Never pick up or carry the mower while the motor is running.
How to lift and move the product properly (Fig. R)
CAUTION: Do not lift the product when it is parked in the charging station. It can damage the charging station and/or the product. Push the STOP button and pull the product out of the charging station before lifting it.
To safely move from or within the mowing zone:
- Push the STOP button to stop the product.
- Press the OK button for 4 seconds to switch off the product.
- Carry the product by the carry handle with the blade disc away from the body.
Storage
■ Before storage, switch off the mower and make sure the mower has at least 30-40% battery left.
■ Clean the mower.
■ Keep the mower in a dry, frost free space indoors in winter.
- Keep the mower, charging station, and power supply away from heat sources (such as stoves, radiators, etc.) or chemicals. Protect the power supply from moisture and keep it in a well-ventilated place.
WARNING: When there is a risk of a thunderstorm, unplug the power supply from the power socket. Disconnect all low-voltage cables connecting to the charging station and RTK antenna. Reconnect when there is no longer a risk of thunderstorms.
Protecting the Environment
Do not dispose of electrical appliances as unsorted municipal waste, use separate collection facilities.
Contact your local government for information regarding the collection systems available.
If electrical appliances are disposed of in landfills or dumps, hazardous substances can leak into the groundwater and get into the food chain, damaging your health and well-being.
EN TROUBLESHOOTING
Error Codes List
The list below shows a number of error codes shown on the LCD screen of the product and your EGO Connect™ app. Contact EGO service center if the same code appears frequently.
| Error code Description Solution | | |
| 1000 Electronic systems self-test error | Self test of all electrical systems returned an error.1. Power off the mower, and restart.If the error persists, contact EGO support for remote assistance. |
| 1001 Mowing motor self-test failed | Self test of mowing motor returned an error.1. Power off the mower, and restart.If the error persists, contact your EGO service provider. |
| 1002 Mowing motor overload | | Mowing motor has a spike in power demand.1. Remove hard objects in the mowing area such as stones, branches and toys.2. Press the Start + OK buttons on the mower, or select Clear Error in the app.3. If the error persists, power off the mower and restart.If the error persists, contact your EGO service provider. |
| 1003 Mowing motor failure | | Mowing motor power supply is abnormal.1. Power off the mower and restart.If the error persists, contact your EGO service provider. |
| 1004 Mowing motor blocked | | Mowing motor detected abnormally high power demand.1. Check and adjust the cutting height setting. Grass longer than 9 cm should be cut to a manageable level for the mower to maintain.2. Press the Start + OK buttons on the mower, or select Clear Error in the app.3. If the error persists, power off the mower, check the cutting disk for obstructions.NOTE: High motor usage can stress parts and lead to reduced service life. If this error persists, contact your EGO service provider. |
| 1005 Mowing motor overload | | Mowing motor stalled.1. Check and adjust the cutting height setting. Grass longer than 9 cm should be cut to a manageable level for the mower to maintain.2. Press the Start + OK buttons on the mower, or select Clear Error in the app.3. If the error persists, power off the mower, check the cutting disk for obstructions.NOTE: High motor usage can stress parts and lead to reduced service life. If this error persists, contact your EGO service provider. |
|
| 1006 Mowing motor supply voltage too low | Mowing motor power supply is abnormal.1. Power off the mower and restart.If the error persists, contact your EGO service provider. |
| Error code Description Solution | |
| 1007 Mowing motor overheat | | Mowing motor is too hot.1. Allow the motor to cool.NOTE: High power usage can excessively stress parts and lead to reduced service life.If this error persists, contact your EGO service provider. |
| 1008 Cutting-height motor blocked | | Cutting height motor has stalled.1. Power off the mower and check the mowing disk for damage and obstructions.2. Power on the mower and attempt to raise/lower the cutting height.If this error persists, contact your EGO service provider. |
| 1009 Cutting-height motor overload | | Cutting height motor is overloaded.1. Power off the mower and check the mowing disk for damage and obstructions.2. Power on the mower and attempt to raise/lower the cutting height.If this error persists, contact your EGO service provider. |
| 1010 Driving motor calibration error | | Driving motor calibration error.1. Power off the mower and restart.If the error persists, contact EGO support for remote assistance. |
| 1011 Left or right driving motor fault | | Problem with the power delivery to left or right drive motor.1. Power off the mower and restart.If this error persists, contact your EGO service provider. |
| 1012 Left or right driving motor fault | | Driving motor power supply is abnormal.1. Power off the mower and restart.If the error persists, contact your EGO service provider. |
| 1013 Left or right driving motor blocked | | Left or right driving motor has stalled.1. Check whether the wheels are jammed and remove obstructions.2. Press the Start + OK buttons on the mower, or select Clear Error in the app.If the error persists, contact your EGO service provider. |
| 1014 Left or right driving motor overload | | Left or right driving motor is overloaded.1. Check whether the wheels are jammed and remove obstructions.2. Press the Start + OK buttons on the mower, or select Clear Error in the app.If the error persists, contact your EGO service provider. |
| 1015 | Left or right driving motor supply voltage too low | Left or right driving motor power supply is abnormal.1. Power off the mower and restart.If the error persists, contact your EGO service provider. |
EN
EN
| Error code Description Solution | |
| 1016 Driving motor calibration | error | Driving motor calibration errorNo actions required; the mower performs dynamic calibration automatically during on the charging station.If the error persists, contact your EGO service provider. |
| 2001 Battery fault | | Battery has fault.Power off the mower and contact your EGO service provider. |
| 2002 Charging stop due to the | temperature | Charging stop due to over-temperatureNo actions required; the mower will resume charging once the temperature returns to normal.If the error persists, contact your EGO service provider. |
| 2003 Low battery charge | | Battery capacity is too low.Put the mower on the charging station to charge.If the error persists, contact your EGO service provider. |
| 2004 Mowing stop due to the | temperature | Mowing stop due to the over-temperature.No actions required; allow the mower staying on the charging station until the temperature returns to normal.If the error persists, contact your EGO service provider. |
| 3001 Angle sensor calibration | error | The angle sensor calibration returns an error.Keep the mower level and stationary, then restart it.If the error persists, contact your EGO service provider. |
| 3002 RTK receiver fault | | RTK receiver returns an error.Keep the mower level and stationary, then restart it.If the error persists, contact your EGO service provider. |
| 3003 Electric self-test failed | | Electric self-test returns an error.Keep the mower level and stationary, then restart it.If the error persists, contact your EGO service provider. |
| 3004 Screen error | | Screen communication failure.Check whether the display is normal. If the screen shows abnormalities, restart the mower.If the error persists, contact your EGO service provider. |
| 3005 Lift sensor failure Contact your EGO service provider | |
| 3006 Collision sensor failure Contact your EGO service provider | |
| 4008 Charging station pairingError code Description Solution | unsuccessful | The mower failed in pairing with the charging station.Please unplug and plug the charging station power cord, then press the Start + OK button on the mower or tap Clear Error on the app, and place the mower into the charging station.If the error persists, restart the mower and try step 1 again.If the error persists, contact your EGO service provider. |
| 5001 | Unstable power supply to charging station | Power off and power on the charging station, then press the Start + OK buttons.If the error persists, contact your EGO service provider to replace the power supply. |
| 5002 | Abnormal charging voltage to the mower | Power off and power on the charging station, then press the Start + OK buttons.If the error persists, contact EGO support for remote assistance. |
| 5003 Abnormal RTK station antenna | | Power off and power on the RTK station, then press the Start + OK buttons.If the error persists, contact EGO support for remote assistance. |
| 6001 Mower trapped | | The mower is trapped due to vision obstacles.If there are obstacles near the mower, remove them; if the mower is in a confined space, move it to an open area.Press the Start + OK button on the mower, or tap Clear Error in the app to resume operation.If the mower repeatedly gets stuck in the same location, create a no-go zone for that area.If the error persists, contact EGO support for remote assistance. |
| 6002 Mower trapped | | The mower is trapped due to collision.If there are obstacles near the mower, remove them; if the mower is in a confined space, move it to an open area.Press the Start + OK button on the mower, or tap Clear Error in the app to resume operation.If collisions persist in the same location, create a restricted zone for the area where escape attempts fail.If the error persists, contact EGO support for remote assistance. |
| 6003 Mower stuck | | The mower is stuck due to slipping.If the ground has pits, level the lawn; if the ground is slippery, clear standing water.Press the Start + OK button on the mower, or tap Clear Error in the app to resume operation.If repeated slipping occurs in the same spot, create a no-go zone for the area where the mower failed to escape.If the error persists, contact EGO support for remote assistance. |
| 6004 Mower trapped | | The mower is trapped due to lifted.If the ground is uneven, level the lawn.Press the Start + OK button on the mower, or tap Clear Error in the app to resume operation.If the mower repeatedly gets lifted in the same spot, create a no-go zone for the area where it fails to escape.If the error persists, contact EGO support for remote assistance. |
EN
EN
| Error code Description Solution | | |
| 6005 Out of mapped boundary | | The mower has moved 1 m beyond the boundary of the working area.1. Check if the boundary slope exceeds the slope limit (8.5°). If it does, adjust the boundary.2. Place the mower within the boundary. Then press the Start + OK button on the mower to clear the fault code.If the error persists, contact EGO support for remote assistance. |
| 6006 Mower tipped over | | The mower is tipped over.1. If the ground is uneven, level the lawn.2. Check if the boundary slope exceeds the slope limit (8.5°). If it does, adjust the boundary.3. Check if the working slope exceeds the slope limit (26.6°). If it does, set the area as a no-go zone.4. Press the Start + OK button on the mower.5. If the mower repeatedly gets dumping in the same spot, create a no-go zone for the area where it fails to escape.If the error persists, contact EGO support for remote assistance. |
| 6007 Collision sensor stuck | | The mower collision sensor is stuck.1. If there are obstacles near the mower, remove them; if the mower is in a confined space, move it to an open area.2. Press the Start + OK button on the mower to resume operation.3. If collisions repeatedly occur in the same location, we recommend creating a no-go zone for the area where the mower failed to escape.If the error persists, contact EGO support for remote assistance. |
| 6008 Mower lifted | | The mower is lifted.1. Place the mower on a flat surface and check if the caster bracket can move vertically.2. Then press the Start + OK button on the mower to clear the fault code.If the error persists, contact EGO support for remote assistance. |
| 6009 Mower tilted | | The mower is tilted.1. If the ground has bumps, level the lawn; Check if the boundary slope exceeds the slope limit (8.5°). If it does, adjust the boundary.2. Then press the Start + OK button on the mower to clear the fault code.If the error persists, contact EGO support for remote assistance. |
| 6010 | Mower failed to return to charging station | The mower can't return to the charging station.1. Ensure there are no obstacles near the charging station and that it is installed on a level surface.2. Press the Start + OK button on the mower, or tap Clear Error in the app.3. Press Park + OK to return, or tap HOME in the app.If the error persists, contact EGO support for remote assistance. |
| 6011 Mower failed to leave charging station | The mower can't leave the charging station.1. Ensure there are no obstacles near the charging station and that it is installed on a level surface.2. Then press the Start + OK button on the mower, or tap Clear Error in the app to resume operation.If the error persists, contact EGO support for remote assistance. |
| 6012 Theft detected | | The mower is out of the geofenced area.1. If the mower is within the geofence, enter the password to unlock it, then press the Start + OK button on the mower to clear the fault code. If it continues to report stolen, contact EGO support for remote assistance.2. If the mower is outside the geofence but recoverable, move it back into the geofence and repeat step 1.3. If the mower is lost, contact law enforcement and retrieve it based on the location uploaded by the mower. |
| 6013 | Charging station or local RTK station moved | 1. Check if the local RTK station or charging station have been moved. If so, return them to their original positions first.2. Press the Start + OK button on the mower, or tap Clear Error in the app.3. If you cannot return them to their original positions or the fault persists, follow the RTK base station relocation procedure or charging station relocation procedure on the app's settings page. |
| 6014 Local RTK station moved | | 1. Check if the local RTK station position has been moved. If so, first restore it to its original location.2. Press the Start + OK button on the mower, or tap Clear Error in the app.3. If unable to return it to its original position or the fault persists, follow the RTK base station relocation procedure on the app's settings page. |
| 6015 Weak antenna signal strength | 1. Check the local RTK station and remove any obstructions on the top. If the error persists, contact EGO support for remote assistance. |
| 6016 Mower permanently locked | The mower is permanently locked.1. Log-in to EGO Connect using the mower's master account and unlock. |
| 6017 Mower falling down | | The mower has fallen down.1. If the ground is uneven, level the lawn.2. Check if the boundary slope exceeds the slope limit (8.5°). If it does, adjust the boundary.3. Check if the working slope exceeds the slope limit (26.6°). If it does, set the area as a no-go zone.4. Press the Start + OK button on the mower.5. If the mower repeatedly gets dumping in the same spot, create a no-go zone for the area where it fails to escape.If the error persists, contact EGO support for remote assistance. |
EN
EN
| Error code Description Solution | | |
| 7001 Mower location unavailable | | 1. Restart the mower and put it on the charging station.If the error persists, contact EGO support for remote assistance. |
| 7002 Mower location unavailable | | 1. Restart the mower and put it on the charging station.If the error persists, contact EGO support for remote assistance. |
| 7003 | Local RTK station disconnected for extended period of time | Local RTK station has been disconnected for an extended period of time.1. Verify the status light on the bottom of the local RTK antenna.■ RED - RTK station abnormal■ GREEN - RTK station normal2. Power off the local RTK station and power on it again.If the error persists, contact EGO support for remote assistance. |
| 8001 Camera overheated | | The camera has been temporarily turned off due to high temperature.It will restart automatically once the temperature returns to normal. No action is required.If the error persists, contact your EGO service provider. |
| 8002 Camera communication error | | Camera communication returns an error.1. Power off and restart the mower.If the error persists, contact your EGO service provider. |
| 8003 Camera dirty Camera lens may be dirty. Please clean it for better performance. |
Symptoms
If the product does not operate correctly, refer to the symptoms below. Contact EGO service center if you still cannot find the reason for the error.
| Problem Cause Solution | | |
| The product has difficulty docking. | 1. The charging station is on a slope or not on a level surface. | 1. Place the charging station on a level surface. |
| 2. The charging station is not firmly installed. | 2. Check if the six screws fixed on the station are loose. |
| The product slips when docking. | Wet grass and mud stuck to the rear wheel lead to the product to slip. | Clean the wheels. |
| The product runs at the wrong time. | 1. The starting and stopping times for mowing are incorrect. | 1. Reset the start time and stop time settings for mowing.Tap (Device Details) >Work Settings>Work Schedule |
| 2. The product clock needs to be set. | 2. Set the clock.Tap (Device Details) >Others Time Zone and Country |
| The product vibrates. | 1. Damaged blades lead to imbalance in the cutting system. | 1. Inspect the blades and screws and replace them if necessary. |
| 2. Too many blades in the same position lead to imbalance in the cutting system. | 2. Check that only one blade is fitted at each screw. |
| 3. Missing blade in mounting position lead to imbalance in the cutting system. | 3. Check that the three blades are installed in each mounting position. |
| The product operates, but the blades do not rotate. | 1. The product searches for the charging station, or is reversing out of the charging station. | 1. No action. The blade disc does not rotate when the product is searching for the charging station. |
| 2. The mowing motor is damage. 2. Contact EGO service center. |
| 3. The mower operates in transport path. | 3. No action. The mower operates in this path, but does not cut grass. |
| The product mows for shorter periods than usual between charges. | 1. Grass or other foreign object blocks the blades. | 1. Remove and clean the chassis and blades. |
| 2. The battery is reaching End-of-life. 2. Contact EGO service center. |
| 3. Dull blades. More energy is needed when cutting the grass. | 3. Replace all the blades and screws. |
| Short mowing and charging times. The battery is reaching End-of-life. Contact EGO service center. |
| The product returns to the charging station during mowing when it is not raining. | The rain sensor switch is triggered unintentionally. | Check the rain sensor switch. This function can be disabled if necessary in the app. |
| Uneven mowing results | 1. The product works too few hours per day. 1. | Increase the mowing time. |
| 2. Dull blades. 2. Replace all the blades and screws. |
| 3. Long grass in relation to the set cutting height. | 3. Increase the cutting height and then successively lower it. |
| 4. Accumulation of grass by the blades or around the motor shaft. | 4. Check that the blades rotate freely and easily. If not, unscrew the blades and remove grass and foreign objects. |
LED Status Indicator on the Charging Station
The LED status indicator on the charging station must show a solid or flashing GREEN for a correct installation. If not, follow the below instructions:
| LED Status Indicator Charging station status | |
| Solid RED The charging station is abnormal. | |
| Solid GREEN The product is charged fully. | |
| Flashing GREEN | The charging station is charging for product. |
| Solid RED for 2 seconds, flashing GREEN for 2 seconds | The Bluetooth® pairing between charging station and product is disconnected. |
| Solid GREEN for 2 seconds, flashing RED for 2 seconds | The Bluetooth® between charging station and product is connected successfully. |
| Flashing YELLOW | The product is in docking with the charging station by infrared. |
EN
Mood Lights on the Mower
The mood lights on the mower show the current product status:
NOTE: The WHITE color below list can change based on user settings in the app.
| Mood lights Product status | |
| Solid WHITE | 1. The product is returning to charging station.2. The product is mapping. |
| Pulsate WHITE The product is mowing properly. | |
| Solid RED The product stopped because of an error or firmware update failure. |
| Solid YELLOW The product is in Pause mode. | |
| Flash BLUE The product Bluetooth | ^ is pairing. |
| Solid BLUE for 3 seconds The product Bluetooth | ^ pairing is successful. |
| Lights OFF | 1. The product is in sleep mode.2. The product is in charging station. |
| GREEN running style Firmware update is in progress. |
| Solid GREEN | 1. Firmware update is successful.2. Firmware update failed but rollback is successful. |
WARRANTY
EGO WARRANTY POLICY
Please visit the website egopowerplus.eu or egorobotmowers.eu for full terms and conditions of the EGO Warranty policy.
EMBALAGEM (IMAGEM D)
INSTALACJA I MAPOWANIE
Przed rozpoczęciem
Przygotuj aplikację

POLITYKA GWARANCYJNA EGO
Rakenduse seaded (Joonis P)
- ∂ggbjg n ∑m6ymdnmdmdu (wgysmngdn) > ls∂y∂sm
- amplitude of the function of the sum of the sum of the sum of the sum of the sum of the sum of the sum of the sum of the sum of the sum of the sum of the sum of the sum of the sum of the sum of the sum of the sum of the sum of the sum of the sum of the sum of the sum of the sum of the sum of the sum of the sum of the sum of the sum of the sum of the sum of the sum of the sum of the sum of the sum in
- დააუენეთ გრადივის დანუების და დასრულების დრო.
- ুন্তিগুর হম্বাদ, হম্বাদুরুস দুদসমূলোনুয় শুদমুয়ার্থাস র্মাসুন্ডু
- 350000000000000000000000000000000000000000000000000000
■ PIN 3m0n5 3s0s03n6n3s
■ phosphatase dehydrolysis
sā dāmbyumānqmmān lāsmbbghm n sāmsādghfngdnl sāmqgbs.
modification of the following forms of the first three forms of the first three forms of the first three forms of the first three forms of the first three forms of the first three forms of the first three forms of the first three forms of the first three forms of the first three forms of the first three forms of the first three forms of the first three forms of the first three forms of the first three forms of the first three forms of the first three forms of the first three forms of the first three forms of the first three forms of the first four forms of the first four forms of the first four forms of the first four forms of the first four forms of the first four forms of the first four forms of the first four forms of the first four forms of the first four forms of the first four forms of the first four forms of the first four forms of the first four forms of the first four forms of the first four forms of the first four forms of the first four forms of the first four forms of the first four forms of the first five forms of the first five forms of the first five forms of the first five forms of the first five forms of the first five forms of the first five forms of the first five forms of the first five forms of the first five forms of the first five forms of the first five forms of the first five forms of the second form of the second form of the second form of the second form of the second form of the second form of the second form of the second form of the second form of the second form of the second form of the second form of the second form of the second form of the second form of the second form of the second form of the second form of the second form of the second form of the second form of the second form of the second form of the second form of the second form of the second from a
zsāgāngdōn bāmāzāngdōn
© © © © © © © © © © © © © © © © © © © © © © © © © © © © © © © © © © © © © © © © © © © © © © © © © © © © © © © © © © © © © © © © © © © © © © © © © © © © © © © © © © © © © © © © © © © © © © © © © © © © ©©
הכלהה
בַרְשָׁה בִּרְשָׁה
תְרָה
הכלה
הכלה ↑
הכלה 17
בְרַע
הכלה
.11.
.12 בַרְשׁה בַרְשׁה
.13 בְּרָה אַלְבָר
.14 מַרְׁת הַרְׁת
.15 אַרְה בָּרִי
.16 מְׁרַעָה
.17 7170n
- \$.הכלהה"ה"ה"ה"ה"ה"ה"ה"ה"ה"ה"ה"ה"ה"ה"ה"ה"ה"ה"ה"ה"ה"ה"ה"ה"ה"ה"ה"ה"ה"ה"ה"ה"ה"ה"ה"ה"ה"ה"ה"ה"ה"ה"ה"ה"ה"ה"ה"ה"ה"ה"
- Bluetooth® "הכלה" (1), IF-IW "הכלה 4G "הכלה 100000000000000000000000000000000000000000000000000000000000000000000000
- "הכלה" (2), tcennoc EGO "הכלה 19999999999999999999999999999999999999999999999999999999999999999999999999999999999999999999999
三GO
natural_image
Line drawing of a robotic vacuum cleaner with EGO branding and control buttons (no text or symbols beyond branding)
RMR1500E/RMR3000E/RMR6000E
הכלהה