
WD 5 Control - Vacuum Cleaner Kärcher - Free user manual and instructions
Find the device manual for free WD 5 Control Kärcher in PDF.

User questions about WD 5 Control Kärcher
0 question about this device. Answer the ones you know or ask your own.
Ask a new question about this device
Download the instructions for your Vacuum Cleaner in PDF format for free! Find your manual WD 5 Control - Kärcher and take your electronic device back in hand. On this page are published all the documents necessary for the use of your device. WD 5 Control by Kärcher.
USER MANUAL WD 5 Control Kärcher
natural_image
Line drawing of a vacuum cleaner with control panel and fan (no text or symbols)Deutsch 6
English 11
Français 16
Italiano 21
Español 27
Português 32
Nederlands 38
Türkçe 43
Svenska 48
Suomi 53
Norsk 58
Dansk 62
Eesti 67
Latviešu 72
Lietuviškai 77
Polski 82
Magyar 88
Čeština 93
Slovenčina 98
Slovenščina 103
Română 108
Hrvatski 113
Srpski 118
Ελληνικά 123
Русский 129
Українська 136
Қазақша 142
Български 149
العربيه 160
A
WD 7 Control P S
20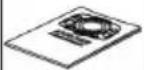 | 21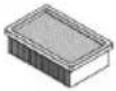 | 22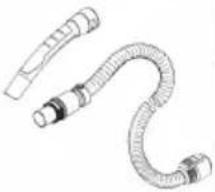 | 23 | 24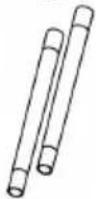 | 25 | 26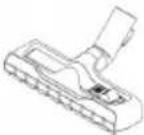 | 27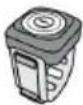 | 28 |
natural_image
Line drawing of a vacuum cleaner device with no visible text or symbols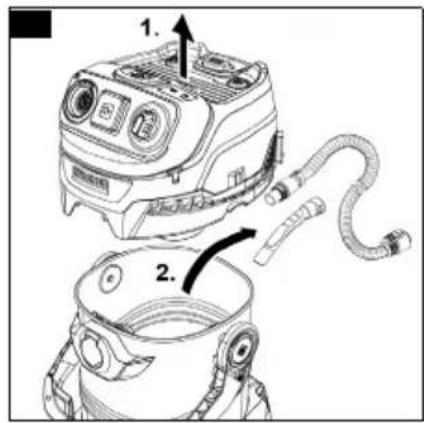

natural_image
Technical line drawing of a mechanical component with no visible text or symbols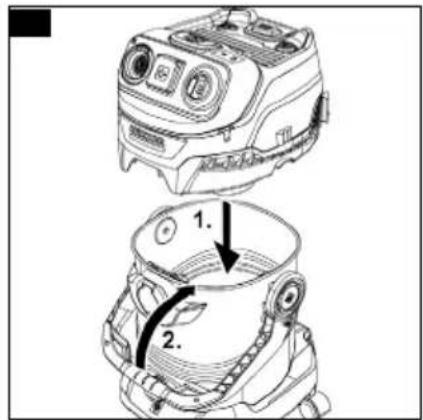
natural_image
Line drawing of a vacuum cleaner's handle and lever assembly (no text or symbols)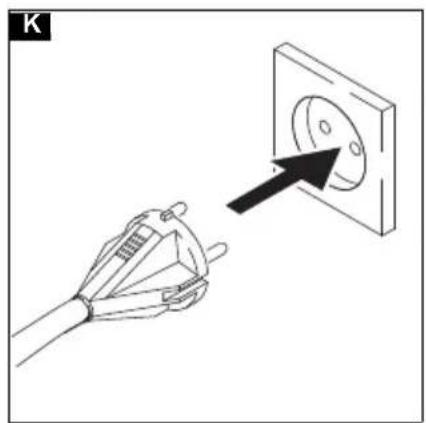
natural_image
Illustration of a hand holding an electrical socket connected to a wall socket with a black arrow pointing to the socket (no text or symbols)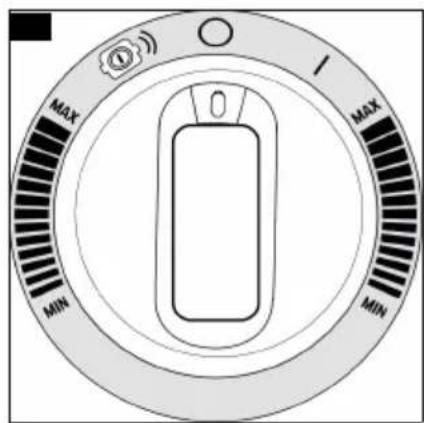


natural_image
Diagram of a cable connector being inserted into a device, showing the cable and connector (no text or symbols present)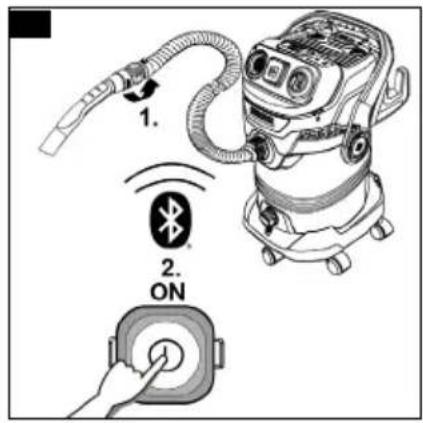


natural_image
Line drawing of a vacuum cleaner with an inset close-up showing internal components (no text or symbols)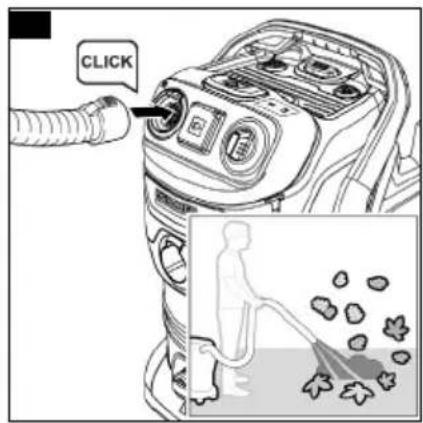
natural_image
Technical line drawing of a vacuum cleaner with attached hose and control panel (no text or symbols)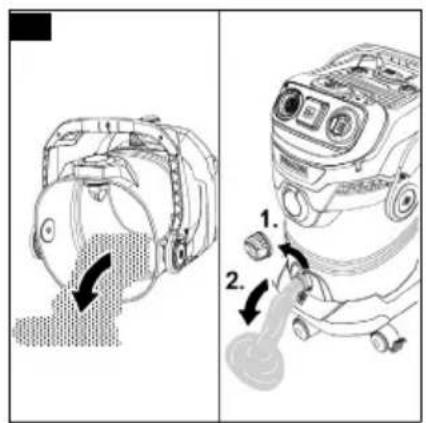
natural_image
Technical line drawing of a mechanical device with a highlighted component (no text or symbols)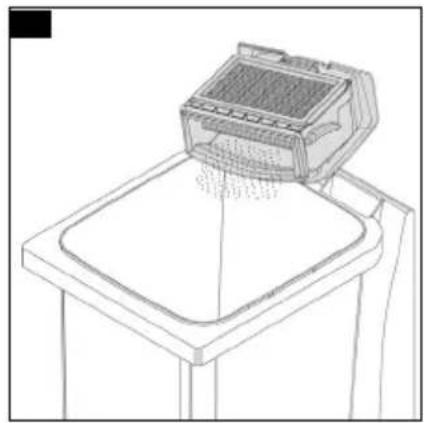
natural_image
Line drawing of a printer printing a tray (no text or symbols)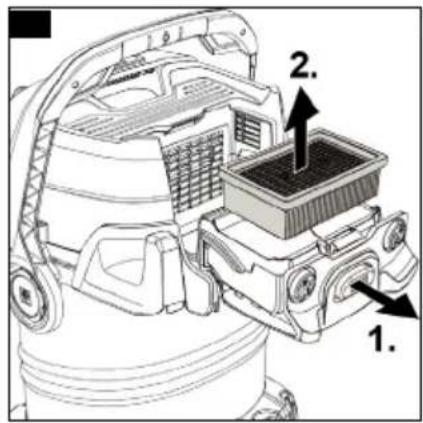
natural_image
Technical line drawing of a vehicle engine assembly with internal components and a magnified inset showing hand insertion (no text or symbols)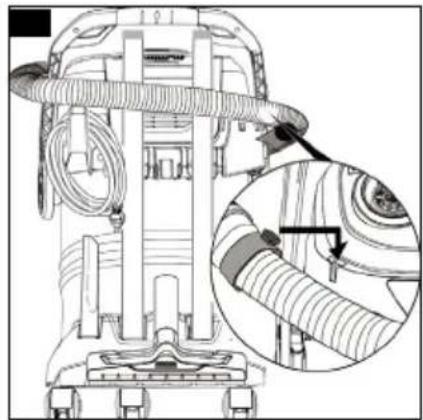
natural_image
Technical line drawing of a vacuum cleaner with attached hoses and a close-up inset showing the component detail (no text or symbols)Allgemeine Hinweise


Read these original operating instructions and the enclosed safety instructions before using the device for the first
time. Proceed accordingly.
Keep both books for future reference or for future owners.
Safety instructions for the battery
⚠ WARNING
- Keep the battery out of reach of children. Swallowing can lead to chemical burns, perforation of soft
tissue, and death. Severe burns can occur with 2 h of ingestion. Seek medical attention immediately.
- Do not expose the appliance or battery to excessive temperatures. Be aware of the risk of terminals of the battery-operated appliance or battery being short circuited by metal objects.
- Exhausted batteries are to be removed from the appliance and safety disposed of.
- If the appliance is to be stored unused for a long period, remove the batteries.
- Do not use modified or damaged batteries.
• The supply terminals are not to be short-circuited. - This appliance contains non-rechargeable batteries, these batteries are not to be recharged.
Intended use
Only use the device in private households.
In accordance with the descriptions and the safety information in these operating instructions, the device is intended for use as a wet and dry vacuum cleaner.
Cold ashes may only be vacuumed with suitable accessories.
Protect the device from rain and do not store it outdoors.
Note
The manufacturer accepts no liability for possible damage caused by improper use or incorrect operation.
Trademarks
The bluetooth ^® wordmarks and logos are registered trademarks of Bluetooth SIG, Inc. Any use of these trademarks by Alfred Kärcher SE & Co. KG is under license.
EU Declaration of Conformity
| Device Type Frequency | band, MHz | Power, max. EIRP, mW | |
| WD 5 Control | Blue-tooth® | 2402-2480 6,6 | |
| WD 5 Control S | |||
| WD 5 Control P | Low En-ergy | ||
| WD 5 Control P S | |||
| WD 6 Control P S | |||
| WD 7 Control P S | |||
| Remote Control | |||
Alfred Kärcher GmbH & Co. KG hereby declares that the radio device type wet and dry vacuum cleaner complies with the 2014/53/EU directive. The full text of the EU Declaration of Conformity can be found at . www.karcher.com/wd-control.
Declaration of Conformity
| Device Type Frequency | band, MHz | Power, max. EIRP, mW | |
| WD 5 Control | Blue-tooth® | 2402-2480 6,6 | |
| WD 5 Control S | |||
| WD 5 Control P | Low En-ergy | ||
| WD 5 Control P S | |||
| WD 6 Control P S | |||
| WD 7 Control P S | |||
| Remote Control | |||
Alfred Kärcher SE & Co. KG hereby declares that the radio device type Robo Cleaner complies with the UK regulation S.I. 2017/1206 (as amended). The full text of the Declaration of Conformity can be found at www.kaercher.com/wd-control.
Environmental protection

The packing materials can be recycled. Please dispose of packaging in accordance with the environmental regulations.

Electrical and electronic devices contain valuable, recyclable materials and often components such as batteries, rechargeable batteries or oil, which - if handled or disposed of incorrectly - can pose a potential danger to human health and the environment. However, these components are required for the correct operation of the device. Devices marked by this symbol are not allowed to be disposed of together with the household rubbish.
Notes on the content materials (REACH)
Current information on content materials can be found at: www.kaercher.de/REACH
Accessories and spare parts
Only use original accessories and original spare parts. They ensure that the appliance will run fault-free and safely.
Information on accessories and spare parts can be found at www.kaercher.com.
Scope of delivery
The scope of delivery for the appliance is shown on the packaging. Check the contents for completeness when unpacking. If any accessories are missing or in the event of any shipping damage, please notify your dealer.
Warranty
The warranty conditions issued by our relevant sales company apply in all countries. We shall remedy possible malfunctions on your appliance within the warranty period free of cost, provided that a material or manufacturing flaw is the cause. In a warranty case, please contact your dealer (with the purchase receipt) or the next authorised customer service site.
(See overleaf for the address)
Further warranty information (if available) can be found in the service area of your local Kärcher website under "Downloads".
Device description
The illustrations show the device with the best possible equipment (WD 7 Control P S).
The device is equipped with different equipment depending on the model selected. The specific equipment is described on the device packaging.
For the figures, please refer to the graphics page.
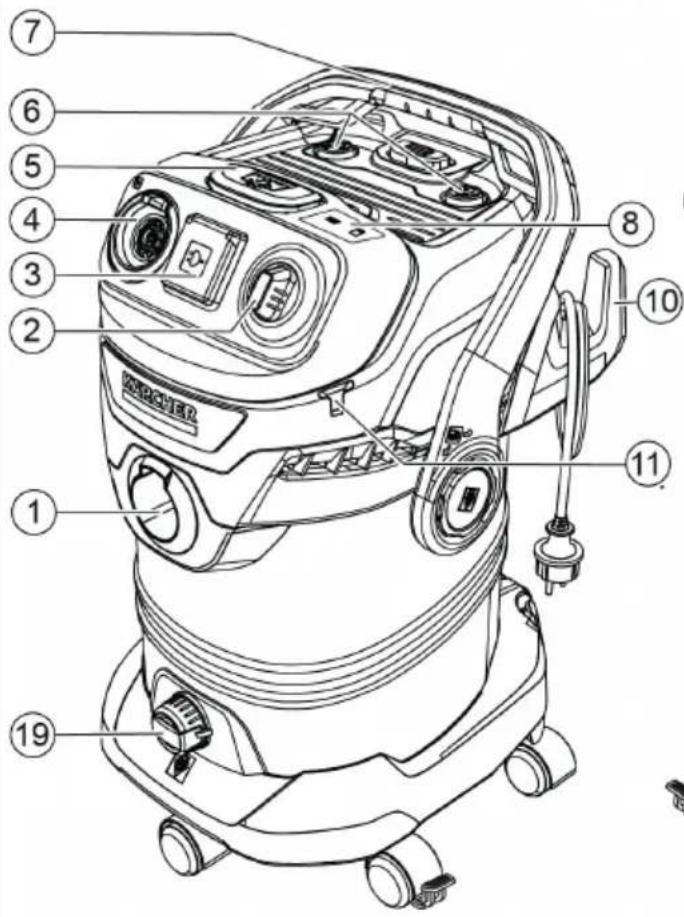
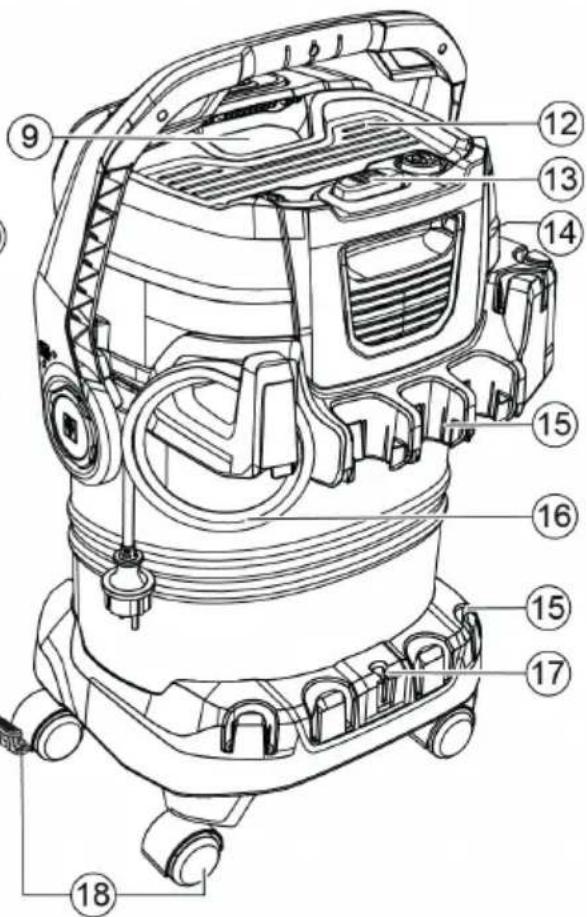
Illustration A
① Suction hose connection
② Rotary switch
(with performance regulation and remote control adjustment)
③* Device socket
④ Connection for blowing function
⑤ Filter cleaning button
⑥ Parking position of handle / filter cleaning
⑦ Carrying handle
⑧ Filter control indicator for filter bags and flat pleated filters
⑨ Recessed grip
⑩ Cable hooks
⑪ Hose storage (both sides)
⑫Storage area
⑬Filter box and unlocking button
⑭Type plate with technical data (such as container size)
15 Accessory storage
⑯Mains connection cable with mains plug
⑰ Floor nozzle parking position
18 Steering rollers with 1x parking brake
19* Drain screw
20Filter bag
21 Flat pleated filter
22 Removable handle with electrostatic protection
②3 Suction hose with connection piece
24 Suction pipes 2 x 0.5 m
25 Crevice nozzle
26 Floor nozzle
27 Remote control with detachable strap (incl. CR2032 button cell battery)
28* Adapter for connecting power tools
* Depending on the device variant
Installation
Installing the steering rollers
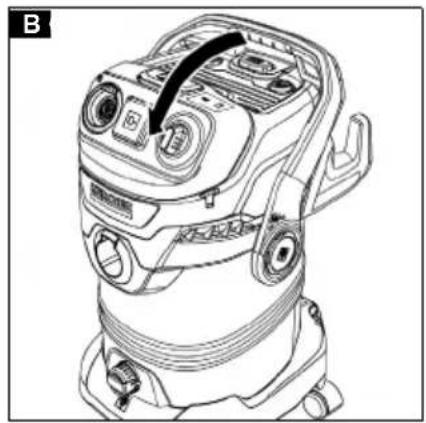
- The carrying handle also locks the device head and container. To unlock, swivel the bracket all the way forward until the lock is free.
Illustration B
- Before initial startup, remove contents from the container.
Illustration C
- Mount steering rollers.
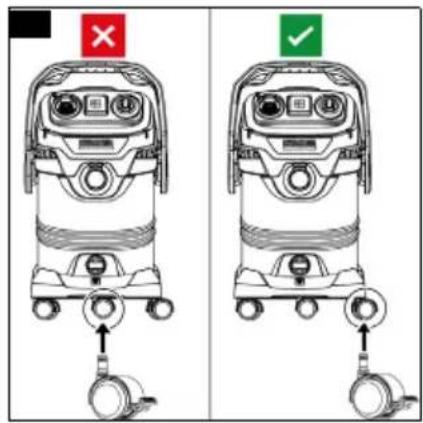
Note
One of the 5 steering rollers is equipped with a parking brake to prevent it from rolling away unintentionally.
For optimum manoeuvrability (e.g. over thresholds), do not fit the parking wheel brake at the front in the middle, but at the front on the right or left as required.
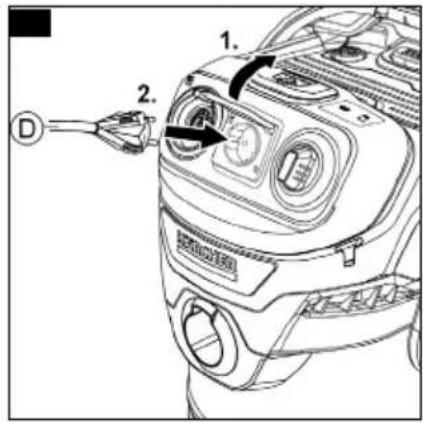
Illustration D
⚠️DANGER
Apply the parking brake at the steering roller to ensure a secure footing for the device. The device may move uncontrollably if the parking brake is open.
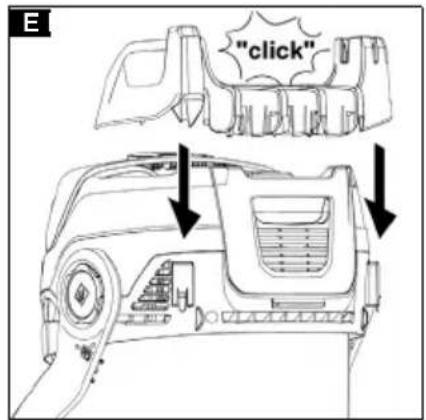
Installing the support for the accessory holder
- Clip the accessory storage holder on the back of the device head.
Illustration E
Mounting the remote control
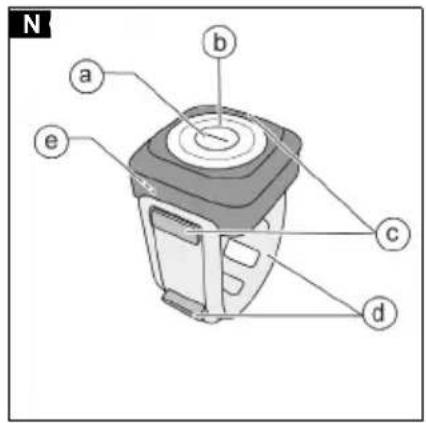
The remote control consists of:
- a On/Off button
• b LED display for vibration detection
• c Remote control fastening hook
• d Elastic band with fixing
• e Cover for button cell battery
Illustration N
- Attach one end of the rubber strap to one of the two strap fastening points on the remote control casing.
- Attach the remote control to the designated position at the end of the suction hose.
Illustration O
- Attach the other end of the rubber strap to the second strap fastening point on the remote control, ensuring that the rubber strap is firmly attached.
Note
The remote control can also be attached directly to the cordless tool.
Care must be taken to ensure that the strap is firmly seated so that the battery-powered tool vibrations can be transmitted properly.
If necessary, fold over the excess rubber strap and secure it at the strap fastening point to prevent it from sticking out while working.
Suitable locations are those where the cordless tool generates sufficient vibration during operation.
The remote control must not be attached in places that are necessary for operating the cordless tool (e.g. grip surfaces, switches, displays).
Note
The protective film on the button cell battery must be removed before first use.
The remote control can be opened with a coin to remove the battery, see chapter Replacing the remote control button cell battery.
Initial startup
Inserting the filter bag
- Fully unfold the filter bag.
-
Attach the filter bag to the device connection and press it on firmly.
Illustration F -
Fit and lock the device head.
Illustration G
Installing the hose, pipes, floor nozzle
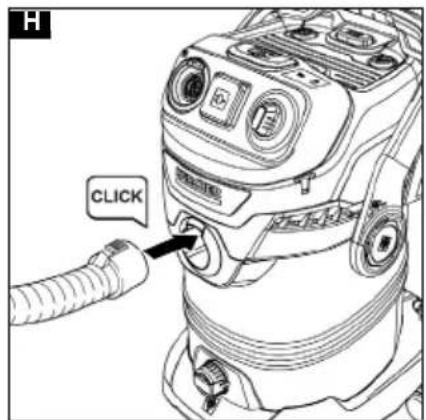
- Connect the suction hose.
Illustration H - Connect the suction hose to the handle.
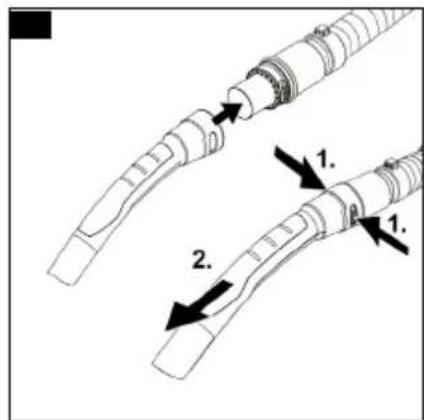
Illustration I
Note
For convenient vacuuming in confined spaces, the handle can be removed, and the accessories plugged directly onto the suction hose.
To release the handle, the grey areas on both sides of the handle must be pressed, and the handle pulled off of the hose.
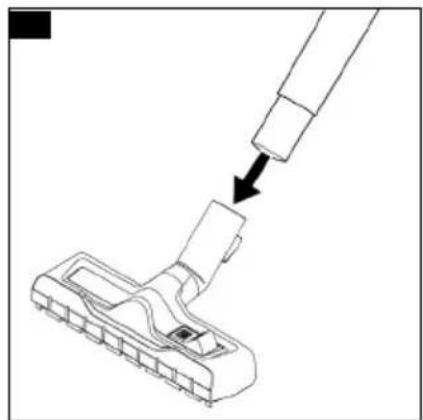
- Connect the floor nozzle to the suction pipes.
- Use the position with the brush strips extended to vacuum dry dirt.
- Use the position with squeegees extended to suck up damp dirt / water.
Illustration J
Starting up the device
Note
The device can be switched on and off manually (power switch position on the right-hand side) or with the remote control (power switch position on the left-hand side, remote control symbol).
With the remote control, the remote control commands are sent to the device via Bluetooth® Low Energy (BLE).
- Plug the mains plug into the socket.
Illustration K
Switching on manually
Device without device socket
- Set the power switch to the desired position.
Illustration L
- Position "I": The suction / blowing function is activated. The suction strength can be set from "MAX" to "MIN" as required.
- Position ① The remote control is activated and the device can be controlled via the remote control. The suction strength can be set from "MAX" to "MIN" as required.
- Position "O": The device is switched off.
Device with device socket
- Set the power switch to the desired position.
Illustration M
- Position "I": The suction / blowing function is activated. The suction strength can be set from "MAX" to "MIN" as required.
- Position and : When a power tool is connected, the suction is activated automatically when the power tool is operated.
The remote control is activated and the device can be controlled via the remote control. The suction strength can be set from "MAX" to "MIN" as required.
- Position "O": The device is switched off.
Note
As long as the device is supplied with power, the power socket can be used as a power source.
Note
Limited for Switzerland only: The socket outlet shall only be used during operation in dry condition.
Switching on with the remote control
Note
- Use with the remote control enables convenient switching on and off without having to constantly go back to the device, as well as automatic switching on and off when using cordless tools, thanks to the vibration detection.
Initial startup of the remote control in manual mode
1 Turn the power switch to the left to the symbol.
Illustration L Illustration M
2 Attach the remote control to the end of the suction hose, making sure it is firmly seated.
3 Press the remote control briefly to switch on the device, the wireless connection is established.
Illustration P
4 The device switches on and the suction / blowing function starts.
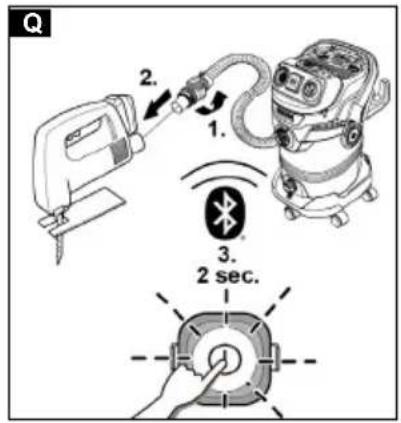
Initial startup of the remote control in automatic mode (vibration mode for cordless tools) Note
To avoid false vibration detection due to uneven floors (e.g. wooden floor boards), do not use the vibration mode while working with the floor nozzle. Only use vibration mode with a power tool.
1 Turn the power switch to the left to the symbol

Illustration L
Illustration M
2 Attach the remote control to the end of the suction hose, making sure it is firmly seated.
Illustration O
Note
The remote control is detachable and can also be mounted directly on the handle of the cordless tool due to its adjustability, see chapter Mounting the remote control.
3 Attach the suction hose to the holder provided on the cordless tool and use the adapter if necessary.
4 Press and hold the on/off button on the remote control for about 2 seconds.
The LED starts to flash, the device is in vibration mode.
Illustration Q
5 Switch on the cordless tool.
The device detects the vibration, switches on and the suction / blowing function starts.
Note
After 15 minutes of no activity, no button presses and no vibration, the remote control automatically exits vibration detection and the LED goes out to reduce battery consumption.
Note
If the power tool is switched off, the suction turbine continues to run for approx. 5 seconds in order to suck in the residual dirt in the suction hose.
Operation
ATTENTION
Flat pleated filter missing
Device damage
Always work with the flat pleated filter inserted.
Note
Pay attention to the latest part numbers when purchasing and installing filter bags and flat pleated filters. Information on accessories and spare parts can be found at www.kaercher.com.
Dry vacuuming
ATTENTION
Vacuuming cold ashes
Device damage
Only vacuum cold ash with an ash pre-separator.
ATTENTION
Defective or wet flat pleated filter
Device damage
Before initial startup, check the flat pleated filter for damage and replace it if necessary.
Only vacuum with a dry flat pleated filter.
Note
Replace the filter bag in good time, as a filter bag that is too full could be damaged. The fill degree of the filter bag depends on the amount of dirt vacuumed. The filter bag should be replaced more frequently when vacuuming fine dust, sand, etc.
Filter control display for filter bags and flat pleated filters
Note
The LEDs of the filter control display signalise the decreasing suction performance.
The LEDs on the filter control display provide individual information about the required filter cleaning / filter change for both the flat pleated filter and the filter bag. See chapter Filter control display for filter bags and/or flat pleated filters lights up.
Illustration U
Note
The filter control display is not a filling level display for the filter bag. The suction performance may decrease, especially when vacuuming fine dust, if the fine pores of the filter bags are clogged. For permanently high suction performance, the filter bag should be replaced even if the maximum fill level is not reached.
Wet vacuuming
ATTENTION
Wet vacuuming with a filter bag
Device damage
Do not use a filter bag when vacuuming wet.
ATTENTION
Operation with full container
When the container is full, a float switch closes the suction opening and the device runs at a higher speed.
Switch off the device immediately and empty the container.
Note
If the device falls over, the float can also close. To make the device capable of vacuuming again, set up the device, switch it off, wait 5 seconds and then switch it on again.
Working with corded power tools (only for devices with a built-in device socket)
△CAUTION
Unintentional starting of the power tool
Injury or property damage
Make sure that the power tool is ready for operation as soon as it is connected to the device socket.
- Connect the suction hose.
Illustration H
-
If necessary, the adapter can be adjusted to the connection diameter of the power tool with a suitable tool.
-
Option A) Fit the adapter on the handle of the suction hose. Connect the suction hose to the power tool using the adapter.
Option B) For more flexibility when working, connect the adapter to the thin tool hose (special accessories) and the handle of the suction hose and connect it to the power tool.
Option C) With some power tools, the handle of the suction hose can be connected directly to the power tool.
Illustration R
- Plug the mains plug of the power tool (D) into the device socket.
Illustration S
- Set the power switch to

The "MAX" to "MIN" power can be regulated using the rotary switch.
The suction is activated automatically.
Illustration M
Note
Note the maximum connected load (see information on the device socket).
Note
As soon as the power tool is switched on, the suction turbine starts up with a 0.5 second delay. If the power tool is switched off, the suction turbine continues to run for approx. 5 seconds in order to suck in the residual dirt in the suction hose.
Integrated filter cleaning system
Note
The filter cleaning system is designed for vacuuming large quantities of fine dust. The filter cleaning system allows the soiled flat pleated filter / filter bag to be cleaned at the push of a button and the suction performance to be increased again.
- Place the handle of the suction hose in the designated parking position on the device head. Press the filter cleaning button three times with the device switched on, waiting 4 seconds between the individual actuations.
Illustration T
Note
After pressing the filter cleaning button several times, check the container for its filling volume. Otherwise dirt can escape when the container is opened
Filter control display for filter bags and flat pleated filters
Note
If the filter bag or flat pleated filter is clogged, the filter bag or flat pleated filter symbol lights up on device models with a filter control display. When the respective symbol lights up, this indicates that the suction power has decreased and that the filter needs to be cleaned or replaced.
- After cleaning the filter bag / flat pleated filter by pressing the filter cleaning button (see chapter Integrated filter cleaning system), the LED goes out immediately.
- Illustration U
LED Filter bag : If the LED lights up again after 10 seconds, the filter bag must be changed.
Note
Even if the maximum fill level of the filter bag is not reached, the filter bag may be clogged, especially when vacuuming fine dust.
— LED Flat pleated filter 📄: If the LED lights up again after 10 seconds, the flat pleated filter must be removed and cleaned manually, see chapter Care and maintenance.
— If the LED lights up again after cleaning, the filter has reached the end of its service life and must be replaced.
Blower function
The blower function can be used to clean areas that are difficult to reach or where vacuuming is not possible, e.g. leaves in a gravel bed.
- Insert the suction hose into the blower connection. The blower function is now activated.
Illustration V
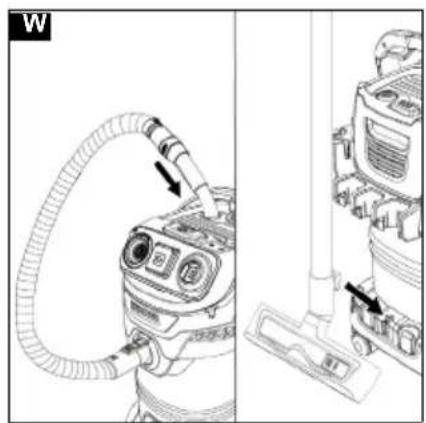
Interrupting operation
-
Set the power switch to "O". or press the remote control. The device is switched off.
-
Variant 1: Place the handle of the suction hose in the intermediate parking position. Variant 2: Attach the floor nozzle in the parking position Illustration W
Ending operation
-
Set the power switch to "O". The device is switched off.
-
Remove the remote control from the suction hose or cordless tool.
-
Pull out the mains plug.
-
Remove the device head. Illustration B
-
Empty the container. For devices equipped with a drain screw, the container can be emptied via the drain screw when handling liquids. Illustration X
-
Storage possibility: Illustration AE
Note
The suction hose can be wrapped around the device head and attached to the device head with the help of the hose collar.
- Store the device and remote control in a dry and frost-proof room.
Care and service
General care instructions
- Clean the device and plastic accessory parts with a commonly available plastic cleaner.
- Rinse the container and accessories with water, as necessary, and dry them before further use.
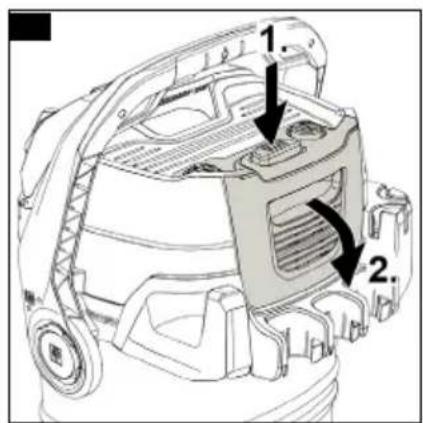
Clean the filter box / flat pleated filter
-
Unlock the filter box and fold it out. Illustration Y
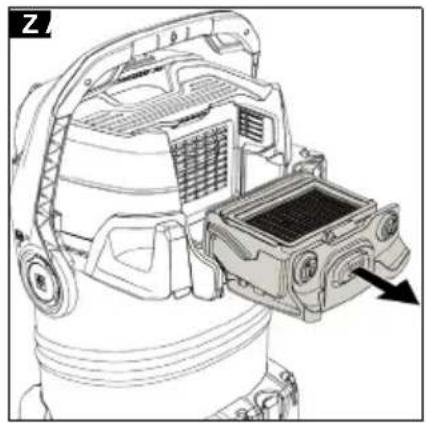
-
Remove the filter box. Illustration Z
-
Empty the filter box into a waste container. In the case of heavy soiling, tap the filter box against the edge of the waste container. The flat pleated filter does not have to be removed from the filter box. Illustration AA
If necessary, clean the flat pleated filter separately.
-
To do this, remove the flat pleated filter from the filter box. Illustration AB
-
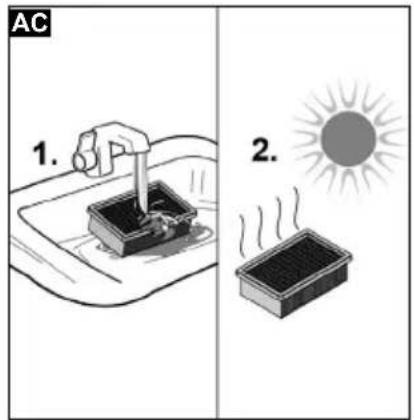
Clean the flat pleated filter under running water. Do not rub or brush off. Allow the flat pleated filter to dry completely before reusing.
Illustration AC
We recommend cleaning the flat pleated filter after each use.
Replacing the remote control button cell battery Note
The old/replaced button cell battery must be disposed of in accordance with the applicable regulations.
For further information, see chapter Safety instructions for the battery
-
Open the battery cover on the back of the remote control with a coin.
-
Carefully remove the battery and replace it with a new one. Pay attention to the labelling of the battery (CR2032) for correct insertion (the positive pole must be facing the battery cover).
-
Reattach the battery cover and close it securely with the coin. Check that the cover is seated correctly.
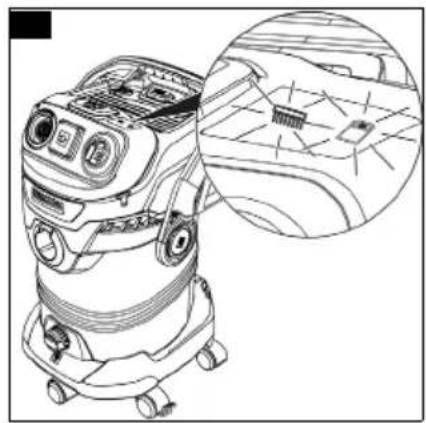
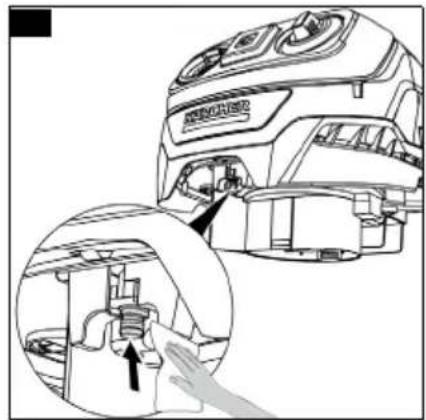
Cleaning the sensor for the filter control function
Note
Devices with a filter control display have a sensor at the bottom front of the device head that measures the suction performance for the filter control function. In order not to impair the measurements, the sensor must be cleaned if it is heavily soiled.
- Unlock and remove the device head.
- Carefully clean the sensor with a moist cloth.
Illustration AD
- Refit and lock the device head.
Troubleshooting guide
Malfunctions often have simple causes that you can remedy yourself using the following overview. When in doubt, or in the case of malfunctions not mentioned here, please contact your authorised Customer Service.
Declining suction performance
Accessories, the suction hose or the suction tubes are clogged.
- Remove the clog with a suitable aid.
The filter bag is full - Replace the filter bag.
The flat pleated filter is dirty. - Clean the flat pleated filter (see Chapter Clean the filter box / flat pleated filter).
The flat pleated filter is damaged. - Replace the flat pleated filter.
Filter control display for filter bags and/or flat pleated filters lights up
Filter bags and/or flat pleated filters are full or clogged with fine dust.
- Press the filter cleaning button to clean the filter bag and/or flat pleated filter or replace them if necessary (see chapter Filter control display for filter bags and flat pleated filters, see chapter Clean the filter box / flat pleated filter).
Device cannot be switched on with the remote control
The remote control is outside the signal range of 10 metres.
● Bring the remote control/device within signal range. The remote control battery is flat.
- Insert a new battery.
The power switch is not set to the remote control symbol.
- Turn the power switch to the left to the remote control symbol.
Remote control LED lights up / does not flash in Automatic Mode
The remote control battery is flat or nearly flat.
- Insert a new battery.
The remote control does not work
The remote control is exposed to insufficient vibration to generate the start signal and send it to the vacuum cleaner because the strap is mounted too loosely on the suction hose.
- Select the next recess to fix the strap more firmly to the suction hose.
- For better vibration transmission, attach the remote control directly to the cordless tool if possible.
Technical data
Note
The technical data can be found on the type plate.
Remarques générales
Defect of nat vlak harmonicafilter
Sette inn filterposen
Manglende flatt foldefilter
Skader på apparatet
Rengjøre filterkassetten / det flate foldefilteret
- Løsne filterkassetten og trekk den ut.
Figur Y
Üldised hooldusjuhised
| WD 5 | WD 6 | WD 7 | |
| Control | Control | Control | |
| P S | P S | P S |
1.Twopsil chropom'shmp
طورة إيضاحية
Scan QR Code for download and easy product registration in Home & Garden App or website.
karcher.com/register

EN - Download the Home & Garden App to register your device for full support in cleaning.
■ Control of smart products
■ Application tips & expert knowledge
■ Product information, overview of accessories and operating instructions
■ Support and service contact
■ Onlineshop – exclusive offers and much more


- Allgemeine Hinweise
- Safety instructions for the battery
- ⚠ WARNING
- Intended use
- Note
- Trademarks
- Environmental protection
- Notes on the content materials (REACH)
- Accessories and spare parts
- Scope of delivery
- Warranty
- Device description
- Illustration A
- Installation
- Installing the steering rollers
- Illustration B
- Illustration C
- Illustration D
- ⚠️DANGER
- Installing the support for the accessory holder
- Mounting the remote control
- Illustration N
- Initial startup
- Inserting the filter bag
- Installing the hose, pipes, floor nozzle
- Starting up the device
- Switching on manually
- Device without device socket
- Illustration L
- Device with device socket
- Illustration M
- Switching on with the remote control
- Initial startup of the remote control in manual mode
- Illustration L Illustration M
- Illustration P
- Initial startup of the remote control in automatic mode (vibration mode for cordless tools) Note
- Illustration O
- Illustration Q
- Operation
- ATTENTION
- Flat pleated filter missing
- Dry vacuuming
- Vacuuming cold ashes
- Defective or wet flat pleated filter
- Filter control display for filter bags and flat pleated filters
- Illustration U
- Wet vacuuming
- Wet vacuuming with a filter bag
- Operation with full container
- Working with corded power tools (only for devices with a built-in device socket)
- △CAUTION
- Unintentional starting of the power tool
- Illustration H
- Illustration R
- Illustration S
- Integrated filter cleaning system
- Illustration T
- - Illustration U
- Blower function
- Illustration V
- Interrupting operation
- Ending operation
- Care and service
- General care instructions
- Clean the filter box / flat pleated filter
- Illustration AC
- Replacing the remote control button cell battery Note
- Cleaning the sensor for the filter control function
- Illustration AD
- Troubleshooting guide
- Declining suction performance
- Filter control display for filter bags and/or flat pleated filters lights up
- Device cannot be switched on with the remote control
- Remote control LED lights up / does not flash in Automatic Mode
- The remote control does not work
- Technical data
- Remarques générales
- Defect of nat vlak harmonicafilter
- Sette inn filterposen
- Manglende flatt foldefilter
- Rengjøre filterkassetten / det flate foldefilteret
- Figur Y
- Üldised hooldusjuhised
Brand : Kärcher
Model : WD 5 Control
Category : Vacuum Cleaner