
COB2000 - Surveillance Camera ELRO - Free user manual and instructions
Find the device manual for free COB2000 ELRO in PDF.


| Product type | Wireless battery-powered outdoor surveillance camera |
| Brand | ELRO |
| Model | COB2000 |
| Video resolution | Full HD 1080P (1920×1080) at 25 fps |
| Viewing angle | 110° horizontal |
| Night vision | 6 infrared LEDs 850 nm, range approx. 10 m |
| Connectivity | Wi-Fi 2.4 GHz (IEEE 802.11 b/g/n) |
| Power supply | Built-in battery 4×18650 (3.7V, 2600mAh), charging via USB-C |
| Battery life | Up to 10 months with moderate use (depending on settings) |
| Storage | Micro SD card up to 64 GB (not included), cloud storage (subscription) |
| Audio | Built-in microphone and speaker, two-way communication |
| Motion detection | PIR sensor with AI human detection |
| Mobile app | ELRO Home Safe (iOS and Android) |
| Protection rating | Weatherproof seals (IP not specified) |
| Operating temperature | 0°C to 40°C (recommended 10-30°C) |
| Weight | Approx. 400 g |
| Dimensions | Approx. 10 × 8 × 8 cm |
| Main functions | Motion detection, night vision, two-way audio, SD card recording, push alerts |
| Maintenance | Clean with a soft, dry cloth; do not use chemicals |
| Safety | Do not expose to direct sunlight, avoid shocks, do not open the housing |
| Spare parts | Battery not replaceable, SD card and charging cable removable |
| Warranty | See www.elro.eu |
Frequently Asked Questions - COB2000 ELRO
User questions about COB2000 ELRO
0 question about this device. Answer the ones you know or ask your own.
Ask a new question about this device
Download the instructions for your Surveillance Camera in PDF format for free! Find your manual COB2000 - ELRO and take your electronic device back in hand. On this page are published all the documents necessary for the use of your device. COB2000 by ELRO.
USER MANUAL COB2000 ELRO
natural_image
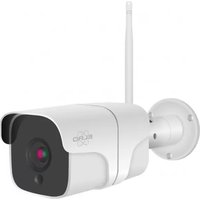
White ECRO security camera with mounted sensor and antenna (no visible text or symbols on body)Manual
FULL HD OUTDOOR BATTERY CAMERA
COB2000
Home is not a place, it's a feeling
ENGLISH Page 2
Go to www.elro.eu to download the latest version of this user manual.
DEUTSCH Seite 12
- Introduction...... - 4 -
- Packaging contents.... - 4 -
- Camera overview.... - 4 -
- Camera mounting.... - 4 -
- ELRO Home Safe App....- 5 -
- Add camera.... - 5 -
- Explaining the camera....- 6 -
- Explanation of settings.... - 7 -
- Battery Management....- 8 -
- Reset....-9-
- FAQ / frequently asked questions....- 9 -
- Specifications.... - 10 -
- General Safety & Warnings ...... - 10 -
- DoC declaration of conformity.... - 11 -
- Symbols.... - 11 -
DE Inhalt
Congratulations on purchasing the ELRO COB2000 Outdoor Battery Camera! This camera allows you to keep an eye on everything outdoors. The camera can be added to the free ELRO Home Safe App. This app allows you to control multiple cameras. This way, you put together a security system that keeps an eye on all the important things for you. Give yourself time to read this manual carefully before you start installing.
2. Packaging contents
a. 1080P Full HD Outdoor Battery Camera
b. Mounting bracket
c. Mounting hardware; screws and plugs
d. Charging cable
e. Manual
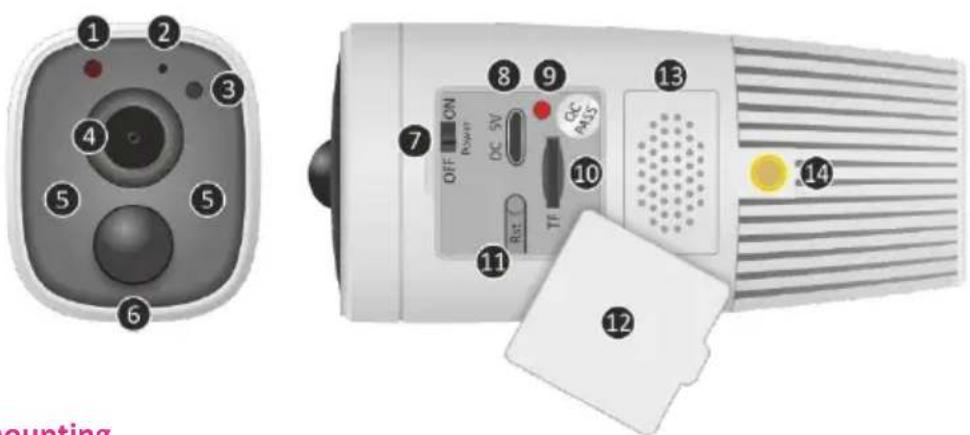
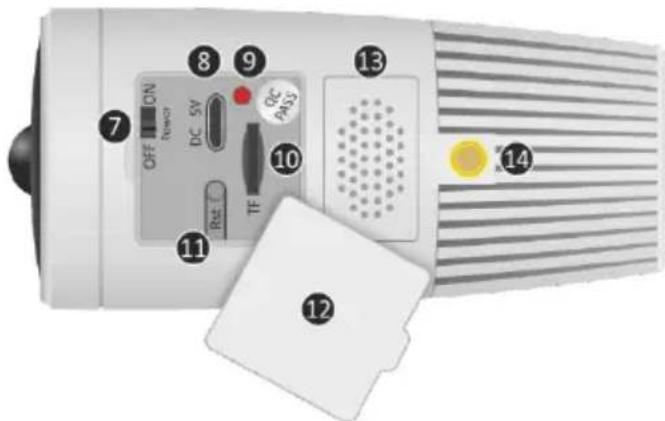
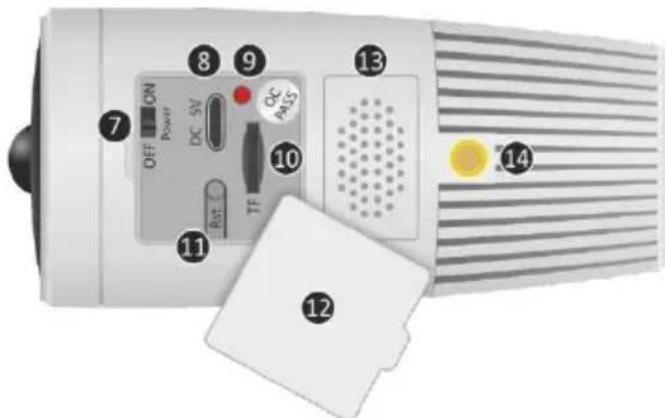
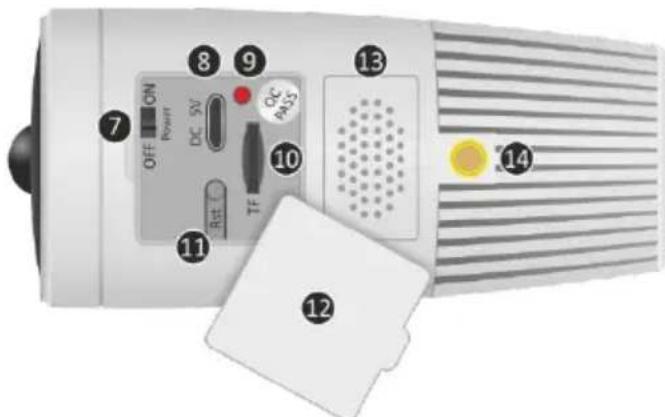
3. Camera overview
- Indicator light
a. Solid blue; the camera is switched on.
b. Flashing red; waiting for Wi-Fi connection, ready to connect.
c. Red while scanning QR code, blue when the camera is successfully connected.
d. Blue turns red when motion is detected.
- Microphone
- Day/night sensor
- Camera Lens
- 6x Infrared LEDs (2x 3 pcs)
- PIR Sensor
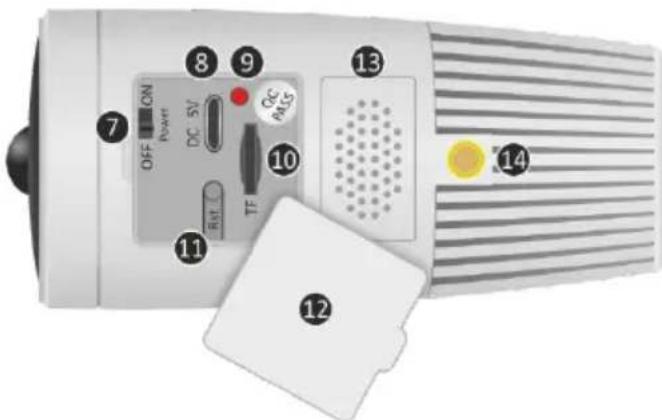
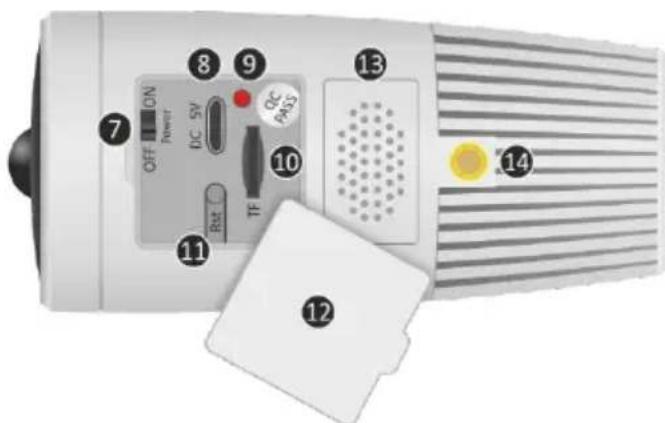
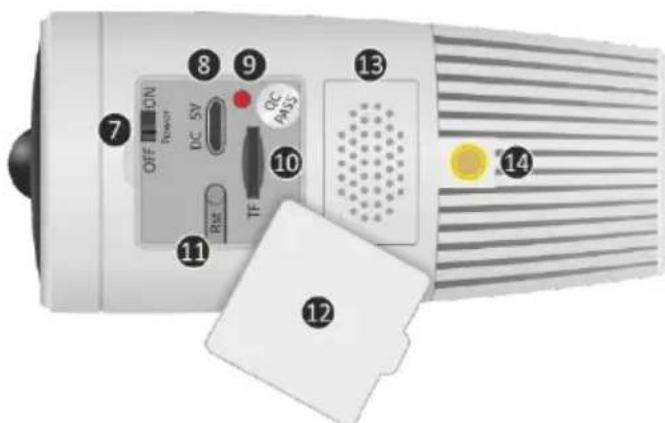
- On/Off switch
- USB power cable connection
- Charging indicator light; Red; battery charging. Green; battery is 100% charged
- Micro SD card slot (Micro SD card (excl.), max 64gb)
- Reset button
- Waterproof protective rubber
- Speaker
- Mounting bracket screw
4. Camera mounting
Important
- Make sure the battery is charged before starting pairing and installation.
Before starting installation, pair the camera with the app first and check its performance by viewing the image via the app from the same location/position where the camera will be mounted. Installation is described further on in this manual.
The location should be free of dust and not in view of a strong light source or direct sunlight. Check the location for potential movements/triggers. See 9. Battery Management for more information and advice. - Avoid thick walls or obstacles between router and camera.
- This camera has built-in IR LEDs that allow images to be viewed in black and white in no/low light conditions.
4.1 Charging the camera
When using the camera for the first time, it is recommended to fully charge the battery for the first time.
- Plug the adapter into the wall socket and connect the USB cord
- Connect the USB-C connector to the camera. The camera will now receive its power.
- A red LED will be visible at the camera's adapter connector.
- When the battery is 100% charged, the LED will change to green.
4.2 Camera mounting
When the camera is paired with the app (see 6. Add camera), follow the steps below.
- Mark the position of the mounting bracket's screw holes on the wall.
- Drill the holes and insert the 3 plugs into the holes.
- Attach the bracket, insert the screws through the mounting bracket into the dowels and tighten firmly.
- Screw the camera onto the mounting screw of the mounting bracket.
- Now point the camera at the area you want to monitor.
- The camera hangs and is ready for use.
5. ELRO Home Safe App
Download the free ELRO Home Safe app from the Google Play Store or App Store. Read through User Agreements and Privacy Policy and accept them to continue.
Google Play Store
iOS Apple App Store
5.1 Registering
If you don't have an account yet, you can register an account for free.
a. Click on "Sign up".
b. Enter your country and enter the correct e-mail address.
c. Check the box next to the Privacy Policy and User Agreement. Then press "Retrieve Verification Code".
d. Check that you have received an e-mail with the verification code. Also check for SPAM. When received, enter this code.
e. Set a new password. Use 6-20 characters with a combination of letters and numbers. Then press "Done".
f. Accept all permissions to complete the registration. Once this is done, you can use the ELRO Home Safe App.
5.2 Login
If you already have an account, you can log in with your details.
a. Click on "Log In".
b. Enter your country, email address and password.
c. Check the box next to the Privacy Policy and User Agreement. Press "Log In".
d. Now you are logged in and can use the ELRO Home Safe App.
6. Add camera
The camera can be easily added via QR-Code. Follow the steps below carefully and the camera will be added to the app within minutes.
6.1 QR Code
a. Make sure the camera is charged. Turn on the camera; the indicator light should be flashing red.
b. Go to the 'Home' tab. Press the '+' at the top right and select 'Add device'.
c. Select the category 'Camera' in the left-hand row and press the 'COB2000' camera.
d. Check whether the red light is still flashing to indicate that the camera is still in pairing mode. If not, switch the camera OFF and ON using 3. Camera overview / 7. On/off switch.
e. In the app, press the symbol 'Indicator light flashes blue' and then click next.
f. The WiFi name is filled in automatically. Then enter the password for this network. Press 'Next'.
g. A QR code will now appear on the screen. Hold this QR code at a distance of approximately 20 cm from the camera so that the camera can read it.
h. The camera will make a 'Koe Koe' sound like an owl when it has been successful. Then press 'Scan successful'.
j. The camera will now be added, press done.
Important
- Connect to your router/modem's 2.4Ghz WiFi signal.
- The camera has no ability to use AP mode, EZ mode and Cable.
7. Explaining the camera

Description of all menus and functionalities of the app.
Navigation
Return to the previous screen.
Full screen mode
Causes images to be displayed full-screen and tilted.
Snapshot
Tap this to take a picture. The photo is saved locally in the app and uses the smartphone's memory.
Talk - One-way communication
Tap this and hold down. This allows you to speak through the smartphone's microphone and you will be heard from the camera. When the Talk mode / Two-way talk setting (see 8 Setting explanation, Talk mode) is set, the icon will change to a phone symbol.
Manual recording
Tap this and a recording will be made. Tap again to stop and save the recording. The video is stored locally in the app and thus uses the smartphone's memory.
Functionalities
Tap this and with menu with all functions of the doorbell are displayed. Press to close the menu

Volume muted
Tap this and the volume turns on. Press again to mute the volume again.
Screen fill
Fill the screen without tilting the image. Tap again to restore the image.
125 KB/S
Transmission speed

Displays the speed of the signal between the camera and the router.
Image quality
Sets the image quality, tap to HD change to and SD vice versa. This affects the images and photos captured and can affect smartphone memory and battery life.
Full High Definition = 1920 x 1080
Standard Definition = 640 x 360

Battery percentage
See what the camera's battery percentage is. This indicates how much power the camera has left. When battery is
charging, it will show in the battery.

Playback
Review all recordings stored on the SD card.
Timeline
On the timeline, scroll to the moment you specifically want to watch back.
→ Full screen

While recording, tap here and watch the recording in full screen.

Manual recording
Tap here and a recording is made. Tap again to stop and save the recording. The video is stored locally in the app and thus uses the smartphone's memory.

Snapshot
Tap this to take a photo. The photo is saved locally in the app and thus uses the smartphone memory.

Narrow timeline
Tap here to resize the timeline. Tap again to enlarge the timeline.

Calendar
Select a specific day to watch back recordings here.

Volume down
Tap here to turn on the volume. Tap again to mute the volume.

Album
View back all photos and recordings stored locally in the app.

Theme Color
Change the app's theme to either Light Mode or Dark Mode.

Night Mode
Specify whether the camera should automatically switch between day and night vision. This can also be switched on and off manually.

Anti-Flicker
Anti-Flicker causes the camera to recognise flickering light and try to minimise it. Select 50Hz, 60Hz or disable this function completely.

PIR
Set the sensitivity of the PIR sensor. Choose from Low Sensitivity, Medium Sensitivity or High Sensitivity. It is also possible to disable the PIR.

Notifications
View all recent notifications detected by the camera.

Cloud
Make optional use of cloud storage. Activate a subscription as desired.

Smart Scenes
Create a specific scene or action. For example, switch on an external siren when motion is detected.

Features
Open the menu to view, enable or disable all features.
8. Explanation of settings
Press at the top right to go to settings.
Icon / Device name
- Change the icon, device name and device location of the camera.
Device information
- View further information about the device.
Tap-to-Run / Automation
- View all linked scenes here.
Basic function settings; Change some basic functions here.
- Flip screen; rotate the image when hanging the camera upside down.
- Time Watermark; show the time during live viewing and recording
- Talk mode; change the direction of a communication call.
- One-way communication; hold down the microphone button to speak through the camera.
- Two-way conversation; communicate through the smartphone and camera like a
- phone call.
- Anti-Flicker; specify whether the camera should recognize and minimize flickering light. Select 50Hz, 60Hz or disable this feature completely.
IR Night vision
- Specify whether the camera should automatically switch between day and night vision. This can also be switched on and off manually.
Working mode
- Set a working mode for the camera. Choose one of two choices here;
- Energy-saving mode; The camera is on standby. The camera does not record when on standby. Then, when the camera detects (human) movement, it will wake up and start recording. When watching live manually, the camera will also wake up.
- Continuous; The camera will keep recording until the battery runs out. It will not be idle.
Detection alarm settings
- Enable Human Motion Detection. This function makes the camera detect "human" movements only via AI. It is advised to enable this feature.
- Enable to limit the number of recordings to only relevant ones.
- Enable for more efficient battery usage.
- Receive specific notifications: "Human Motion Detected" instead of "Motion Detected".
PIR
- Set the sensitivity of the PIR motion sensor. Choose from Off, Low and High.
Energy management setting
- See here what the battery percentage of the camera is and also see what the power source of the camera is. This can switch between battery and power cable (charging). It is possible through Energy Management to set an alarm threshold for the camera. The app will give a notification when the battery percentage drops below a certain value. The alarm percentage can be set from 10% to 50%.
Storage settings
- View the capacity of the SD card here. From here, you can also format (empty) the SD card.
Cloud storage
- Adjust the settings for the cloud function.
Offline notification
- Enable the app to give a notification when the camera is offline for more than 30 minutes.
Frequently asked questions and feedback
- Quickly go to the FAQ or provide feedback on the product, app or other services.
Share device
- Share the camera with one or more users who also wish to use the camera and its features. Sharing can be done by linking an existing ELRO Home Safe account or by sharing a link from the camera.
Add to home screen
- Create a shortcut from the smartphone to open the camera directly, without first opening the ELRO Home Safe and activating the camera.
Device update
- Check whether any updates are available. When they are available, you can also download and install them from here. It is possible to have these updates installed automatically.
Remove device
- Remove the camera from the app. The camera will also be reset. The camera will say "System Reset".
9. Battery Management
The ELRO COB2000 has 4 built-in 18650 batteries. These batteries are not replaceable. It is common for only two batteries to be used in standard battery security cameras. This means that the COB2000 is more powerful than other battery security cameras in the camera segment. When installing, it is very important to check that the camera is mounted in the best conditions. It is important to check that the location, situation and settings meet the camera's requirements to maximize battery life.
For instance, it is advised to avoid crowded locations and hang the camera sheltered away to make it more resistant to weather conditions such as rain and snow. If the camera is exposed to extreme temperatures, such as heat (hot) or snow (cold), the battery life will be affected and will be shorter.
Check out the battery life table below. Please note! This is only an estimate and may vary from one situation to another. Consider the 10 points below to arrive at an "ideal" situation.
| Triggers per day +/- | Duration recording in sec | Duration in days +/- | Duration in months +/- |
| 20 | 20 | 200-300 | 6-10 |
| 40 | 20 | 70-150 | 2-5 |
| Continuous | 20 | 2,5 | 0,08 |
Important
- If the WiFi network where the camera is installed is unstable, the camera is often offline and reconnected, which will also consume power. There is built-in 4pcs battery, no need extra battery to reconnect.
- SD (Standard Definition) will reduce power consume.
- Using the app also affects battery life. Changing settings or frequently reviewing images consumes battery because of data traffic. Possibly limit app usage to only necessary.
- Temperature can affect battery life. Make sure the camera is active above 10 degrees and below 30 degrees. If you deviate from this, it can affect battery life.
- The COB2000 is a battery product, that means over time the battery condition deteriorates due to heavy use.
- The rechargeable batteries are built-in and not replaceable. If the camera is opened, it may be at the expense of the warranty and is no longer entitled to this.
- Enable Human Motion Detection to make the camera only register "human" movements. This way, detections are handled more efficiently and battery is saved.
- Continuous recording can be set via Working Mode (see 8. Settings explanation, Working Mode).
- To give a perspective; when the camera is set to continuous recording, the battery works +/- 50-60 hours.
- The shots taken have a duration of 20 seconds. This cannot be changed.
Important advice!
To maximize battery life, we recommend ruling out "unnecessary" recordings. So make sure the camera only records unwanted people on your own premises. Rule out the possibility of the camera detecting moving vehicles on public roads, for instance. This reduces the number of unnecessary recordings and allows you to make longer use of the camera's battery.
10. Reset
You can easily reset the camera. After resetting the camera, the red light will flash to indicate that the mating mode is active. This can be done in three ways:
Method 1;
Hold down the reset button (see 3 Overview of the camera, 11 Reset button) and release as soon as the camera sounds "Koe Koe" like an owl. Then delete the camera from the app by holding the selected camera on the home screen or going to the general settings. Then press "Delete Device".
Method 2;
Delete the camera from the app from the general settings (see 8. Settings explanation, Delete Device). The camera sounds "Koe Koe" like an owl.
Method 3;
Delete the camera from the app by holding the selected camera on the home screen, then press "Delete Device". The camera sounds "Koe Koe" like an owl.
11. FAQ / frequently asked questions
Having problems with the installation? Then please visit www.elro.eu/faq to get a quick answer to your question. Here you will find the most recent version of the manual and answers to frequently asked questions (FAQ). Check out some frequently asked questions below.
Q; Can I replace the batteries of the camera?
A; No, these batteries are built-in and cannot be replaced. Opening the camera may affect its operation and will be at the expense of the warranty.
Q; My Wi-Fi name is not automatically entered during installation.
A; Make sure that the location feature is on. This way, the wifi name will be filled in automatically.
Q; After installing a new router, my camera remains offline.
A; Reset the camera and reinstall using the data from the new internet router.
Q; Why am I not receiving notifications?
A; Make sure all notifications permissions are accepted and that the app is allowed to send you allowed to send you notifications.
Q; Can I add multiple cameras to the app?
A; Yes, you can add multiple and different cameras to the ELRO Home Safe app.
Should any questions remain unanswered despite this comprehensive user guide, please turn to our website www.elro.eu/faq and see if you can find the answer in the "Frequently Asked Questions" (FAQs).
12. Specifications
Main Processor T31ZL
Sensor 1/2.8CMOS
Video 1920*1080@25fps. H.264 Bitrate self-adaptive. Suitable for changeable network environments(3G,4G or WIFI)
Audio Two-way voice & Support echo cancellation | Built-in speaker / Built-in Microphone
View Angle 110° Horizontal
Day & Night IR-CUT double filter automatically switches. 6pcs infrared LED 850mm.
Min. Illumination: 1 Lux
Connection Support WiFi 2.4 GHz, IEEE 802.11 b\g\n. AP Hot spot. Scan QR code
Storage Support SD card 8G / 16G / 32G / 64G
Recording Support smart phone local record, records video playback. Optional recording time setting between 15s-45s, once triggered.
Screen Shot Support Smart phone screen shots
Working Condition PIR detection triggered / Mobile phone Control
Running up System running up in millisecond
Inform Push message within 1s-2s
Motion Detection PIR motion detection, sensitivity High(2s) - Medium (within 5s) Low (within 10 s)
Scene Mode Backlight compensation / Infrared night vision / Quick movement / HLC / D-WDR
Share Support QR code share(one-click generates QR-code, share to others). Maximum supports 7 authenticated users (supports users 3 view at the same time).
Battery 3.7V, 4pcs 18650 battery, 2600mAh,
Power Consumption Working 170mA, Standby 160μA
13. General Safety & Warnings
• If you are unsure about assembly and connection, try it out on the "kitchen table" first.
- Do not install in an environment with high temperature or high humidity.
• Do not install near televisions, the signals may interfere.
- Avoid throwing, dropping or otherwise damaging it.
- Clean with a soft cloth, do not use polish, thinner or corrosive agents.
• Do not expose the camera lens to direct sunlight.
• Use the product in a situation where there is no interference.
• When a car or motorbike passes, the image may become blurred or cut out due to interference from radio waves.
• To avoid damage, install according to the instructions.
• Use the parts supplied in the packaging.
14. DoC declaration of conformity
I, ELRO Europe, hereby declare that the type of radio equipment COB2000 is in conformity with Directive 2014/53/EU. The full text of the EU Declaration of Conformity can be consulted at the following internet address: www.elro.eu/compliance. Frequency: 2.4GHz / Maximum transmission power: < 20 dBm
15. Symbols
Recycling and disposal; The WEEE symbol (a) means that this product and batteries must be disposed of separately from household waste. When this product reaches the end of its service life, take it to a designated waste collection point nearby to ensure safe disposal or recycling. Protect environment and public health, handle natural resources responsibly! Read the manual (b) before use and keep it in a safe place for future use and maintenance. Warranty (c) visit www.elro.eu
ELRO Europe | www.elro.eu
Postbus 9607 - Box E800
1006 GC Amsterdam - The Netherlands

(a)

(b)

(c)

1. Einführung
5. ELRO Home Safe App
Google Play Store

iOS Apple App Store
5.1 Registrieren
5. ELRO Home Safe App
Google Play Store

iOS Apple App Store
5.1 Registreren
ELRO Europe | www.elro.eu
Postbus 9607 - Box E800
1006 GC Amsterdam - The Netherlands

1. Introduction
Google Play Store
iOS Apple App Store

5.1 Registre
Google Play Store

iOS Apple App Store
5.1 Registro
5. App ELRO Home Safe
Google Play Store

iOS Apple App Store
5.1 Registrazione
Google Play Store
iOS Apple App Store
5.1 Registrering
Fuld High Definition = 1920 x 1080
Support Smart phone screen shots
Arbejdsforhold
Push-besked inden for 1s-2s
Google Play Store
iOS Apple App Store
5.1 Registrering
Full High Definition = 1920 x 1080
Standard definition = 640 x 360

Batteriprocent
ELRO Europa | www.elro.eu
Postbus 9607 - Box E800
1006 GC Amsterdam – Nederländerna

1. Wprowadzenie
4. Montaż kamery
Ważne
Google Play Store
iOS Apple App Store
5.1 Rejestracja
4. Kamera montaji
Önemli
Google Play Store
iOS Apple App Store

5.1 Kayit

- Manual
- FULL HD OUTDOOR BATTERY CAMERA
- ENGLISH Page 2
- DEUTSCH Seite 12
- DE Inhalt
- Packaging contents
- Camera overview
- Camera mounting
- Important
- Charging the camera
- Camera mounting
- ELRO Home Safe App
- Registering
- Login
- Add camera
- QR Code
- Explaining the camera
- KB/S
- Snapshot
- Narrow timeline
- Calendar
- Volume down
- Album
- Theme Color
- Night Mode
- Anti-Flicker
- PIR
- Notifications
- Cloud
- Smart Scenes
- Features
- Explanation of settings
- Detection alarm settings
- Energy management setting
- Storage settings
- Cloud storage
- Offline notification
- Frequently asked questions and feedback
- Share device
- Add to home screen
- Device update
- Remove device
- Battery Management
- Important advice!
- Reset
- Method 1;
- Method 2;
- Method 3;
- FAQ / frequently asked questions
- Specifications
- General Safety & Warnings
- DoC declaration of conformity
- Symbols
- Einführung
- Registrieren
- Registreren
- Introduction
- Registre
- Registro
- App ELRO Home Safe
- Registrazione
- Registrering
- Batteriprocent
- Wprowadzenie
- Montaż kamery
- Ważne
- Rejestracja
- Kamera montaji
- Önemli
- Kayit
Brand : ELRO
Model : COB2000
Category : Surveillance Camera