
CZ40RIPS - Surveillance Camera ELRO - Free user manual and instructions
Find the device manual for free CZ40RIPS ELRO in PDF.
| Product Type | Surveillance Camera |
| Brand | ELRO |
| Model | CZ40RIPS |
| Camera Dimensions | 20 cm x 8 cm x 7.5 cm |
| Monitor Dimensions | 19.5 cm x 12.3 cm x 2.4 cm |
| Monitor Weight | 437 g |
| Camera Power Supply | 9 V DC / 0.6 A |
| Monitor Power Supply | 5 V DC / 2 A |
| Monitor Battery | Lithium 3.7 V / 2000 mAh |
| Camera Resolution | FHD 1920 x 1080 pixels |
| Viewing Angle | 112° (FOV), 95° horizontal, 51° vertical |
| Night Vision | 16 IR LEDs 850 nm, range 15 m |
| Wireless Range | 100 m in open space |
| Motion Detection | PIR sensor and video motion detection (VMD) |
| Audio Functions | Built-in microphone and speaker, two-way communication |
| Siren | 85 dB, manual activation from monitor |
| Recording | On Micro SD card (max 128 GB), scheduled or motion-triggered |
| Mobile App | ELRO Monitoring 2.0 (iOS and Android) |
| Protection Rating | IP65 (camera) |
| Package Contents | 7-inch monitor, camera, 2 antennas, 2 power adapters, network cable, mounting kit, manual |
| Expandability | Up to 4 cameras (compatible model CC40RXX) |
| Operating Temperature | Camera: -10°C to 50°C; Monitor: -10°C to 40°C |
Frequently Asked Questions - CZ40RIPS ELRO
User questions about CZ40RIPS ELRO
0 question about this device. Answer the ones you know or ask your own.
Ask a new question about this device
Download the instructions for your Surveillance Camera in PDF format for free! Find your manual CZ40RIPS - ELRO and take your electronic device back in hand. On this page are published all the documents necessary for the use of your device. CZ40RIPS by ELRO.
USER MANUAL CZ40RIPS ELRO
USER MANUAL
CAMERA SECURITY SET
CZ40RIPS
Home is not a place, it's a feeling
Content
- Introduction ...... - 2 -
- Overview Monitor, symbols and camera ...... - 3 -
- Camera installation ....- 7 -
- Usage - 8 -
- General Settings....- 10 -
- ELRO Monitoring 2.0 App....- 16 -
- FAQ / Frequently asked questions ...... - 22 -
- Specifications ...... - 23 -
Symbols....- 24 -
Go to www.elro.eu to download the latest version of this user manual.
1. Introduction
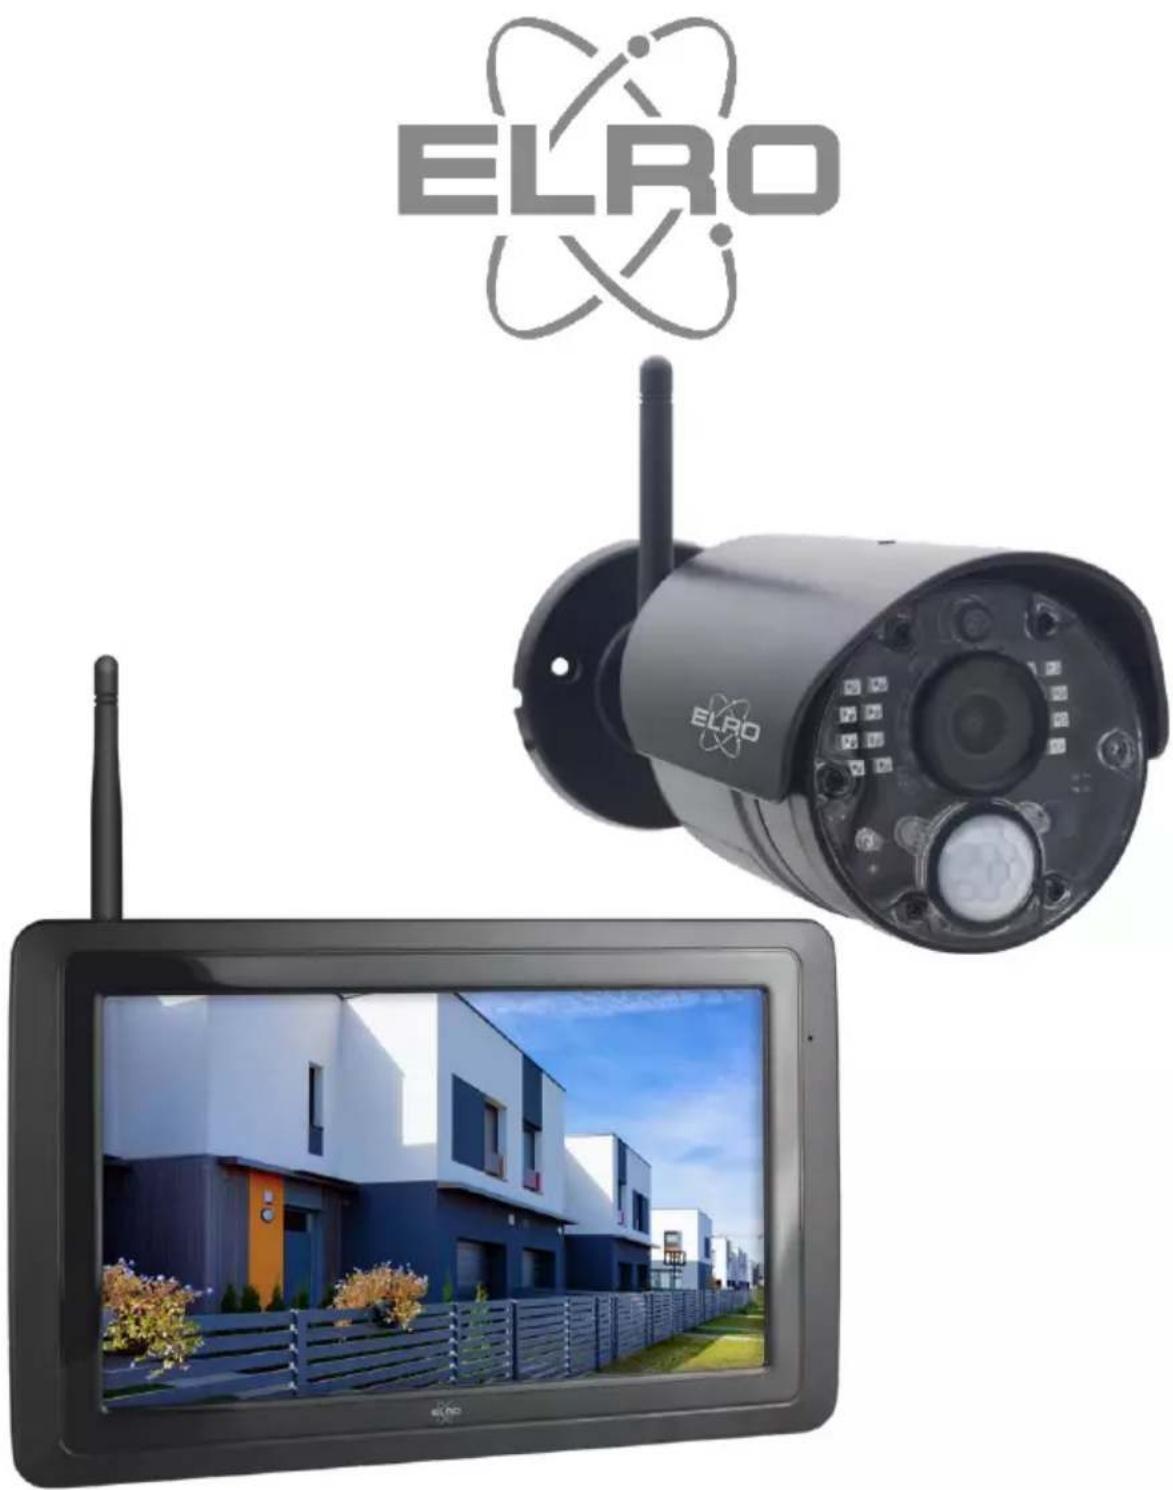
With the ELRO CZ40RIPS CAMERA SECURITY KIT, crime and vandalism can be prevented and you can monitor home and possessions.
- Monitor
The set comes with a 7-inch / 17 cm monitor on which images can be viewed live. The monitor has "touchscreen" operation. It is possible to continuously store footage if you insert an SD card in the slot of the monitor. The monitor can be connected to the internet with an included network cable. Using the ELRO Monitoring 2.0 app, you can view camera images on smartphone or tablet. The monitor has two antennas that provide an extra strong wireless connection to the camera.
- Camera
The camera has a 1080P HD resolution for sharp images, always allowing people to be recognized. Thanks to its IP65 rating, the camera is resistant to all types of weather and very suitable for hanging outdoors. The camera is equipped with a motion detector so that image processing is also activated only after detection.
- Accessories
The set is expandable to a security system with 4 cameras. The additional ELRO CC40RXX security camera is available separately.
1.1. Package contents
• Monitor 7 inch / 17 cm
- Adapter (monitor) 5V DC / 2A / Cable length 2.4m
- Camera 1080P HD
- Adapter (camera) 9V DC / 0.6A / Cable length 2.4m
- Antenna
- Network cable
- Mounting material
- Manual
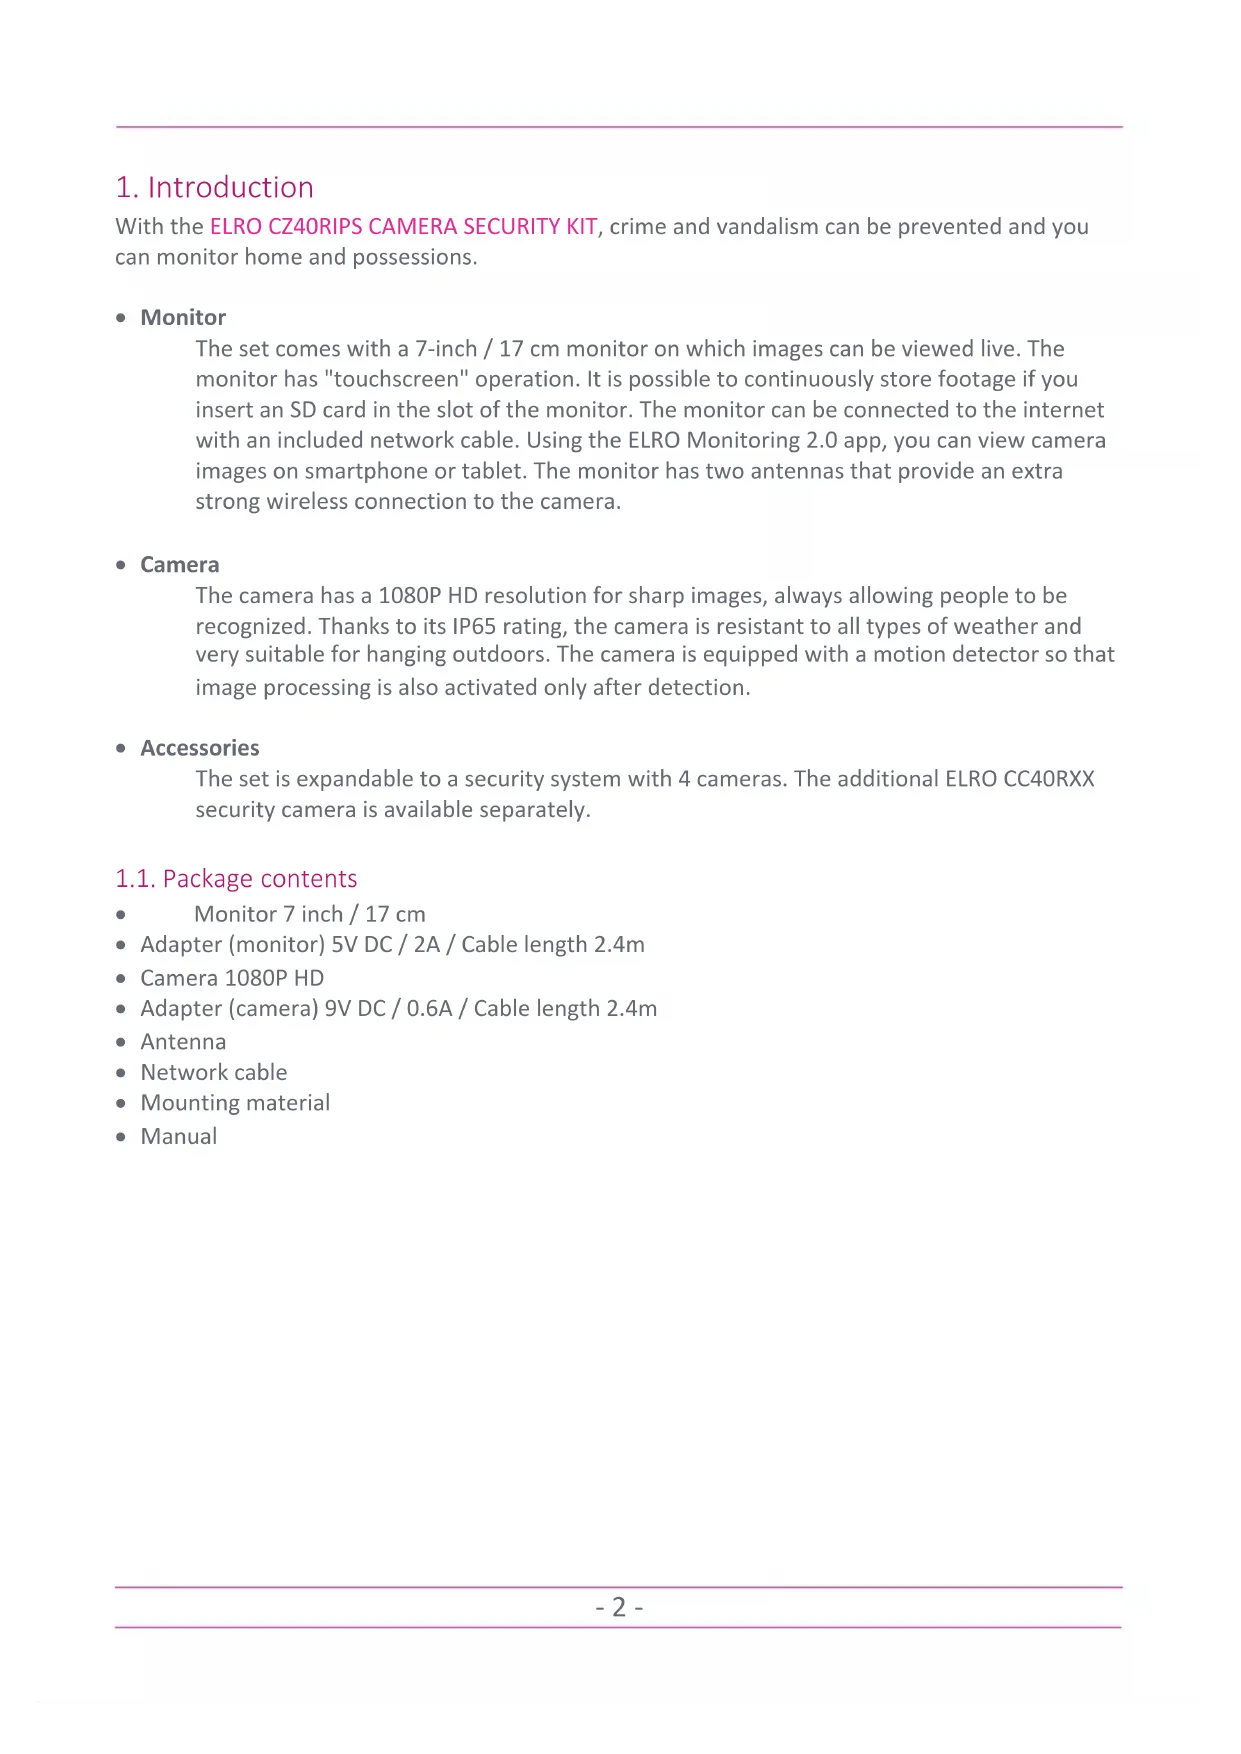
- Overview Monitor, symbols and camera
2.1 Overview Monitor
- ANTENNA
Unfold for optimal wireless reception.
- SCAN MODUS
Press briefly to activate energy-saving mode (see 4.6 Energy-saving Scan mode).
-
MOUNTING EYES
-
TABLE STAND
-
SPEAKER
-
UID-NUMBER / QR-CODE
Scan the QR Code for connection to smartphone / tablet (see 6. ELRO Monitoring 2.0 App).
- UTP PORT
Connect the monitor to the router for an internet connection (Ethernet cable incl.).
-
ADAPTER SUPPLY
-
ON/OFF SWITCH
-
VOLUME CONTROL
-
TALK
Press and hold to speak to a visitor through the camera.
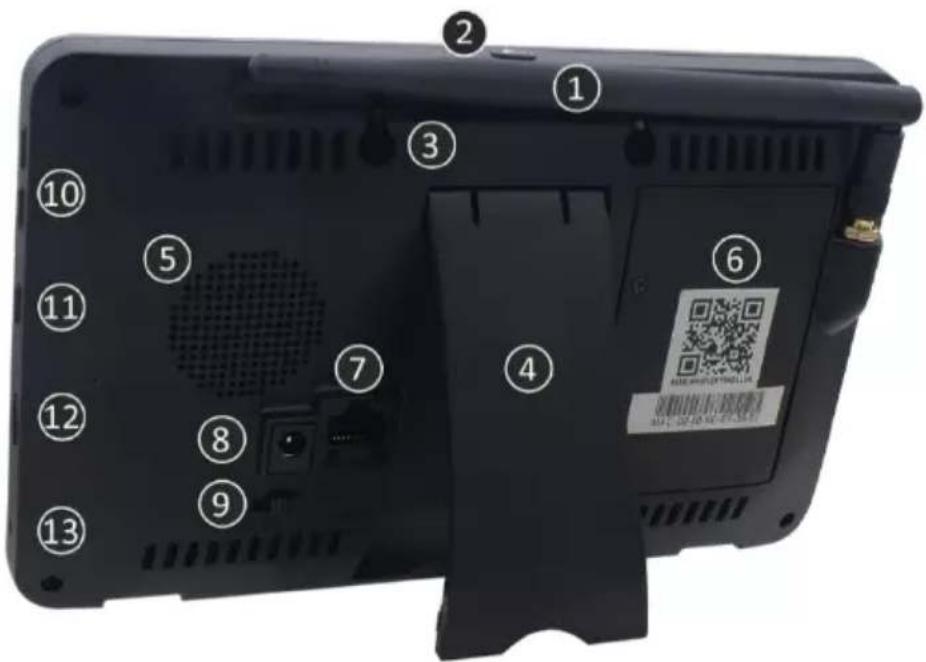
- MICRO SD CARD SLOT
Excluding SD card, maximum 128 GB. Dimensions 15 x 11 x 1 mm.
- LED
Lights blue when Scan mode is activated. (see 4.6 Energy-saving Scan mode). Also flashes blue when battery is empty.
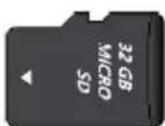
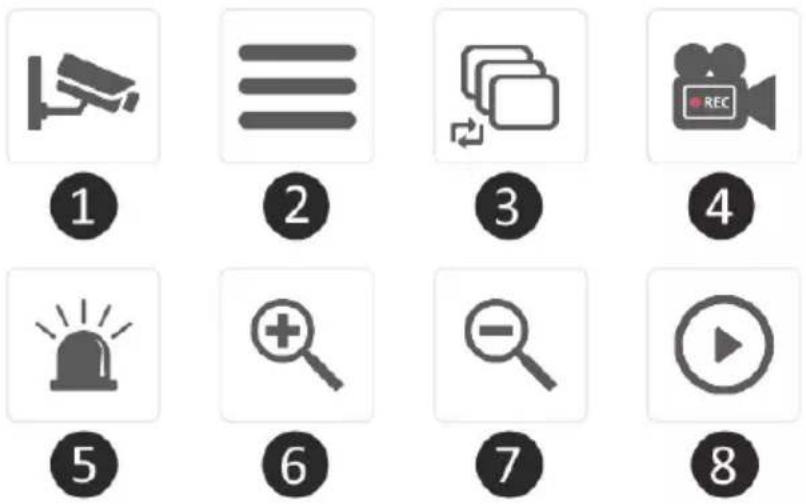
2.2. Overview symbols

1. SIGNAL INDICATOR
Indicates how strong the signal is.
2. CAMERA NUMBER
The number indicates the camera from which images are displayed.
3. SD CARD
Visible when an SD card is inserted in the monitor.
Green; there is recording space available.
Red; the SD card is full.
4. RECORDING INDICATOR
Red flashing; recording is in progress.
5. NETWORK STATUS INDICATOR
Green; There is a connection to the internet.
White; A network is connected, but no connection to the internet.
Red; The monitor is not connected to a network and has no internet.
6. APP CONNECTION
This icon appears when there is an active connection to the ELRO Monitoring 2.0 app.
7. UPDATE AVAILABLE
This icon appears when a new firmware update is available.
8. ZOOMED
This icon appears when there is zoomed in on one of the five areas.
9. OVERWRITE SD CARD
This icon appears when the oldest files are allowed to be overwritten when the SD card is full.
10. NEW RECORDING AVAILABLE
A recording has been made and is ready for viewing.
11. TALK BACK INDICATOR
Symbol appears when "Talk" (see 2.1 Overview Monitor, 11 Talk) is kept pressed down.
12. BATTERY INDICATOR - BATTERY DURATION +/- 2 hours
Red flashing; battery is empty.
Solid green and 5 bars; battery is fully charged.
Solid green with Power Symbol; battery is charged.
13. MOTION RECORDING INDICATOR
When this symbol appears, it means that Motion Recording is enabled (see 5.3.5 Recording setup - Motion Recording On / Off)
14. MUTE
This symbol shows that the sound is muted. Press this symbol to activate the sound.
15. EXIT ZOOM MODE
When you have zoomed in on one of the five areas, this symbol appears. Press here to exit zoom mode.
16. VOLUME INDICATOR
Symbol appears if Volume control (see 2.1 Overview Monitor, 10. Volume control) is used.
17. DATE & TIME (Y/M/D - H/M/S)
18. POP-UP MENU TAB
19. MICROPHONE
20. AUDIO CIRCULATION
This icon indicates audio circulation. It will play the audio of one camera every 10 sec and automatically switch to the next camera. Tap to turn on. Green is enabled, red is disabled.
21. SEQ - IMAGE CIRCULATION
is icon appears when the monitor changes camera images every 8 seconds.
22. OUT OF RANGE / NO IMAGE
23. SCREEN CHANGE
Tap centrally on the screen when two or more cameras are added to switch between single screen and dual/quattro screen.
2.3. Overview shortcuts
Use the Pop-Up Menu Tab (see 2.2 Overview symbols, 18 Pop-Up Menu Tab) to access the following shortcuts.
1. CHANNEL
Tap here to switch camera channel.
2. MAIN MENU
Tap here to go to the Main Menu.
3. IMAGE CIRCULATION
Activate Image Circulation (SEQ) so that the monitor changes camera images every 8 seconds. When activated, dual/quattro screen will show SEQ on screen.
4. MANUAL RECORDING
Tap here to make a manual recording. The recording icon (see 2.2 Overview symbols, 4 Recording Indicator) will appear. This recording can be watched back via Playback (see 2.3 Overview shortcuts, 8 Playback).
5. SIREN
Press and hold this button to make the camera play a siren (85db). Release the button to stop the siren (see 4.5 Manual siren activation).
6. ZOOMING IN
Select one of the five areas to zoom in on.
7. ZOOMING OUT
When you have zoomed in on one of the five areas, this symbol appears. Press here to exit zoom mode.
8. PLAYBACK
Review all recorded footage. It also shows a calendar so you can look back at a specific moment.
2.4. Overview camera
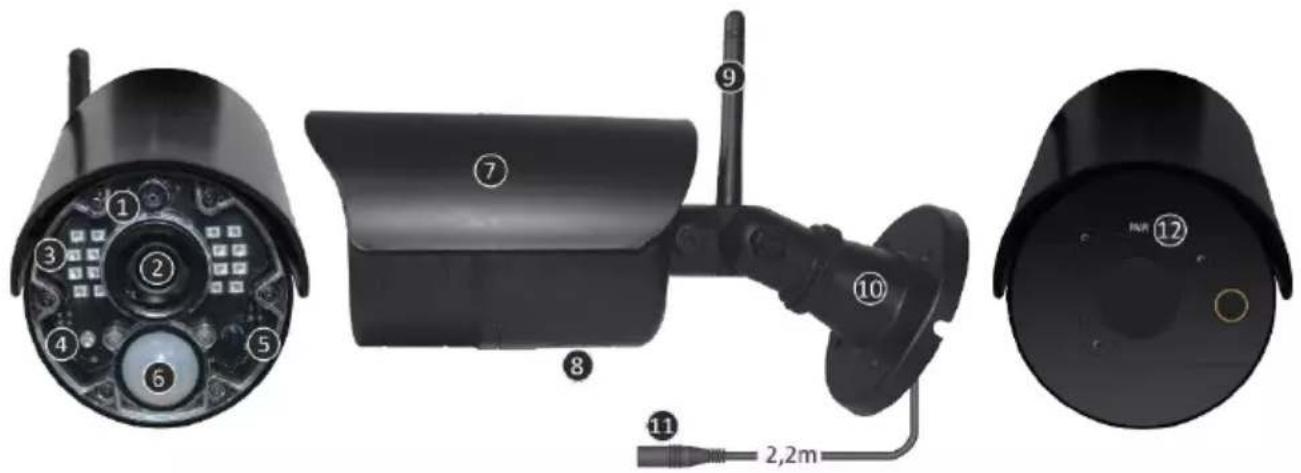
- MICROPHONE
- CAMERA LENS
- INFRARED LEDS
Turn red when the Night Vision Sensor (see 5) has detected darkness.
- DETECTION WARNING LIGHT
Flashes red when motion is detected.
- NIGHT VISION SENSOR
Records whether there is sufficient darkness to switch to night vision.
- PIR-SENSOR
Registers whether there is movement through heat displacement.
7. RAIN COVER
8. SPEAKER
9. ANTENNA
10. MOUNTING BRACKET
11. ADAPTER PORT
12. PAIR/COUPLING
Button is used to pair camera with monitor (see 5.2.1 Camera setup - Pairing).
3. Camera installation
Important!
- Before starting mounting, check performance by viewing the image on the monitor viewing from the same location/position where the camera will be mounted.
- The location should be free of dust and not in view of a strong light source or direct sunlight.
- Avoid thick walls, steel structures, double glazing or other obstacles between the camera and the monitor.
- This camera has built-in IR LEDs that allow images to be viewed in no/low light conditions. Images will then be shown in black and white.
3.1 Camera mounting
-
Mark the position of the screw holes using the mounting bracket on the wall.
-
Drill the holes and insert the 4 plugs.
-
Attach the camera, insert the screws through the mounting bracket into the dowels and tighten the screws securely.
-
Now point the camera at the area you want to monitor. Caution! Please be mindful of public order and point the camera only at properties.
-
Connect the (9V DC / 0.6A) power adapter (see image below) to the camera.
-
Press the plugs firmly together so that no moisture can enter.

natural_image
Diagram of a cable with two connectors and directional arrows indicating movement (no text or symbols)Note!
You can install 3 additional cameras (maximum 4 cameras). When adding cameras that were not in the original box, the cameras must be paired with the receiver. Refer to the Pairing section (see
5.2.1 Camera setup - Pairing) on pairing the cameras in this manual.
4. Usage
This chapter explains all the operating functions of the camera set. So you know exactly what is possible with this camera set.
4.1 Viewing live footage

When the set is plugged into the power socket for the first time, it is possible to see directly on the monitor the images the camera is transmitting. You can directly watch live what the camera sees.
4.2 Automatic recording

Via the motion detector settings (see 5.5.1 Motion detection settings), the camera can be adjusted to record when motion is detected as desired. It is possible to set the sensitivity and even hide areas. When an SD card is inserted in the monitor, the images are stored and can be reviewed at a later time.
4.3 Manual recording

Besides automatic recording, there is also the option to record manually. When an SD card is inserted in the monitor, the images are saved and can be reviewed at a later time.
4.4 Viewing footage

When an SD card is installed in the monitor, it is possible to look back at all recorded images. Via the Playback symbol (see 2.3 Overview shortcuts, 8 Playback), a schedule is retrieved and it is possible to search for a specific moment.
When the specific day is tapped, a recording list is then displayed. In this list, you can go to a specific time to view these images. Tap on a specific time and the footage is immediately started. It is possible to start, pause, stop, rewind and delete the footage immediately.
Further navigation allows you to continue to the next or previous recording, return to the previous page or return to the home screen altogether.
4.5 Manual siren activation

With the short cut on the start screen (see 2.3 Overview shortcuts, 5 Siren), it is possible to manually activate the siren. When you press and hold this button, the camera will sound a loud alarm until you release the button.
Note! This is only possible when you see the images of one specific camera on the monitor. With a dual or quattro screen, it is not possible to activate the siren.
4.6 Energy-saving Scan mode

Scan mode is a way to activate the monitor, when motion is detected by the motion sensor. This function has the advantage that the screen is not on continuously and it is energy-saving.
You enable Scan mode by briefly pressing the button once (see 2.1 Overview Monitor, 2 Scan modus) when the monitor is ON.
4.7 Expanding the camera set

The set is expandable to a complete security system with up to 4 cameras. Only the additional ELRO CC40RXX security camera is compatible for this system and is available separately from our sales channels.
To pair the additional camera, see 5.2.1 Camera setup - Pairing.
5. General Settings
This chapter describes all menu screens of the monitor in detail. Tap the Pop-Up Menu Tab (see 2.2 Overview symbols, 18 Pop-Up Menu Tab) icon and proceed to Menu (see 2.3 Overview shortcuts, 2 General Settings).
When there is no activity for 14 seconds, the menu will automatically close.
5.1 Navigation
Navigating the menu screens and subsections is easy using the finger.

Tapping this will take you back to the main screen.

Tapping this will take you back to the previous screen.
5.2 Menu
The general settings screen contains 6 subsections, each of which can contain sub-screens. These sub-screens allow you to set system functions. For example, you can turn cameras on and off, set up a specific schedule for specific cameras to record, set the date and time, and set the sensitivity for motion detection. The rest of this chapter provides details on how to use these screens.
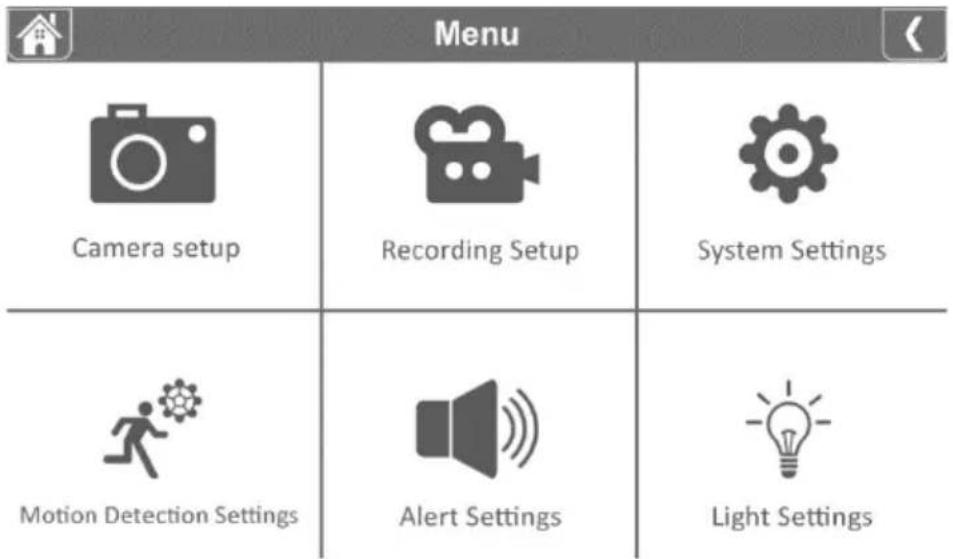
5.2.1 Camera setup - Pairing

The camera is linked to the monitor on channel 1 at the factory. When a new camera is added to the system, you need to "introduce" the camera and monitor to each other so they can communicate. You can also use this procedure to move a camera from one channel to another channel.
Proceed as follows:
- Tap pairing on the camera setup screen.
- Tap the channel number the camera should pair with.
- A message appears with instructions to press the pairing button (see 2.4 Overview Camera, 12 Pair/Coupling) of the camera. This must be done within 30 seconds.
- 3 seconds after the camera is successfully paired, the monitor shows the camera footage.
Note!
- If a camera is already assigned to the selected channel, the pairing procedure overwrites the pairing of the camera with the new channel.
- Pair only one camera at a time! The monitor connects to the first camera it recognizes. If two or more cameras are in pairing mode, you cannot determine which camera the monitor recognizes first.
5.2.2 Camera setup - Camera On / Off
When you add a camera to the system, it is automatically switched on. You may want to temporarily disable one of the cameras. You do this by flipping the switch of the respective camera. Green is enabled and grey is disabled. Although the camera is switched off, it is still paired.
5.2.3 Camera setup - Brightness

It is possible to set the brightness for each camera. This is useful if the camera is hanging in a room that is a bit brighter or darker. First tap 03 so that the arrows appear. Then tap the up or down arrows under the camera you want to adjust. 06 increases the brightness, 03 is the default value and 01 decreases it.
5.2.4 Camera setup - Resolution

For each camera, change the resolution. You can change the resolution to HD or FHD HD: 1280x720 FHD: 1920x1080
Depending on internet speed in combination with the app, we recommend starting with low video quality. Low resolution is fewer MBs so higher speed.
5.2.5 Camera setup – Night Vision Setup

For each camera, specify whether the Night Vision sensor (see 2.4. Overview Camera, 5 Night Vision sensor) should automatically detect or be disabled. If the sensor detects automatically, if there is sufficient blackout, the camera images will be shown in black and white.
5.2.6 Camera setup – Anti-flicker

Set the camera's power frequency (50Hz or 60Hz) to prevent flickering.
5.3.1 Recording setup - Duration
You can set how long the camera keeps recording after motion detection triggers the recording. The options are 15 seconds, 30 seconds or 1 minute.
Tap the icon and make a selection. (Default = 15 seconds)
When the camera records continuously, the recordings will be cut into files that have a duration of 10 minutes. This cannot be adjusted.
5.3.2 Recording setup - Scheduled Recording / Continuous Recording

Here you can set a complete weekly schedule when each camera should start recording. You can set several cameras at the same time and the recording times can overlap. It is also possible to set within the recording schedule to record only when motion is detected. To do so, tap the "Motion" button.
In the Scheduled recordings overview screen, you can see which days of the week and at which times recordings have been scheduled. To actually schedule and delete
recordings, tap at the bottom right of the screen. ☑ Modify
Multiple cameras can be selected simultaneously and you can also choose to have scheduled recordings start only after movement.
The total recording time is limited to the available space on the SD card. If the SD card is set to overwrite the oldest files when it is full, the system continues recording; otherwise, recording stops until space is available.
Scheduled recordings are divided into 10-minute file sizes. For example, if you record a 25-minute event, you will have two 10-minute recordings plus a 5-minute recording.
If the camera set is to record continuously, it is necessary to create a recording schedule.
5.3.3 Recording setup - File overwrite

This feature lets you set the system to automatically overwrite the oldest files once the SD card is full. This allows you to continue recording. If you do not allow overwriting, recording stops when the SD card is full. The monitor will show that the SD card is full.
(See 2.2. Overview symbols, 3 SD card)
5.3.4 Recording setup - Audio On / Off

For each camera, specify whether audio should be included when recording video. When audio is disabled, no sound is available when viewing the recording.
5.3.5 Recording setup - Motion Recording On / Off

For each camera, specify whether to record when the camera detects motion. If you disable it, the camera will not record. This is the default setting for the camera set. If the camera set is to record continuously, it is necessary to create a recording schedule (see 5.3.2 Recording setup - Scheduled recording).
5.4.1 System settings – Time Setup

Set the current date and time here. The system must be connected to your network via Ethernet cable to synchronize with the internet time server. With the Daylight Saving Time option, you can specify whether the system should take into account winter time and summer time.
5.4.2 System settings - Network setup

Continue setting the monitor's network here.
5.4.2.1 Network setup – Wireless Transmitting

Specify which wireless protocol to use. By default, this is set to auto. This makes the monitor automatically search for the best and most stable channel (CH1-11). Maintenance is used for service purposes.
5.4.2.2 Network setup - Advanced setup

Here you can choose DHCP Dynamic Host Configuration Protocol or STATIC (fixed) IP address. DCHP is the most common connection. The router automatically assigns an IP address to the system. Static IP is for those who have the ability to specify an IP address for their system.
5.4.2.3 Network setup - Reset password

This function resets the system to the default password "000000". A new password can only be set via the app.
5.4.2.4 Network setup - Information

Here you will find all network information, nothing can be changed or set.
5.4.3 System settings - Language

Set the language here.
5.4.4 System settings – Default Settings

Reset the complete set to factory defaults. This resets stored data, settings and schedules to their default values. To reset the password, see 5.4.2.3 Network setup - Reset password.
5.4.5 System settings - Format Memory Card

Format the memory card. This will completely empty the memory card and delete all files.
5.4.6 System settings - Firmware Upgrade

You can upgrade to the most up-to-date firmware via this route. When the update symbol (see 2.2 Overview symbols, 7 Update Available) is visible, it means that a new firmware update is available. Choose to upgrade via an SD card or via the server.
5.5.1 Motion Detection Settings - Sensitivity

Here you can set the sensitivity of Video Motion Detection or PIR Detection for each camera. First select the combined or individual desire and then set the sensitivity. You can choose from High - Medium - Low - Off.
Video Motion Detection (VMD): Motion detection through pixel change
PIR Detection (HMD): Motion detection through heat displacement
5.5.2 Motion Detection Settings - Mask Area

It is possible to exclude certain areas in the screen from detection. The VMD will not detect and register a selected area, so that, for example, bushes and/or trees cannot cause detection.
5.6.1 Alert settings - Alert on monitor

The monitor offers the ability to trigger an alert alarm when motion is detected.
5.6.1.1 Warning on monitor - Alert volume

Set the volume of the alert. This sound consists of short beeps. When you turn up the volume, the bars will be filled and an example sound will be heard.
5.6.1.2 Warning on monitor - Channel Alert On / Off
Turn warning on or off per channel.
5.6.1.3 Warning on monitor – Alert Mute Schedule

Set a schedule when the monitor should mute all alerts. This may be applicable when you don't want to receive alerts at night, for example. To actually schedule and delete
recordings, tap Modifier
5.6.2 Alert settings - Alert on camera

Besides alerts via the monitor, the camera can also give an alert in the form of lighting or a voice message. Use the switches for each camera to set whether they should give illumination or a voice message.
This alert will be triggered when the camera has registered motion. Just make sure motion detection is enabled.
5.7 Lighting settings

The ELRO CZ40RIPS has no lighting. This function is therefore not in operation.
6. ELRO Monitoring 2.0 App
With the ELRO CZ40RIPS Camera Set, you have the option of pairing the set with a smartphone. Among other things, this allows you to view live images and also look back at events. This way, you keep an eye on everything remotely.

6.1 Pairing
The CZ40RIPS Camera set and the ELRO Monitoring 2.0 app are very easy to pair. To do so, follow the steps below carefully and you will have everything linked within 5 minutes.
The ELRO Monitoring 2.0 App is free to download from the App store or Google Play Store.
Note!
- Make sure the monitor is connected to the internet router with a cable. If you connect the cable to a computer or laptop, the monitor will not have an internet connection.
- At all times, scan the QR-Code on the back of the monitor. This is the unique ID code belonging to the set.
- Check the status of the Network Indicator (see 2.2 Overview of symbols, 5 Network Status Indicator). When it has the Green status, you can proceed with pairing.
Green; There is a connection to the internet.
White; A network is connected, but no connection to the internet.
Red; The monitor is not connected to a network and has no internet
- The default password of the set is 000000 (6 x zero).

Proceed as follows:
- Download and install the ELRO Monitoring 2.0 App on smartphone and/or tablet.
- Open the app and go to Add Device (see 6.3.3 General – Add Device)
- Choose one of three options to add the camera;
a. The app automatically searches for UID codes in the area. The UID code of the respective monitor is displayed in the list. Tap here and enter the default password.
b. Add manually: it is possible to enter the UID code manually. Enter this code and enter the default password.
c. Tap QR-Code and scan the QR-Code on the back of the monitor. The UID code will be filled in automatically, leaving you to enter only the default password.
-
The camera now enters the dashboard.
-
Open the camera for the first time. You will immediately be asked to change the password to a more secure one. Enter the default password first and then choose a new password. Do not share this password with unauthorized persons.
The password has no specific requirements. However, it is mandatory to create a password. The choice for a new password must not be empty.
- Once the password has been successfully changed, you can use the ELRO Monitoring 2.0 app!
6.2 App usage
In this chapter, we will tell you more about how to use the app and what its features are.
6.2.1 Viewing live footage

When the set is paired with the app, it is possible to see the images that the camera transmits directly on the smartphone. You can directly watch what each camera sees live.
6.2.2 Taking snapshots manually

When live images are displayed on the smartphone, it is possible to take a snapshot of the image at the touch of a button. This snapshot is stored locally on the smartphone and thus uses the phone's memory.
6.2.3 Communicate
Through the app, it is possible to communicate with the person in front of the camera. The microphone and speaker in the camera create the function to talk and listen.
6.2.4 Viewing footage

When an SD card is installed in the monitor, it is possible to review all recorded images. From the app, the recordings are synchronized with the monitor's schedule and it is possible to search for a specific moment in time.
6.2.5 Expanding

The moment multiple monitors are installed in one or more buildings, you can add multiple sets to the app. This way, multiple locations are gathered in one app.
6.3 Overview App & Symbols
In this chapter, we will tell you more about the navigation and symbols of the app.
6.3.1 General - Dashboard
See the overview of all added devices here.
6.3.2 General - Playback

View the recorded images for each camera. When you tap this icon, a recording list appears. In this recording list, you can see all the events saved by the SD card. The recordings are displayed by camera (CH) and by date and time.
Tap at a specific time and the images are started immediately. It is possible to start and pause the images.
Using the search option, it is possible to search further back to a specific moment, for example from the previous day, week or a specific date.
6.3.3 General – Add Device

Via this icon it is possible to add a new device (see 6.1 Pairing).
6.3.3 General - About

View app information such as version number here.
6.4 Live view
Here we will tell you more about the symbols and functions in the live view screen. In the dashboard, select the device you want to watch.
6.4.1 Live view - Navigation

Go back to the dashboard.
6.4.2 Live view - Select channel

This symbol indicates which camera channel is selected. Tap one of the four channels to watch the respective channel live.
6.4.3 Live view - View Snapshots

View all saved snapshots here. Snapshots can also be deleted or shared from here.
6.4.4 Live view - Make Snapshot

Tap this icon to take a snapshot. The snapshot is reflected in the album (see 6.4.3 Live view - Viewing snapshots)
6.4.5 Live view - Sound on

Using the speaker, you can hear the ambient sound of the camera. Tap the icon to enable the sound. Tap again to switch the sound off again.
6.4.6 Live view - Talk

The microphone allows you to speak to the person reporting to the camera. Grey is off, pink is on. Tap the icon to turn the microphone on. Tap again to turn the microphone off.
6.4.7 Live view - Lighting

The ELRO CZ40RIPS has no lighting. This function is therefore not in operation.
6.4.8 Live view - Status
Below the live image you can see the status of the camera.
- Channel name; Indicates which device and channel is playing.
- Device status; Indicates whether the device is connecting, offline or online.
- Video quality; Indicates the quality of the image.
- Network quality: Indicates network quality.
6.5 App management & Settings

In the dashboard, tap this icon to customize the device. Here you can manage the camera in the app and settings can be made.
6.5.1 Edit device - Name
Change the device name. The name is saved automatically.
6.5.2 Edit device - Password
Here you can enter the device's password. The password can be changed in the extended settings.
6.5.3 Edit device - Connection status
Displays the current connection status. Tap it to reconnect.
6.5.4 Edit device - Advanced Settings
Go to the advanced settings of the camera.
6.5.4.1 Advanced Settings - Video Quality
Change video quality here. With video quality, the format in pixels is chosen. The larger the format, the longer the video takes to load and the more memory of the smartphone/tablet is used:
High = 1920 x 1080
Low = 1280 x 720
This information can be seen on live viewing. A quality is also listed here; Good, Normal or Bad.
6.5.4.2 Advanced Settings - Alert Interval / Notifications on Smartphone
Use this setting to set the notifications on the smartphone.
First, you set until how long after the last detection you receive another notification. The following options are available here:
Example: A person enters the detection area and you receive a notification. The first subsequent notification only occurs when motion detection occurs again after 3 minutes.
Note!
When you have selected "Off", no notifications are sent but motion is detected and stored on the SD card.
After selecting a Notification interval, it is necessary to also set the monitor correctly. To set this correctly, the following steps need to be taken:
- Make sure the sensitivity is set properly via the monitor. To do this, go to Motion detection (see 5.5.1 Motion Detection Settings - sensitivity) and set the sensitivity to high.
- Go to the smartphone settings and make sure the ELRO Monitoring 2.0 App has permission to send notifications.
- Finally, return to the app. Check the Notification Interval setting again and return to the dashboard. The settings are saved. It may take some time to process the settings.
6.5.4.3 Advanced Settings – Modify Password
Here you can change and confirm the password. First enter the old password and then the new one twice. If the password is forgotten, you can reset it via the monitor (see 5.4.2.3 Network setup - Reset password).
6.5.4.4 Advanced Settings - Dark Mode
Change the color of the app. The choice here is a light mode or a dark mode.
6.5.4.5 Advanced Settings - Device info
Here you will find all network information, such as model and IP address. Nothing can be changed.
6.5.4.6 Advanced Settings – Light Settings
The ELRO CZ40RIPS has no lighting. This function is therefore not in operation.
6.5.5 Edit device - About us
A link to our website elro.eu for more information about us.
6.5.6 Edit device - FAQ / Frequently asked questions
View the frequently asked questions / FAQ here.
6.5.7 Edit device - Feedback
Leave a review about ELRO and our services. Found any errors or improvements? Please contact our customer service team.
6.5.8 Edit device - App version
This is the version number of the app.
7. FAQ / Frequently asked questions
Are there any unanswered questions despite this comprehensive user guide? Then please refer to our FAQ. Below you will find a selection of the most frequently asked questions. Is your answer not listed here? Take a look at our FAQ at www.elro.eu or contact our customer service.
My camera is out of range.
Make sure the camera is in range of the monitor and that the monitor's antenna is extended when using the system. This will result in an increased range of the camera set.
My camera is out of range, within a few meters of the monitor.
To find out where the problem is, check whether the camera is still receiving power. If necessary, contact our customer service.
a. Swap the adapter with another camera, if present.
b. Do the adapter and camera change temperature when connected to the power network? If not, the camera is not receiving power.
c. Use a voltmeter to test whether the adapter still provides voltage, if any. If not, the camera is not receiving power.
d. Does the camera make a "click sound" when you put a hand on the lens for more than 3 seconds? This way you simulate night mode (black and white). No click to be heard? Then the camera is not receiving power.
Can I add a second monitor?
No, this is not possible. Only one connection can be made between a monitor and a camera.
What is the range of the motion sensor?
The range of the PIR sensor is around 5 meters. It can vary due to different conditions. For example, temperature and humidity.
The camera does not record motion/tiredly.
Check that Motion Recording is enabled. (See 5.3.5 Recording setup - Motion recording On / Off) Then check the walking direction of the person in front of the camera. If it walks straight towards the camera, the camera will not be able to detect the person (heat spot) properly. The heat spot must run from detection area to detection area to recognize movement.
How do I get my set back online in the ELRO Monitoring 2.0 App?
Check the comments (see 6. ELRO Monitoring 2.0 App, 6.1 Pairing). If necessary, try another port or reset the internet router.
Can I pair my old ELRO Camera with one of your new camera systems?
No, it is not possible to pair old ELRO cameras (before 2018) with our new ELRO systems. Check our website for the complete overview.
8. Specifications
8.1 Specifications camera
| Frequency range | 2400MHz~2483.5MHz |
| Data rate | 802.11b/g |
| Transmit power | 14dBm (TYP) |
| Modulation type | PWFi (Proprietary WiFi) |
| Camera dimensions | 20cm x 8cm x 7.5cm |
| Adapter length | 185cm |
| Wireless range | 100m (open space) |
| Image sensor type | 1/2.9" CMOS |
| Effective Pixels | (h) 1920 x (v) 1080P |
| Light sensitivity | 3.5 Lux (without IR LED) |
| Image processing | MP4 |
| Image resolution / Frame rate | FHD : 1920 x 1080P - 8fps |
| HD : 1280 x 720 - 15fps | |
| Lens | 2.8mm / F2.1 (ICR cut filter) |
| Angle of view | 112° (FOV), 95° Horizontal - 51° Vertical |
| Daylight sensor | 0.02Lux @ (F2.1, AGC on), 0 Lux with IR |
| IR LED range (night vision) | 16 LED / 850nm / 15m |
| Current voltage | 9V DC 600mA ±5% |
| Power consumption | ≤ 3W (ICR switching moment 4.5W) |
| Ambient temperature | -10°C ~ 50°C |
| Protection class | IP65 |
| Humidity | 0% ~ 90% |
| OSD (On-screen display) | Date, time and title |
| Audio Compression | PCM |
8.2 Specifications monitor
| Frequency range | 2400MHz~2483.5MHz |
| Data rate | 802.11b/g |
| Sensitivity | 16dBm |
| Modulation type | PWifi (Proprietary WiFi) |
| Format LCD | 7 Inch / 17cm |
| LCD Resolution | 1024 RGB (H) x 600 (V) |
| Monitor size | 19.5 cm x 12.3 cm x 2.4 cm |
| Monitor weight | 437 g |
| Adapter length | 185cm |
| Wireless range | 100m (open space) |
| Recording | ASF |
| SD Memory Card | Micro SD - Max. 128GB |
| Recording resolution | FHD: 1080P / HD: 720P |
| Lithium rechargeable battery | 3.7V - 2000mAh |
| Battery capacity loss | approx. 20% after 300 charge cycles |
| Current voltage | 5V DC 2A ±5% |
| Current consumption | 670mA maximum (1200mA) |
| Ambient temperature | -10°C ~ 40°C (14°F ~ 104°F) |
| Humidity | 0% ~ 90% |
Symbols
Recycling and disposal: The WEEE symbol (a) means that this product and batteries must be disposed of separately from household waste. When this product reaches the end of its life, take it to a designated waste collection point nearby to ensure safe disposal or recycling. Protect environment and public health, handle natural resources responsibly! Read the manual (b) before use and keep it in a safe place for future use and maintenance. Warranty (c) visit www.elro.eu.


ELRO Europe | www.elro.eu
Postbus 9607 - Box E800
1006 GC Amsterdam - The Netherlands

GEBRUIKSAANWIJZING
CAMERA SECURITY SET
CZ40RIPS
Home is not a place, it's a feeling
Inhoud
- Introductie ....- 2 -
- Overzicht Monitor, symbolen en camera....- 3 -
- Camera installatie ....- 7 -
- Gebruik....- 8 -
- Algemene Instellingen....- 10 -
- ELRO Monitoring 2.0 App....- 16 -
- FAQ / Veel gestelde vragen....- 22 -
- Specificaties ...... - 23 -
Symbolen - 24 -
- ANTENNE
1. SIGNAAL INDICATOR
Rood; de SD-card is vol.
4. OPNAME INDICATOR
13. BEWEGING OPNAME INDICATOR
- MICROFOON
- CAMERA LENS
- INFRAROOD LED'S
- DETECTIE WAARSCHUWINGSLICHT
natural_image
Diagram of a cable with two connectors and directional arrows indicating movement (no text or symbols)Opmerking!
5.2.4 Camera setup – Resolutie

6. ELRO Monitoring 2.0 App
natural_image
Pink icon of a surveillance camera with 'ELRO' text below (no additional symbols or text)6.1 Koppelen
De ELRO Monitoring 2.0 App is gratis te downloaden in de App store of Google Play Store.
Opmerking!
8.1 Specificaties camera
8.2 Specifications monitor
| Frequentiegebied | 2400MHz~2483.5MHz |
| Gegevenssnelheid | 802.11b/g |
| Gevoeligheid | 16dBm |
| Modulatie type | PWifi (Proprietary WiFi) |
| Formaat LCD | 7 Inch / 17cm |
| LCD Resolutie | 1024 RGB (H) x 600 (V) |
| Afmeting monitor | 19,5 cm x 12,3 cm x 2,4 cm |
| Gewicht monitor | 437 g |
| Lengte adapter | 185cm |
| Draadloze bereik | 100m (open ruimte) |
| Opname | ASF |
| SD-Geheugenkaart | Micro SD – Max. 128GB |
| Opnameresolutie | FHD: 1080P / HD: 720P |
| Lithium oplaadbare batterij | 3.7V - 2000mAh |
| Capaciteitsverlies van de batterij | ca. 20% na 300 laadcycli |
| Stroomspanning | 5V DC 2A ±5% |
| Stroomverbruik | 670mA maximum (1200mA) |
| Omgevingstemperatuur | -10°C ~ 40°C (14°F ~ 104°F) |
| Vochtigheid | 0% ~ 90% |
Symbolen
HANDBUCH
Home is not a place, it's a feeling
Inhalt
- ANTENNE
Select one of the five areas to zoom in on.
7. AUSZOOMEN
- MIKROFON
- KAMERA-OBJEKTIV
- INFRAROT-LEDS
natural_image
Diagram of a USB cable with two connectors and directional arrows indicating movement (no text or symbols)Hinweis!
6. ELRO Monitoring 2.0 App
MANUEL DE L'UTILISATEUR
CAMERA DE SÉCURITÉ
CZ40RIPS
Home is not a place, it's a feeling
Contenu
- ANTENNE
- MICROPHONE
- OBJECTIF DE LA CAMÉRA
- LED INFRAROUGEES
natural_image
Diagram of a USB cable with two connectors and directional arrows indicating movement (no text or symbols)Note!
Continue setting the monitor's network here.
It is possible to exclude certain areas in the screen from detection. The VMD will not detect and register a selected area, so that, for example, bushes and/or trees cannot cause detection.
6. ELRO Monitoring 2.0 App
natural_image
Pink security camera icon with 'ELRO' logo below (no text or symbols on device)6.1 Couplage


- USER MANUAL
- CAMERA SECURITY SET
- Content
- Introduction
- - Monitor
- - Camera
- - Accessories
- Package contents
- Overview symbols
- SIGNAL INDICATOR
- CAMERA NUMBER
- SD CARD
- RECORDING INDICATOR
- NETWORK STATUS INDICATOR
- APP CONNECTION
- UPDATE AVAILABLE
- ZOOMED
- OVERWRITE SD CARD
- NEW RECORDING AVAILABLE
- TALK BACK INDICATOR
- BATTERY INDICATOR - BATTERY DURATION +/- 2 hours
- MOTION RECORDING INDICATOR
- MUTE
- EXIT ZOOM MODE
- VOLUME INDICATOR
- DATE & TIME (Y/M/D - H/M/S)
- POP-UP MENU TAB
- MICROPHONE
- AUDIO CIRCULATION
- SEQ - IMAGE CIRCULATION
- OUT OF RANGE / NO IMAGE
- SCREEN CHANGE
- Overview shortcuts
- CHANNEL
- MAIN MENU
- IMAGE CIRCULATION
- MANUAL RECORDING
- SIREN
- ZOOMING IN
- ZOOMING OUT
- PLAYBACK
- Overview camera
- Camera installation
- Important!
- Camera mounting
- Note!
- Usage
- Viewing live footage
- Automatic recording
- Manual recording
- Viewing footage
- Manual siren activation
- Energy-saving Scan mode
- Expanding the camera set
- General Settings
- Navigation
- Menu
- Camera setup - Pairing
- Proceed as follows:
- Camera setup - Camera On / Off
- Camera setup - Brightness
- Camera setup - Resolution
- Camera setup – Night Vision Setup
- Camera setup – Anti-flicker
- Recording setup - Duration
- Recording setup - Scheduled Recording / Continuous Recording
- Recording setup - File overwrite
- Recording setup - Audio On / Off
- Recording setup - Motion Recording On / Off
- System settings – Time Setup
- System settings - Network setup
- Network setup – Wireless Transmitting
- Network setup - Advanced setup
- Network setup - Reset password
- Network setup - Information
- System settings - Language
- System settings – Default Settings
- System settings - Format Memory Card
- System settings - Firmware Upgrade
- Motion Detection Settings - Sensitivity
- Motion Detection Settings - Mask Area
- Alert settings - Alert on monitor
- Warning on monitor - Alert volume
- Warning on monitor - Channel Alert On / Off
- Warning on monitor – Alert Mute Schedule
- Alert settings - Alert on camera
- Lighting settings
- ELRO Monitoring 2.0 App
- Pairing
- App usage
- Viewing live footage
- Taking snapshots manually
- Communicate
- Viewing footage
- Expanding
- Overview App & Symbols
- General - Dashboard
- General - Playback
- General – Add Device
- General - About
- Live view
- Live view - Navigation
- Live view - Select channel
- Live view - View Snapshots
- Live view - Make Snapshot
- Live view - Sound on
- Live view - Talk
- Live view - Lighting
- Live view - Status
- App management & Settings
- Edit device - Name
- Edit device - Password
- Edit device - Connection status
- Edit device - Advanced Settings
- Advanced Settings - Video Quality
- Advanced Settings - Alert Interval / Notifications on Smartphone
- Advanced Settings – Modify Password
- Advanced Settings - Dark Mode
- Advanced Settings - Device info
- Advanced Settings – Light Settings
- Edit device - About us
- Edit device - FAQ / Frequently asked questions
- Edit device - Feedback
- Edit device - App version
- FAQ / Frequently asked questions
- My camera is out of range.
- Can I add a second monitor?
- What is the range of the motion sensor?
- The camera does not record motion/tiredly.
- How do I get my set back online in the ELRO Monitoring 2.0 App?
- Can I pair my old ELRO Camera with one of your new camera systems?
- Specifications
- Specifications camera
- Specifications monitor
- Symbols
- GEBRUIKSAANWIJZING
- Inhoud
- SIGNAAL INDICATOR
- OPNAME INDICATOR
- BEWEGING OPNAME INDICATOR
- Opmerking!
- Camera setup – Resolutie
- Koppelen
- Specificaties camera
- Symbolen
- HANDBUCH
- Inhalt
- AUSZOOMEN
- Hinweis!
- MANUEL DE L'UTILISATEUR
- CAMERA DE SÉCURITÉ
- Contenu
- Couplage
Brand : ELRO
Model : CZ40RIPS
Category : Surveillance Camera