
CI5000 - Surveillance Camera ELRO - Free user manual and instructions
Find the device manual for free CI5000 ELRO in PDF.
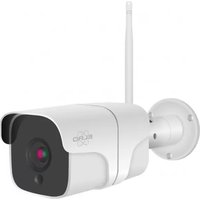
| Product Type | Outdoor surveillance camera |
| Brand | ELRO |
| Model | CI5000 |
| Video Resolution | 1920 x 1080 (Full HD) |
| Viewing Angle | 110° (horizontal 90°, diagonal 50°) |
| Night Vision | Up to 10 meters with 18 infrared LEDs |
| Wireless Connectivity | Wi-Fi 2.4 GHz IEEE 802.11b/g/n |
| Wired Connectivity | RJ-45 port 10/100 Mbps |
| Audio | Built-in microphone with noise reduction and HIFI speaker 8Ω/2W |
| Power Supply | Power adapter 12V/1A (input 100-240V AC) |
| Power Consumption | Less than 4W max |
| Local Storage | Micro SD card slot up to 128 GB (not included) |
| Cloud Storage | Optional with subscription |
| Motion Detection | Yes, with adjustable sensitivity and human filtering |
| Sound Detection | Yes |
| Protection Rating | IP66 |
| Dimensions (without bracket) | 105 x 60 x 60 mm |
| Net Weight | 350 g |
| Operating Temperature | -20°C to +50°C |
| Package Contents | Camera, mounting hardware, adapter cable, manual |
| Compatibility | iOS 7+ / Android 4.0+ |
| Additional Features | Two-way audio, manual recording, snapshot, device sharing |
| Care and Cleaning | Clean the lens with a soft, dry cloth. Avoid water and abrasive products. |
| Spare Parts and Repairability | Contact ELRO customer service for spare parts. Repair must be carried out by a professional. |
Frequently Asked Questions - CI5000 ELRO
User questions about CI5000 ELRO
0 question about this device. Answer the ones you know or ask your own.
Ask a new question about this device
Download the instructions for your Surveillance Camera in PDF format for free! Find your manual CI5000 - ELRO and take your electronic device back in hand. On this page are published all the documents necessary for the use of your device. CI5000 by ELRO.
USER MANUAL CI5000 ELRO
natural_image
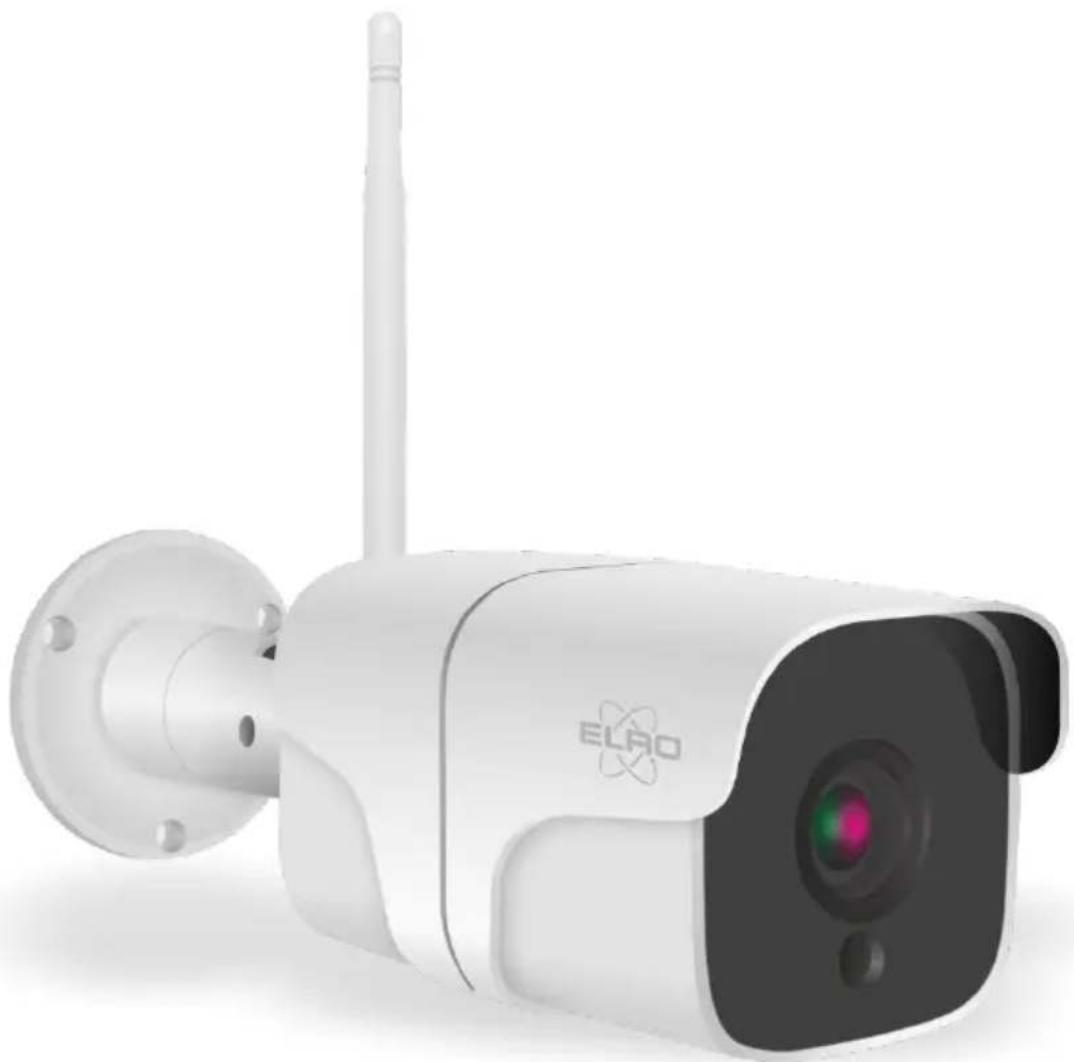
Exterior view of a white ELAO security camera with antenna and wall-mounted sensor (no text or symbols visible)USER MANUAL
FULL HD OUTDOOR IP CAMERA
C07000
Home is not a place, it's a feeling
Content
- Introduction......-2 -
- Package contents....- 2 -
- Overview of the camera ....- 2 -
- Camera Mounting....- 3 -
- ELRO Home Safe App....- 3 -
- Add camera ...... - 4 -
- Explanation about the camera ...... - 6 -
- Explanation of the settings....- 7 -
- Reset....- 9 -
- Frequently asked questions / FAQ....- 10 -
- Specifications....- 11 -
- Symbols ...... - 11 -
Go to www.elro.eu to download the latest version of this manual.
1. Introduction
Congratulations on your purchase of the ELRO CO7000 Outdoor Camera! This camera allows you to keep an eye on everything outdoors. The camera can be added in the free ELRO Home Safe App. This app allows you to control multiple cameras. This way, you put together a security system that keeps an eye on all the important things for you. Give yourself time to read this manual carefully before you start installing.
2. Package contents
a. 1080P Full HD Outdoor Camera
b. Mounting materials; screws and dowels
c. Power cable with adapter
d. Manual
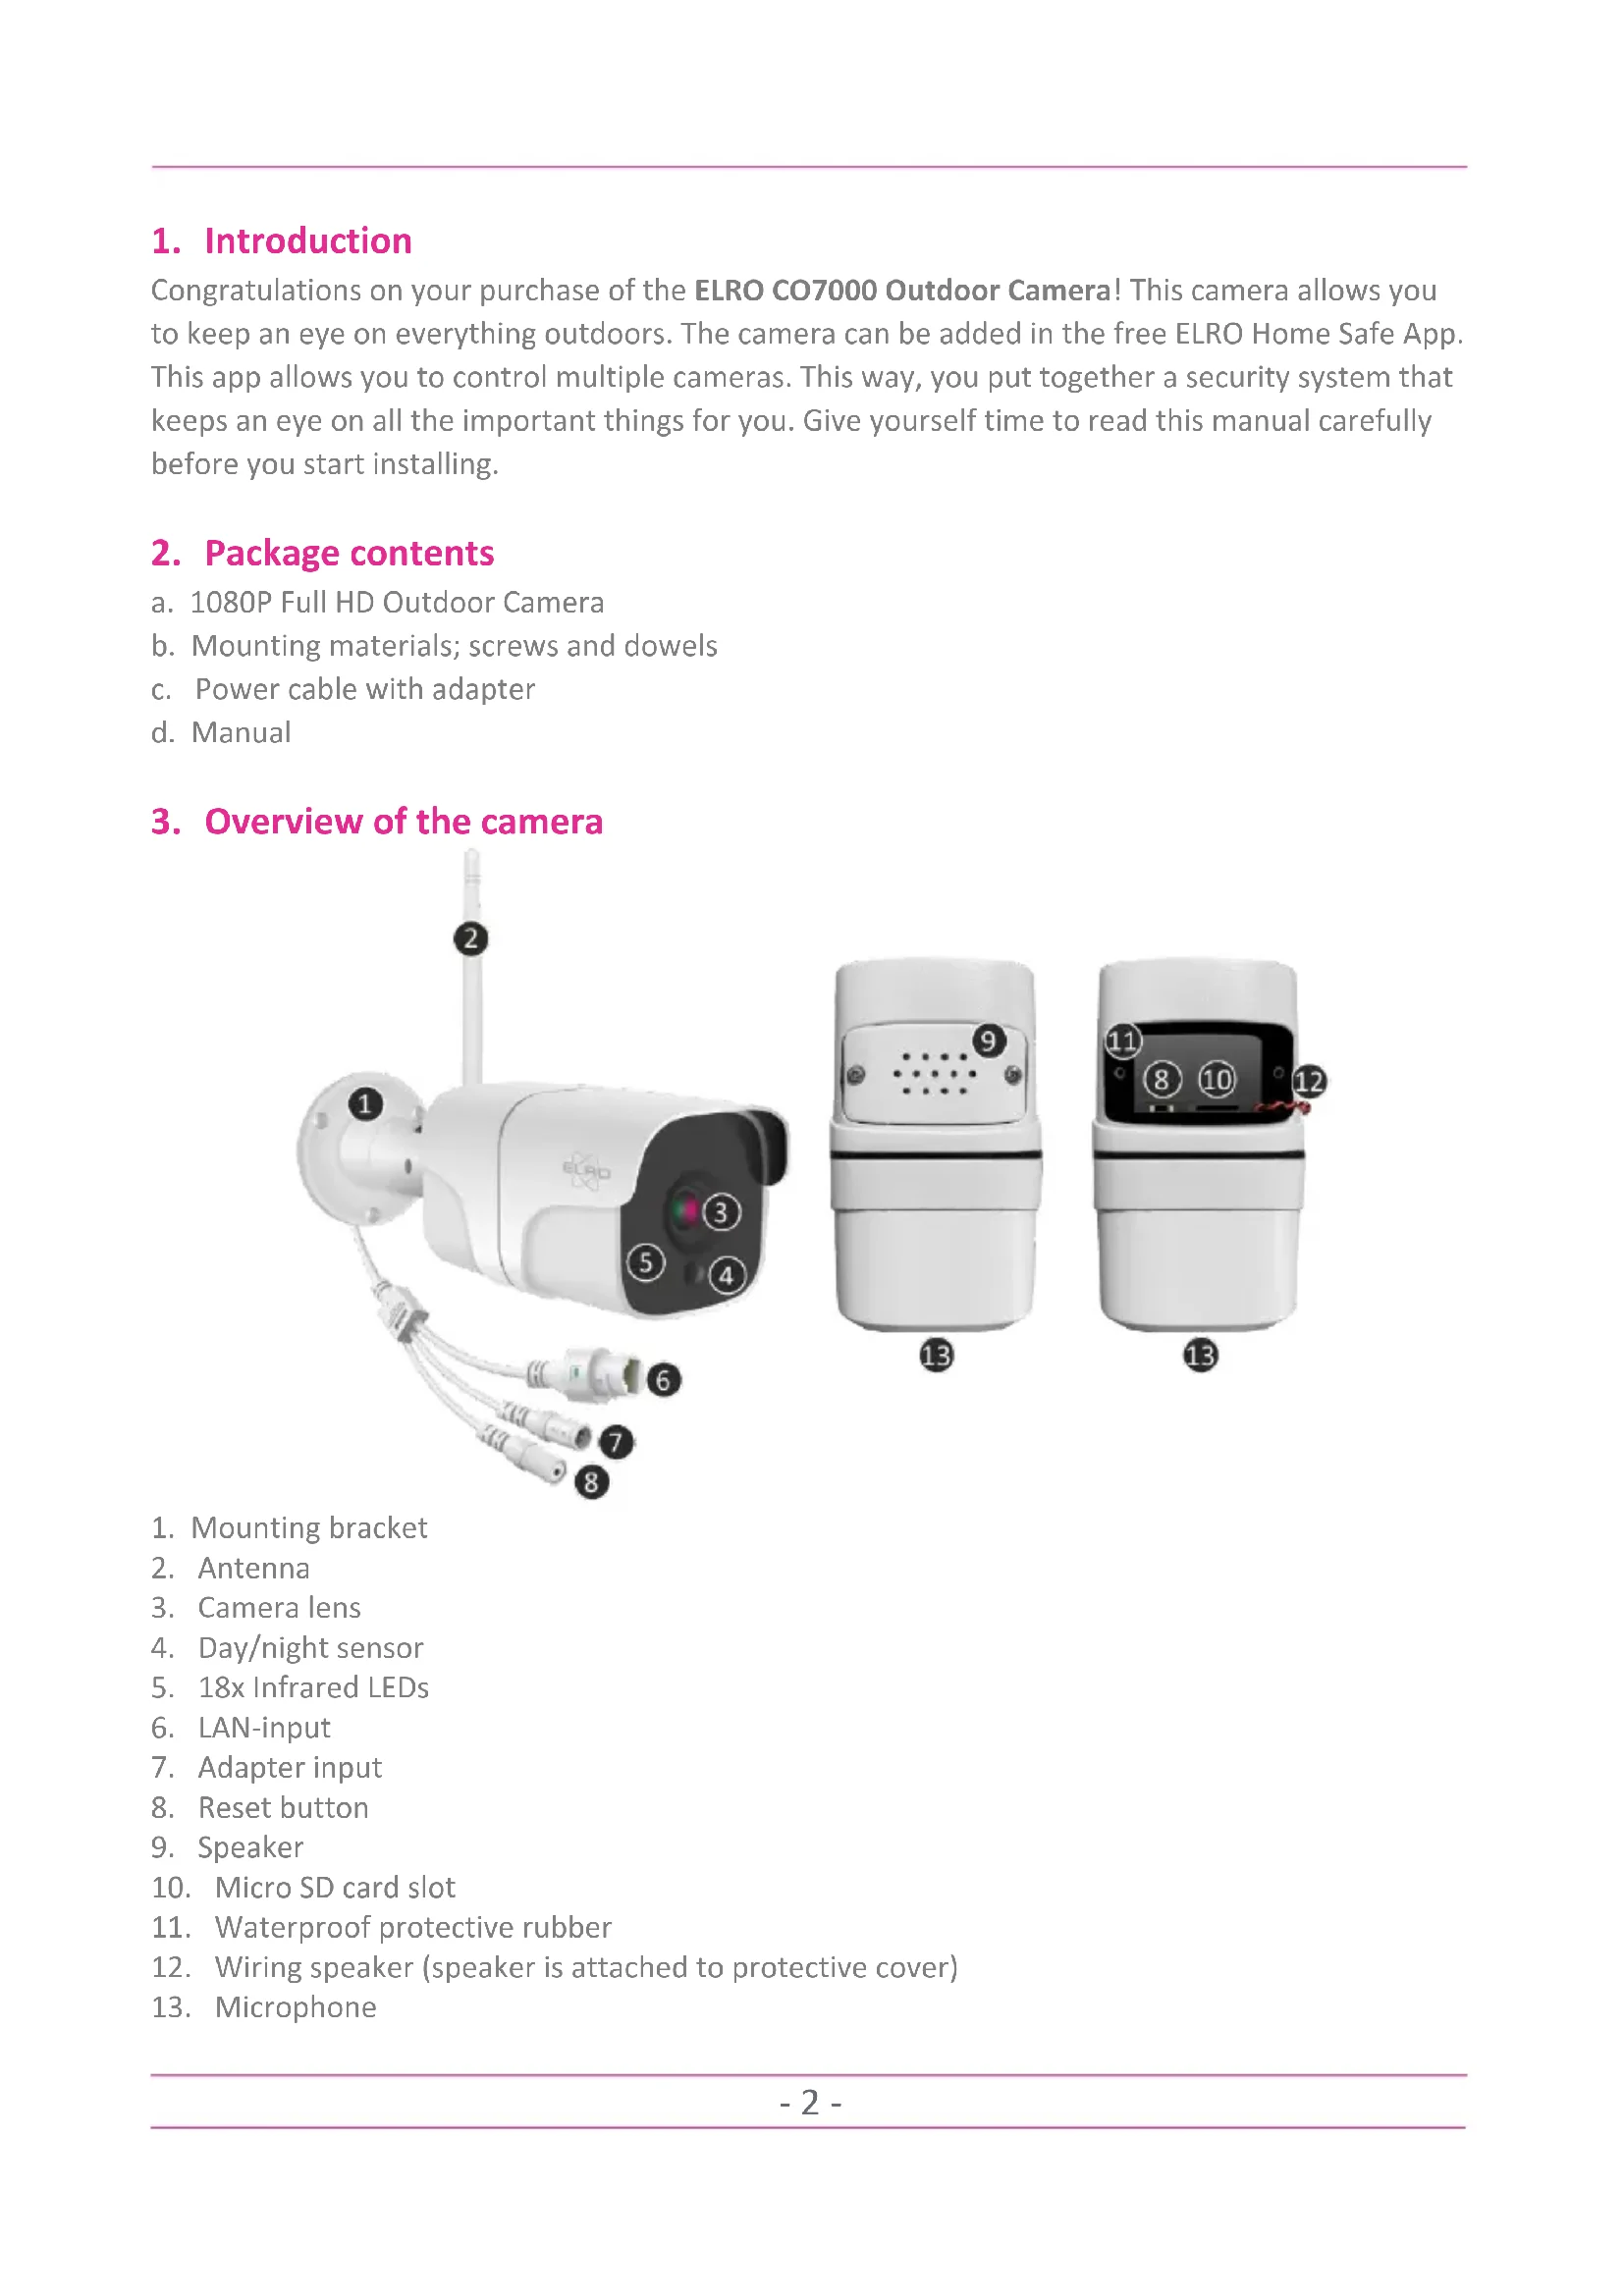
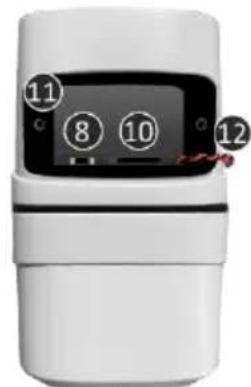
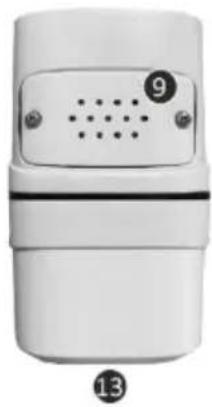
3. Overview of the camera
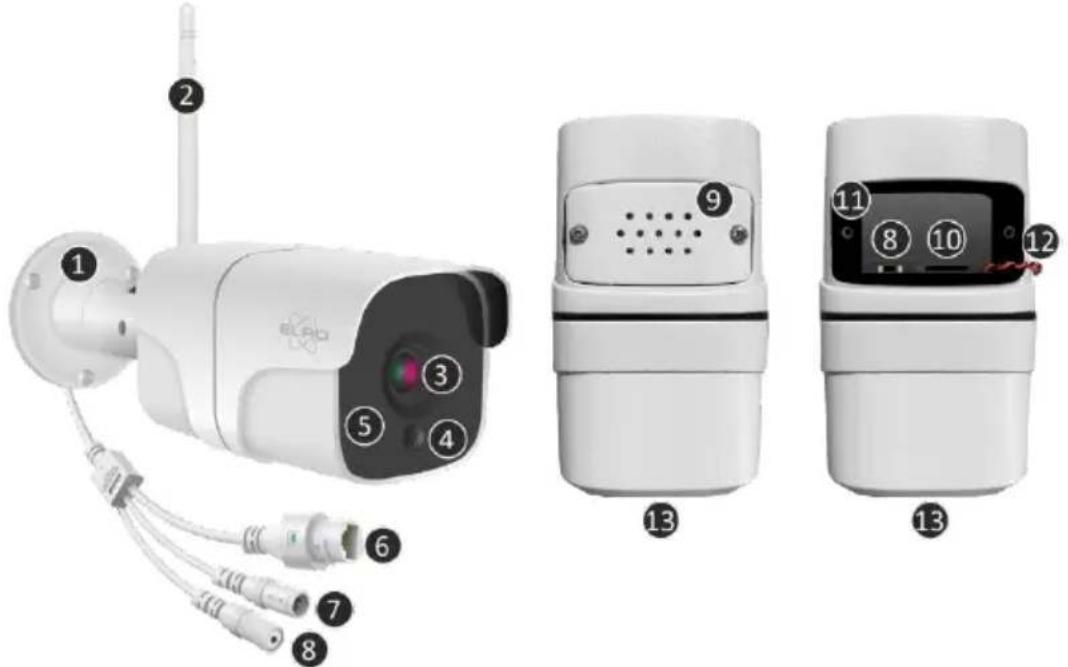
- Mounting bracket
- Antenna
- Camera lens
- Day/night sensor
- 18x Infrared LEDs
- LAN-input
- Adapter input
- Reset button
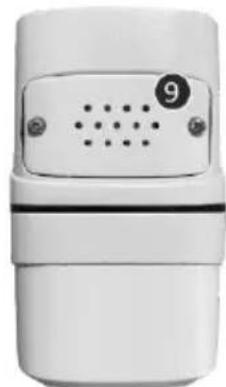
- Speaker
- Micro SD card slot
- Waterproof protective rubber
- Wiring speaker (speaker is attached to protective cover)
- Microphone
4. Camera Mounting
Important!
• Before you start mounting, check performance by pre-connecting the camera to the internet and testing from the same location/position where the camera will be mounted.
- The location should be free of dust and not in view of a strong light source or direct sunlight.
- Avoid thick walls, steel structures, double-glazed windows or other obstacles between the camera and the Internet router. When connecting with LAN cable, this point does not apply.
- This camera has built-in IR LEDs that allow images to be viewed in no/low light conditions. Images will then be shown in black and white.
• Turn the supplied antenna on the back of the camera for better signal coverage.
4.1 Camera mounting
- Mark the position of the screw holes using the mounting bracket on the wall.
- Drill the holes and insert the 4 plugs.
- Attach the camera, insert the screws through the mounting bracket into the dowels and tighten the screws securely.
- Now point the camera at the area you want to monitor.
Attention! Observe public order and point the camera only at property. - Connect the power adapter to the camera.
- Press the plugs together properly.
5. ELRO Home Safe App
Download the free ELRO Home Safe app from the Google Play Store or App Store. Read through User Agreements and Privacy Policy and accept them to continue.


Google Play Store

iOS Apple App Store
5.1 Register
If you do not yet have an account, you can register one for free.
A. Click on "Sign up".
B. Enter your country and enter the correct e-mail address.
C. Check the box next to the Privacy Policy and User Agreement. Then press "Retrieve Verification Code".
D. Check if you received an e-mail with the verification code. Also check for SPAM. When received, enter this code.
E. Set a new password. Use 6-20 characters with a combination of letters and numbers. Then press "Done".
F. Accept all permissions to complete the registration. Once this is done, you can use the ELRO Home Safe App.
5.2 Login
If you already have an account, you can log in with your details.
A. Click on "Log In".
B. Enter your country, email address and password.
C. Check the box next to the Privacy Policy and User Agreement. Press "Log In".
D. Now you are logged in and can use the ELRO Home Safe App.
6. Add camera
The camera can be easily added in three ways. QR-Code, wired or EZ-Mode. Follow the steps below carefully and the camera will be added to the app within minutes.
6.1 QR Code
a. Connect the power cable to the camera and plug the adapter into the wall socket. Wait a few seconds for the camera to say "ELRO CO7000 Starting Up". The camera then indicates that it is ready to be connected by saying "Please connect the camera to your wifi".
b. Go to the "Home" tab Press the "+" right at the top and select "Add device".
c. In the left-hand row, select the "Camera" category and press the "CO7000" camera.
d. Select the QR Code option at the top right. This is a default choice and you do not need to change anything else here.
e. When you hear "Please connect the camera to your wifi", you can tick the box. When this is checked, you can press the "Next" button.
f. The WiFi name is filled in automatically. Then enter the password of this network. Press "Next".
g. A QR-Code will now appear on the screen. Hold this QR code approximately 20 cm in front of the camera so that the camera can read it.
h. The camera will say "Scanning QR-Code successfully" when it has succeeded. This is followed by: "Your Wifi is Connected. Welcome to using ELRO CO7000 Outdoor Camera". After this, press "I heard a prompt".
g. The camera is now automatically added to the app. When the addition is successful, the app will indicate this. Then press "Done".
h. The camera is now successfully added to the app and will immediately play live images.

6.2 EZ-Modus
a. Connect the power cable to the camera and plug the adapter into the power socket. Wait a few seconds until the camera says; "ELRO CO7000 Starting Up". Then the camera indicates that it is ready to be connected by saying "Please connect the camera to your wifi".
b. Go to the "Home" tab Press the "+" right at the top and select "Add device".
c. In the left-hand row, select the "Camera" category and press the "CO7000" camera.
d. Press QR-Code at the top right and select EZ-Mode.
e. When you hear "Please connect the camera to your wifi", you can tick the box. When checked, you can press the "Next" button.
f. The WiFi name is filled in automatically. Then enter the password of this network. Press "Next".
g. The camera is now automatically added to the app. When it has succeeded in connecting, the camera says: "Your Wifi is Connected. Welcome to using ELRO CO7000 Outdoor Camera". When the addition is successful, the app will indicate this. Then press "Done".
h. The camera is now successfully added to the app and will immediately play live images.
6.3 Cable
a. Connect the power cable to the camera and plug the adapter into the wall socket. Wait a few seconds until the camera says; "ELRO CO7000 Starting Up". Then the camera indicates that it is ready to be connected by saying "Please connect the camera to your wifi".
b. Then insert a LAN cable into the camera's designated port and connect the camera directly to the internet router.
b. Go to the "Home" tab Press the "+" right at the top and select "Add device".
c. In the left-hand row, select the "Camera" category and press the "CO7000" camera.
d. Press QR-Code at the top right and select Cable.
e. When you hear "Please connect the camera to your wifi", you can tick the box. When this is checked, you can press the "Next" button.
g. The camera is now automatically added to the app. When it has succeeded in connecting, the camera says: "Your Wifi is Connected. Welcome to using ELRO CO7000 Outdoor Camera". When the addition is successful, the app will indicate this. Then press "Done".
h. The camera is now successfully added to the app and will immediately play live images.
Important
- Connect to your router/modem's 2.4Ghz WiFi signal.
7. Explanation about the camera
Description of all menus and functionalities of the app.

Navigation

Go back to the previous screen.

Full screen mode

Ensures screen-filling and tilting of images.

Snapshot

Tap this to take a photo. The photo is stored locally in the app and uses the smartphone's memory.

Talk – One-way communication

Tap this and hold down. This will allow you to speak through the smartphone's microphone and you will be heard from the camera. When the Talk mode / Two-way call (see 8 Explanation of the settings, Talk mode) is set, the icon will change to a phone symbol.

Manual recording

Tap this and a recording is made. Tap again to stop and save the recording. The video is stored locally in the app and thus uses the smartphone's memory.

Functionalities

Tap this and with menu with all functions of the camera are displayed. Press to close the menu.

Volume muted

Tap this and the volume is switched on. Press again to mute the volume again.

Fill screen

Fill the image screen without tilting the image. Tap again to restore the image.

Image quality

Sets the image quality, tap to change to and vice versa. This affects the images and photos recorded and may affect the smartphone's memory.

Full High Definition 1920 x 1080

Standard Definition 640 x 360

Playback
- Review all recordings stored on the SD card.
Timeline
- Slide on the timeline to the moment you specifically want to watch back.

Full screen
- While recording, tap here and watch the recording in full screen.

Manual recording
- Tap this and a recording is made. Tap again to stop and save the recording. The video is stored locally in the app and thus uses the smartphone's memory.

Snapshot
- Tap this to take a photo. The photo is stored locally in the app and thus uses the smartphone memory.

Reduce timeline
- Tap here to reduce the size of the timeline. Tap again to enlarge the timeline.

Calendar
- Select a specific day to watch recordings here.

Volume muted
- Tap this and the volume is switched on. Press again to mute the volume again.

Gallery
- Review all photos and recordings stored locally in the app.

Theme Color
- Change the app's theme to a Light Mode or Dark Mode.

Night Mode
- Specify whether the camera should automatically switch between day and night vision. This can also be switched on and off manually.

Motion Detection
- Switch on and the camera will record and send notifications when motion is detected. The icon will turn red when the function is enabled. Further settings via general settings.

Sound Detection
- Switch on and the camera will record and send notifications when sound is detected. The icon will turn red when the function is enabled. Further settings via general settings.

Buttons Management
- View all functions and shortcuts.

Messages
- View all recent notifications detected by the camera. Press "All" to view and filter more specific moments. You can filter by (human) movement, among other things. In addition, you can view all notifications from a specific day and delete notifications.

Cloud
- Make optional use of cloud storage. Activate a subscription of your choice.

Features
- Open the menu to view, enable or disable all functions.
8. Explanation of the settings
In the top right corner, press •to•go to settings.
Icon / Device name
- Change camera icon, device name and device location.
Device information
- View further information on the device.
Tap-to-run / Automation
- See all linked scenes here.
Basis function settings
- Change some basic functions here.
- Flip screen; rotate the screen when hanging the camera upside down.
- Talk mode; Change the direction of a communication conversation.
■ One-way communication; press and hold the microphone button to speak through the camera.
■ Two-way conversation; communicate via smartphone and camera like a phone call.
IR Night Vision
- Specify whether the camera should automatically switch between day and night vision. This can also be switched on and off manually.
Detection alarm settings
- Change detection alarm settings here.
- Motion
■ Enable Motion Detection.
■ Set the sensitivity of motion detection.
- Set an area. Change the red box of your choice and save. Press the "+" to add more boxes and save.
■ Human movement filtering; Enable Human Body detection, the doorbell will recognise "human" movement via AI and send a specific notification for this.
- Sound Detection
■ Enable Sound Detection.
- Alarm Timer Settings
- Set a schedule when the camera should record certain detection. This can be set completely as desired.
- Alarm Interval
- Set the notification interval. This can be set to 1min, 3min, 5min. Alarm interval means that, for example, the camera checks for detection every 1min and sends a notification every minute when it is present.
Storage settings
- View the capacity of the SD card here. From here, you can also format (empty) the SD card.
Recording settings
- Change the settings for recording on the SD card.
- Local recording; Specify whether the camera should record or not. The recorded images are saved on the SD card.
- Mute recording; No sound will be recorded.
- Recording mode; Change whether the camera should record non-stop (continuous) or on an event (motion or sound).
- Schedule; Set a schedule when the camera should record certain detection. This can be set completely as desired.
Cloud Storage
- Choose and manage a cloud subscription per camera. Further adjust the settings for the cloud function.
Offline notification
- Enable the app to notify when the camera is offline for more than 30 minutes.
FAQ & feedback
- Quickly go to the FAQ or provide feedback on the product, app or other services.
Share device
- Share the camera with one or more users who also wish to use the camera and its features. Sharing can be done by linking an existing ELRO Home Safe account or by sharing a link from the camera.
Add to home screen
- Create a shortcut from the smartphone to open the camera directly, without first opening the ELRO Home Safe and activating the camera.
Device update
- Check whether any updates are available. When they are available, you can also download and install them from here. It is possible to have these updates installed automatically.
Restart device
- The camera will reboot.
Remove device
- Delete the camera from the app. The camera will also be reset. The camera will say "The reset is successful".
9. Reset
You can easily reset the camera. This can be done in three ways.
Method 1:
Hold down the reset button (see 3 Camera Overview, 8 Reset button) and release as soon as the camera says; "The reset is successful".
Then delete the camera from the app by holding the selected camera in the home screen and then press "Remove Device".
Method 2:
Delete the camera from the app from the general settings (see 8 Explanation of the settings, Remove device). The camera will say "The reset is successful".
Method 3:
Delete the camera from the app by holding the selected camera in the home screen and then press "Delete Device". The camera will say "The reset is successful".
10. Frequently asked questions / FAQ
View all frequently asked questions on our website www.elro.eu. Is your question not among them? Then contact our customer service team at info@elro.eu.
Q: My wifi name is not entered automatically during installation.
A: Make sure the location feature is on. This way, the wifi name is filled in automatically.
Q: After installing a new router, my camera remains offline.
A: Reset and reinstall the camera with the data from the new internet router.
Q: How big should the hole be for cabling?
A: At least 2cm.
Q: Why is my SD card not recognized?
A: Check the camera settings and make sure the camera is recording through the SD card. Also try inserting the SD card into the camera when it is active.
Q: Why am I not receiving notifications?
A: Make sure all notifications permissions are accepted and that the app is allowed to send you messages.
Q: Can I add multiple cameras to the app?
A: Yes, you can add multiple and different ELRO cameras to the ELRO Home Safe App.
11. Specifications
| Resolution | 1920 x 1080 (Full HD) |
| Focal length | f3.6mm |
| Image sensor type | 1/2.7 "Full HD CMOS |
| Aperture | F 2.0 |
| Angle | 110° - Horizontal : 90° / Diagonal : 50° |
| Frame rate | Max 15fps |
| IR LEDs | 18 units |
| Night-time visibility | 10 m |
| Day and Night | IR -CUT filter auto switch |
| Smartphone version | iOS7 or above, Android 4.0 or above |
| Signal-to-Noise ratio | ≥52dB |
| Audio Input | Built-in microphone with -38dB noise reduction |
| Audio Output | Built-in 8 ohm / 2W HIFI speaker |
| Wireless standard | IEEE802.11b/g/n 2.4G |
| Wireless security | WPA, WPA2 |
| Wired standard | RJ-45 10M/100M |
| Power supply (adapter) | Input 100-240V AC 50/80Hz 0.3A max. |
| Power consumption | Output 12V/1A 12W |
| Storage | Less than 4W max. |
| Dimensions | Built-in SD card slot, max 128gb Micro SD (excl.) |
| Net weight | 105 mm (L) x 60 mm (W) x 60 mm (H) (excl. bracket) |
| Density class | 350g |
| Ambient temperature | IP66 |
| Humidity | -20°C ~+50°C |
12. Symbols

Recycling and disposal: The WEEE symbol means that this product and batteries should be disposed of separately from household waste. When this product reaches the end of its life, take it to a designated waste collection point nearby to ensure safe disposal or recycling. Protect environment and public health, handle natural resources responsibly!

Read the manual before use and keep it in a safe place for future use and maintenance.

Guarantee visit www.elro.eu
ELRO Europe | www.elro.eu
PO Box 9607 - Box E800
1006 GC Amsterdam - The Netherlands


natural_image
Exterior view of a white ELAO security camera with antenna and wall-mounted sensor (no text or symbols visible)HANDBUCH
Home is not a place, it's a feeling
Inhalt
5. ELRO Home Safe App
Google Play Store
iOS Apple App Store

5.1 Register
■ Enable Sound Detection.
- Zeitplan
natural_image
Exterior view of a white ELAO security camera with antenna and wall-mounted sensor (no text or symbols visible)GEBRUIKSAANWIJZING
FULL HD OUTDOOR IP CAMERA
C07000
Home is not a place, it's a feeling
Inhoud
- Inleiding....- 2 -
- Inhoud van de verpakking ....- 2 -
- Overzicht van de camera....- 2 -
- Camera Montage....- 3 -
- ELRO Home Safe App....- 3 -
- Camera toevoegen ....- 4 -
- Uitleg over de camera ....- 6 -
- Uitleg over de instellingen....- 8 -
- Resetten ....- 10 -
- Veel gestelde vragen / FAQ....- 10 -
- Specifications....- 11 -
- Symbolen....- 11 -
natural_image
White mobile phone device with ventilation grille and control buttons (no visible text or symbols)13
13
5. ELRO Home Safe App
Google Play Store

iOS Apple App Store
5.1 Registreren
6.2 EZ-Modus
natural_image
Exterior view of a white ELAO security camera with antenna and wall-mounted sensor (no text or symbols visible)MANUEL DE L'UTILISATEUR
CAMÉRA IP EXTÉRIEURE FULL HD
C07000
Home is not a place, it's a feeling
Contenu
- Introduction......-2 -
- Contenu de l'emballage....- 2 -
- Description de la caméra....- 2 -
- Montage de la caméra....- 3 -
- ELRO Home Safe App....- 3 -
- Ajouter une caméra....- 4 -
- Explication concernant la caméra....- 6 -
- Explication de la configuration ....- 8 -
- Reset....- 10 -
- Foire aux questions / FAQ ....- 11 -
- Spécifications....- 12 -
- Symbols ...... - 12 -
natural_image
White electronic device with labeled ports (9, 13) and dot patterns on the front panel (no readable text or symbols beyond labels)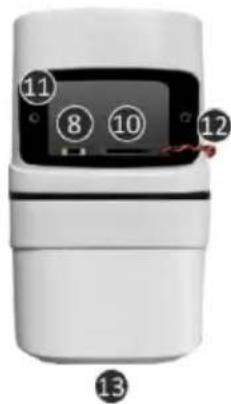
5. ELRO Home Safe App
Google Play Store

iOS Apple App Store

5.1 Registre


- USER MANUAL
- FULL HD OUTDOOR IP CAMERA
- Content
- Introduction
- Package contents
- Overview of the camera
- Camera Mounting
- Important!
- Camera mounting
- ELRO Home Safe App
- Register
- Login
- Add camera
- QR Code
- EZ-Modus
- Cable
- Important
- Explanation about the camera
- Navigation
- Full screen mode
- Snapshot
- Talk – One-way communication
- Manual recording
- Functionalities
- Volume muted
- Fill screen
- Image quality
- Playback
- Timeline
- Full screen
- Reduce timeline
- Calendar
- Gallery
- Theme Color
- Night Mode
- Motion Detection
- Sound Detection
- Buttons Management
- Messages
- Cloud
- Features
- Explanation of the settings
- Basis function settings
- IR Night Vision
- Detection alarm settings
- - Motion
- - Sound Detection
- - Alarm Timer Settings
- - Alarm Interval
- Storage settings
- Recording settings
- Cloud Storage
- Offline notification
- FAQ & feedback
- Share device
- Add to home screen
- Device update
- Restart device
- Remove device
- Reset
- Method 1:
- Method 2:
- Method 3:
- Frequently asked questions / FAQ
- Specifications
- Symbols
- HANDBUCH
- Inhalt
- - Zeitplan
- GEBRUIKSAANWIJZING
- Inhoud
- Registreren
- CAMÉRA IP EXTÉRIEURE FULL HD
- Contenu
- Registre
Brand : ELRO
Model : CI5000
Category : Surveillance Camera