Conga Rockstar RS90 Pet Flex - Vacuum Cleaner CECOTEC - Free user manual and instructions
Find the device manual for free Conga Rockstar RS90 Pet Flex CECOTEC in PDF.

| Product type | Stick vacuum |
| Brand | Cecotec |
| Model | Conga Rockstar RS90 Pet Flex |
| Battery | Removable, rechargeable (charging time 4 to 6 hours) |
| Filter | HEPA |
| Dirt reservoir | With bottom opening button, removable |
| Motorized floor brush | With anti-blocking and overcurrent protection |
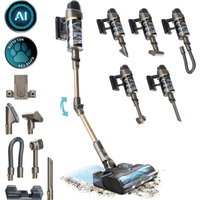
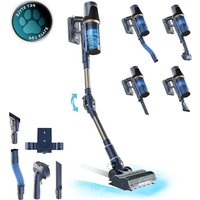
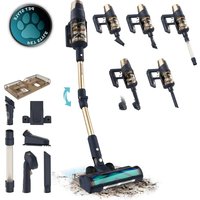
| Included accessories | Pet hair brush, 2-in-1 accessory, crevice nozzle, flexible hose, extension tube, wall mount |
| Operating modes | Automatic (with infrared dust sensor) and manual (multiple levels) |
| Display | LED screen with power, battery, alarm, and manual position indicator |
| Dust sensor | Infrared, adjusts power in real time in automatic mode |
| Reservoir cleaning | Empty by pressing the opening button; clean HEPA filter and honeycomb with a soft brush |
| Brush cleaning | Removable rotating brush, can be rinsed with clean water (dry completely before reinstalling) |
| Error codes | E1 (dust sensor), E2 (short circuit), E3 (brush blockage), E4 (battery overheating), E5 (low battery), E6 (adapter voltage), E7 (battery depleted), E9 (duct obstructed) |
| Safety | Overcurrent, overheating, blockage, short circuit protection |
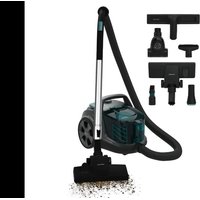
| Box contents | Stick vacuum, removable battery, 2-in-1 accessory, crevice tool, flexible hose, extension tube, pet hair brush, wall mount, instruction manual |
| Power supply | Provided mains adapter (charging only) |
Frequently Asked Questions - Conga Rockstar RS90 Pet Flex CECOTEC
User questions about Conga Rockstar RS90 Pet Flex CECOTEC
0 question about this device. Answer the ones you know or ask your own.
Ask a new question about this device
Download the instructions for your Vacuum Cleaner in PDF format for free! Find your manual Conga Rockstar RS90 Pet Flex - CECOTEC and take your electronic device back in hand. On this page are published all the documents necessary for the use of your device. Conga Rockstar RS90 Pet Flex by CECOTEC.
USER MANUAL Conga Rockstar RS90 Pet Flex CECOTEC
natural_image
Exterior view of a black and gold robotic vacuum cleaner against a teal background (no text or symbols visible)cecòtec
- Parts and components 13
- Before use 13
- Operation 14
- Cleaning and maintenance 16
- Troubleshooting 18
- Copyright 19
- Simplified EU Declaration of Conformity 19
SOMMAIRE
EN • The coding in this manual is generic and applies to all code variants of the appliance.
- Main unit
- Foldable tube
- Flexible hose
- Adapter
- 2-in-1 accessory
- Crevice tool
- Pet brush
- Wall bracket
NOTE:
The graphics in this manual are schematic representations and may not exactly match the product.
2. BEFORE USE
- This appliance comes in a packaging designed to protect it during transport. Take the appliance out of its box and remove all packaging materials. You can keep the original box and other packaging materials in a safe place to prevent damage to the appliance if you
ENGLISH
need to transport it in the future. If you wish to dispose of the original packaging, make sure all items are recycled properly.
- Check that all parts and components are included and in good condition. If any of them are missing or damaged, please contact Cecotec's Official Technical Support Service immediately.
Box content
- Upright vacuum cleaner
- Removable battery
- 2-in-1 accessory
- Crevice tool
- Flexible hose
- Extension tube
- Pet brush
- Wall bracket
- Instruction manual
- Do not remove the product's serial number in order to keep proper traceability if technical assistance is required.
3. OPERATION
Assembly
Fig. 3
Note:
- Turn off the vacuum cleaner before installing or replacing accessories.
-
This product does not require fixing and can stand upright on its own. However, hold the appliance and accessories firmly during installation.
-
Align the connector of the motorised floor brush with the extension tube, insert and lock it firmly in place.
- Insert the suction end of the main unit into the connection end of the extension tube and secure it firmly.
- To disassemble, press the corresponding release button and pull outwards to remove the floor brush or main unit.
Battery installation and removal
Fig. 4
- Press the battery release button and pull outwards to remove the battery.
- To install it, align the battery at the rear of the main unit and slide it in until it locks into place.
Fig. 4 key
- Battery release button
Charging the battery
During operation of the upright vacuum cleaner, when the LED display shows 00%, this indicates insufficient battery power and charging is required.
- Only use the charger supplied with this appliance for charging.
- Turn off the vacuum cleaner, then plug the adapter into the charging port. The LED display will show real-time power, and the battery LED light will flash, indicating normal charging. Fig. 5.
- The LED display shows real-time power. The flashing battery LED light indicates normal charging.
- When the LED display shows 100% and the battery LED light remains steady (stops flashing), charging is complete.
Fig. 5 key
- Battery LED indicator lights
- Charging port
Warning:
- Do not turn on the vacuum cleaner while charging!
- Do not remove the battery when connected to the main unit for charging!
- The battery can only be charged at an ambient temperature between 0 °C and +45 °C. Excessive heat or cold may extend charging time and potentially damage the battery.
- Normal charging time for this product is 4-6 hours. It is recommended to perform 1-3 complete charge-discharge cycles before first use to fully activate the battery.
- If the appliance is not used for an extended period, it is recommended to fully charge and discharge it approximately once every 3 months to prevent battery electrode passivation due to prolonged inactivity.
Using the vacuum cleaner
- Once assembled, press the power button to start the vacuum cleaner and begin operation, press again to it turn off.
- The default setting when powered on is Auto mode. Press the Auto/Manual mode switch button while the appliance is running to change to Manual mode. After switching, low manual speed is set by default. Keep pressing this button to adjust through different power levels.
ENGLISH
Note:
- The battery indicator light remains on when the vacuum cleaner is operating normally. When battery power is low, the battery indicator light will continue to flash until it turns off automatically. Charge it promptly.
- The motorised floor brush will rotate at high speed when vacuuming. Avoid remaining too long in the same floor position, as this may damage the floor surface.
- The motorised floor brush is equipped with an overcurrent protection device. When the motorised floor brush becomes entangled or blocked, the preset protection device will cut power. In this case, immediately turn off the appliance, remove the battery, check and clean the motorised floor brush. After clearing the blockage, reinsert the battery and restart the appliance to use it again.
- The vacuum cleaner is equipped with an infrared dust sensor (Fig. 6). In Auto mode, the appliance's power can be adjusted in real-time according to the detected amount of dust. However, prolonged use may lead to dust accumulation affecting normal operation of the dust sensor. If the LED display shows E1, turn off the appliance, remove the battery and dust container, and clean the dust sensor. After reinstalling the battery and dust container, start the vacuum cleaner for normal use.
4. CLEANING AND MAINTENANCE
Cleaning the dust container:
- Turn off the appliance and remove accessories.
- Align the bottom of the main unit's dust collection container with the waste bin and press the dust container opening button to empty dust. The bottom lid of the container will open automatically; gently shake to empty dust from the collection container, close the bottom lid and lock it firmly. Fig. 7
Fig. 7 key
- Dust container opening button
Note: When dust in the collection container reaches the marked maximum position, clean it promptly.
Cleaning the filter components:
- Press the dust container release button and remove the dust container assembly. Fig. 8
- Then remove the HEPA filter and rotate the filter assembly anticlockwise. Fig. 9
- Next, remove the filter from the dust container. Fig. 10
- Clean the nozzle, filter and dust container with a soft brush and reinstall in reverse order. Improper installation will result in reduced suction power.
- To maintain optimal cleaning performance, cleaning is recommended every 4-6 uses (depending on actual usage).
Warning: Do not operate this appliance without installing the separation filter!
Fig. 8 key
- Dust container release button
Fig. 10 key
- HEPA filter
- Honeycomb filter
- Dust container
Removing foreign object blockages
When the appliance's air duct becomes entangled and blocked by foreign objects, the protection device will cut power to the motorised floor brush, and it will stop rotating. Immediately switch off the appliance, check and clean the motorised floor brush or extension tube, remove the blockage and allow it to cool down for a period before resuming use.
Removing foreign objects blocking the extension tube: Remove the extension tube, check and unblock it, then reinstall.
Removing foreign objects blocking the motorised floor brush: Refer to the "Cleaning the motorised floor brush" section.
Cleaning the motorised floor brush
-
Press the round lock on the side of the motorised floor brush to remove the rotating brush. Fig. 10
Caution: some dust will fall when removing it. -
Remove entangled hair, pet hair or debris from the rotating brush to eliminate dust. Fig. 11 Note: It can be rinsed with clean water if necessary and must be completely dry before reinstalling for use.
-
TROUBLESHOOTING
| Problem Possible cause Possible solution | ||
| The vacuum cleaner does not turn on. | Low battery. Refer to the "Charging the battery" section in the manual for proper charging instructions. | |
| The vacuum cleaner has no or low suction power. | The dust container is full. Empty the dust container contents. | |
| The extension tube or floor brush is blocked by foreign objects. | Refer to the instruction manual section: "Removing foreign object blockages". | |
| The dust container or separation filter is not correctly installed. | Reinstall the dust container or separation filter correctly. | |
| There are obvious dust leaks from the vacuum cleaner. | The dust container or separation filter is not correctly installed. | Reinstall the dust container or separation filter correctly. |
| The dust container is full. Empty the dust container contents. | ||
| The LED display shows "E3". The rotating brush is entangled or jammed, and the protection device has been activated. | Refer to the instruction manual section: "Removing foreign object blockages". | |
| The vacuum cleaner operating time has decreased. | Low battery. Refer to the "Charging the battery" section in the manual for proper charging instructions. | |
| The battery life is deteriorating. | Purchase and use a replacement battery through Cecotec's Official Technical Support Service. | |
Error codes
| Error code Fault | |
| E1 The infrared dust detection | sensor requires cleaning. |
| E2 The short circuit (overcurrent) | protection has been activated. |
| E3 The floor brush blockage | protection has been activated. |
| E4 The battery over-temperature | protection has been activated. |
| E5 The battery is too low, and the protection has been activated. | |
| E6 The adapter voltage is too high / current is too high. | |
| E7 The no-charge battery protection has been activated. | |
| E9 The air duct is blocked. | |
6. COPYRIGHT
The intellectual property rights over the texts in this manual belong to CECOTEC INNOVACIONES, S.L. All rights reserved. The content of this publication may not, either in part or in its entirety, be reproduced, stored in a retrieval system, transmitted or distributed by any means (electronic, mechanical, photocopying, recording or similar) without prior authorisation from CECOTEC INNOVACIONES, S.L.
7. SIMPLIFIED EU DECLARATION OF CONFORMITY
CE Cecotec Innovaciones hereby declares that this product complies with the essential requirements and other relevant provisions of the regulations applicable in the European Union. This product has been designed, manufactured and tested in compliance with the required safety and quality standards. The full text of the EU Declaration of Conformity can be found on the following website: https://cecotec.es/es/information/declaration-of-conformity