YT-82185 - Saw Yato - Free user manual and instructions
Find the device manual for free YT-82185 Yato in PDF.


User questions about YT-82185 Yato
0 question about this device. Answer the ones you know or ask your own.
Ask a new question about this device
Download the instructions for your Saw in PDF format for free! Find your manual YT-82185 - Yato and take your electronic device back in hand. On this page are published all the documents necessary for the use of your device. YT-82185 by Yato.
USER MANUAL YT-82185 Yato
natural_image
Industrial power tool with visible mechanical components and wheels (no text or symbols)CE
PL DE RU UA LT LV CZ SK HU RO ES FR IT NL GR
text_image
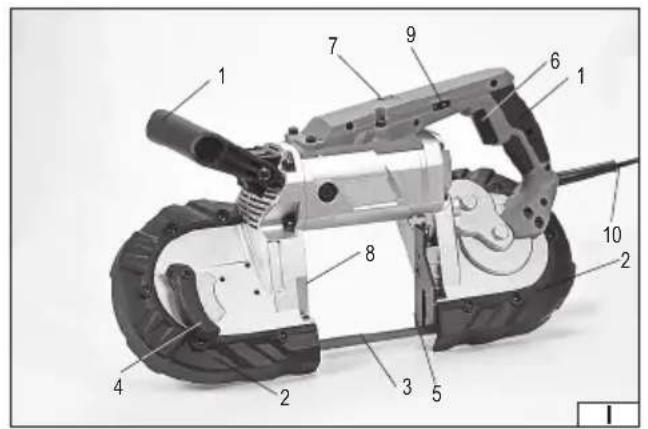
Labeled diagram of a mechanical device with numbered parts for identification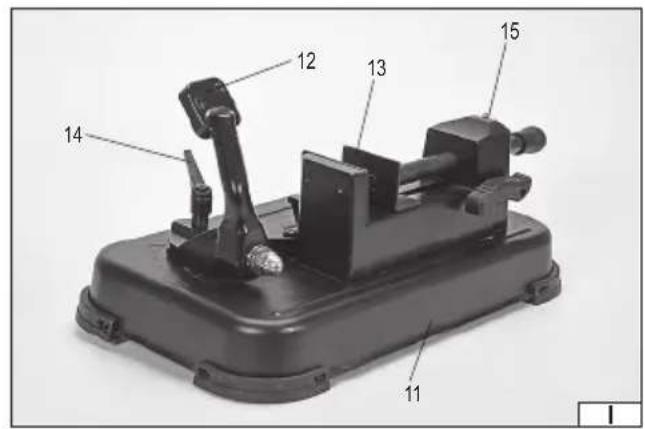
text_image
Labeled diagram of a mechanical device with numbered parts for identification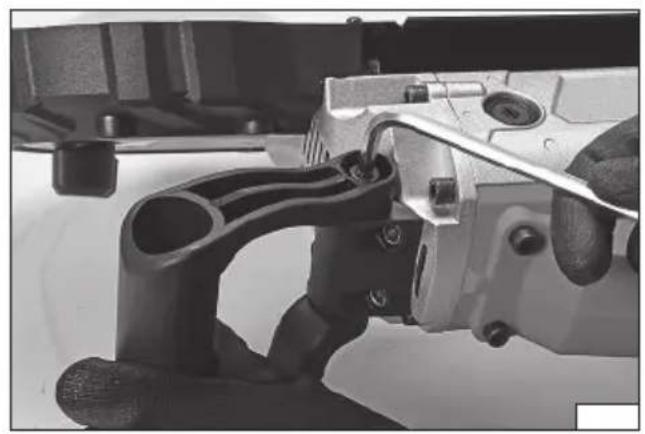
natural_image
Close-up of a mechanical assembly with no visible text or symbols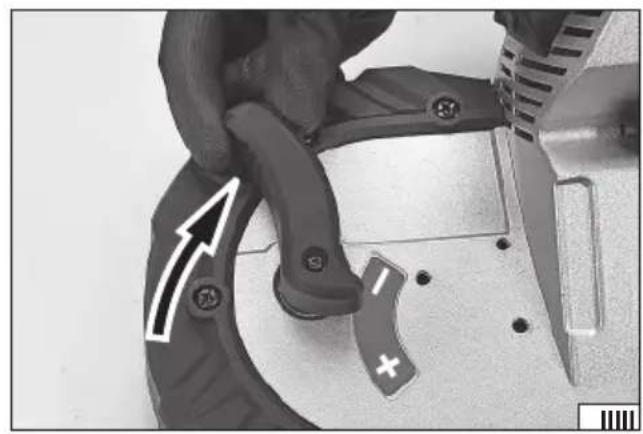
natural_image
Close-up of a hand operating a sewing machine with a tool, showing no visible text or symbols.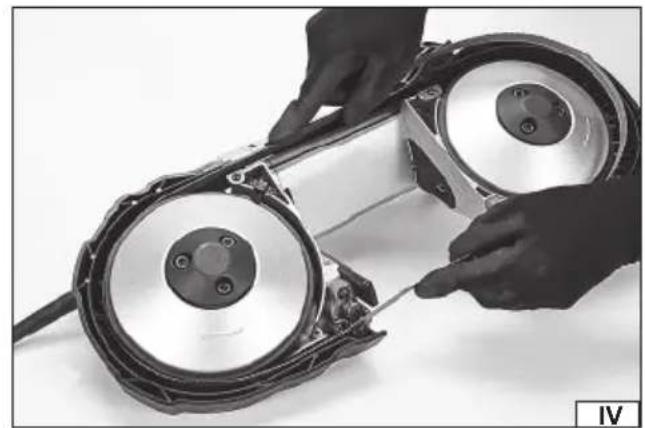
natural_image
Close-up of hands assembling a mechanical component with two circular parts (no visible text or symbols)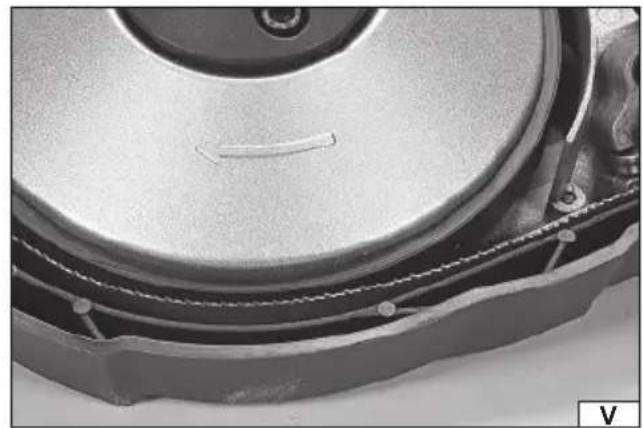
natural_image
Close-up of a mechanical component with metallic casing and textured base (no visible text or symbols)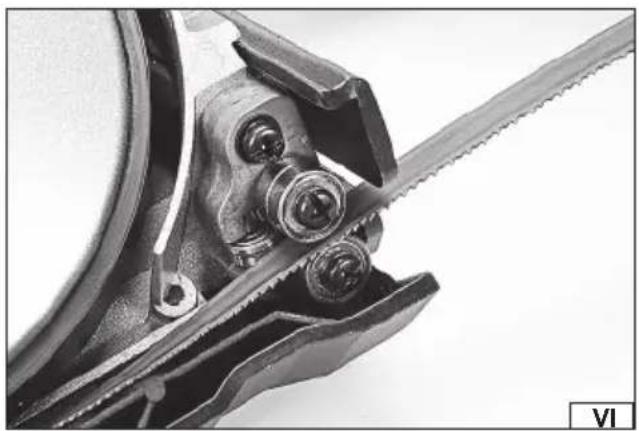
natural_image
Close-up of a mechanical clamp or clamping device with a diagonal saw cutting through it (no visible text or symbols)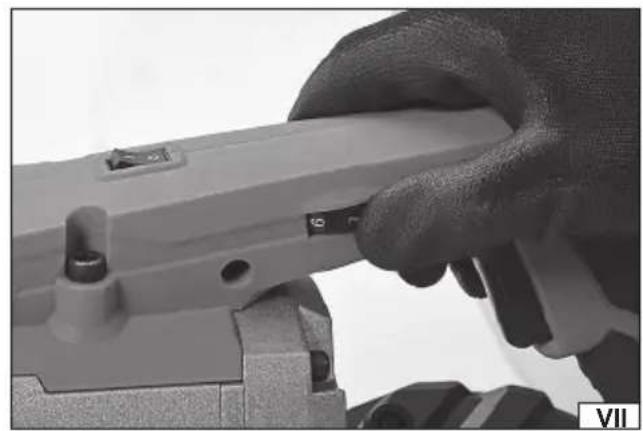
natural_image
Close-up of a gloved hand holding a mechanical tool, no visible text or symbolsnatural_image
Close-up of a hand pressing a button on a mechanical component (no visible text or symbols)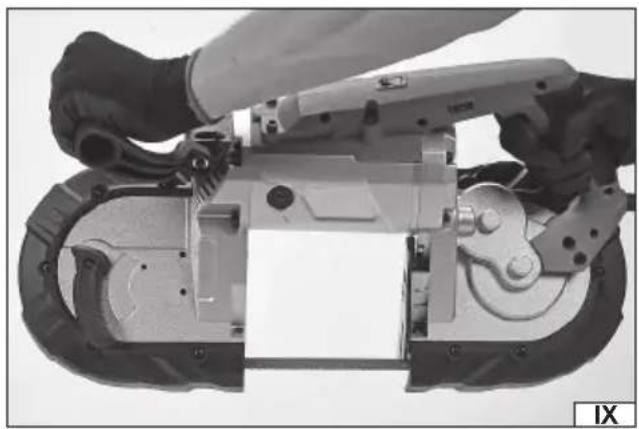
natural_image
Close-up of hands operating a mechanical device with a tool, no visible text or symbols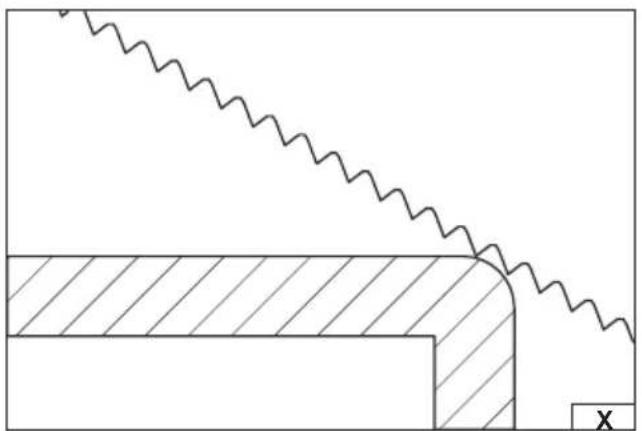
natural_image
Technical diagram showing a zigzag line intersecting a rectangular block with hatched fill, no text or symbols present.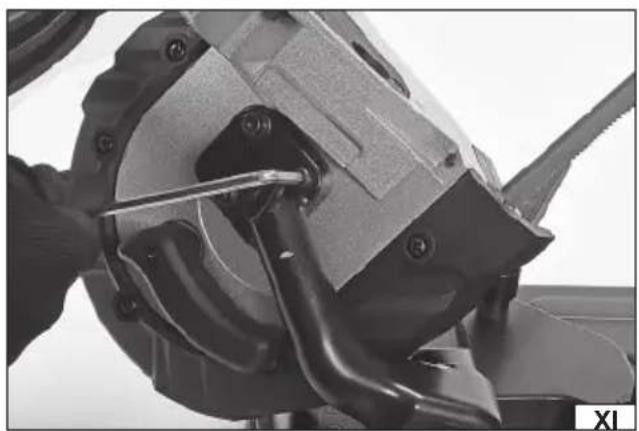
natural_image
Close-up of a mechanical component with a tool inserted, showing no visible text or symbols.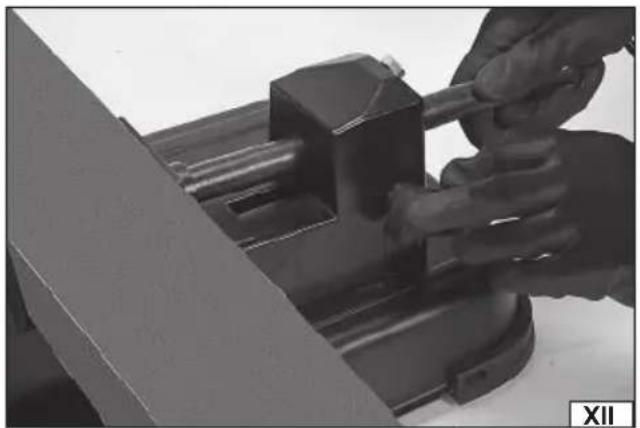
natural_image
Close-up of a hand using a tool to press or install a metal block on a workbench (no visible text or symbols)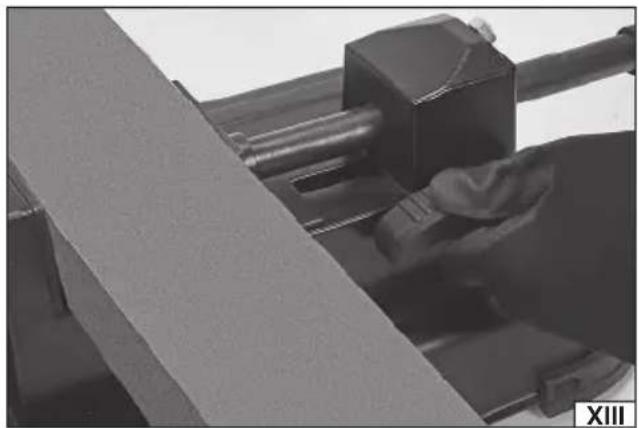
natural_image
Close-up of a mechanical assembly with a cylindrical component and a flat surface, no visible text or symbols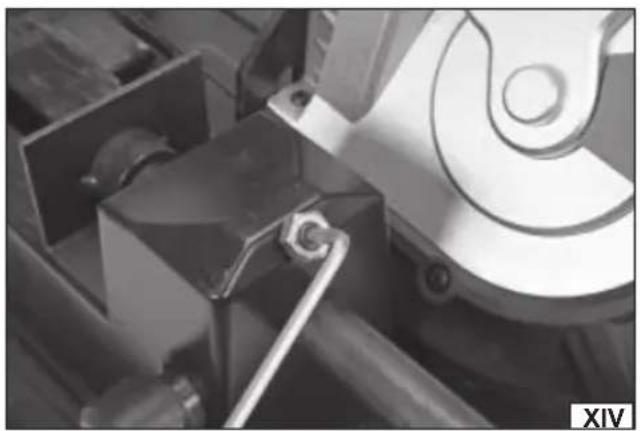
natural_image
Close-up of mechanical components including a tool and a curved component (no visible text or symbols)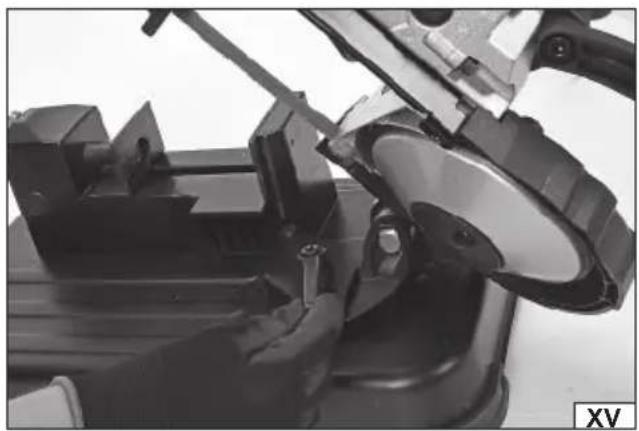
natural_image
Close-up of a mechanical assembly with a hand operating a tool, no visible text or symbols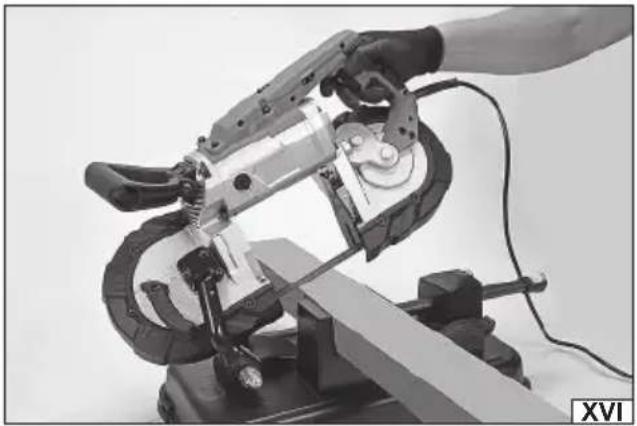
natural_image
Close-up of a hand operating a mechanical cutting tool on a workbench, no visible text or symbolsPL
- handle
- blade guard
- saw blade
- blade tension lever
- guide bar
- on/off switch
- lamp
- LED lamp
9.speed control - power cord and plug
- base
- base holder
- base clamp
- base angle adjustment
- clamp adjustment screw
DE
Mains voltage and frequency
Second class of insulation
Read the operating instruction
Wear protective goggles
Wear hearing protectors
This symbol indicates that waste electrical and electronic equipment (including batteries and storage cells) cannot be disposed of with other types of waste. Waste equipment should be collected and handed over separately to a collection point for recycling and recovery, in order to reduce the amount of waste and the use of natural resources. Uncontrolled release of hazardous components contained in electrical and electronic equipment may pose a risk to human health and have adverse effects for the environment. The household plays an important role in contributing to reuse and recovery, including recycling of waste equipment. For more information about the appropriate recycling methods, contact your local authority or retailer.
WYPOSAŻENIE PRODUKTU
The band saw is a handheld power tool, which, by means of a blade formed into an endless loop, can cut pipes, tubes, and other metal sections. The band saw features a base that makes cutting easy and safe. As the correct, reliable, and safe operation of the tool depends on its proper use:
Read and keep the entire manual before the first use of the tool.
The tool supplier shall not be liable for any damage resulting from failure to comply the safety instructions and recommendations specified in this manual.
ACCESSORIES
The tool is delivered complete and requires preparation for operation. A saw blade and a base are supplied with the product.
TECHNICAL DATA
| Parameter Units Value | ||
| Catalogue No. YT-82195 | ||
| Rated voltage [V~] 220 - 240 | ||
| Rated frequency [Hz] 50 | ||
| Rated power [W] 1100 | ||
| Saw blade speed [m/s] 0.7 - 2.4 | ||
| Saw blade specifications | ||
| - length | [mm] | 1140 |
| - height | [mm] | 12.7 |
| - thickness [mm] 0.6 | ||
| - number of teeth per inch of blade length (TPI) | - | 14 |
| Cutting range (H x W) | [mm] | 127 x 127 |
| Weight | [kg] | 6.6 |
| Protection class | - | II |
| Ingress protection rating | - | IP20 |
| Noise level | ||
| - sound pressure, LpA ± K | [dB(A)] | 89 ± 3 |
| - sound power, LwA ± K | [dB(A)] | 100 ± 3 |
| Vibration level, ah ± K (metal/wood cutting) | [m/s2] | 6.62 ± 1.5 / 6.08 ± 1.5 |
GENERAL SAFETY CONDITIONS
NOTE! Get acquainted with all the instructions below. Failure to observe them may lead to an electric shock, fire or injuries. The notion of electric tool used in the instructions applies to all the tools which are powered with electric current, both wire tools and wireless ones.
OBSERVE THE FOLLOWING INSTRUCTIONS
Place of work
The place of work must be properly illuminated and clean. Disorder and poor illumination may be a cause of accidents.
Do not work with electric tools in explosive environments, or those which contain inflammable liquids, gases or vapours.
Electric tools generate sparks, which may cause a fire in case of contact with inflammable gases or vapours.
Do not allow children and outsiders to the place of work. A lack of concentration may result in a loss of control over the tool.
Electric safety
The plug of the power supply cable must fit the mains socket. Do not modify the plug. Do not use any adapters whatsoever in order to adapt the plug to the socket. Unmodified plug which fits the socket reduces the risk of an electric shock.
Avoid contact with grounded surfaces, such as pipes, heaters and refrigerators. Grounding of the body increases the risk of an electric shock.
Do not expose electric tools to precipitation or humidity. Water and humidity which gets into the electric tool increases the risk of an electric shock.
Do not overload the power supply cable. Do not use the power supply cable in order to carry the tool or to connect and disconnect the plug from the mains socket. Avoid contact of the power supply cable with heat, oils, sharp tools and
EN
moving elements. Damage to the power supply cable increases the risk of an electric shock.
In case work is realised outside closed areas, it is necessary to use extension cords designed for applications outside closed areas. Using a correct extension cord permits to reduce the risk of an electric shock.
If operating a power tool in a damp location is unavoidable, use a residual current device (RDC) protected supply. Use of an RCD reduces the risk of electric shock.
Personal safety
Commence work in good physical and psychological conditions. Pay attention to what you do. Do not work if you are tired or under effects of medicines or alcohol. Even a moment's inattention during work may lead to serious injuries.
Always use individual means of protection. Always wear goggles. Using individual means of protection, such as dust-masks, protective shoes, helmets and hearing protections permits to reduce the risk of serious injuries.
Avoid accidental activation of the tool. Make sure the switch is in the OFF position, before you connect the tool to the mains. Holding the tool with a finger on the switch or connecting an electric tool when the switch is in the ON position may lead to serious injuries.
Before you turn an electric tool on remove all the spanners and other tools, which have been used for adjustments. A spanner left on rotating elements of the tool may lead to serious injuries.
Keep your balance. Maintain an appropriate position. It will permit to control the electric tool in case of unpredicted situations during its operation.
Use protective clothes. Do not wear loose clothes or jewellery. Keep your hair, clothes and gloves away from moving elements of the electric tool. Loose clothes, jewellery or long hair may get caught on moving elements of the tool.
Use dust extractors or dust containers, if the tool is equipped with any. Make sure they are properly connected. Using of dust extractors permits to reduce the risk of serious injuries.
Operation of the electric tool
Do not overload the electric tool. Use a proper tool for the given purpose. A correct selection of the tool for the given work will result in a more efficient and safer work.
Do not use the electric tool if the switch is not functioning properly. A tool which may not be controlled by means of a switch is dangerous and must be repaired.
Disconnect the plug from the mains socket before any adjustment, replacement of accessories or storage of the tool. It will permit to avoid accidental activation of the electric tool.
Store the tool away from children. Do not allow untrained persons to operate the tool. An electric tool may be dangerous in hands of an untrained person.
Make sure the tool is properly maintained. Check the tool in order to detect any unfitting or loose moving elements. Check whether the elements of the tool are not damaged. In case any damaged elements of the tool are detected, they must be repaired before the electric tool is operated. Many accidents are caused by improper maintenance of tools.
Cutting tools must be sharp and clean. Properly maintained cutting tools are easier to control during work.
Use electric tools and accessories in accordance with the aforementioned instructions. Use the tool in accordance with its purpose, taking into account the kind and conditions of work. Should the tool be used for other applications than the ones it has been designed for, the risk of a dangerous situation increases.
Repairs
The tool may be repaired only by authorised service centres, which must use solely original spare parts. It will guarantee a proper level of safety of operation of the electric tool.
ADDITIONAL SAFETY INSTRUCTIONS
The band saw is only designed for cutting pipes and sections made of metal. Any other use is forbidden. Do not use the band saw for cutting wood, including firewood and construction timber, engineered wood products, or any materials which contain harmful substances, e.g. asbestos. Do not cut ceramic materials, e.g. concrete or bricks.
The band saw only cuts in a straight line. Do not cut materials larger with a cross-section larger than the cutting range.
Wear personal protective equipment at work, including: hearing protection, safety goggles or glasses, protective clothing with long sleeves and legs, protective gloves and footwear with anti-slip soles.
When cutting dust-generating materials, wear respiratory protection, e.g. dust half-masks.
Before starting to cut, make sure that the saw blade has been correctly mounted and it will rotate in the correct direction.
Check the saw blade for damage each time you start cutting. If any damage is found, replace the saw blade with an undamaged one. Typical damage to the blade includes cracks, bends and broken teeth.
The saw blade must always be sharpened well.
Always hold the band saw handles with both hands during operation. Holding the band saw way can lead to a loss of control over it. A loss of control of the band saw can lead to serious injury.
Move the saw blade straight and do not tilt the saw blade sideways while cutting; otherwise the saw blade can become stuck or break. If the saw blade is stuck in the cut, immediately turn off the band saw by releasing the ON/OFF switch, and release the
EN
saw blade from the cut. Do not start cutting until the saw blade is completely clear from the cut. Otherwise, the tool may kick back towards you, which can cause serious injuries. The most common causes of the saw blade becoming stuck in the cut are: tilting the saw blade sideways during cutting, changes in the structure of the material being cut, e.g. Internal voids, and overloading of the band saw by pressing it down into the material with excessive force.
When you want to resume cutting, let the saw blade reach the full set speed first before introducing it back into the cut.
Make sure that the power cord clear from the cutting area when cutting. When cutting materials which may conceal live cables, hold the band saw by insulated handles. Cutting a live wire or the live power cord can result in electric shock and serious injury or death.
If the power cord is cut, have it replaced by an authorized service agent of the band saw's manufacturer. Do not repair the power cord itself. Do not use the band saw with its power cord damaged.
The band saw reaches a high temperature when cutting. Be extremely careful when working and directly afterwards. Keep off the hot band blade: serious injury hazard.
Remove the cutting swarf when the saw blade has stopped completely. Removing swarf with the saw blade in motion may result in serious injury.
Vibration hazard
Although this power tool is designed to minimise the risks from vibration, it has not been possible to completely eliminate the vibrations which may cause residual risks. Improper handling of the power tool can cause risks associated with vibration exposure. Vibration exposure may result permanent damage to the nerves and the blood circulation in the hands and the arms. Wear warm clothes when working at low temperatures and keep the hands warm and dry. If numbness, tingling, pain or skin whiteness occurs in your fingers or hands, stop operating the power tool, report to the employer, and consult a doctor. Operate and service the power tool with the instructions in this manual to avoid an unnecessary increase of the vibration level. Choose, maintain and replace the consumables / cutters as shown in this manual order to prevent an unnecessary increase of the vibration level. Rest the weight of the power tool on its base, tensioner or stabiliser, if possible. Maintain a light and sure grip on the power tool and mind the reaction forces from processing with the power tool. The risk of vibration is higher the higher is the force of your grip on the power tool. Incorrect mounting of the cutter in the power tool may result in increased vibration levels.
The declared, total declared value of vibration was measured by the standard test method, and it can be applied to compare one tool to another. The declared, Declared total value of vibration can was used in a preliminary assessment of exposure.
Attention! The vibration emissions when working with the tool can differ from the declared value, depending on how you use the tool. Attention! You should specify the security measures to protect the operator, which are based on an assessment of exposure in the actual conditions of operation (including in it all parts of the work cycle, such as, for example, the time when the tool is turned off or it is idling, and its activation time).
Residual risks
Even the correct operation of the power tool entails certain and unavoidable residual risks. Depending on the type and design of the power tool, the following potential hazards may occur, which originate from:
- Touching an unguarded part of the saw blade, resulting in physical injury;
- Exposure to ejected fragments of the saw blade upon its fracture, resulting in physical injury;
- Ejection of workpiece fragments;
- Hearing loss if the required hearing protection is not worn at work;
- Contact with live voltage due to the defective or cut power cord or motor housing, resulting in electric shock;
- Exposure to harmful substances leaking from the workpiece. Failure to follow the manual of the power tool may result in misuse and expose the operator to other residual risks.
PRODUCT OPERATION
Warning! All adjustment and preparation for work shall be done with the band saw isolated from live voltage. Make sure that the power cord of the band saw has been unplugged from the mains outlet.
Front handle (II) adjustment
Before starting to work, adjust the front handle in the safest and most ergonomic position. Adjust the handle at an angle at which both hands are at least slightly bent in the elbows when holding the band saw, and the grip itself ensures freedom of movement of the band saw within the working area.
Loosen the handle lock bolt, set the handle in the desired position, and then fix the handle by retightening the lock bolt.
Mounting the saw blade
Warning! The saw blade has sharp edges. To reduce the risk of injury, handle the saw blade in protective gloves.
Warning! Mount a band saw with a size listed in the Technical Data table.
Inspect the saw blade thoroughly inspected for damage, deformation, broken teeth, and evidence of rust before mounting. Do not mount a saw blade if damaged.
Turn the blade tension lever as far as it will go towards the “-” mark (III). This will reduce the distance between the saw blade
EN
wheels and help release the saw blade and mount the new one.
Clean the gap in which the saw blade and its driving wheels move with a soft brush or compressed air at a pressure up to 0.3 MPa. Slide the saw blade into the slot (IV) so that it rests on the edge surface of both driving wheels.
The saw blade teeth must point to the outside of the gap (V).
Slide the saw blade between the guide rollers (VI) on both sides of the cutting area.
Turn the blade tension lever as far as it will go towards the “+” mark to increase the distance between the driving wheels and properly tension the saw blade.
Check that the saw blade has not slipped off the driving wheels and/or slipped out from between the guide rollers.
Saw blade speed control (VII)
The saw blade speed can be adjusted within the range specified in the Technical Data table. The saw blade speed is adjusted with the blade speed control knob. The higher is the number visible on the knob, the higher the saw blade speed is.
Working area lamp (VIII)
The LED lamp is turned on by moving its switch to "I". The LED lamp is turned off by moving its switch to "O".
Starting the band saw
Mount the saw blade and set the maximum saw blade speed.
Make sure that the ON/OFF switch is set to OFF. Plug the power cord into a mains outlet.
Hold the band saw by both handles (IX). Adopt a balanced posture. Make sure that the saw blade will not touch any object when staring the band saw. Start the band saw by pressing and holding the ON/OFF switch. Wait for the saw blade to reach is full speed and hold the band saw steady for about one minute.
In the meantime watch the band saw for any abnormalities. If strong vibration, high noise, odour or smoke is noticed, immediately turn off the bad saw by releasing the ON/OFF switch, wait for the saw blade to stop completely, put the band saw away and unplug the power cord from the mains outle. Do not restart the band saw before removing the cause of the abnormality.
If no signs of abnormal performance are found when starting the band saw, turn it off and unplug the power cord from the mains outlet. Next, check that the saw blade has not slipped off the driving wheels and/or out of the guide rollers. Mount the saw blade properly, if needed.
Cutting materials
Warning! Do not use any coolants, e.g. water or oil during cutting. The band saw is only suitable for dry cutting. Exposure of the band saw to water or liquids may result in electrical shock and serious injury or death.
Before you start cutting, prepare the workpiece. Check if the size of the workpiece is within the cutting range limits.
Mark the cutting line on all surfaces of the material the cut will be made on. This will help the saw blade run properly through the workpiece.
The material to be cut should be fixed. Use a vice, a clamp or other suitable fixtures or supports. If you want to cut a long material, support the workpiece near the location of the cut and at the opposite end. The workpiece must be supported on both sides of the cut. The supports must prevent the workpiece parts being separated by the cut from collapsing inward, which may cause the saw blade to stick in between.
Keep the guide bar touching the workpiece throughout the cut.
Do not apply excessive pressure on the workpiece and/or an excessive saw blade speed. Establish the proper pressure and saw blade speed experimentally by trying to cut scrap material.
Watch the colour of the swarf and the edges of the cut. If discoloration becomes visible, the temperature is rising too high at the cut due to excessive pressure on the band saw and/or an excessive saw blade speed. When cutting metals other than steel, excessive pressure and/or band saw speed may cause caking of the saw blade teeth with the swarf. This will reduce the cutting performance.
Too much pressure and/or speed accelerates the wear of the saw blade. If you notice a drop in the blade teeth sharpness or broken teeth after a cut, replace the saw blade with a new one. Reduce the pressure and/or the saw blade speed when cutting.
Apply the band saw to the workpiece at an angle to the surface of entry (X) to facilitate the engagement of the teeth. Apply the slightest pressure possible and a lower saw blade speed at the start of the cut. With the cut groove properly formed, you can increase the pressure and/or the saw blade speed as required to cut efficiently.
Band saw base
The band saw features a base that makes cutting easier and reduces the risk of the saw blade tilting sideways and bending within the cut.
Warning! Turn off the band saw and unplug the power cord from the mains outlet before mounting the band saw on its base.
Mount the band saw on the base with the screws (XI). Place a spring washer and a plan washer under the head of each screw. Check the tightness of the screws before starting the band saw and retighten them if necessary.
Place the base on a hard, level and fl at surface.
The base has a clamp to immobilize the workpiece. Lift the clamp lever and move the clamp arm. Place the material to be cut between the stop plate and the clamp (XII).
Turn the clamp lever (XIII) into position and check that the clamp arm cannot move. If the clamp lever does not lock the clamp arm,
EN
unscrew the counter nut, slightly tighten the screw (XIV) and secure it by retightening the counter nut.
The base can also be used to set the cutting angle at a tilt. To do this, loosen the screw with the lever (XV). Adjust the cutting angle and secure it by retightening the screw with the lever. The lever arm can rotate independently of the screw. This prevents the lever arm from touching the saw blade. To do this, simply lift the arm, hold in position and then rotate it. The lever arm automatically returns to the lower position.
You do not need to hold the front handle (XVI) when cutting as above.
PRODUCT MAINTENANCE
Warning! All maintenance must be carried out with the product isolated from the mains voltage. Make sure that the power cord of the band saw has been unplugged from the mains outlet. Inspect the saw blade, the guide rollers, and the rubber lining of the driving wheels for damage after work. If damage or excessive tear and wear is found, replace the affected parts. You can replace the saw blade as instructed above. Other components require replacement at an authorized service agent's. Having finished working with the workpiece/material, inspect the power tool for damage by visually inspecting the exterior and the body and the handles. Check the power cord and its rubber gland, the action of the ON/OFF switch, the vents for clogging, the motor brushes for sparking, the noise of the bearings and the drive transmission, and how the power tool starts and runs. Any abnormality found during this inspection or the operation require servicing at an authorized service agent's. Having finished your work, clean the housing, the vents, all switches, all handles and guards with compressed air (at 0.3 MPa maximum), a brush or a dry cloth. Do not use any chemicals or cleaners. Clean the cutter and the handles with a clean dry cloth. During the warranty period, the user is not allowed to install any power tools or replace any components or parts, as this will void the warranty rights.
Spare parts
For a detailed list of spare parts for the appliance go to the “Download” section in the Product tab on the TOYA SA website: www.toya.pl.
PRODUKTINFORMATIONEN
PRODUKTA KONSERVĀCIJA
CARACTÉRISTIQUES DU PRODUIT
DECLARATION OF CONFORMITY
0325/YT-82185/EC/2025
We declare and guarantee with full responsibility that the following products:
Band saw; 220 - 240 V\~; 50 Hz; 1100 W; 0,7-2,4 m/s; item no. YT-82185
meet requirements of the following European Standards / Technical Specifications:
EN 60745-1:2009 + A11:2010
EN 60745-2-20:2009
EN IEC 55014-1:2021
EN IEC 55014-2:2021
EN IEC 61000-3-2:2019
EN 61000-3-3:2013 + A1:2019
and fulfill requirements of the following European Directives:
2006/42/EC Machinery and safety elements
2014/30/EU Electromagnetic compatibility (EMC) Directive
2011/65/EU Restriction of the Use of Certain Hazardous Substances
Serial number: concern all serials numbers of item(s) mentioned in this declaration
The person authorized to compile the technical file:
Agnieszka Rędziak
(Place and date of issue)
V-CE PREZES ZARZADU
JAN SZMIDT
(Name and signature of authorized person)
TOYA S.A.