
SSMSR 600 A1 - Hand blender SILVERCREST - Free user manual and instructions
Find the device manual for free SSMSR 600 A1 SILVERCREST in PDF.

| Product type | Immersion blender with whisk and chopper |
| Brand and model | SilverCrest SSMSR 600 A1 |
| Power supply | 220-240 V~, 50-60 Hz |
| Power consumption | 600 W |
| Protection class | II |
| Short operating time (blender shaft) | 1 minute |
| Short operating time (whisk) | 3 minutes |
| Short operating time (chopper) | 1 minute |
| Cooling time (blender shaft / chopper) | At least 2 minutes |
| Cooling time (whisk) | At least 3 minutes |
| Package contents | Motor unit, blender shaft, whisk, adapter, chopper (bowl, blade, lid), measuring beaker (with lid), instruction manual |
| Measuring beaker capacity | 700 ml (max 300 ml for blending) |
| Chopper bowl capacity | 500 ml (solid foods) / 300 ml (liquids) |
| Dishwasher-safe parts | Blender shaft, blade, bowl, bowl lid, whisk, measuring beaker lid, measuring beaker |
| Speed control | Continuous variable speed (MIN to MAX) + TURBO button |
| Functions | Blending, chopping, whisking, pureeing, emulsifying |
| Safety | Motor stops before disassembly, overheating protection, do not immerse motor unit |
| Warranty | 3 years (subject to conditions) |
| Customer service (France) | Tel. 0800 919270, email targa@lidl.fr |
Frequently Asked Questions - SSMSR 600 A1 SILVERCREST
User questions about SSMSR 600 A1 SILVERCREST
0 question about this device. Answer the ones you know or ask your own.
Ask a new question about this device
Download the instructions for your Hand blender in PDF format for free! Find your manual SSMSR 600 A1 - SILVERCREST and take your electronic device back in hand. On this page are published all the documents necessary for the use of your device. SSMSR 600 A1 by SILVERCREST.
USER MANUAL SSMSR 600 A1 SILVERCREST
Last Information Update
Verm on des informations Dature plus avola versus
Остатки артиягности
Operating instructions and safety instructions
NL BE
STAAFMIXER
natural_image
Illustration of a hand pouring liquid into a container with a tool, no text or symbols present
https://www.targa.gmbh/downloads/conformity/478883_2410.pdf
- Intended use ....28
- Package contents ...... 28
- Technical Data ....29
3.1 CO time....30
3.2 Cooling time....30
- Safety instructions....30
- Copyright 36
- Before initial use....36
6.1 Attaching the immersion blender [5] or whisk [11] 37
6.2 Removing the immersion blender (5) or whisk (11) 37
6.3 Connecting/disconnecting the motor block (4) and chopper 37
6.4 Setting the speed....38
6.5 The measuring cup [13]....38
- Initial use ....38
7.1 Operating with the immersion blender [5]....39
7.1.1 Table of processing times, immersion blender (5) 40
7.2 Operating with the whisk [11] 40
7.3 Operating with the chopper 41
7.3.1 Table of processing times, chopper....42
- Cleaning 43
- Storing the device when not in use 44
- Troubleshooting ....44
- Recipe suggestions....45
- Environmental and waste disposal information....47
- Marks of conformity....48
- Warranty information....49
Congratulations!
By purchasing the SilverCrest hand-held blender set SSMSR 600 A1, hereinafter referred to as hand-held blender, you have opted for a high-quality product.
Familiarise yourself with the hand-held blender before using it for the first time and read these operating instructions carefully. Observe the safety instructions and only use the hand-held blender in the manner described in these operating instructions and for the indicated fields of application.
Keep this operating manual in a safe place. Hand over all documents in the event that you pass on the hand-held blender to a third party.
1. INTENDED USE
The hand-held blender is a household device and is only intended for chopping and blending boneless foodstuffs. The whisk provided allows liquid or semi-liquid ingredients and mixtures to be beaten until frothy or finely mixed. The hand-held blender must not be used outside of closed rooms or in regions with a tropical climate. It is not intended for business or commercial use. Use the hand-held blender solely for private purposes in living areas; any other use is deemed improper. This hand-held blender meets the requirements of all relevant standards related to CE conformity. Compliance with these standards is no longer guaranteed if a change is made to the hand-held blender without the authorization of the manufacturer. The manufacturer shall not be liable for any damages or faults arising as a result.
Please observe the national regulations and/or laws of the country in which the device is used.
2. PACKAGE CONTENTS
Unpack the hand-held blender and all of the accessories. Remove all packaging materials and check all of the components for completeness and signs of damage. If any parts are missing or damaged, please contact the manufacturer.
• Motor block with power cable and plug
- Immersion blender
- Whisk
- Adapter [for whisk]
- Blender (bowl, blade and cover)
• Measuring cup (with measuring cup lid)
- Quick start guide (the complete operating manual is available online)
This operating manual also has a cover that can be unfolded. The inside of the cover provides a schematic of the hand-held blender and all controls. The numbers identify the following parts/functions:
Figure A – Hand-held blender
| 1 | Speed controller |
| 2 Switch (normal speed) | |
| 3 TURBO switch (fast speed) | |
| 4 | Motor block |
| 5 | Immersion blender |
Figure B – Chopper
| 6 Bowl cover (with gear mechanism) | |
| 7 | Blade |
| 8 | Bowl |
| 9 | Lid |
Figure C – Whisk
| 10 Adapter [for whisk] | |
| 11 | Whisk |
Figure D – Measuring cup
| 12 Measuring cup lid | |
| 13 | Measuring cup |
3. TECHNICAL DATA
| Manufacturer TARGA GmbH | |
| Designation SilverCrest SSMSR 600 A1 | |
| Power supply | 220 - 240 V~ (AC voltage), 50-60 Hz |
| Power consumption 600 W | |
| CO time 1 minute with immersion blender [5] | 3 minutes with whisk [11]1 minute with chopper |
| Protection class | II |
The specifications and design are subject to change without notice.

The user does not have to do anything to switch the product between 50 and 60 Hz. The product is suitable for both 50 and 60 Hz supplies.
3.1 CO TIME
The CO time (continuous operation time) specifies how long the hand-held mixer can be operated before the motor overheats and causes damage. The continuous operation time for the hand-held blender is 1 minute when using the immersion blender [5], 3 minutes when using the whisk [11] and 1 minute when using the chopper.
Do not use the immersion blender [5] and the chopper on very firm or very tough foods (e.g. meat) continuously for more than 30 seconds.
3.2 COOLING TIME
Following the maximum period of use of up to 1 minute with the immersion blender (5) or up to 3 minutes with the whisk (11) and 1 minute with the chopper, let the hand-held blender cool down for:
- At least 2 minutes when using the immersion blender (5) or chopper
- At least 3 minutes when using the whisk [11]
Only then continue with the process previously started.
4. SAFETY INSTRUCTIONS
Before using the device for the first time, please read the following instructions carefully and observe all warnings, even if you are familiar with using electronic and household devices. Keep this operating manual in a safe place for future reference. If you give the device away or sell it, please ensure that you also pass on this operating manual. It is part of the device.
Key to symbols

DANGER! This signal word indicates a hazard involving a high level of risk, which if not avoided, may result in severe injury or death.

WARNING This signal word indicates danger involving a medium level of risk, which if not avoided, may result in severe injury or even death.

DANGER! This symbol indicates hazards to health and/or property posed by an electric shock, potentially including risk of death.


Risk of fire! This symbol is a warning that fires may occur if instructions are not followed.
This symbol indicates that under no circumstances may the motor block (4) be immersed in water.
This symbol indicates parts that are dishwasher-safe.
This symbol indicates products whose physical and chemical composition have been tested and found to be safe for use in contact with foodstuffs in accordance with Regulation EC 1935/2004.

This symbol indicates further information on the topic.

This symbol on the measuring cup (13) indicates the maximum amount of liquid that can be processed in the measuring cup (13) without the contents overflowing.

Manufacturer's address
Foreseeable misuse
- Use the hand-held blender as intended. Misuse of the device may result in injury.
- The hand-held blender may not be used to chop very hard foods. These include frozen foods, coffee beans, grains and spices. It is also not possible to process chocolate.
- No other materials than foodstuffs may be processed. The hand-held blender may be damaged.
- Do not use the hand-held blender unless it is in contact with suitable foods. Operating the hand-held blender for an
extended period of time when it is not in contact with suitable foodstuffs may result in it being damaged.
Personal safety
- This device must not be used by children. The hand-held blender and its connecting cable must be kept away from children. Ensure that children are supervised and do not play with this device. In particular, keep the immersion blender [5] and the blade [7] away from children in order to prevent any injuries caused by it.

DANGER! The packaging material is not a toy. Children must not play with plastic bags. There is a risk of suffocation. Store the device out of reach of children.
- This device can be used by people with reduced physical, sensory or mental abilities or who lack experience and knowledge, provided they are supervised or have been instructed in the safe use of the device and understand the resulting dangers.
• Children must not play with the device.

DANGER! Risk of injury
- The device must be switched off and disconnected from the mains prior to replacing accessories or additional parts that move during operation.
-
Disconnect the hand-held blender from the mains network if you wish to assemble, disassemble or clean it. The same applies when it is not in use and during thunder and lightning. There is a risk of injury!
-
Do not remove the motor block [4] until the whisk [11] has stopped. There is a risk of injury!
- Do not remove the motor block (4) until the immersion blender (5) has stopped. Never reach into the rotating blade. There is a risk of injury!
- Do not remove the motor block (4) until the blade (7) in the chopper has stopped. Never reach into the rotating blade. There is a risk of injury!
- Take care when cleaning the hand-held blender! The blade in the immersion blender (5) and the blade (7) in the chopper is very sharp! There is a risk of injury!
- After switching off the device, wait until the whisk [11] has stopped before removing the hand-held blender from the food. There is a risk of injury!
- After switching off the device, wait until the blade in the immersion blender (5) has stopped before removing the handheld blender from the food. There is a risk of injury!
- Never reach into the rotating whisk (11). Do not place any objects in the whisk (11) and keep baggy clothing and long hair away. There is a risk of injury!
- Never reach into the rotating blade of the immersion blender [5]. Do not place any objects in the blade and keep baggy clothing and long hair away from the rotating blade. There is a risk of injury!
- Never reach into the rotating blade [7] of the chopper. There is a risk of injury!

DANGER of electric shock
- Only connect the hand-held blender to the mains network once the motor block (4) and immersion blender (5), whisk (11) and chopper are assembled. There is a risk of electric shock!
- Only plug the hand-held blender into a power socket that is properly installed and easily accessible and whose mains voltage corresponds with the rating plate specifications. Once the device is plugged in, the power socket must be kept easily accessible so that the plug can be pulled out quickly in an emergency.
- Never operate the hand-held blender in the vicinity of the bath, shower or a filled sink.
- The power cable and plug must not be damaged.
- If the device's power cable is damaged, it must be replaced by the manufacturer, their service department or by a similarly qualified person in order to prevent any hazards.
- Never open the housing of the motor block (4), as this contains parts to be maintained. If the housing is open, there is a risk of electric shock.
- If you notice any smoke, unusual noises or smells, remove the plug from the power socket immediately. If this happens, you must stop using the hand-held blender until it has been checked by a technician. If the device catches fire, do not inhale any resulting smoke. If you do inhale any smoke, seek medical
attention. Inhaling smoke can be harmful to your health. There is a risk of injury!
- Ensure that the power cable cannot be damaged by sharp edges or hot surfaces. The power cable must not get jammed or squashed. Always remove the power cable from the power socket by the plug; never pull on the cable itself. Always lay the power cable in such a way that nobody can stand or trip on it. There is a risk of injury!
- The device must always be disconnected from the mains network if left unattended, in the event of malfunctions, prior to assembly, disassembly or cleaning. There is a risk of electric shock!

Under no circumstances may the motor block (4) be immersed in water, and no liquids must ingress into the housing of the motor block (4).
- Should liquids ingress into the housing of the motor block [4], immediately remove the plug from the power socket and contact the service department. There is a risk of electric shock!
- Never touch the motor block [4], the power cable or the plug with wet hands. There is a risk of electric shock!
- Disconnect the hand-held blender from the mains network as soon as it has been used. The device is only de-energised once the plug has been removed. There is a risk of electric shock!

RISK of fire
Following the maximum period of use of up to 1 minute with the immersion blender (5), 3 minutes with the whisk (11) or 1 minute with the chopper, let the hand-held blender cool down as follows:
- At least 2 minute when using the immersion blender [5]
- At least 3 minutes when using the whisk [11]
- At least 2 minutes when using the chopper
Only then continue with the process previously started. There is a risk of fire.
5. COPYRIGHT
All contents of this operating manual are subject to copyright law and are provided to the user solely as a source of information. Any form of copying or reproduction of data and information without the express written permission of the author is prohibited. This also concerns commercial use of the content and data. The text and illustrations correspond to the technical standards at the time of printing. Subject to alterations.
Unpack the hand-held blender and all of the accessories and verify that the package contents are complete. Remove the protective film. Keep the packaging material away from children and dispose of it in an environmentally-friendly manner.
Prior to using it for the first time, the hand-held blender must be cleaned as described in the "Cleaning" section.
Assemble the hand-held blender once the cleaned parts have fully dried:
To use the whisk [11], this must first be placed in the adapter [10] provided. Proceed as follows:
Guide the shaft of the whisk (11) into the holder of the adapter (10) until the shaft audibly snaps into place. Ensure that the two catches on the shaft of the whisk (11) engage with the corresponding recesses on the adapter (10).
natural_image
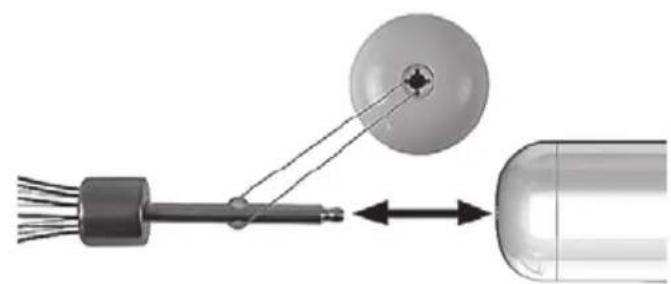
Diagram of a mechanical or electrical component with wires and a spherical component, showing directional movement (no text or symbols)An arrow marking (▼) is attached to motor block (4). The following markings are applied on the immersion blender (5) and whisk (11): and .
These markings provide support when attaching and removing the immersion blender [5], whisk [11] or chopper.
6.1 ATTACHING THE IMMERSION BLENDER [5] OR WHISK [11]
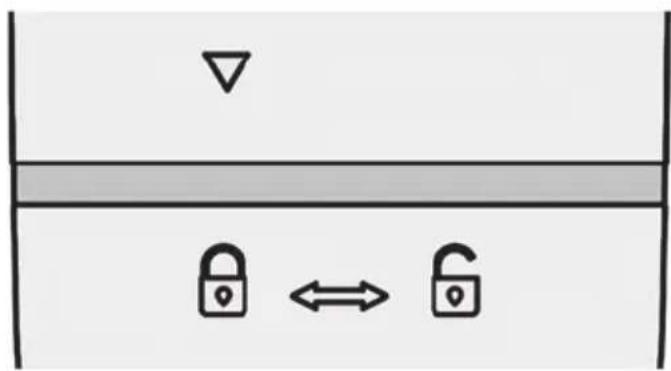
- Attach the motor block (4) onto the immersion blender (5) or whisk (11) so that the arrow marking [▼] points towards the opened padlock on the immersion blender (5) or whisk (11).
- Now rotate the motor block [4] as far as it will go in the direction of the closed padlock symbol so that the arrow marking [▼] points towards the closed padlock 🔒 on the immersion blender [5] or whisk [11]. Ensure that the immersion blender [5] or whisk [11] audibly and perceptibly snaps into place.
6.2 REMOVING THE IMMERSION BLENDER [5] OR WHISK [11]
- Rotate the motor block (4) as far as it will go in the direction of the open padlock symbol so that the arrow marking [▼] points towards the open padlock on the immersion blender (5) or whisk [11].
- Now remove the motor block [4] from the immersion blender [5] or whisk [11].
6.3 CONNECTING/DISCONNECTING THE MOTOR BLOCK [4] AND CHOPPER
- Place the bowl (8) on a flat, dry surface.
- Carefully set the blade (7) onto the blade holder in the bowl (8). Rotate it slightly in the process and make sure it slides all the way down onto the blade holder. It is normal if the blade (7) does not fit tight on the blade holder at this time. The blade (7) will only be really tight after the bowl cover (6) is put on.
- Add the food to be chopped to the bowl (8). In doing so, note the symbols for the maximum fill level of 500 ml for foodstuffs and 300 ml for liquids.
- Now put the bowl cover (6) onto the bowl (8) from above, moving it slightly until it lies flat on the top edge of the bowl (8) and the blade (7) engages correctly in the bowl cover (6). Hold the bowl (8) with one hand and turn the bowl cover (6) as far as possible to the left to secure the bowl cover (6) on the bowl (8).
- Attach the motor block (4) on the bowl cover (6) so that the arrow marking (▼) points towards the opened padlock on the bowl cover (6).
- Now rotate the motor block [4] as far as it will go in the direction of the closed padlock symbol so that the arrow marking (▼) points towards the closed padlock 🔒 on the bowl cover [6]. Ensure that the motor block [4] audibly and perceptibly clicks into place.
The chopper is now ready for use.
- To remove the motor block (4) after using the chopper, rotate the motor block (4) as far as it will go in the direction of the open padlock symbol so that the arrow marking (▼) points towards the open padlock on the bowl cover (6).
- Now remove the motor block (4) upwards from the bowl cover (6).
![SILVERCREST SSMSR 600 A1 - CONNECTING/DISCONNECTING THE MOTOR BLOCK [4] AND CHOPPER - 1](/content/2026/04/745765/images/5c0246eb61de5bc0c5b143eb1a4bb1655c35d981a21ed78f22f9fe07ac12cad9.jpg)
If you want to store food in the bowl [8], use the lid [9] provided. First remove the bowl cover [6] and blade [7] if applicable.
6.4 SETTING THE SPEED
The speed controller [1] on the motor block [4] is used to continuously adjust the speed of the hand blender. As such, you can set the optimum speed for each food to be processed.
- Slide the speed controller [1] in the 'MAX' direction to increase the speed.
- Slide the speed controller [1] in the 'MIN' direction to decrease the speed.
The speed setting is only possible if the hand-held blender is operated with switch [2] for normal speed. When operating with the TURBO switch [3] , the maximum processing speed is made immediately available.
6.5 THE MEASURING CUP [13]
• Liquids of up to 700 ml can be measured with the measuring cup (13) provided.
- You can also use the measuring cup (13) when using the immersion blender (5) or whisk (11) to process your foods.
![SILVERCREST SSMSR 600 A1 - THE MEASURING CUP [13] - 1](/content/2026/04/745765/images/2f48a79d47059f32b4fabb9a41ca5e303620212f480878bc7937097cd67e53d1.jpg)
If you use the measuring cup [13] for processing, only a maximum quantity of 300 ml [14] may be filled. Otherwise, liquid may overflow or spray out from the measuring cup [13]. When using the whisk [11], only work with the switch [2] and never press the TURBO switch [3].
7. INITIAL USE
The hand-held blender is suitable for the following uses:
Chopping and blending fruit and vegetables in soups, sauces and dips
Mixing drinks
Making milkshakes
- Beating cream, egg whites, etc.
Making mayonnaise or stirring desserts

It is recommended to adjust the speed of the hand-held blender to the food to be processed.
When using the immersion blender (5) and the chopper, select a lower speed for soft foods and a higher or TURBO speed for harder foods.
When using the whisk (11), adjust the speed according to the desired processing result.
7.1 OPERATING WITH THE IMMERSION BLENDER [5]
Place food to be chopped in a container as narrow and high-sided as possible with a flat base. This is the ideal requirement for consistent blending. Nevertheless, it is also possible to use the appliance in a standard saucepan.
To prevent injuries caused by the rotating blade, only switch the hand-held blender on once the immersion blender [5] is immersed in the mixture.
Proceed as follows:
- Pour the food to be processed into a suitable container or pan.
• Vertically guide the immersion blender (5) into the mixture. - Depending on requirements, start the hand-held blender with the switch [2] and select a suitable speed with the speed controller [1]. If you wish to use the maximum speed straight away, you can start the hand-held mixer with the TURBO switch [3]. Press and hold the desired button during the mixing or blending process. If the immersion blender [5] sticks to the base of the container, briefly release the button and then continue with the mixing process.
- To achieve consistent processing of the mixture, gently move the hand-held blender up and down during blending.
- Once the mixing result meets your requirements, release the switch [2] or TURBO switch [3] as long as the immersion blender [5] is still in the mixture.
- Wait until the blade has stopped before you remove the immersion blender [5] out of the blended food.

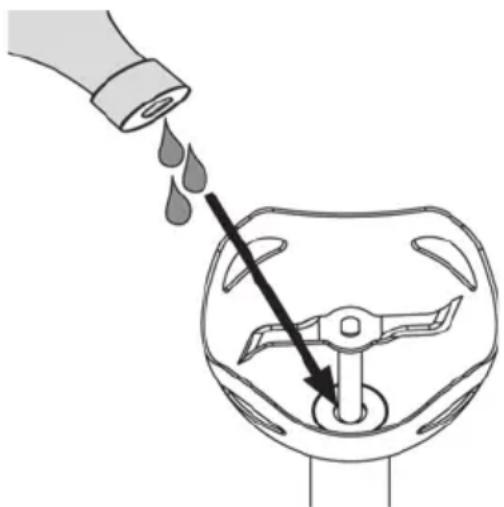
If you notice any unusual noises during operation, such as squeaking or similar noises, apply a little flavourless cooking oil to the drive shaft of the immersion blender [5]. Please refer to the illustration opposite when doing so.
natural_image
Diagram showing a hand pouring liquid into a container with a valve, illustrating fluid flow (no text or symbols)
For easier cleaning, hold the immersion blender [5] in a container of clear water immediately after using and then briefly press the switch [2] several times.
7.1.1 TABLE OF PROCESSING TIMES, IMMERSION BLENDER [5]
The following table is intended to serve as a general guide when processing different foods. Follow the recommended processing times to prevent the hand-held blender from overheating. If the mixing result does not meet your requirements within this time, discontinue the blending process and allow the motor to cool down. Then, continue with the blending process.
![SILVERCREST SSMSR 600 A1 - TABLE OF PROCESSING TIMES, IMMERSION BLENDER [5] - 1](/content/2026/04/745765/images/8bdcba27410e5559aaa32bb11bde03b32b711857b62c1dcc472566d7e4d43b6b.jpg)
Following the maximum period of use of up to 1 minute with the immersion blender [5], let the hand blender cool down for at least 2 minutes.
| Foodstuffs Recommended | Volume | Speed Processing time | |
| Fruit, vegetables 100–200 g | 100–400 ml | Level MIN to MAX or TURBO * | 30–60 seconds |
| Soups, sauces, baby food | Level MIN to MAX or TURBO * | 60 seconds | |
| Beverages with dairy products, blended drinks | 100–1,000 ml | Level MIN to MAX or TURBO * | 60 seconds |
*: Set the speed according to the desired consistency.
![SILVERCREST SSMSR 600 A1 - TABLE OF PROCESSING TIMES, IMMERSION BLENDER [5] - 2](/content/2026/04/745765/images/bc684e68dd3b95697b6da725d02ccb6f0e99f9709573458c3722554476f55c59.jpg)
If you use the measuring cup [13] for processing, only a maximum quantity of 300 ml [13] may be filled. Otherwise, liquid may overflow or spray out from the measuring cup [13]. Please always use a mixing container adequate for the quantity to be processed when processing larger quantities of food.
7.2 OPERATING WITH THE WHISK [11]
![SILVERCREST SSMSR 600 A1 - OPERATING WITH THE WHISK [11] - 1](/content/2026/04/745765/images/94278b5a3bf92c3b6781455a8980ab413df8a05aaa8e04d732c2429f6d7a5544.jpg)
To prevent liquids from spraying during mixing, never use the whisk [11] with the TURBO switch [3].
Place the liquid to be processed in the measuring cup provided (13 – fill with a maximum of 300 ml) or another narrow, high-sided container with a flat base. This is the ideal requirement for great processing.
To prevent injuries caused by the rotating whisk (11), only switch the hand-held blender on once the whisk (11) is immersed in the mixture.
Proceed as follows:
- Pour the food to be processed into a suitable container.
- Vertically guide the whisk [11] into the mixture.
- Start the hand-held blender with the switch [2] and select a suitable speed with the speed controller [1]. Press and hold the switch [2] during operation. Reduce the speed if too much spray is produced.
- To achieve consistent processing of the mixture, gently move the hand-held blender up and down.
- Once the mixing result meets your requirements, release the switch [2] as long as the whisk [11] is still in the mixture.
- Wait until the whisk [11] has stopped before you remove it out of the processed food.
Note the symbols for the maximum fill level of 500 ml for foodstuffs and 300 ml for liquids.

To measure the correct volume of liquid using the scale provided, the blade [7] has to be installed first and must stay in place while measuring.
After assembling the chopper and connecting it to the motor block [4]:
- Insert the plug into the power socket.
- Push and hold the switch [2] to process foodstuffs at normal speed. Regulate the speed as needed with the speed controller [1]. Or, use the TURBO switch [3] to work directly with maximum speed.

Hold the chopper with one hand while operating the switches [2, 3] with the other hand.
Never separate the motor block [4] from the bowl cover [6] while operating the switches [2, 3].
Release the pressed switch [2, 3] when you are happy with the food processing result.
7.3.1 TABLE OF PROCESSING TIMES, CHOPPER
The following table is intended to serve as a general guide when processing different foods. Follow the recommended processing times to prevent the hand-held blender from overheating. If the mixing result does not meet your requirements within this time, discontinue the blending process and allow the motor to cool down. Then, continue with the blending process.

Following the maximum period of use of up to 1 minute with the chopper, let the hand blender cool down for at least 2 minutes.
| Foodstuffs Volume | (max.) | Speed Processing time | |
| Onions ** 200 g Level MIN | 5 times 1 second pulse,shake in between | ||
| Garlic, | 25 cloves | Level MIN to MAX * | Approx. 15 seconds |
| Carrots | 200 g | Level MIN to MAX * | Approx. 15 seconds |
| Almonds/hazelnuts | 200 g | TURBO level | Approx. 20 seconds |
| Walnuts 200 g Medium speed * Approx. 15 seconds | |||
| Parmesan/hard cheese | 250 g TURBO level Approx. 30 seconds | ||
| Parsley ** | 30 g | TURBO level | 5 times 1 second pulse,shake in between |
| Fresh herbs ** | 40 g | TURBO level | 6 times 1 second pulse,shake in between |
*: Set the speed according to the desired consistency.
**: When processing these foodstuffs, please shake and/or tap the bowl [8] in between the described pulses to move unprocessed food into the range of the blade for optimal results.
8. CLEANING

Risk of injury! Take care when cleaning the hand-held blender! The blade in the immersion blender [5] is very sharp!

Warning of damage to property! Do not use any scratching or abrasive cleaning agents or abrasive objects (such as a metal scourer) for cleaning purposes. Failure to do so may cause the hand-held blender to become damaged.

It is recommended to clean the immersion blender [5], blade [7] or whisk [11] directly after use in order to prevent the processed foods from drying. In particular, after processing very salty foods the immersion blender [5], blade [7] or whisk [11] should be immediately rinsed with clean water.
- Remove the plug from the socket.
- Remove the immersion blender (5) or whisk (11) from the motor block (4).
- Disconnect the whisk (11) from the adapter (10) by pulling the shaft of the whisk (11) out of the holder on the adapter (10).
• Take the blade [7] out of the bowl [8]. - Clean the motor block (4), the bowl cover (6) and the adapter (10) with a slightly damp cloth and then dry the parts well. Use some washing up-liquid, if necessary. Cleaning in the rinsing bath would result in irreparable damage!
- You can clean the immersion blender [5], blade [7], bowl [8], cover [9], whisk [11], measuring cup lid [12] and measuring cup [13] in a basin. After cleaning, rinse with plenty of clean water to remove any detergent residue. Dry the parts thoroughly afterwards.
- Alternatively, you can clean the immersion blender [5], blade [7], bowl [8], cover [9], whisk [11], measuring cup lid [12] and measuring cup [13] in the dishwasher.

For optimal cleaning of the immersion blender [5] in the dishwasher, make sure you position it vertically with the blade facing up. Then allow the immersion blender [5] to dry thoroughly.
9. STORING THE DEVICE WHEN NOT IN USE
If the hand-held blender is not going to be used for a long period of time, clean it as described in the previous section. Store this in a clean, dry location out of reach of children.
10. TROUBLESHOOTING
If your hand-held blender does not work as usual, use the following instructions to try and solve the problem. If working through the following tips does not eliminate the fault, please contact our customer service department.
The hand-held blender is not working
- The plug is not inserted. Insert the plug into a power socket.
- The power socket is faulty. Try the device in another power socket that definitely works.
The blade does not rotate / rotates with difficulty
- The motor block [4] and immersion blender [5], whisk [11] or chopper are not correctly assembled. Disconnect the device from the mains network and check the assembly.
- Is there an object in the mixing container or bowl [8]? If so, remove this.
• The mixed foods are too hard or too tough.
11. RECIPE SUGGESTIONS
Mayonnaise
| Ingredients | Volume Note | |
| Vegetable oil 250 g Be sure to use grams, not millilitres; has to be at room temperature | ||
| Egg yolk 1 Has to be at room temperature | ||
| Vinegar 15 g for example, wine vinegar, but not vinegar concentrate! Has to be at room temperature | ||
| Salt, sugar, mustard, pepper or other spices | According to taste | You can add any herbs or spices as well as the quantity according to taste. |
How to make the recipe:
First put the vinegar and egg yolk in the measuring cup and mix, then slowly add the oil (for 250 g, over approx. 150 seconds) while starting the mixing process with the whisk [11]. Now add any other optional ingredients. Mix at the highest speed until the mixture is homogeneous.
Mango Lassi
| Ingredients Volume Note | ||
| One mango 250 g It's best to use a ripened mango. | ||
| Yoghurt 250 g You can use a dairy-free yoghurt (soy or coconut, for example) to create a vegan version of this recipe. | ||
| Soy drink 130 ml | ||
| Lemon juice 1 tsp | ||
| Sugar | 4 tsp | Alternatively, you can use honey or agave syrup. |
How to make the recipe:
Start by peeling the mango, and then cut the flesh into cubes and remove the stone. Then, blend the other ingredients together with the diced fruit using the immersion blender [5] at medium speed to get a creamy lassi.
Strawberry cream dessert
| Ingredients Volume Note | ||
| Strawberries | 500 g | |
| Thickening agent | 1 tbsp | e.g., agar, pectin, starch |
| Sugar | 1 tsp | |
| Vanilla sugar | 1 sachet | |
| Sheep's-milk yoghurt | 150 g | |
| Lime syrup | 100 ml | |
How to make the recipe:
Blend 250 g of the strawberries with the rest of the ingredients using the immersion blender [5] until the desired level of creaminess is attained. Dice the remaining strawberries [250 g] and divide all but two tbps. into six bowls. Then divide the cream evenly among the bowls and decorate with the remaining small-diced strawberries. Then chill in the refrigerator for three to four hours.
Parsley-basil pesto
| Ingredients Volume Note | ||
| Basil | 12 | bunch |
| Smooth parsley 1 bunch | ||
| Pine nuts 3 tbsp | ||
| Parmesan 70 g | ||
| Salt A pinch | ||
| Pepper A pinch | ||
| Olive oil | 65 ml | |
How to make the recipe:
Wash the basil and parsley. Remove the leaves from the stalks of parsley. Cut the cheese into cubes. Then place all ingredients into the supplied measuring cup [13] and blend finely at full speed with the immersion blender [5] . Divide the pesto between two jars and cover with a little oil and screw the lids on tightly.
Fig and cream cheese dip with walnuts
| Ingredients Volume Note | ||
| Cream cheese | 300 g | |
| Dried figs Four | ||
| Walnuts | 50 g | |
| Honey | 1 tbsp | |
| Lime | 12 | |
| Salt | A pinch | |
| Pepper | A pinch | |
How to make the recipe:
Finely chop the walnuts. Mix the juice of half a lime, cream cheese, honey, dried figs, salt and pepper at low speed with the immersion blender [5] until you obtain a creamy mixture. Finally, stir in the finely chopped walnuts.
We hope you enjoy your creation!
12. ENVIRONMENTAL AND WASTE DISPOSAL INFORMATION
 | Devices marked with this symbol are subject to the European Union Directive 2012/19/EU. Electrical and electronic devices may not be put in the household waste, but must be disposed of via designated public disposal centres. By properly disposing of the old device, you can avoid environmental damage and hazards to health. Further information regarding proper disposal of the old device can be obtained from your local authority or the shop where you purchased the device. | |
 | Make sure that the packaging is disposed of in an environmentally friendly manner. Cardboard packaging can be put out for waste-paper collection or taken to public collection points for recycling. The plastic packaging used for your device will be collected by your local waste management company and disposed of in an environmentally friendly manner. | |
 ES/PT ES/PT | ||
Relevant for France only:  ‘Sorting made easier’This product, including all accessories, its printed material and packaging components, can be recycled. They are subject to an extended producer responsibility and are sorted and collected separately. ‘Sorting made easier’This product, including all accessories, its printed material and packaging components, can be recycled. They are subject to an extended producer responsibility and are sorted and collected separately. | ||
Relevant for Spain and Portugal only:Please separate the packaging material and dispose of it in the relevant collection containers in accordance with the symbols on the packaging: Please pay attention to the labels on packaging materials when you separate waste; these are marked with abbreviations (a) and numbers (b) that mean the following:1-7: Plastics/20-22: Paper and cardboard/80-98: Composite materials. Please pay attention to the labels on packaging materials when you separate waste; these are marked with abbreviations (a) and numbers (b) that mean the following:1-7: Plastics/20-22: Paper and cardboard/80-98: Composite materials. | ||
 | ||
| Symbol Material This product contains the following packaging components | ||
 | Corrugatedcardboard | Sales packaging, cardboard insert |
 | Paper Tissue paper within sales packaging | |
 | Chlorinatedpolyethylene | Plastic bag |
13. MARKS OF CONFORMITY

This product fulfils the requirements specified in the applicable European and national policies. This product's conformity has been verified. The declarations and documents are stored with the manufacturer.

This product fulfils the requirements specified in the applicable national policies for the Republic of Serbia.
You can download the full EU declaration of conformity and any other relevant declarations of conformity under the following link:
https://www.targa.gmbh/downloads/conformity/478883_2410.pdf
Contact address according to the Product Safety Regulation [EU] 2023/988: ce@targa.de
14. WARRANTY INFORMATION
Warranty of TARGA GmbH
Dear Customer,
This device is sold with three years warranty from the date of purchase. In the event of product defects, you have legal rights towards the seller. These statutory rights are not restricted by our warranty as described below.
Warranty conditions
The warranty period commences upon the date of purchase. Please keep the original receipt in a safe place as it is required as proof of purchase. If any material or manufacturing faults occur within three years of purchase of this product, we will repair or replace the product free of charge as we deem appropriate.
Warranty period and legal warranty rights
The warranty period is not extended in the event of a warranty claim. This also applies to replaced and repaired parts. Any damage or defects discovered upon purchase must be reported immediately when the product has been unpacked. Any repairs required after the warranty period will be subject to charge.
Scope of warranty
The device was carefully manufactured in compliance with stringent quality guidelines and subjected to thorough testing before it left the works. The warranty applies to material and manufacturing faults. This warranty does not cover product components which are subject to normal wear and which can therefore be regarded as wearing parts, or damage to fragile components such as switches, rechargeable batteries or components made of glass. This warranty is void if the product is damaged, incorrectly used or serviced. To ensure correct use of the product, always comply fully with all instructions contained in the user manual. The warnings and recommendations in the user manual regarding correct and incorrect use and handling of the product must always be observed and complied with. The product is solely designed for private use and is not suitable for commercial applications. The warranty is rendered void in the event of incorrect handling and misuse, if it is subjected to force, and also if any person other than our authorised service technicians interfere with the device. No new warranty period commences if the product is repaired or replaced.
Submitting warranty claims
To ensure speedy handling of your complaint, please note the following:
Before using your product for the first time, please read the enclosed documentation carefully. Should any problems arise which cannot be solved in this way, please call our hotline.
- Always have your receipt, the product article number as well as the serial number (if available) to hand as proof of purchase.
- If it is not possible to solve the problem on the phone, our hotline support staff will initiate further servicing procedures depending on the fault.
You can find this and many more manuals, product videos and installation software available for download at www.lidl-service.com. This QR code takes you directly to the LIDL service page [www.lidl-service.com]. There, you can enter the item number (IAN) to access your operating manual.


Service

Phone: 0800 404 7657
E-Mail: targa@lidl.co.uk

Phone: 1800 101010
E-Mail: targa@lidl.ie

Phone: 800 62230
E-Mail: targa@lidl.com.mt

Phone: 8009 4241
E-Mail: targa@lidl.com.cy
IAN: 478883_2410

Manufacturer
Please note that the following address is not a service address. First contact the service point stated above.
TARGA
GmbH
Coesterweg 45
59494 Soest
GERMANY
TABLE DES MATIERES
Illustration B – Hachoir
natural_image
Illustration of a hand pouring liquid into a container with a tool, no text or symbols present
13. REMARQUES RELATIVES A LA CONFORMITE

https://www.targa.gmbh/downloads/conformity/478883_2410.pdf
Cher client, chère cliente,
Cher client, chère cliente,
natural_image
Diagram of a mechanical or electrical component with wires and a spherical component connected by rods, showing bidirectional motion (no text or symbols)
6.1 PUREERSTAAF [5] OF GARDE [11] PLAATSEN
natural_image
Diagram showing a hand pouring liquid into a container with a valve, no text or symbols present![SILVERCREST SSMSR 600 A1 - PUREERSTAAF [5] OF GARDE [11] PLAATSEN - 1](/content/2026/04/745765/images/d7471c0045b69dc95bffb9697921fbd8201fac963935dac8afe7703d7fcdf8aa.jpg)
10. PROBLEEMOPLOSSING
https://www.targa.gmbh/downloads/conformity/478883_2410.pdf
Contactadres volgens 2023/988 Verordening Productveiligheid: ce@targa.de
14. GARANTIEBEPALINGEN
natural_image
Diagram of a mechanical or electrical component with wires and a spherical component, showing directional movement (no text or symbols)
6.1 NAKŁADANIE ROZDRABNIACZA [5] LUB TRZEPACZKI [11]
natural_image
Illustration of a hand pouring liquid into a container with a tool, no text or symbols present![SILVERCREST SSMSR 600 A1 - NAKŁADANIE ROZDRABNIACZA [5] LUB TRZEPACZKI [11] - 1](/content/2026/04/745765/images/9d36ab7c790561f489ba7f2c135a8b18f5836fb921c8b59304ff76054b19426f.jpg)
natural_image
Diagram of a mechanical or electrical component with wires and a spherical component connected by rods, showing bidirectional movement (no text or symbols)Na bloku motoru [4] je vyznačena šipka [▼].
6.1 NASAZENÍ MIXOVACÍHO NÁSTAVCE [5] NEBO ŠLEHACÍ METLY [11]
natural_image
Diagram showing a hand pouring liquid into a container with a tool, no text or symbols present![SILVERCREST SSMSR 600 A1 - NASAZENÍ MIXOVACÍHO NÁSTAVCE [5] NEBO ŠLEHACÍ METLY [11] - 1](/content/2026/04/745765/images/cff3e07fbdc0d79e4926e0c998561056b61137f52a83472f0ba1fd514b8a3c37.jpg)
https://www.targa.gmbh/downloads/conformity/478883_2410.pdf
natural_image
Diagram of a mechanical or electrical component with wires and a spherical component connected by rods, showing bidirectional movement (no text or symbols)6.1 NASADENIE MIXOVACIEHO NÁSTAVCA [5] ALEBO METLIČKY [11]
natural_image
Diagram showing a hand pouring liquid into a container with a tool inside (no text or symbols)![SILVERCREST SSMSR 600 A1 - NASADENIE MIXOVACIEHO NÁSTAVCA [5] ALEBO METLIČKY [11] - 1](/content/2026/04/745765/images/0322c39b87dca2ac2e73b959b7bbaeb42a1e4d47d5aa898275181a31e3773f53.jpg)
natural_image
Diagram of a mechanical or electrical component with wires and a spherical component connected by rods, showing directional movement (no text or symbols)natural_image
Illustration of a hand pouring liquid into a container with a tool, no text or symbols present![SILVERCREST SSMSR 600 A1 - NASADENIE MIXOVACIEHO NÁSTAVCA [5] ALEBO METLIČKY [11] - 2](/content/2026/04/745765/images/0c3ff2e81c052b2f23d80683ff33efd08804168b7edc0cc591ad4d344a41bfbb.jpg)
https://www.targa.gmbh/downloads/conformity/478883_2410.pdf
natural_image
Diagram of a mechanical or electrical component with wires and a spherical component connected by rods, showing bidirectional movement (no text or symbols)6.1 MONTERING AF BLENDERSTAVEN [5] ELLER PISKERISET [11]
natural_image
Illustration of a hand pouring liquid into a container with a tool, no text or symbols present![SILVERCREST SSMSR 600 A1 - MONTERING AF BLENDERSTAVEN [5] ELLER PISKERISET [11] - 1](/content/2026/04/745765/images/eadd26777382f97f28ff66e7d1903373e5cf1b017dea777edef4dfc9f050e9f7.jpg)
natural_image
Illustration of a hand pouring liquid into a container with a tool, no text or symbols present![SILVERCREST SSMSR 600 A1 - MONTERING AF BLENDERSTAVEN [5] ELLER PISKERISET [11] - 2](/content/2026/04/745765/images/01600bb8783f079c8c54a2a983404dcf1d822f48d4124dabbc786513fe23f91f.jpg)
https://www.targa.gmbh/downloads/conformity/478883_2410.pdf
natural_image
Diagram of a mechanical or electrical component with wires and a spherical component, showing directional movement (no text or symbols)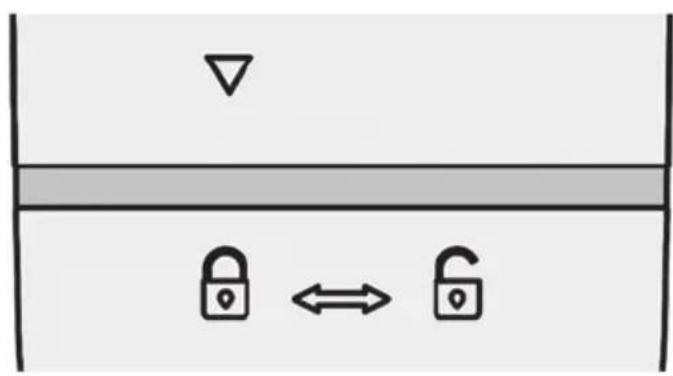
6.1 PÜRÉSÍTŐ SZÁR [5] VAGY HABVERŐ [11] FELHELYEZÉSE
natural_image
Illustration of a hand pouring liquid into a container with a tool, no text or symbols present![SILVERCREST SSMSR 600 A1 - PÜRÉSÍTŐ SZÁR [5] VAGY HABVERŐ [11] FELHELYEZÉSE - 1](/content/2026/04/745765/images/2132035838a0f3a8df8ef0996bc6d39c5fca88747b15e18388cf60129d486cd7.jpg)
https://www.targa.gmbh/downloads/conformity/478883_2410.pdf

- Congratulations!
- INTENDED USE
- PACKAGE CONTENTS
- TECHNICAL DATA
- CO TIME
- COOLING TIME
- SAFETY INSTRUCTIONS
- Key to symbols
- Foreseeable misuse
- Personal safety
- DANGER! Risk of injury
- DANGER of electric shock
- RISK of fire
- COPYRIGHT
- ATTACHING THE IMMERSION BLENDER [5] OR WHISK [11]
- REMOVING THE IMMERSION BLENDER [5] OR WHISK [11]
- CONNECTING/DISCONNECTING THE MOTOR BLOCK [4] AND CHOPPER
- SETTING THE SPEED
- THE MEASURING CUP [13]
- INITIAL USE
- OPERATING WITH THE IMMERSION BLENDER [5]
- Proceed as follows:
- TABLE OF PROCESSING TIMES, IMMERSION BLENDER [5]
- OPERATING WITH THE WHISK [11]
- TABLE OF PROCESSING TIMES, CHOPPER
- CLEANING
- STORING THE DEVICE WHEN NOT IN USE
- TROUBLESHOOTING
- The hand-held blender is not working
- The blade does not rotate / rotates with difficulty
- RECIPE SUGGESTIONS
- How to make the recipe:
- ENVIRONMENTAL AND WASTE DISPOSAL INFORMATION
- MARKS OF CONFORMITY
- WARRANTY INFORMATION
- Warranty of TARGA GmbH
- Warranty conditions
- Warranty period and legal warranty rights
- Scope of warranty
- Submitting warranty claims
- TABLE DES MATIERES
- REMARQUES RELATIVES A LA CONFORMITE
- PUREERSTAAF [5] OF GARDE [11] PLAATSEN
- PROBLEEMOPLOSSING
- GARANTIEBEPALINGEN
- NAKŁADANIE ROZDRABNIACZA [5] LUB TRZEPACZKI [11]
- NASAZENÍ MIXOVACÍHO NÁSTAVCE [5] NEBO ŠLEHACÍ METLY [11]
- NASADENIE MIXOVACIEHO NÁSTAVCA [5] ALEBO METLIČKY [11]
- MONTERING AF BLENDERSTAVEN [5] ELLER PISKERISET [11]
- PÜRÉSÍTŐ SZÁR [5] VAGY HABVERŐ [11] FELHELYEZÉSE
Brand : SILVERCREST
Model : SSMSR 600 A1
Category : Hand blender