PBRA 20-Li B2 - Portable radio PARKSIDE - Free user manual and instructions
Find the device manual for free PBRA 20-Li B2 PARKSIDE in PDF.

User questions about PBRA 20-Li B2 PARKSIDE
0 question about this device. Answer the ones you know or ask your own.
Ask a new question about this device
Download the instructions for your Portable radio in PDF format for free! Find your manual PBRA 20-Li B2 - PARKSIDE and take your electronic device back in hand. On this page are published all the documents necessary for the use of your device. PBRA 20-Li B2 by PARKSIDE.
USER MANUAL PBRA 20-Li B2 PARKSIDE

natural_image
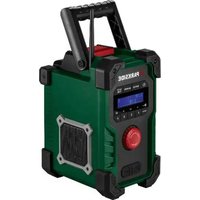
Exterior view of a Parkside electric shock absorber device (no visible text or symbols on body)Akku-Baustellenradio 20 V/ 'Rugged'Radio 20V/ Radio de chantier sans fi l 20 V PBRA 20-Li B2
DE AT CH
Translation of the original instructions
NL BE
Before reading, unfold the page containing the illustrations and familiarise yourself with all functions of the device.
FR BE
Dynamic Range Control
(DRC) einstellen 16
AUX-In Betrieb 16
Service-Center....23
Importeur 23
Fehlersuche....24
13 Tune-Taster / Random - Taster
14 Lautstärkeregler
15 Mute - Taster / Play & Pause - Taster
16 PREV - Taster / Zurück - Taster
17 Source - Taster
18 Preset/TWS - Taster
19 Akku-Anzeige
20 Uhrzeit-Anzeige
21 Anzeige
22 Signal-Anzeige
23 Führungsschiene
(B × H × T)......169 × 407 × 226 mm
Standard.....ca.10 m
Recyclingsymbol: Wellpappe
Digital Audio Broadcasting

Recyclingsymbol: Wellpappe
General description......27
Scope of delivery 27
Description of functions......27
Overview....27
Technical data 28
Charging time 29
Safety information 30
Graphical symbols 30
General safety instructions.... 31
Safety instructions for screens ..... 31
Safety information for power adapters .... 31
Safety information for radio interfaces....32
Initial start-up 32
Removing/inserting the battery (12 V and 20 V) 32
Checking the charge level of the rechargeable battery (12 V / 20 V) .. 32
Power supply using the plug-in power adapter....32
Switching on/off....33
Operation 33
Setting the volume....33
Switching playback mode 33
Operating as a radio (FM)......33
Station search (FM) 33
Saving stations to the preset list......34
Retrieving stored stations from the preset list....34
Retrieving station information......34
Mute 34
Special settings for FM ......34
Search settings.... 35
Audio settings....35
Operating as a radio (DAB+)......35
Station search....35
Retrieve station from the list of stations .... 35
Saving stations to the preset list......36
Retrieving stored stations from the preset list....36
Retrieving station information......36
Mute 36
Special settings for DAB+ ......36
Inactive stations 37
Setting Dynamic Range Control (DRC) 37
AUX-In operation 37
Connecting via 3.5 mm jack socket on the front of the device......37
Connecting via the 3.5 mm jack socket in the battery compartment ..... 37
Mute 37
Playback from a USB stick ......38
Connecting via USB 38
Pausing/continuing playback 38
Selecting tracks....38
Activating/deactivating Random / Repeat mode 38
Operating via Bluetooth®......38
Connecting via Bluetooth®....38
Pausing/continuing playback 39
Selecting tracks....39
TWS – True Wireless Stereo ...... 39
System settings for all modes.....39
Setting the backlighting....40
Setting the date/time....40
Setting the language 40
Restoring factory settings......40
Software version 41
Cleaning and servicing......41
Cleaning....41
Maintenance 41
Transport 41
Storage......41
Disposal/environmental protection ....41
Spare parts/accessories ......42
Warranty 42
Repair service....43
Troubleshooting ....44
Translation of the original EC declaration of conformity ....201
Introduction
Congratulations on purchasing your new device. You have chosen a high-quality device. This device was quality-tested and subjected to a final inspection during production, therefore ensuring proper functioning of your device.

The operating instructions form part of this device. It contains important information on safety, use and disposal. Before using the device, you should familiarise yourself with all operating and safety instructions. Use the device only as described and for the stated fi elds of application. Store the operating instructions carefully and ensure that all documents are handed over in the event that the device is passed on to another user.
Proper use
The device is designed to play radio and external playback media via Bluetooth®, USB and AUX.
Any other use not expressly approved in the present instruction manual can damage the device and thus present a substantial risk for the user.
The manufacturer is not liable for damage caused by improper use or incorrect operation. This device is not suitable for commercial use. The warranty is void in the case of commercial use.
General description
The device is part of the Parkside X 12 V TEAM and X 20 V TEAM series and can be operated using Parkside X 12 V TEAM or X 20 V TEAM series batteries.
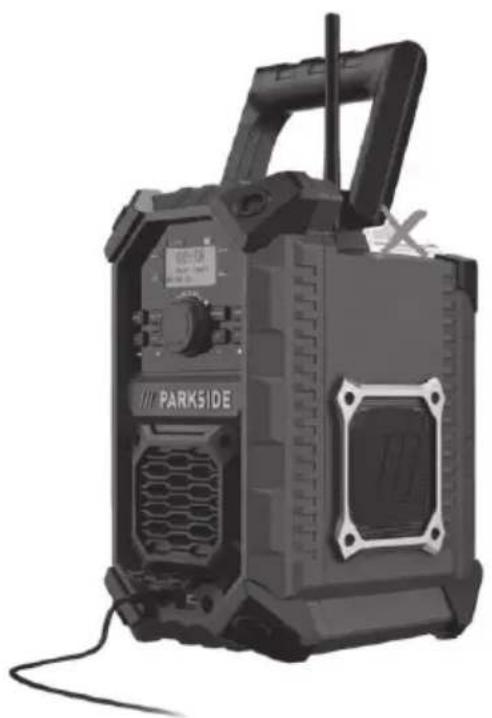
An illustration of the most important functional components can be found on the front fold-out page.
Scope of delivery
Unpack the device, remove all transport protection fi lm and packaging material from the device and check for completeness:
- Cordless jobsite radio
- Plug-in power adapter
- Operating instructions

The rechargeable battery and charger are not included in delivery.
Description of functions
The cordless jobsite radio has an LCD display, an antenna and a carrying handle. The available radio frequency bands are FM and DAB.
In addition, the device has a connection option for a power adapter, two USB ports, two AUX sockets, and a Bluetooth interface®.
Please refer to the descriptions below for information on how the operating elements work.
Overview

1 Carrying handle
2 Battery compartment cover
3 Antenna
4 Speaker
5 3.5 mm Jack socket / AUX-IN (Front)
6 USB port (front)
7 DC input
8 Battery compartment lock
9 Display
10 Info/advanced button
11 Power button
GB IE
12 NEXT button / Forward button
13 Tune button / Shuffle button
14 Volume control knob
15 Mute button / Play & pause button
16 PREV button / Back button
17 Source button
18 Preset/TWS button
19 Battery indicator
20 Time display
21 Display
22 Signal display
23 Guide rail
24 3.5 mm Jack socket / AUX-IN (battery compartment)
25 USB port (battery compartment)
26 Plug-in power adapter
27 DC connector Plug-in power adapter
28 Charger (not included)
29 Rechargeable battery (not included)
30 Release button
31 3.5 mm Jack cable (not included)
Technical data
Rugged Radio ...... PBRA 20-Li B2
Nominal input voltage U_1
Battery type:
PAP 20 A1, PAP 20 A3 ..... 20 V=
Nominal input voltage U_2
Battery type: PAPK 12 A1, PAPK 12 A2,
PAPK 12 B1, PAPK 12 B2,
PAPK 12 B3, PAPK 12 D1 ..... 12 V==
Nominal input voltage U_3
External plug-in power adapter
Power consumption ...... 12 V==; 2 A
DC connector polarity......
Protection type....IP65
Weight (without battery)....2.6 kg
Dimensions
(W × H × D) .....169 × 407 × 226 mm
Speaker output 2x 5 W Stereo
FM frequency range .....87.5-108 MHz
Frequency range
DAB+ 174,928 - 239,200 MHz
Operating time with battery
(12 V, 2 Ah)....5 hours
Operating time with battery
(12 V, 4 Ah)....10 hours
Operating time with battery
(20 V, 2 Ah)....5 hours
Operating time with battery
(20 V, 4 Ah)....10 hours
Bluetooth® version 5.0
Supported
Bluetooth® profi les......A2DP, AVRCP
Frequency band......2,402 - 2,480 GHz
Transmission power ......Class 2
Bluetooth® transmission range
Standard......approx. 10m
under optimal conditions .....max. 30 m
Integrated station memory
DAB+ 30
VHF....30
USB charging port (front)
Output voltage....5 V=
Output current 2.0 A
USB port (battery compartment)
Output voltage....5 V=
Output current 0.2 A
USB version....1.0
USB stick size ......max. 64 GB
USB stick formatting ...... FAT32
Playback formats
(USB port) ...... MP3, WAV, APE, FLAC
Temperature.....max. 50 °C
Operation 0 - 25 °C
Storage....-5 - 50 °C
Humidity: ....<= 75%
External plug-in power
adapter......XH1200-2000WG
Input voltage U _A ......220-240 V\~
Input current 0.8 A
Input AC frequency 50/60 Hz
Output voltage....12.0 V==
Output current 2.0 A
Output power 24.0 W
Average effi ciency during operation ....86,35 %
Efficiency at low load (10 %)......85,76 %
Power consumption at zero load ...0.09 W
Protection type IPXO
Charging time
The device is part of the Parkside X 12 V TEAM and X 20 V TEAM series and can be operated using Parkside X 12 V TEAM or X 20 V TEAM series batteries.
Batteries of the Parkside X 12 V TEAM series may only be charged using chargers of the Parkside X 12 V TEAM series.
Batteries of the Parkside X 20 V TEAM series may only be charged using chargers
of the Parkside X 20 V TEAM series.
We recommend that you operate this appliance with the following 20 V batteries only: PAP 20 A1, PAP 20 A3.
We recommend charging these batteries with the following chargers:
PLG 20 A1, PLG 20 A3, PDSLG 20 A1.
We recommend that you operate this appliance with the following 12 V batteries only: PAPK 12 A1, PAPK 12 A2, PAPK 12 B1, PAPK 12 B2, PAPK 12 B3, PAPK 12 D1. We recommend charging these batteries with the following chargers:
PLGK 12 A1, PLGK 12 A2, PLGK 12 B2.
An up-to-date list of battery compatibility can be found at: www.lidl.de/akku
| Charging time (min) | PAPK 12 A1 PAPK 12 A3 | PAPK 12 A2 | PAPK 12 B1 PAPK 12 B2 PAPK 12 B3 | PAPK 12 D1 |
| PLGK 12 A1 60 | 60 120 150 | |||
| PLGK 12 A2 60 | 60 120 150 | |||
| PLGK 12 B2 30 | 45 60 80 | |||
| PDSLG 12 A1 PDSLG 12 A2 | 60 45 60 | 80 |
| Charging time (min) | PAP 20 A1 PAP 20 B1 | PAP 20 A2 | PAP 20 A3 PAP 20 B3 | Smart PAPS 204 A1 | Smart PAPS 208 A1 |
| PLG 20 A1 PLG 20 A4 PLG 20 C1 | 60 90 | 120 120 210 | |||
| PLG 20 A2 | 45 | 60 | 80 | 80 | 165 |
| PLG 20 A3 PLG 20 C3 | 35 45 | 60 | 50 | 120 | |
| PDSLG 20 A1 | 35 | 45 | 60 | 50 | 120 |
| Smart PLGS 2012 A1 | 35 40 | 40 | 40 | 50 |
GB IE
Safety information
This section describes the basic safety rules when working with the device.
Graphical symbols
Symbols on the device:

Electrical devices must not be disposed of with domestic waste.
Symbols on the plug-in power adapter

Read operating instructions

Polarity: Positive on the inside, negative on the outside.

The power adapter is only suitable for use indoors.

Safety transformer – short-circuit proof

Switched-mode power supply

Protection class II (double insulation)

Electrical devices must not be disposed of with domestic waste.
== Direct voltage
\~ Alternating voltage
Symbols on the packaging

Please dispose of packaging and product in an environmentally friendly manner.

Recycling symbol: Corrugated cardboard
Trademark symbols

Digital Audio Broadcasting
Bluetooth
The Bluetooth® name and logos are registered trademarks owned by the Bluetooth SIG, Inc. and any use of such brands by Grizzly Tools GmbH & Co. KG is subject to a license. Other trademarks and brand names are the property of their respective owners.
USB-III
USB is a registered trademark of USB Implementers Forum Inc.
Symbols used in the instruction manual:

Warning symbol with information on the prevention of personal injury or property damage

Hazard symbol with in- formation on the preve- tion of personal injury caused by electric shock

Advisory symbol with information on how to best use the device
Signal words in the manual:
Danger: The signal word denotes a hazard with a high degree of risk which, if
not avoided, will result in death or serious injury.
Warning: The signal word denotes a hazard with a medium level of risk which, if not avoided, can result in death or serious injury.
Caution: The signal word denotes a hazard with a low level of risk which, if not avoided, can result in minor or moderate injury.
General safety instructions

Danger! The packaging material is not a toy. It poses a danger to life from suffocation.
- Children, individuals with limited physical, sensory or mental capabilities, those with insufficient experience or knowledge or individuals who are not familiar with the instructions must never be permitted to use the device. Local regulations may specify a restricted age limit for the user.
- Protection against water jets (IP65) is only guaranteed when the covers and battery compartment are completely closed.
- Unplug the plug-in power adapter from the mains during a lightning storm or when the device is not in use for long periods of time.
- Do not place the device near any heat sources such as radiators, heaters or other appliances that produce heat.
- Do not use the device at a high volume for long periods of time. Select an appropriate volume to avoid hearing damage.
- Do not use the device near open fl ames (e.g. candles). This can result in fi re.
• Prevent foreign objects from entering the
device.
- If temperatures fluctuate, allow the device to acclimatise before using it. otherwise condensation may form inside the device, which could result in a defect.
- If smoke is emitted by your device, remove the power adapter, remove the battery from the device and send the device in for servicing.
- Do not open the device.
- Always place the device on an even, stable surface. Avoid subjecting the device to vibration.
- Do not use any accessories that are not recommended by PARKSIDE. This can result in electric shock or fire.
Safety instructions for screens
- LCD screens contain liquids that can cause skin irritation and poisoning. In case of contact with eyes, mouth or skin, rinse the affected sites with water and seek medical attention.
Safety information for power adapters
- When using the plug-in power adapter, ensure there is easy access to the mains plug.
- The plug-in power adapter also consumes a small amount of power even in stand-by mode (even if the radio is not connected). To fully disconnect from the main, remove the plug-in power adapter from the mains socket.
- Do not touch the plug-in power adapter with wet hands.
- Do not pull on the cable. Instead, grasp the plug by the insulated grip surface.
- Do not open the plug-in power adapter.
Safety information for radio interfaces
- Switch off the device if you are near to medical electrical systems, a hospital, an operating theatre or an aircraft. The radio waves emitted by the device can impair the function of sensitive peripheral devices.
- Keep the device at least 20 cm away from implanted defi brillators or cardiac pacemakers in order not to jeopardise its proper functioning.
- Keep the device away from hearing aids. The radio waves emitted can generate noise.
- Do not operate the device in the vicinity of fl ammable gases or in potentially explosive environments (e. g. paint shops), there is a risk of explosion and fire.
- Wireless data connections are not secured against access by unauthorised third parties.

Observe the safety information and notes on charging and proper use as shown in the operating instructions for your battery and charger from the Parkside X 20 V Team or X 12 V Team series. A detailed description of the charging process and further information can be found in the separate operating instructions.
Initial start-up
Removing/inserting the battery (12 V and 20 V)
-
Loosen the lock of the battery compartment (8).
-
Open the battery compartment cover (2).
- To remove the battery (29) (not included in delivery) from the device, press the release button (30) on the battery and pull the battery (29) (not included in delivery) out.
- To insert the battery (29) (not included in delivery) into the device, push the battery (29) (not included in delivery) along the guide rail (23) into the device. You will hear it click into place.
- Close the battery compartment cover (2).
- Fasten the lock of the battery compartment (8).

Caution: Be careful not to pinch your fingers when opening and closing the battery compartment cover.
Checking the charge level of the rechargeable battery (12 V / 20 V)
Charge level indicator on the display
The battery indicator (19) on the display shows the charge status of the battery.
Power supply using the plug-in power adapter
- Connect the DC connector (27) of the plug-in power adapter (26) to the DC input (7) on the front of the radio.
- Insert the plug-in power adapter (26) into a wall socket.
If you operate the radio with the mains adapter, the power supply from the battery is automatically disconnected. Connected batteries do not charge when the device is operating with mains power.
If you operate the radio with the plug-in power adapter, the battery indicator (19) does not appear on the display.

Switching on/off
Switching on the device
- Press the power button (11). The display (9) lights up.
- Press the power button (11). All play-backs stop and the display (9) switches off.
Switching off the device
If the volume is set to „0“, the amplifier switches off after 10 seconds. The device must be switched on again.
Operation

Ensure that the ambient temperature does not exceed 25°C or fall below 0°C during operation.
Setting the volume
When switching on/off, the volume automatically changes to a preset value.
Increasing the volume
- Turn the volume knob (14) in a clockwise direction.
- Turn the volume knob (14) in an anticlockwise direction.
Reducing the volume
Switching playback mode
Press the Source button (17) repeatedly. The radio will now cycle through the available playback modes (DAB+, FM and Bluetooth®). AUX and USB are only available for selection if a playback medium is connected via the AUX sockets (5/24) or the USB port (battery compartment) (25).
Operating as a radio (FM)
Pull up the antenna (3) so that it is vertical.
Press the Source button (17) repeatedly until the time display (20) shows "FM".
The signal indicator (20) on the display (9) shows the signal strength. If this is low, it is advisable to initiate a channel search
Station search (FM)
Automatic search
- Press and hold the Tune button (13) for approx. 2 seconds. All stored stations are deleted and the radio now automatically scans the frequency band for up to 30 receivable stations.
- Press the Preset button (18). The list of stations is now shown on the display.
- Press the NEXT / PREV button (12/16) to scroll through the list entries.
Alternatively, you can also scroll through the list by turning the volume control knob (14). - Push the volume control knob (14) to confirm the station selection. Alternatively: The selection is automatically applied after approx. 10 seconds.
Semi-automatic search
- Press and hold the NEXT button (12). The radio now automatically searches for the next receivable signal in ascending order.
- Press and hold the PREV button (16). The radio now automatically searches for the next receivable signal in descending order.
GB IE
If you press the NEXT / PREV button (12/16) again during the search, the search will stop early.
Setting stations manually
- Press the volume control knob (14) briefy once.
- Change the frequency by turning the volume control knob (14).
- Push the volume control knob (14) to save the setting and to re-enable the volume control.
Or: Press the NEXT / PREV buttons (12/16) once.

The frequency changes in 0.05 MHz increments.
Quickly turning the volume control starts a search in the corresponding direction.
Saving stations to the preset list
- Press and hold the Preset button (18) for approx. 2 seconds.
- Using the NEXT / PREV buttons (12/16), select a memory location to overwrite to.
Alternatively, you can also scroll through the list by turning the volume control knob (14). - Push the volume control knob (14) to overwrite the selected station to the memory location.
Retrieving stored stations from the preset list
- Press the Preset button (18) once.
- Scroll through the list using the NEXT / PREV buttons (12/16) or the
volume control knob (14).
- Push the volume control knob (14) to change to the selected station. Alternatively: The selection is automatically played after approx. 10 seconds.
Retrieving station information
- Press the Info/Advanced button (10).
- Repeatedly press the Info/Advanced button (10) to scroll through the station information.
| Frequency band | retrievable station information |
| FM (RDS) Radio | textProgramme genreStation nameMono/stereoTimeDate |
Mute
The Mute function deactivates the sound output while playback continues. To activate this, press the Mute button (15). To deactivate this, press the Mute button (15) again.
The active "mute function" is indicated by a corresponding symbol in the display.
Special settings for FM
- Press and hold the Info/Advanced button (10) for approx. 2 seconds to access the Settings menu.
- Scroll using the NEXT / PREV buttons (12/16) or the volume control knob (14).
- Push the volume control knob (14) to confirm the selection.

A description of the settings in the "System" menu can be found in the chapter "System settings" on page 39.
Search settings
- Select "Search settings" in the menu.
- Using the NEXT / PREV buttons (12/16) or the volume control knob (14), select "All stations" to obtain a full list of stations or "Only strong stations" to obtain only stations with a strong signal.
- Press the volume control knob (14) to confirm the settings.
Audio settings
- Select "Audio settings" in the menu.
- Using the NEXT / PREV buttons (12/16) or the volume control knob (14), select "Stereo possible" to play back stereo signals when available or "Mono only" to play back mono signals only.
- Press the volume control knob (14) to confirm the settings.
Operating as a radio (DAB+)
Pull up the antenna (3) so that it is vertical.
Press the Source button (17) repeatedly until the time display (20) shows "DAB".
The signal indicator (22) on the display (9) shows the signal strength. If this is low, it is advisable to initiate a channel search.
Station search
Press and hold the Tune button (13) for approx. 2 seconds. The radio now automatically searches for receivable stations.
Alternative
- Press and hold the Info/advanced button (10) for approx. 2 seconds.
- Using the NEXT / PREV buttons (12/16) or the volume control knob (14), scroll to the list entry "Complete search".
- Push the volume control knob (14) to confirm the selection.
Once the search is complete, a station list is generated which can be retrieved using the NEXT / PREV buttons (12/16).
Favourite stations can be stored in an additional preset list in the desired order.
Setting stations manually
- Press and hold the Info/advanced button (10) for approx. 2 seconds.
- Using the NEXT / PREV buttons (12/16) or the volume control knob (14), scroll to the list entry "Set manually".
- Push the volume control knob (14) to confirm the selection.
- Change the frequency by turning the volume control knob (14).
- Push the volume control knob (14) to save the setting and to re-enable the volume control.
Retrieve station from the list of stations
- Scroll through the list using the NEXT / PREV buttons (12/16). Alternatively: Press the NEXT / PREV button (12/16) and scroll through the list entries using the volume control knob (14).
- Push the volume control knob (14) to change to the selected station. Alternatively: The selection is automatically applied after approx. 10 seconds.
Saving stations to the preset list
- Press and hold the Preset button (18) for approx. 2 seconds.
- Use the NEXT / PREV buttons (12/16) to select a memory location where you would like to save the current station.
Alternatively, you can also scroll through the list by turning the volume control knob (14). - Push the volume control knob (14) to save the current station to the selected memory location.
Retrieving stored stations from the preset list
- Press the Preset button (18) once.
- Scroll through the list using the NEXT / PREV buttons (12/16) or the volume control knob (14).
- Push the volume control knob (14) to change to the selected station. Alternatively: The selection is automatically applied after approx. 10 seconds.
Retrieving station information
- Press the Info/Advanced button (10).
- Repeatedly press the Info/Advanced button (10) to scroll through the station information.
| Frequency band | retrievable station information |
| DAB Radio text | Signal strengthProgramme genreMultiplex nameFrequency/channelSignal error rateBitrate/audio typeTimeDate |
Mute
The Mute function deactivates the sound output while playback continues. To activate this, press the Mute button (15). To deactivate this, press the Mute button (15) again.
The active "mute function" is indicated by a corresponding symbol in the display.
Special settings for DAB+
- Press and hold the Info/Advanced button (10) for approx. 2 seconds to access the Settings menu.
- Scroll using the NEXT / PREV buttons (12/16) or the volume control knob (14).
- Push the volume control knob (14) to confirm the selection.
A description of the settings in the "System" menu can be found in the chapter "System settings" on page 39.
A description of the settings in the "Complete search" and "Set manually" menu points can be found in the chapter "Operating as a radio (DAB+)".
Inactive stations
The "Inactive stations" function is used to remove old and no longer receivable stations from the station list.
- Select "Inactive stations" in the menu.
- Using the NEXT / PREV buttons (12/16) or the volume control knob (14), select "Yes" to delete inactive stations or "No" to return to the Settings menu.
- Press the volume control knob (14) to confirm the settings.
Setting Dynamic Range Control (DRC)

This function is only available if DAB+ is selected.
DRC ensures that quiet passages are amplified and can therefore be heard in noisy environments.
- Select "DRC" in the menu.
- Select the desired DRC setting using the NEXT / PREV buttons (12/16) or the volume control knob (14).
There are three possible options: off - No amplifi cation of quiet passages low - Moderate amplifi cation of quiet passages high - Maximum amplifi cation of quiet passages
- Press the volume control knob (14) to confirm the settings.
AUX-In operation
Connecting via 3.5 mm jack socket on the front of the device
- Plug the jack cable (31) (not included in delivery) into the jack socket (5) on the front panel of the device.
- Connect the jack cable (31) (not included in delivery) to a playback device.
Once a jack cable (31) (not included in delivery) is connect to the jack socket (5) on the front panel of the device, the radio automatically switches to this input.
Connecting via the 3.5 mm jack socket in the battery compartment
- Plug the jack cable (31) (not included in delivery) into the jack socket (24) in the device's battery compartment.
- Connect the jack cable (31) (not included in delivery) to a playback device.
Once a jack cable (31) (not included in delivery) is connect to the jack socket (24) in the device's battery compartment, the radio automatically switches to this input. Playback can only be started and stopped on the playback device. Other playback functions can also only be controlled on the playback device.
Mute
The Mute function deactivates the sound output while playback continues. To activate this, press the Mute button (15). To deactivate this, press the Mute button (15) again.
The active "mute function" is indicated by a corresponding symbol in the display.
Playback from a USB stick Connecting via USB
- Insert the USB stick (not included in delivery) into the USB port (25) in the device's battery compartment.

Only external devices can be charged via the USB port (6) on the front panel. This USB port (6) cannot be used to play back audio.

Playback of audio fi les from mobile phones is not possible via USB. Use Bluetooth® or AUX for this.

Only USB sticks in FAT32 format up to a maximum size of 64 GB can be used.

Audio fi les in the following formats can be played back: MP3, WAV, APE, FLAC.
Pausing/continuing playback
Pausing playback
- Press the Play & Pause button (15) during playback.
Continuing playback
- Press the Play & Pause button (15).
Selecting tracks
- Press the NEXT button (12) to jump to the next track.
- Press the PREV button (16) to reset the current track to the beginning.
- Press the PREV button (16) again within 3 seconds to go back to the previous track.
Activating/deactivating Random / Repeat mode
Repeatedly press on the Tune button (13) until the desired mode is shown.
| Mode Function | |
| Rep-1 | The current track is played again |
| Repeat All | The complete content of the USB stick (not included in delivery) is played back again |
| Random | The music is played in a random order and the complete content of the USB stick (not included in delivery) is played back again. |
| Normal | The music is played in order. The playback stops after the last track on the USB stick (not included in delivery) |
Operating via Bluetooth®
Connecting via Bluetooth®
- Press the Source button (17) repeatedly until the time display shows "Bluetooth".
- The display will flash.
- Connect your external Bluetooth®-enabled device to the radio. Select "PBRA 20-Li B2" from the list.
- As soon as the device is connected, a beep will sound, the display will stop
fl ashing and the device will display "Connected".
- Playback can only be started on the Bluetooth playback device.
Pausing/continuing playback
Pausing playback
- Press the Play & Pause button (15) during playback.
Continuing playback
- Press the Play & Pause button (15).
Selecting tracks
-
Press the NEXT button (12) to jump to the next track.
-
Press the PREV button (16) to reset the current track to the beginning.
-
Press the PREV button (16) again within 3 seconds to go back to the previous track.
TWS - True Wireless Stereo
With the TWS function you can connect two identical radios to a stereo speaker pair via Bluetooth®.
- Ensure that neither of the devices is connected to a playback device via Bluetooth®.
- Press the Source button (17) repeatedly until the time display shows "Bluetooth".
- Press the TWS button (18) once on each device. The TWS indicator will flash on the display (9).
- The devices will connect with one another and the TWS indicator on the display (9) of one device will stop flashing. „TWS Connected“ appears in the display.
- The device on which the TWS indicator continues to flash is the master device. "TWS Disconnected" appears in the
display. The mobile phone is now connected to this device as described in the chapter "Operating via Bluetooth®". "TWS Connected" is now shown in the display.
- To cancel the connection between the two speakers, press the TWS button (18) once.
System settings for all modes

Information on special settings for the different playback modes can be found in the relevant chapters.
In Radio mode (FM and DAB+)
- Press and hold the Info/Advanced button (10) for approx. 2 seconds to access the Settings menu.
- Scroll to the list entry "System" using the NEXT / PREV buttons (12/16) or the volume control knob (14).
- Push the volume control knob (14) to confirm the selection.
- Scroll to the desired entry using the NEXT / PREV buttons (12/16) or the volume control knob (14).
- Push the volume control knob (14) to confirm the selection.
When playing back external media (USB, AUX and Bluetooth®)
- Press and hold the Info/Advanced button (10) for approx. 2 seconds to access the Settings menu.
- Scroll to the desired entry using the NEXT / PREV buttons (12/16) or the volume control knob (14).
- Push the volume control knob (14) to confirm the selection.
Setting the backlighting
- Select "Lighting" in the System menu.
- Scroll through the list using the NEXT / PREV buttons (12/16) or the volume control knob (14).
- Push the volume control knob (14) to confirm the selected list entry.
Setting the date/time
Setting the time and date
- Select "Time" in the menu.
- Select "Set time/date" in the Time menu.
- The hour will now flash. This can be changed using the NEXT / PREV buttons (12/16) or the volume control knob (14). Press the volume control knob (14) to confirm the entered time.
- Proceed in the same way with the minutes and the date.
Setting the time automatically
- Select "Time" in the menu.
- Select "Autom. Update" in the Time menu.
- Select the desired update behaviour using the NEXT / PREV buttons (12/16) or the volume control knob (14).
- Push the volume control knob (14) to confirm the selection.
There are four possible options:
No update - time and date do not update automatically
Update all - time and date update automatically via FM and DAB
Update via FM - time and date update automatically via FM
Update via DAB - time and date update automatically via DAB
If the automatic update is active, the time and date will always update when the radio is in the corresponding playback mode.
Setting the time format
- Select "Time" in the menu.
- Select "Set 12/24 hours" in the Time menu.
- Select the desired time format using the NEXT / PREV buttons (12/16) or the volume control knob (14). Press the volume control knob (14) to confirm the settings.
Setting the date format
- Select "Time" in the menu.
- Select "Set date format" in the Time menu.
- Select the desired date format using the NEXT / PREV buttons (12/16) or the volume control knob (14). Press the volume control knob (14) to confirm the settings.
Setting the language
- Select "Language" in the System menu.
- Scroll through the list using the NEXT / PREV buttons (12/16) or the volume control knob (14).
- Push the volume control knob (14) to confirm the setting.
Restoring factory settings
- Select "Factory settings" in the System menu.
- Select "Yes" in the Factory settings menu. The radio will now automatically restore the factory settings. To do so, the radio performs a restart and DAB+ station search.
Software version
- Select "SW version" in the System menu.
- This will display the installed software version.
- Press the Info/Advanced button (10) to return to the Main menu.
Cleaning and servicing

Switch off the device and remove the battery from the device and the plug-in power adapter from the mains socket before carrying out any work on the device.

You should have any repair and maintenance work that is not described in these instructions carried out by our Service Centre. Only use original parts.
Cleaning

The device must not be sprayed with water or placed in water. Otherwise there is a risk of electric shock.

Do not use any cleaning agents or solvents. This could damage the device irreparably. Chemical substances may attack the plastic parts of the machine.
- Keep the ventilation slits, speaker and carrying handle of the device clean. Use a dry cloth or brush to do this.
- Clean the device with a damp cloth and a mild cleaning agent.
Maintenance
The device is maintenance free.
Transport
Fold in the antenna (3) before transporting the device.
Storage
• Always store devices and accessories so that they are:
- dry.
- clean.
- protected against dust.
- out of the reach of children.
- Remove the rechargeable battery from the device before storing the device for a prolonged period (e.g. over winter) (see the separate operating instructions for the battery and charger).
Disposal/environmental protection
Remove the battery from the device and recycle the device, battery, accessories and packaging in an environmentally-friendly manner. Please observe the regulations for disposal that are applicable in your area.

The symbol showing a crossed-out bin on wheels indicates that this device is subject to directive 2012/19/EU. This directive states that you may not dispose of this device with regular household waste, but must hand it in at specially set up collection points, recycling centers or waste disposal companies. This disposal is free of charge. Protect the environment through proper disposal. Remove the rechargeable battery before disposing of the device.
GB IE

Please dispose of packaging and product in an environmentally friendly manner.

Recycling symbol: Corrugated card-board
The packaging material consists of environmentally friendly materials that you can dispose of in an environmentally sound manner at your local waste disposal station.
Spare parts/accessories
You can get spare parts and accessories from www.grizzlytools.shop
If you have issues ordering, please use the contact form.
If you have any other questions, please contact the service centre (see page 43).
Warranty
Dear customer, this device comes with a 3-year warranty from the date of purchase. Should the product have defects, you are entitled to further rights vis-a-vis the product vendor. These statutory rights are not limited by the warranty described in the following.
Warranty conditions
The warranty period begins upon the date of purchase. Please retain the original receipt. This documentation will be required as proof of purchase.
If a material or manufacturing defect occurs within three years from the date of purchasing of this product, the product will be repaired or replaced by us for free - according to our choice. This warranty service requires you to present the defective device and proof of purchase (sales receipt) within three years and describe briefly in writing the nature of the defect and when it occurred.
If the defect is covered by our warranty, you will receive the repaired device back or a new product. Repair or replacement of the product will not start a new warranty period.
Warranty period and statutory defect claims
Claims being granted on the warranty does not extend the warranty period. This also applies to replaced and repaired parts. Any damage or defects apparent at purchase must be reported immediately upon unpacking. Repairs made after the warranty period has expired are chargeable.
Scope of warranty
The device was carefully manufactured according to strict quality guidelines and meticulously checked before delivery.
The warranty applies to material or manufacturing defects. This warranty does not extend to product parts exposed to normal wear and tear, which are therefore considered consumable parts (e.g. battery, push buttons) or to damage to fragile parts (e.g. display, antenna).
The warranty elapses if the product was damaged or if it was used improperly or not serviced. All instructions listed in the operating instructions have to be observed precisely to ensure proper use of the product. Purposes for use and actions that the operating instructions advises or cautions against must be avoided.
This product is only intended for private use and not for commercial use. The warranty will elapse in the event of improper and
false use, application of force and in the event of interventions that have not been made by a service branch authorised by us.
Procedure for warranty cases
To ensure that your request is processed quickly, please follow the instructions below:
- Please keep your sales receipt and identification number (IAN 373442_2104) as proof of purchase for all queries.
- You can find the item number on the type plate.
- If functional errors or other defects occur, fi rst contact the service department named below by telephoneor email. You will then receive further information on how to process your complaint.
- After consulting our customer service, you can send a defective product to the service address given to you free of charge, enclosing the sales receipt and specifying the nature of the defect and when it occurred. In order to avoid acceptance problems and additional costs, it is imperative that you only use the address given to you. Make sure that the freight is prepaid for the shipment and that it is not sent as bulky goods, express or other special freight. Please send in the device including all accessories supplied with the purchase and ensure that it is sufficiently secure for transport.
Repair service
You can have repairs which are not subject to warranty performed by our service branch for a charge. They will gladly create a cost estimate for you.
We can only work on devices which are sent in properly packed and with postage paid.
Caution: Please send your device cleaned and with an indication of the defect to our service branch.
Devices sent in where freight is not prepaid – as bulky goods, express or as other special freight – will not be accepted.
We will dispose of any defective devices that you send to us free of charge.
Service-Center
GB
Service Great Britain
Tel.: 0800 404 7657
E-Mail: grizzly@lidl.co.uk
IAN 373442_2104
JE
Service Ireland
Tel.: 1800 10 10 10
E-Mail: grizzly@lidl.ie
IAN 373442_2104
Importer
Please note that the following address is not a service address. Please initially contact the service centre specified above.
Switch off the device and remove the battery from the device and the plug-in power adapter from the mains socket before carrying out any work on the device.
| Problem Possible cause | Error correction | |
| Machine does not start | Battery (22) not inserted | Insert the battery (22) (see "Inserting/removing the battery") |
| Rechargeable battery (22) discharged | Charge the battery (22) (observe the separate operating instructions for the rechargeable battery and charger) | |
| On/Off button (2) is faulty. | Repairs must be carried out by our Customer Service department. | |
| Device works with interruptions | Internal loose contact | Repairs must be carried out by our Customer Service department. |
| On/Off button (2) is faulty. | ||
| Faltering playback Noise during play-back | Poor signal | (FM and DAB+ only) Adjust antenna (3) |
| (FM and DAB+ only) Adjust the frequency (see "Manual search" in the chapter "Station search (FM))" | ||
| Place the radio where there is a better signal. | ||
| Transmission range for Bluetooth connection exceeded | Place the connected device near the radio. Transmission ranges of up to 30 m are possible. The optimal range is approx. 10 m. | |
| No sound or very quiet with AUX | Playback device is off or set to "Stop" | Start playback on playback device |
| Playback device is set too quiet | Increase volume on playback device | |
| No sound | Radio is set too quiet | Increase volume (see "Setting the volume" in "Operation" chapter") |
| The radio's mute function is activated | Check whether the mute function is active. If so, the relevant symbol will be shown on the display. Deactivate the mute function by pressing the Mute button (14) | |
| USB stick not recognised | USB stick improperly formatted | Format USB stick to FAT32 |
| USB socket defective | Repairs must be carried out by our Customer Service department. | |
| USB stick too large | Use a USB stick with no more than 64 GB capacity | |
| Playback of USB stick not possible | USB stick improperly formatted | Format USB stick to FAT32 |
| Incorrect audio format | Convert the audio data into the relevant format (MP3, WAV, APE, FLAC) | |
| Playback via Bluetooth® not possible | Bluetooth® not activated on mobile end device | Activate Bluetooth® in the settings of the mobile end device |
| Jobsite radio not selected as playback medium on mobile end device | Select Jobsite radio in the Bluetooth® settings of the mobile end device | |
| Device already coupled with another mobile end device | Disconnect mobile end devices in range of the Jobsite radio | |
| Bluetooth® module defective | Repairs must be carried out by our Customer Service department. | |
| Jobsite radio is not displayed on the mobile end device | The Jobsite radio and mobile end devices are outside of the transmission range | Reduce the distance between the Jobsite radio and mobile end device |
| Mobile end device does not support the Bluetooth® standard of the Jobsite radio | Use a newer mobile end device |
Table des matières
Introduction ......47
Stations inactives 58
Régler le Dynamic Range Control (DRC) 58
Mode AUX-In ....58
Digital Audio Broadcasting

Bluetooth
Digital Audio Broadcasting
Bluetooth
Digital Audio Broadcasting

Bluetooth
Digital Audio Broadcasting
Bluetooth
Indstilling of Dynamic Range Control (DRC) 167
AUX-In-drift 167
Reparationsservice......173
Fejlsøgning 174
(12 V, 2 Ah)....5 timer
(12 V, 4 Ah)....10 timer
(20 V, 2 Ah)....5 timer
Digital Audio Broadcasting
Bluetooth
Indstilling of Dynamic Range Control (DRC)

Ajustar Dynamic Range Control (DRC) 188
6 Conector USB (frontal)
7 Entrada CC
Digital Audio Broadcasting

Bluetooth
Ajustar Dynamic Range Control (DRC)

 Translation of the original EC declaration of conformity Translation of the original EC declaration of conformity | |
| We hereby confi rm that the Rugged Radio model PBRA 20-Li B2 Serial number 000001 - 085000 conforms with the following applicable relevant version of the EU guidelines: | |
| 2009/125/EC • 2011/65/EU* • 2014/53/EU | |
| In order to guarantee consistency, the following harmonised standards as well as national standards and stipulations have been applied: | |
| EN 62368-1:2014/A11:2017 • EN 50663:2017 EN 55032:2015/A11:2020 • EN 55035:2017/A11:2020 EN IEC 61000-3-2:2019/A1:2021 • EN 61000-3-3:2013/A1:2019 EN 301 489-1 V2.2.3 • EN 301 489-17 V3.2.4 • EN 300 328 V2.2.2 EN 303 345-3 V1.1.1 • EN 303 345-4 V1.1.1 • EN 303 345-1 V1.1.1 VO 2019/1782 • EN IEC 63000:2018 | |
| This declaration of conformity is issued under the sole responsibility of the manufacturer: | |
 Grizzly Tools GmbH & Co. KG Stockstädter Straße 20 63762 Großostheim Germany 31.03.2022 Grizzly Tools GmbH & Co. KG Stockstädter Straße 20 63762 Großostheim Germany 31.03.2022 |  Christian Frank Documentation Representative Christian Frank Documentation Representative |
Translation of the original EC declaration of conformity
* The object of the declaration described above satisfies the provisions of Directive 2011/65/EU of the European Parliament and the Council of 8 June 2011 on limiting the use of certain harmful substances in electrical and electronic appliances.

IAN 373442_2104