
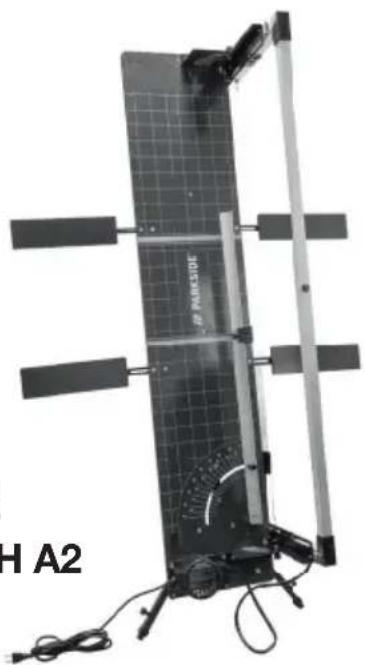
PGDH A2 - Thermal cutting table PARKSIDE - Free user manual and instructions
Find the device manual for free PGDH A2 PARKSIDE in PDF.

| Product type | Hot wire thermal cutting table for rigid foam |
| Brand | Parkside |
| Model | PGDH A2 |
| Supply voltage | 220–240 V ~ 50 Hz |
| Transformer power | 200 W |
| Transformer output | 36 V ~ / 5.6 A |
| Transformer protection class | II (double insulation) |
| Maximum cutting depth | 330 mm |
| Maximum cutting length | 1370 mm |
| Hot wire diameter | 0.5 mm |
| Maximum hot wire temperature | 360 °C |
| Power cord length | 3 m |
| Compatible materials | Polystyrene rigid foam boards (e.g., insulation) |
| Cut types | Straight, bevel, miter, rabbet/bayonet, groove, long |
| Included accessories | Brass brush, hot wire replacement tool, 3 spare wires, Allen key |
| Safety instructions | Wear gloves and safety goggles; use with RCD 30 mA socket; do not expose to rain; keep out of reach of children |
| Maintenance | Clean the cooled wire with the brass brush; replace the wire using the provided tool |
| Warranty | 3 years (conditions in manual) |
| Country of manufacture | Germany (C.M.C. GmbH) |
Frequently Asked Questions - PGDH A2 PARKSIDE
User questions about PGDH A2 PARKSIDE
0 question about this device. Answer the ones you know or ask your own.
Ask a new question about this device
Download the instructions for your Thermal cutting table in PDF format for free! Find your manual PGDH A2 - PARKSIDE and take your electronic device back in hand. On this page are published all the documents necessary for the use of your device. PGDH A2 by PARKSIDE.
USER MANUAL PGDH A2 PARKSIDE
PDF ONLINE
parkside-diy.com
natural_image
Exterior view of a solar panel with visible components and wiring (no text or symbols)GLOW WIRE HARD FOAM CUTTER PGDH A2 GLÜHDRAHT-HARTSCHAUMSCHNEIDEGERÄT PGDH A2 TABLE DE DÉCOUPE À FIL CHAUD POUR MOUSSE RIGIDE PGDH A2
GB IE NI CY MT ○ ○
GLOW WIRE HARD FOAM CUTTER
Operation and Safety Notes
Translation of the original instructions
FR BE CH
TABLE DE DÉCOUPE À FIL CHAUD POUR MOUSSE RIGIDE
Before reading, unfold the page containing the illustrations and familiarise yourself with all functions of the device.
DE AT CH
GB/IE/NI/CY/MT Operation and Safety Notes Page 5
natural_image
Close-up of a black wrist strap device with a numbered label '29' and an inset close-up showing its textured grip (no readable text or symbols)Table of pictograms used....Page 5
Introduction......Page 6
Intended use Page 6
Scope of delivery....Page 7
Features......Page 7
Technical specifications....Page 8
Safety instructions......Page 8
Before using the device....Page 12
Commissioning Page 12
Cutting options....Page 13
Maintenance and cleaning....Page 14
Troubleshooting Page 15
Storage Page 15
Information on recycling and disposal Page 15
EC Declaration of Conformity ......Page 16
Warranty and service information Page 17
Warranty conditions....Page 17
Warranty period and statutory claims for defects....Page 17
Extent of warranty....Page 17
Processing of warranty claims....Page 17
Service Page 18
| ● Table of pictograms used | |
| Read the operating instructions for this product attentively and with care before use. | |
| Important note! | |
| Observe warnings and safety instructions! | |
| Warning: Risk of electric shock! Danger to life! | |
| IP44 | Transformer protection type |
| Direct current | |
| 50 Hz | Frequency of 50 Hertz |
| V ~ | Alternating voltage in volt |
| Protection class II | |
 | Dispose of the device and packaging in an environmentally friendly manner. |
 | You are legally obliged to place devices marked as such in a collection which is separate from unsorted municipal waste. Not to be disposed of in the household waste. |
 | Made from recycled material |
 | Do not dispose of electrical devices in the household waste. |
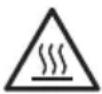 | The heated glow wire is a high hazard potential.Contact may cause burns. |
 | Wear safety goggles. |
 | Wear protective gloves |
 | Keep away from rain. |
 | Thermal circuit breaker |
Glow wire hard foam cutter PGDH A2
- Introduction
Congratulations! You have chosen one of our high-quality products. During production this device was checked for quality and subject to a final inspection. This ensures that your device is working properly. Please familiarise yourself with the product before using it for the first time. To do so, please read through the following operating and safety
instructions carefully. Use the product only as described and only for the specific applications as stated. Ensure you hand over all documentation when passing the product on to anyone else.
KEEP OUT OF THE REACH OF CHILDREN!
- Intended use
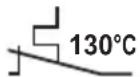
The glow wire hard foam cutter is intended to be used exclusively for cutting polystyrene hard foam panels (e.g. façade insulation boards, roof insulation panels). It must not be used to cut any other materials. The wire is heated up by an electric transformer and will heat up to 360^ C in approx. 3 seconds. Any polystyrene hard foam material that touches the wire will melt. This results in seamlessly welded edges. You will achieve impeccable cutting results. Any use that differs from the intended
use as stated above is prohibited and potentially dangerous. Damage resulting from non-observation or incorrect use is not covered by the warranty or any liability on the part of the manufacturer. The device is not intended for commercial use. Commercial use will void the warranty.
- Scope of delivery
1 Glow Wire Hard Foam Cutter
1 set of operating instructions
1 brass brush
1 tool for changing the glow wire
3 replacement glow wires
1 Allen key
Features

PLEASE NOTE: After unpacking the product, please check that all of the package contents are sent and that the glow wire hard foam cutter is in perfect condition. Do not use the device if it is effective.
See also fig. A - K:
| 1 | Glow Wire Hard Foam Cutter | 16 | Screws |
| 2 | Cutting bow | 17 | Electrical connection |
| 3 | Glow wire | 17a | Socket for electrical connection |
| 4 | Cutting board | 18 | Spring |
| 5 | Cutting board extension | 19 | Brass brush |
| 6 | Heating button | 20 | Tool for changing the glow wire |
| 7 | Side telescopic feet | 21 | Replacement glow wire |
| 8 | Mains plug | 22 | Screw for position adjustment |
| 9 | Transformer | 23 | Screw for position adjustment Cutting bow |
| 10 | Adjustable guide rail | 24 | Screw for position adjustment Adjustable guide rail |
| 11 | Angle adjustment of the cutting bow | 25 | Screw for depth stop |
| 12 | Screw for telescopic foot | 26 | Locking pins |
| 13 | Snap screws for side telescopic feet | 27 | Stop for length adjustment |
| 14 | Guide rail | 28 | Depth stop |
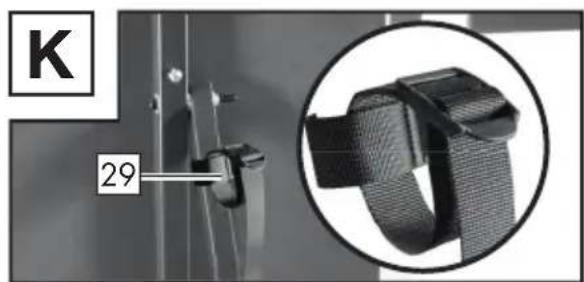
| 15 | Rear telescopic foot | 29 | Railing attachment |
| 15a | Fixing rail for rear telescopic foot | 30 | Allen key |
PLEASE NOTE: The use of the term “product” or “device” in the following text refers to the glow wire hard foam cutter named in these operating instructions.
• Technical specifications
| Model: PGDH A2 | |
| Supply voltage: 220–240 V ~ 50 Hz | |
| Transformer power: 200 W | |
| Transformer output voltage: 36 V ~ / 5.6 A | |
| Transformer protection class: II (dual insulation) | |
| Maximum cutting depth: 330 mm | |
| Maximum cutting length: 1370 mm | |
| Glow wire diameter: 0.5 mm | |
| Maximum temperature of glow wire: 360 °C | |
| Mains cable length 3 m |
PLEASE NOTE: Changes to technical and visual aspects of the product may be made without notice as part of future developments. All dimensions, information and specifications in the operating instructions are therefore subject to change. The operating instructions cannot therefore be used as the basis for asserting a legal claim.
● Safety instructions
⚠️ PLEASE READ THE OPERATING INSTRUCTIONS CAREFULLY BEFORE USE. THEY ARE A PART OF THE PRODUCT AND MUST BE AVAILABLE AT ALL TIMES.
■ ⚠️ WARNING! Risk of serious injury or death for children and infants. Never leave children unsupervised near the packaging material. There is a risk of suffocation.
■ Before starting work, familiarise yourself with all the operating elements, in particular with the functions and mechanisms. If necessary ask a professional. Read and follow the operating instructions for the device. This section covers the basic safety regulations that apply when working with the device.
■ ⚠️ ATTENTION! The appropriate work clothes must be worn when operating the device.
■ Gloves must be worn when operating the device.
■ The cutting wire is under a high level of spring tension. Should the wire break during operation, there may be flying sparks. The use of safety goggles is therefore mandatory.
- When working in non-ventilated rooms, the vapours generated during cutting must be extracted directly at the cutting edge using an extraction device. The hard foam boards must not have any adhesive residues or other contamination. PVC and PVC-coated materials must not be processed due to the harmful vapours produced during cutting.
⚠️ATTENTION!If the mains cable is damaged or cut through, unplug the mains plug immediately from the socket.
■ ⚠️ ATTENTION! The glow wire of the glow wire hard foam cutter gets very hot! RISK OF BURNS!
RISK OF ELECTRIC SHOCK!
■ Only connect the device to a socket with RCD (Residual Current Device) with a rated residual current of no more than 30 mA; fuse of at least 6 Ampere.
If the mains cable for this device becomes damaged, ensure that the cable is replaced by the manufacturer, a customer service technician or other qualified person to avoid any possible hazards.
KEEP OUT OF THE REACH OF CHILDREN!
This device can be used by children aged eight years and older, and by persons with reduced physical, sensory or mental capacities or a lack of experience and knowledge if they are supervised or they have been instructed in how to use the device safely and understand the dangers that may arise when using it. Do not allow children to play with the device. Cleaning and day-to-day maintenance must not be performed by children without supervision.
⚠️ ATTENTION! Make sure that the working area is well ventilated.
⚠️ATTENTION! Electrical appliances do not belong in the householdwaste.
- Follow the further instructions in the “Maintenance and cleaning” chapter, as well as the “Storage” chapter.
CAUTION! HOW TO AVOID ACCIDENTS AND INJURIES:
■ Individuals who are not familiar with the operating instructions must not use the device. Local regulations may specify the minimum age for the operating personnel.
■ Wear sturdy shoes.
■ Take appropriate measures to keep children away from the device when it is running. There is a risk of injury.
- Do not operate the device near any flammable liquids or gases. Failure to do so risks causing a fire or explosion.
- Keep the device in a dry location and out of the reach of children when it is not being used.
⚠️ CAUTION! HOW TO AVOID DAMAGE TO THE DEVICE AND ANY HARM TO PERSONS THAT MAY RESULT FROM SUCH DAMAGE:
■ Only cut materials that are suitable for this device. Not complying with this may cause damage to the device and expose the user to a risk of injury.
- Do not work with damaged, incomplete devices or those which have been modified without the approval of the manufacturer. Before using the device, a specialist should carry out a check to make sure that the electrical protective measures required are in place.
- Check the device regularly to make sure it is functioning properly.
■ Only use original accessories and do not carry out any modifications to the device.
- Please read the instructions in the operating instructions on the subject of “Maintenance and cleaning”. All additional measures must be carried out by a qualified electrician. Always contact our service point if you need any repairs.
ELECTRICAL SAFETY:
⚠️ CAUTION! How to avoid accidents and injuries from electric shock:
- When operating the device, the mains plug must be freely accessible once the device is installed.
■ Before you start using the device have the power supply professionally checked:
- Earthing, zeroeing, residual current protection circuit must meet the safety regulations of the energy supply company and be working perfectly,
- Protection of the electrical plug connections against moisture.
RISK OF ELECTRIC SHOCK:
■ Make sure that the mains voltage matches the specifications on the rating plate.
- Carry out the electrical installation in accordance with the national regulations.
■ Before each use, check the device mains cable and mains plug for damage. Defective mains cables must not be repaired, instead they must be replaced with new ones. Have any damage to your device repaired by an authorised specialist.
- Do not use the mains cable to unplug the mains plug from the socket. Protect the mains cable from heat, oil and sharp edges. - Do not pull, carry or fix the device by the mains cable.
- Only use extension cables that are splashproof and intended for outdoor use. Always fully unroll a cable reel before use. Check the cable for damage.
■ Unplug the mains plug from the socket before carrying out any work on the device and when it is not being used.
■ Extension cables must not have a smaller cross-section than rubber hose lines marked with H07RN8-F. The cable length must be 10 m. The strand cross section of the extension cable must be at least 2.5 mm ^4 .
■ Extension cables and power cables must be checked regularly. Defective cables or those which are not intended for this purpose must not be used.
If the device is damaged, it is not to be used and must be repaired by a qualified person.
If you are not using the device for a longer period of time, it must be kept dry and protected from the effects of weather.
This device may only be connected to power supplies with the appropriate current draw. It should be correctly connected to a 230 V/50 Hz shockproof socket. When doing this, also compare the details on the rating plate.
- For your own safety, consult an electrician if you are uncertain when connecting electrical parts.
■ Ensure that the sockets and connectors are protected against moisture. Do not use the device in the rain.
■ Select a position where it cannot fall over.
■ Make sure that the glow wire hard foam cutter, the plugs and extension cables are positioned so that they are protected from water.
■ Always unplug all the plugs before you carry out any work on glow wire hard foam cutter.
- Outdoors, never use connectors, adapters, extensions or connecting cables that are not approved for outdoor use.
■ Position the cables so that they do not cause an obstruction to a path or can be damaged.
■ After assembling the device, you must always be able to reach the plugs of the devices at any time. They must not be built over or built in, so that, in the event of an emergency they can always be pulled out.
If the glow wire hard foam cutter malfunctions, unplug the mains plug immediately. Do not try to repair the glow wire hard foam
cutter yourself, as this poses a risk to your health and that of others. In addition, any guarantee or warranty claims will be voided. Only authorised individuals may carry out repairs on this device.
■ Attention: fragile components! Make sure that the glow wire hard foam cutter is not subject to impacts or knocks.
- Do not use the device if you are tired or under the influence of medicines.
■ Before carrying out any adjustment or maintenance work, unplug the mains plug.
● Before using the device
- Unpack the glow wire hard foam cutter and check it for completeness and damage. Do not use the device if it is defective.
- Check that the electrical socket is in good condition and that it is sufficiently fused (at least 6 A, RCD switch).
■ Make sure that the working area is well ventilated. - Select the installation location so that there is no risk of tripping over the device, accessories or cables.
PLEASE NOTE: We recommend that the glow wire hard foam cutter ^1 is set up by 2 people.
PLEASE NOTE: The glow wire hard foam cutter ^1 can be attached to a railing using the railing attachment ^29 and secured against tipping over.
WARNING! Risk of serious injury or death for children and infants. Never leave children unsupervised near the packaging material. There is a risk of suffocation.
- Flip the rear telescopic foot and the side telescopic feet 7. Fix the rear telescopic foot 15 by securing the fixing rail 15a with the screw 12. Secure the side telescopic feet 7 using the locking screws for the side telescopic feet 13 (see fig. B).
The desired working height can be set using the telescopic feet and 15. - Fold out all four extensions of the cutting plate by loosening the screws 16 (see fig. J). Put the locking pins 26 in the cutting board extension 5 . Re-tighten the screws 16 as soon as the cutting board extensions 5 are in the desired position (see fig. B).
- Set the desired angle for the adjustable guide rail Fix the adjustable guide rail using the screw (see fig. F).
■ Flip the guide 14 aibut (see fig. I). - Flip the cutting bow out. Fix the cutting bow 2 in the desired position using the screws for the angle adjustment of the cutting bow 23 (see Fig. E).
- Follow the procedure in reverse order to dismantle the glow wire hard foam cutter 1. The glow wire 3 must be cooled down before dismantling.
- Commissioning
■ Connect the electrical connection to the socket for the electrical connection 17a (see fig. C).
- Plug the mains plug into the socket
Place the hard foam to be cut on the cutting board along the adjustable guide rails 4.
Use the screws for the depth 25 to set the stop for the cutting depth 28 . Set the stop for the cutting depth 28 to the desired depth (see fig. G).

ATTENTION: If the minimum depth is set too low, the glow wire will hit the cutting board extensions. Make sure that there is an adequate gap. FIRE HAZARD!
Press the heating button The glow wire 3 heats up in just a few seconds.
- Hold the heating button down while you cut the hard foam to the desired size using the glow wire 3.
■ Release the heating button at the end of each cut. The heating button 6 must not be pressed continuously or fixed in the pressed position. FIRE HAZARD!
• Cutting options
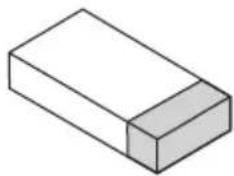
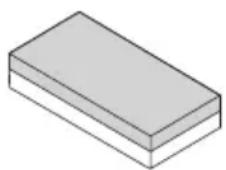
Straight cut
natural_image
Simple 3D illustration of a rectangular block with a shaded side (no text or symbols)Set the angle-adjustable guide rail ^10 to 90° (see fig. F) and set the angle of the cutting bow ^11 to 0°. Put the material in place and move to the required position. If necessary, use the stop for the length adjustment ^27 as an aid. Press the heating button ^6 and keep it pressed. Push the cutting bow ^2 in the direction of the material until the material is completely cut. Release the heating button ^6 . The glow wire ^3 will cool down in a few seconds.
Bevel cut
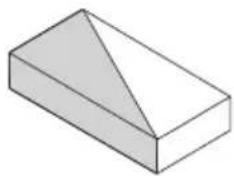
natural_image
Simple 3D geometric shape resembling a rectangular prism with a triangular cutout (no text or symbols)Set the angle-adjustable guide rail ^10 to the required cutting angle (see fig. F). Set the angle adjustment of the cutting bow ^11 to 0°. Put the material in place and move to the required position. If necessary, use the stop for the length adjustment ^27 as an aid. Press the heating button ^6 and keep it pressed. Push the cutting bow ^2 in the direction of the material until the material is completely cut. Release the heating button ^6 . The glow wire ^3 will cool down in a few seconds.
Mitre cut
Set the angle-adjustable guide rail ^10 to 90^ (see fig. F). Adjust the angle setting of the cutting bow ^11 to the required dimension of the mitre cut. Put the material in place and move to the required position. If necessary, use the stop for the length adjustment ^27 as an aid. Press the heating button ^6 and keep it pressed. Push the cutting bow ^2 in the direction of the material until the material is completely cut. Release the heating button ^6 . The glow wire ^3 will cool down in a few seconds.
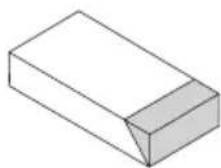
Dovetail cut/step cut

natural_image
Simple 3D illustration of a rectangular block with a shaded side (no text or symbols)Set the angle-adjustable guide rail 10 to 90^ (see fig. F) and set the angle of the cutting bow 11 to 0^ . Use the depth stop 28 : To do this, undo the screw for the depth stop 25 on both sides of the cutting rail. Move the depth stop 28 to the desired position and secure it by tightening the screw for the depth stop 25 (PLEASE NOTE: In order to prevent the cutting rail 2 from tilting, the depth stops 28 must be set at the same position on both sides of the cutting rail 2). Put the material in place. Press the heating button 6 and keep it pressed. Push the cutting rail 2 in the direction of the material until the cutting rail 2 is stopped by the depth stop 28. The previously set step depth will be cut. When you have reached the step depth, pull the material away in the required direction until the step is completely cut. Release the heating button 6. The glow wire 3 will cool down in a few seconds.
Groove cut

Set the angle-adjustable guide rail 10 to 90^ (see fig. F) and set the angle of the cutting bow 11 to 0^ . Use the depth stop 28 : To do this, undo the screw for the depth stop 25 on both sides of the cutting rail 2 . Move the depth stop 28 to the required position and fix it in place by tightening the screw for the depth stop 25 (PLEASE NOTE: In order to prevent the cutting rail 2 from tilting, the depth stops 28 must be set at the same position on both sides of the cutting rail 2 . Put the material in place. Press the heating button 6 and keep it pressed. Push the cutting rail 2 in the direction of the material until the cutting rail 2 is stopped by the depth stop 28 . The previously set step depth will be cut. When you have reached the step depth, pull the material away in the required direction. When you have reached the groove length, pull the cutting rail 2 back up. Release the heating button 6 . The glow wire 3 will cool down in a few seconds.
Rip cut
Set the angle-adjustable guide rail 10 to 90^ (see fig. F) and set the angle of the cutting bow 11 to 0^ . Use the depth stop 28 : To do this, undo the screw for the depth stop 25 on both sides of the cutting rail. 2 Move the depth stop 28 to the required position and fix it in place by tightening the screw for the depth stop 25 (PLEASE NOTE: In order to prevent the cutting rail 2 from tilting, the depth stops 28 must be set at the same position on both sides of the cutting rail). Put the material in place. Press the heating button 6 and keep it pressed. Push the cutting rail 2 in the direction of the material 4 until the cutting rail 2 is stopped by the depth stop 28. Now push the material completely through the glow wire 3 in the desired direction. The material is cut along the previously set step depth. Release the heating button 6. The glow wire 3 will cool down in a few seconds.
● Maintenance and cleaning

CAUTION! In order to clean the glow wire hard foam cutter 1 or carry out maintenance work, always disconnect it first by unplugging the mains plug 8 from the voltage supply and allow it to cool. There is a risk of electric shock or risk of injury through moving parts.
- Clean the cooled glow with the brass brush 19 provided.
■ Only clean the rest of the device once the glow wire has cooled down. - Clean the glow wire hard foam cutter with a dry cloth.
Replacing the glow wire
Tension the spring using the tool for changing the glow wire 20 ; this releases the tension on other spring. Replace the defective glow wire 3 and release the tension on the spring 18 again (see Fig. D).

CAUTION! There is a risk of burn injuries.

PLEASE NOTE: Only use accessories and spare parts recommended by the manufacturer.
- Troubleshooting
If the glow wire hard foam cutter 1 does not work, check the following:
| Faults Cause Corrective action | ||
| The glow wire 3 does not heat up. | Power supply interrupted | Check the residual current protection switch of your mains socket and use another socket to make sure that the glow wire hard foam cutter 1 is being properly supplied with power. |
| Cable breakage Please contact our service point. | ||
| Glow wire 3 torn/ burnt out | Replace the glow wire 3 as described under “Replacing the glow wire”. | |
- Storage
■ Always store the device in its folded state.
To do this, dismantle the device following the instructions for setting up in reverse order.
- Keep the device clean and dry and out of the reach of children.
● Information on recycling and disposal

DO NOT DISPOSE OF ELECTRICAL TOOLS IN HOUSEHOLD WASTE! DON'T THROW AWAY – RECYCLE!
be collected separately for environmentally compatible recycling or recovery. The symbol of the crossed out dustbin means that this device must not be disposed of in the household waste at the end of its service life. The device must be handed in at established collection points, recycling centres or waste management depots. The disposal of defective devices which you have sent in will be carried out free of charge. In addition, distributors of electrical and electronic equipment as well as food distributors are obliged to accept returned waste. LIDL provides you with return options directly in its branches and shops. Return and disposal is free of charge for you. When buying a new device you have the right to return an equivalent old device at no charge. In addition you have the option, regardless of whether you are buying a new device, to hand in (up to three) old devices at no charge, as long as the device is no larger than 25 cm in any dimension. Before returning the device please delete all personal information. Before returning, please remove batteries or rechargeable battery packs which are not enclosed by the old device, as well as bulbs, which can be removed without destroying the product and take them to a separate collection point.

Batteries containing harmful substances are labelled with the adjacent symbol, which indicates the prohibition on disposal in household waste. The abbreviations for the essential heavy metals are: Cd = cadmium, Hg = mercury, Pb = lead.
Take used batteries to a waste management company in your city or community or return them to your dealer. This satisfies your legal obligations while also making contribution to protecting the environment.
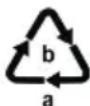
Please note the marking on the different packaging materials and separate them as necessary. The packaging materials are marked with abbreviations (a) and digits (b) with the following definitions: 1–7: Plastics, 20–22: Paper and cardboard, 80–98: Composite materials.
● EC Declaration of Conformity
We,
C. M. C. GmbH Holding
Responsible for documentation:
Joachim Bettinger
Katharina-Loth-Str. 15
66386 St. Ingbert
Germany
hereby take sole responsibility for declaring that the product
Glow Wire Hard Foam Cutter
IAN: 471954_2407
Item no.: 2797
Year of manufacture: 2025/13
Model: PGDH A2
meets the basic safety requirements as specified in the European Directives
Electromagnetic compatibility:
(2014/30/EU)
Low Voltage Directive:
(2014/35/EU)
RoHS Directive
(2011/65/EU)+(2015/863/EU).
The object of the declaration described above meets the requirements of Directive 2011/65/EU of the European Parliament and of the Council of 8 June 2011 on the restriction of the use of certain hazardous substances in electrical and electronic equipment.
This conformity assessment is based on the following harmonised standards:
EN 61558-2-6:2009
EN IEC 61558-1:2019
EN IEC 55014-1: 2021
EN IEC 55014-2: 2021
EN IEC 61000-3-2:2019+A1 2021
EN 61000-3-3:2013+A1:2019+A2:2021
EN 60335-1:2012/A15:2021
EN 60335-2-45:2002/A2:2012
EN 62233:2008
- Quality assurance -
● Warranty and service information
Warranty from C. M. C. GmbH Holding
Dear Customer,
The warranty for this equipment is 3 years from the date of purchase. In the event of product defects, you have legal rights against the retailer of this product. Your statutory rights are not affected in any way by our warranty conditions, which are described below.
- Warranty conditions
The warranty period begins on the date of purchase. Please retain the original sales receipt. This document is required as your proof of purchase.
Should this product show any defect in materials or manufacture within 3 years from the date of purchase, we will repair or replace it – at our discretion – free of charge. This warranty service requires that you retain proof of purchase (sales receipt) for the defective device for the three year period and that you briefly explain in writing what the fault entails and when it occurred.
If the defect is covered by our warranty, we will repair and return your product or send you a replacement. The original warranty period is not extended when a device is repair or replaced.
● Warranty period and statutory claims for defects
The warranty period is not extended by the guarantee. This also applies to replaced and repaired parts. Any damages or defects detected at the time of purchase must be reported immediately after unpacking. Any incidental repairs after the warranty period are subject to a fee.
- Extent of warranty
This device has been manufactured according to strict quality guidelines and carefully inspected before delivery.
The warranty applies to material and manufacturing defects only. This warranty does not extend to product parts, which are subject to normal wear and tear and can thus be regarded as consumable parts, or for damages to fragile parts, e.g. switches or parts made from glass.
This warranty is voided if the product becomes damaged or is improperly used or maintained. For proper use of the product, all of the instructions given in the operating instructions must be followed precisely. If the operating instructions advise you or warn you against certain uses or actions, these must be avoided in all circumstances.
The product is for consumer use only and is not intended for commercial or trade use. The warranty becomes void in the event of misuse and improper use, use of force, and any work on the device that has not been carried out by our authorised service branch.
- Processing of warranty claims
To ensure prompt processing of your claim, please follow the instructions given below.
- Please retain proof of purchase and the article number (e.g. IAN) for all inquiries.
The product number can be found on the type plate on the product, an engraving on the product, the cover page of your instructions (bottom left), or the sticker on the back or underside of the product.
In the event of malfunctions or other defects, please first contact our service department below by phone or email.
If your product is found to be defective, you can then send your product with proof of purchase (till receipt) and a statement describing what the fault involves and when it occurred free of charge to the service address given.
- You can view and download this handbook and many more at parkside-diy.com. With this QR code you can go straight to parkside-diy.com. You can access the user instructions for your product by entering the product number (IAN) 471954_2407.

Service
How to contact us:
GB, IE, NI, CY, MT
Website: www.cmc-creative.de
E-mail: service.gb@cmc-creative.de
Phone: 0-808-189-0652
Registered office: Germany
IAN 471954_2407
Please note that the following address is not a service address. Please contact the service point given above first.
Address:
C. M. C. GmbH Holding
Katharina-Loth-Str. 15
66386 St. Ingbert
Germany
To order spare parts:
natural_image
Simple 3D illustration of a rectangular block with a shaded side (no text or symbols)natural_image
Simple 3D geometric shape resembling a rectangular prism with a shaded triangular section on top face (no text or symbols)natural_image
Simple 3D illustration of a rectangular block with a shaded side (no text or symbols)service.at@cmc-creative.de
service.ch@cmc-creative.de
Telefon: +49 (0) 6894/ 9989750
natural_image
Simple 3D illustration of a rectangular block with a shaded side (no text or symbols)natural_image
3D geometric shape resembling a truncated pyramid or prism, rendered in grayscale with no text or symbols.natural_image
Simple 3D illustration of a rectangular block with a shaded side (no text or symbols)natural_image
Simple 3D illustration of a rectangular block with a shaded top section (no text or symbols)natural_image
Simple 3D geometric shape resembling a rectangular prism with shaded faces (no text or symbols)natural_image
Simple 3D illustration of a rectangular block with a shaded side (no text or symbols)natural_image
Simple 3D illustration of a rectangular block with a shaded top section (no text or symbols)natural_image
Simple 3D geometric shape resembling a rectangular prism with a triangular section on top face (no text or symbols)natural_image
Simple 3D illustration of a rectangular block with a shaded side (no text or symbols)⚠️ RYZYKO PORAŻENIA PRĄDEM!
natural_image
Simple 3D illustration of a rectangular block with a shaded top section (no text or symbols)natural_image
3D geometric shape resembling a rectangular prism with a triangular cutout on top face (no text or symbols)natural_image
Simple 3D illustration of a rectangular block with a shaded side (no text or symbols)natural_image
Simple 3D illustration of a rectangular block with a shaded side (no text or symbols)natural_image
3D geometric shape resembling a rectangular prism with a shaded triangular section on top face (no text or symbols)natural_image
Simple 3D illustration of a rectangular block with a shaded side (no text or symbols)natural_image
Isometric line drawing of a rectangular block with a slot, no text or symbols presentnatural_image
Simple 3D illustration of a rectangular block with a shaded side (no text or symbols)natural_image
3D geometric shape resembling a wedge or prism, shaded with no text or symbolsnatural_image
Simple 3D illustration of a rectangular block with a shaded side (no text or symbols)natural_image
Simple 3D illustration of a rectangular block with a shaded side (no text or symbols)natural_image
Simple 3D geometric shape resembling a rectangular prism with a triangular section on top face (no text or symbols)natural_image
Simple 3D illustration of a rectangular block with a shaded side (no text or symbols)natural_image
Simple 3D illustration of a rectangular block with a shaded side (no text or symbols)natural_image
3D geometric shape resembling a rectangular prism with a triangular cutout on top face (no text or symbols)natural_image
Simple 3D illustration of a rectangular block with a shaded side (no text or symbols)Nome: Riku Service snc
Indirizzo Internet: www.riku-service.com
E-Mail: assistenzalidl@riku-service.com
Telefono: 0039 (0) 4711430103
Sede: Germania
IAN 471954_2407