SURQ 4 A2 - Smart Home SILVERCREST - Free user manual and instructions
Find the device manual for free SURQ 4 A2 SILVERCREST in PDF.

| Product type | DAB+/FM clock radio with Bluetooth, wireless charging and USB port |
| Brand | SilverCrest |
| Model | SURQ 4 A2 |
| Dimensions (W x H x D) | Approx. 14.9 x 8.2 x 14.9 cm |
| Weight | Approx. 660 g |
| Power supply | Mains adapter 100-240 V ~ 50/60 Hz, output 9 V ⎓ 2.5 A |
| Power consumption | Operation max. 22.5 W, standby < 1 W |
| Radio bands | DAB (174.928 – 239.20 MHz), FM (87.5 – 108 MHz) |
| Bluetooth | Version 5.0, profiles A2DP/AVRCP, range up to 10 m |
| Auxiliary input | 3.5 mm jack socket (AUX IN) |
| Wireless charging | Qi, max. power 5 W |
| USB charging port | USB type A, 5 V ⎓ 1 A |
| Headphone output | 3.5 mm jack socket, max. voltage 150 mV |
| Speakers | 2 × 4 W |
| Alarm functions | 2 independent alarms, choice of radio or buzzer, snooze 9 min, programming daily/weekly/weekend/once |
| Additional functions | Sleep timer (up to 120 min), nap timer (5-120 min), preset equalizer (Pop, Rock, Jazz, Classic), screen brightness adjustment 3 levels |
| Cleaning and maintenance | Use a soft, dry cloth. Do not use abrasive products or liquids. Disconnect before cleaning. |
| Safety | Protection class II, indoor use only, do not expose to moisture, do not open the housing |
| Spare parts / repairability | No spare parts supplied. Contact customer service for repairs. 3-year warranty. |
| General information | Manual available in multiple languages at www.lidl-service.com (IAN 379304_2110) |
Frequently Asked Questions - SURQ 4 A2 SILVERCREST
User questions about SURQ 4 A2 SILVERCREST
0 question about this device. Answer the ones you know or ask your own.
Ask a new question about this device
Download the instructions for your Smart Home in PDF format for free! Find your manual SURQ 4 A2 - SILVERCREST and take your electronic device back in hand. On this page are published all the documents necessary for the use of your device. SURQ 4 A2 by SILVERCREST.
USER MANUAL SURQ 4 A2 SILVERCREST
natural_image
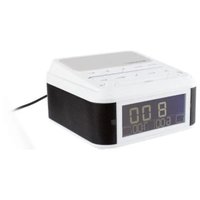
Two digital home alarm clocks, one white and one black, both displaying 7:24 time with no visible text or symbols on the devices themselves.
BLUETOOTH® ALARM CLOCK RADIO / BLUETOOTH®-RADIOWECKER SURQ 4 A2
GBIE
BLUETOOTH® ALARM CLOCK RADIO
Operating instructions
FRBE
RADIO-RÉVEIL BLUETOOTH®
Mode d'emploi
CZ
RÁDIOVÝ BUDÍK S BLUETOOTH®
Návod k obsluze
SK
RÁDIOVÝ BUDÍK BLUETOOTH®
Návod na obsluhu
DK
RADIOVÄKKEUR MED BLUETOOTH®
GB/IE Operating Instruction Page
5
| DE/AT/CH | Bedienungsanleitung | Seite | 37 |
| FR/BE | Mode d'emploi | Page | 71 |
| NL/BE | Gebruiksaanwijzing | Pagina | 105 |
| CZ | Návod k obsluze | Strona | 137 |
| PL | Instrukcja obstugi | Strana | 167 |
| SK | Návod na obsluhu | Strana | 199 |
| ES | Instrucciones de uso | Página | 229 |
| DK | Betjeningsvejledning | Side | 261 |
| IT | Istruzioni per l'uso | Pagina | 291 |
| HU | Kezelési útmutató | Oldal | 325 |
| SI | Navodila za uporabo | Stran | 357 |
A
B
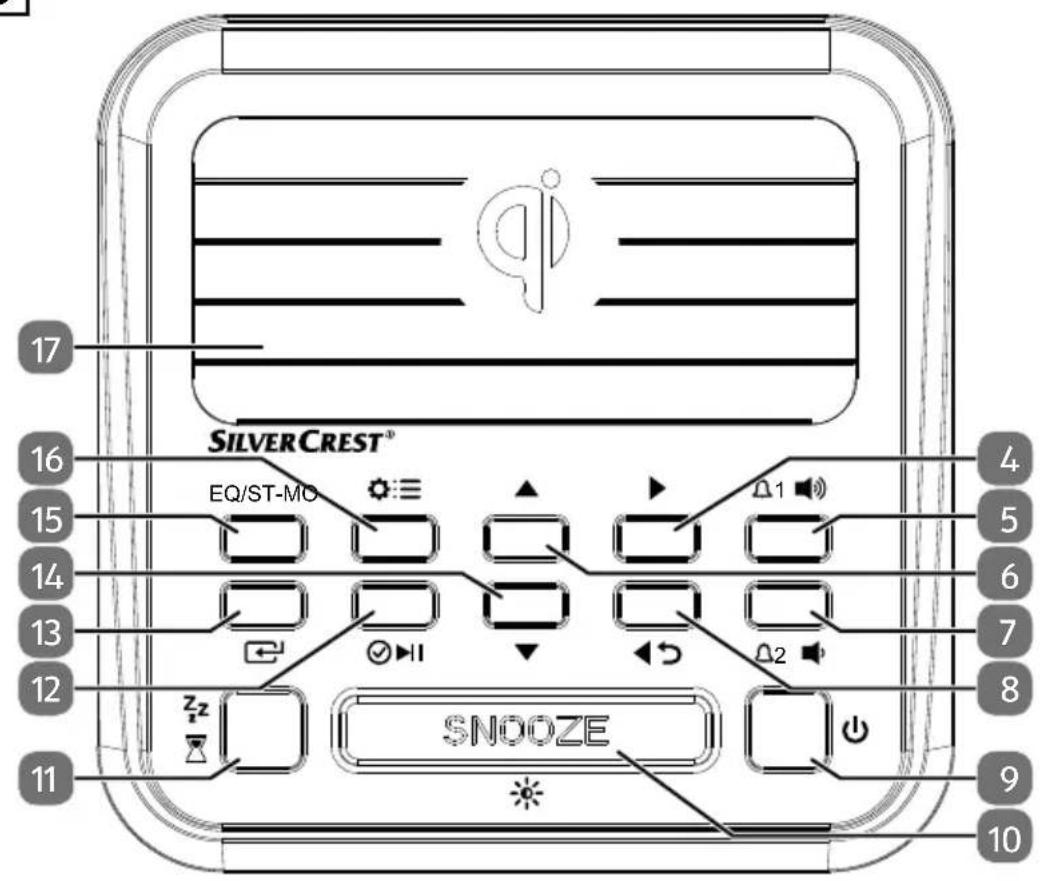
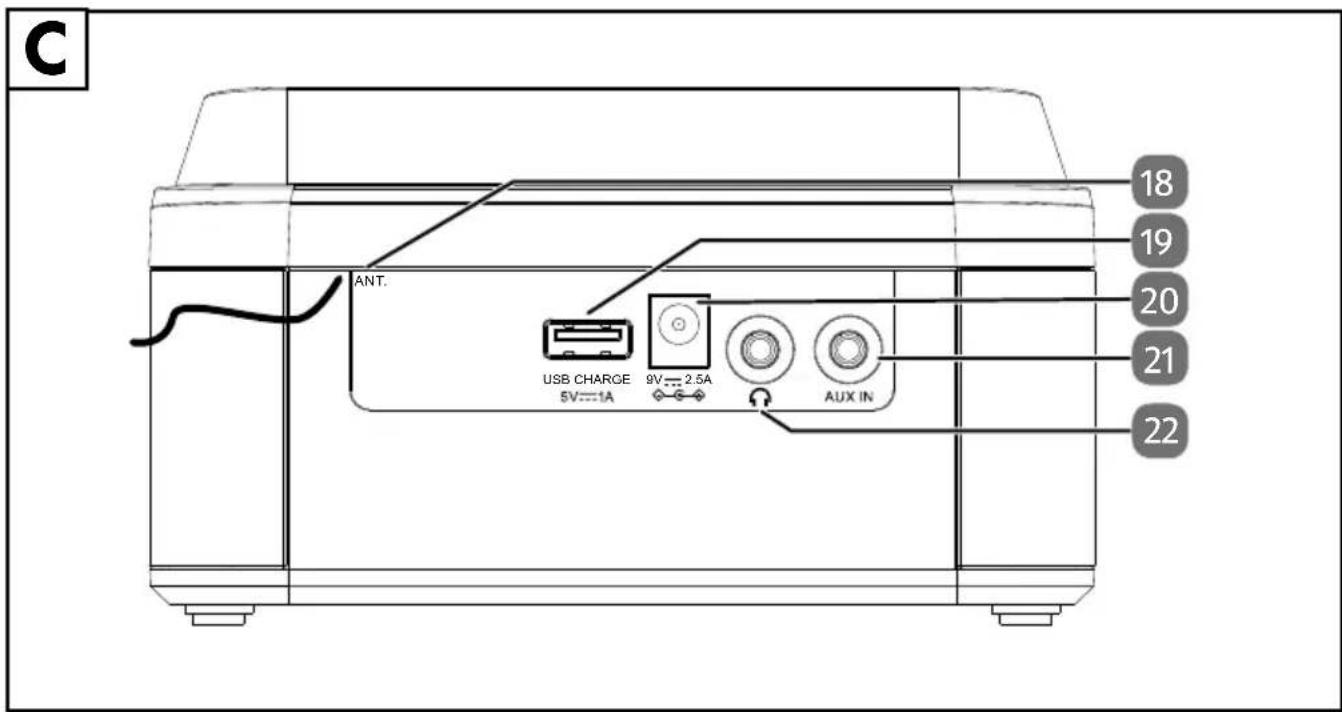
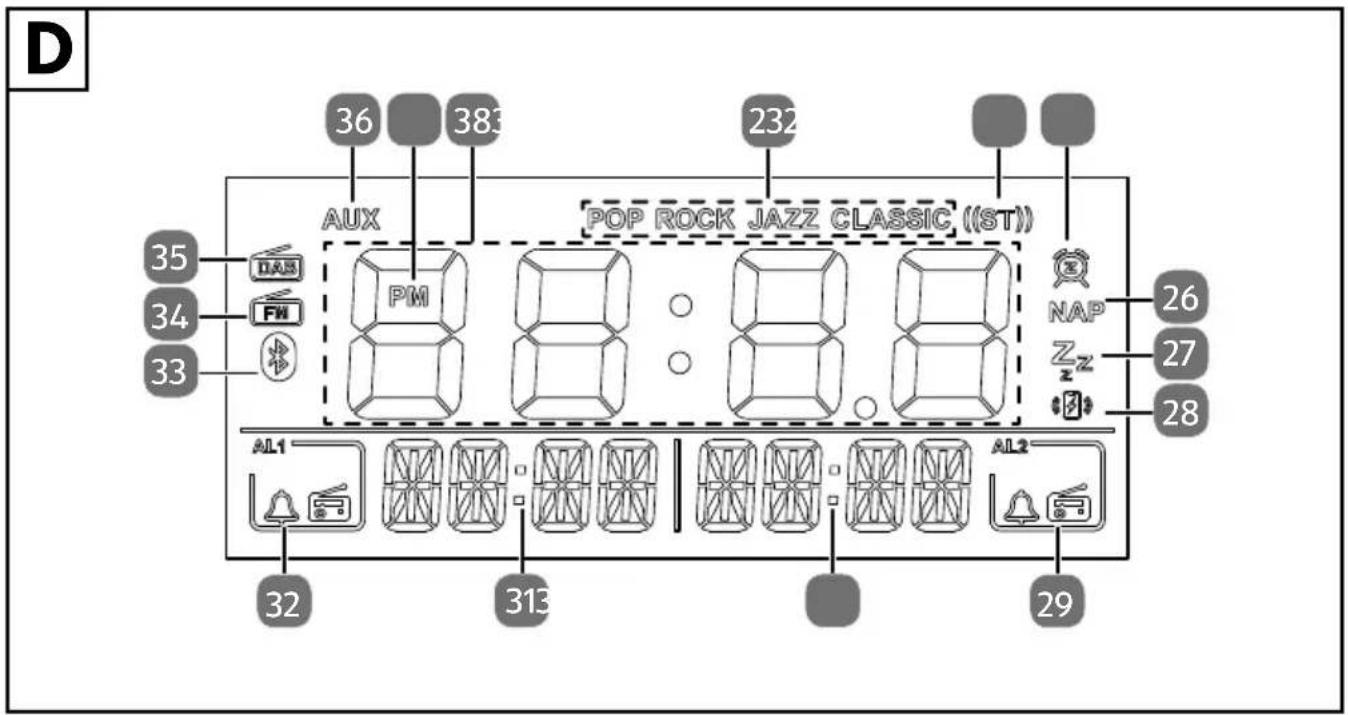
Table of contents
1. Information about this user manual ....7
1.1. Explanation of symbols .....7
2. Proper use ....1
3. Safety instructions .... 11
3.1. Unauthorised persons
3.2. Operating safety 11
3.3. Repairs....15
3.4. Damage to hearing....15
4. Declaration of conformity 15
5. Package contents 16
6. Device overview....16
7. Getting started....17
7.1. Unpacking and setting up.... 17
7.2. Connecting the mains adapter....18
7.3. Adjusting the aerial 18
7.4. Switching the device on/off....18
7.5. Setting the volume 18
7.6. Sound presets 18
7.7. Dimmer function....19
7.8. Setting the time/automatic dimming....19
8. Radio mode 2
8.1. DAB mode....20
8.2. FM mode.... 21
9. Sleep timer 2
10. NAP timer 23
11. Alarm times....23
11.1. Setting the alarm time....23
11.2. Stopping the alarm tone/activating the snooze function .....23
12. Settings menu ...... 24
12.1. Overview of the menus 24
13. Bluetooth® mode ......25
13.1. Pairing Bluetooth® devices 25
13.2. Connecting an external device to the AUX IN connection .....26
14. Charging external devices....26
14.1. Wireless charging for smartphones 26
14.2. Charging a device via the USB port 26
15. Connecting headphones ......27
16. Resetting the device....27
17. Cleaning the device 27
SILVER CREST®
- Possible faults 28
- Storing the device when not in use ....28
- Disposal 29
- Technical specifications ....30
- Privacy statement 32
22.1. Trademark information 32
- MLAP GmbH Warranty ....32
23.1. Conditions of warranty 33
23.2. Warranty period and legal claims for defects ....33
23.3. Scope of warranty 33
23.4. Processing of warranty claims 34
- Service 34
24.1. Supplier/Producer/Importer 35
1. Information about this user manual

Thank you for choosing our product. We hope you enjoy using this device. Please read the safety instructions and the user manual carefully before using the device for the first time. Note the warnings on the device and in the user manual.
Always keep the user manual close to hand. If you sell the device or give it away, please ensure that you also pass on this user manual. It is an essential component of the product.
1.1. Explanation of symbols
If a block of text is marked with one of the warning symbols listed below, the hazard described in that text must be avoided to prevent the potential consequences described there from occurring.

DANGER!
Warning: risk of fatal injury!
■ Follow the instructions to avoid situations that will lead to fatal or serious injuries.

WARNING!
Warning: risk of possible fatal injury and/or serious irreversible injuries!
■ Follow the instructions to avoid situations that may lead to fatal or serious injuries.

WARNING!
Warning: risk of electric shock!
■ Follow the instructions to avoid situations that may lead to fatal or serious injuries.

CAUTION!
Warning: risk of minor and/or moderate injuries!
■ Follow the instructions to avoid situations that may lead to moderate or minor injuries.

NOTICE!
Follow the instructions to avoid property damage.
■ Follow the instructions to avoid situations that may damage the device.

Notes regarding assembly or operation
SILVERCREST®

Packaging material label regarding waste separation. Label includes abbreviations (a) and numbers (b) with the following meaning: 1–7: plastics/20–22: paper and cardboard/80–98: composite materials.

Dispose of the device in compliance with environmental regulations (see chapter entitled "Disposal").

Follow the instructions in the user manual!

Protection class II
Electrical devices in protection class II are devices that have double and/or reinforced insulation throughout, and do not have an option for connecting a protective earth. The housing of an electrical device in protection class II, with surrounding insulating material, might either form all of the additional or reinforced insulation, or part of it.

Indoor use
Devices with this symbol are intended solely for indoor use.

Polarity markings
Symbol denoting the polarity of the DC connector (according to IEC 60417).
On devices carrying this marking, positive is on the inside and negative on the outside.

Energy efficiency level VI
Energy efficiency levels are used to describe the efficiency levels of internal and external power supply units. Energy efficiency is sub-divided into a number of categories, where Level VI is the most efficient.
Switched-mode electrical power supply
A switched-mode power supply converts an unstable input voltage to a constant output voltage.

Transformer - short circuit-proof
A transformer in which the temperature does not exceed specified limits if the transformer is overloaded or short-circuited and which continues to meet all the requirements specified in the standard once the overload or short circuit has been rectified.

This symbol means that the mains power adapter must no longer be used if the plug or plug contacts are damaged.
Symbol for direct current (DC)
Symbol for alternating current (AC)
ta=40°C Denotes the maximum ambient temperature at which the mains adapter may be operated.
IP20 Protection against solid foreign objects with a diameter ≥ 12.5 mm.
Safety instruction
Instruction
- List
For EU mains adapters only:

Tested safety
Products that feature this symbol meet the requirements of the German Product Safety Act.
SILVERCREST®
2. Proper use
The clock radio is an entertainment electronics device and is intended for:
• receiving and playing analogue and digital radio programmes
- waking you up with an alarm tone or radio playback
- playing sound media via Bluetooth® and AUX
- displaying the time
- charging mobile devices.
The device is only intended for private use and not for industrial/commercial use.
Comply with all the information in this user manual, especially the safety instructions. Any other use is considered improper and can cause personal injury or property damage.
The specified reception frequency range represents the technical possibilities of the device. Information received outside this range may not be used or further distributed. The respective national laws must be observed.
3. Safety instructions
3.1. Unauthorised persons
This device may be used by children over the age of 8 and by persons with limited physical, sensory or mental abilities or by those without experience and knowledge, if they are supervised or have been instructed in the safe use of the device and understand the dangers that result from it. Children must not be allowed to play with the device. Cleaning and user maintenance must not be carried out by children unless they are supervised.
- Keep the device and its accessories out of the reach of children.

DANGER!
Risk of choking and suffocation!
The packaging material is not a toy! Packaging film can be swallowed or used improperly, creating a risk of choking and suffocation.
- Keep packaging material such as plastic film or plastic bags away from children.
3.2. Operating safety
Do not use the device or the mains cable if the device/mains adapter or cables are visibly damaged or if the device/mains adapter has been dropped. If the mains adapter, mains cable or device is damaged, immediately unplug the mains adapter from the socket.
If the device has been moved from a cold to a warm space, condensation may form inside the device. Wait a few hours before using the device. The device can be operated safely as soon as it has reached room temperature.
SILVERCREST®
■ Do not modify the device without our consent and do not use any auxiliary equipment that we have not approved or supplied.
■ Only use replacement parts or accessories that we have supplied or approved.
3.2.1. Power supply

WARNING Risk of electric shock!
The device contains live parts. They pose a risk of electric shock or fire if an unintentional short circuit occurs.
■ Never open the housing of the device/mains adapter and do not push objects inside the product through the slots and openings.
■ Only operate the device and the enclosed mains adapter with each other.
■ Only connect the mains adapter to a properly installed, earthed mains socket that is easy to reach and close to the place where you have set up the device. The mains voltage must match the technical specifications for the mains adapter.
■ Always keep the socket free of obstructions so that the mains adapter can be disconnected easily.
■ Always unplug the mains adapter from the power socket before cleaning.
■ When disconnecting the mains adapter from the power socket, always pull on the plug and not the cable.
If the mains cable, mains adapter or the device itself are damaged, or if liquids or foreign bodies get into the device, unplug the mains adapter from the power socket immediately.
SILVERCREST®
In an emergency, for example, if you see smoke coming out of the device or if it makes unusual noises, immediately unplug the mains adapter from the mains socket.
■ The device uses a small amount of electricity, even when it is in standby mode. To completely switch off the device, unplug the mains adapter from the mains.
3.2.2. Installation location/surroundings
■ Only use the device indoors in dry rooms.
■ To prevent the device from falling, only install and operate it and its components on a sturdy, level and vibration-free surface.
■ During the set-up process, maintain a minimum distance of 5 cm around the device for sufficient ventilation.
■ Ventilation must not be impeded by covering the device with objects such as mag azines, table cloths, curtains etc.
■ Do not place the device near direct heat sources (e.g. heaters) that could affect it.
■ Do not place naked flames (e.g. lit candles) on or near the device.
■ Do not place containers filled with liquid, e.g. vases, on or near the product, and protect all the parts from drips or splashes. Such containers may tip over and the liquid may impair the electrical safety of the device.
■ Do not touch the mains adapter with wet hands.
■ Do not place any objects on the cables as otherwise they may be damaged.
■ Always position the device cable so that no-one can tread on it or trip over it.
■ Only use the device in living rooms or similar.
■ Do not use the device outdoors.
SILVER CREST®
■ Do not expose the device or mains adapter to extreme conditions. Avoid:
■ high humidity or wet conditions
■ extremely high or low temperatures
■ direct sunlight
■ naked flames.
In the first few hours of use, new products may give off a typical, unavoidable but totally harmless smell which will wear off with time. We recommend you ventilate the room regularly to help dissipate this odour. We have taken appropriate measures during the development of this product to ensure that levels are well below legal limits.
■ The device is equipped with non-slip plastic feet. Since furniture is coated with a variety of varnishes and plastics which are cleaned with different cleaning agents, it cannot be completely excluded that some of these cleaning agents contain ingredients which might damage the plastic feet, and cause them to become soft. If necessary, place a non-slip mat under the device.
3.2.3. Electromagnetic compatibility
■ To avoid malfunctions, keep the device at a distance of at least one metre from high-frequency or magnetic interference sources (televisions, other loudspeakers, mobile and cordless telephones etc.).
3.3. Repairs
Please contact our Service Centre if you have technical problems with your device.

WARNING
Risk of electric shock!
There is a risk of electric shock from live parts.
■ Never open the housing of the device or mains adapter. Never attempt to repair the device/mains adapter yourself.
- If the mains adapter housing or the mains cable is damaged, it must be replaced by the manufacturer (or relevant customer service) or other suitably qualified person. This is to avoid hazards.
3.4. Damage to hearing
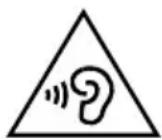
Damage to hearing!
Excessive sound pressure when using earphones and headphones can result in damage to and/or loss of hearing.
■ Before pressing play, set the volume to the lowest setting by pressing repeatedly.
4. Declaration of conformity

MLAP GmbH hereby declares that the radio equipment type clock radio IAN 379304_2110 complies with the directive 2014/53/EU (RE directive), as well as the directive 2009/125/EC (ecodesign directive) and the directive 2011/65/EU (RoHS directive).
The complete EU declaration of conformity is available at: www.mlap.info/conformity.
SILVER CREST®
5. Package contents

DANGER!
Risk of choking and suffocation!
The packaging material is not a toy! Risk of choking and suffocation through swallowing plastic wrap.
- Keep the plastic packaging out of the reach of children.
Please check your purchase to ensure that all items are included. If anything is missing, please contact us within 14 days of purchase.
Remove the product from the packaging and remove all packaging materials.
The following items are supplied with your product:
- Clock radio
- Mains adapter
- Instruction manual
6. Device overview
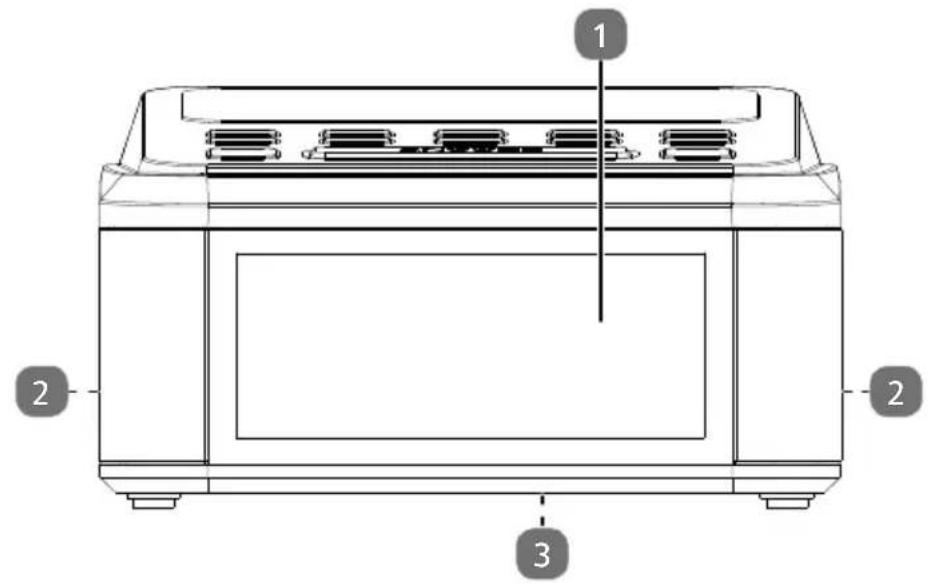
Description of the front panel, see Fig. A
1) Display
2) Speaker (on both sides)
3) Type plate (on the underside)
Description of the buttons, see Fig. B
4) ▶ – DAB: next station; FM: next frequency, press and hold: next station; Bluetooth: next track
5) - Set alarm 1; - Increase volume
6) ▲ - Ascending selection
7) - Set alarm 2; - Decrease volume
8) - DAB: previous station; FM: previous frequency, press and hold: previous station; Bluetooth: previous track; in menu: return to previous menu
9) ⏻ - Switch device on/off; deactivate alarm for 24 hours
10) SNOOZE – Snooze function, ✱ – Dim display
11) - Set NAP timer; Set sleep timer
12) ▶ II – Bluetooth: start/stop playback; √ – in menu: confirm selection
13) - Switch between DAB/FM/Bluetooth/AUX mode
14) ▼ – Descending selection
15) EQ/ST-MO - Equaliser; FM: switch between stereo and mono
16) ☐:≡ – Open settings menu; display station information; store station/call up stored station; set time
17) Charging pad for wireless charging of a smartphone
Description of the back of the device, see Fig. C
16 - English
18) ANT. - Wire antenna
19) USB CHARGE 5V- - - 1A - USB charging port e.g. for smartphones
20) 9V 2.5A - Connection for mains adapter
21) AUX IN - Connection for external playback device
22) - Headset connection
Description of the display, see Fig. D
23) POP, ROCK, JAZZ, CLASSIC – sound presets
24) FM: stereo reception
25) Snooze function active
26) NAP timer active
27) Sleep timer active
28) Wireless charging active
29) Alarm time 2 active (alarm or radio signal)
30) Display alarm time 2
31) Display alarm time 1
32) Alarm time 1 active (alarm or radio signal)
33) Bluetooth mode activate
34) FM operating mode active
35) DAB operating mode active
36) AUX operating mode active
37) PM display for time in 12-hour mode
38) Time display
7. Getting started
7.1. Unpacking and setting up
Remove the product from the packaging and remove all packaging materials.

DANGER!
Risk of choking and suffocation!
Risk of choking and suffocation through swallowing or inhaling plastic wrap.
- Keep the plastic packaging out of the reach of children.
Place the device on a sturdy, level surface. Take care to ensure the following:
• the device is not exposed to intense sources of heat
• the device is not exposed to direct sunlight
- the device does not come into contact with liquids, not even water droplets or spray.
SILVER CREST®
7.2. Connecting the mains adapter
The device is powered by the mains adapter.

Only operate the clock radio using the mains adapter supplied. The mains adapter has a type plate detailing the technical specifications of the mains adapter.
Connect the plug of the mains adapter cable to the 9V---2.5A connection of the device.
Plug the mains adapter into an easily accessible mains socket.

If you do not need to use the device for a relatively long time, take it out of operation by unplugging the mains adapter from the mains power socket!
7.3. Adjusting the aerial
A wire aerial has already been connected to the device for radio reception. Fully unwind the aerial and arrange it for optimum reception.
7.4. Switching the device on/off
▶ Press the ⏻ button to switch on the device. The last station (FM or DAB) set is then played.
▶ Press the button to switch the device into standby mode.

When the device is switched on for the first time, it automatically searches for all DAB stations that can be received and stores them. SYNC... is shown on the display. The date and time are also set as part of this process. This process may take a few minutes.
Stored radio stations and the date and time are retained even after the device is disconnected from the mains.
7.5. Setting the volume
▶ Press the button to increase the volume.
▶ Press the button to decrease the volume.
7.6. Sound presets
▶ You can optimise the sound using the sound presets. The following sound presets are available for this: POP, ROCK, JAZZ, CLASSIC.
▶ Press the EQ button repeatedly to select the required sound preset. The currently selected sound preset is shown on the display.
To switch off the sound presets, press EQ repeatedly until no sound preset is shown on the display.
7.7. Dimmer function
You can adjust the display brightness in three levels as follows:
Press the ✿ button repeatedly until you reach the desired brightness.
▶ Press and hold the ✝ button for approximately 2 seconds. The display turns off and does not appear until you operate the device again. If the device is not operated for about 10 seconds, the display turns off again.
▶ Press the button briefly to deactivate this function.
7.8. Setting the time/automatic dimming
When the device is switched on for the first time, the date and time are set using the radio signal. The time can also be set manually. The automatic dimming of the display is also set during this process:
In standby mode, press and hold the ⚙:≡ button until 24 H flashes on the display.
▶ Press the ▲ or ▼ buttons to select 12- or 24-hour format and press ⏰ to confirm.
▶ Press the ▲ or ▼ buttons to set the required hour and press ⏰ to confirm.
▶ Press the ▲ or ▼ buttons to set the required minutes and press ⏰ to confirm.
▶ Press the ▲ or ▼ buttons to set the desired day of the week (D-1 = Monday, D-2 = Tuesday etc.)
▶ Press to confirm.
AUTO DIM appears on the display. You can dim the display automatically for a specific period of time.
▶ Press the ▲ or ▼ buttons to select ON or OFF.
▶ Press to confirm.
▶ DIMSTART appears. Press the ▲ or ▼ buttons to set the desired hour for the dimmer start time and press Ⓤ to confirm.
▶ Press the ▲ or ▼ buttons to set the desired minutes for the start time and press ⏰ to confirm.
DIM ENDS appears. Press the ▲ or ▼ buttons to set the desired hour for the dimmer end time and press ⏻ to confirm.
▶ Press the ▲ or ▼ buttons to set the desired minutes for the end time and press ⏰ to confirm.
If you do not press any button within 7 seconds, the device switches back to standby mode.

In the menu, you can select whether the time and week day are to continue to be set automatically using the radio signal. For more information, see "12. Settings menu" on page 24, menu item SYSTEM/AUTO TIME SYNC
SILVERCREST®
8. Radio mode
You can use this device to receive FM and DAB stations.
Your device has the Dynamic Label Segment (DLS) information service, which displays information such as artist, song titles or current traffic news on the display.

Configure the basic settings as described in section "12. Settings menu" on page 24.
8.1. DAB mode
When the device is switched on, press the ☐ button several times until DAB is shown on the display.
8.1.1. Calling up DAB stations
▶ Set the desired DAB station by pressing the ◀ or ▶ buttons once or several times. The selected station is played a few moments later. Stations in the station list that cannot currently be received are marked with OFF AIR.
8.1.2. Storing stations automatically
A station list including all DAB stations that can be received was already created the first time the device was switched on. The stations are stored in alphabetical order.
You can, however, also manually perform a new search:
Press and hold the ⏻ button. The search is performed and all stations found are stored again. The search progress and the number of stored stations are displayed.

The previously stored station slots are overwritten.
8.1.3. Searching for DAB stations manually
Press and hold the Ⓧ:≡ button to open the menu. FULL SCAN appears.
▶ Use the ▲ or ▼ buttons to select MANUAL.
▶ Press the button to confirm.
The first reception block 5A with the corresponding frequency is shown on the display.
▶ Use the ▲ or ▼ buttons to select the required reception block. Familiarise yourself with the blocks that can be received in your transmission area.
Press the ⏻ button to open the channel. If the frequency is occupied with stations, >> | >>>> appears on the display. If the frequency is not occupied by stations, -- | - - - - appears on the display.
▶ Press the button again to store the station.

When a manual search is performed, the previously stored station slots are not overwritten. The newly found stations are simply added.
8.1.4. Storing DAB stations
You can store 30 preset DAB stations.
▶ Set the required DAB station as described above.
▶ Press and hold the ⏻:≡ button to open the menu. FULL SCAN appears.
▶ Use the ▲ or ▼ buttons to select PRESET STORE.
▶ Press the button to confirm.
▶ E01 EMPTY (or a memory slot occupied by a station) is shown on the display.
▶ Use the ▲ or ▼ buttons to select a memory slot.
Then press the √ button to store the station. STORED will appear on the display.
8.1.5. Calling up DAB stations
▶ Press the ▲ or ▼ button repeatedly to display the desired memory slot.
8.1.6. Display information/select views
▶ Press the ⚙:≡ button repeatedly to view the following information on the display:
- Station name • Signal fault
- Radio text - Bit rate
• Signal strength • DAB variants
- Programme section - Time
- Multiplex - Date
- Block/frequency
8.2. FM mode
When the device is switched on, press the ☑ button several times until FM is shown on the display.
8.2.1. Storing FM stations automatically
▶ Press and hold the ⏻ button. The search is performed and all stations found are stored. The search progress and the number of stored stations are displayed.

The previously stored station slots are overwritten.
8.2.2. Searching for FM stations manually
▶ Press and hold one of the ◀ or ▶ buttons to start an automatic station search backwards/forwards. The station search stops when the next strongest station signal is reached.
▶ Briefly press the ◀ or ▶ button to switch to the previous/next frequency in 0.05 MHz increments.
SILVERCREST®
8.2.3. Storing FM stations
You can store 30 preset FM stations.
Set the required FM station as described in section "8.2.2. Searching for FM stations manually".
▶ Press and hold the ⚙:≡ button to open the menu. PRESET STORE appears as the first menu item.
▶ Press the button to confirm.
▶ 01 EMPTY (or a memory slot occupied by a station) is shown on the display.
▶ Use the ▲ or ▼ buttons to select a memory slot.
▶ Then press the ⏻ button to store the station. STORED will appear on the display.
8.2.4. Calling up FM stations
▶ Press the ▲ or ▼ button repeatedly to display the desired memory slot.
8.2.5. Selecting stereo/mono sound
In FM mode, you can play radio stations in stereo or mono sound.
▶ Press and hold the ST.-MO. button until STEREO or MONO is shown on the display. If the sound is played in stereo, ((ST)) is also shown on the display.
8.2.6. Display information/select views
Press the ⚙:≡ button repeatedly to view the following information on the display:
- Station name
- Radio text
• Programme section
9. Sleep timer
It is possible to programme a sleep timer on the device. After the set time, the device automatically switches to standby mode.
During operation, press the 72z button repeatedly to select the desired duration (5, 10, 15, 30, 60, 90, 120 minutes).
While the set timer elapses, the display will show z_z
To switch off the sleep timer before the time has elapsed, press the 72z button several times until SLP OFF appears on the display.
10. NAP timer
Set a short-time timer to activate an alarm signal after a set duration.
In standby mode, press the ☒ button several times until the required duration (5–120 minutes) has been set in 5-minute increments.
▶ You can also fine-tune the duration in 1-minute increments using the ▲ or ▼ buttons.
NAP is shown on the display and an alarm signal sounds once the set time has elapsed.
When the alarm sounds, press the button to stop the alarm.
To cancel the short-time timer before the alarm sounds, press the ☒ button repeatedly or press and hold the button until OFF is shown on the display and NAP disappears.
11. Alarm times
It is possible to set two alarms at different times. The alarm will either trigger an alarm tone or switch on the radio. In addition, you can implement the alarm daily or only on certain days.
11.1. Setting the alarm time
If you wish to be woken by the radio, first select a radio station in DAB or FM mode. The last radio station set is used for the alarm.
If the device isn't already in standby mode, press ⏻ to switch to standby mode.
▶ Press and hold the △1/△2 button until the hour of the selected alarm time flashes.
▶ Use the ▲ or ▼ buttons to select the hours of the alarm time and press the respective alarm time button △1 or △2 confirm.
▶ Use the ▲ or ▼ buttons to select the minutes of the alarm time and press the respective alarm time button △1 or △2 confirm.
▶ Use the ▲ or ▼ buttons to set how regularly the alarm should be started: daily (1-7), weekdays (1-5), weekends (6-7), once (1T) and press the respective alarm time button on to confirm.
▶ Use the ▲ or ▼ buttons to select what you want to wake up to: alarm (BB), DAB radio (DAB), FM radio (FM) and press the respective alarm time button △1or △2to confirm.
▶ Use the ▲ or ▼ buttons to select the volume of the alarm and press the respective alarm time button △1 or △2 confirm.
When the alarm is switched on, the respective symbol with the selected alarm tone is shown on the display (AL 1) and/or (AL 2).
11.2. Stopping the alarm tone/activating the snooze function
When the alarm tone sounds you can deactivate it by pressing ⏻ until the next alarm time or activate the snooze function by pressing SNOOZE. When the alarm is snoozed, the symbol flashes on the display. The alarm will then sound again after approx. 9 minutes.
SILVER CREST®
11.2.1. Activating/deactivating the alarm
▶ Press the 1 or 2 button repeatedly to select the desired alarm tone.
▶ Press the △1 or △2 button repeatedly to switch off the alarm. OFF will appear on the display.
12. Settings menu
Proceed as follows to navigate in the menu and make settings:
If the device is switched on, press and hold the ⏻:≡ button to access the menu. The menu entries differ depending on the operating mode set. Please refer to the table in section "12.1. Overview of the menus" on page 24 for further information.
▶ Use the ▲ or ▼ buttons to select a specific menu or specific entry.
▶ Press the button to open a specific menu or to confirm a setting.
▶ Press to return to the previous menu.
▶ Press and hold ⚙:≡ to exit the menu directly.
12.1. Overview of the menus
| FULL SCAN (DAB only) | Perform full station search | |
| PRESET STORE | Select the memory slot for a radio station | |
| SCAN SET (FM only) | Select whether the search is to include all stations or only stations with a strong signal. | |
| ALL | Search for all stations | |
| STRONG | Search for only strong stations | |
| AUDIO SET (FM only) | STEREO | Radio reception with stereo sound |
| MONO | Radio reception with mono sound | |
| MANUAL (DAB only) | Manual selection of radio frequency | |
| DRC (DAB only) | Dynamic Range Control (DRC): Select the compression | |
| OFF | Off | |
| LOW | Low | |
| HIGH | High | |
| PRUNE (DAB only) | Delete all DAB stations that cannot be received in the current region. | |
| YES | Yes, delete the station | |
| NO | Do not delete the station | |
| SYSTEM AUTOTIMESYNC | Choose whether or not the date and time are set automatically.UPDATE FROM ANY: set the time via DAB/FMUPDATE FROM DAB: set the time via DABUPDATE FROM FM: set the time via FMNO UPDATE: no automatic time setting | |
| RESET Reset to factory settingsYES: reset the deviceNO: do not reset the device | ||
| SW VER Display of software version | ||
13. Bluetooth® mode
You can use Bluetooth® to play tracks wirelessly from external devices (such as MP3 players or mobile phones with Bluetooth®) on this device.
Press the button repeatedly until is shown on the display.
13.1. Pairing Bluetooth® devices
▶ Enable the Bluetooth function on your external device and pair the devices. Refer to the user manual for your audio playback device for more information. The name of the DAB/FM clock radio is "SURQ 4 A2".
If you are prompted to enter a password on the external device, enter "0000" as the password.
During the pairing process, PAIRING flashes on the display.
▶ Pairing is complete once CONNECT appears on the display and an ascending acoustic signal sounds. The external device can now be used with the DAB/FM clock radio.
If you would like to end Bluetooth ^® transmission, switch off Bluetooth ^® on the external device, use to change the source on the DAB/FM clock radio or press and hold the button until pairing mode restarts. Upon disconnection, a descending acoustic signal sounds.
You can control how tracks are played, the volume and a range of special functions on your external device and on the DAB/FM clock radio. What functions are available is dependent on your external device and the software that you use.
Press the 📋 button to increase the volume, press the 🔊 button to decrease the volume.
▶ Press the button to start or stop playback.
▶ Press the ◀ button to skip back to the start of the track; press the button again within 3 seconds to return to the previous track.
▶ Use the ▶ button to switch to the next track.
SILVER CREST®
13.2. Connecting an external device to the AUX IN connection
You can use the AUX IN jack to connect an external playback device (for example a CD player or MP3 player).
▶ Switch the DAB/FM clock radio to standby mode.
▶ Switch off your external device.
Plug the end of a 3.5 mm jack cable (not supplied with the device) into the AUX IN socket on the back of the DAB/FM clock radio.
Connect the other end of the cable to your external device.
▶ Switch on your external device and, if necessary, the DAB/FM clock radio.
▶ Press the ⏻ button repeatedly until AUX is shown on the display. The audio signal from your external device can now be played back.

Playback is fully controlled using the external device. Set the volume on both the DAB/FM clock radio and the external device to an appropriate level.
14. Charging external devices
14.1. Wireless charging for smartphones
There is a QI charging pad for smartphones on the top of the device, which enables wireless/inductive charging.
Place the smartphone on the charging pad. Charging begins immediately. Take care to ensure that the device is positioned correctly, to ensure that reliable charging is guaranteed. “Is” shown on the display during the charging process.

The maximum charging output is 5 W.
The charging function can, where applicable, be impaired by protective cases for the smartphone.
14.2. Charging a device via the USB port
The USB port allows you to charge external devices up to 1 A such as smartphones.
Connect the external device to the USB CHARGE 5V —— 1A port.
15. Connecting headphones
There is a 3.5 mm jack connection labelled on the back of the device.
Plug the headphone connection cable with a 3.5 mm jack plug into the jack connection.
WARNING!
Possible hearing damage!
Excessive sound pressure when using earphones and headphones can result in damage to and/or loss of hearing.
Using headphones to listen to a device playing at high volume for an extended period can damage your hearing.
■ Before pressing play, set the volume to the lowest setting.
16. Resetting the device
The device can be reset as described in section "12. Settings menu" on page 24 under the menu option SYSTEM / RESET. This resets the device to its factory settings and all stored stations and station lists as well as alarms and the time are deleted.
17. Cleaning the device

Damage to the device due to static electricity, incorrect cleaning agents or the penetration of liquids!
Follow the instructions to avoid situations that may damage the device.
Use only use a slightly damp cloth with a mild cleaning agent or an antistatic
cloth.
Make sure that no liquids penetrate the device.
▶ Regularly wipe the device housing with a slightly damp cloth or an antistatic cloth.
SILVER CREST®
18. Possible faults
If the device stops working properly, please refer to the troubleshooting table shown below to see if you can resolve the problem yourself.
Never attempt to repair the device yourself. If a repair is necessary, please contact our Service Centre or a suitable authorised repair workshop.
| Characteristic Cause Remedy | ||
| There is no sound during radio reception. | The volume is too low. Increase the volume. | |
| Radio reception is disrupted. | The radio station was accidentally changed. | Reset the station. |
| Interference from electrical devices. | Move the device to a different location. | |
| The aerial is not aligned properly. | Re-align the aerial. | |
| No display or no display lighting. | The display has been fully dimmed. | Press the button to set a different display brightness. |
| No sound during playback via AUX IN or Bluetooth. | When the device is connected via AUX IN or Bluetooth: The volume of the external device is too low. | Increase the volume on the external device. |
| The device does not respond when the buttons are pressed. | Electrostatic discharge is present. | Switch off the device.Unplug the mains adapter from the mains socket. |
| The symbol flashes on the display, the charging process is not carried out. | The mobile device is not positioned correctly on the charging pad.There may be metal on the charging pad. | Realign the mobile device on the charging pad to start the charging process.Remove any foreign materials from the charging pad. |
19. Storing the device when not in use
If you do not intend to use the device over a longer period of time, store it in a cool, dry place and make sure that it is protected from dust and extreme temperature fluctuations.
▶ Remove the mains adapter from the mains socket.
20. Disposal
PACKAGING

Your device has been packaged to protect it from damage in transit. The packaging is made of materials that can be recycled in an environmentally friendly manner.

Packaging material label regarding waste separation. Label 21: Paper and cardboard

DEVICE
All old devices marked with the symbol shown must not be disposed of in normal household waste.
In accordance with Directive 2012/19/EU, the device must be properly disposed of at the end of its service life.
This involves separating the materials in the device for the purpose of recycling and minimising the environmental impact.
Take old devices to an electrical scrap collection point or a recycling centre. Contact your local waste disposal company or your local authority for more information on this subject.
SILVER CREST®
21. Technical specifications
| Radio | |
| Power consumption During operation: max. | 22.5 WDuring standby: < 1 W |
| Audio output power 2 x 4 W | |
| Number of memory slots 30 (FM), 30 (DAB) | |
| FM band 87.5–108 MHz | |
| DAB band 174.928–239.20 MHz | |
| Mains adapter | |
| Manufacturer Dong Guan Reyi Power Electronics Co., Ltd. | Importer:MLAP GmbHMeitnerstr. 970563 StuttgartGermanyHR number: HRB 763735 |
| Model name RY36A090250EU | |
| Input voltage/input AC frequency/current | AC 100–240 V ~ 50/60 Hz, 1 A |
| Output voltage/current DC 9.0 V | —— 2.5 A ◇●⊕ |
| Output power 22.5 W | |
| Protection class | II |
| Protection class | IP20 |
| Average efficiency during operation | 89.24% |
| Efficiency with low load (10%) | 85.82% |
| Power consumption with zero load | 0.067 W |
| Relevant load conditions: | |
 | |
| Qi charging pad | |
| Charging output | 5 W |
| Frequency range | 110.26 to 146.96 kHz |
| Maximum field strength | 0.5328 A/m @0 cm |
| Connections | |
| Headphone socket 3.5 mm jack | Output voltage 150 mV max. |
| USB portOutput voltage/currentUSB type A charging port | 5 V---1 A |
| Connection for external devices (AUX) 3.5 mm jack | |
| Bluetooth | |
| Frequency 2402 to 2480 MHz | |
| Maximum transmission power Max. 10 dBm | |
| Version 5.0 | |
| Profile A2DP, AVRCP | |
| Range Up to 10 metres (without obstacles) | |
| Dimensions/weight | |
| Dimensions (W x H x D) Approx. 14.9 x 8 | 2 x 14.9 cm |
| Weight Approx. 660 g | |
| Environmental conditions for operation and storage | |
| Temperatures | 5 °C to +40 °C |
| Humidity(non-condensing) | < 85% |
SILVER CREST®
22. Privacy statement
Dear Customer,
We wish to inform you that we, MLAP GmbH, Meitnerstr. 9, 70563 Stuttgart, Germany, process your personal data as a data controller.
For matters regarding data protection, we are supported by our company data protection officer who can be contacted at MLAP GmbH, Datenschutz, Meitnerstr. 9, 70563 Stuttgart, Germany, datenschutz@mlap.info. We process your data for the purpose of warranty processing and associated processes (e.g. repairs) and rely on the sales contract concluded with us when processing your data.
Your data will be provided to repair service providers contracted by us for the purpose of warranty processing and associated processes (e.g. repairs). We generally store your personal data for a period of three years in order to fulfil your legal warranty rights.
You have the right to be informed of the personal data concerned as well as the right to rectification, erasure and restriction of processing, the right to object to processing and the right to data portability.
In the case of the right to be informed and the right to erasure, restrictions apply according to paragraphs 34 and 35 of the BDSG (Federal Data Protection Act) (Art. 23 of the GDPR). In addition, there is a right of appeal to a competent data protection supervisory authority (Article 77 of the GDPR in conjunction with paragraph 19 of the BDSG). For MLAP, this is the state official for data protection and freedom of information Baden-Württemberg, PO box 10 29 32, 70025 Stuttgart, Germany. www.baden-wuerttemberg.datenschutz.de.
The processing of your data is necessary for warranty processing: it is not possible to process the warranty without the provision of the required data.
22.1. Trademark information
The Bluetooth® word mark and logos are registered trademarks of Bluetooth SIG, Inc. and are used by the manufacturer under licence.
SilverCrest ^® is a registered trademark of Lidl Stiftung & Co. KG.
"Qi" and the QI logo are trademarks of Wireless Power Consortium (WPC).
The USB ^™ word mark and logos are registered trademarks of the USB Implementers Forum, Inc. and are used by MLAP GmbH under licence.
Other trademarks are the property of their respective owners.
23. MLAP GmbH Warranty
Dear customer,
The warranty on this product is 3 years from the date of purchase. In the event of defects in this product, you have legal rights against the product vendor. These legal rights are in no way limited by the warranty described below.
23.1. Conditions of warranty
The warranty period begins on the date of purchase. Please take care to keep the original purchase receipt. This document will serve as a proof of purchase.
If, within three years of the date of purchase of this product, any defect in material or manufacture should become evident, the product will – as we choose – be repaired free of charge or replaced. This warranty is subject to presentation, within the three-year term, of the defective product and the proof of purchase (receipt) and a brief, written description of what constitutes the defect and when it became evident.
If the defect is covered by our warranty, you will receive back the repaired product or a new replacement. Repair or exchange of the product does not lead to a renewed warranty period.
23.2. Warranty period and legal claims for defects
The warranty period is not prolonged by the above fulfilment. This also applies for replaced and repaired parts. Any damage or defects present at the time of purchase must be notified immediately after unpacking. Repairs that are carried out after the expiration of the warranty period are subject to a charge.
23.3. Scope of warranty
The product is manufactured in accordance with strict quality guidelines and thoroughly tested before dispatch.
The warranty applies for defects in materials or manufacture. This warranty does not extend to product parts that are subject to normal wear and can therefore be regarded as wearing parts or to damage to fragile parts, e.g. switches, batteries or parts made of glass.
This warranty is void if the product has been damaged or not properly used or serviced. For proper use of the product, exact compliance with all instructions listed in the user manual is required. It is essential to avoid procedures and use for purposes against which the user manual advises or warns.
The product is intended for private use only and not for industrial/commercial use. Improper handling and usage not in accordance with the intended purpose, use of force and any interventions that are not carried out by our authorised service centre will render the warranty null and void.
SILVER CREST®
23.4. Processing of warranty claims
For speedy processing of your request, please observe the following instructions:
- For all enquiries, please keep the receipt and the article number IAN 379304_2110 to hand as proof of purchase.
- The article number is to be found on the type plate, an engraving, on the title page of your instructions (bottom left) or on an adhesive label on the rear or underside.
- If functional or other defects occur, first contact the service department named below by telephone or via our contact form.
24. Service
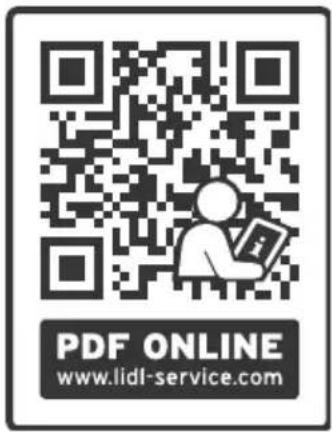
You can download this user manual and many other manuals, product videos and installation software from www.lidl-service.com.
Scan this QR code to be directed straight to the Lidl Service website (www.lidl-service.com) where you can open your user manual by entering the article number IAN 379304_2110
| GB | Service United KingdomHotline1 +44 20 34811602Mon - Fri: 09:00 - 17:00Please use the contact form at www.mlap.info/contact |
| IAN 379304_2110 |
24.1. Supplier/Producer/Importer
Please note that you cannot use the address below for returns. Please contact the Service Centre mentioned above.

MLAP GmbH
Meitnerstr. 9
70563 Stuttgart
Germany
Importer for GB market by:
Lidl Great Britain Ltd · Lidl House
14 Kingston Road · Surbiton · KT5 9NU
GREAT BRITAIN
SILVERCREST®
Inhaltsverzeichnis
11.2.1. Wekker activeren/deactiveren
Symbol for vekselstrøm