
SSR AA1 - Vacuum Cleaner SILVERCREST - Free user manual and instructions
Find the device manual for free SSR AA1 SILVERCREST in PDF.

| Product type | Robot vacuum with suction station |
| Brand | SilverCrest |
| Model | SSR AA1 Best |
| Operating voltage (robot) | 14.8 V DC |
| Rated power (robot) | 35 W |
| Battery | Li-ion, 2900 mAh, 14.8 V |
| Runtime | Up to 100 minutes |
| Charging time | Approximately 6 to 7 hours |
| Suction power (robot) | Up to 3 kPa |
| Dust bin capacity (robot) | 300 ml (usable 200 ml) |
| Dimensions (robot) | Diameter 33.5 cm, height 9.5 cm |
| Rated power (station) | 1050 W |
| Suction power (station) | Approximately 25 kPa |
| Bin capacity (station) | 3.5 l |
| Package contents | Vacuum cleaner, 5 dust bags, suction station, high-performance filter, 1 additional side brush, cleaning brush, instruction manual |
| Connectivity | WiFi 2.4 GHz, Lidl Home app (iOS 10.0+, Android 5.0+) |
| Laser | Class 1, wavelength 780 nm, power 10 mW |
| Frequency band | 2412-2472 MHz, max emission power 17.5 dBm |
| Cleaning modes | Smart, Spot, Corner, Room, Zone |
| Sensors | Anti-drop, anti-collision |
| Safety | Indoor use, child supervision, auto shutdown, laser protection |
| Maintenance | Regular cleaning of bin, filters, brushes, sensors |
| Warranty | 3 years |
Frequently Asked Questions - SSR AA1 SILVERCREST
User questions about SSR AA1 SILVERCREST
0 question about this device. Answer the ones you know or ask your own.
Ask a new question about this device
Download the instructions for your Vacuum Cleaner in PDF format for free! Find your manual SSR AA1 - SILVERCREST and take your electronic device back in hand. On this page are published all the documents necessary for the use of your device. SSR AA1 by SILVERCREST.
USER MANUAL SSR AA1 SILVERCREST
natural_image
Black robotic vacuum cleaner with visible sensor and tassels (no text or symbols)SAUGROBOTER MIT ABSAUGSTATION/ SELF-EMPTYING ROBOT VACUUM CLEANER/ ROBOT ASPIRATEUR AVEC STATION D'ASPIRATION
DE AT CH
SAUGROBOTER MIT ABSAUGSTATION
Operation and safety notes
NL BE
ZUIGROBOT MET AFZUIGSTATION
Before reading, unfold both pages containing illustrations and familiarise yourself with all functions of the device.
FR BE
B
natural_image
Technical line drawing of a refrigerator with front and side views (no text or symbols)
- Produkt aufladen
natural_image
Diagram of a circular device with a rectangular base and cable, connected to a small rectangular component (no text or symbols)natural_image
Illustration of a hand adjusting a circular component with a pointer (no text or symbols)● Per Lidl Home App bedienen
natural_image
Two 3D wireframe room layouts showing a robotic vacuum cleaner inside and a smaller robotic vacuum cleaner in the interior, with no text or symbols present.
natural_image
Line drawing of a person standing in a hallway with a robotic vacuum cleaner nearby (no text or symbols)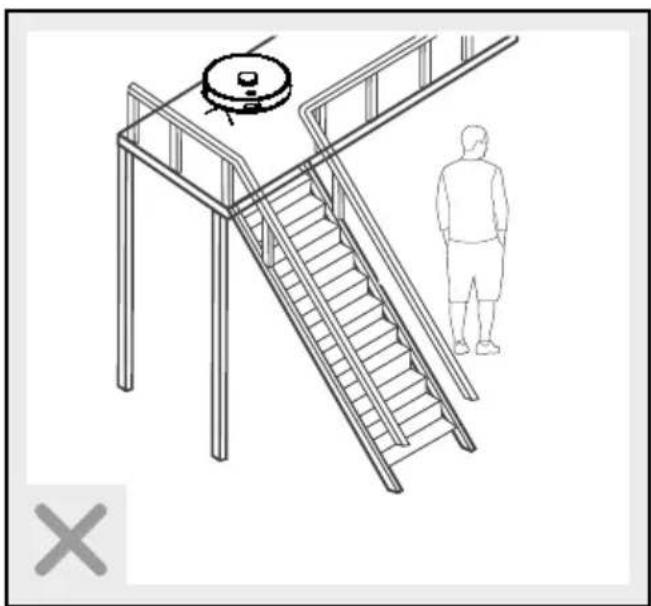
natural_image
Line drawing of a staircase with a circular object on top and a person standing nearby (no text or symbols)natural_image
Illustration of a hand adjusting a circular component with a pointer (no text or symbols)
natural_image
Abstract black-and-white diagram of a winding path with an arrow and circular symbol (no text or labels)natural_image
Abstract black-and-white diagram of a maze with an arrow indicating direction (no text or symbols)natural_image
Pure diagram of a mechanical or electrical component layout without any text, numbers, or symbolsnatural_image
Floor plan diagram showing a room with a house icon and directional arrow (no text or labels)natural_image
Diagram of a circular device with a rectangular base and cable, connected to a small electronic component (no text or symbols)natural_image
Technical line drawing of a vacuum cleaner with internal components and housing (no text or symbols)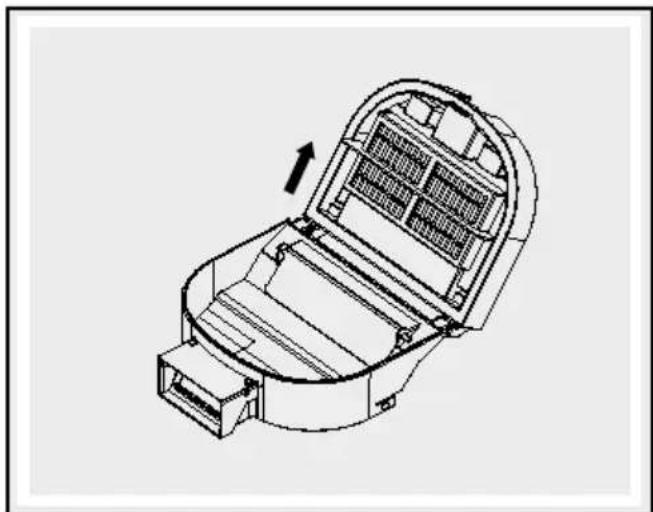
natural_image
Technical line drawing of a mechanical device with an open lid and internal compartments (no text or symbols)
natural_image
Diagram of a mechanical component pouring particles into a container (no text or symbols)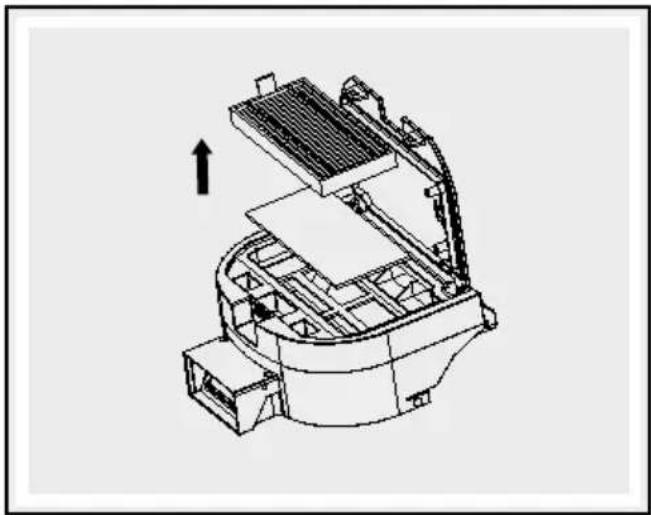
natural_image
Technical line drawing of a mechanical assembly with no visible text or symbolsnatural_image
Technical line drawing of a mechanical assembly with gears and components (no text or symbols)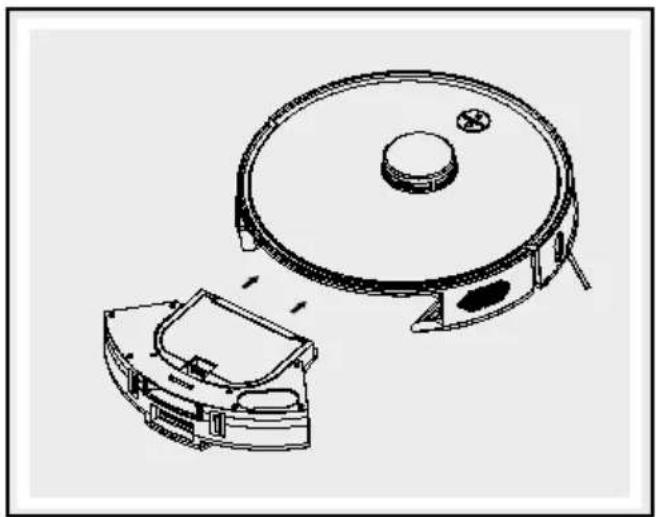
natural_image
Technical line drawing of a robotic vacuum cleaner with internal components (no text or symbols)
natural_image
Line drawing of a mechanical device with a hand pointing to the component (no text or symbols)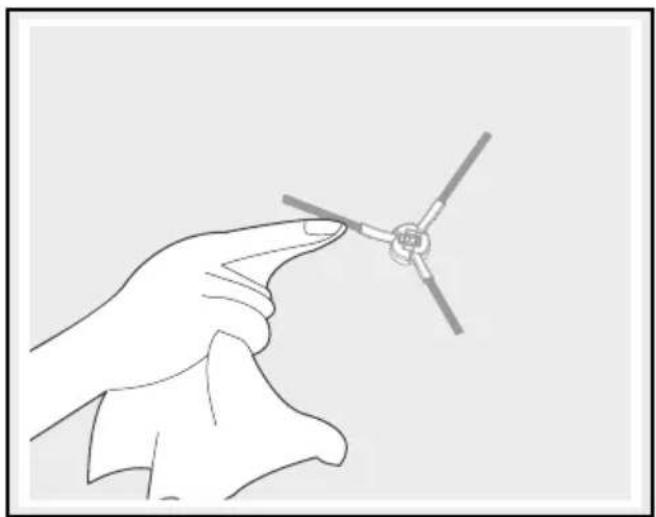
natural_image
Line drawing of a hand holding a small wind turbine component (no text or symbols)
natural_image
Technical diagram of a mechanical assembly with a magnified inset showing a tool interacting with a component (no visible text or labels)natural_image
Technical diagram of a mechanical device with internal components and an inset magnified view (no text or labels)Absaugstation reinigen
natural_image
Line drawing of a hand inserting a small electronic device into a rectangular housing (no text or symbols)natural_image
Technical diagram of a mechanical or electrical component with no visible text, numbers, or symbols.natural_image
Line drawing of a rectangular electronic device with a lid and handle, showing internal structure and mounting bracket (no text or symbols)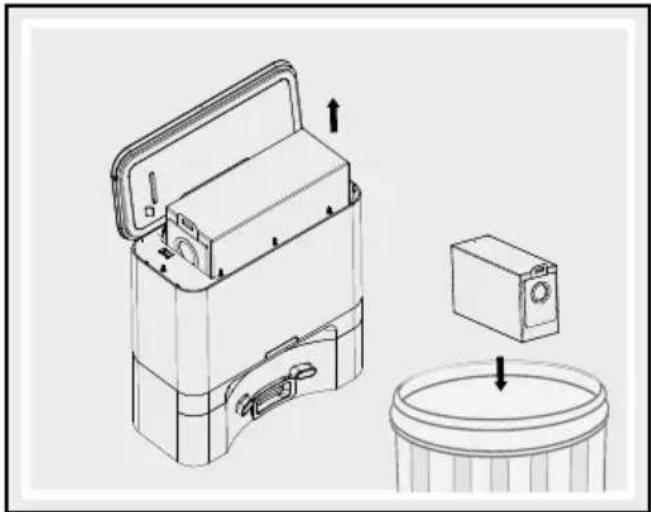
natural_image
Technical line drawing of a mechanical device with an open lid, showing internal components and a cylindrical base (no text or symbols)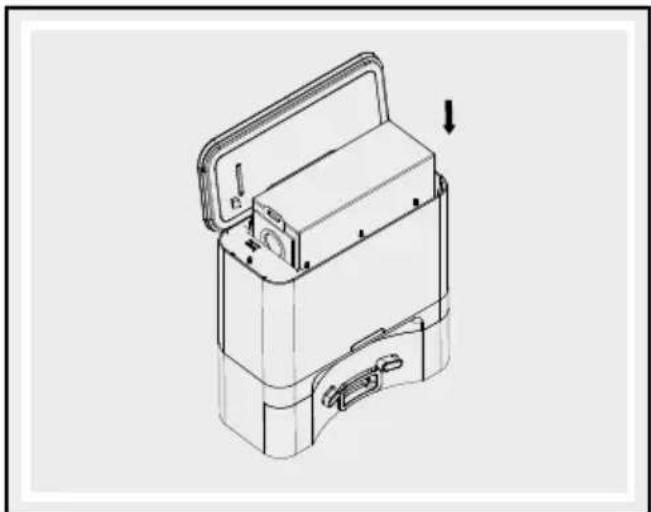
natural_image
Technical line drawing of a mechanical device with open lid and internal compartments, showing no text or symbolsnatural_image
Technical line drawing of a device casing with internal compartments and mounting brackets (no text or symbols)https://ksr.navonline-helpdesk.de
IAN 442213\_2304
Intended use......Page 28
Trademark notice Page 28
Parts description Page 29
Scope of delivery....Page 29
Technical data......Page 29
Safety notices....Page 30
Safety instructions for batteries/rechargeable batteries......Page 32
Initial use Page 33
Set up suction station with charging dock Page 33
Charging the product....Page 33
Switching the product on/off Page 34
Operation via the Lidi Home app....Page 34
Couple the product and mobile device....Page 34
Create product group......Page 35
Remove product group......Page 35
Uncouple product from mobile device Page 35
Operate product via app....Page 35
Settings Page 35
Create schedule Page 36
Set advanced settings......Page 36
Operation Page 38
Cleaning modes......Page 39
Use the suction function....Page 40
Cleaning and storage Page 41
Cleaning the side wheels....Page 43
Troubleshooting/Problem solving......Page 45
Disposal Page 45
Warranty/Service......Page 46
Declaration of conformity Page 46
| List of pictograms used | |||
 | Observe the warnings and safety instructions! |  | Caution! Danger of explosion! |
 | Read the instructions! |  | SMPS (Switched Mode Power Supply) |
 | This product is only suitable for use indoors, in dry and enclosed spaces. |  | Polarity of the mains connection |
 | Direct current/voltage EU compliant |  | |
 | Alternating current/voltage |  | Dispose of the packaging and product in an environmentally-friendly manner! |
 | Never leave children unsupervised with the packaging material or the product. |  | 36-month warranty |
 | Short-circuit proof safety transformer |  | TÜV SÜD/GS certified |
 | Wear safety gloves! |  | Safety notices Instructions for use |
Self-Emptying robot vacuum cleaner SSR AA1 Best
- Introduction

We congratulate you on the purchase of your new product. You have chosen a high quality product. The instructions for
use are part of the product. They contain important information concerning safety, use and disposal. Before using the product, please familiarise yourself with all of the safety information and instructions for use. Only use the product as described and for the specified applications. If you pass the product on to anyone else, please ensure that you also pass on all the documentation with it.
Intended use
This product is suitable for vacuuming up loose, dry dirt, e.g. dust, lint or crumbs on smooth flooring and low pile carpets. Only use the product indoors. This product is only intended for private, non-commercial use. Only use the product for the intended purpose. Any use other than previously mentioned or product modification is prohibited and can result in injuries and/or product damage. The manufacturer assumes no liability for damage arising from improper use.
Trademark notice
- The trademark and the brand name SilverCrest are the property of their current owner.
- Any other names and products may be trademarks or registered trademarks of their respective owners.
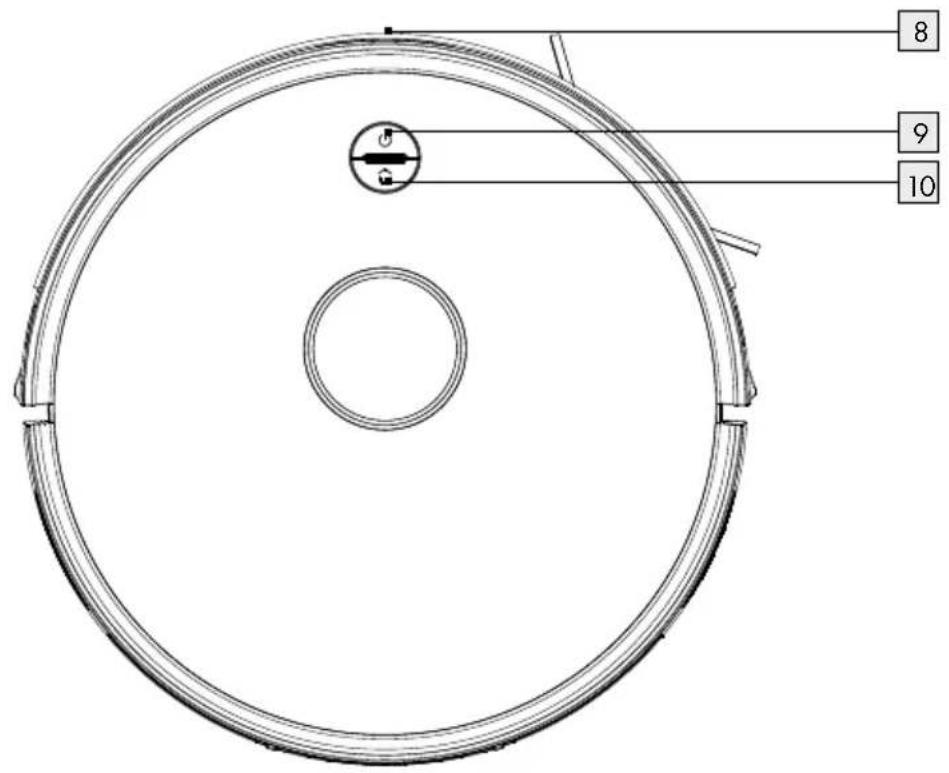
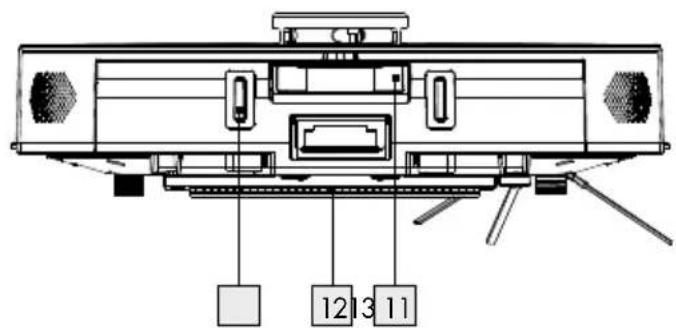
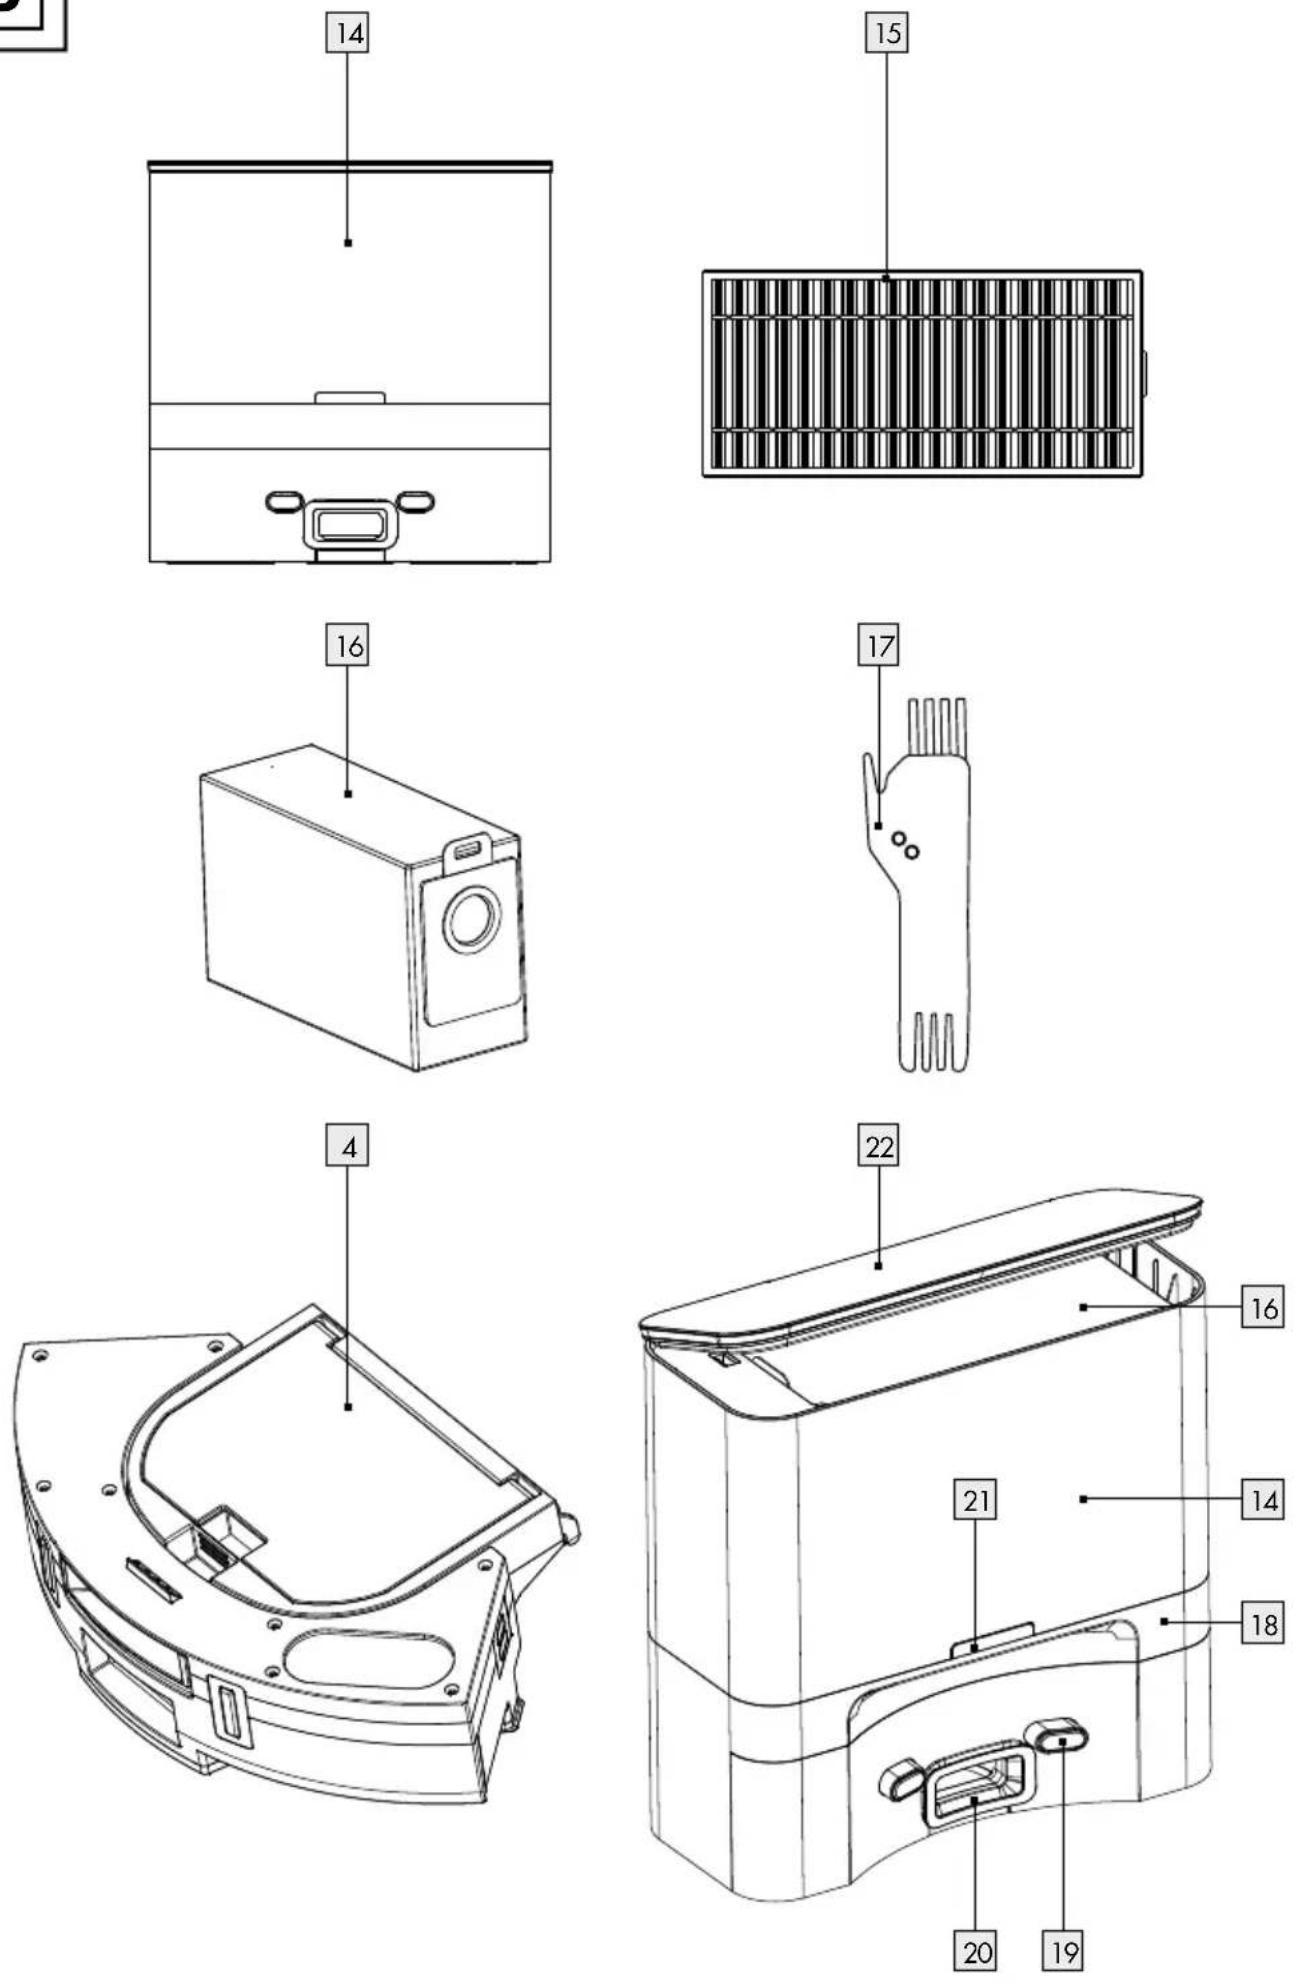
Parts description (Fig. A and B)
| 1 | Front wheel |
| 2 | Anti-drop sensor |
| 3 | Main brush |
| 4 | Dust collector |
| 5 | Side wheel |
| 6 | Battery compartment cover |
| 7 | Side brush |
| 8 | Anti-collision sensor |
| 9 | On/Off button |
| 10 | “Home mode” button (return to charging dock) |
| 11 | Dust collector button |
| 12 | Cleaning scraper |
| 13 | Charging socket (robot vacuum cleaner) |
| 14 | Suction station with charging dock |
| 15 | High performance filter |
| 16 | Dust bag |
| 17 | Cleaning brush |
| 18 | Sensor |
| 19 | Charging socket (suction station) |
| 20 | Suction opening |
| 21 | Operating control light |
| 22 | Cover |
- Scope of delivery
Verify that the contents are complete and that the product is in perfect condition immediately after unpacking.
1 robot vacuum cleaner
5 disposable dust bags
1 suction station with integrated charging dock
1 high performance filter
1 extra side brush
1 cleaning brush
1 set of instructions for use
●Technicaldata
Robot vacuum cleaner
Model: Silvercrest SSR AA1 Best
Operating voltage: 14.8V ---
Rated power: 35 W
Rechargeable battery: Li-ion rechargeable battery (2900 mAh, 14.8 V)
Run time: max. 100 minutes (varies according to mode and flooring)
Charging time: approx. 6–7 hours
Suction power: up to 3 kPa
Volume of dust collector: 300 ml; useable volume 200 ml
Dimensions: ∅ 33.5 cm/height: 9.5 cm
Charging dock with suction station
Rated power: 1050W
Suction power: approx. 25 kPa
Volume of dust bag: 3.51
System requirements of app
iOS from Version 10.0, Android ^TM from Version 5.0
Class I laser product
Invisible laser radiation
Laser energy - radiation near the opening may cause burns
Wave length: 780 nm
Output power: 10 mW
Frequency: 0.48 ms
Pulse duration: 0.467 ms
Frequency band: 2412 MHz-2472 Mhz
Maximum transmitting
power: 17.5 dBm
The laser in the vacuum cleaner conforms to the IEC 60825:2014 standard for Class 1 laser products.
■ The product must only be used with the supplied mains adapter.
■ The mains adapter must be disconnected from the socket before cleaning or servicing the product.
■ This product contains a rechargeable battery that can only be replaced by specialists.
- Do not allow the power supply terminals to short-circuit.

Safety notices
KEEP ALL SAFETY NOTICES AND INSTRUCTIONS FOR FUTURE REFERENCE!
WARNING! DANGER TO LIFE AND
RISK OF ACCIDENTS FOR INFANTS AND CHILDREN!
Never leave children unsupervised with the packaging material. There is a risk of suffocation. Keep children away from the product.
This product may be used by children aged 8 years and up, as well as by persons with reduced physical, sensory or mental capacities, or those lacking experience and/or knowledge, as long as they are supervised or instructed in the safe use of the product and they understand the associated risks.
- Do not allow children to play with the product. Cleaning and user care should not be performed by children without supervision.
- Verify the line voltage matches that specified on the suction station 14.
Only use the original rechargeable battery and suction station 14 supplied by the manufacturer. Never use primary batteries. For more information please see the "Technical data" chapter.
■ Never use the suction station 14 if it is damaged. -
Handle the power cable with care to avoid damage. Do not use the power cable to move or pull the product or the suction station 14. Do not allow the product to run over the power cable and keep it away from heat sources.
If the power cable is damaged, it must be replaced by a qualified service technician to avoid dangers.
■ Do not use the product if damaged due to -
falls,
- damage,
- ingress water,
- outdoor use and not working properly. Have the product repaired by the
manufacturer or its customer service department.
- Do not use the product in rooms with children.
- Do not use the product in wet or moist environments (locations where there is a risk of the product coming into contact with or being immersed in water).
- Do not use the product near open fire.
- Do not use the product in temperatures over +40 °C or below +10 °C.
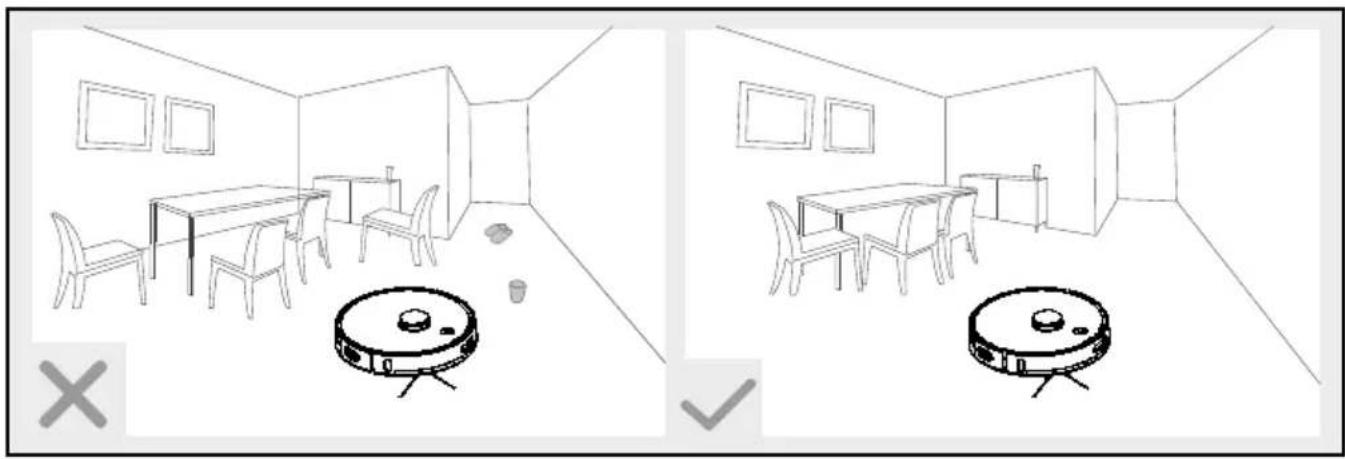
■ Remove any obstacles prior to use, for example power cables, toys and other objects. - Tuck rug edges under the rug. Do not allow curtains and tablecloths to touch the floor.
■ Try to position furniture neatly.
■ Test the product in areas with stairs. This allows you to verify the product detects the edge of the drop off. - Do not stand in the way of the robot vacuum cleaner. If you do so, the robot vacuum cleaner will be unable to clean these areas.
- Keep hair, clothing and fingers away from the openings and operating parts of the product.
- Do not allow the product to vacuum up items which could
clog the product, for example stones, paper waste, etc.
- Do not allow the product to vacuum up flammable materials, for example fuel or toner from printers or photocopiers.
- Do not allow the product to vacuum up burning items, for example cigarettes, matches, ashes or other objects which could cause a fire.
- Do not use the product if the suction opening is blocked. Remove dust, hair, cotton wool, etc., to allow air to flow freely in the suction opening.
Before using the product, ensure that the dust collector 4 and the high-performance filter 15 are installed correctly. - Check the area to be cleaned before every use and observe the safety notes and information about preparing the room.
- Check the suction station 14, power cable and mains adapter for damage before every use.
- Regularly check and clean the high performance filter 15 and the dust collector 4 to extend the life of your product.
■ Never use the product without filters to prevent damaging the
motor and shortening the life of the product.
■ Always switch off the product before transporting it.
■ Fully charge the product at least once a month to prevent deep discharge and thus battery damage.
- Do not cover or tape over the anti-drop sensors 2 on the product. Otherwise the product will be unable to navigate.
- Regularly clean the anti-drop sensors 2. If the floor sensors are dirty the product may fall down stairs or landings.
■ When using the product, inform any others in the room so nobody steps on or trips over the product.
■ Discontinue using the product if the plastic parts are cracked or deformed. Always replace damaged parts with genuine spare parts.

Safetyinstructions for batteries/rechargeable batteries
DANGER TO LIFE! Keep batteries/rechargeable batteries out of reach of children. If acciden-
tally swallowed seek immediate medical attention.
DANGER OF EXPLOSION! Never recharge
non-rechargeable batteries.
Do not short-circuit batteries/rechargeable batteries and/or open them. Overheating, fire or bursting can be the result.
■ Never throw batteries/rechargeable batteries into fire or water.
- Do not exert mechanical loads to batteries/rechargeable batteries.
Risk of leakage of batteries/rechargeable batteries
- Avoid extreme environmental conditions and temperatures, which could affect batteries/rechargeable batteries, e.g. radiators/direct sunlight.
If batteries/rechargeable batteries have leaked, avoid contact with skin, eyes and mucous membranes with the chemicals! Flush immediately the affected areas with fresh water and seek medical attention!
WEAR PROTECTIVE GLOVES! Leaked or

damagedbatteries/rechargeable batteries can cause burns on contact with the skin. Wear suitable
protective gloves at all times if such an event occurs.
This product features a built-in rechargeable battery which cannot be replaced by the user. The rechargeable battery must be removed or replaced by the manufacturer or their service centre or a similarly qualified person to avoid hazards. When disposing of the product, you must indicate this product contains a rechargeable battery.
- Initial use
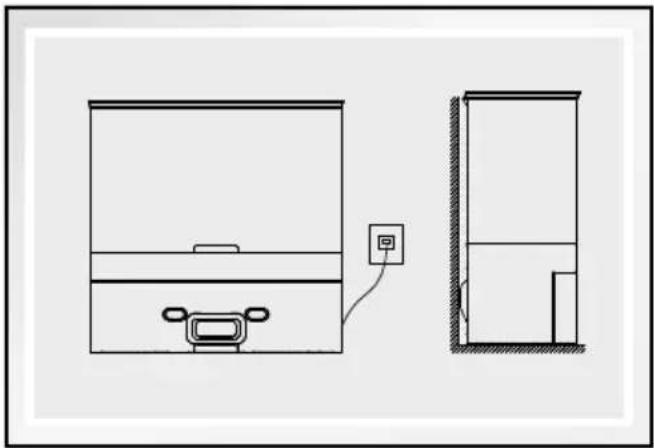
- Set up suction station with charging dock
Set up the suction station 4 flat against a wall and connect the power cable. The operating control light 21 flashes in red.
Note: Keep 0.5 m from the left/right and 1.5 m from the front clear of other objects.
Note: The area around the suction station must not have mirrors or other highly reflective objects within 15 cm of the floor. If necessary, cover these.
⚠️CAUTION! Keep the suction station 14 out of direct sunlight.
CAUTION! Change the position of the suction station 14 as little as possible.
Open the cover 22 and insert the dust bag 16. Close the cover 22 again. The operating control light 21 flashes slowly, then the suction station 14 enters standby mode.
natural_image
Technical line drawing of a refrigerator with front and side views, showing internal components and wiring (no text or symbols)
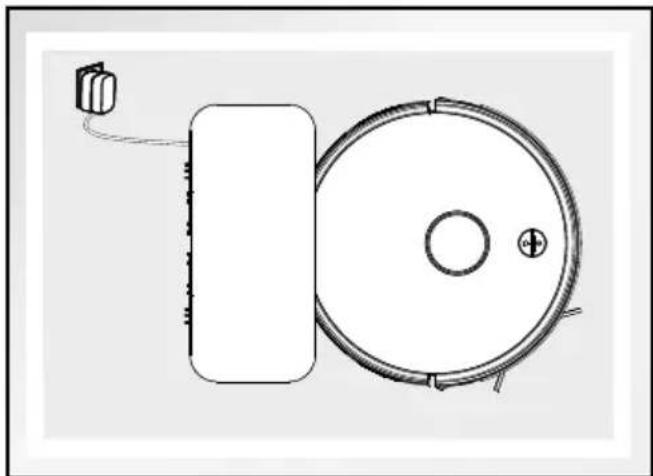
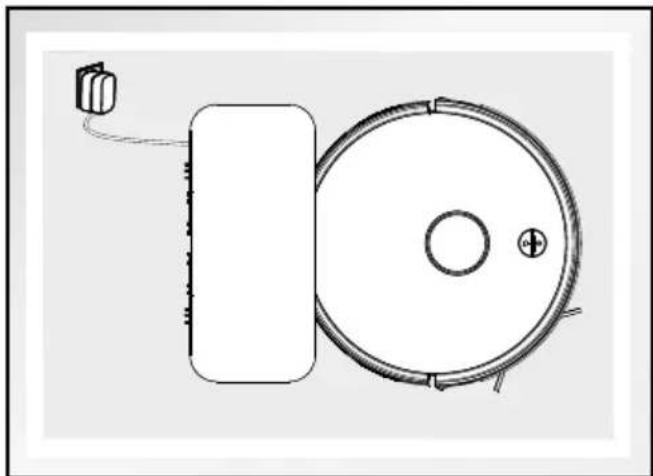
● Charging the product
Fully charge the product before using it for the first time.
It takes approx. 6 to 7 hours to charge.
Place the robot vacuum cleaner in front of the suction station 14, then connect it to the charging socket 19.
Note: During the charging process, the operating control light [21] flashes slowly in orange. If the robot vacuum cleaner is fully charged then this lights up in green and goes out after some time.
N ote: During everyday use of the product, make sure that the charging sockets 13, 19 are clean. If they are not, this could impair the charging process.
natural_image
Simple line drawing of a circular device with a rectangular base and cable, no text or symbols present.Note: You can also press the C"home mode" button 10 at any time to immediately send the robot vacuum cleaner back to the suction station 14.
Note: Available battery capacity falls in the event of deep discharge or prolonged periods where the product is not in use. In such situations, activate the battery by connecting the robot vacuum cleaner to the suction station 14, allow it to charge up for 3 minutes, then disconnect it from the suction station 14. Repeat this procedure 3 times and then start with a typical charging process lasting 5–6 hours.
Note: The battery has a long service life and rarely has to be replaced. However, if this does become necessary then please contact our customer service team.
On/Off button 9
Charging in progress: flashes orange
Charging complete: light off
Product error: flashes red
Low battery: flashes orange
Standby mode: slowly flashes green
Operating control light 21
Dust bag 16 is not
inserted correctly or
cover 22 is not closed: flashes red
Suction function starts: flashes orange
Charging function: slowly flashes orange
Dust bag 16 is full
or suction opening
is blocked: flashes orange
Standby mode: off
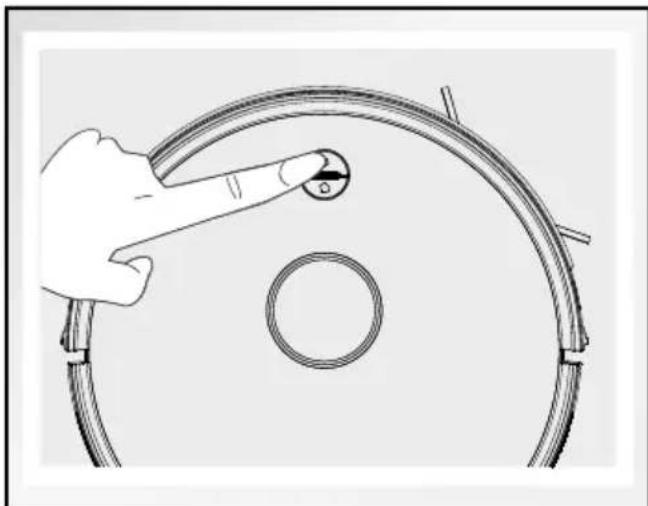
- Switching the product on/off
□Holdthe On/Off button
9 for approx.
3 seconds to switch on the product. If the ⏻ On/Off button ⑨ lights up green, the product was successfully switched on.
Note: Do not switch off the product after it has finished cleaning. Leave it in the suction station 14 so that it is ready for the next cleaning session.
□Holdthe On/Off button
9 for approx. 5
seconds to completely switch off the product.
natural_image
Illustration of a hand holding a circular component with a knob, no text or symbols present● Operation via the Lidi Home app
The Lidl Home app can be found either in Google Play Store or Apple App Store.
Note: The Android version of the app follows the same principles as the iOS version; there may be discrepancies between the two platforms, such as slightly different screen commands or symbols.
● Couple the product and mobile device
Install Lidl Home app and set up an account:
Tap the "Home" tab.
☐ + tap the top right-hand corner.
Select "Other" category.
Select "Robot vacuum cleaner SSR AL1".
Select 2.4 GHz WiFi Network (home network).
Enter WiFi network password.
- Tap "Next". - Hold down both the On/Off button 9 and the [ ] "home mode" button 10 on the robot vacuum cleaner for 4 seconds. You will hear a beep.
☐ Follow the instructions in the app and switch over to the WiFi settings on your smartphone.
☐ Select the Lidl Home-XXXX network.
☐ Ensure that the robot vacuum cleaner is fully connected.
☐ Return to the Lidl Home app.
☐ Name the robot vacuum cleaner after establishing the connection
- Create product group
Open the Lidl Home app.
Tap the "Home" tab.
☐ Tap one of the connected robot vacuum cleaners.
☐ Tap the pencil symbol (top right-hand corner).
Tap "Create group".
□Selectdevices.
Tap"Confirm".
□ Enter group name.
Tap"Save".
- Remove product group
Open the Lidl Home app.
Tap the "Home" tab.
☐ Tap the group to be removed.
☐ Tap the pencil symbol (top right-hand corner).
☐ Tap "Delete group".
Tap"Confirm".
● Uncouple product from mobile device
Open the Lidl Home app.
Tap the "Home" tab.
☐ Tap the robot vacuum cleaner to be removed.
☐ Tap the pencil symbol (top right-hand corner).
Tap "Remove device".
☐ Select "Disconnect" or "Disconnect and delete all data".
Operate product via app
Navigate to the Control Panel first so you can operate the robot vacuum cleaner with the app:
Open the Lidl Home app.
Tap the "Home" tab.
☐ Tap one of the connected robot vacuum cleaners.
You can control the following functions from here:
Standby: Interrupts the active cleaning process.
Smart: The robot vacuum cleaner carries out cleaning in parallel, overlapping movements.
Charging: The robot vacuum cleaner returns to the charging dock.
Settings: see "Settings"
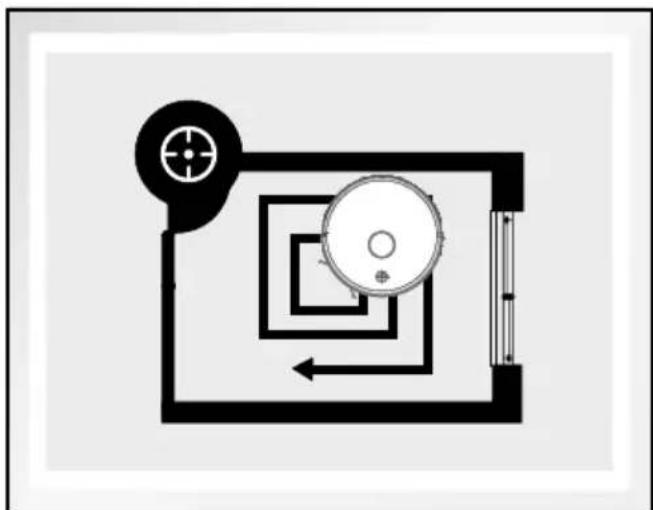
Corner: This mode is suitable for cleaning the corners and edges of a room. In "Corner mode", the product follows a barrier (for example a wall). This mode ends automatically if the robot vacuum cleaner no longer detects any walls or corners.
Room:The robot vacuum cleaner moves to the room/rooms you have selected and cleans these in smart mode.
Area: The robot vacuum cleaner moves to the area/areas you have marked and cleans these in smart mode.
Processmap: In this menu you can combine, divide or rename the rooms on the map.
Restrictedzone: Create restricted areas or barriers.
Note: Restricted areas are places that the robot vacuum cleaner does not enter.
Note: A barrier is a line that you place on the map and that a robot vacuum cleaner does not cross.
Note: The map will be saved after the robot vacuum cleaner has carried out a full cleaning process in smart mode.
Settings
You can enter the following settings here:
Manual: The robot vacuum cleaner can be controlled with 4 direction buttons.
Maps: You can check or delete the maps saved in the robot vacuum cleaner. Up to 3 maps can be saved at the same time.
Search for robot: The robot vacuum cleaner emits a beep for 10 seconds.
Schedule: see "Schedule"
Carpet recognition: When activated, the robot vacuum cleaner automatically increases the suction power on carpets.
Suction station: At this point you can set the frequency of which the robot vacuum cleaner is emptied by the suction station 14 and manually clean up the robot vacuum.
Notifications: You can turn notifications on or off about the robot status, cleaning reminders or similar here.
Suction power:
Select the suction power:
- ECO: Low suction power and low energy consumption
2.Normal:Default suction power - ideal combination of running time and suction power
- MAX: Maximum suction power for stubborn dirt
Continue from the stopping point:
-
activated: If the robot vacuum cleaner has to go to the suction station with charging dock 14 during operation, then after charging, it continues vacuuming from the point at which vacuuming was interrupted.
-
deactivated: If the robot vacuum cleaner has to go to the suction station with charging dock 14 during operation, then after charging, it waits there until it is reactivated.
Volume: Set the signal volume for the robot vacuum cleaner. This has no effect on cleaning-related noises.
Records: You can see the vacuum cleaner's records here.
The records of vacuuming are listed with the date and start time. You can see more information by tapping the date in question. The robot vacuum cleaner logs the area that was cleaned and the length of time taken. Furthermore, you can also see a map of the cleaned area so that you can
trace the route taken by the vacuum cleaner. You can delete individual records in the list view by swiping left and then tapping "Delete".
Spare parts:
Side brushes: Shows the estimated life of the side brushes 7. Reset these after replacement is complete.
Main brush: Shows the estimated life of the main brush 3. Reset these after replacement is complete.
Filter: Shows the estimated life of the filter. Reset these after replacement is complete.
- Create schedule
You can set a schedule so that the robot vacuum cleaner carries out its work automatically:
□Tap"Schedule".
□ Select a day of the week.
□ Adjust the time.
If managing several days:
□Tap"Repeat".
☐ Select day(s) of the week.
Selected days of the week are labelled with a tick. To deselect a selected day of the week, simply tap it once again.
Then confirm the schedule that has been created:
□Tap"Back".
□Tap"Confirm".
- Set advanced settings
Tap the pencil symbol in the control panel to get to the advanced features:
Customise the product:
-
Tap the pencil in the advanced settings.
-
Tap the symbol and take a photo or select one from the album in the mobile device. Permission for access to the camera and/or the photo archive is required to do this.
-
Tap "Name" to rename the product.
-
Ta p "Location" to assign the product to a room.
☐ Tap the "Device information" tab to see information about your product:
-
Virtual ID
-
IP address
-
Time zone of the product
-
WiFi signal strength
☐ Tap the "Tap for performance and automation" to see the smart features and automation within the product.
☐ The "Offline notification" controller is used to decide whether the robot vacuum cleaner sends a notification if it is offline for more than 30 minutes.
Position 1 ON: Notification is sent
Position 2 OFF: Notification is not sent
You can share access to the robot vacuum cleaner with other Lidl Home app users via the "Offline notification" tab.
☐ Use the "Create group" tab to add the robot vacuum cleaner to a group so that all products within this group can be controlled synchronously.
- Tap "Create group".
- Select products (selected products are labelled with a tick).
- Tap "Save" in the top right-hand corner.
- Name the group.
- Tap "Save".
The group is now shown on the home screen.
☐ Tap "FAQ" to see questions that are frequently asked about the product.
☐ Tap "Check for firmware upgrade" and the robot vacuum cleaner checks to see if a new version of the firmware is available.
☐ Tap "Remove device" to remove the product from the app. There are 2 options available:
-
"Disconnect": The product is removed from the app. The data remains in the robot vacuum cleaner's memory. This process only puts the product back into offline mode and starts pairing mode.
-
"Disconnect and delete all data":
The product is reset to factory settings. All data is deleted from the product and the cloud using this function. Use this function before giving the product to others, before disposing of it, or sending it back to the manufacturer.
Ensure that all data has been deleted from the device and also from the cloud.
Follow the instructions in the app or tap "Cancel" so that the device is not removed.
Note: The privacy policy can be accessed in the Lidl Home app under Privacy in the "ME" tab.
Note: What data is processed by the robot vacuum cleaner? A map is created for precise laser navigation, which is saved in both the robot vacuum cleaner and the cloud until it is manually deleted.
Note: If you no longer wish to use the robot vacuum cleaner or want to delete the maps from the cloud or the vacuum cleaner, you can go to "Settings/maps/individual maps" to delete one or to "Advanced tools/remove device"/"disconnect and delete" to delete all maps. By holding down the ⏻ On/Off button 9 and the C>home mode" button 10 on the robot vacuum cleaner, the vacuum cleaner is only set in pairing mode whilst the data stored on the device is still saved.
Note: At least one stored map is required to use all the features of the robot vacuum cleaner.
Note: During the vacuum process in the "Smart", "Spot", "Area" and "Room" modes, the robot vacuum cleaner records the route taken, the start time and the finish time of vacuuming. This data is collected for the live illustration of the map as well as the recordings. Records are saved for 60 days so that a clear representation of previous use can be shown.
Note: To restore the factory settings of the product:
Open the LIDL Home app and select the "Home" tab.
☐ Select the device and tap the pencil icon in the top right-hand corner.
☐ Tap "Remove device", then "Disconnect and delete data".
☐ After tapping "Confirm" the factory settings of the product will be restored and your data will be deleted.
Note: An update of the firmware can lead to changes to the functions on the app.
An updated set of operating instructions can be found here: "Me" tab
☐ Tap "Operating Instructions".
Operation

natural_image
Two 3D wireframe room layouts showing a robotic vacuum cleaner inside and a smaller robotic vacuum cleaner in the interior, with no text or symbols present.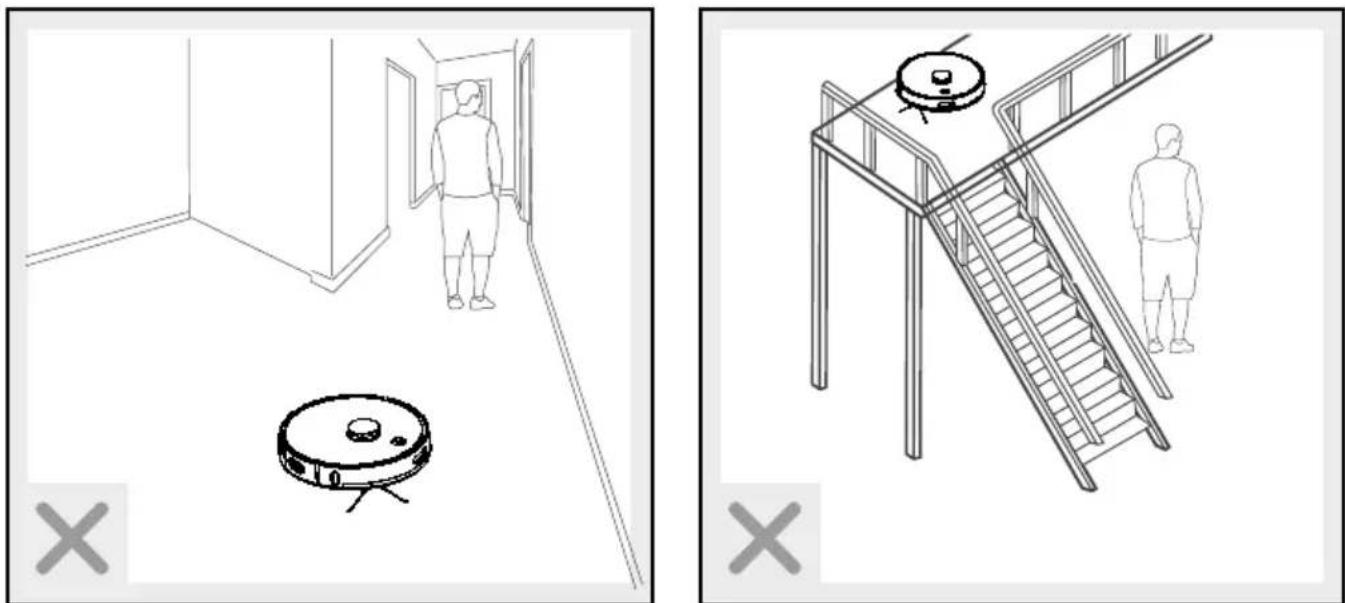
natural_image
Two technical diagrams showing room layouts and staircases with no visible text or symbolsDue to the complexity of domestic environments, the product may skip some areas when cleaning. For better cleaning results, we recommend using the product daily.
Remove any obstacles prior to use, for example power cables, toys and other objects.
☐ Tuck rug edges under the rug. Do not allow curtains and tablecloths to touch the floor.
☐ Try to position furniture neatly.
☐ Test the product in areas with stairs. This allows you to check whether the product can detect the edge of an area which it could fall off.
Do not stand in the way of the robot vacuum cleaner. If you do so, the robot vacuum cleaner will be unable to clean these areas.
☐ Ensure furniture is at least 8 cm off the floor to allow the robot vacuum cleaner to easily clean under it.
☐ If you have a multi-level residence, install rails on the upper levels so that the robot vacuum cleaner does not fall.
Cleaning
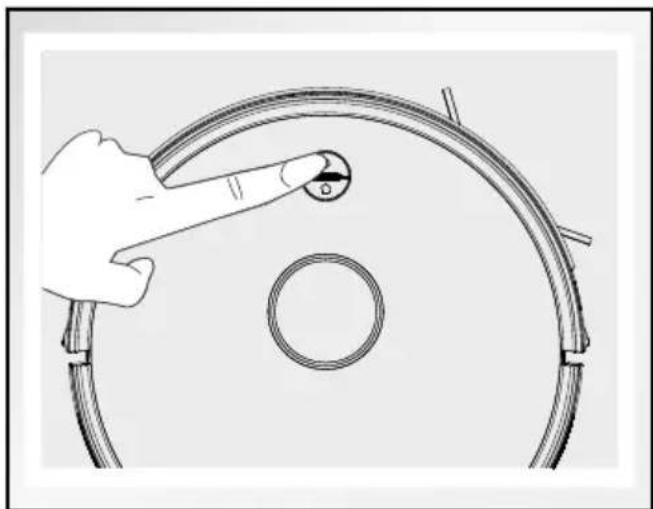
☐ Make sure that the robot vacuum cleaner is in standby mode. The ⏻ On/Off button 9 flashes slowly in green. If this is not the case, press the ⏻ On/Off button 9 to put the robot vacuum cleaner in standby mode.
Pressthe On/Off button 9. The On/Off button lights up.
□Whenthe On/Off button 9 flashes, the robot vacuum cleaner will automatically start cleaning.
natural_image
Hand pointing at a circular component with a knob, next to a ring (no text or symbols visible)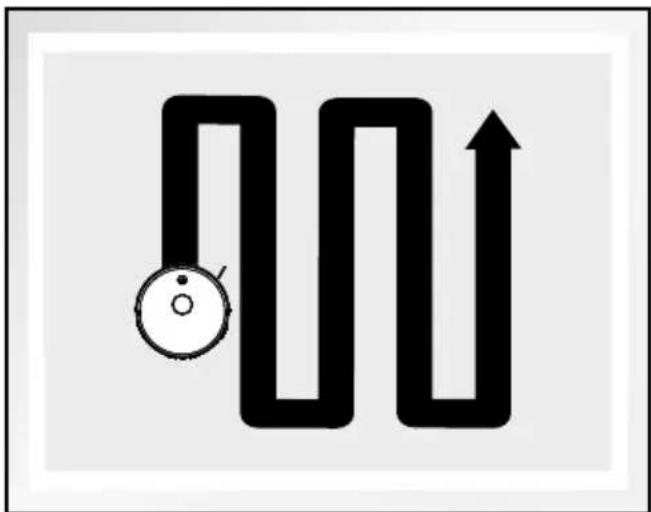
natural_image
Abstract black-and-white diagram of a maze with an arrow indicating direction (no text or symbols)Note: After 10 minutes without a command, the robot vacuum cleaner will enter sleep mode. Pressing the ⏻ On/Off button 9 wakes the robot vacuum cleaner up and out of its sleeping state. Press this button again and the robot vacuum cleaner will automatically start cleaning.
Pausing
☐ When the robot vacuum cleaner is in operation, press the ⏻ On/Off 9 button on the vacuum cleaner or in the app to pause cleaning.
To restart it, press the On/Off button 9 on the vacuum cleaner or in the app to stop the pause function.
●Cleaningmodes
The product features different cleaning modes for better results. You can select the modes in the app.
To switch to the next mode, ensure the product is "awake". If it is in sleep mode, press the ⏻ On/Off button 9 to exit sleep mode.
Smart/auto cleaning

natural_image
Abstract black-and-white diagram of a winding path with an arrow and circular symbol (no text or labels)The robot vacuum cleaner will start with automatic cleaning. During the cleaning process, it recognises the places it has not yet cleaned, then carries out extra cleaning automatically at a later point in time with even higher levels of cleaning efficiency.
☐ Select the corresponding function in the app to start automatic cleaning.
Spot mode
natural_image
Pure schematic diagram of a mechanical or electrical component with no text, numbers, or symbolsThis mode is suitable for very dirty or very dusty areas. In spot cleaning mode, the product will focus on one area to clean.
☐ Select the corresponding function in the app to start this mode.
Note: Spot mode will end automatically, and the robot vacuum cleaner enters standby mode.
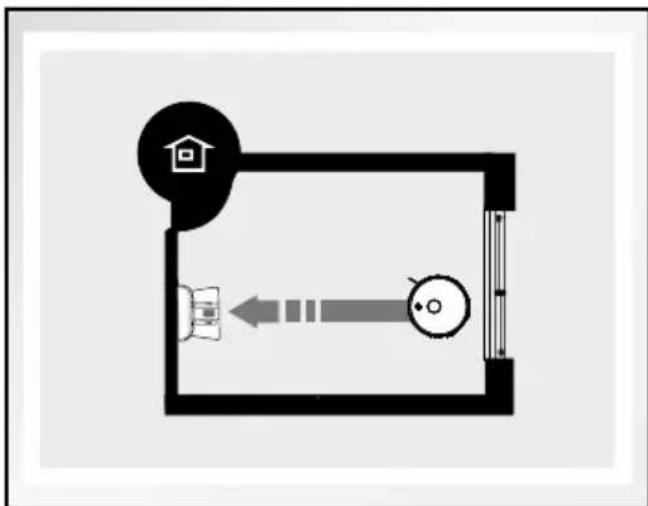
Home mode
natural_image
Simple floor plan diagram with a house icon and directional arrow (no text or labels)Use this mode to return the product to the suction station 14.
Note: The robot vacuum cleaner automatically returns to the suction station 14 when the battery is low.
☐ Select the corresponding function in the app so that the robot vacuum cleaner returns to the suction station 14.
Use the suction function
If the robot vacuum cleaner is connected to the suction station 14 then the charging process starts immediately. After 3 seconds, the suction station 14 sucks out dust from the robot vacuum cleaner for 15 seconds. During this process, the operating control light 21 flashes orange.
Note: Dust extraction is then carried out after the robot vacuum cleaner has vacuumed for at least 10 minutes in auto mode and no other settings have been set in the app regarding the suction function. If you have selected another setting then dust extraction will start accordingly.
natural_image
Diagram of a circular device with a rectangular base and cable, connected to a small electronic component (no text or symbols)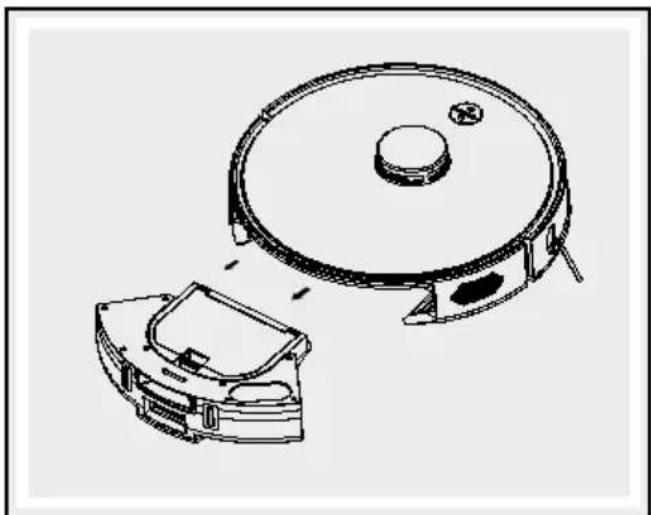
natural_image
Technical line drawing of a robotic vacuum cleaner with a circular housing and internal components (no text or symbols)● Cleaning and storage
Hold down the On/Off button 9 for at least 5 seconds to switch off the robot vacuum cleaner before cleaning the product.
■ Unplug the power cable from the mains socket before cleaning the product.
Do not rinse the product directly with water.
Do not wipe the product with a cloth soaked in water.
■ Disconnect the power supply if the product will not be used for an extended period.

natural_image
Technical line drawing of a mechanical component with an open lid and internal compartments (no text or symbols)| Part Cleaning intervals | |
| Dust collector 4 | Depends on usage |
| Primary filter, high performance filter 15 | Weekly, 2 x weekly if very dirty |
| Side brush 7 | Every 4 weeks |
| Anti-drop sensors 2 | Every 2 weeks |
| Front wheel 1 | Every 4 weeks |
natural_image
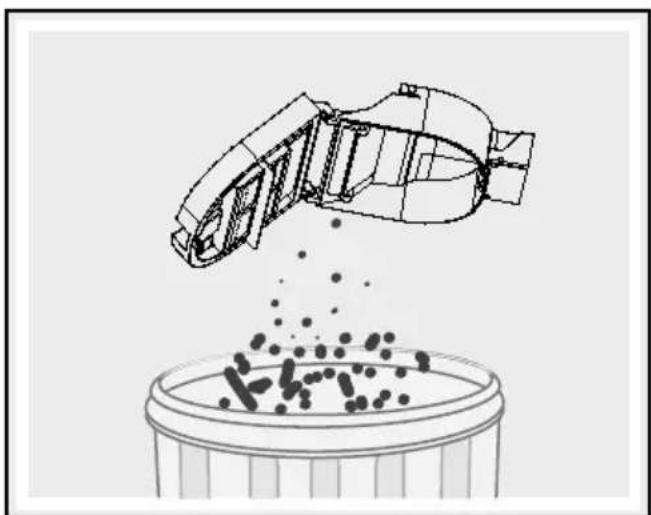
Diagram of a mechanical component pouring particles into a container (no text or symbols)Cleaning the dust collector and filter
□ Clean the dust collector 4 by tapping out the dust and then rinsing with water. You can likewise tap the dirt out of the primary filter and clean it with water. Please dry the dust collector 4 and the primary filter fully before re-installing them in the product. Please tap the dirt out of the high performance filter 15 and clean with the included cleaning brush 17. Please do not clean this filter with water.
☐ Proceed as shown in the following illustrations.

natural_image
Technical line drawing of a mechanical assembly with no visible text or symbolsClean side brush
□ Clean the side brush 7 by removing any hair or dirt.
☐ Replace a faulty side brush 7. Proceed as follows:
☐ Remove the faulty side brush 7 by unscrewing the screws counter-clockwise with a cross-tip screwdriver.
☐ Install the new side brush 7 in the designated opening, and tighten the screws clockwise.
□ Verify that the side brush 7 is secure.

natural_image
Technical line drawing of a mechanical assembly with gears and components (no text or symbols)
natural_image
Technical line drawing of a vacuum cleaner with a circular housing and attached casing (no text or symbols)
natural_image
Line drawing of a hand holding a small mechanical component (no text or symbols)Cleaning the main housing
□ Clean the front wheel 1 to remove any tangled hair.
□ Clean the anti-drop sensors 2 to maintain their sensitivity.
□ Clean the anti-collision sensor to maintain its sensitivity.

natural_image
Technical diagram of a mechanical assembly with an inset magnified view of a component detail (no text or symbols present)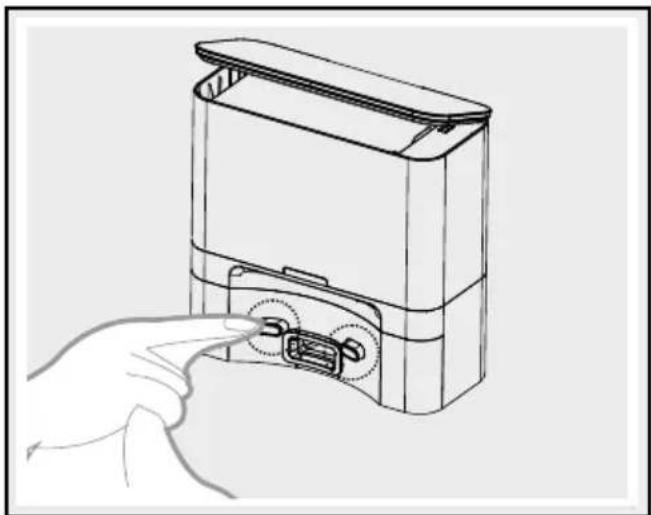
natural_image
Line drawing of a hand inserting a USB into a device housing (no text or symbols)
natural_image
Line drawing of a mounted device with a hand pointing to the side (no text or symbols)- Cleaning the side wheels
Remove any dirt that has stuck to the side wheels 5.

natural_image
Technical diagram of a mechanical assembly with a magnified inset showing internal components (no text or labels)
natural_image
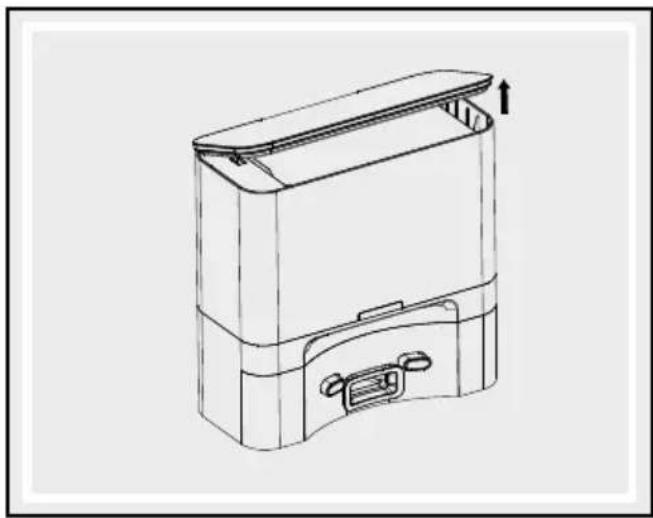
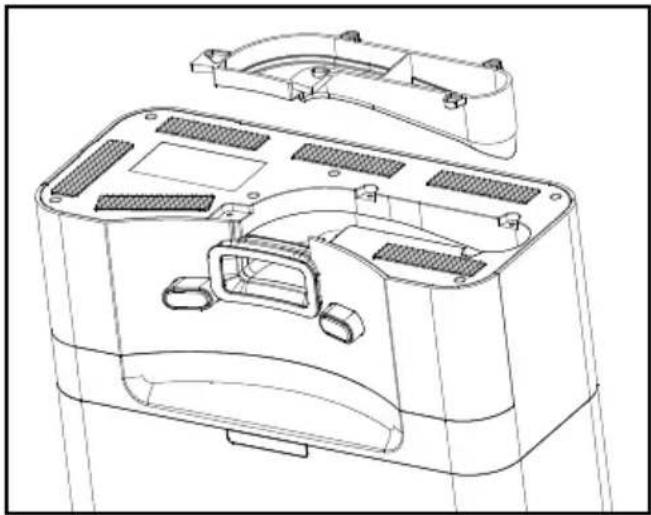
Technical diagram of a mechanical assembly inside a spherical housing, showing internal components and no visible text or symbols.Replace the dust bag
Open up the suction station 14 and remove the used dust bag 16. Insert a new dust bag 16 into the suction station 14, then close the cover again.
Cleaning the suction station
Clean the charging sockets, 19 on the suction station 14 and on the side of the robot vacuum cleaner with a damp cloth.
natural_image
Line drawing of a rectangular electronic device with a lid and handle, no text or symbols present
natural_image
Technical line drawing of a mechanical device with a cylindrical base and internal components, no text or symbols present.
natural_image
Technical line drawing of a mechanical device with open lid and internal compartments (no text or symbols)Note: A faulty dust bag 16 can damage the suction station 14. Before insertion, check that the dust bag 16 is intact.
Note: The dust bag 16 is a consumable with a service life of around one-and-a-half months. Please check it regularly and replace it to avoid damage resulting from long-term use.
Note: If dirt collects above the filter on the suction station 14 then remove it in good time so that the fan motor is not blocked and that operation is not impaired in any way.
Clean suction opening
If foreign objects block the suction opening in the suction station 14 then unplug the mains and turn over the suction station 14.
☐ Proceed as shown in the illustration when it comes to removing the transparent cover with a screw-driver. Do not use any force to do so!
Remove the foreign object.
□ Afterwards, carefully put the cover back on.
natural_image
Technical line drawing of a device casing with internal compartments and mounting brackets (no text or symbols)● Troubleshooting/Problemsolving
The robot vacuum cleaner frequently indicates errors with a short beep:
| No. Cause Solution | ||
| 01 | The anti-drop sensors 2 and the anti-collision sensor 8 are not working. | Clean the anti-drop sensors 2 and the anti-collision sensor 8 to remove any foreign objects. |
| 02 The robot vacuum cleaner is stuck and is no longer moving. | Carry the robot vacuum cleaner to a different location and restart it. | |
Note: If the suggested solutions do not solve the problem, proceed as follows:
☐ Reset the robot vacuum cleaner by switching it off and back on again using ⏻ the On/Off button 9.
☐ If the robot vacuum cleaner still does not work after this reset, please contact the service centre.
| Fault Possible cause Solution | ||
| The run time of the robot vacuum cleaner is too short. | The battery is not fully charged. | Recharge the robot vacuum cleaner. |
| The suction power of the robot vacuum cleaner has decreased. | The high performance filter 15 is dirty or moist. | Clean the high performance filter 15 or replace it with a new one. |
| The dust collector 4 is spilling dirt. | The dust collector 4 is too full. | Empty the dust collector 4. |
●Disposal
The packaging is made entirely of recyclable materials, which you may dispose of at local recycling facilities.
Observe the marking of the packaging materials for waste separation, which are marked with abbreviations (a) and numbers (b) with following meaning: 1-7: plastics/20-22: paper and fibre-board/80-98: composite materials.

Contact your local refuse disposal authority for more details of how to dispose of your worn-out product.
To help protect the environment, please dispose of the product properly when it has reached the end of its useful life and not in the household waste. Information
on collection points and their opening hours can be obtained from your local authority.

The product incl. accessories and packaging materials are recyclable and are subject to extended producer responsibility. Dispose them separately, following the illustrated Info-tri (sorting information), for better waste treatment. The Triman logo is valid in France only.
Faulty or used batteries/rechargeable batteries must be recycled in accordance with Directive 2006/66/EC and its amendments. Please return the batteries/rechargeable batteries and/or the product to the available collection points.
Environmental damage through incorrect disposal of the batteries/rechargeable batteries!
Batteries/rechargeable batteries may not be disposed of with the usual domestic waste. They may contain toxic heavy metals and are subject to hazardous waste treatment rules and regulations. The chemical symbols for heavy metals are as follows: Cd = cadmium, Hg = mercury, Pb = lead. That is why you should dispose of used batteries/rechargeable batteries at a local collection point.
Robot vacuum cleaner only
The built-in rechargeable battery cannot be removed for disposal. Return the entire product to a waste electronics collection point.
● Warranty/Service
Dear customer,
Our products are submitted to strict quality control. However, we do apologise if this device does not work properly and ask you to contact our Customer Service Department listed below. Please feel free to phone us using the Service Hotline specified. Warranty claims are subject to - without limiting your legal rights.
The following:
- Warranty claims must be filed within a period of max. 3 years from the date of purchase. Our warranty services are limited to correcting defects in material and manufacture, or replacement of the device. Our warranty service is free of charge to you.
- Warranty claims must always be filed promptly upon discovery.
- Warranty claims will not be accepted after the warranty period has expired.
- Please keep your receipt as proof of purchase.
Not covered by warranty:
- improper or incorrect handling
- failure to observe the safety notes for the device
-
using force
-
changes not performed by an authorised service centre
- damage due to return in packaging not safe for transport (the sales packaging of this product is not suitable for separate shipping)
- Self-induced damage due to e.g. impact, shock, drops
- Failure to observe the instructions for use
- normal wear
- unauthorised repairs
You may request the instructions for use in PDF format from our Customer Service Department.
Service GB IE
Tel.: 00800-83300000
E-Mail: support.lidl@ksr-group.com

https://ksr.navonline-helpdesk.de
IAN 442213\_2304
Please have your receipt and item number (IAN 442213_2304) ready as your proof of purchase when enquiring about the product.
Hotline hours:
Monday to Friday 09:00 to 18:00 (CET)
● Declaration of conformity
This product fulfils the requirements of the applicable European and national directives. This is confirmed by the CE mark. The relevant declarations are held by the manufacturer.
https://ksr.navonline-helpdesk.de

natural_image
Line drawing of a refrigerator with a wall-mounted power outlet and side panel (no text or symbols)
natural_image
Diagram of a circular device with a rectangular base and cable, connected to a small rectangular component (no text or symbols)natural_image
Illustration of a hand adjusting a circular component with a knob, mounted on a curved cable (no text or symbols)
natural_image
Two 3D wireframe room layouts showing a robotic vacuum cleaner inside and a smaller robotic vacuum cleaner in the interior, with no text or symbols present.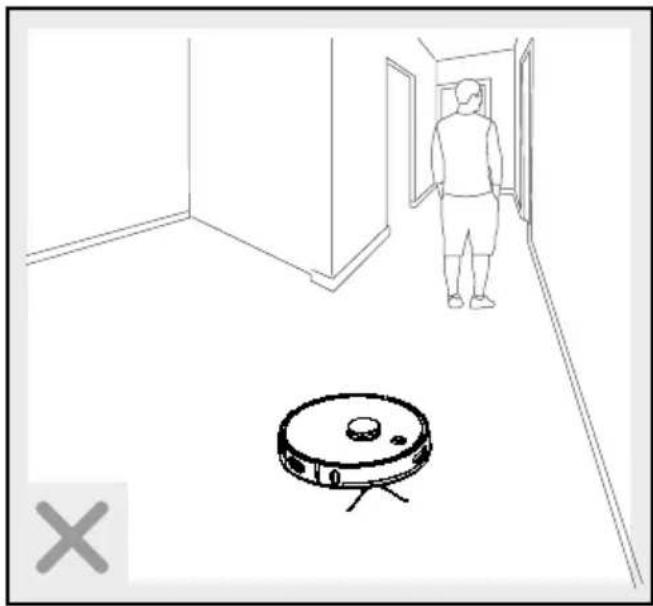
natural_image
Line drawing of a person walking through a hallway with a robotic vacuum cleaner nearby (no text or symbols)natural_image
Line drawing of a staircase with a circular object on top and a person standing nearby (no text or symbols)natural_image
Illustration of a hand pointing at a circular component with a hole, mounted on a curved cable (no text or symbols)
natural_image
Abstract black-and-white diagram of a winding path with an arrowhead, no text or symbols presentnatural_image
Abstract black-and-white diagram of a winding path with an arrow and circular symbol (no text or labels)natural_image
Pure schematic diagram of a mechanical or electrical component with no text, numbers, or symbolsnatural_image
Simple line drawing of a room layout with a house icon and directional arrow (no text or symbols)natural_image
Diagram of a circular device with a rectangular base and cable, connected to a small rectangular component (no text or symbols)natural_image
Technical line drawing of a robotic vacuum cleaner with internal components (no text or symbols)
natural_image
Technical line drawing of a mechanical component with an open lid and internal compartments (no text or symbols)
natural_image
Diagram of a mechanical component pouring particles into a container (no text or symbols)
natural_image
Technical line drawing of a mechanical assembly with no visible text or symbolsnatural_image
Technical line drawing of a mechanical assembly with gears and shafts (no text or symbols)
natural_image
Technical line drawing of a robotic vacuum cleaner with a circular housing and open lid (no text or symbols)
natural_image
Line drawing of a hand holding a small mechanical component (no text or symbols)natural_image
Technical diagram of a mechanical device with internal components and a magnified inset showing a detail (no text or symbols present)
natural_image
Line drawing of a handheld electronic device with control panel and indicator lights (no text or symbols)
natural_image
Technical diagram of a mechanical assembly with a magnified inset showing internal components (no text or labels)natural_image
Line drawing of a hand inserting a USB into a device housing (no text or symbols)natural_image
Cross-sectional diagram of a mechanical or electrical component with no visible text or symbolsnatural_image
Line drawing of a rectangular electronic device with a lid and handle, showing internal components and an upward arrow indicating motion (no text or symbols)
natural_image
Technical line drawing of a mechanical device with open lid, internal casing, and base component (no text or symbols)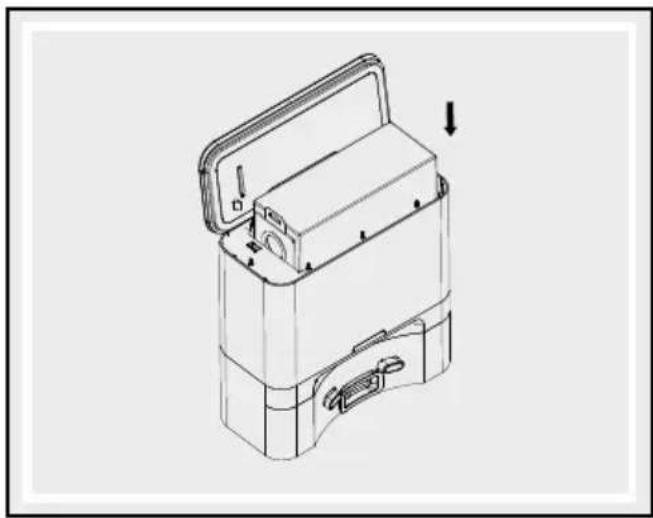
natural_image
Technical line drawing of a mechanical device with open lid and internal compartments, showing no text or symbolsnatural_image
Technical line drawing of a device casing with internal compartments and mounting brackets (no text or symbols)https://ksr.navonline-helpdesk.de
IAN 442213\_2304
natural_image
Technical line drawing of a refrigerator with front and side views, showing internal components and wiring (no text or symbols)
Product opladen
natural_image
Diagram of a circular device with a rectangular base and cable, connected to a small rectangular component (no text or symbols)natural_image
Illustration of a hand adjusting a circular component with a knob, mounted on a curved cable (no text or symbols)- Via de Lidl Home-app bedienen
De Lidl Home-app vindt u in de Google Play Store of Apple App Store.

natural_image
Two 3D wireframe room layouts showing a robotic vacuum cleaner inside and a smaller robotic vacuum cleaner in the interior, with no text or symbols present.
natural_image
Line drawing of a room interior with a person standing near a robotic vacuum cleaner (no text or symbols)natural_image
Line drawing of a staircase with a circular object on top, viewed from the side by a person (no text or symbols)natural_image
Illustration of a hand adjusting a circular component with a pointer (no text or symbols)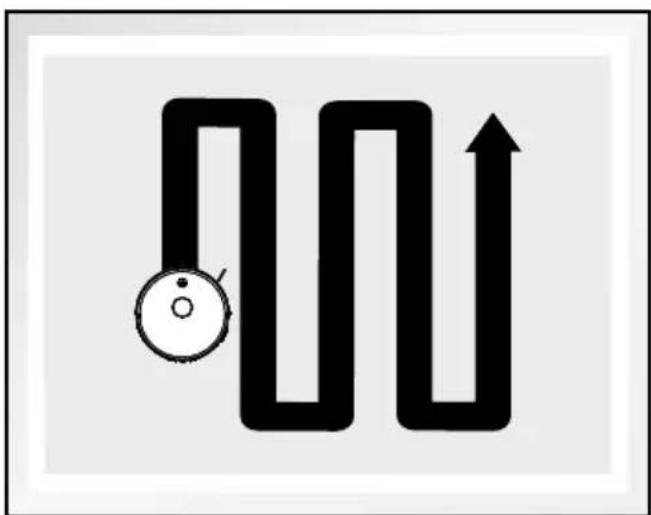
natural_image
Abstract black-and-white diagram of a maze with an arrow indicating direction (no text or symbols)natural_image
Abstract black-and-white diagram of a maze with an arrow indicating direction (no text or symbols)natural_image
Pure schematic diagram of a mechanical or electrical component with no text, numbers, or symbolsnatural_image
Simple floor plan diagram with a house icon and directional arrow (no text or symbols)natural_image
Diagram of a circular device with a rectangular base and cable, connected to a small rectangular component (no text or symbols)natural_image
Technical line drawing of a robotic vacuum cleaner with internal components (no text or symbols)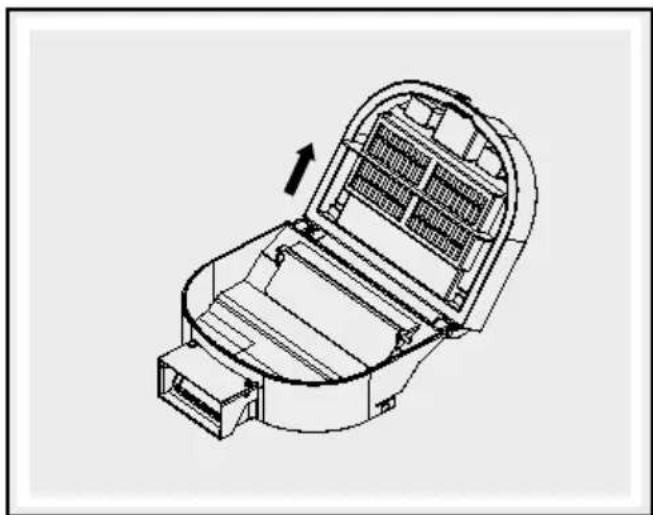
natural_image
Technical line drawing of a mechanical device with an open lid and internal compartments, showing no text or symbols.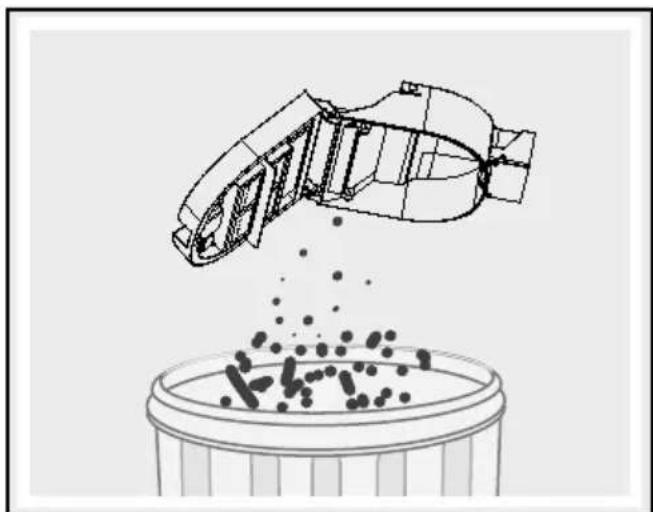
natural_image
Diagram of a mechanical device pouring particles into a container (no text or symbols)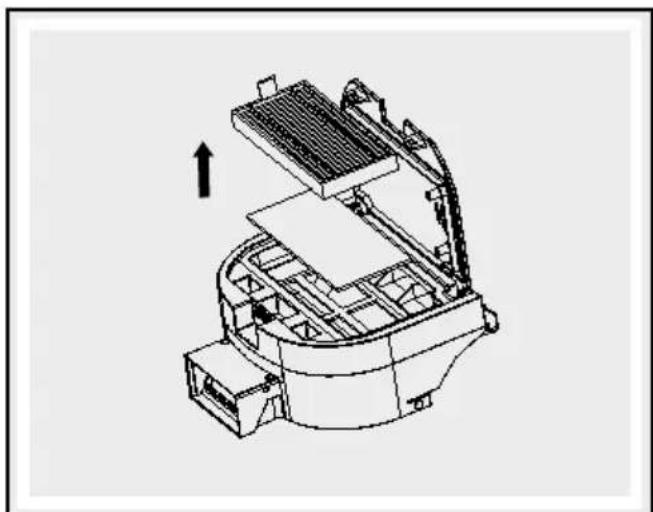
natural_image
Technical line drawing of a mechanical device with internal components and an upward arrow indicating motion (no text or symbols)Zijborstel reinigen
natural_image
Technical line drawing of a mechanical assembly with gears and components (no text or symbols)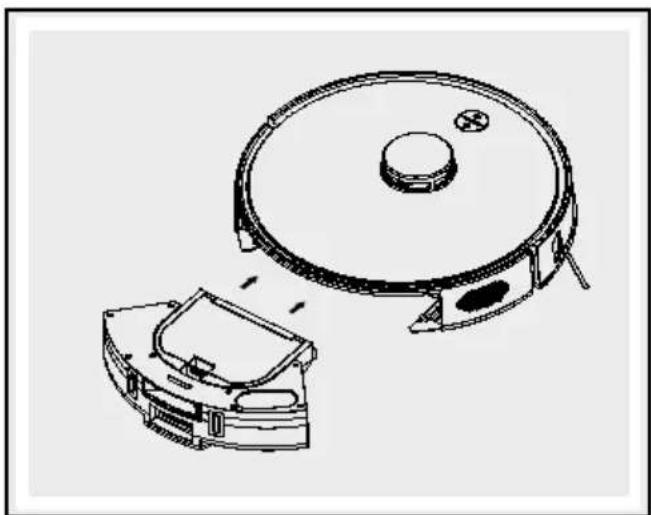
natural_image
Technical line drawing of a robotic vacuum cleaner with a circular housing and open lid (no text or symbols)
natural_image
Line drawing of a hand holding a small propeller airplane (no text or symbols)Behuizing reinigen
natural_image
Technical diagram of a mechanical device with internal components and a magnified inset showing a detail (no text or symbols present)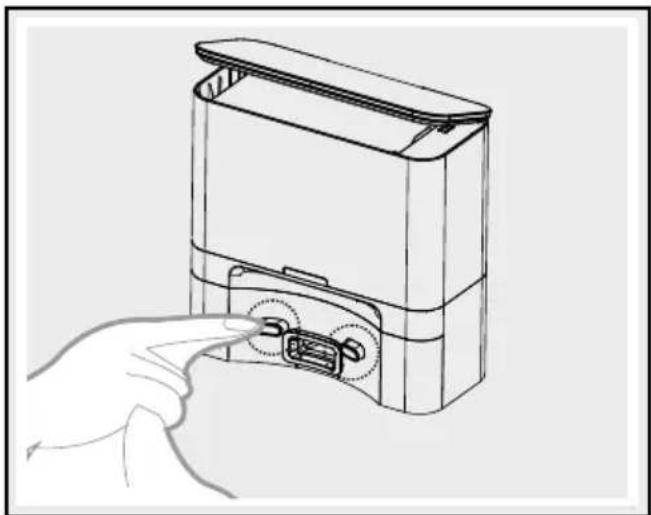
natural_image
Line drawing of a hand inserting a USB into a device housing (no text or symbols)Zijwielenreinigen
natural_image
Line drawing of a mounted device with adjustment knobs and a hand pointing to the left side (no text or symbols)
natural_image
Technical diagram of a mechanical assembly inside a spherical housing, showing internal components and no visible text or symbols.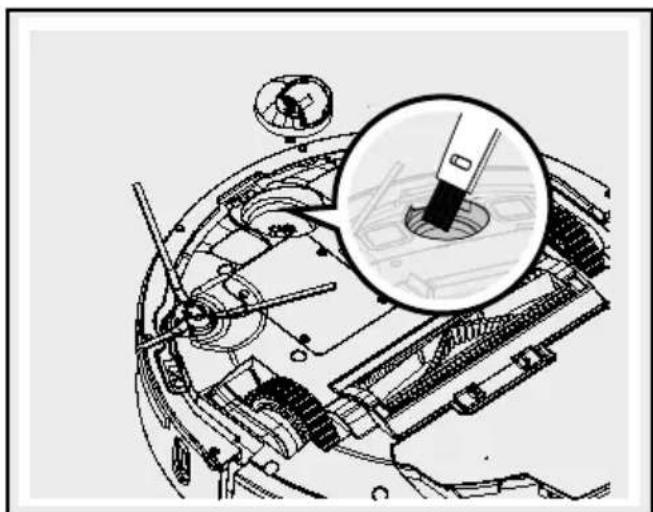
natural_image
Technical diagram of a mechanical assembly with a magnified inset showing internal components (no text or labels)Stofzak vervangen
natural_image
Line drawing of a rectangular electronic device with lid and ports, no text or symbols presentAfzuigstation reinigen
natural_image
Technical line drawing of a mechanical device with open lid, internal components, and a cylindrical base (no text or symbols)
natural_image
Technical line drawing of a mechanical device with open lid and internal compartments, showing no text or symbolsnatural_image
Technical line drawing of a device casing with internal compartments and mounting brackets (no text or symbols)● Storingen/problemenoplossen
https://ksr.navonline-helpdesk.de
IAN 442213\_2304
STWO UTRATY ŻYCIA I WYPADKU DLA DZIECI!
natural_image
Line drawing of a refrigerator with a wall-mounted power outlet and side panel (no text or symbols)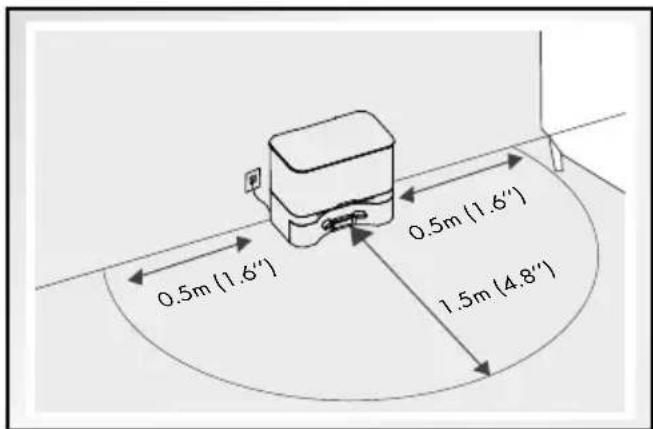
Ładowanieproduktu
natural_image
Diagram of a circular device with a rectangular base and cable, connected to a small rectangular component (no text or symbols)natural_image
Hand pointing at a circular component with a knob, mounted on a curved metal frame (no text or symbols visible)
natural_image
Two 3D line drawings of a room with furniture and a robotic vacuum cleaner, no text or symbols present.
natural_image
Two technical line drawings showing room layouts and a robotic vacuum cleaner, with no visible text or symbols.natural_image
Hand pointing at a circular component with a knob, mounted on a curved mechanical part (no text or symbols visible)
natural_image
Abstract black-and-white diagram of a maze with an arrow indicating direction (no text or symbols)natural_image
Abstract black-and-white diagram of a winding path with an arrow and circular symbol (no text or labels)natural_image
Pure electrical circuit lines without any symbolsnatural_image
Simple line drawing of a room layout with a house icon and directional arrow (no text or symbols)natural_image
Diagram of a circular device with a rectangular base and cable, connected to a small electronic component (no text or symbols)natural_image
Technical line drawing of a robotic vacuum cleaner with a circular housing and internal components (no text or symbols)
natural_image
Technical line drawing of a mechanical component with an open lid and internal compartments (no text or symbols)
natural_image
Diagram of a mechanical device pouring particles into a container (no text or symbols)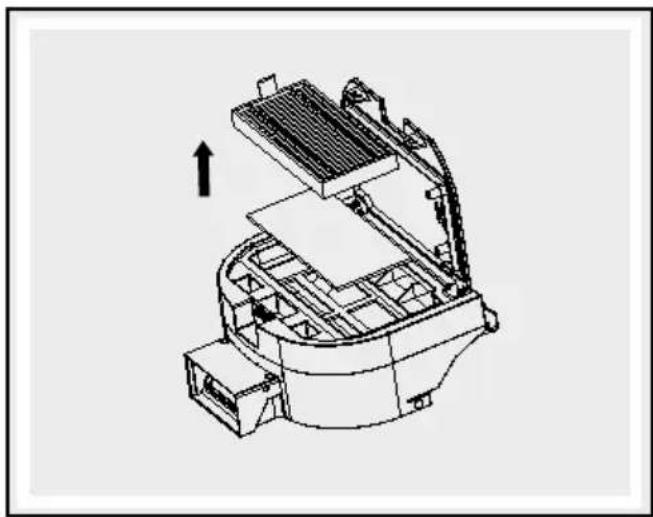
natural_image
Technical line drawing of a mechanical device with internal components and an upward arrow indicating motion (no text or symbols)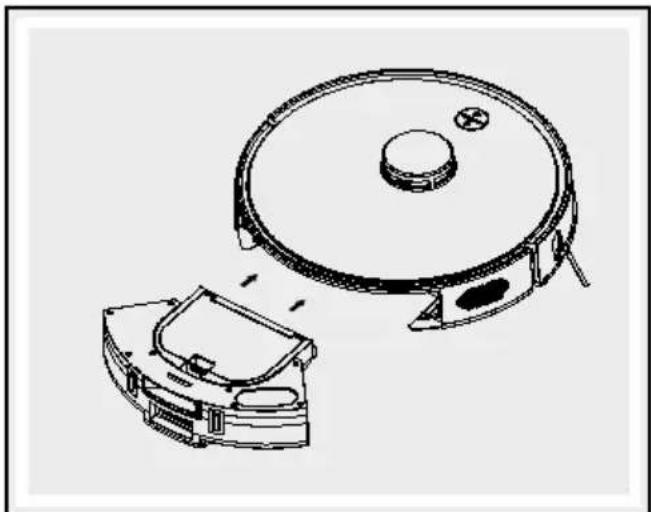
natural_image
Technical line drawing of a vacuum cleaner with a circular housing and attached device (no text or symbols)natural_image
Technical line drawing of a mechanical assembly with gears and components (no text or labels)
natural_image
Line drawing of a hand holding a small propeller airplane (no text or symbols)natural_image
Technical diagram of a mechanical device with internal components and an inset magnified view (no text or labels)
natural_image
Line drawing of a mounted device with a hand pointing to the left side (no text or symbols)
natural_image
Technical diagram of a mechanical assembly with a magnified inset showing a tool interacting with a component (no visible text or labels)natural_image
Line drawing of a hand inserting a USB into a device housing (no text or symbols)natural_image
Cross-sectional diagram of a mechanical or electrical component with no visible text or symbolsWymiana worka na kurz
natural_image
Line drawing of a rectangular electronic device with a handle and mounting bracket (no text or symbols)
natural_image
Technical line drawing of a mechanical device with an open lid, showing internal components and a cylindrical base (no text or symbols)
natural_image
Technical line drawing of a mechanical device with open lid and internal compartments (no text or symbols)natural_image
Technical line drawing of a device casing with internal compartments and mounting brackets (no text or symbols)https://ksr.navonline-helpdesk.de
IAN 442213\_2304
NOSTE OCHRANNÉ RUKAVICE! Vyteklé i
natural_image
Technical line drawing of a refrigerator with front and side views (no text or symbols)
Nabíjení výrobku
natural_image
Diagram of a circular device with a rectangular base and cable, connected to a small rectangular component (no text or symbols)natural_image
Illustration of a hand adjusting a circular component with a knob, mounted on a curved cable (no text or symbols)
natural_image
Two 3D wireframe room layouts showing a robotic vacuum cleaner inside and a circular robot on the floor, with no text or symbols present.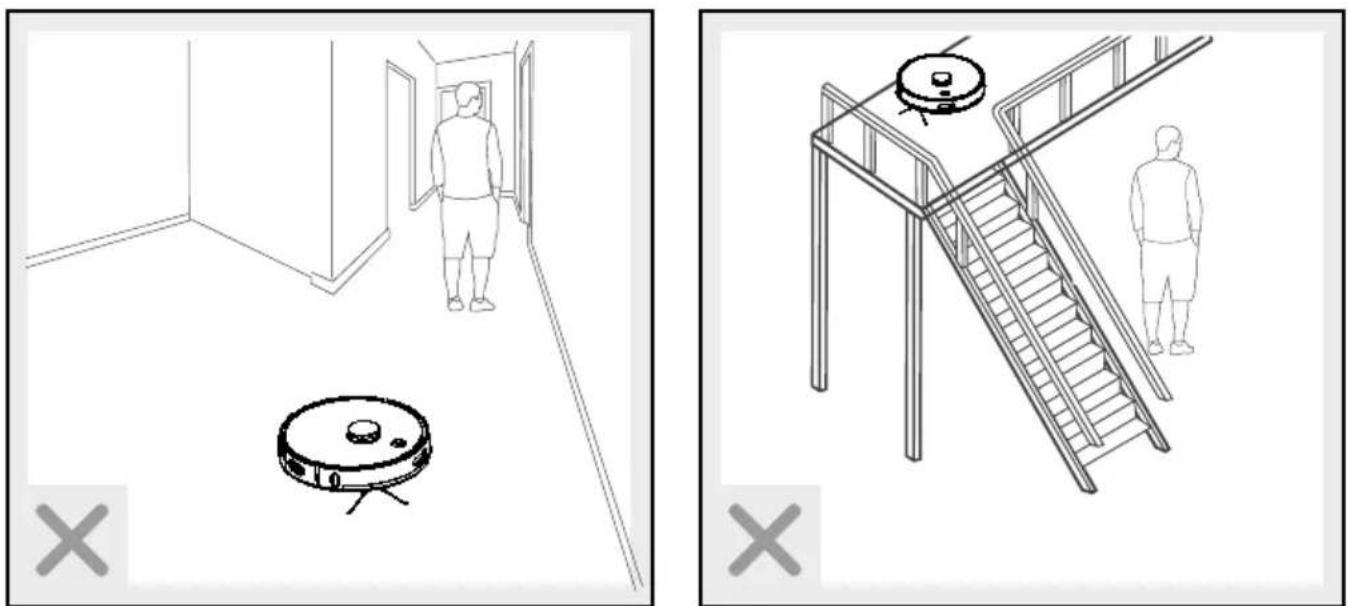
natural_image
Two technical line drawings showing room layouts and a robotic vacuum cleaner, with no visible text or symbols.natural_image
Illustration of a hand holding a circular component with a knob, next to a ring (no text or symbols)
natural_image
Abstract black-and-white diagram of a maze with an arrow indicating direction (no text or symbols)natural_image
Abstract black-and-white diagram of a winding path with an arrow and circular symbol (no text or labels)natural_image
Pure schematic diagram of a mechanical or electrical component with no text, numbers, or symbolsnatural_image
Simple floor plan diagram with a house icon and directional arrow (no text or labels)natural_image
Diagram of a circular device with a rectangular base and cable, connected to a small rectangular component (no text or symbols)natural_image
Technical line drawing of a robotic vacuum cleaner with a circular housing and internal components (no text or symbols)
natural_image
Technical line drawing of a mechanical component with an open lid and internal compartments (no text or symbols)
natural_image
Diagram of a mechanical component pouring particles into a container (no text or symbols)
natural_image
Technical line drawing of a mechanical device with internal components and an upward arrow indicating motion (no text or symbols)
natural_image
Technical line drawing of a robotic vacuum cleaner with a circular housing and open lid (no text or symbols)natural_image
Technical line drawing of a mechanical assembly with internal components (no text or symbols)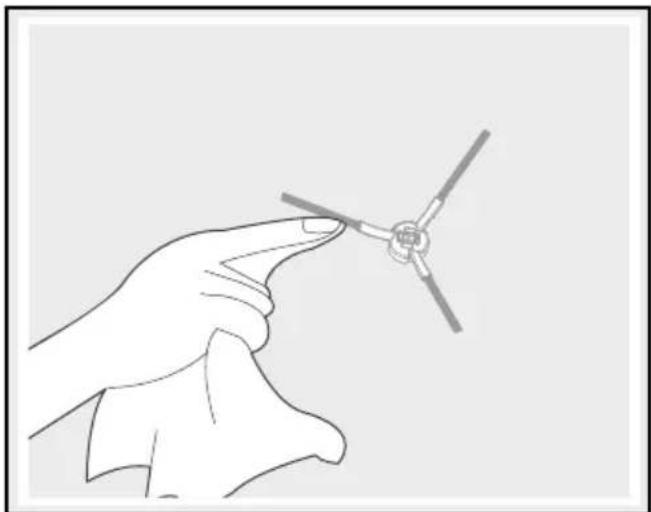
natural_image
Line drawing of a hand holding a small mechanical component (no text or symbols)natural_image
Technical diagram of a mechanical device with internal components and a magnified inset showing a detail (no text or symbols present)
natural_image
Line drawing of a mechanical device with a hand adjusting its top view (no text or symbols)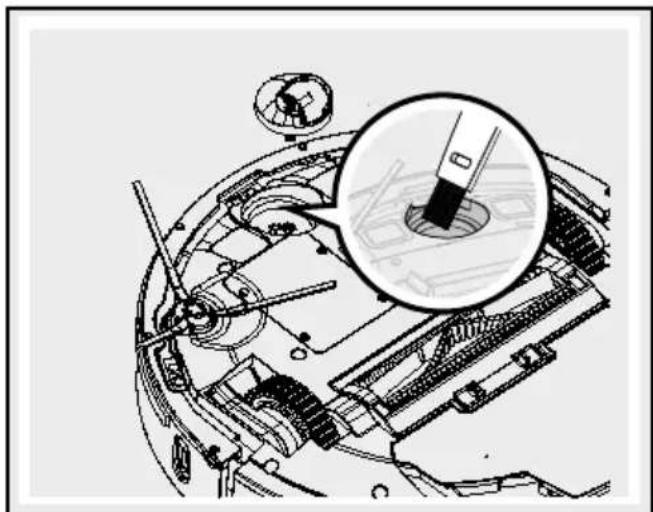
natural_image
Technical diagram of a mechanical assembly with a magnified inset showing a tool interacting with a component (no visible text or labels)natural_image
Line drawing of a hand inserting a USB into a device housing (no text or symbols)natural_image
Technical line drawing of a mechanical assembly inside a spherical housing, showing internal components and no text or symbols.natural_image
Line drawing of a rectangular electronic device with a handle and top panel, showing internal components and an upward arrow indicating motion (no text or symbols)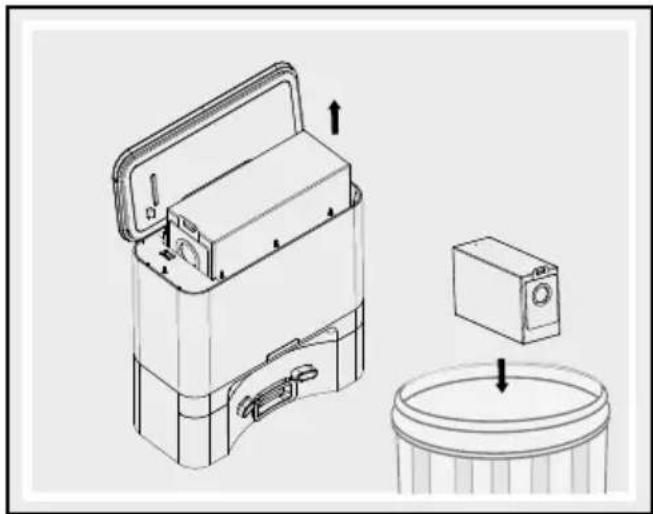
natural_image
Technical line drawing of a mechanical device with open lid, internal casing, and cylindrical base (no text or symbols)
natural_image
Technical line drawing of a mechanical device with open lid and internal compartments, showing no text or symbolsnatural_image
Technical line drawing of a device casing with internal compartments and mounting brackets (no text or symbols)https://ksr.navonline-helpdesk.de
IAN 442213\_2304
NOSTE OCHRANNÉ RUKAVICE! Vytečené
natural_image
Technical line drawing of a refrigerator with front and side views, showing internal components and wiring (no text or symbols)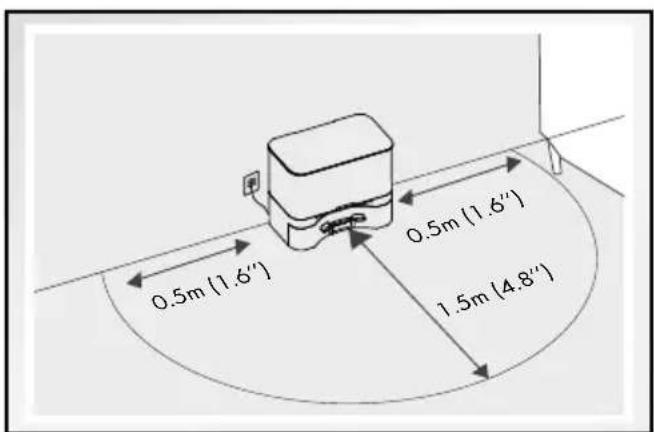
Nabíjanie výrobku
natural_image
Diagram of a circular device with a rectangular base and cable, connected to a small electronic component (no text or symbols)natural_image
Illustration of a hand adjusting a circular component with a pointer (no text or symbols)
natural_image
Two 3D wireframe room layouts showing a robotic vacuum cleaner inside and a smaller robotic vacuum cleaner in the interior, with no text or symbols present.
natural_image
Line drawing of a person standing in a hallway with a robotic vacuum cleaner nearby (no text or symbols)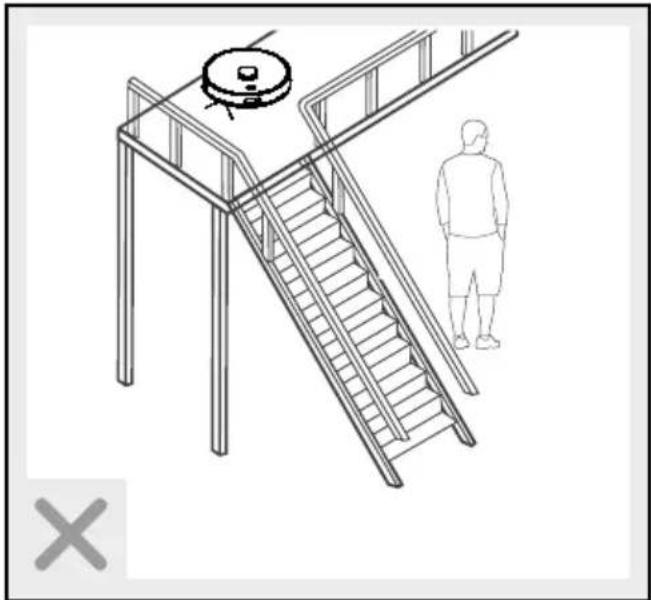
natural_image
Line drawing of a staircase with a circular object on top, and a person standing nearby (no text or symbols)natural_image
Illustration of a hand adjusting a circular component with a pointer (no text or symbols)
natural_image
Abstract black-and-white diagram of a winding path with an arrow and circular symbol (no text or labels)Čistenie
natural_image
Abstract black-and-white diagram of a winding path with an arrow and circular symbol (no text or labels)natural_image
Pure schematic diagram of a mechanical or electrical component with no text, numbers, or symbolsnatural_image
Simple line drawing of a room layout with a house icon and directional arrow (no text or symbols)natural_image
Diagram of a circular device with a rectangular base and cable, connected to a small rectangular component (no text or symbols)natural_image
Technical line drawing of a robotic vacuum cleaner with a circular housing and internal components (no text or symbols)
natural_image
Technical line drawing of a mechanical device with an open lid and internal compartments (no text or symbols)
natural_image
Diagram of a mechanical device pouring particles into a container (no text or symbols)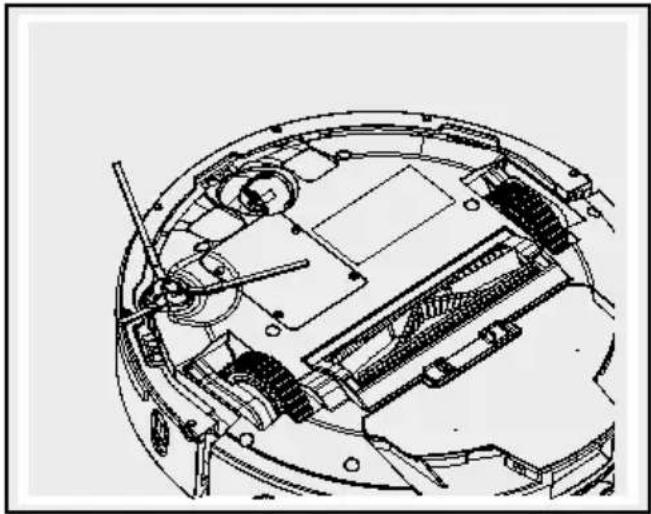
natural_image
Technical line drawing of a mechanical assembly with gears and components (no text or symbols)
natural_image
Technical line drawing of a mechanical assembly with no visible text or symbols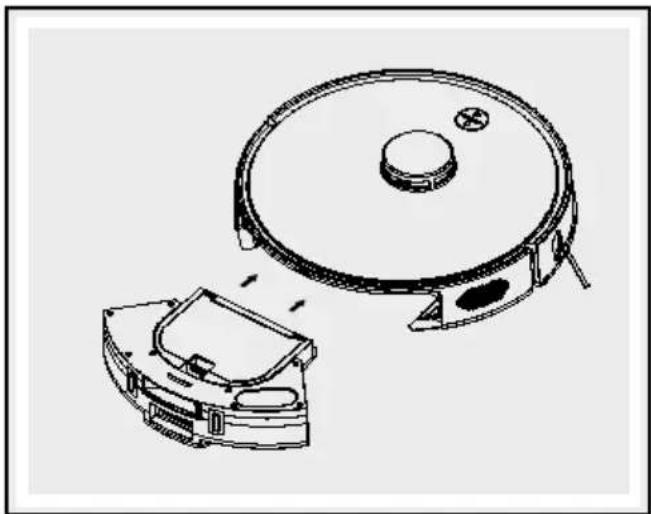
natural_image
Technical line drawing of a vacuum cleaner with internal components and mounting base (no text or symbols)natural_image
Line drawing of a hand holding a small propeller airplane (no text or symbols)natural_image
Technical diagram of a mechanical device with an inset magnified view showing internal components (no text or labels)
natural_image
Line drawing of a hand inserting a USB into a device housing (no text or symbols)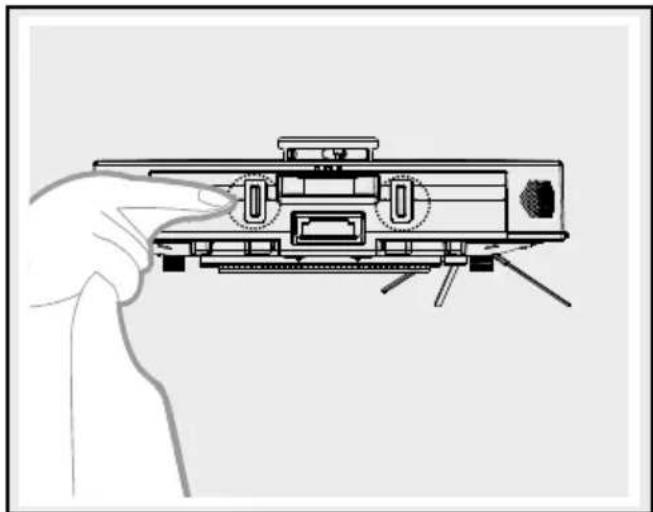
natural_image
Line drawing of a handheld electronic device with control knobs and indicator lights (no text or symbols)natural_image
Technical diagram of a mechanical assembly with a magnified inset showing a tool interacting with a component (no visible text or labels)
natural_image
Technical diagram of a mechanical or electrical component with no visible text, numbers, or symbols.natural_image
Line drawing of a rectangular electronic device with a lid and handle, showing internal components and an upward arrow (no text or symbols)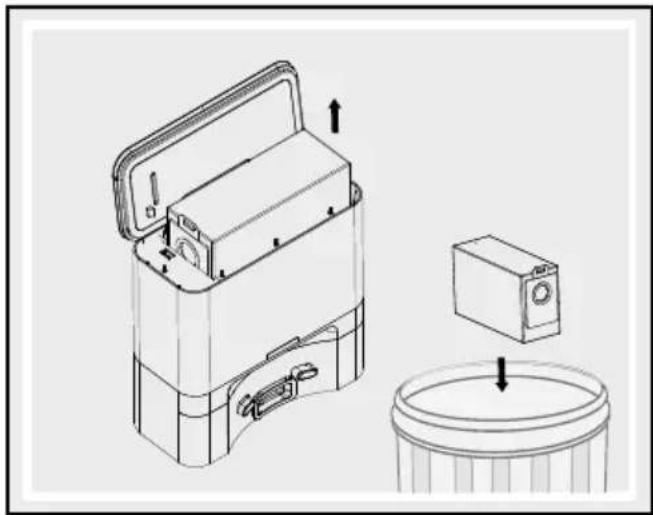
natural_image
Technical line drawing of a mechanical device with open lid, internal components, and a cylindrical base (no text or symbols)
natural_image
Technical line drawing of a mechanical device with open lid and internal compartments, showing no text or symbolsnatural_image
Technical line drawing of a device casing with internal compartments and mounting brackets (no text or symbols)https://ksr.navonline-helpdesk.de
IAN 442213\_2304
natural_image
Line drawing of a refrigerator with a wall-mounted power outlet and side panel (no text or symbols)
natural_image
Diagram of a circular device with a rectangular base and cable, connected to a small electronic component (no text or symbols)natural_image
Hand pointing at a circular component with a hole, mounted on a curved surface (no text or symbols visible)
natural_image
Two 3D wireframe room layouts showing a robotic vacuum cleaner inside and a smaller robotic vacuum cleaner in the interior, with no text or symbols present.
natural_image
Two technical diagrams showing room layouts and staircases with no visible text or symbolsnatural_image
Line drawing of a staircase with a circular object on top and a person standing nearby (no text or symbols)natural_image
Illustration of a hand adjusting a circular component with a pointer (no text or symbols)
natural_image
Abstract black-and-white diagram of a winding path with an arrow and circular symbol (no text or labels)natural_image
Abstract black-and-white diagram of a winding path with an arrow and circular symbol (no text or labels)natural_image
Pure schematic diagram of a mechanical or electrical component with no text, numbers, or symbolsnatural_image
Simple floor plan diagram with a house icon and directional arrows, no text or symbols presentnatural_image
Diagram of a circular device with a rectangular base and cable, connected to a small electronic component (no text or symbols)natural_image
Technical line drawing of a robotic vacuum cleaner with a circular housing and internal components (no text or symbols)
natural_image
Technical line drawing of a mechanical device with an open lid and internal compartments (no text or symbols)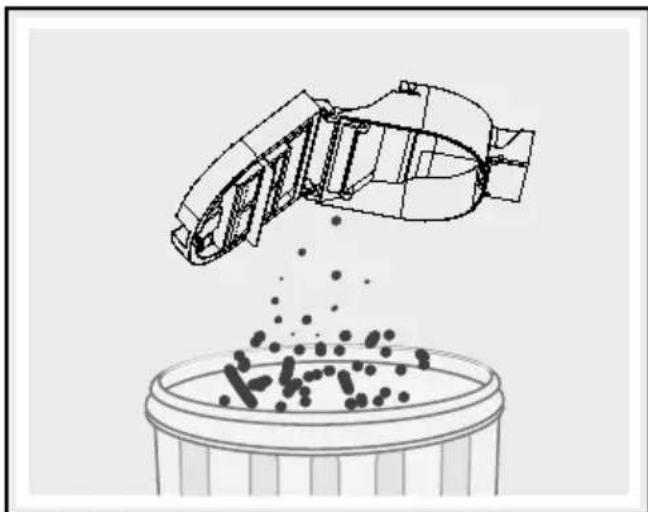
natural_image
Diagram of a mechanical component pouring particles into a container (no text or symbols)
natural_image
Technical line drawing of a mechanical assembly with no visible text or symbolsnatural_image
Technical line drawing of a mechanical assembly with internal components (no text or symbols)
natural_image
Technical line drawing of a robotic vacuum cleaner with a circular housing and attached component (no text or symbols)
natural_image
Line drawing of a hand holding a small propeller airplane (no text or symbols)Limpiar la carcasa principal
natural_image
Technical diagram of a mechanical assembly with an inset magnified view showing internal components (no text or labels)
natural_image
Line drawing of a mounted device with a hand pointing to the left side (no text or symbols)
natural_image
Technical diagram of a mechanical assembly with a magnified inset showing a tool interacting with a component (no visible text or labels)natural_image
Line drawing of a hand inserting a USB into a device housing (no text or symbols)natural_image
Technical line drawing of a mechanical assembly inside a spherical housing, showing internal components and no text or symbols.natural_image
Line drawing of a rectangular electronic device with a handle and top panel, showing internal components and a directional arrow (no text or symbols)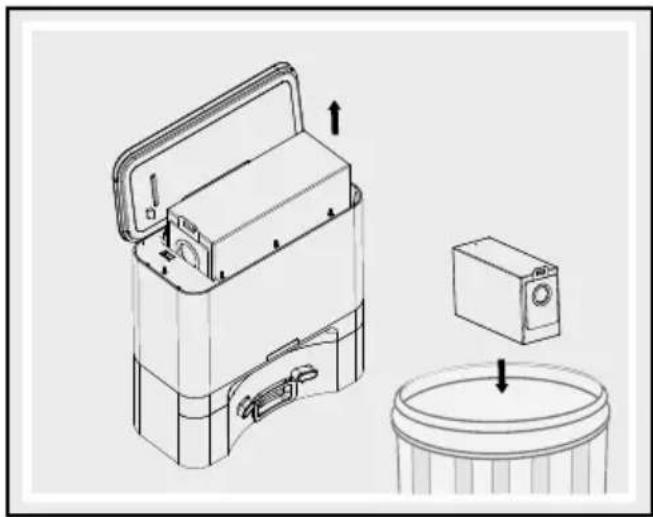
natural_image
Technical line drawing of a mechanical device with an open case, a box, and a cylindrical container (no text or symbols)
natural_image
Technical line drawing of a mechanical device with open lid and internal compartments (no text or symbols)natural_image
Technical line drawing of a device casing with internal compartments and mounting brackets (no text or symbols)https://ksr.navonline-helpdesk.de
IAN 442213\_2304
natural_image
Technical line drawing of a refrigerator with front and side views (no text or symbols)
natural_image
Diagram of a circular device with a rectangular base and cable, connected to a small electronic component (no text or symbols)natural_image
Illustration of a hand adjusting a circular component with a knob, mounted on a curved surface (no text or symbols)● Betjening via LIDL Home-appen
Die Lidl Home-appen finder du i Google Play Store eller Apple App Store.

natural_image
Two line drawings of a room interior with furniture and a robotic vacuum cleaner (no text or symbols)
natural_image
Two technical line drawings showing room layouts and a robotic vacuum cleaner, with no visible text or symbols.natural_image
Illustration of a hand holding a circular component with a knob, next to a ring (no text or symbols)
natural_image
Abstract black-and-white diagram of a maze with an arrow indicating direction (no text or symbols)natural_image
Abstract black-and-white diagram of a winding path with an arrow and circular symbol (no text or labels)natural_image
Pure schematic diagram of a mechanical or electrical component with no text, numbers, or symbolsnatural_image
Floor plan diagram showing a room with a house icon and directional arrow (no text or labels)natural_image
Diagram of a circular device with a rectangular base and cable, connected to a small electronic component (no text or symbols)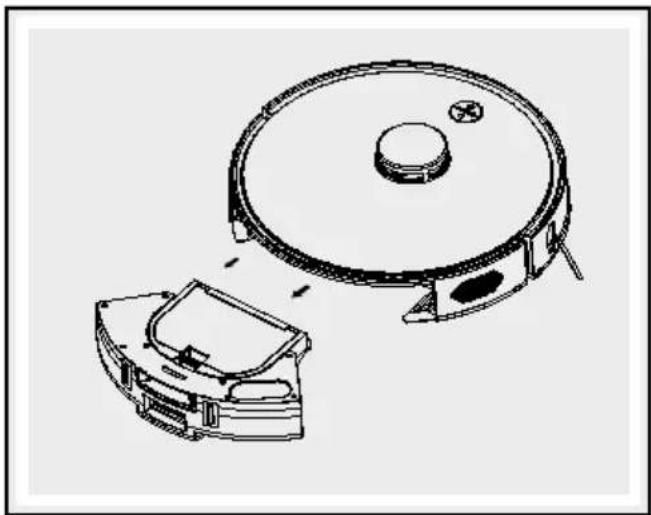
natural_image
Technical line drawing of a circular device with a lid and internal components, showing no text or symbols.natural_image
Technical line drawing of a mechanical component with an open lid and internal compartments (no text or symbols)natural_image
Diagram of a mechanical device pouring particles into a container (no text or symbols)natural_image
Technical line drawing of a mechanical device with internal components and an upward arrow indicating motion (no text or symbols)
natural_image
Technical line drawing of a robotic vacuum cleaner with open lid and circular housing (no text or symbols)natural_image
Technical line drawing of a mechanical assembly with gears and shafts (no text or symbols)
natural_image
Line drawing of a hand pointing at a small propeller airplane (no text or symbols)natural_image
Technical diagram of a mechanical assembly with an inset magnified view of a component (no text or labels)
natural_image
Line drawing of a mounted device with adjustment knobs and a hand pointing to it (no text or symbols)
natural_image
Technical diagram of a mechanical assembly with a magnified inset showing a tool interacting with a component (no visible text or labels)natural_image
Line drawing of a hand inserting a USB into a device housing (no text or symbols)natural_image
Cross-sectional diagram of a mechanical or electrical component with no visible text or symbolsSkift af støvpose
natural_image
Line drawing of a rectangular electronic device with a lid and mounting bracket (no text or symbols)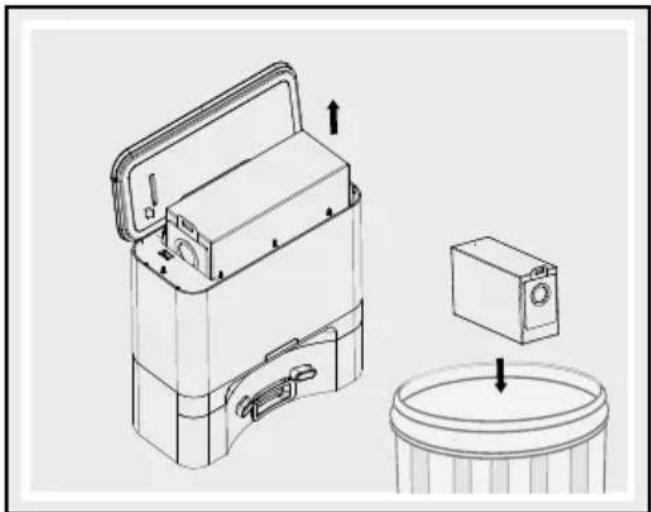
natural_image
Technical line drawing of a mechanical device with open lid, internal casing, and cylindrical base (no text or symbols)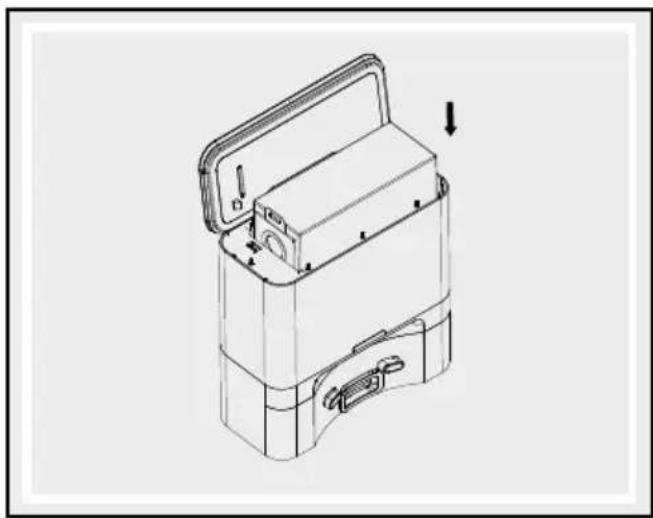
natural_image
Technical line drawing of a mechanical device with open lid and internal compartments (no text or symbols)natural_image
Technical line drawing of a device casing with internal compartments and mounting brackets (no text or symbols)https://ksr.navonline-helpdesk.de
IAN 442213\_2304
natural_image
Line drawing of a refrigerator with a wall-mounted power outlet and side panel (no text or symbols)
natural_image
Technical line drawing of a mechanical device with a circular component and attached cable (no text or symbols)natural_image
Illustration of a hand adjusting a circular component with a knob, mounted on a curved metal frame (no text or symbols)
natural_image
Two 3D wireframe room layouts showing a robotic vacuum cleaner inside and a smaller robotic vacuum cleaner in the interior, with no text or symbols present.
natural_image
Two technical line drawings showing room layouts and a robotic vacuum cleaner, with no visible text or symbols.natural_image
Hand pointing at a circular component with a knob, mounted on a curved metal frame (no text or symbols visible)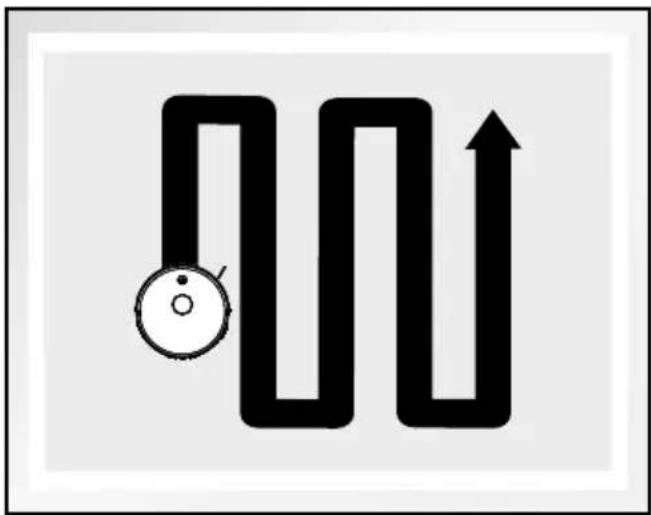
natural_image
Abstract black-and-white diagram of a winding path with an arrow and circular symbol (no text or labels)natural_image
Abstract black-and-white diagram of a winding path with an arrow and circular symbol (no text or labels)natural_image
Pure schematic diagram of a mechanical or electrical component with no text, numbers, or symbolsnatural_image
Simple floor plan diagram with a house icon and directional arrow (no text or labels)natural_image
Diagram of a circular device with a rectangular base and cable, connected to a small rectangular component (no text or symbols)natural_image
Technical line drawing of a robotic vacuum cleaner with a circular housing and internal components (no text or symbols)
natural_image
Technical line drawing of a mechanical component with an open lid and internal compartments (no text or symbols)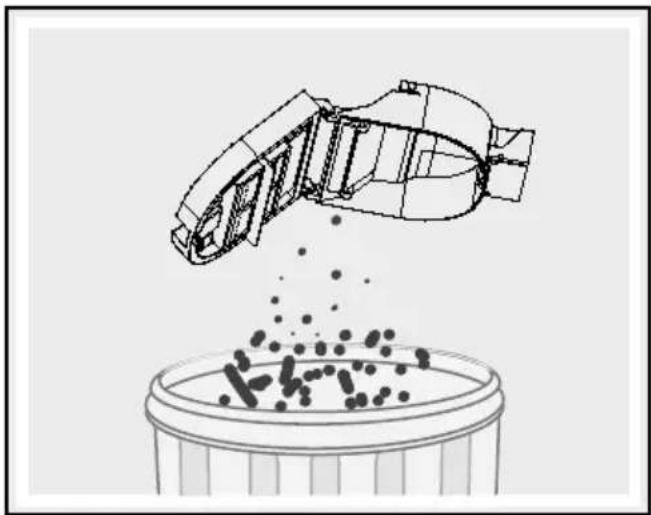
natural_image
Diagram of a mechanical component pouring particles into a container (no text or symbols)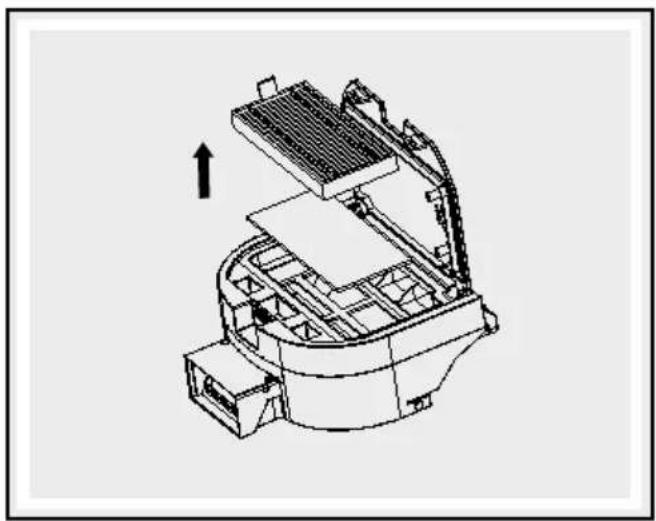
natural_image
Technical line drawing of a mechanical assembly with no visible text or symbols
natural_image
Technical line drawing of a vacuum cleaner with a circular top and open base (no text or symbols)natural_image
Line drawing of a hand holding a small mechanical component (no text or symbols)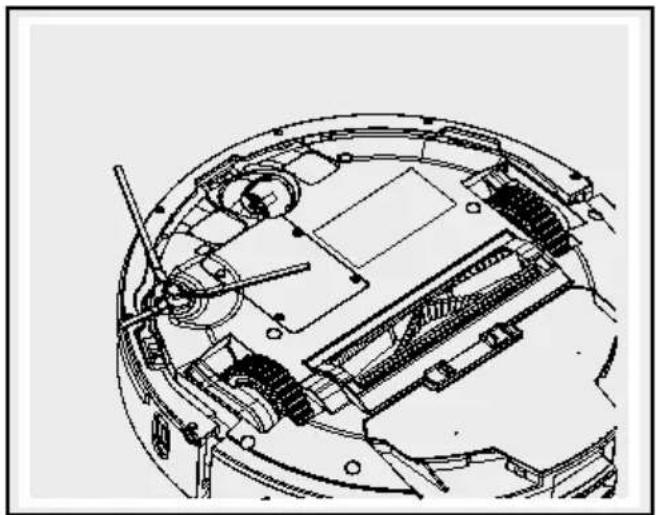
natural_image
Technical line drawing of a mechanical assembly with gears and components (no text or symbols)natural_image
Technical diagram of a mechanical assembly with a magnified inset showing internal components (no text or labels)
natural_image
Line drawing of a hand inserting a USB into a device housing (no text or symbols)
natural_image
Line drawing of a mechanical device with a hand adjusting its component (no text or symbols)- Pulire le ruote laterali
natural_image
Technical diagram of a mechanical assembly with a magnified inset showing a tool interacting with a component (no visible text or labels)
natural_image
Technical line drawing of a mechanical assembly inside a spherical housing, showing internal components and no text or symbols.natural_image
Line drawing of a rectangular electronic device with a lid and handle, no text or symbols present
natural_image
Technical line drawing of a mechanical device with an open lid, a box, and a cylindrical container (no text or symbols)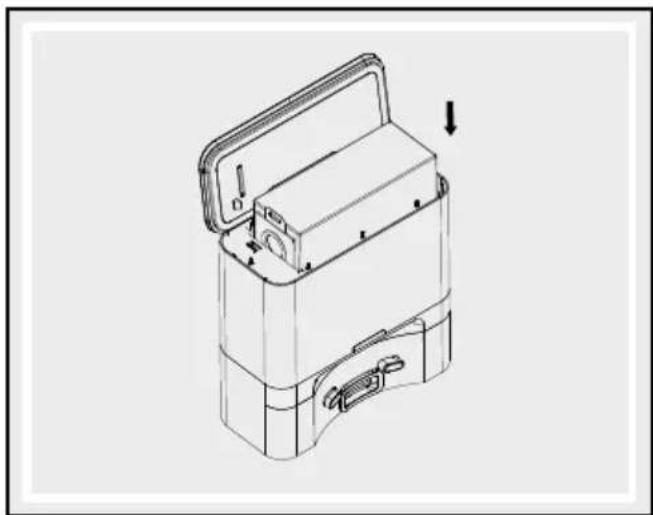
natural_image
Technical line drawing of a mechanical device with open lid and internal compartments (no text or symbols)natural_image
Technical line drawing of a device casing with internal compartments and mounting brackets (no text or symbols)https://ksr.navonline-helpdesk.de
IAN 442213\_2304
natural_image
Technical line drawing of a two-view refrigerator with front and side views (no text or symbols)
A termék feltöltése
natural_image
Diagram of a circular device with a rectangular base and cable, connected to a small electronic component (no text or symbols)natural_image
Illustration of a hand holding a circular component with a knob, next to a ring (no text or symbols)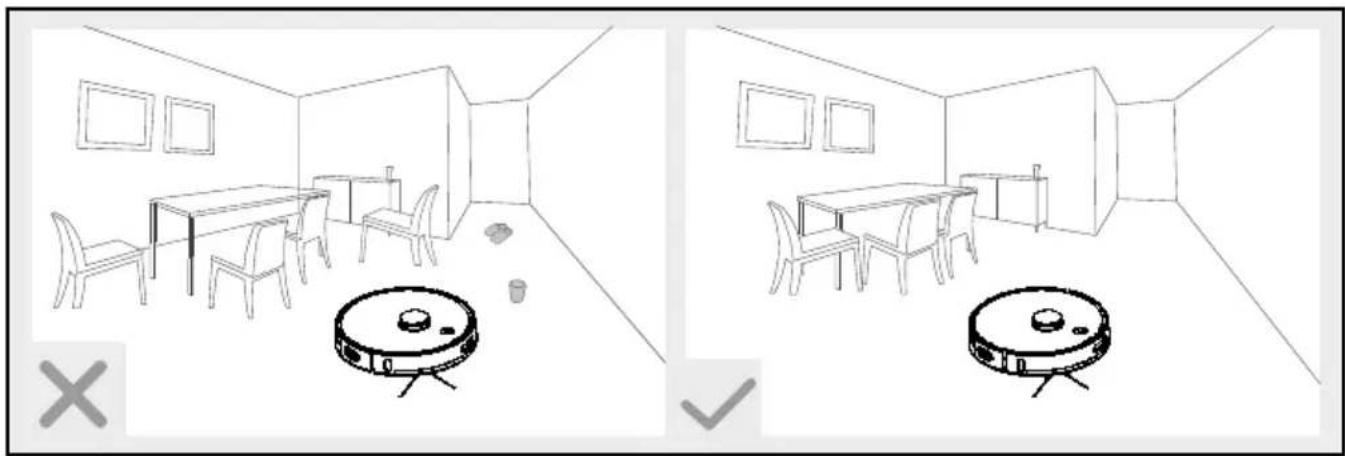
natural_image
Two 3D wireframe room layouts showing a robotic vacuum cleaner inside and a smaller robotic vacuum cleaner in the interior, with no text or symbols present.
natural_image
Line drawing of a room interior with a person standing near a robotic vacuum cleaner (no text or symbols)
natural_image
Line drawing of a staircase with a circular object on top, and a person standing nearby (no text or symbols)natural_image
Illustration of a hand adjusting a circular component with a knob, surrounded by coiled cables (no text or symbols)
natural_image
Abstract black-and-white diagram of a maze with an arrow indicating direction (no text or symbols)natural_image
Abstract black-and-white diagram of a winding path with an arrow and circular symbol (no text or labels)natural_image
Pure diagram of a mechanical or electrical component layout without any text, numbers, or symbolsnatural_image
Simple line drawing of a room layout with a house icon and directional arrow (no text or symbols)natural_image
Diagram of a circular device with a rectangular base and cable, connected to a small rectangular component (no text or symbols)natural_image
Technical line drawing of a robotic vacuum cleaner with a circular housing and internal components (no text or symbols)
natural_image
Technical line drawing of a mechanical component with an open lid and internal compartments (no text or symbols)
natural_image
Diagram of a mechanical device pouring particles into a container (no text or symbols)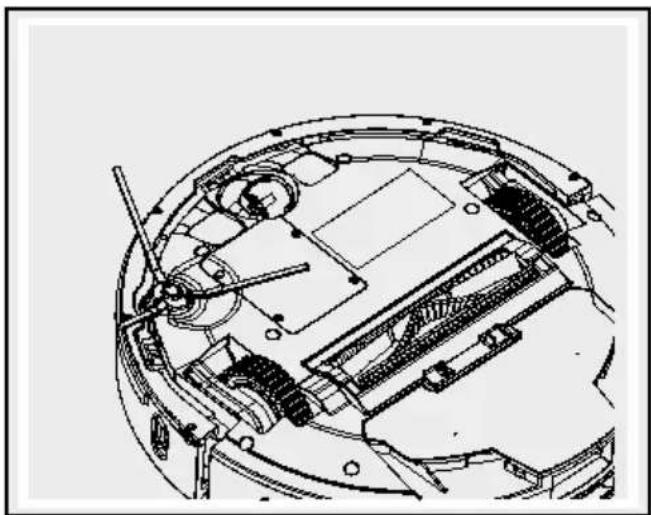
natural_image
Technical line drawing of a mechanical assembly with gears and shafts (no text or symbols)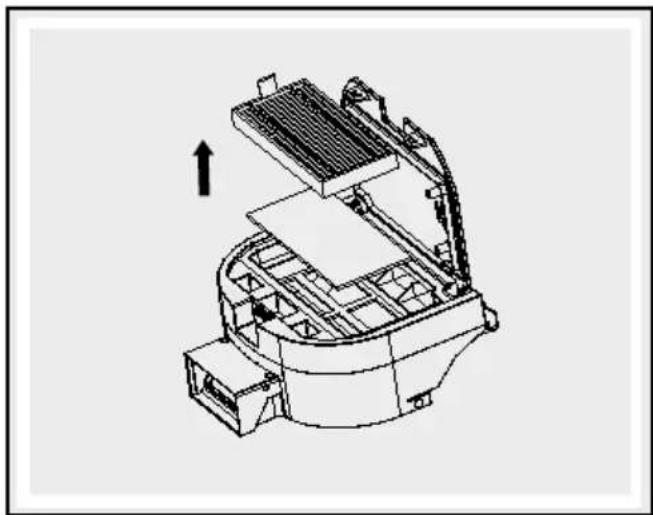
natural_image
Technical line drawing of a mechanical assembly with no visible text or symbols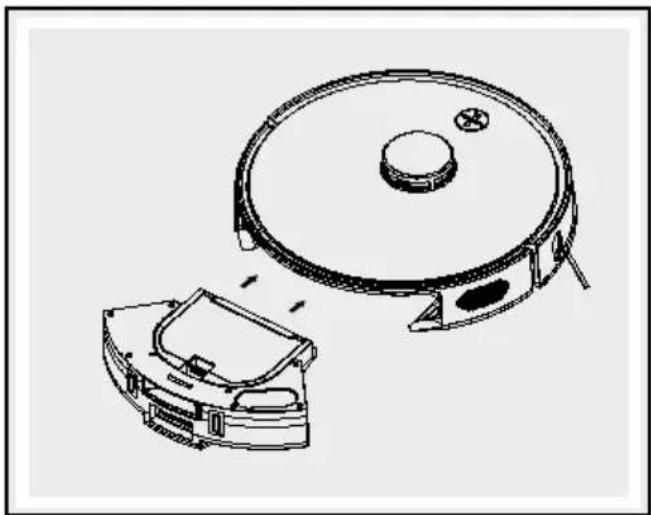
natural_image
Technical line drawing of a robotic vacuum cleaner with a circular housing and open lid (no text or symbols)natural_image
Line drawing of a hand holding a small mechanical component (no text or symbols)natural_image
Technical diagram of a mechanical assembly with a magnified inset showing internal components (no text or labels)
natural_image
Line drawing of a hand inserting a USB into a device housing (no text or symbols)
natural_image
Line drawing of a mechanical device with a hand adjusting its top view (no text or symbols)natural_image
Technical diagram of a mechanical assembly with a magnified inset showing a tool interacting with a component (no visible text or labels)
natural_image
Cross-sectional diagram of a mechanical or electrical component with no visible text or symbolsnatural_image
Line drawing of a rectangular electronic device with a lid and handle, no text or symbols present
natural_image
Technical line drawing of a mechanical device with an open lid, showing internal components and a cylindrical base (no text or symbols)
natural_image
Technical line drawing of a mechanical device with open lid and internal compartments (no text or symbols)natural_image
Technical line drawing of a device casing with internal compartments and mounting brackets (no text or symbols)https://ksr.navonline-helpdesk.de
